Wpi 3d printing
Printing in 3D | Worcester Polytechnic Institute
The end of C-Term brought to a close one of the busiest terms for three pieces of equipment on campus. Although coffee machines were running on overtime as projects neared completion, the Additive Manufacturing machines in the Rapid Prototype Lab (also called the 3D printers) were churning out hundreds of pieces.
Erica Stults, an application scientist with Academic & Research Computing, runs the lab and says C-Term is especially busy for the printers as MQP schedules gear up for presentations.
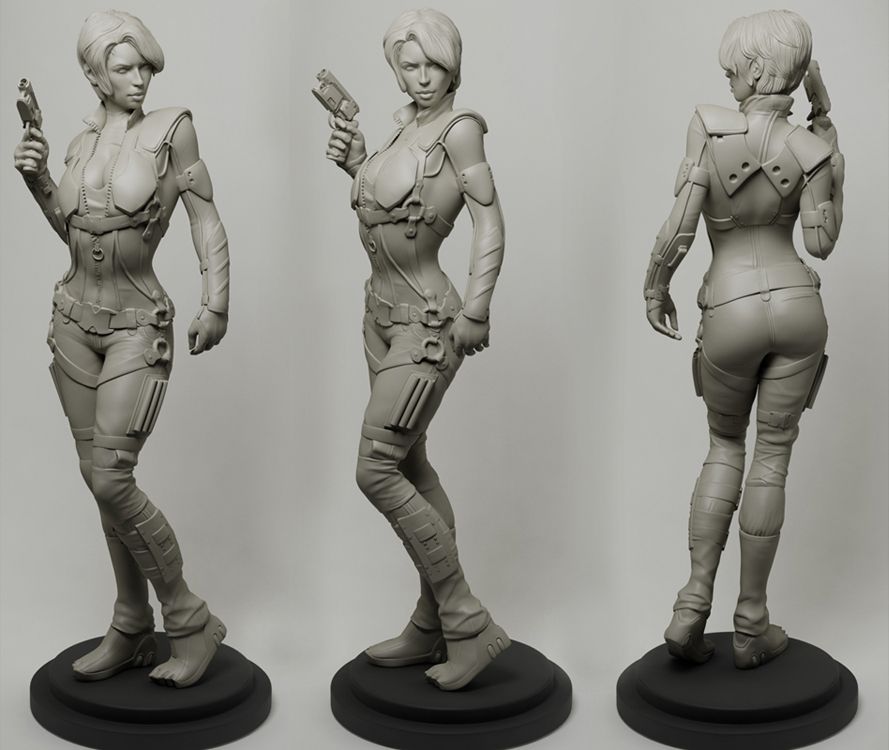
A handful of items created by the Additive Manufacturing
machines.
“These are used for all kinds of projects—MQPs, IQPs, independent study projects, grad research, coursework,” says Stults. “As long as there is a staff member or an advisor to approve the project, they can be used.”
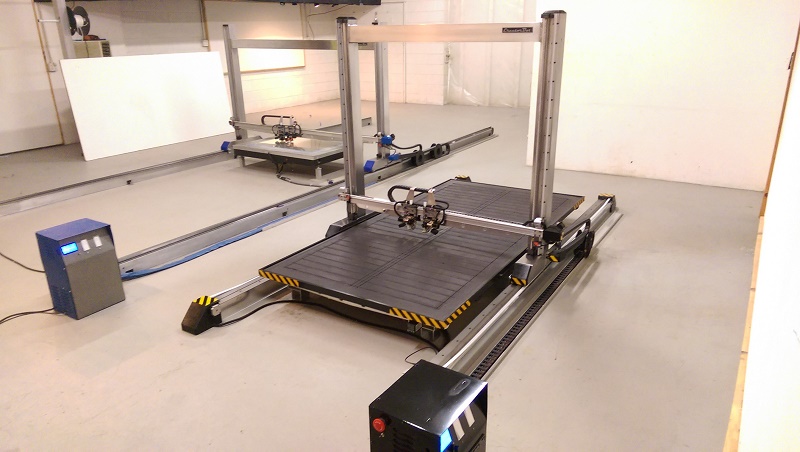
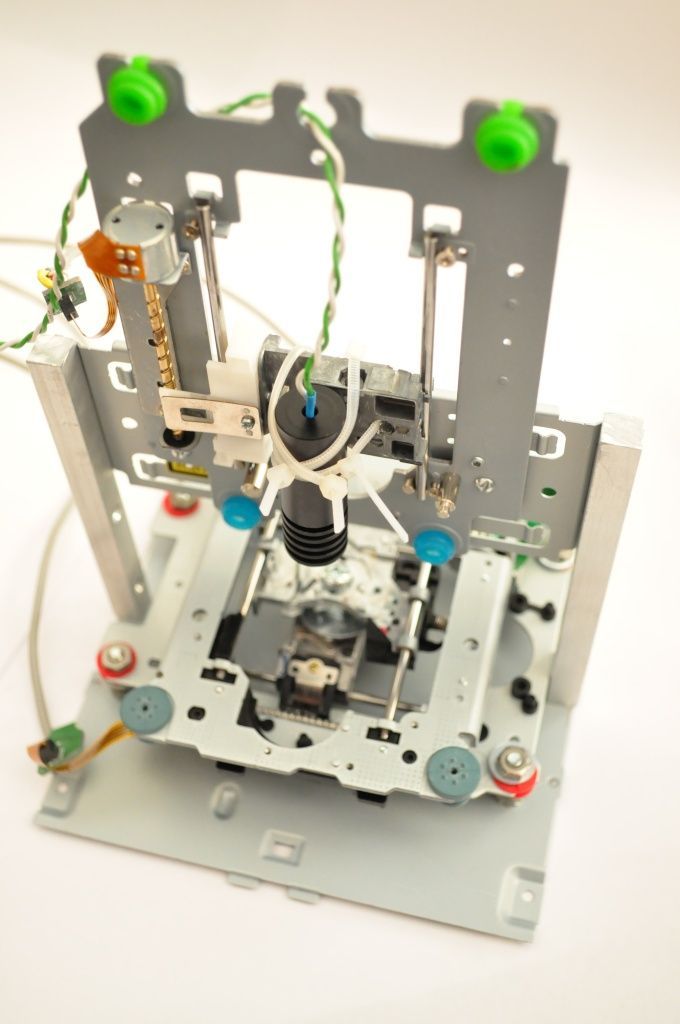
The Rapid Prototype Lab in Higgins Laboratories holds the printers, all of which have distinct capabilities. And while there are other small-scale additive manufacturing printers around campus (including one for non-academic purposes in the CollabLab), these are the machines students and faculty use for most projects. The request is submitted with an STL CAD file that provides instructions to produce the exact tool or object being requested.
The largest and oldest machine, the Dimension, is also the workhorse of the bunch because of its flexibility. “It’s essentially a glue gun,” says Stults. At eight years old, the machine uses ABS plastic in an additive manufacturing process known as fused deposition modeling (FDM) to create something new. A blank tray is inserted into the 10x10x12-inch “printing envelope,” where spools of plastic are melted at high heat (280 degrees Celsius/536 degrees Fahrenheit) and passed through jets that follow the designated software pattern to place a horizontal first layer of supportive material and then an outline of the object.
Once that’s done, the jets build layers in an isotropic infill (zig-zag) pattern. Where an object has moveable parts, holes, or crevices, a support material is injected to make spaces. That material hardens during the process and is removed either by hand or by soaking in a tub of sodium hydroxide.
A smaller printer, the Objet, uses multiple materials and a slightly different printing process. “This one prints with liquid resin, which is cured with a UV light,” Stults says, noting the Objet’s printing materials are about four times more expensive than those used by the Dimension. The Objet can mix two materials at a time and can even use a biocompatible material. Because of this quality, the resulting texture can feel as different as flexible rubber or hard plastic.
So while both machines produce complex geometries, the Objet offers a process than can yield more refined results. Support material gives definition or creates needed separation, but the Objet’s support material has to be removed with a pressure washer. “You can print finer materials but it doesn’t mean the material will survive the pressure washing,” says Stults.
A wrench created by one of the machines.
The smallest and newest printer, the Mark 2, can churn out extra-strong materials, thanks to the continuous strands of Kevlar, fiberglass, or carbon fiber reinforcement that can be used. Similar to the Dimension, the object is printed in an outline and then two nozzles fill in with isotropic infill.
The printers require approval and there are certain guidelines for students, says Stults. Any request is thoroughly assessed, with Stults making sure the request is possible and that the machines are the best tool for whatever is needed.
“You can’t request something that can be made on campus,” says Stults, and the requests are for individual projects, not larger production runs. “Our machine shop is awesome and full service, but there are things we design that they can’t make there.”
The lab offers fast service, with a general three-day stretch (actual results are produced in a few hours to several days depending on the request volume and the individual requests) from request to printed object to ensure there’s time for printing, removing the support material, and drying. “I tell the students it’s rapid prototyping, not insta-prototyping,” says Stults, laughing.
Many colleges and universities have similar printers and services on campus and Stults says it’s a new normal that saves time and money in the long run, and encourages innovative thinking.
“These printers allow things to be made on site that previously we had to send off site or not do at all,” says Stults. And it saves frustration as well because the printers make intricate objects that can’t be made with other available materials and equipment. “It could derail a project if the students spent so much time on something that could not be made,” says Stults.
Stults, who earned her BS, MS, and PhD at WPI, has run the lab for seven years with her first introduction to them as a TA in the advanced CAD class she now teaches. And while the printers are often referred to as 3D printers, the name is not technically correct as that process uses powder and adhesive, she says.
She has seen all kinds of requests come through over the years, from the tiniest part to something that almost takes up the whole printing envelope space in the large Dimension printer (yes, one mold did feature a goat’s head and the WPI seal).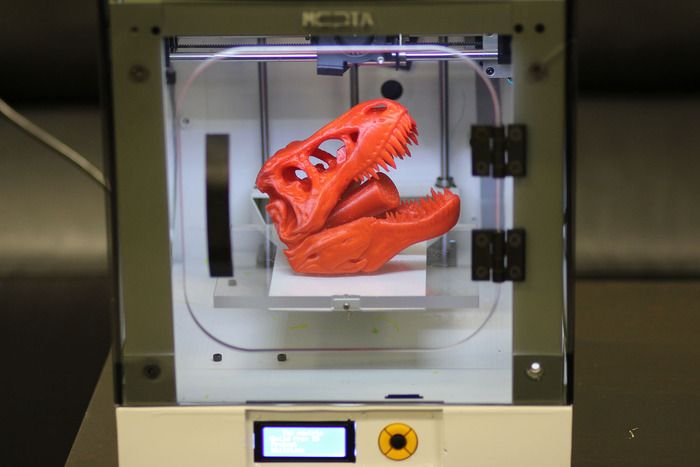 And the printing requests aren’t strictly for engineering projects. The humanities use them as well—even once requesting a robotic drummer component for the music department.
And Stults is also available for questions and consultations to talk through potential projects. Some come to her and ask, “I need this to exist in the real world. How can I do that?”
Thanks to these printers, that’s easier than ever before.
- By Julia Quinn-Szcesuil
The Innovation Studio | Worcester Polytechnic Institute
Planned to encourage open minds through open spaces and the right tools to realize a vision, the distinct areas arranged within The Innovation Studio’s 78,000 sq. ft. area will spark ingenuity. Check out the information display at the Quad entrance for a stream of weather, news, social feeds, activities, stories about donors, and WPI announcements.
McDonough Makerspace and Fitzgerald Prototype Lab
Super glue, Teflon, microwave ovens—accidental discoveries all. With the invitation to create, model, and test new ideas and state-of-the-art equipment (like rapid prototype 3-D printers), we can only imagine what’s going to come out of the makerspace. Inspiring unstructured creation, this is where the smallest connection can start the biggest change.
Aberdale Active Learning Classroom
What makes active learning classrooms different? Lots! This classroom uses space and furnishings with intention—to help students gather in groups or so faculty members may teach while moving around the room. The focus for this space: WPI’s Great Problems Seminar.
Noiles Teaching Laboratory
All robots, all the time. This teaching lab might look like a futuristic playhouse, but the work done here will change the way surgeries are performed, caretaking happens, manufacturing is produced, and music is played. It’s all about the robots—and it’s a blast.
Class of 1964 Connections Gallery
At the two-story video feature wall, take in the compelling and inspirational visual representations of the WPI Plan ideals. See the places we send our students around the world, stories and activities of students and alumni, and the complexities of our science and technology scholarship.
Oliver Active Learning Classrooms
Additional space for active learning classrooms welcomes larger groups and more opportunity for students to engage with the curriculum and each other.
Global Lab with Scherer Video Recording Suite
A global education is a WPI hallmark, and the Global Lab brings together project-based learning, digital storytelling, and engagement with our partners around the world. Here, we explore how audio/visual tools and emergent media technologies can deepen collaboration, expand the impacts of global partnerships, and provide new opportunities for reflecting, learning, and sharing.
Innovation & Entrepreneurship Center
This space aligns entrepreneurial activities across campus and across disciplines and connects WPI innovators to commercial and venture capital opportunities. Whether seeking advice, bouncing ideas around, learning from failures, or celebrating successes, the expertise, camaraderie, and resources here will stimulate innovation throughout the WPI community.
Best STL Files for 3D Printing Weaving・Cults
Basket mold 14 cm
1 €
basket weaving mold 10 cm
1 €
Rattan Basket Center Template
2.08 €
Rattan basket star pattern
2.08 €
Macramé lamp holder
2 €
yarn bowl bomb
2.06 €
Pochita lamp
0.93 €
Valentines-hearts
1.34 €
Valentine Hearts *Commercial version*
4. 02 €
02 €
Among Us Fan Art Danish Christmas Hearts
Free
Danish Christmas cones *commercial version*
4.02 €
Danish Christmas cones
1.34 €
Danish Christmas Hearts
1.34 €
Danish Christmas Hearts *Commercial version*
4.02 €
Boat shuttle v2
0.95 €
Rigid head
Free
Assembly Loom
Free
Printed weaving hook (without supports)
2.84 €
Leclerc Weaverbird 9 Loom Improvements0003
Free
AVL Warping Wheel Hacks
Free
Knitting needles knitting needles
1. 23 €
23 €
Ball of wool Bola de Lana
1.23 €
Double Ended Bobbin/Pirn Winder Handle Modification
Free
Itomaki yarn holder
0,95 €
Sectional Curvature Clamp
Free
Tension box for weaving
0,95 €
3d printing
0.78 €
Double ended bobbin winder / Pirn winder
3.31 €
Weaving tablet 30 mm
Free
Braiding bobbin
Free
Laser cut twig basket weaving mold
Free
Boat transfer
0. 95 €
95 €
Kids Weaving Loom
Free
ONE12 SCALE HEAD - RED SKULL WITH REMOVABLE HAT- MCU VER
61.48 €
Hugo Weaving - Agent Smith
5.68 €
Knit Loom Set 懶人編織器套組
Free
WPI (wraps per inch) Gauge for yarn
Free
Weft Needles
Free
rocket
Free
Simple weaving loom
Free
Boat Shuttle Bobbins (spools) for weaving
Free
Small Weaving Vase
Free
Weaving Spiders Come Not Here
Free
Weaving ring 2
Free
Weaving rings
Free
Weaving ring
Free
KUMIHIMO profession
4 €
Weaving Beginner Set
1 €
3D printing – Worldskills Russia national team
“
3D printing technology was invented back in the 80s of the last century, but became popular not so long ago.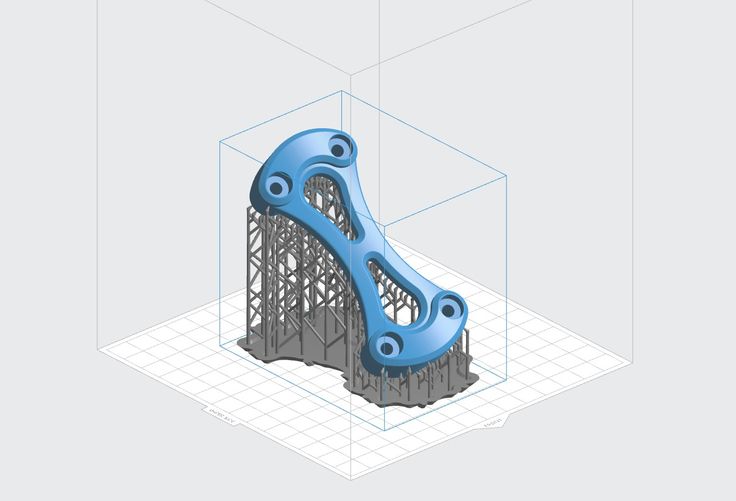 With this printing method, the material is layered on top of each other, forming a finished product, and not just a two-dimensional image. Thanks to this, the possibilities of 3D printing are almost limitless: you can produce both a small high-precision part and an entire structure! In this tutorial, we'll walk through the entire 3D printing process from start to finish.
Glossary
We recommend that you study the following concepts to successfully master the material:
Additive manufacturing machine. The finished product is, as it were, "grown" from a certain material
The principle of production, in which the finished product is formed by gradually adding material to the base
Programs that allow you to cut STL models into layers and, based on this, generate a G-code in which commands are written for 3D printer
Video lecture
Abstract
Additive manufacturing technologies
There are a huge variety of 3D printing technologies in the world today, from the oldest and simplest FDM technology to the emerging 3D bioprinting technology.
SLA (stereolithography)
Technology for the production of models from liquid photopolymer resins. The polymerization of the resin occurs due to irradiation with an ultraviolet laser at the points of contact of the material with the beam. Upon completion of the contour construction, the working platform is immersed in a tank with liquid resin for a distance equal to the thickness of one layer. After leveling the surface of the liquid material, the process of building the next layer begins. The cycle is repeated until the complete model is built.
The main advantage of stereolithography is its high printing precision. The minimum layer height can be as low as 25 microns.
Among the shortcomings, it is worth noting the high cost of manufactured models due to the high price of consumables.
Here is an example of a printed part with mechanical supports.
SLS (Selective Laser Sintering)
In this manufacturing process, a laser selectively sinters polymer powder particles, fusing them together to create layer after layer.
This technology provides high precision, detail and allows to produce parts with good and stable mechanical properties unlike FDM and SLA. And printing in the volume of consumables allows you to print parts of even the most complex shape without mechanical supports.
Here is an example of a part printed using this technique.
MJP (Multi Inkjet 3D Printing)
This technology is based on the layering of an object from a wax-based photopolymer to build supports and a resin with properties selected for the part itself.
MJP is somewhat similar to SLA technology: both use photopolymer resins and UV lasers. But MJP is distinguished by more detailed printing and the presence of wax supports, which, in turn, allows you to completely get rid of the post-processing of the model.
This is what a part made using this technology looks like.
CJP (colour inkjet)
The principle of printing is to apply powdered materials layer by layer, after which a binder polymer is applied. The peculiarity of the technology is that polymers of different colors can be used, which makes it possible to create multi-colored and textured parts.
This technology is used to create realistic prototypes of buildings, clothes and shoes, human organs in medicine, and to make scanned human figures.
FDM (Fusion Deposition Modeling)
This technology is printed by fusing the material layer by layer.
Although FDM technology is the oldest printing technology, it has become widespread relatively recently. It includes ease of study and use, availability on the market of additive technologies and an excellent ratio between price and quality of finished products.
FDM technology allows you to use different types of media for printing. Each material differs in its properties and printing parameters. These can be:
- simple plastics: ABS, PLA;
- engineering plastics: PetG, ePeek;
- special materials: PVA, Hips, Flex.

Making a part on a 3D printer
Safety precautions
- When using a 3D printer, do not reach into the working area where printing is being done.
- Protective goggles and gloves must be worn when handling photopolymer printers that use photopolymer resin.
- Wear respiratory and eye protection when using printers that use powder media.
What We Need
3D Printer
3D Printing Plastic
Computer with 9005 Slicer Installed5
USB drive
Special glue for 3D prints
Napkins
Printing
1. 3D model of STL format. We load it into a special Software called the School.
2. We arrange the model so as to minimize the number of supports.
3. Set the print options. Set the height of the layer. It should not exceed the diameter of the nozzle installed on the printer. The higher the layer height, the faster the print, but the surface quality of the model suffers.
4. Set the fill percentage. They affect the occupancy rate of the model: the higher the percentage, the stronger the model. But at the same time, material consumption and printing time increase.
5. Perform support settings. The main ones are the gaps between the model and the support body during printing. When setting supports, you must take into account the height of the layer.
6. Perform adhesion settings. They allow you to create "skirts" around the models, which increase the contact area of the model with the table. The smaller the contact area, the wider the "skirt" should be.
7. After setting all parameters, press Slicing.
8. Save the job and send it to the printer.
Preparing the printer
1. Loading material into the printer.
2. In the program, go to the "Plastics" section, select the "Plastic Loading" item and set the type of plastic you want to load.
3. Calibrating the printer. To do this, go to the "Service" section, select the "Desk settings" item and follow the instructions on the screen.
4. The job can be run in one of the print speed profiles: Draft, Standard, or Quality. Each profile is labeled with an estimated print time. Select the required profile.
5. Apply the 3D printing adhesive to the napkin and spread it evenly on the table.
6. We start the job and wait for the part to be printed.
Finished product measurement and post-processing
1. Printing completed. Let the model cool down and remove it from the table.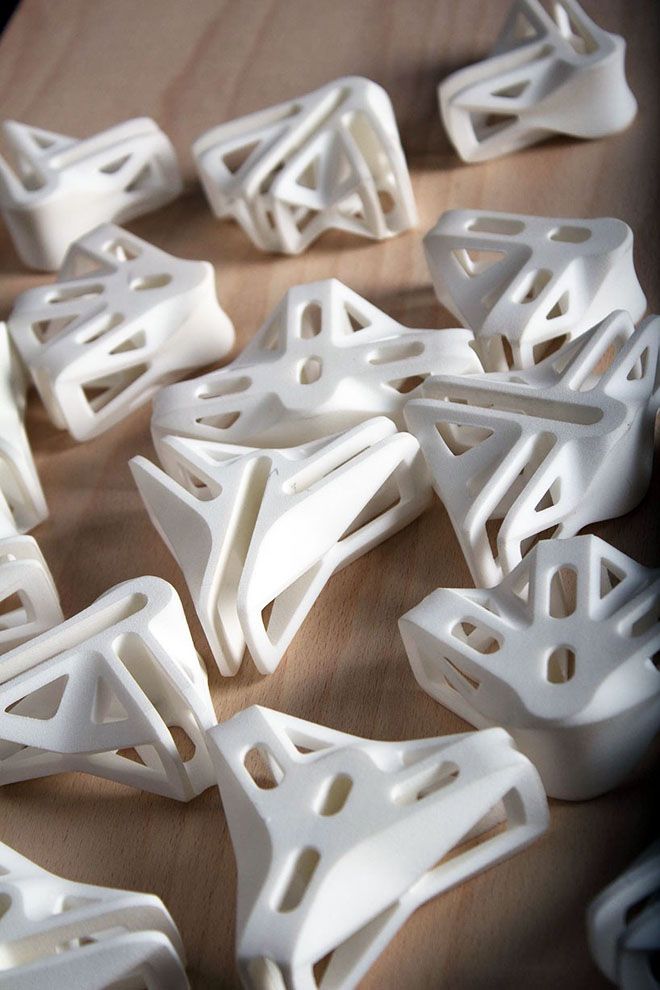
Important
Do not remove the finished model from the table immediately, as this can ruin the model itself or even damage the table
2. We are reviewing the finished product. We take the dimensions of the physical model and compare them with the dimensions of the three-dimensional model.
3. We evaluate the surfaces of the model. Very slight roughness is the norm for FDM printing. To achieve ideal surfaces, the model needs further post-processing.
“
In this lesson, we went through the entire path of a 3D printer operator and figured out the steps that go into it. And now consolidate your knowledge by completing a small task.
Interactive task
To reinforce your knowledge, take the test
| Let's start! |
| Next |
Sorry, you answered all the questions incorrectly
Read the lecture and watch the video again
| Go again |