Gmax 3d printer
gCreate gMax 2 PRO (with enclosure) 3D Printer - Specs
Home / Products / Desktop 3D Printers / gCreate gMax 2 PRO (with enclosure)
- – Massive print size: 457 x 457 x 609 mm (18 x 18 x 24 in)
- – Easily Swappable Build Plates and Tool Heads
- – Copperhead Hotend Can Print Up To 400°C
- – Full Color Responsive Touch Screen
- – Made in the USA
- – Ships to USA and Canada only
$5,295gCreate
Buy Now
Designed and rigorously tested to be versatile across a wide range of materials and functionalities, the gMax 2 PRO with enclosure is the premium solution for accurate, consistent 3D printing with a build volume suited for life sized objects.
gCreate gMax 2 PRO (with enclosure) specifications
- Company: gCreate
- Technology: FFF FDM
- Printer type: Filament deposition
- Year: 2022
- Assembly: Fully-assembled
- Ships to: USA, Canada
Materials
- Materials: PLA, PETG, TPU, CF-Nylon, PVA, GF Nylon, 90% Metal Filament, PC+TPE, Nylon 645, ABS & many more
- Material system: Open material system
Build size (XYZ)
- Print size metric: 457 x 457 x 609 mm
- Print size imperial: 18 x 18 x 24 inches
Properties
- Diameter: 1.
75 mm
- Layer thickness: 10 - 900 Microns
- Closed print chamber: Yes, fully enclosed
- Feeder system: Direct
- Extruder: Single
- Max. extruder temp.: 752 °F / 400 °C
- Print bed details: BuildTak G10FR4 Ultra Durable Glass Reinforced Composite Heated Build Plate with External SSR
- Max. bed temp.: 248 °F / 120 °C
- Bed leveling: Fully automatic
- Display: Full Color Touch Screen
- Connectivity: Print via USB, SD Card or USB Stick
Requirements
- Slicing: Cura, Simplify3D, Slic3r
Dimensions (XYZ) & weight
- Weight metric: 36 kg
- Weight imperial: 80 pounds
- Fusion3 F410
355 x 355 x 315 mm
Filament deposition
$4,599
Buy Now - Geeetech Mizar S
255 x 255 x 260 mm
Filament deposition
$279
Buy Now - gCreate gMax 2 PRO (with enclosure)
457 x 457 x 609 mm
Filament deposition
$5,295
Buy Now - Geeetech A30T
320 x 320 x 420 mm
Filament deposition
$449
Buy Now - Geeetech Mizar Pro
220 x 220 x 260 mm
Filament deposition
$219
Buy Now - Geeetech Mizar M
255 x 255 x 260 mm
Filament deposition
$399
Buy Now - Geeetech THUNDER
250 x 250 x 260 mm
Filament deposition
$489
Buy Now - Modix BIG-60
600 x 600 x 660 mm
Filament deposition
$4,900
Buy Now
gCreate Announces New gMax 2 PRO 3D Printer « Fabbaloo
By Kerry Stevenson on May 6th, 2022 in news, printer
Tags: fff, gcreate, large, professional
The gMax 2 Pro 3D printer [Source: gCreate]Brooklyn-based gCreate announced a new professional 3D printer, the gMax 2 PRO.
When we last encountered gCreate, they had announced the prior model, the gMax 2 back in 2019. Now they’ve improved the design with the gMax 2 PRO.
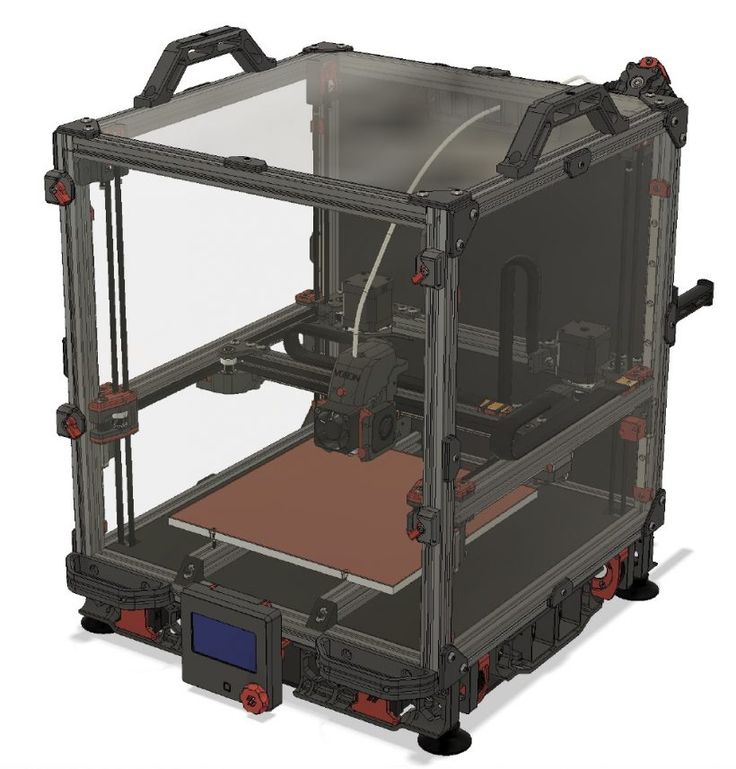
Extruder and hot end assembly on the gMax 2 Pro 3D printer [Source: gCreate]The new PRO system has the same build volume as its predecessor, a massive 457 x 457 x 610 mm. Key features include:
- 400C hot end, made by Slice Engineering (the heat efficient Copperhead)
- Dual-input hot end options, including the Chimera+
- 32-bit ARM Cortex-M4 controller
- Color touchscreen
- Glass-reinforced composite build surface (heated and swappable)
- Sensorless homing
- Filament out sensor and process
- LED lighting of the build chamber
- Silent stepper motors
- Optional rolling cart for mounting and spool storage
- Automated leveling with BL-Touch sensor
But the big feature over the earlier model is that the gMax 2 PRO is an enclosed option. As you can see in the product images, this option has clear acrylic panels on all sides to allow complete views of prints in progress.
The enclosure is important because it allows the machine to capture heat and raise the ambient temperature around the print job. This reduces the thermal gradient between hot end and print, leading to a sharp reduction in warping that is commonly encountered on open gantry-style devices.
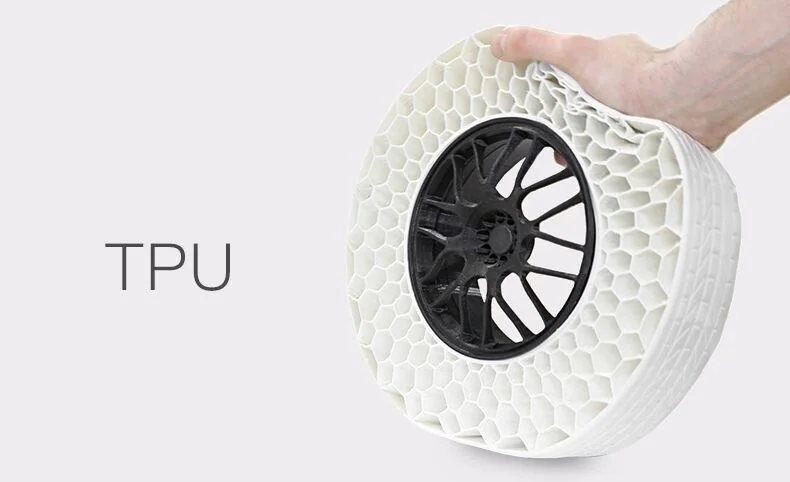
gCreate said the gMax 2 PRO is therefore able to handle many different engineering materials, including PC, PEKK, CF composites, and even highly bendy 60A soft TPU and metal filaments for post-print sintering. It seems that this device is able to handle virtually all commonly available 3D printer filament types.
Sintered metal parts produced on the gMax 2 Pro 3D printer [Source: gCreate]The large gMax 2 PRO machines are shipped fully assembled and also calibrated, so buyers are able to get started right away with ease. gCreate is targeting both government and independent businesses with this device to help with parts shortages caused by supply chain problems.
The gMax 2 PRO is available in two forms: the standard not-enclosed desktop version starting at US$4,895, and the fully enclosed version that ranges from US$6,295 to US$8,275. Additional options may increase the price, of course.
Via gCreate
TwitterKerry Stevenson, aka "General Fabb" has written over 8,000 stories on 3D printing at Fabbaloo since he launched the venture in 2007, with an intention to promote and grow the incredible technology of 3D printing across the world. So far, it seems to be working!
View all of Kerry Stevenson's posts.
3D printer QIDI Tech X-Max
We present you the Chinese development Tech X-Max from QIDI trademark. The model comes fully assembled, which allows you to start working almost immediately after unpacking.
The equipment is controlled by a 5” ergonomic touch screen. The menu is clear and understandable.
Among the advantages of the QIDI Tech X-Max model are:
- silent operation;
- simple calibration function;
- closed case;
- air filtration;
- option to pause printing.
QIDI Tech X-Max comes with two extruders. One easy to work with standard filaments. The second is high temperature, for printing with more complex materials like Nylon and PC.
Closed chamber provides optimal working conditions for shrinkable plastics and filaments that are very sensitive to ambient temperature.
Heated work platform. The maximum heating temperature is 120 degrees. The extruder can heat up to 300 degrees.
You can print directly onto the included magnetic plate. It is flexible, making it easy to remove and separate the finished model. The dimensions of the construction area are 30x25x30cm. This is an impressive size for a desktop model, allowing you to print large models. QIDI Tech X-Max is a reliable FDM printer that will become an assistant and decoration for your desktop.
3D printers are delivered free of charge in Moscow and Russia*
Delivery of 3D printers in Moscow and Moscow Region
Our company delivers 3D printers in Moscow and the Moscow region using courier services Dostavista, Yandex 901 Delivery . After placing the order, the manager will contact you by phone to clarify the delivery details (time, address, name of the recipient).
Delivery of 3D printers to the regions of Russia
Our company delivers 3D printers in Russia using courier services SDEK, Yandex Delivery, Business lines to the TC terminal in your city, pickup point, postomat. After placing the order, our manager will contact you and agree on possible delivery options, the exact date and time at which the order will be delivered;
* The company centrally transfers orders to the shopping mall. Days of shipments to TC SDEC - Tuesday, Thursday . Days of shipments to TC Business Lines - Wednesday;
** The cost of delivery of 3D printers to the cities of the Siberian, Far Eastern Federal Districts is calculated individually according to the tariffs of the shopping mall.
Pickup
The 3D printer can be picked up by yourself directly at the 3DMall office at the address: Moscow, Dmitrovskoye sh., building 9A, building 1, office 5 (2nd floor). To do this, you need to drive to the office during business hours after you receive a notification letter about the readiness of your order to your email address, or the manager will confirm by phone. The working hours and working hours of the company's office are indicated in the contacts section.
Candidate for Best 3D Printer of 2022 / 3D Printers, Machine Tools & Accessories / iXBT Live
If you want quality printing out of the box as well as a solid build, then Kywoo3D Tycoon Max is the one for you. This printer attracted me with interesting features at a low price. And most importantly, what attracted me is a very reliable design. After all, it is she who affects the quality of the print.
I found the first mentions of this manufacturer and printer on Kickstarter, and then on local sites. Then the model was simply discussed, but there were no real owners. But then the first reviews appeared, and to be honest, the printer was not praised in them. Despite the thoughtful design, the printer had problems with airflow and buggy firmware. Therefore, when I needed a 3D printer, I took myself Anet ET4 Pro. But then there was a need for another printer, so I, again returning to the question of choice, decided to take myself a Tycoon Max. And now, having used the printer for several weeks, I realized that I made the right choice. The printer for its price really gives excellent print quality, and if necessary, also a very fast print speed comparable to deltas.
Characteristics of Kywoo3D Tycoon Max:
Well, in words, I’ll add something that is not in the table:
- Print area: 300 * 300 * 230mm
- Print type: FDM
- Number of extruders: 1 print l.
- Nozzle: 0.4mm
- Control: USB, MicroSD card, Wi-Fi
- Power: 350W
- Maximum table temperature: 100C
- Maximum extruder temperature: 260C
- Maximum print speed: 0mm/10mm s (personally tested up to 140mm/s and it prints fine)
- Additional information about the structure:
- High rigidity aluminum profile frame.
- X-axis rails, Y-axis shafts.
- Z-axis motor belt synchronization
- 16-point auto-leveling
- 3.5" touch screen for printer and printing control
- Convenient filament threading with ring 90 1 on the extruder
Now let's talk about the printer itself. It was ordered from a warehouse in the Russian Federation, and the delivery time took 5 days. A huge box weighing 16kg was received in the mail:
Inside the box is a printer disassembled into two parts. Everything lies in layers, which are laid with foam material. So it is unlikely that anything could be damaged along the way.
 Opening the box, the first layer I saw was the lower frame of the Y-axis with a heating table and ultra-base:
 Below the next layer is the main frame of the Z-axis, a coil of PLA test plastic, a box with accessories:
I’ll tell you right away about the complete plastic. It has a weight of 500g, wound on a plastic reel, sealed in a vacuum bag. I printed part of the coil during the tests, and I liked the plastic.
As for complete accessories, everything is relatively standard. Inside the box are a spatula, a set of hexagons in a convenient case, several spare ties, wire cutters, clamps for the ultrabase, four screws for assembling the printer, a Phillips screwdriver, a piece of heat pipe, a spare 0.4mm nozzle, a needle for cleaning the nozzle, a wrench for unscrewing the nozzle, spare limit switch, USB cable, reel mounting stand. Also included is a card reader and a MicroSD 8Gb flash drive manufactured by Netac ( a good manufacturer, I have several flash drives of this company, and they work well )
The printer is powered through a detachable cord with a European-type plug.
 If necessary, it can be replaced without any problems:
 Also included with the printer is an assembly and configuration manual. It is made on high-quality printing, but, in fact, there is no great benefit from it:
Now let's consider ultrabase glass. It has dimensions of 305*320mm and a thickness of 4mm. On the edge there is an inscription with the logo of the manufacturer:
Having already printed enough parts, I can say that the quality of the Ultrabase is excellent. It is strong, there are no problems with plastic sticking, it heats up evenly. And at the end of printing and cooling, the parts come off without problems.
The ultrabase is attached to the heating table with 4 stationery clips (they are included). The heating table itself is made of metal, and is attached to the frame on shafts through plain bearings. By the way, in order to reduce weight and inertia during movement, the manufacturer made the table itself with holes that do not affect rigidity.

By the way, the table is connected to the control board via the XT60 connector. This is the first time I see such a solution, but logically, this is a fairly reliable connection.
Another thing I would like to note on the table frame and X-axis is the presence of good legs that can be adjusted in height. This is useful if the printer is not standing on a completely flat surface, and correct adjustment will avoid unnecessary movement of the frame when printing.
Now let's move on to inspecting the frame along the YZ axes. It also contains the control board and power supply. It also has an extruder. This is what it looks like:
The first thing I want to pay attention to is the overall rigidity of the frame. It uses a double frame made of aluminum profile, on which there is a metal box on top. This box serves two purposes: hiding the interior of the printer and adding rigidity to the frame. And it has a very good effect on the quality of the print.
The Z-axis of the printer is fixed on the frame through two shafts rigidly fixed to the frame itself and a closed plain bearing, and for moving there are two studs with stepper motors on both sides.
 Additionally, the manufacturer has added a belt that synchronizes the operation of these stepper motors:
 Rails are installed on the printer to move the extruder. They are quite high quality, and during the work I personally did not have any problems with them. For better sliding, the rails are immediately lubricated from the factory, and the rails themselves also have holes through which this lubricant enters the rails. Also, through these holes, the rails were fastened along the entire length of the frame.
As for the extruder, the manufacturer did not reinvent the wheel, and equipped the printer with a proven solution. This is MK10, but with some modifications. First, it adds an iron frame that looks good while protecting the user from contact with hot extruder elements. I would like to think that this frame also serves as an additional radiator, but if you look at how it is fixed, it immediately becomes clear that there is not much heat coming to it. And the second addition is a special lamb for scrolling plastic when refueling.
 And this is a really handy feature. When refueling, you do not need to press anything, as in other printers. We simply pull the plastic through the plastic sensor, point it into the hole of the extruder and turn the lamb. Plastic itself immediately clings and is pressed through. A simple and elegant solution that is sorely lacking in other printer models.
 Also immediately above the extruder is a low filament sensor. This is also a pretty good solution, since the distance between the sensor and the extruder is minimized here. And this means that you don’t have to throw out 20-30cm filament bars that simply cannot be pushed into the printer. The amount of waste here is minimal.
As for blowing, a fan with an impeller is used here, which is mounted near the nozzle. Fan model pb04010ms4. The airflow itself is realized through a wide slot. I personally did not notice any problems with blowing during printing, there is enough blowing, and it blows directly on the model. The blowing speed can naturally be adjusted both during the cutting of the model, and already directly during printing, the fan has speed control.
I also once had to disassemble the extruder to replace the nozzle during printing. What was in the kit, I managed to score on my own stupidity, alternating types of plastics without changing the temperature. Therefore, I will show the extruder in disassembled form:
I also want to draw attention to the fact that the printer has a table auto-calibration function. For this, a BL Touch sensor is installed here. More precisely, there is not the original 3D Touch with a plastic plug.
But by the way, I have no complaints about his work. The table calibrates perfectly, and even if there is a misalignment of fractions of millimeters, everything is taken into account and there are no problems with printing. The table itself is calibrated using 36 points (6*6) and looks like this:
Also, in addition, I can also note the presence of a silicone pad on the hotend, so that the temperature is more stable:
Well, after we have examined both halves of the frame, we can start assembling the printer.
 She's very simple. The existing 4 screws are screwed through the grooves, and we stretch harder.
 Additionally, you need to connect the connector to the table and connect the motor along the X axis. By the way, in the printer, all the wires are laid right away, and where they can be fixed with ties. Therefore, nothing dangles here, does not hang down and is as neat as possible:
That's it, the assembly is finished. This is what the assembled printer looks like, well, with the exception of the ultrabase and the bracket for installing the filament spool.
The bracket itself, by the way, is standard, like most printers in this price range. Metal profile and plastic tube. The bracket is installed at any point of the aluminum profile, through two spacer nuts:
Well, once the printer is assembled, you can consider the rest of the design elements. If you look at the back of the printer, you can see the power button and the port for connecting the power cord:
On the other hand, there is a sticker on the frame with information about the printer:
Separately, I would like to note one more convenient feature of this particular printer, which I have not seen anywhere else.
 These are convenient carrying handles:
 They are metal and rigidly fixed to the frame, you can safely lift the entire structure with them and not worry that something will break. For me, this is very important, since my printer can be transferred to different points around the room, and even between rooms. Depending on how long the print is placed.
If you look at the printer from the right end, then you can see a slot for a MicroSD card through which a model for printing is thrown onto the printer. There is also a MicroUSB port for connecting to a computer (does anyone use this method of printing?) and another slot for SD cards, the purpose of this slot remains a mystery to me:
Well, now the most interesting. It is, of course, a touch screen. When you turn on the printer, we first see a splash screen with the manufacturer's logo, and then the main desktop, from which you can get to different settings:0003
All items on the desktop are interactive. Management is implemented by clicking on the desired element.
 For example, by clicking on the ruler of XYZ axes, we get to the axis calibration menu:
 And if you click on the flash drive icon, the files for printing located on the flash drive are opened:
The printer sees folders and subfolders without problems, but there are Russian file names Problems. In the current firmware, the Cyrillic alphabet looks like unreadable krakozyabry.
If you click on the gear icon, then naturally we get into the settings menu. Here you can select the temperature of the preheating of the table and extruder, change the filament during printing or in idle time. Find out information about the firmware, set up Wi-fi and select the interface language ( there is no Russian language in the photo, but it has already been added in the latest firmware )
By the way, the printer has a built-in Wi-fi module, and it can be run in access point mode or connected to a home wi-fi network.
In the first case, you can connect to the printer and use an additional plug-in in Cura to send files for printing over the air, as well as monitor the status of the printer:
True, the wi-fi module has one minus.
 It stands inside a metal case, and it dampens the signal very noticeably. If the printer is in the next room, then I can no longer connect to it because the signal level is too weak. In fact, the range of the access point is about 5-6 meters maximum.
 But back to the screen. Despite the modern 32-bit processor, another disadvantage that I want to point out is the lack of model previews. This option is already firmly in use, and I would like to hope that it will also appear in future firmware. But so far the interface looks pretty simple. By the way, this is also visible at print time, when progress is displayed simply as a blue bar with a percentage of completion.
But in general, the management here is really convenient. You can change the Z-axis gap on the fly, change the speed of the blower fan and the temperatures of the table and extruder.
Well, I also want to show the inside of the printer without disassembling it. How could I get the camera. The printer is powered by the built-in Mean Well LRS-350-24 power supply.
 Already by the name it is clear that this power supply produces 24v / 350w.
 In the future, I plan to crawl up to this PSU and add a backlight tape to the printer frame so that you can see the printing process.
The brains of the printer are located in the upper part of the case, it is already much more difficult to crawl there with the camera:
But since the board is sold separately, I'll just add a photo from the manufacturer here:
True, in this photo it is not clear which processor is used in the board. But let's hope it's good enough.
In general, if we talk about the assembly, then it did not raise any questions for me. The frame here is well thought out and very rigid. All axles run smoothly and there is no backlash. The printer is large, solid and heavy. And gravity, as we know from the words of Boris Razor, is good and reliable.
Now it's time to talk about the printing process and the models I have printed
The first thing I decided to do was check the speed characteristics of the printer.
 The specifications indicate that its maximum speed reaches 150mm / s. Therefore, I printed a test cube at this speed:
 I shot with a macro lens so that the flaws in the layers were immediately visible. And they are here, since my plastic is not the best, besides, it’s also old, taken from the remnants.
Then I printed the same cube, but at a speed of 180mm/s, and put it next to the first cube:
Try to guess from the photo which of these two cubes was printed at what speed.
I'll give you a hint. On faster printing, at 180 mm/s, the plastic from the nozzle no longer has time to come out and lay down evenly, so the layers appear thinner, and there are gaps between the layers.
And yes, on the left it's a cube printed at 180mm/s and on the right it was 150mm/s.
And by the way, this speed is quite suitable for printing rough parts, when you need to determine the degree of fit and size, without regard to quality. This saves a lot of printing time.
Well, at a speed of 150mm / s, you can already print full-fledged models. Here, for example, I printed a model at this speed:
And this is not a draft part, but a full-fledged one, for a commercial order. Here is what I printed, the size of this medal is 22 centimeters:
If you look at macro photography, you can evaluate both the detail and the level of stacking layers at this print speed:
By the way, as you can see, the medal was printed in two colors of PLA plastic. This type of printing is not difficult, just at a certain moment of printing, you can pause the printer and replace the filament. But I want to add that Cura has a handy plugin that allows you to precisely set the pause on the desired layer. To do this, go to the plugins, and select the “Filament Change” function in the post-processing plugins, in which we simply set the layer on which the pause will occur. The printer will stop printing at the right moment, move its head to the extreme left side in front and squeak loudly, calling for a replacement of the filament:
Through this plug-in, you can set the replacement of the filament at least on each of the layers, which is very convenient and allows you to achieve interesting effects when printing art objects.
 I hope my advice will be useful to those who are fond of 3D printing.
 I also printed an axolotl toy for children, which consists of closed links:
Printing was done at a speed of 120mm / s, and could have been more successful if I had not forgotten to remove the automatic supports in Cura. But since there were supports, I had to spend time post-processing and separating the supports, as well as cleaning up excess plastic in the links. This is what this axolotl looks like on a macro shot:
Layer height 0.25mm, travel speed 120mm/s, table temperature 60 degrees, extruder temperature 220 degrees.
The next model was among the models on the flash drive provided with the printer, this is a ghost keychain.
By the way, I want to add a macro photo of the substrate that remained after printing, so that you can evaluate the uniformity of laying layers and tracks:
a piece of ordinary sponge to clean the plastic from dust, which is very visible on white parts.
 Some print different boxes and cases, but I just took a piece of dish sponge and pierced it with a filament, which I then moved on. After that, the parts became noticeably cleaner.
 Another custom-printed detail. Steering shaft bushings for Nissan Qashkai. Designed to eliminate the runout between the shaft and the tube in the steering reach adjustment mechanism:
Another model. Decepticon logo overlay for standard Mazda car logo:
Spinner gear. A toy that I printed to test the possibility of printing gears:
Stand legs for Sony PlayStation 4 Slim:
Well, there were many other models that were printed to order, but I did not have time to take high-quality photos. I mainly use PLA and Petg plastics when printing. Well, a little ABS, which I really dislike because of its capriciousness to ambient temperature and drafts. And as you can see from the photo, there are no problems with printing. The only problem I've encountered is changing different types of plastic during printing and clogging the nozzle as a result.
 But it's my own fault, I shouldn't have experimented.
 Conclusion:
As you can see from the review, I really liked the Kywoo3D Tycoon Max 3D printer. It is definitely worth the money, here it is clear that the manufacturer did not save on everything and everyone, as is the case with other manufacturers. I will try to indicate the advantages that the buyer receives:
Reliable design and rigid frame . A double profile and a metal frame are assembled into a single design that is reliable and does not give any backlash. This has a positive effect on detail and print quality, as well as on the maximum print speeds. Also, all cables and wires are correctly laid in the printer immediately from the factory. And the heating table is attached through the XT60 connector, which has long proven its reliability.
Shafts along the axes Z and X. The presence of shafts and plain bearings also has a positive effect on the accuracy of printing and the reliability of the design as a whole.
 Since they are less subject to wear and play, unlike wheels that drive along a profile.
 Axis rail Y . The advantage of rails over conventional wheels, I think, is not even worth discussing. This is a more accurate movement of the extruder, and the absence of backlash, and durability. Of course, it would be better to have rails on all axes, but this will significantly increase the price of the printer, and it will no longer be so interesting.
Convenient filament threading with scroll knob . Here I will attribute this not only to pluses, but directly to huge pluses. Such a trifle like, but very much affects the work with the printer, especially if you print a lot and often change the filament.
Short feed extruder MK10 . Allows you to safely print any type of filament, including flex. In addition, unlike Bowden, plastic is saved here. The retract works more adequately. In general, I personally prefer Direct extruders, although I have a printer with a bowden system.
Availability of Wi- fi module. Let him be weak, and not everyone needs him. But for some it will be very useful and necessary.
Motor axis synchronization Z . Another little thing that many manufacturers neglect. Meanwhile, this little thing affects the accuracy of printing. And many people customize their printers by adding a Z-axis belt.
Auto level. The printer builds a table map using 36 points and then takes into account any irregularities during printing. Which is very good for the adhesion of the base layer. Well, of course, there are no dances around the printer with a leaflet for an exact fit. To be honest, this process is what I dislike the most during printing.
Print area 300*300*230mm. With these dimensions of the printed area, you can print a much larger number of details than with the usual 220 * 220mm in most models.
 True, as a minus, the dimensions of the printer themselves are already acting here. Under it, you need to prepare a surface with dimensions of 62 * 62 centimeters, and not every table is suitable here.
 But to be honest, I did not find any minuses for the printer. Well, except perhaps the dimensions and the weak signal of the Wi-fi module. But I already wrote about this above. Well, perhaps the relatively simple firmware can be attributed to the minuses, although it does not affect the print quality, it's just an interface.
Kywoo3D Tycoon Max is currently my main 3D printer, on which I print most models. For yourself and to order. Print field 300 * 300 * 230mm allows you to print large enough parts or batches of parts, which suits me completely. I also liked the robust, well-thought-out and monolithic design of the printer, as well as the speed of its operation. As for working on wi-fi, this did not take root for me. At first I dabbled in sending and monitoring, and then, out of habit, I returned to the flash drive and card reader again.
Learn more
 90 -0.4mm