Mbot 3d printer review
The Magicfirm MBot Grid II+, an average desktop 3D printer
Introduction
Magicfirm is a Chinese company founded in 2009. Magicfirm has developed and manufactured the MBot personal 3D printer series, based on open-source designs 3D printers.
Their first printer was a Makerbot clone, called the MBot Cube, designed with a plywood panel and priced at only $559 in its Kit/DIY version. This affordable 3D printer was later on replaced by the Grid, which was itself updated in the Grid II and Grid II+, the version we are testing today.
The MBot Grid II+ is a desktop 3D printer made by Magicfirm, a manufacturer based in China.
The Magicfirm MBot Grid II+ is equipped with smart plate tilt compensation function. This allows the 3D printer to automatically compensate any inclination of the build plate dynamically. The Magicfirm MBot Grid II+ has also been upgraded with wearing part strengthening. Learn more about the new features of the Grid II+ in our dedicated hub.
This machine is upgradable to get two print heads for multi-color printing for an additional $100.
Contact manufacturer Add to comparison
Magicfirm/Mbot works on optimizing the structure and performance of their desktop 3D printers and software to provide a faster and more accurate 3D printing experience with a better user experience.
By learning from customers’ requirements and feedback, the company continuously improves the performance of their products, as do many 3D printer brands.
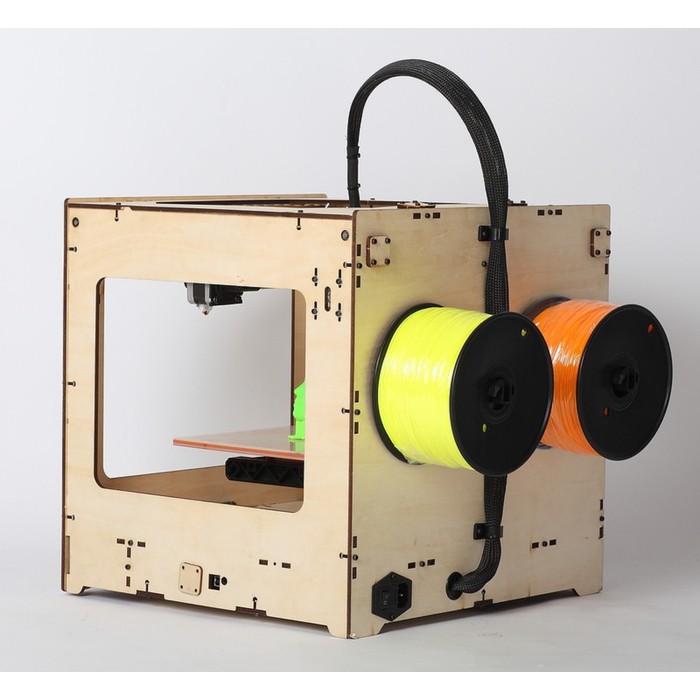
Our Magicfirm MBot Grid II+ setup.The MBot Grid II+ was introduced in January 2016. It offers some interesting features for a reasonably priced desktop 3D printer, including:
- A glass build plate covered with a BuildTak-like material. Non-heated print bed but great for PLA 3D printing, with a nice stickiness during the 3D prints, and easy-to-remove the objects once finished.

- An automatic compensation system to level the build plate while printing.
For an additional $100, the MBot Grid II+ can be equipped with a second extruder head, for multi-material 3D prints.
- Tested objects: MBot test file, Benchy, Make Magazine Torture Test, Twisted Hex vase, and 3D KitBash Test Kit.
- The 3D filament used for the test: MBot Magicfirm Premium White PLA and Machines-3D Electric Blue PLA.
- Total 3D printing test time: 50 hours
Pros
- Robustness of the frame and simplicity of the design
- The stickiness of the build surface
- Great customer support
- Quiet
Cons
- Issues during the 3D printing process
- Some important software functionalities are missing
- Awful quality of the included 3D filament
Packaging
Unboxing: a thick styrofoam package
Inside of the MBot Grid II Plus cardboard packaging. On the left the accessories box, on the right the 3D printer bellow the first layer.
The Magicfirm MBot Grid II+ was delivered to us directly in Tokyo from China. The cardboard is pretty big and weighs 31 kg. When you open it, you first find a layer of cardboard, then a thick styrofoam layer, which are held all the accessories for the 3D printer. Once the accessories layer is removed, you can directly access the 3D printer itself, surrounded by 2 large shells of styrofoam.
To remove the 3D printer from its protective envelope, it is best to grab it by the side of its solid frame. The extruder is held in place on its two sides by duck tape. Below the print bed holder, you can find small and secured cardboard which contains a roll of Magicfirm 3D filament.
Instructions manual: scarce information, but the bare minimum is here
The Magicfirm Mbot Grid II+ was delivered with two very short instruction manuals, well-illustrated and in a nice glossy paper, but … redacted in Chinese!
Hopefully, the 3D printer comes with useful QR codes in the package, which directly link to the Mbot website, where all the basic information to run the 3D printer is available in English, and PDF format.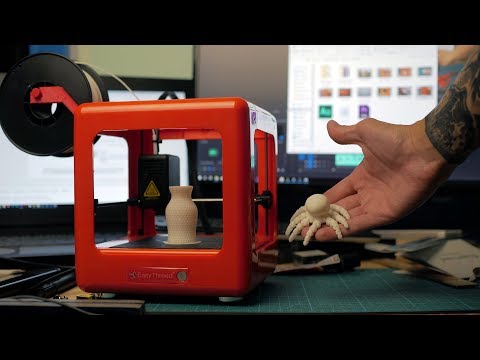 However there is not a lot of details, and for beginners, this can be unsettling.
Accessories: the land of plenty
The MBot Grid II+ accessories.The Magicfirm MBot Grid II+ accessories package contains cutting pliers, a nozzle cleaning tool, 4 Allen keys, and a small spatula to remove the 3D prints from the print bed.
For the connectivity, Magicfirm included an alimentation cable, a USB cable, a USB dongle as an SD card reader, and a SanDisk 8Gb SD card. Also included in the package is a 1 kg spool of Mbot Magicfirm Premium White PLA 3D filament, wrapped in a sealed plastic bag with a humidity absorber.
As we learned later during this test, this 3D filament is of very poor quality and we recommend simply not use it and rather use filament of better quality.
Overview and setup
Software
The Magicfirm software: MPrint.Installing MPrint, the software to operate the 3D printer, is straightforward.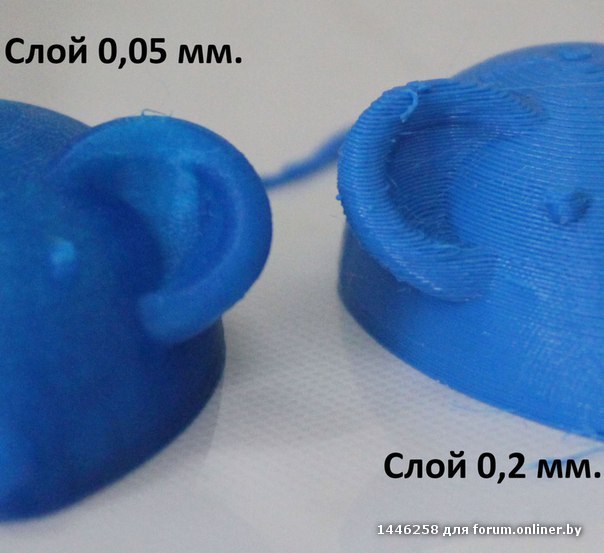 We simply downloaded the latest version from the MBot website. MPrint is available for Windows and Mac computers.
For this test, we used a Macbook Pro computer so we downloaded the latest version of MPrint 1.2.5.1. The small files can be downloaded in a few seconds and installed in less than a minute.
MPrint offers a very simple interface with only the basic necessary options to 3D print. The left buttons are used to Import, Export, Navigate the 3D models and Configure the settings for the 3D print.
Note that some of the features available on the Windows version do not work on Mac. It is not possible to swap between slicers, as only MBotSlicer is offered on Mac (on Windows you also have access to Slic3r).
The MPrint software cannot connect the MBot Grid II+ to a Mac (once again, this feature is only available for Windows). Therefore we only used it in order to generate the .X3G files before saving them on the SD card.
On the 3D printer side, displayed on the MBot Grid II + LCD screen, the software is very simple. The simple user interface offers 4 different menus: “Print”, “Filament”, “Settings” and “Version” to operate the 3D printer.
Hardware
The Magicfirm MBot Grid II Plus seen from above.The Magicfirm MBot Grid II+ has a solid and sturdy build that inspires trust, quite similar to the Zortrax M200. The Grid II+ is heavy and robust and its front panel is made of black acrylic for a classy and glossy look and feel. The installation of the filament support (a cheap plastic part) is fast and simple as it simply needs to be put in place at the back of the 3D printer, the gravity holds it in place.
There are no 3D printed parts on the MBot Grid II+. The maintenance is easy with its open frame and accessible machinery and electronics.
A closer inspection of the inside of the 3D printer, however, reveals that the screws are of low quality and the threading can be damaged after too many maintenance operations. Almost any part can be disassembled with the Allen keys, an important point for maintenance.
The 3D printer has a small LCD screen (by default displayed in Chinese). It offers a bright contrast and is easy to read. The interface button is large and flat, except for a small round recess. Most of the animations are funny, like the little Pacman showing the 3D printing progress. Its user experience is very pleasant, with a nice feel when turning it and a smooth click for validation.
The LCD screen interface of the MBot Grid 2 Plus.The build plate of the MBot Grid II+ is made of glass, a material that makes for a good print platform thanks to its stability against environmental conditions (temperature, hygrometry). The build plate is covered with a BuildTak-like material for enhanced adhesion of 3D printed objects.
The MBot Grid II+ is also equipped with a LED lamp. When the extruder is heating, the 3D printer LED is red. While 3D printing, the build chamber is illuminated with a nice blue glow, which becomes white when the 3D printing job is complete. In addition, the 3D printer makes some “cute” noises when it starts and when it stops printing, like a little robot!
Getting started
The very first step for 3D printing is to load some 3D filament to the extruder. This is a fast and simple process. We simply pressed the Load option in the “Filament” menu, and once the extruder has heated properly the extruding motor starts extruding. After a few seconds, you can stop the process, the 3D printer is ready.
To get started with our Mbot Grid II+, we began by 3D printing one of the 3D files included on the SD card. Because most of the 3D printers are directly tested and calibrated at the factory, we simply selected the MBot test file and hit the “Print” button.
The first layers (raft) came out well but very soon we realized that there was an issue with the print as the vase was getting 3D printed with a lot of shifting: each layer was not on top of the previous one, but slightly on its left.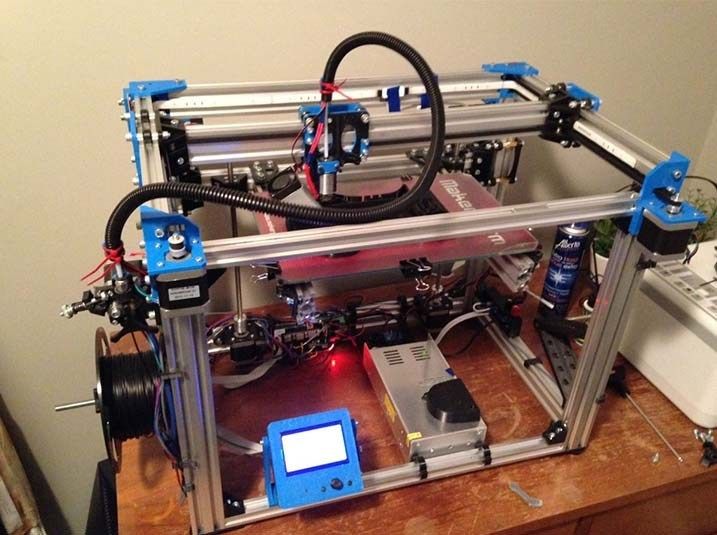 The higher the layer, the more shift we got, and after 15 minutes of 3D printing we stopped the experience.
We first thought it was related to the file itself, so we prepared a 3D Benchy with MPrint (more about that later in the same section), but when 3D printing we got the same result; an increasingly shifting layer deposition. Once again we canceled the 3D print.
We contacted the Magicfirm support team and got a very fast answer (less than 30 minutes). They advised us to consult a dedicated FAQ page on their website, and a procedure to check the hardware calibration of the build plate. Meanwhile, we started investigating what could be going wrong with the 3D printer hardware.
We soon realized there was an issue with the Y end travel function sensor (attached to a small electronic card), as the LED was not lighting when solicited. We disassembled it and also the X end travel electronic card (entirely similar to the Y one) to see if the card or the cable was damaged. As the working X end travel card stopped working we concluded the issue was linked to the cable.
We removed the back metal panel which covers the motherboard. We quickly discovered the culprit: the cable was simply unplugged from the motherboard, it must have happened during shipping. After plugging it back in, the sensor worked properly.
It was now time to recalibrate properly the print bed. The process is quite simple, it implies following instructions displayed when 3D printing a specific 3D file, by default on the SD card. It took us less than 5 minutes to get the correct settings and be back on track. We once again selected the MBot default file and this time, the print came out nicely. The 3D printing surface was not perfect but OKish so we decided to keep on going and testing.
The Magicfirm MBot Grid 2 Plus motherboard.On the software side, the process for launching a 3D print is pretty straightforward. In MPrint, you can simply drag and drop your 3D model on the virtual build plate. The options offered are limited, but you can rotate, scale and reposition the 3D model before exporting it.
The navigation options are simple and easy to understand, and you can zoom in and turn around the object to check that everything is OK. Note that panning is not available, so the camera is always aiming for the middle of the plate.
Our first successful 3D print on the Magicfirm MBot Grid 2 Plus.To launch our next print, we simply selected the 3D printer in the drop-down menu, and once our STL file was imported (the famous 3DBenchy) we started to input the correct 3D printing parameters. By default, the resolution (layer thickness) is set to 200 microns, the temperature 230 degrees Celsius (quite hot for PLA) and the raft is activated. We unticked the “raft option” (as well as the Support) and hit the Export button.
This generates a .X3G file, the GCode of instructions for the MBot Grid II+ which you need to transfer to the SD Card before using it to 3D print. Because there are only a few options, this process is quite intuitive.
Experience
Software
The software provided by Magicfirm to operate their 3D printers is simple and straightforward. It does not offer a lot of options and you won’t get lost while operating it, although the lack of instruction can be challenging for entry-level users. 3D printing experts will be frustrated by the lack of options.
The MBot Grid 2 Plus software MPrint experience.With only a few options available, the user interface offers a good overall experience. It is easy to import an STL file, select the 3D printing parameters and export the file in the .X3G format. As we tested MPrint on a Mac, our feedback only applies to this system.
The export button offers a few export destinations, and it is not possible to precisely chose where you want to save the file. We recommend first insert the SD card reader in the USB slot so it immediately shows in the destination menu.
The Auto-align feature of the build plate can be selected in the Parameters in MPrint, along with the other 3D printing parameters such as extrusion speed, the temperature of extrusion, infill ratio…
The slicing tool, called MBotSlicer, is extremely slow. When the file is big or complex, it can take up to several minutes to obtain the .X3G file, and the progress bar is adding to the frustration of the wait. It sometimes got stuck for ages on the 12% value, before going very fast to reach 100%.
Once the printable 3D file is generated, there are absolutely no statistics about how much 3D filament will be used or the time it will take to 3D print the part. The only 3D printing time estimate you get comes only after the printing process has started and a few layers are done. This is really frustrating.
The 3D printing preview offered by the software is not very practical. It is a very simple viewer that lets you show/hide the building layer. It is hard to get any useful information from this, apart from checking there are supports are the right place.
3D printing
Once the correct print parameters are input correctly, the 3D printing process itself is quite smooth. It is simple to load the 3D file from the SD card and simply hit the Print option.
The build plate of the MBot Grid II+ is covered with a BuildTak-like material which provides excellent adhesion during the 3D print but also makes the 3D printed object very hard to remove. We did not find any option to increase the height of the first layer, so every 3D printed object had to be removed with a sharp cutter.
After a few prints with quite mediocre results, we were quite concerned about the performance of the Magicfirm MBot Grid II+. The biggest issue was a lot of oozing between parts and gaps, and the unclean finish of surfaces. This was not expected given the robust build and experience of the manufacturer.
The Magicfirm MBot 3D Filament.We quickly found out that the 3D filament provided (MBot Magicfirm Premium White PLA) was the one to blame. This material is of very low quality. It also had the tendency to break in many small parts, which makes it necessary to unload and reload the filament.
We switched to another filament and obtained very good results immediately. We used a generic PLA from the brand Machines-3D, a 3D printer reseller from France. We carried on all the following tests using this filament and we also lowered a bit the extrusion temperature, to a more standard 210 degrees Celsius.
The intelligent auto compensation system of the build plate works well because no matter how many times we moved the 3D printer and removed the build plate, the 3D prints always offered good quality regarding the Z-axis alignment. However, we noticed that when several small structures needed to be 3D printed, the nozzle was oozing a bit, which conducted to some small misalignment on the X and Y-axis. This is detailed in the 3D Printing Results section of this article.
The disassembled Magicfirm MBot Grid 2 Plus print head.During most of this extensive 3D printer review of the Magicfirm MBot Grid II+, everything went well, with a steady 3D printing output and some challenging 3D prints that lasted more than 8 hours. However, twice the 3D printer paused itself due to a “Filament probe” issue.
After a reload of the 3D filament we had to manually relaunch the print from where it had stopped, hopefully without consequences. The pause function is very efficient but this unexpected behavior brings concern.
We must also mention that during our tests, we encountered a major extruder block. Cleaning the nozzle did not solve the problem and we had to remove unwanted plastic from the extruder feeder system. For this, we had to remove the extruder by disassembling it from its carriage and then picking up the little blobs of plastic with small tweezers.
The whole operation (including putting back together everything) took us almost 30 minutes, but once the job was done, we realized there was a better and simpler way to do that. It is, in fact, possible to access directly the extruding feeder by only moving away from the front fan, held only by a pair of screws.
On a more positive note, we must mention the fact that once again the MBot customer support was fast and efficient, a very important point.
Noise
The MBot Grid II+ is rather quiet for an open-frame 3D printer. The noise frequencies are not too irritating and it is possible to use them inside an office, as long as you are not too close to it. We measured values around 55 dB in operation at a one-meter distance, using the Android Sonometer app on a Nexus 5 smartphone.
3D printing results
Test prints were all produced using Machines-3D Electric Blue PLA (a generic material) as the Magicfirm offered 3D filament was really bad. We tested several 3D print layer thicknesses (between 200 microns and 100 microns) at an extrusion temperature of 210 degrees Celsius. All the other parameters (speed, retractation, infill…) were the default recommended by Magicfirm MPrint software. Apart from the initial test MBot test file, we did not use support and raft.
The best results were obtained using a 150-micron layer thickness. This parameter allows the MBot Grid II+ extruder to perform at its best potential, with almost no oozing. We also found it to offer the best quality to speed ratio, with 200 microns being a bit rough, and 100 microns simultaneously too long and not significantly better.
1. Benchy
3D Benchy 3D printed on the Magicfirm MBot Grid 2 Plus in 100 microns resolution.To evaluate the performance of the Magicfirm MBot Grid II+, we started by printing out some Benchys. The 3D Benchy is a de-facto standard torture test for 3D printers and is commonly used to verify dimensional accuracy and overall 3D printer capabilities.
For reference, we included the first 3D printed Benchy with the default MBot Magicfirm Premium White PLA.
3D Benchy 3D printed on the Magicfirm MBot Grid 2 Plus.The Benchy came out really clean with the Machines-3D Electric Blue PLA. Both 100 microns and 150 microns resolution offers a nice finish, clean surfaces, and good details. Interestingly, the 150-micron one was cleaner with no little hanging threads. The “3DBenchy” writing on the back of the hull is also more defined in 150 microns.
2. Make torture test
Make torture test 3D printed on the Magicfirm MBot Grid 2 Plus.Make Magazine’s 3D Printer Torture Test offers a rigorous approach for testing the limits of a 3D printer. We use it as a benchmark test. All the 3D prints were done in 150 microns layer thickness. The results were good for most tests. However, it seems that the MBot Grid II+ has a hard time stopping the extrusion flow and finding back the correct position to start extruding again; hence the poor results of the “Fine positive space features performance” test.
- Dimensional accuracy – The MBot Grid II+ did a very honest job, with average deviations in X or Y are between 0.1 and 0.2mm.
- Bridging performance – The bridging performance was good, with only the two longest bridges having dropped perimeters.
- Overhang performance – A good performance, only the back of the 70 degrees angle is a bit less clean.
 Surfaces are almost all clean and aligned.
 - Negative Spaces Tolerances – The three easier-to-remove pins went off very nicely. The last two won’t move even when forcing.
- Fine Positive Space Features Performance – The result for this test was not good, with a lot of stringing at the ends of the spires and a bad alignment of the different layers.
- Mechanical Resonance in XY
- Mechanical Resonance in Z – Both mechanical tests went very well, with proper alignments and clean surfaces.
3. Twisted Hex Vase
Twisted Hex Vase 3D printed on the Magicfirm MBot Grid 2 Plus.Twisted Hex Vase by bkpsu
This nice-looking vase is great to assess the 3D printer’s ability to print clean and smooth surfaces. It has a large base so can be hard to unstick from the print bed and can create warping and too much adhesion to the build plate.
We also like it because of its hexagon shape that looks a bit like our logo 🙂 .
The Twisted Hex Vase came out very clean, the flashy color of the blue PLA making it very good looking. The only downside of this 3D print was the struggle to get it off the build plate.
4. 3DKitBash v2
3DK has released its own set of 10 chips designed to test all the above-mentioned aspects of 3D printing (including voids, spikes, edges, text, bridges, flex, and articulations). The articulations offer the ability to test the ability of the 3D printer to produce functional assemblies in one print.
The ten-piece set of Test Chips from 3DK was printed successfully, with good and detailed surfaces for most of the chips; they were also hard to remove from the print bed, a recurring problem with the MBot Grid II+. While all chips were dimensionally accurate, surface textures were slightly rough. All Print-In-Place elements were produced accurately and required almost no physical help to engage their range of motion.
As a reference we also made a side-by-side comparison of the first 3D prints made with the included MBot Magicfirm PLA and the Machines-3D PLA. The difference is staggering.
3D KitBash V0.2 test files 3D printed on the Magicfirm MBot Grid 2 Plus with two different PLA filaments.Value
The Magicfirm MBot Grid II+ is a 3D printer with a robust frame. It offers no special features and its print quality is above average with good PLA filament. However, most of its user experience seems to be unfinished with its slow and limited software.
MPrint has potential but Magicfirm needs to upgrade it quickly to make it good. We also encountered a lot of issues during our test. For a consumer-grade product that is not acceptable, even more, when the Magicfirm MBot Grid II+ is priced at $1,099. The very bad 3D PLA filament should also be replaced, and we strongly advise Magicfirm to change provider.
Conclusion
Our overall conclusion reflects our experience with the Magicfirm MBot Grid II+, printing with Machines-3D Electric Blue PLA. As we recommend to absolutely avoid this filament, we do not include the results with the MBot Magicfirm Premium White PLA.
The MBot Grid II+ can produce good quality 3D prints when used with good quality PLA filament. We got the best results with closed objects when the 3D printer did not have to stop and start again extruding multiple times.
That might be caused by a difficulty to handle very precisely the extrusion flow. We recommend users stick to 150 microns layer thickness for obtaining good quality 3D prints and avoid spending too much time.
Magicfirm should upgrade their MPrint software and add a few features. In our opinion, the main priority would be adding an estimate of the total print time, which could be done at the software and 3D printer level.
Another very interesting option we would like to see is the possibility to set offsets between the first layer and the print bed, and between the raft and the object. Right now, that makes the final 3D print really hard to remove from the print bed and to separate the object from its raft.
The Magicfirm MBot Grid II+ is a promising desktop 3D printer but it’s not fully satisfying yet. It is capable of producing above-average quality 3D prints. Its automated leveling feature works well, it is quiet and won’t be out of place in a working office or a consumer basement/garage.
However, this 3D printer has some serious flaws and it’s hard to recommend buying it. We encountered a lot of issues during our 50 hours of 3D printing. Running into a few problems with an affordable desktop 3D printer is expected, but we got a filament jam, an unplugged cable that tempered an important sensor and even some impromptus pauses during the 3D printing process.
We must also mention the very bad quality of the included 3D filament which went straight to the bin after a few tests. One good point though, the customer support is very kind and reactive, and you never feel left alone.
All these issues could be acceptable on a DIY/Kit under $500, but the MBot Grid II+ does not come cheap. At $1,099, the single extruder version has a lot of competitors and most of the time it will be worth saving and buy a cheaper 3D printer, such as the $899 Original Prusa i3 MK2. Another alternative would be to invest in a slightly more expensive product such as the $1299 Sindoh 3DWOX for example.
We strongly believe Magicfirm can improve their product (software and hardware) and the Grid II+ has a lot of potentials to evolve from an average desktop 3D printer to a good one.
Mbot Cube 2 3D Printer Review
Mbot Cube 2 3D Printer Review Results
6.8 Good
The MBot Cube 2 can build larger objects, and comes in at a lower cost than other 3D printers in its class.
More Details ❯
-
Printing Speed 6
-
Build Size 8
-
User Experience 7
-
Value 8
-
Design 7
-
Precision 5
3D printing might very well be the future of manufacturing. The last two years have seen amazing innovations and price reductions in consumer 3D printers. The community of enthusiasts that are leading and exploring 3D printing make this a really exciting space to pay attention to. One of the printers that is drawing a ton of attention is the Mbot Cube 2. With a very reasonable price, it competes very well with its competition. Here is our Mbot Cube 2 3d Printer Review.
More Details ❯
Specs
One of the great things about the Mbot Cube 2 is that it can print much larger objects than a lot of its competition, and can do so while keeping the cost of the printer at a reasonable size. It can print objects up to 487 cubic inches.
It can receive standard .stl files through USB or SD card, which is rare in a printer at this price point. It is also dual extruder, so it can print 2 colors at the same time.
Software
The Mbot Cube 2 works with MakerBot software (more properly known as MakerWare), which is open source, and is great for transferring and managing 3D file to printer transfers.
User Experience
The overall user experience of the Mbot Cube 2 3D printer is very good. Like almost all 3D printers, it does require some assembly and collaboration to get working right before you start printing. It also isn’t as nice looking as a product like the MakerBot Replicator 2 (see Review here), but if looks don’t matter to you, then this printer will do you just fine.
Where the Mbot fails a bit is in support. It isn’t as well known as other printers, which means there isn’t as big a support community out there to help when something goes wrong.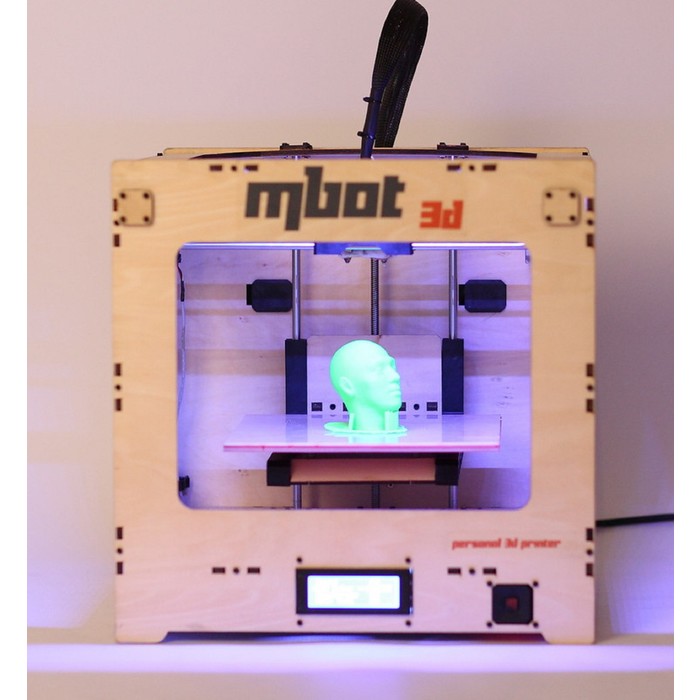 It also doesn’t come with a warranty, which means any fixes and upgrades will come right out of your pocket.
The good news is that the Mbot Cube 2 is very affordable. It comes in at $1600 on Amazon, which makes it less expensive than the Replicator 2.
Versus The Competition
It isn’t the prettiest 3D printer on the market, but it does a great job printing 3D objects, which is all that really matters. At this price, it is a great way to start out with designing and printing 3D objects. It doesn’t come with all the features of something like the Replicator 2, but it does have a huge build envelope, and comes with dual extruders. That’s something that not many other printers in this price range can say.
3D printing is becoming a huge thing in many circles. There are even online communities where people share 3D object files with one another. With the Mbot Cube 2 3D printer, you will be able to get a great start on learning how to manufacturer your own 3D objects right in your home, without breaking the bank.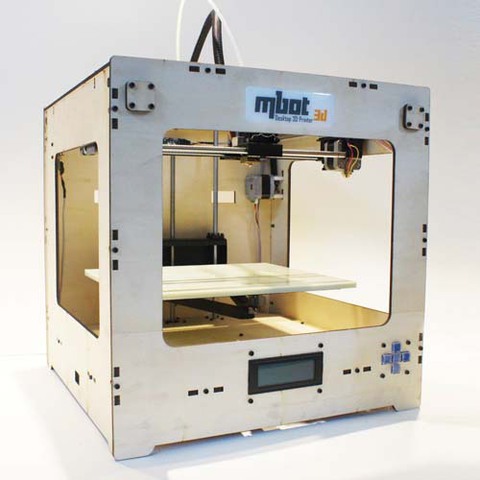
More Details ❯
Share. Twitter Facebook Google+ Pinterest LinkedIn Tumblr Email
Review of MBot
home 3D printersArchive
. In this review, three models will be considered - MBot Printer PVC Color System, MBot 3D-Printer and MBotII. It is worth noting that all three 3D printers have one important advantage - this is a relatively low price for a quality home device. Let's start our review to know the details of the technical specifications of each device. nine0003
MBot Printer PVC Color System
Let's start with the MBot Printer PVC Color System, which is currently sold out.
This model is the progenitor of other products of this company. Why might this printer model be attractive to a potential client? We offer to take everything apart:
- The print area of the device is as much as 200x200x200 mm.
 In addition, the manufacturer offers modern software for the smooth operation of the printer. nine0022
 - Most modern 3D printers can print in one color, however MBot can use two extruders at once, connected to its own consumable source. The two extruders work great together.
- The same two extruders allow you to use both the main consumable and the support material. This technology allows you to print objects with complex geometry.
- Equipped with an improved composite alloy printhead that can be easily removed and installed. nine0022
Let's pay attention to the specifications of MBot printer PVC 3D printer:
Home printer called MBot Printer for $999
This product was developed by MagicfilmLLC and is currently one of the most affordable home 3D printers on the market. In fact, this model is an improved version of its predecessor - it has the same technical characteristics as the PVC model. Among the technical characteristics, it should be noted the presence of two extruders, a built-in touch screen and an SD card slot. It is also worth noting that this 3D printer model was created based on the Replicator 2 3D printer from MakerBot. Specifications are the same as MBot printer PVC. nine0003
$1399 CubeII home printer
Another home printer option from MBot is the $1399 CubeII device, which was manufactured by MagicFilmLLC.
The device is also affordable in terms of price and one of the main advantages of the printer is the ability to print in two colors. This model differs from its predecessor, the Cube model, and offers more options for the modern enthusiast. This device for three-dimensional printing can be described in three words - the printer is higher, better and faster. The print area has been increased and will allow the wearer to print large objects. The developers have added a new holder in order to increase the accuracy of printing. The surface on which the object is recreated can now be removed and cleaned of dirt and remaining consumables. Print speed has also been increased. Let's take a look at the specifications of MBot's CubeII 3D printer:
- Printer dimensions 405x405x410 mm
- Print area 260x230x200 mm
- Print speed 100mm/s (50% faster than most other home printers)
- Uses ReplicatorG software
- File Format - STL
- Compatible with WindowsXP/7, Linux and MacOSX
MBot Printer Kit for $669
In addition to these three models on the MBot website, you can find the MBot Printer Kit, which is a disassembled version of the MBot Cube. IKEA style assembly instructions included. The cost of such pleasure is 669$
All MBot printers can be ordered on the manufacturer's website: http://www.mbot3d.com
Our review has come to an end, but we will still delight our readers with interesting and useful information about high-quality products from modern 3D printer manufacturers.
Subscribe author
Subscribe
Don't want
3d printer MBot Cube, Plywood SH
Turch January 8th, 2015
One of the popular home 3D printers is a model developed by MBot. In this review, we will consider three main models - MBot Printer PVC Color System, MBot 3D-Printer and MBotII, each of which has its own characteristics. The main advantage of the equipment of this brand is the affordability of the cost, which is quite suitable for using printers at home. The Chinese manufacturer offers two models of printers that have one or two extruders. In most technical data, the devices are the same, and the differences are only in the possibility of fast and color printing in models with two extruders.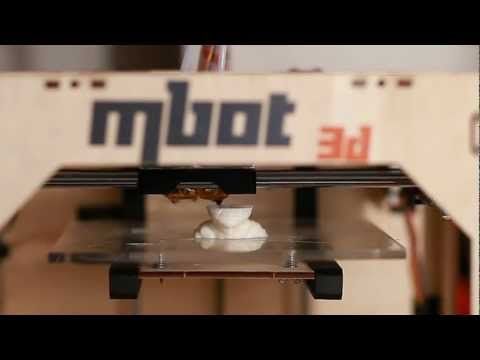 nine0003
MBOT PRINTER PVC COLOR SYSTEM
This printer was the very first in the company, and it immediately became attractive to a potential buyer. There are several reasons for this:
- The printable surface is large and measures 200x200x200mm.
- Equipped with modern software, using the printer is convenient and easy.
- Most 3D printer models work with plastic of one color, while this model is able to use two extruders at once, and therefore there are ample opportunities for printing. nine0022
- Due to the presence of two extruders, it is possible to use consumable and auxiliary material, which is needed as a support when printing, for example, complex models.
- The printer has an improved print head made of composite alloy. It is easy to remove and install.
MBOT PRINTER PVC COLOR SYSTEM can print on a spacious working surface measuring 200x200x200mm. The thickness of the part layer is minimal, while it can be adjusted. Various types of plastic and other materials are used as consumables in this model. Such a device will cost almost $ 1,000. nine0003
The printing process is controlled by buttons located at the bottom of the front panel. They allow you to start or stop printing, change the operating mode or settings. All information about the printing process is displayed on the LCD display. Like most modern printers, this model can be powered by a computer, and the filament spool is conveniently attached to the back of the device.
The printer software is free to download and allows you to import stl files to print your model. It is noteworthy, but with a three-dimensional object, you can perform any manipulations on the plane. The presence of two print heads is a guarantee that you can create beautiful volumetric products of various colors. Based on this printer, you can create 3D models using the FDM method - layer-by-layer deposition, while you can adjust the layer thickness, so that finished products have a smooth surface.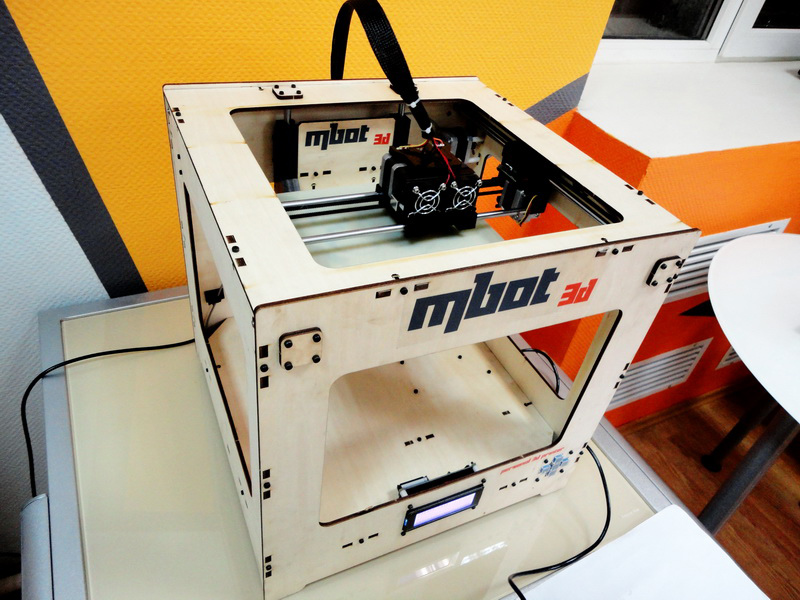 Two types of plastic can be used as consumables - ABS, PLA. nine0003
MBot Cube II
This device costs a little more - almost $ 1,300, while attracting attention not only the cost of the product, but also the ability to print in two colors. Unlike its predecessor, this printer is more capable because it's bigger, better, and faster. Thanks to the increased working platform, it became possible to print large objects. If necessary, the surface can be removed and cleaned, and in order to increase the accuracy of printing, manufacturers have equipped the model with a special holder. The technical features of the MBot Cube II™ model include:
- enlarged print area up to 260x230x200 mm,
- high speed printing,
- high quality 3D printing,
- using ReplicatorG software,
- compatible with operating systems WindowsXP/7, Linux and MacOSX,
- compact dimensions and easy operation.
Model MBot Cube II is characterized by the presence of a steel body, strong and strong, which ensures the stability of the whole structure, improving stability. The metal frame increased the weight of the device, but it became safer to use. To make printing more accurate, manufacturers have equipped the device with an additional extruder holder, so that the model is printed more evenly and more accurately. The printer can be connected to a PC using a USB cable. All control buttons are located next to the display, so they are convenient and easy to use. nine0003
MBot Cube Plywood SH
This is another budget printer that can be used at home. With large dimensions, the model takes up little space, allowing for high-quality and accurate printing. The body is made of wood and has impressive dimensions. The device is controlled by buttons on the front panel of the device. Like most modern printers, this model has a USB port for connecting to a computer, and a spool of plastic filament is attached behind the body, which makes the device ergonomic and compact. nine0003
This printer has one print head with a nozzle diameter of 0.4 mm. At the same time, the device makes it possible to print three-dimensional figures of large sizes and different colors.