Making your own 3d printer filament
Felfil Filament Maker | Make your own 3D printing filament with Felfil Evo
Felfil Evo Extruder
The Perfect Match for your 3d printer
order now
Felfil Shredder
Crush your Plastic Wastes
order now
Felfil Spooler
Easier way to extrude
order now
Our filament maker system
The Felfil filament extrusion line is composed by Felfil Evo, a 3d printer plastic extruder machine, Felfil Spooler which is a winding machine and Felfil Shredder that is a small plastic shredder. This extruding system allows anyone to make custom 3D printing filaments at home or in a lab, starting from industrial pellet or chopped wrong 3D prints, old models and plastic waste.
Using our desktop filament maker you will be able to choose your filament color, diameter and material, day by day, according to your creativity and your needs. In this way you will save over 80% of the price of filaments spools and help to protect the environment.
Recycle
Use failed 3D prints or plastic waste to create your filament
Save money
Save up to 80% of the spool costs starting from our pellets
Experiment
Make your custom 3D printing filament for any 3D printer
Get Your Desktop Filament Extruder
Choose between our different models and start to make your own filament
request a quote
This is the complete filament maker system by Felfil, that includes Felfil Evo Assembled and Felfil Spooler.
You will receive all assembled, ready to make your custom and DIY 3d filament.
A complete solution to make your own filament directly on your desktop.
That’s the full recycling system by Felfil. It includes a plastic shredder, the extruder and the winder. All arrives already assembled and tested.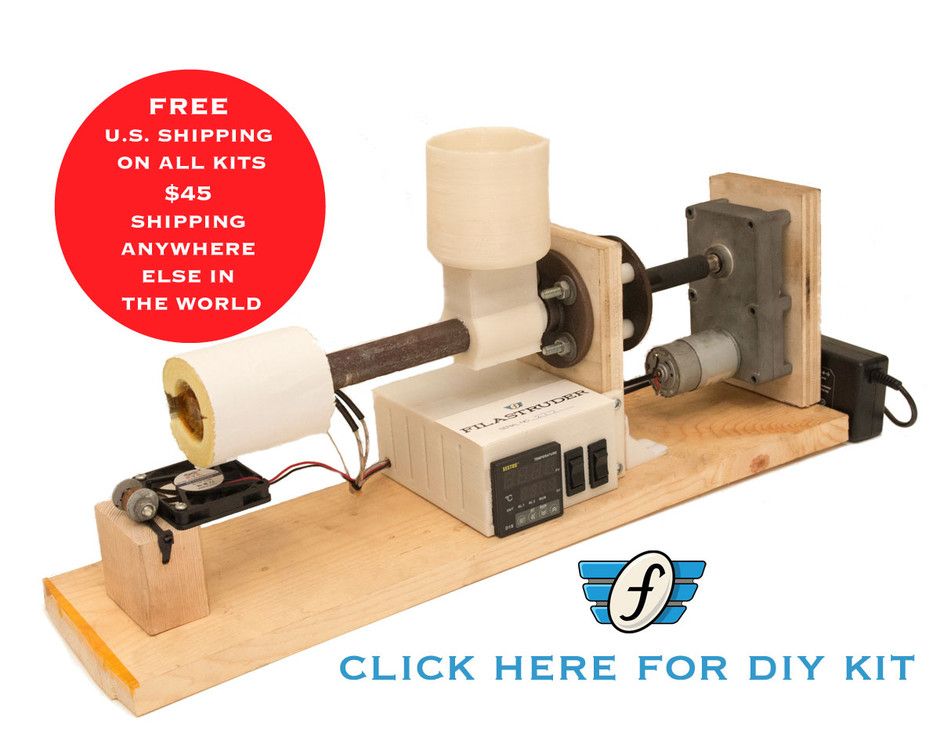
All three products can be placed on your desktop, and you can start immediately to recycle your old 3d prints or plastic wastes.
The Felfil Evo Complete Kit is the solution for who want to build their own extruder, step by step. Then, it is shortly to begin to extrude.
Buying this package you will get all the components of Felfil Evo, you just have to assemble them following the instruction manuals.
This is the complete filament maker system by Felfil, that includes Felfil Evo Assembled and Felfil Spooler.
You will receive all assembled, ready to make your custom and DIY 3d filament.
A complete solution to make your own filament directly on your desktop.
This solution is perfect for who want to try immediately our extruder! An ideal choice for those who want to begin to extrude easily.
You will receive the filament maker already assembled, ready to make your custom and DIY 3d filament. You have just to unbox it and connect the plug.
The Felfil Evo Complete Kit is the solution for who want to build their own extruder, step by step.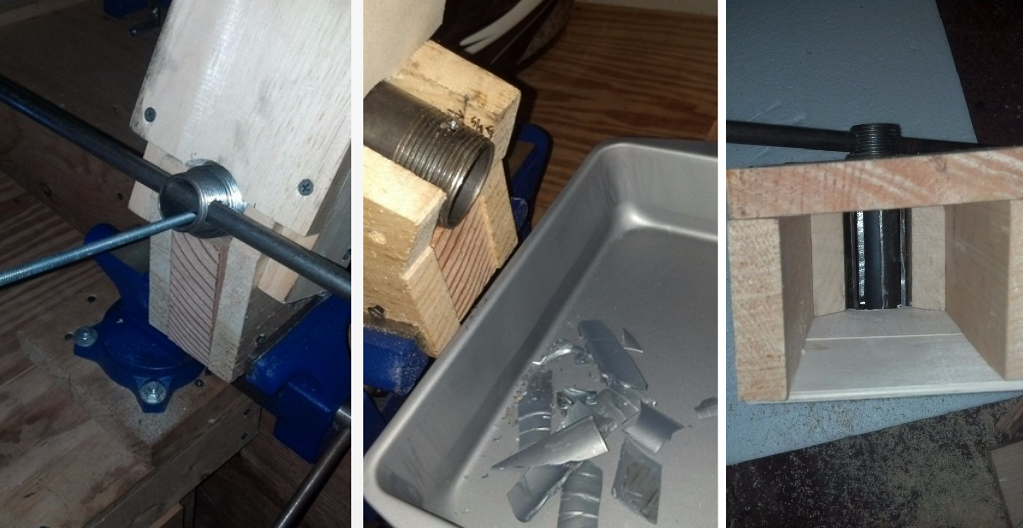 Then, it is shortly to begin to extrude.
Buying this package you will get all the components of Felfil Evo, you just have to assemble them following the instruction manuals.
ONE SYSTEM, SEVERAL APPLICATIONS
Our filament extruder system is easy to use and suitable for different applications, find out yours
Fablab /Makers
Felfil Evo is an open source project and it is perfect for FabLabs and MakerSpace users: amatorial 3D printers and experts.
It is studied to help Makers recycle plastic waste from 3D printing activities, to save money and try different materials in order to stimulate creativity and innovative ideas.
You can create incredible and original objects from your old 3D prints.
Lean more
Laboratories
With our system it is possible to experiment new material, test their features and study their application. Felfil Evo and Felfil Spooler can be used in many sectors for prototyping activities.
With our desktop filament maker, research laboratories can be independent creating and testing small quantities of filament and have an immediate experience with the new materials.
Lean more
Education
Felfil helps students to learn about new technologies and additive manufacturing.
Thanks to our filament recycler system it is possible to learn about plastic materials for 3D printing and their potential for reuse culture.
The educational potentials of Felfil project concerns recycling and reuse, maker philosophy and application sectors of 3D printing.
Lean more
Our Clients
Born as open hardware but ready to make filament easily and safely at home. It’s a desktop 3d printer filament extruder able to produce custom filaments for your 3D printer.
Meet Felfil Evo
Meet
Make your choice
You can choose between three different version of Felfil Evo filament maker
DIY Project
Discover how to customize Felfil Evo
More
Make Your Own Filament | Hackaday
- by: Al Williams
According to [Alex] it is easy to make your own rolls of 3D printing filament, even though existing off-the-shelf solutions don’t work very well. His explanation for this is economics. He built a filament extruder using a high torque induction motor and gearbox that was locally sourced. He argues that shipping heavy gear around would make a similar extruder commercially unattractive. He sunk about $600 into the device but estimates that a company would need to charge at least $1,500 or more for the same thing. That may seem steep but as [Alex] points out, a 1 kg roll of filament really only has about 750 grams for filament and plastic pellets cost $2 to $3 per kilogram.
There are other costs, of course, like the electricity required to heat and move the plastic. Still, the system appears to use about $1 of electricity for every 10 kg of filament. You can see the process in the video below.
If you think about it, the mechanism isn’t too different from a 3D printer. You heat plastic, force it through a nozzle, and it cools off. The big differences are you are not moving around and have to manage the pellets using a screw feed. It turns out the screw and associated components make up a large part of the machine’s cost.
The other key component is a 1 HP motor. A typical motor will run at 1800 RPM, so you also need a gearbox to slow things down. You’ll also need drive electronics, heaters, and temperature control. If you pay retail for everything, you are going to have trouble matching the $600 price tag. However, the motors and quite a bit of it can be found used or salvaged. A lot of the details are in the second post. The details of the part of the machine that winds the new filament are in yet another post.
If you don’t want to spend quite as much, you can also make a smaller version that can produce about 2 kg per hour as opposed to the 5 kg per hour that the big machine makes. The little sister uses an eBike motor and the whole thing should come in for well under $500. There are several other posts linked from the original ones, including notes on the water bath required, measuring filament thickness, and even selling filament for profit.
We’ve seen a lot of takes on making filament. One even claims to cost about $100.
filament from plastic bottles, how to make
filament production By making filaments for printing on a 3D printer on their own, the user can save a lot of money spent on consumables. Plastic filament for printing can be made from PET bottles. Consider which bottles are suitable for this, the procedure for manufacturing a filament, as well as the advantages and disadvantages of this method.
Is it possible to make plastic for a 3D printer from PET bottles?
When making plastic filament for 3D printing, it is recommended to use the following types of PET bottles:
- Blue. Such bottles have the hardest plastic, but when melted, it will be the most fluid of all.
- White and green. The plastic of these bottles is softer than that of the blue ones. In molten form, the material is thicker.
- Brown. These bottles have the softest plastic. When molten, it is highly viscous (similar to ABS filament).
How to make DIY thread and print with plastic bottles?
Preparatory work
Bottles must be unraveled into ribbons before production starts.
Soft bottles have a thinner plastic, so it is better to break them into strips of 10 mm.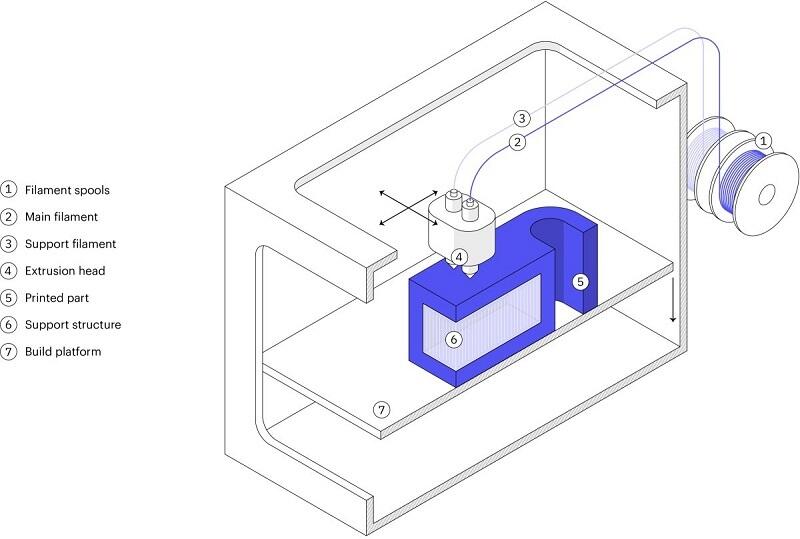
Containers with medium hard or harder plastic material can be cut into thin strips, about 7 mm thick.
PET bottle 3D printer filament tools
To create a filament from PET bottles, you will need the following tools:
- utility knife or bottle cutter;
Important! When choosing a bottle cutter, you need to pay attention to the accuracy of cutting plastic. The width of different cut strips should not differ by more than 0.1 mm.
- oven;
- plastic crusher;
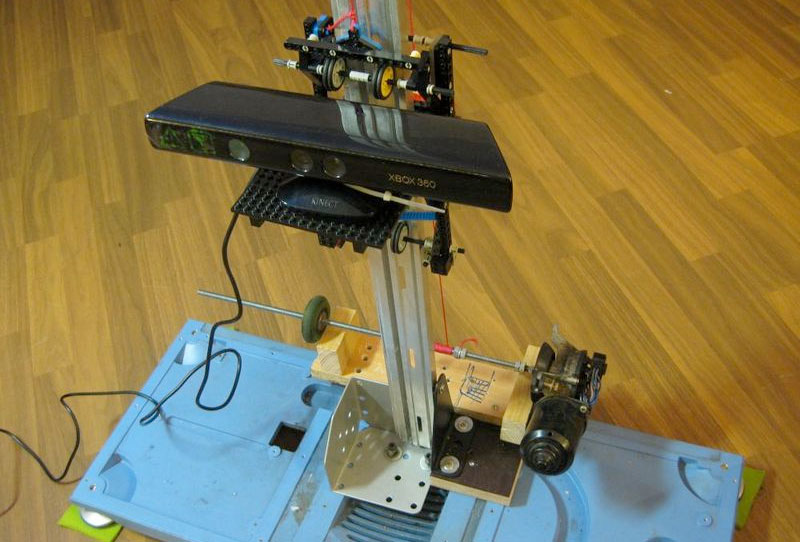
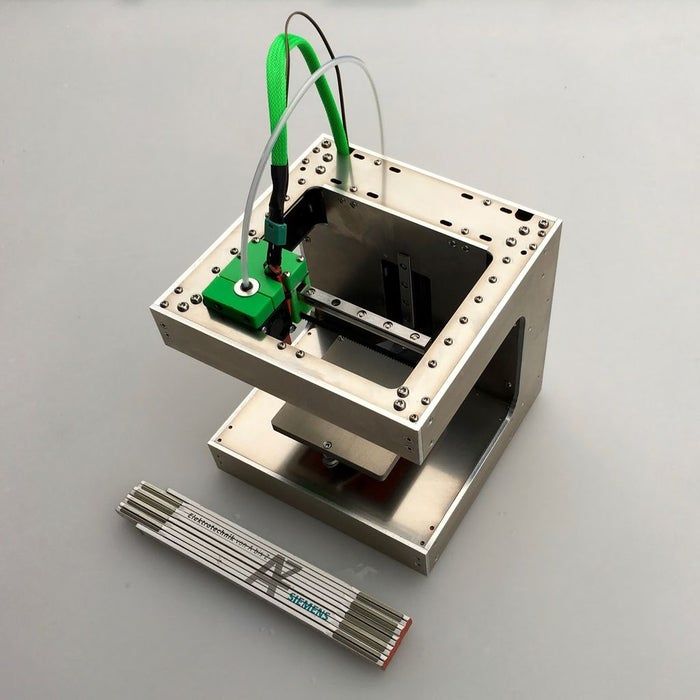
- homemade vertical extruder - it has a metal pipe with a drill screw that rotates with a stepper motor, and a nozzle with two heaters from a 3D printer;
- rotary table;
- large basin;
- cold water.
Step-by-step instructions
The production of PET bottle filament for 3D printing is carried out in the following order:
- Cut plastic bottles must be melted in an oven at 180 °C.
 The melting time depends on the number of bottles.
 Help. It takes approximately 40 minutes to melt 10 plastic bottles.
- After melting, the plastic must be completely cool. All excess moisture will evaporate from the material, and it will crystallize. In appearance, the polymer resembles glass.
- The cooled material must be ground in a crusher into a finer fraction.
- The crushed plastic is then fed into the vertical extruder. The rotating screw moves the ground polymer to the bottom of the device to the nozzle with heaters. The plastic starts to melt.
- The molten PET plastic leaves the nozzle and enters a basin of cold water, which is located on a rotating table. The rotation of the table will prevent sticking of the material. The thread must be cooled as quickly as possible so that it becomes flexible and transparent. In this case, it can be used for 3D printing.
- Let the homemade filament dry well before printing.
 Since in the presence of a large amount of moisture, a thread of molten plastic will exit the extruder in the form of foam. It is recommended to dry the skeins of thread in a closed container with silica gel at a temperature of 50–60 °C. To do this, you can use the oven or simply place the container on the radiator.
When using ready-made filament for 3D printing on a printer, several nuances should be taken into account:
- Print the product on a cold table, the temperature of which does not exceed 35 ° C. This limitation of the temperature regime is due to the fact that the plastic must quickly cool down to a temperature below 70 ° C. Otherwise, the material may almost completely lose its strength properties.
- Extruder temperature should be around 265°C. But it may differ depending on the printing speed and the type of plastic from which the filament is made.
- If the feed mechanism of the 3D printer is made of brass, then it is better to put a thin-walled rubber hose on the roller.
 It will not allow the PET thread to slide.
The pros and cons of using bottles to create plastic
The main advantage of recycling PET bottles for plastic 3D printing filaments is that you can save on the purchase of industrial filaments and recycle unnecessary packaging, which, when taken to landfills, greatly pollutes the environment .
Disadvantages of using homemade filament:
- you can print products only at a low speed, as the thread breaks when it is increased;
- requires a crusher to grind the material and a separate extruder to transport the plastic;
- It is not possible to print large items because the thread length is limited.
Making your own 3D printing filament is a great way to save on consumables and recycle unwanted PET bottles. Homemade filaments are close in properties to purchased ones. Therefore, they can be used to print small products of excellent quality.
- March 14, 2021
- 11871
Get expert advice
How to make plastic (filament) for a 3D printer out of a PET bottle
Those who are interested in 3D printing are sometimes simply shocked by their costs for a plastic thread for printing (filament). Although it is not very expensive, it is consumed in large volumes, therefore, the amounts for her ass are considerable. In order not to spend money, filament can be made free of charge from ordinary plastic PET bottles.
Equipment required:
- Bottle cutter;
- tire pump;
- heater 200-225 degrees Celsius with outlet nozzle 1.75 mm;
- broaching and winding mechanism.
Process for making filament from PET bottles
PET bottles are used as the raw material for making filament. Ideally, they should be in color. They need to be leveled before use. For this, the usual bottle cap is being finalized. It is necessary to embed a valve from the car chamber into it. With its help, the bottle is pumped with air by a conventional pump to raise the pressure inside (more details here - https://sdelaysam-svoimirukami.ru/6732-kak-vyprjamljat-ljubye-figurnye-pjet-butylki.html).
Next, the valve is clamped in the screwdriver's chuck. It is necessary to rotate the inflated bottle over a lit gas burner. It will warm up, soften and even out due to internal pressure.
A straight bottle is cut into strips with a bottle cutter. It will turn out to be more homogeneous than if it were dissolved without preparation. If the walls of the bottle are thick, then the width of the tape should be 5-6 mm. From a thin bottle, from mineral water, it is better to cut 7-8 mm wide.
The edge of the tape is cut at an angle, after which it is launched into the nozzle of a heated heater. To work with PET tape, its temperature should be +200-225 degrees Celsius. The diameter of the outlet of the nozzle is 1. 75 mm, while the inlet is countersunk to make it easier for a wide tape to enter and change shape.
The edge of the filament drawn through the hot nozzle must be tied off and connected to the broaching and winding mechanism. That is a stepper motor with gearboxes and a coil. Details for it can be printed on the printer. The winding speed is adjustable so that the tape has enough time to heat up and change shape.
To make the rod long, the tapes can be glued together before production by heating the tips to +270-280 degrees Celsius. The resulting filament prints perfectly when the temperature is set to +250-260 degrees Celsius.
All equipment needed for production can be made by hand. There are no special requirements for it other than the possibility of adjustment. For the heater, this is the temperature, respectively, and for the winding mechanism, the speed of rotation of the coil. As a result, you can literally get high-quality filament from garbage.
If the tape is straight, and it will be so if the bottle is pre-flattened, then the quality of printing with such a rod is ideal.