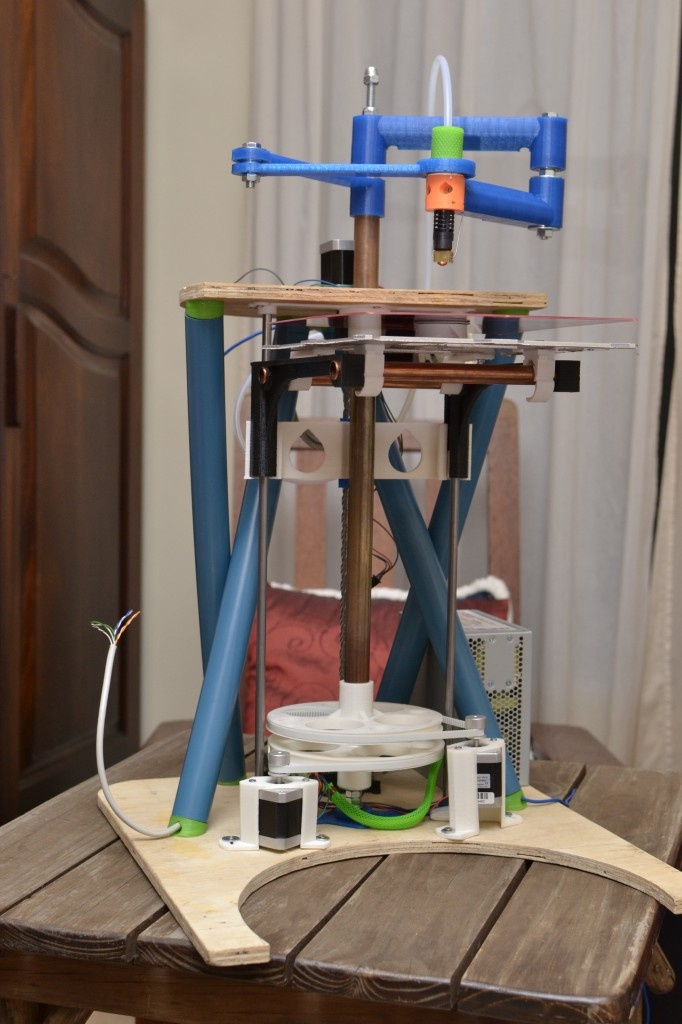
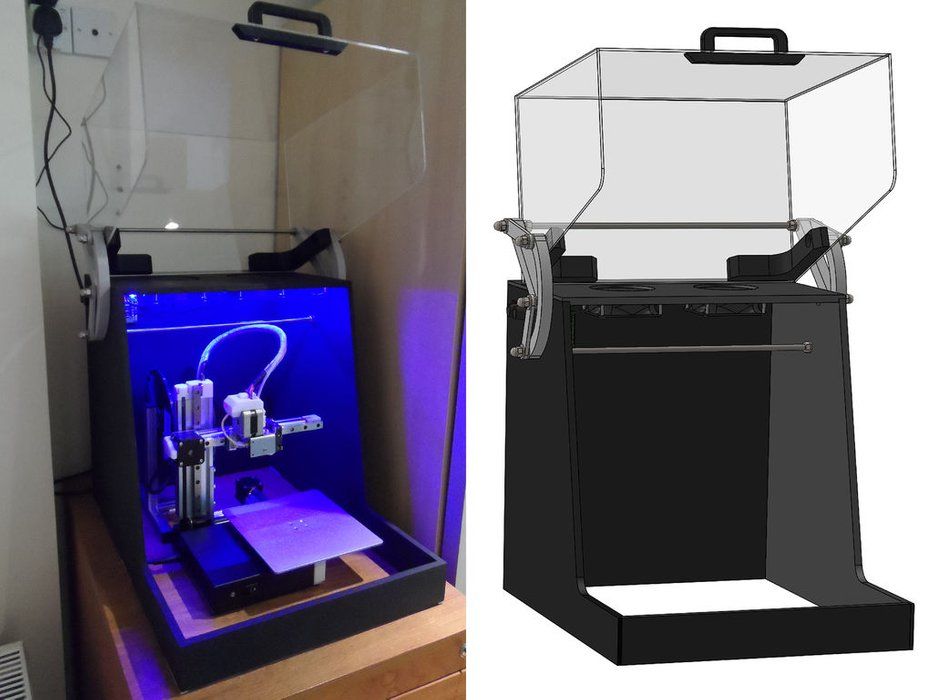
MAKE YOUR OWN CLAY AUGER PRINTHEAD WITH MECHANICAL RAM DELIVERY
This is a development on or an upgrade to the Make Your Own 3D Delta Printer for Ceramics first published in 2013. It consists of an auger type stop start or retraction printhead with a mechanical ram clay delivery. This same printhead can be used with a compressed air clay delivery as developed by WASP that makes use of a Boilie Gun, used by carp fishermen for ground bait making.
I have a slightly reduced size Delta that I travel with but then have always needed to make sure that I have compressed air available for the clay delivery. So I have long wanted to develop an all mechanical system and this is the result. As always my over riding criteria was to keep things simple. I did not want extra electronic controls or the need to go to a higher voltage. It is designed around kit I already had such as the Techncon dispensing cartridge and upgrades the nonstop glue gun type printhead of the original 2013 JK Delta printer design.
PRINTHEAD
Printhead introduction – The overriding design principal with this printhead was that it would be easy to take apart to clean and maintain. I do not like plastic printed parts as I have not found them to be strong enough and why go to that length if the parts can be kept this simple. The body of the printhead is engineering nylon. My choice of this material is because clay is incredibly abrasive, so I wanted to avoid metal and with my basic hand tools I can easily cut and drill this material. The auger screw fits snugly down the middle while being free to turn. I use different sized screws depending on what scale of printer and size of extrusion or nozzle I intend to use. If the screw bore is too big it is easy to get pulsing in the extrusion that textures the print surface. If too small you do not get enough flow or the motor is turning so fast it heats up over a lengthy print. My judgement for these decisions is not very measured but a mix of intuition and suck it and see, combined with what parts I can source easily. The stepper motor probably does not need to be as powerful as those used to move the delta printer arms but I have always used similar motors. The motor wires plug into the E pins on the Ramps board with corresponding driver and power adjustment screw. I have use the same design of printhead with clay piped in from a compressed air and mechanical ram driven delivery system with little noticeable difference.
Auger screw – The stepper motor I use is a SY42STh57-1684A High Torque Hybrid Stepper Motor. Four lengths of M3 threaded rod are bolted into the stepper motor to connect the motor to the nylon body. The length of these are determined by the beam coupling that is used to connect the motor drive shaft to the auger screw. (Different sized beam couplings are available). A hose clamp is used to clamp the M3 spacer rods to the nylon body cylinder. The nylon body cylinder is the same diameter as the glue gun extruder of the original JK Delta design so that it could be interchangable. If this is not necessary a body diameter of around 40 – 45 mm is a good idea so there is enough body material to drill the holes necessary for the auger screw and clay inlet pipe. Also this diameter of body cylinder can be securely attached to the printers printhead plate. I have varied the nylon cylinder length depending on the weight of auger - between 50mm for a small 6mm screw and 70 mm long for a larger 8mm screw. The screw length is determined by the length of the body cylinder. I aim to have the tip of the screw ending as close to the nozzle as possible. Obviously a hole the diameter of your screw is drilled in the vertical centre of the nylon body cylinder. (A wood drill bit will do this) I put a rubber tap washer on the shaft of the screw up against the coupling that will then touch down on the top of the nylon body when the printhead is clamped together (not in all photos) to help keep clay pressure down the central shaft. Although the turn of the screw will be driving clay down I feel it is favourable to have the clay feed under more pressure than the screw will naturally take to help force the clay extrusion.
Feed pipe – I have tried various feed pipe attachments. Push connectors clog up with clay and stop working. Threaded connectors are a pain to undo. This simple wire pin through the pipe does the job. The clay feed pipe I use is 12mm natural nylon pneumatic airline pipe. I use this as I believe it to be more slippery than softer types of plastic pipe. Watch that you get 10mm inside measurement or the pipe is too stiff - a down side is this pipe does tend to kink. A 12 mm hole is drilled into the side of the nylon cylinder body to take the feed pipe. This hole is drilled at least the width of your hose clamp down from the top of the nylon body and far enough in to connect with the vertical screw channel. With the feed pipe in place I drill a vertical hole to take the wire pin that keeps the feed pipe in place. This vertical hole I drill the full length of the body cylinder so clay can be cleaned out of this hole. If not the pin will not go down after a while. An old bicycle spoke makes for a good pin.
Nozzle – I use a range of nozzle sizes depending on what I am doing so I have kept to a standard ¼ inch threaded outlet hole underneath the printhead. The central hole is drilled bigger and a ¼” tap used to create the thread. This gives the option of attaching a male Luerlock fitment that will take the range of Luer Lock dispensing tips or larger ¼” dispensing nozzles. I do like a metal nozzle tip so I customise my own nozzles. Nozzles will range from 1.2mm up to 4mm with 2.5mm being my standard.
Parts – 1 x Nema 17 Stepper Motor 4 x 70mm M3 threaded rod 4 x M3 nuts 1 x Flexible beam coupling 1 x rubber tap washer 1 x 6mm roofing screw 1 x 55mm length 45mm diameter engineering nylon rod 1 x Worm drive hose clamp 50mm dia 1 x 25cm natural nylon pneumatic airline pipe 12mm OD/10mm ID 1 x ¼” male Luerlock connector fitment 1 x Luerlock dispensing tip – Olive Green cut to 2.5 mm opening
The screws are standard and I get them from my local hardware shop. To improve the efficiency I grind the tread deeper with an angle grinder and then cut the screws to the required length.
MECHANICAL RAM
Mechanical ram introduction – This design is not ideal in that the clay container could do with being larger but I am working on this. Currently it will holding enough clay for around three cups or one medium sized vase so it is a good starting point. Also the clay cartridges are high density polyethylene plastic and will expand under pressure if hard clay is used but they are reasonably inexpensive and translucent so you can see where the plunger is. The whole unit has to be quite lengthy and is then cumbersome to attach to your 3D printer. My best solution has been to hang it vertically with a counterbalanced as this allows for enough free movement particularly in the initial homing and start to print on a delta printer. It is designed to be easily remove from the printer and to change the cartridge. I use clay of the same consistence as I would for a compressed air delivery system and that is about the consistency of toothpaste. The auger screw extrusion and plunger ram are working in unison from the same gcode so there is no danger of too much pressure building up, if one stops they both stop. The down side is the balance between the clay delivery, the ram and the clay extrusion, the screw is set at the time of slicing the gcode and while the overall flow can be changed on the fly when printing the relationship or setting between the two elements creating the flow cannot. This is not a problem once you have a successful profile setup in your slicing software.
The clay containers are 355ml/12ounce Techncon HDPE Dispensing Cartridge (TS120C) with outer diameter of 43mm and inner diameter of 40mm. They are 313mm long with a 1/4" NPT (6mm) female threaded outlet. The connection to the auger printhead is made with a 250mm length of nylon pneumatic airline pipe of 12mm OD/10mm ID. At my local plumbing supply I found a short length of brass 1/4" threaded tube that makes the link between cartridge outlet and nylon pipe.
During operation the clay containers are held in a 680mm long rig. My construction is a little light weight in construction and as it is put under quite sum longitudinal pressure it is worth engineering it well. Mine is made with four lengths of aluminium tube intersected with three 20mm thick MDF blocks. Each block is 60mm square with the bottom end block centrally drilled to take the profile of the cartridge end. The middle block is drilled to the diameter of the cartridge and placed along the length to hold the top edge of the cartridge. The top end block is fashioned to take the stepper motor with gearbox. The corners of each block are drilled to pass through the four 680mm lengths of aluminium tube. These are drilled and pinned to be held in place. A 40 mm length of threaded rod has been screwed into the top end end of each aluminium tube to take the securing nuts that hold the motor block in place.
The motor is a Nema 17 Stepper Motor with a 27:1 Planetary Gearbox attached. The motor is secured to the end block with four 30mm long M3 bolts. The motor shaft of this is joined to a 310mm length of 8mm threaded rod - the thread looks to be 20 turns per 25mm. The joiner I have used is a kiln element joiner. The motor wire will need a joiner plug in it so the ram can be uncoupled from the printer for cartridge change over.
A nut on this threaded shaft pushes a plate that is held from spinning by being held by the four aluminium lengths. The sliding plate will want to spin because the nut is made to fit snugly in the centre of the plate. My sliding plate is made of 6mm thick clear plastic and the profile of the nut is cut in the middle. A metal square with a 8mm central hole is attached on the side away from the motor so the nut is kept in place.
So finally to the plunger construction that is made from a 290mm length of tube that will slide over the motor threaded shaft. The sliding plate pushes up against the end of this tube so there is a metal washer to reduce friction and ware. On the other end of the tube is the plunger. I originally printed this in plastic but the forces involved ripped the plastic so I have resorted to a 45mm long wooden plunger made from a 38mm diameter dowel - heavy duty broom handle. The end of this is rounded to the inside profile of the clay cartridge. An O-ring makes for a tight fit of the plunger inside the cartridge. Originally I had two O-rings but have found one to be quite adequate. The plunger is centrally drilled a little over half way through its length to take the plunger tube. This is then secured by drilling and pinning at right angles.
Parts – 1+ x 355ml/12ounce Techncon Cartridge 1 x 250mm length of nylon pipe of 12mm OD/10mm ID 1 x 1/4" threaded brass tube 4 x 680mm aluminium tube 4 x 40mm threaded rod 4 x nut to fit threaded rod 3 x 20x60x60 mm MDF blocks 1 x Nema 17 Stepper Motor with a 27:1 Planetary Gearbox 4 x 30mm M3 bolts 1 x 310mm 8mm threaded rod 1 x nut for threaded rod 1 x metal washer for threaded rod 1 x joiner for motor shaft to threaded rod 1 x 6x60x60mm plastic slider plate 1 x 3x3mm metal plate 1 x 290mm plunger tube to fit over threaded rod 1 x 45mm wood plunger 38mm diameter 1 x O-ring to fit plunger
SETTINGS
Ramps board – So now you have two stepper motors, one from the auger and one from the ram that need to be connecting to your Ramps Board. This board sits over the Arduino and along with the LCD screen makes up your electronic controller. On the ramps board there are connector pins and drivers, E0 and E1. E represents the feed rate in the gcode andit is the speed the material being printed is feed to the printhead. Plug the auger motor into E0 and the Ram motor into E1. Tune the motor driveres as required.
Marlin Firmware – If you were to use the Marlin Firmware from the original 2013 JK delta the ram and auger will turn at the same speed according to the filament flow rate set when slicing. You will need to use the latest version of Marlin as this allows for the use of the gcode M163 that can set a mix factor for the E0 and E1. I have a video here explaining the settings for the Marlin Firmware. Download the latest version of Marlin from their website and from the documentation on the Marlin Website and my video you should be able to set up your firmware. There is one point I would not have covered in the video and that is the need to increase the DEFAULT_AXIS_STEPS_PER_UNIT for the E0/E1 motors. This is found in Configuration.h, the only tab in marlin you should need to look at and is under ‘Movement Settings’. You are looking for #define DEFAULT_AXIS_STEPS_PER_UNIT {72, 72, 72, 100}. The bracketed numbers denote the X,Y,Z,E0/E1 number of steps. By changing the E0/E1 steps from 100 to 200 the auger and ram will turn twice as faster.
Slicing gcode – I use Cura as my slicing software and there is documentation here on how I set it up. Not covered is how to add the M163 gcode into the slicing header or start gcode. The image to the right image is how this should look. There is further reference here on the Marlin website. Confusingly the gcode line uses S0 for the E0 motor and S1 for the E1 motor. I have found that the ratio of a balance between the clay feed from the ram and clay extrusion from the auger can change from clay to clay and with different nozzles so you will need to experiment to find the best settings for your setup. I would suggest start with S0 P1 and S1 P1, an equal balance and go from there.
Jonathan Keep, digital 3D ceramic printing journal
See Digital Printed Pots See Selected Answers to Questions from Students and Press 2012 - 2017
10 January 2020
A Guide to Clay 3D Printing
I have written this Pdf guide that is based on the workshops that I present. It covers:
Setting up a Clay 3D Printer,
3D Files for Clay Printing,
Clay for 3D Printing,
Converting a Reasonably Priced 3D Printer to Print with Clay,
Self Build Clay Printhead,
Cura for Clay 3D Printing.
Download
29 May 2020
Testing of Six Clays for Extrusion 3D Printing
I have written up the results of these test as downloadable Pdf's. This test looks at measuring clay consistency, the ratio of clay to water and clay shrinkage when bone dry, bisque fired and fired to a low stoneware temperature.
Download
29 May 2020
Formulating and Testing a Clay Body for Extrusion Clay 3D Printing
This test looks at some of the considerations and the principals of formulating and testing a clay body for 3D printing. The difference of clay consistency on surface quality and print capability is observed as is the addition of additives to improve these qualities.
Download
29 May 2020
Testing the relationship between Nozzle Size, Layer Height, Print Speed and Material Consistency for Clay Extrusion 3D Printing
Concentrating on print quality, these tests focus on three important factors when printing. First the ration between nozzle size and slice or layer height. Secondly the influence of print speed and thirdly whether using stiff or hard clay is advantages.
Download
10 January 2020
Potting in a Digital Age
Studio Potter | Vol 47 No1 Winter/Spring 2019
As far as I am concerned an art work should reflect the age in which it is made. For good or bad we cannot avoid the influence computers are having in our society and on our lives. In this article I look at how computers and computation are being used in the pottery studio and how this could change the way we think about pots.
Download
10 January 2020
The Fourth Way
Ceramic Review | Issue 240 Nov/Dec 2014
In this article I write about how I became interested in and why I use computers in my work. Written five years ago I feel it has stood the test of time well. I also suggest that 3D printing offers a fourth way to giving form to clay – the original three being handbuilding, wheel throwing and moulding.
Download
19 - 20 / 26 - 27 November 2018
SHORT COURSE – RCA, LONDON
There is always a good uptake of this course that I do in the Ceramic and Glass department at the RCA but not many students gone on to incorporate this way of working into their studio practice. The equipment is available to students and staff across the whole art school and so the printers are still well used and the technical staff are kept busy supporting projects from outside of the department.This trend is not uncommon, where I have found more interest for ceramic 3D printing coming from creative practitioners who would not consider themselves clay specialists. I fully understand the situation as most people specialising in ceramics do because they like making things with their hands. However I still believe that it is important that the use of computer aided technology is introduced to clay specialist students in their education so they are aware of what tool sets are available – for conceptually and technical reasons.We had a visit from Prince Charles during the course. Pictured with the Prince is Nico Conti, a second year student who has continued to explore 3D printing and the use of custom nozzles and chaotic structures.
Computation Clay - new ways to work clay in art and design. This was the description for the workshops that I presented for The Academy of Fine Arts,‘Mario Sironi based in Sassari Sardinia. The Accademia Sironi has established an Art Lab at Mas.Edu museum in Sassari to serve students and the local creative community.
The workshops were open to students, makers, architects, master ceramicists, artisans and companies concerned with the artistic fields. The laboratory is well equipped with a Delta WASP 20/40 clay/plastic printer, Formlabs Form 2 printer with ceramic resin, Delta WASP 60/100 for pla/abs as well as other kit common to FabLabs such as laser cutters and thermoforming machines. The lab is very well organised and run by Pier Paolo Luvoni who himself makes fine printed ceramics.
16 September - 13 October 2018
KERAMIK SYMPOSIUM GMUNDEN, AUSTRIA
For four weeks, from mid September into October I joined nine other ceramic artists in Austria for the Gmunden Ceramic Symposium residency.
Celebrating 55 years since the first Symposium, founded by Kurt Ohnsorg, the Laufen sanitaryware factory rejoined tableware producers Gmunden Ceramics to offer studio facilities for the resident artists. Laufen, with a well developed model making CAD department were anxious to host artists using digital tools and I guess that is why I got the invitation.
This is the first time I have had the opportunity to work in a ceramic factory and the experience was fascinating. The scale of production is extraordinary and while the processes and materials are all so familiar from the pottery studio a factory takes it to another level. What was interesting in Laufen was although much is automated there was still that sense of skill in process and material knowledge.
As a successful Europe based ceramic production company you can see how they have needed to work at every element of the business to stay ahead of overseas competition. Design led, the CAD department enables them to develop and change designs very quickly within the production. Production combines automation and high manual skill to maintain quality, while material development in the form of their special SaphirKeramik clay body enables them to produce thin but robust shapes. Design, material and process are all important to this innovative company.
The Italian 3D printer company WASP sent one of their recently launched DELTA40100 clay printers for me to use during the residence. Using the Laufen SaphirKeramik clay, that was not ideal for 3d printing as being designed for slip casting it lacks plasticity, the WASP printer was just brilliant. The residency was a chance to work on a large scale having a printer that can print 40 cm wide and 1 meter high, and then the kilns to fire work of that size. Unfortunately there was just not the time to make full use of these opportunities.
Working on a new series of work based around fractal patterns there was just too much going on and large scale 3D clay printing needs time. The Symposium culminated in an exhibition that is currently on in the K-Hof Kammerhof Museums in Gmunden and runs until 4 Nov 2018, and then will tour.
7 – 10 September 2018
EXHIBIT60 - THE PRINTROOM, SUFFOLK
This exhibition was a chance to look back over a selection of my work from the last twenty years. This period of time more or less covers the period where computers have come to influence how I think about my work and how I make my work.
Sixty works comprising both digital drawings and pots, digital and analogue made up the exhibition. Older large pots were exhibited outside while Monica Petzal’s beautiful, spacious Printroom studio was ideal for displaying the framed drawings alongside the pots. I would like to thank everybody who so generously supported this all too brief exhibition.
05 September 2018
BEYOND PATTERN & CHAOS SYMPOSIUM, NORWICH UNIVERSITY OF THE ARTS
This one day symposium was organised by the NUA interdisciplinary research group dedicated to the practice and theory of pattern, chaos and the spaces in between. Invited to talk about how I use computer code in my work this was a fascinating day. Presentations and conversations through the day ranged from the real to the imaginary, from science to art, from the messy to the ordered. Question like 'do we find comfort in pattern and intrigue in chaos' and observations like 'detail has pattern, the bigger picture is chaos' or the concept of collecting vs the non-normative apparent disorder of hoarding made for a most thought provoking day.
28 – 31 August 2018
WASP, ITALY - RAISE THE BAR FOR CLAY 3D PRINTING
In August I again visited WASP, the Italian 3D printer manufacturer and wonderfully maverick collective who are out to save the world with technology – eco friendly technology. The visit was because together we did a couple of workshops at MIC (Museum of International Ceramics) in Faenza as a prelude to partaking in the Argilla Ceramic Festival 2018.
WASP has recently launched their clay Delta 40100 (40 cm wide, 100cm build dimensions) and I challenge any other 3D printer to be as robust, precise, while working at speed with such a volume of clay. I have now been working with this machine for some time and it has just been a pleasure. I’ve made from small cups to large sculptural forms with it and it has not skipped a beat. My one comment would be that it is a pity that the build width is not 60 cm but I appreciate that if it was the machine would not fit through a standard door and not be as portable as it is.
During my stay at the WASP factory in Massa Lombarda I was able see their experiments in high speed and continues clay feed printing using the Delt40100 linked to a pugmill. This was very impressive. I was also fortunate to be there at the right time to see the ‘crane’ 3D printer building the clay house, ‘Gaia’ that was the central feature of Shamballa, a festival and conference on large-scale 3D printing and green building held earlier in October.
Congratulations to WASP for taking clay 3D printing to another level.
08 – 18 August 2018
ESTONIAN ACADEMY OF ARTS CLAY 3D PRINTING SUMMER SCHOOL, TALLINN
Held in the ceramics department at the Estonian Academy of Arts in Tallinn, ten participants from 8 institutions representing 10 nationality took part in this week long intensive workshop exploring clay 3D printing. Selected from an open application participants came from architecture, design, the fine and applied arts.
Most were postgraduate students. A fluency in working digitally was a necessity and all had 3D printing experience, mostly in clay with a number of individuals having made their own clay printers. The organising body consisted of the Professor of ceramics at the Academy Urmas Puhkan, myself, Lauri Kilusk who works in the department and with clay 3D printing himself, Kaiko Kivi who operated the robot arm, Madis Kaasik who built many of the machines and Kersti Laanmaa who teaches in the ceramics department was project coordinator.
On the first day, after introductions and a short presentation by all involved we quickly ran through what equipment was available. This included one Universal Robot Arm, one large format shallow depth Cartesian flat bed type clay printer (Madis Kaasik design), one small and one medium size Madis Kaasik design Delta clay printer and one WASP 2040 printer. Participants then got on with making a start at printing projects that they had pre-prepared so that by the end of day one we had some understanding of the capabilities of the equipment and where individual’s interests lay.
Day two I gave a presentation of how I work and then so as to ensure dialogue between participants they were grouped around themes of interest and asked to develop new work. The grouping took into account personal directions and interests so one group was quite lose allowing for individuals to get on with personal projects while having a close exchange of ideas within the group. For practical reasons those wanting to make larger works that would dominate time on machines were required to work together on collaborative projects.
Days three and four where nonstop printing. The group worked really well together and with a lot of experience it was a rich working atmosphere with a great exchange of knowledge both technically and conceptually, that was always the objective of the event. Participants shared a self catering accommodation and while I am sure this was intense the exchange of ideas continued with laptops spread across the dining room table and computer work going late into the night.
The final day consisted of, in the morning discussions around technical issues of clay printing and what I consider the most interesting aspect of all this and that is the new ways of working and new ideas that computation offers to working in ceramics. I demonstrated how I use code to generate work and we touched on the theme of ‘copy, cut and paste’. The afternoon and week concluded with a pop-up exhibition of the objects created during the summer school. Where time had permitted work had been bisque fired but the exhibition was very much a work in progress and a chance to assess what were often rough and ready sketches yet to be worked up into finished works.
OLDER POSTS
Some of the most amazing 3D printing materials currently available
3D printing with classic materials such as plastic, metal or ceramics is widespread. In the meantime, there are many alternative materials that are not only unusual, but can make a 3D printed part even more special. In our selection, we introduce you to these unusual materials. From chocolate and salt to recycled plastic waste or ashes, now you can create the most extraordinary items. In some cases, these materials are even proving to be a great alternative to plastic, reducing overconsumption and the associated environmental impact. Today we're going to take a look at these amazing 3D printing materials.
3D printing material from the sea
Today, filaments are still the most commonly used 3D printing materials, mainly because FDM machines are readily available. But did you know that some threads are made from shellfish and crustaceans? The French company Francofil offers materials from PLA and shells of mussels, scallops and oysters. Their shells come from recycled food service waste and are shredded to become threads. The materials are made in France and can be printed like regular PLA.
Photo: Francofil
Local Salt
Emerging Objects is an American company that uses new technologies with innovative materials to create impressive projects. Among the most prominent initiatives is Saltygloo, a salt 3D printed structure. The salt used was collected from San Francisco Bay. Due to climatic conditions, about 500,000 tons of sea salt are produced here annually. Salt has been used to additively manufacture lightweight structures on a large scale. In addition to Saltygloo, the company is known for other salt projects such as the GEOtube tower and building houses.
Photo: Matthew Millman
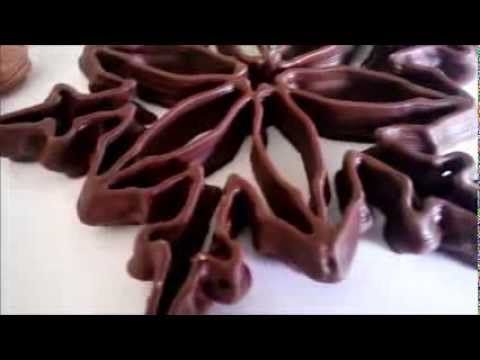
Chocolate is the sweetest 3D printable material
This 3D printable material may not be as exceptional as some of the others on the list, but it is certainly one of the most used. The chocolate 3D printing process is similar to FDM technology, but it has different cooling properties than plastic, so the process takes longer. The popularity of this technology has grown over the years, prompting many companies to develop various designs and even chocolate 3D printers. Among the best known is the collaboration between 3D Systems and Hershey's, one of the world's largest chocolate makers. We also featured some 3D printers that can make delicious sweets like mycusini or Print2Taste. If you want to know more about this technology, don't miss the video below.
3D printed material from the ashes to remember your loved ones
The Spanish company Narbón is introducing new technologies and innovations in the funeral industry. 3DMemories uses 3D printing to create original, unique and exclusive ceramic jewelry from the ashes, hair, DNA or skeletal remains of a loved one. To do this, the pattern must be processed and then combined with porcelain before the decorations can be 3D printed. Then the enamel is applied and the product is fixed. The service offers a wide range of products for men and women. Undoubtedly, 3DMemories with its range of jewelry is an exceptional way to remember a loved one.
Photo: Narbón
Wood-Based Threads
Wood or vegetable threads have also been available on the market for some time. For example, the Dutch company ColorFabb offers several alternative threads in this category. What started in 2014 with BambooFill has expanded in subsequent years with CorkFill and WoodFill. Wood fibers, usually blended with a PLA/PHA base, give parts a natural, high-quality finish. Whether used to make figurines, pieces of furniture, or wall decorations, the threads can be used anywhere the look of wood is desired. Since ColorFabb discontinued BambooFill, a similar product can be purchased in Wood Bamboo form from AzureFilm. According to the company, 40% of recycled wood is mixed with 60% of polymers for this purpose. However, to avoid problems when printing with this filament, it is recommended to reduce the print speed.
Left: ColorFabb, Right: Azure Film
Other Uses for Linen
Another alternative to traditional filaments is a composite of PLA and linen from French manufacturer Nanovia. The company says the composite is not only a sustainable alternative to traditional filaments, but also offers the ability to achieve different shades of brown by applying different print settings. This can be achieved simply by changing the print temperature during production. As for the finish, the manufacturer recommends sealing the printed parts with UV protection to keep them intact for as long as possible.
Photo: Nanovia
Sugar 3D Printing
Sugar Lab was acquired by 3D Systems almost ten years ago and, as the name suggests, has focused on sugar 3D printing. Using the 3D Systems ChefJet Pro printer, the company creates intricately shaped candies and decorations. The Los Angeles-based company claims to be able to produce candy in all flavors and colors. Whether it's birthdays, weddings or Christmas parties, The Sugar Lab offers all sorts of 3D printed candies. As for quantity, the 3D printer seems to be capable of producing up to 100 candies a day. While The Sugar Lab is the most famous company using sugar as a printing material, other companies like The Modernist Cuisine are also trying their hand at 3D printing with sugar.
3D printing with glass
Glass has been popular in many industries for many years and is also used in additive manufacturing. Several researchers, such as those at MIT or Lawrence Livermore National Laboratory (LLNL), have developed 3D printing solutions to print on glass. For example, an MIT team has developed the G3DP2 machine, which can process 5 kg of glass per hour. With this machine, the researchers were able to create three-meter-high glass columns at Milan Design Week. Recently, the Glassomer startup has also unveiled its glass 3D printing technology. The company is developing a material made from fine glass powder and a plastic binder that can be processed on SLA printers.
Photo: Glassomer
Recycled plastic filament
Sustainability is gaining more and more attention in additive manufacturing, and many companies are looking for alternatives. In recent years, several exciting products have been developed to make 3D printing more sustainable by making filaments from recycled plastic. One such project is Print The City by The New Raw, in which plastic from the waste of the people of Amsterdam and Thessaloniki is turned into 3D printed filament and used to print benches and other outdoor furniture. Another initiative is the Million Wave Project, which aims to produce recycled PET filaments for 3D printed prosthetic limbs for those in need. Another example is the ZUV tricycle, which was printed in Austria by EOOS using filaments made from 70kg of plastic waste from supermarkets in Vienna.
Photo: New Raw
Ivory Inspired 3D Printing Material
Among the many materials used for 3D printing, there are some that have been specifically designed to meet specific requirements and solve old problems in an innovative way. One such material is Digory, which was developed by the University of Vienna in collaboration with Cubicure GmbH to meet the need for the restoration of ancient ivory monuments and objects. It is a synthetic resin containing calcium phosphate particles and silica powder. Researchers have developed this new material with ivory-like characteristics and properties to restore objects using 3D printing or SLA technology. The similarity between these two materials is striking - there is almost no difference!
The Digory material on the right is very similar to the real ivory on the left (photo courtesy of Vienna University of Technology).
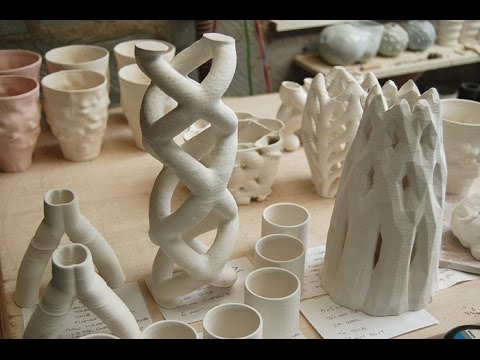
Clay as a greener material for 3D printing
One of the unusual 3D printing materials that has certainly attracted attention in recent years is clay. Technically, this is a subset of ceramic 3D printing that, although difficult to print, is known for its incredible properties, in particular the use of clay was especially popularized by the work of the Italian company WASP. For example, we recently saw WASP and Honda use 3D clay printing to create greener vehicles. There are many other uses, although many of them focus on sustainability due to the clay's properties. This can be seen in projects such as archiREEF terracotta tiles for coral restoration in Hong Kong, or 3D printed clay containers designed to reduce food waste.
Photo: Jonathan Keep
Diamond - 3D Printing of the Hardest Material on Earth
It may surprise many that one of the hardest materials on Earth, diamond, can actually be printed. Back in 2019, Sandvik Additive Manufacturing announced the first ever 3D printed diamond composite. It is not shiny, but will allow manufacturers to 3D print super-hard material, which will help revolutionize, especially in the tool industry. Diamond is often used in industries such as mining and drilling, machining, and medical implants, especially for its wear-resistant properties, but it is difficult to process. Sandvik claims that this breakthrough in composites will now allow very complex shapes to be 3D printed, and the company has high hopes for its use in the near future.
Human cell printing
When it comes to 3D printing in the medical sector, people often think of bioprinting. In bioprinting, cellular structures, including human structures, are made from bioink loaded with stem cells. As with conventional 3D printing, the biomaterial can be applied layer by layer to create things like skin, tissues, bones, and even organs. Although it is still in its infancy as a technology when it comes to creating viable long-term solutions, we have already seen a number of interesting projects using this technology. Notably, the researchers have been experimenting with 3D printing of organs, including the heart, kidneys, pancreas, and liver. Others have also developed a way to bioprint using ceramics and bioink to recreate bones in the human body.
Source
ANIMAL MOTHERS for 3D printing, 3D printing, 3D printing, ceramic 3D packets, thread for 3D printing, 3D printing sugar, 3D -glass printing, ash material 3D printing, chocolate 3D printing, salt 3D printing
Best files for Jonathan・Cults 3D printers
Figurine au 1 4 Jonathan, fusilier et parachutiste de l'armée de l'air Version V2 OpenGIJOEActionFigure
Free
Eleven "Strange things
2. 99 €
Jonathan Byers Stranger Things
2.99 €
Doctor Victor Von Doom // Fantastic Four
0.70 €
Figurine au 1/4 Jonathan, fusilier et parachutiste de l'armée de l'air OpenGIJoeActionfigure
Free
Figurine au 1 4 Jonathan, fusilier et parachutiste de l'armée de l'air
Free
JoJo's Bizarre Adventure Stand Arrow
5 €
Mjolnir (Mighty Thor) - fan art
9.76 €
Jonathan Archer Giant Figurine
Free
Jolyne Kujo // JoJo's Bizarre Adventure ( Stone Ocean )
0.70 €
Jonathan Joestar - Yotaro Kujo
15 €
JONATHAN DAVIS (KORN)
8. 33 €
John Walker Captain America Helmet - High Quality Model - Marvel Comics
38 €
JoJo's Bizarre Adventure Jotaro
4.88 €
Tinkles // Hotel Transylvania 4
0,70 €
JONATHAN letters
0,50 €
Kira Yoshikage Bust - JoJos Bizarre Adventure Statue

 The auger screw fits snugly down the middle while being free to turn. I use different sized screws depending on what scale of printer and size of extrusion or nozzle I intend to use. If the screw bore is too big it is easy to get pulsing in the extrusion that textures the print surface. If too small you do not get enough flow or the motor is turning so fast it heats up over a lengthy print. My judgement for these decisions is not very measured but a mix of intuition and suck it and see, combined with what parts I can source easily.
 Four lengths of M3 threaded rod are bolted into the stepper motor to connect the motor to the nylon body. The length of these are determined by the beam coupling that is used to connect the motor drive shaft to the auger screw. (Different sized beam couplings are available). A hose clamp is used to clamp the M3 spacer rods to the nylon body cylinder. The nylon body cylinder is the same diameter as the glue gun extruder of the original JK Delta design so that it could be interchangable. If this is not necessary a body diameter of around 40 – 45 mm is a good idea so there is enough body material to drill the holes necessary for the auger screw and clay inlet pipe. Also this diameter of body cylinder can be securely attached to the printers printhead plate. I have varied the nylon cylinder length depending on the weight of auger - between 50mm for a small 6mm screw and 70 mm long for a larger 8mm screw. The screw length is determined by the length of the body cylinder. I aim to have the tip of the screw ending as close to the nozzle as possible.
 Obviously a hole the diameter of your screw is drilled in the vertical centre of the nylon body cylinder. (A wood drill bit will do this)
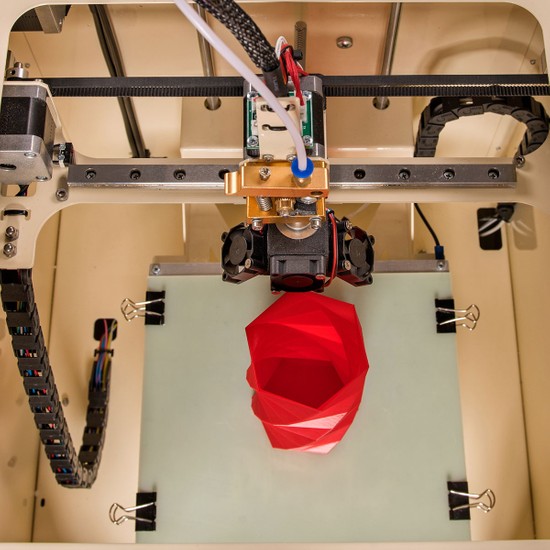 I use this as I believe it to be more slippery than softer types of plastic pipe. Watch that you get 10mm inside measurement or the pipe is too stiff - a down side is this pipe does tend to kink.
 The central hole is drilled bigger and a ¼” tap used to create the thread. This gives the option of attaching a male Luerlock fitment that will take the range of Luer Lock dispensing tips or larger ¼” dispensing nozzles. I do like a metal nozzle tip so I customise my own nozzles. Nozzles will range from 1.2mm up to 4mm with 2.5mm being my standard.
 To improve the efficiency I grind the tread deeper with an angle grinder and then cut the screws to the required length.
 They are 313mm long with a 1/4" NPT (6mm) female threaded outlet. The connection to the auger printhead is made with a 250mm length of nylon pneumatic airline pipe of 12mm OD/10mm ID. At my local plumbing supply I found a short length of brass 1/4" threaded tube that makes the link between cartridge outlet and nylon pipe.
 These are drilled and pinned to be held in place. A 40 mm length of threaded rod has been screwed into the top end end of each aluminium tube to take the securing nuts that hold the motor block in place.
 A metal square with a 8mm central hole is attached on the side away from the motor so the nut is kept in place.
 This board sits over the Arduino and along with the LCD screen makes up your electronic controller. On the ramps board there are connector pins and drivers, E0 and E1. E represents the feed rate in the gcode andit is the speed the material being printed is feed to the printhead. Plug the auger motor into E0 and the Ram motor into E1. Tune the motor driveres as required.
  This is found in Configuration.h, the only tab in marlin you should need to look at and is under ‘Movement Settings’. You are looking for #define DEFAULT_AXIS_STEPS_PER_UNIT {72, 72, 72, 100}. The bracketed numbers denote the X,Y,Z,E0/E1 number of steps. By changing the E0/E1 steps from 100 to 200 the auger and ram will turn twice as faster.

 The difference of clay consistency on surface quality and print capability is observed as is the addition of additives to improve these qualities.
  For good or bad we cannot avoid the influence computers are having in our society and on our lives. In this article I look at how computers and computation are being used in the pottery studio and how this could change the way we think about pots.
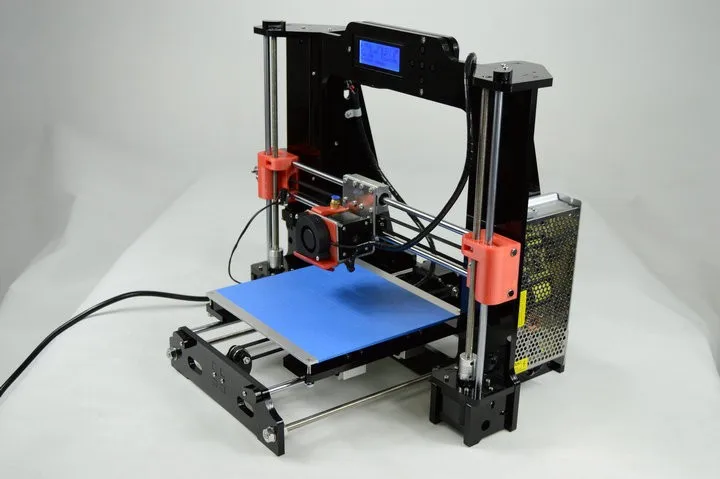 The equipment is available to students and staff across the whole art school and so the printers are still well used and the technical staff are kept busy supporting projects from outside of the department.This trend is not uncommon, where I have found more interest for ceramic 3D printing coming from creative practitioners who would not consider themselves clay specialists. I fully understand the situation as most people specialising in ceramics do because they like making things with their hands. However I still believe that it is important that the use of computer aided technology is introduced to clay specialist students in their education so they are aware of what tool sets are available – for conceptually and technical reasons.We had a visit from Prince Charles during the course. Pictured with the Prince is Nico Conti, a second year student who has continued to explore 3D printing and the use of custom nozzles and chaotic structures.
 This was the description for the workshops that I presented for The Academy of Fine Arts,‘Mario Sironi based in Sassari Sardinia. The Accademia Sironi has established an Art Lab at Mas.Edu museum in Sassari to serve students and the local creative community.
 Production combines automation and high manual skill to maintain quality, while material development in the form of their special SaphirKeramik clay body enables them to produce thin but robust shapes. Design, material and process are all important to this innovative company.
 I would like to thank everybody who so generously supported this all too brief exhibition.
 My one comment would be that it is a pity that the build width is not 60 cm but I appreciate that if it was the machine would not fit through a standard door and not be as portable as it is.
 Selected from an open application participants came from architecture, design, the fine and applied arts.
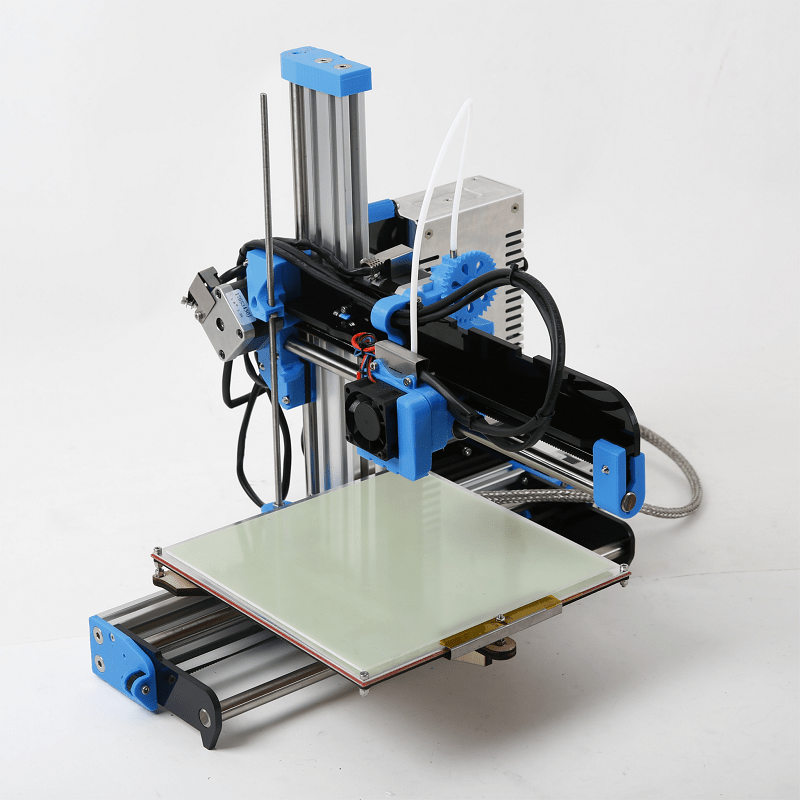 Participants then got on with making a start at printing projects that they had pre-prepared so that by the end of day one we had some understanding of the capabilities of the equipment and where individual’s interests lay.
 Participants shared a self catering accommodation and while I am sure this was intense the exchange of ideas continued with laptops spread across the dining room table and computer work going late into the night.
 In the meantime, there are many alternative materials that are not only unusual, but can make a 3D printed part even more special. In our selection, we introduce you to these unusual materials. From chocolate and salt to recycled plastic waste or ashes, now you can create the most extraordinary items. In some cases, these materials are even proving to be a great alternative to plastic, reducing overconsumption and the associated environmental impact. Today we're going to take a look at these amazing 3D printing materials.
 The popularity of this technology has grown over the years, prompting many companies to develop various designs and even chocolate 3D printers. Among the best known is the collaboration between 3D Systems and Hershey's, one of the world's largest chocolate makers. We also featured some 3D printers that can make delicious sweets like mycusini or Print2Taste. If you want to know more about this technology, don't miss the video below.
  Undoubtedly, 3DMemories with its range of jewelry is an exceptional way to remember a loved one.
  The company says the composite is not only a sustainable alternative to traditional filaments, but also offers the ability to achieve different shades of brown by applying different print settings. This can be achieved simply by changing the print temperature during production. As for the finish, the manufacturer recommends sealing the printed parts with UV protection to keep them intact for as long as possible.
  While The Sugar Lab is the most famous company using sugar as a printing material, other companies like The Modernist Cuisine are also trying their hand at 3D printing with sugar.
  In recent years, several exciting products have been developed to make 3D printing more sustainable by making filaments from recycled plastic. One such project is Print The City by The New Raw, in which plastic from the waste of the people of Amsterdam and Thessaloniki is turned into 3D printed filament and used to print benches and other outdoor furniture. Another initiative is the Million Wave Project, which aims to produce recycled PET filaments for 3D printed prosthetic limbs for those in need. Another example is the ZUV tricycle, which was printed in Austria by EOOS using filaments made from 70kg of plastic waste from supermarkets in Vienna.
  It is a synthetic resin containing calcium phosphate particles and silica powder. Researchers have developed this new material with ivory-like characteristics and properties to restore objects using 3D printing or SLA technology. The similarity between these two materials is striking - there is almost no difference!
 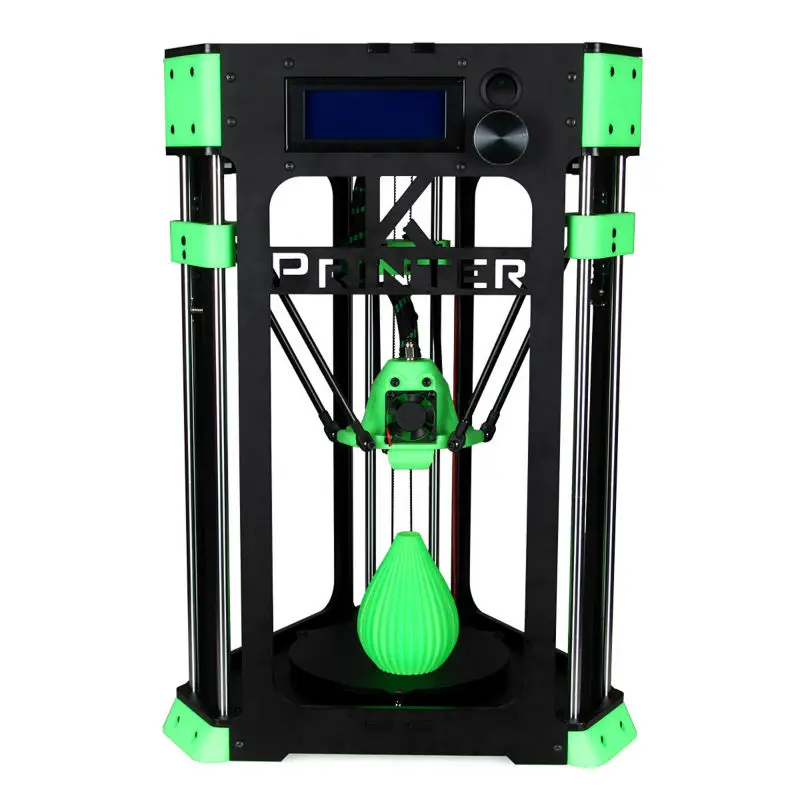 This can be seen in projects such as archiREEF terracotta tiles for coral restoration in Hong Kong, or 3D printed clay containers designed to reduce food waste.
 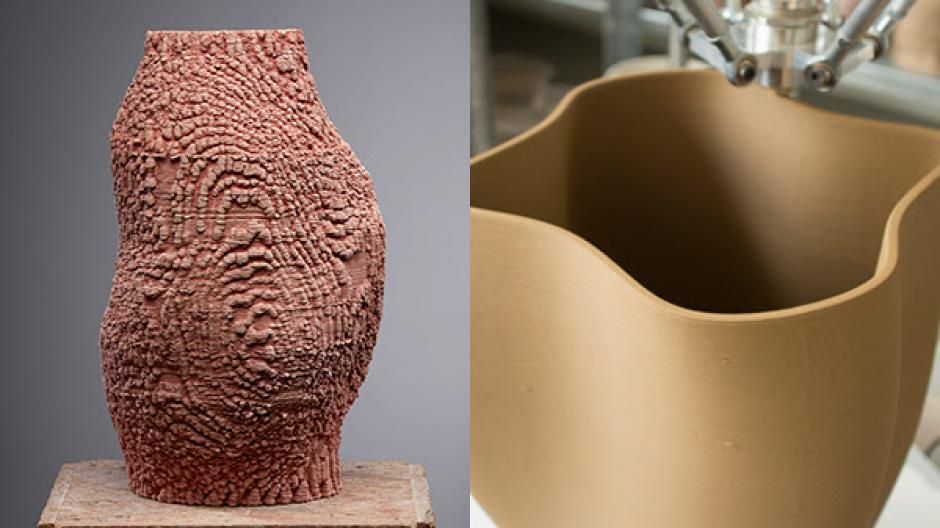 In bioprinting, cellular structures, including human structures, are made from bioink loaded with stem cells. As with conventional 3D printing, the biomaterial can be applied layer by layer to create things like skin, tissues, bones, and even organs. Although it is still in its infancy as a technology when it comes to creating viable long-term solutions, we have already seen a number of interesting projects using this technology. Notably, the researchers have been experimenting with 3D printing of organs, including the heart, kidneys, pancreas, and liver. Others have also developed a way to bioprint using ceramics and bioink to recreate bones in the human body.
  99 €
99 €  33 €
33 €