Isopropanol 3d printer
Effect of disinfectant (70% IPA) on common 3D printing materials — CNC Kitchen
This is the biggest 3D printing material comparison I’ve done so far, but let’s start from the beginning. So, we’re probably all going through quite a rough time at the moment. Many of us are afraid of getting sick and I gotta be honest I’m also a bit of a germophobe myself. During the last days and weeks there have been popping up quite a lot of designs of tools that try to, for example help us open things like doors without directly touching them. There is Materialise’ hands free door opener or a ton of different safe door opening hooks and plenty of other stuff around. Also, there is currently a huge initiative around 3D printed face shields being established. Even though I highly appreciate these efforts, I’ve been asking myself if 3D printing is the right technology for these applications. If you don’t have single use items you might need to consider to disinfect them in some way in regular intervals, because people are for example encouraged to sneeze into their elbows but then use the same part of their arm with the door opener. Even though the door opening hooks are designed for minimum surface contact you still touch the handle then put it into your trouser pockets and finally you use it on the next door, theoretically transmitting germs. So wiping these parts with common disinfectants or even submerging them is something that came up in my head. But how are our 3D printed materials affected by that? Are they getting weaker or even brittle over time? I don’t know so that’s why I 3D printed samples in probably the 10 most common materials, submerged them for 48h in 70% isopropyl alcohol, checked their dimensions and weight and most importantly tested the change in their strength. Just as a disclaimer, I can’t say anything about the effectiveness of this or other disinfecting methods, I’ll only try to find out – if you’re using this method, will it affect you part integrity. With their layer lines, pores and cracks, FDM 3D printed parts are very hard to clean so consider if it’s safe what you’re doing!
3D printed test samples
For this test I chose 70% IPA because this is the substance that you can find in the most common disinfectants and is effective against the current threat. I have already purchased a UV-C lamp with which I want to perform the same tests if there is enough interest. So if you want so see more, let me know and also be sure that you’re subscribed to not miss that. If you have any comments on the procedure also leave a comment below!
The materials that I will be testing are PLA from RedLine filaments, Hobbyking HIPS which is High Impact Poly Styrol, Prusament ASA, eSUN ABS, TPU from Extrudr, DasFilament PETG, Formfuturas Centaur PP filament, Hobbyking Premium Polycarbonate, PA12 or Nylon from Fibrthree and also standard blue resin from Elegoo. I did also include a resin because I think that due to its smooth surface in comparison to FDM 3D prints it might be easier to clean and therefor being better suitable for the intended application. Though I need to point out, that I’d be very hesitant to use regular resin 3D prints in any medical application at the moment due to the outgasings and allergy risks that you have with this material if it’s not certified for medical applications.
I 3D printed tensile test dog-bone specimens both lying on the bed and also vertical to see if and how layer adhesion is affected by the disinfectant. I’ll test one horizontal part and 3 standing parts for each material and condition. The parts were all printed on my two original Prusa i3 printers of which I have one in the Whambam hotbox which makes printing higher demanding materials a little bit easier due to the raised temperatures. Most parts printed without a problem, I think I just had some moisture problems with the TPU and also the nylon. I cleaned up the TPU parts but had to scrap the layer adhesion samples of the PA12 because they already failed while touching.
Print settings overview
Then I sacrificed, in the name of science, some of my isopropyl alcohol that is currently probably as valuable as fine whisky and mixed it in a 70/30 ration with distilled water. I separated the samples into two batches and weight plus measured them to monitor the effect of the liquid on the parts. After that I tossed the parts in the IPA mixture. I checked on the samples after 12, 24 and 48h always measuring and weighing them. The reason I treated the parts for so long and not only doing the 30s soak was to amplify the effect to a measurable level and to simulate a long-term use of the parts. This is very common and Formlabs for example lists their solvent compatibilities also in a kind of similar way.
Samples in 70% IPA
In terms of looks, none of the parts was really affected by the bath, only TPU really showed a major change because not only did the sample become crocked, it also grew in length. A good indication that something changed. Taking a look at the weight of the parts also confirmed that observation because it gained 6% in weight. All other parts only got less than 1% heavier only the resin part also gained 2% in mass. PETG seemed to be the least affected with only 0.16% increase.
Change in weight over time in 70% IPA
Next we get to the more interesting tests and this is the structural integrity. You may have noted that the samples look a little different to what I used in the past. I designed them to be easier and quicker testable due to the sheer amount of tests that I had to perform. The new samples mostly worked fine, only some samples showed some issues that I will point out later. I measured the test section and then loaded the specimens one after the other into my universal test machine and then pulled them at a consistent speed until they failed.
Let’s take a look at the results. I’ll start with the weakest and we’ll work our way up to the strongest. All results are by the way also available on my website if you want to take a second look at the graphs.
The horizontal PP specimen was the weakest and it failed at 14.4MPa but the part out of the IPA bath was just as strong with 14.6MPa. Both samples didn’t fail and were very stretchy. Unfortunately, I just noticed during testing that the standing specimens were not printed with 100% infill why we can’t compare the two printing orientations but I’ll update these values on my website as soon as I retested them. Though also these results, soaked and unsoaked were basically the same. So PP doesn’t seem to be affected by the disinfecting solution which the material is actually known for and I for example had 3D printed trays in my IPA bath for resin prints for ages and never saw them degenerate.
Next, we get to HIPS. Here the horizontally printed parts didn’t seem to be affected by the soak and both were able to bear 25MPa of stress before failing. The standing parts unfortunately showed two inconvenient failures where the parts broke at the lug and not the test section which render these results useless. Though the remaining values also seem to be very similar and lets us conclude that also HIPS is not affected a lot by the water and isopropyl alcohol mixture.
HIPS sample in Universal Test Machine
Next come the resin parts that I printed on the Elegoo Mars and tried to cure them as equally as possible in my makeshift curing station. I only printed standing parts because resin prints, even though maybe not 100% isotropic, don’t show layer adhesion problems similar to FDM prints. The resin parts showed an increase in weight during the bath, so we could expect that something also changes in the strength. The parts ripped very cleanly in the middle. The untreated parts were able to bear 38MPa of stress, the soaked once considerably less with only 28MPa which is a reduction by 26%. So we definitely see an effect here!
Let’s now take a look at ABS which I, at first, didn’t have in my comparison because I though ASA is the new replacement for it but then realized that probably more people still have ABS instead of ASA at home. The untreated, horizontal specimen was able to bear 42MPa, the one after the treatment only 33MPa which is a reduction by 22%. The parts printed standing suffered even more because their strength reduced by more than 50% from 18MPa to 8MPa.
Next let’s check ASA which I at first assumed behaved like ABS. The horizontal parts failed at 48 and 46MPa which is very close. Unfortunately all standing and untreated parts failed at the lug though their strength was a little bit higher than the ones that were in the disinfectant bath. Even though the difference is not high, it can be assumed that the bath had at least a little effect on the material, but it seemed to be less affected than ABS was.
TPU behaved a little differently. This was the material that gained the most weight during the IPA bath and felt softer afterwards. If water, IPA or both seeped into that material is something that I don’t know. Due to the rubberyness of the material I had to stretch it a lot until it finally gave way. The untreated one was almost able to bear 50MPa, the disinfectant treated one only around 30, but still remarkable! The parts printed standing were not able to stretch quite as much but sill a significant amount and failed at 23 and 11MPa on average. So the disinfectant seemed to have a very noticeable effect, not only in strength but also in stiffness, though I think it didn’t make the material unusable.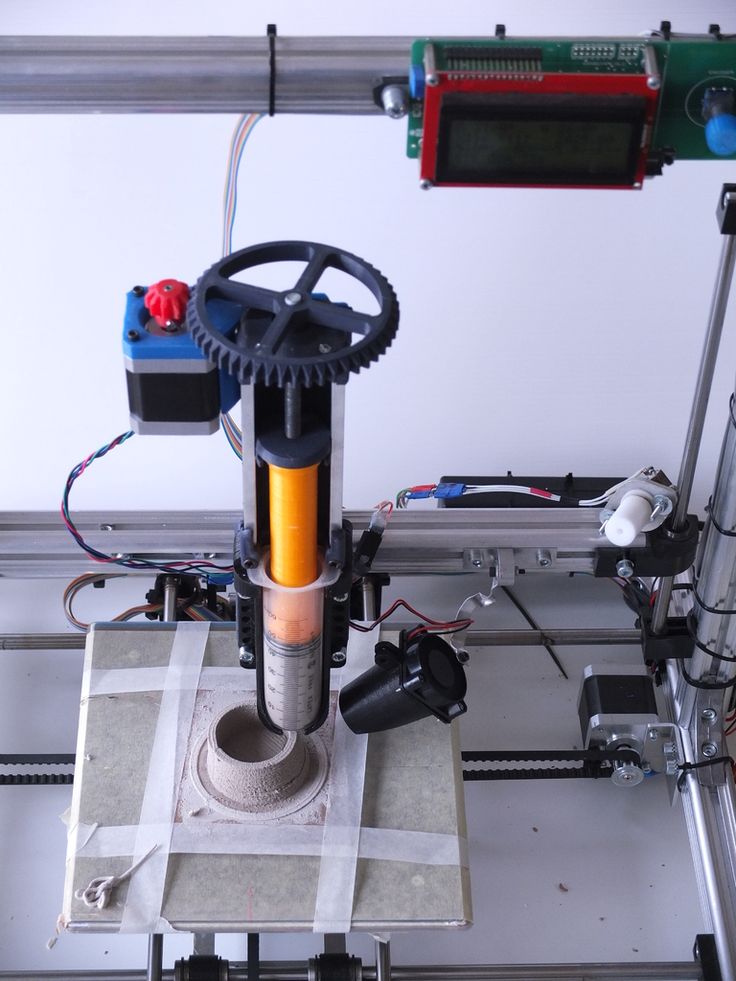 Though maybe consider that in your design.
Next came the probably second most common 3D printing material, PETG. The parts printed lying failed at 58 and 50MPa so the strength was reduced by the 48h in the solvent bath by 13%. The layer adhesion samples failed at 23 and 21MPa, so a strength reduction of 7%. The effect of the disinfectant seems to be measurable but it’s not highly detrimental.
The third strongest material was PLA with a horizontal strength of 60 and 57MPa, so a reduction of 5%. The layer adhesion samples seemed to be unaffected and all failed at around 35MPa so the effect of the IPA and water seem to be negligible.
Next came a very surprising contestant. I haven’t printed pure polycarbonate in the past but at least with the small samples and in the Hotbox, printing was no issue at all and the parts came out very clear. A material I definitely need to use more, especially due to it’s strength of 67 and 66MPa. The layer adhesion samples unfortunately mostly failed at the lug so the results are not really usable. I’ll update these values on my website as soon as I retested them. Still, it seems that PC also doesn’t seem to be affected a lot by the disinfectant and might be additionally interesting since it’s able to withstand temperatures up to 140°C.
The strongest material was the PA12 from Fiberthree that I had laying around that was able to bear an astounding 85MPa printed horizontally and dropped to 74MPa after the IPA bath. Unfortunately, because I wasn’t able to properly dry it on time, I wasn’t able to provide layer adhesion values though the drop of 13% in strength seems to be reasonable.
Tensile Strength of 3D prints before (blue) and after (orange) 48h in 70% IPA (grey: unusable)
In summary we have seen that there are some 3D printing materials that are more affected by the disinfecting solution than others. Even though some materials were degraded quite significantly, none of them got brittle to the point that it was not usable anymore and the 48h of submersion was quite significant. Still it shows that you should always think about which material is suited for the specific application because some environment conditions might have a bigger influence on the results as this isopropyl bath. I’m honestly quite excited about the results from the UV exposure test. If you have other ideas what I could check out then let me know in the comments!
Relative change in strength after 48h in 70% IPA
Stefan Hermann
0 LikesIsopropyl alcohol (IPA) Used for Post-processing of SLA 3D Printing
Estimated reading time: 2 min
Isopropyl alcohol (IPA) dissolves liquid resin, making it effective for washing parts printed on Formlabs SLA printers and for cleaning resin spills. Wash prints with IPA using the Form Wash or the Finish Kit.
NOTE:
Most Formlabs resins can be washed in IPA with a concentration of 90% or higher. Biocompatible Formlabs resins require IPA with a concentration of 96% or higher.
Isopropyl alcohol is a highly-volatile, flammable, colorless, clear liquid with a strong smell.
Isopropyl alcohol is known by different names depending on location and distributor:
- Isopropanol
- 2-propanol
- Rubbing alcohol
- Surgical spirits
NOTICE:
Formlabs does not manufacture isopropyl alcohol (IPA). Always consult the safety data sheet (SDS) from your solvent supplier as the primary source of information for storage and handling.
Handling IPA
DANGER:
Always consult the safety data sheet (SDS) from the IPA supplier as the primary source of information. IPA is flammable and should be used and stored away from ignition sources. Store small quantities of IPA in appropriately labeled and sealed containers.
To handle IPA safely:
- Wear disposable non-reactive gloves (nitrile or neoprene) to handle IPA.
- Work in a well-ventilated area.

- Transfer IPA from larger containers with a siphon pump to avoid overfilling the wash bucket or other container.
Cleaning an IPA spill
Spilled IPA presents an immediate fire and health hazard. IPA spills must be cleaned up immediately. Use only disposable supplies to clean up an IPA spill to avoid risk of fire.
To clean up an IPA spill:
- Put on a pair of disposable nitrile gloves.
- Absorb excess IPA with paper towels.
- Clean up any remaining residue using wet paper towels.
- Dispose of any tools used to clean up the spill (paper towels soaked with IPA, gloves coated in IPA) with hazardous waste according to local regulations.
Recycling or disposing of used IPA
Over time, IPA accumulates dissolved liquid resin, which reduces its efficacy. For best surface quality, replace IPA when the O-ring of the hydrometer rises above the float’s tall wings.
Disposal
To safely dispose of contaminated IPA:
- Consult the safety data sheet (SDS) from the IPA supplier as the primary source of information.

- Research your local regulations for hazardous waste disposal. This will most likely involve hiring a waste disposal service. For smaller amounts, check with your local waste disposal service to see if they have any suggestions for removal.
- Inform your waste disposal service that your bottle contains IPA with small amounts of methacrylated monomers and oligomers (unpolymerized plastic resin) and trace amounts of photoinitiator. Have a copy of the Formlabs resin safety data sheet (SDS) on hand in case the disposal service attendant needs more information.
NOTICE:
Do not pour liquid or partially cured resin into drains or dispose of it with household waste. Do not pour isopropyl alcohol (IPA) that contains dissolved resin into drains or dispose of it with household waste. Safe and appropriate disposal methods of used IPA vary by location.
Recycling
For large volumes of IPA, consider using a solvent recycling system, which offers a cost-effective and more environmentally responsible alternative to paying for waste solvent disposal services. Solvent recycling systems use distillation and fractionation processes to remove solutes from waste solvents, making it possible to reuse the IPA to wash parts. The recycled IPA may still have small amounts of monomer in it. Recycling IPA reduces waste disposal costs, emissions that are required to produce solvents, and the cost of purchasing IPA.
Tags: 3D printing IPA post-process sla
Was this article helpful?
Like 0 Dislike 0
Views: 1466
Preparing to Print on the Form1+ 3D Printer
Congratulations on your purchase of the Form1+ 3D Printer from Formlabs! The first step to realizing your ideas is to prepare your computer and set up your printer.
Download and install the PreForm software package, a tool for importing and processing digital 3D models.
Windows Users:
Windows XP and above are supported. Installation order:
1. Run PreForm_setup.exe after download.
2. Follow the instructions on the screen to complete the installation.
For optimal software performance, make sure you have the latest graphics driver installed.
Mac users:
Supports Mac OS X10.6.8 and later. Installation order:
1. Run PreForm.dmg after download.
2. Accept the terms of the user agreement. nine0011
3. Drag the PreForm to your applications folder.
So, your first 3D print is close, but first you should familiarize yourself with the safety precautions.
The Form1+ 3D Printer is a CE-certified tool that, when handled with care, can create amazing high-precision products. Like any other professional equipment, this device requires a respectful and careful attitude, preparation of the workplace and compliance with safety regulations. Custom changes to the printer device without the control of Formlabs may void the warranty, damage the device, and more importantly, may cause personal injury. nine0004
Laser
Form 1+ is a Class 1 certified laser product that is safe for human eyes. The laser diode has the following specification:
Semiconductor laser diode: Violet (405 nm)
Output power: 120 mW
Never remove the front and back of the printer. Doing so will put you in danger and will also void your warranty. The laser beam itself is extremely dangerous to the eyes, avoid eye contact with the laser. The Form 1+ contains an automatic laser cut-off system when the orange cover is raised. If this system malfunctions, you may be exposed to the laser beam class 3B .
Photopolymer
Photopolymer resin should be taken as household chemicals. Take prudent precautions and follow Formlabs guidelines. Wear gloves when handling liquid photopolymer. The photopolymer is not intended for contact with food and drinks, as well as for medical use with the human body. You can find more detailed information in the description of the materials or in the user manual for the photopolymer.
Isopropyl alcohol
Use appropriate precautions when using isopropyl alcohol. Isopropyl alcohol is a highly flammable, explosive substance.
Keep isopropyl alcohol away from heat, flames and sparks. All isopropyl alcohol containers should be closed when not in use. It is recommended to use protective gloves and work in a well-ventilated area. Formlabs does not manufacture isopropyl alcohol. For a more complete application guide, check with the chemical supplier. See the Form 1+ Isopropyl Alcohol Guide for more information. nine0004
Sharp tools
Set includes tweezers, scraper and sharp wire cutters. Guard your fingers in the direction of application of force to the tool on a slippery platform coated with liquid compound.
Babysitting
Form1+ is a great learning tool. Help young and inexperienced users to safely and enjoy the operation of this equipment.
Electromagnetic Emissions
This equipment has been tested and found to comply with a Class A digital device, pursuant to Part 15 of the FCC Rules. These limits are designed to provide reasonable precautions for the safety of personnel and the operation of the device in a commercial environment. During operation, the device generates, uses and radiates vibrations of the electromagnetic environment. Which can adversely affect the operation of electronic devices. Operation of this device in a residential area is likely to cause adverse effects and in this case, the user of the device is fully responsible for the consequences. nine0004
Below are the main items included in the package and which consumables must be purchased separately.
Your Form 1+ printer will come in three separate boxes of different sizes:
1. The Form 1+ printer itself is in the largest box.
2. Form Finish Kit - Supplied in a medium size box.
3. Liquid compound in a 1 liter container packed in a small box.
To continue working with the printer, you will need the following equipment, which not included:
1. A personal computer running a supported operating system.
2. Isopropyl alcohol (90% or more, 2 liters to start)
3. Extra supply of disposable gloves (latex, nitrile or neoprene)
4. Disposable paper towels
5. Fine comb
6. Inspiration and desire to start working with printing.To maintain the equipment, we also recommend stocking up on the following:
1. Acrylic cleaner.
2. Cleaning liquid for optics.
3. Can of compressed air for cleaning optics.
4. Non-fiber wiping cloth.
The Form 1+ interface is extremely simple - just one button. But this button can serve a variety of purposes. This video tutorial shows you how to turn the Form 1+ on and off, how to confirm the start of printing, how to pause the current print, continue the paused print, cancel printing, and check the firmware version. nine0004
Now that the printer is unpacked and you have made sure that all parts and accessories are in place, choose a convenient location for the Form 1+ and get ready for the first print!
Selecting a location for your
Form 1+ printer does not take up much desk space and is quiet enough. In order to start the printing process, you need to connect the printer to the computer, the device can be disconnected from the computer as soon as the file transfer is completed.
Place Form 1+ on a level surface. If this simple requirement is neglected, the risk of compound spill increases. Form 1+ operates at room temperature (18-28°C).
Try to position the printer so that it is not exposed to both direct sunlight and additional heat from outside.
Power on the Form 1+
1. Connect the power cable to the power supply and connect the power supply to the Form 1+
2. Plug the power supply into a power outlet.
3. Press the button on the Form 1+ to turn on the printer.
4. Connect the USB cable to the printer and the other end to the computer
When the printer is recognized by the operating system and is ready for use, the Form button in the PreForm program will glow orange.
Install the resin tank and print platform
Slide the resin tank into the hopper until it clicks into place. Then slide in and lock the print platform by pushing down on the tab. nine0004
When removing the resin tank, always remove the build platform first to avoid spilling liquid into the printer.
Finally, fill the resin tank before printing. Congratulations! You are closer than ever to turn your ideas into reality!
How to wash photopolymer models?
Washing and Post-Processing Resin
How to Wash Resin Models and Final Curing
The final surface quality and mechanical characteristics of the model are 80% dependent on how well you do the processing of the model after printing.
Washing
After printing, the model must be washed immediately. Isopropyl alcohol (isopropanol) or ethyl alcohol (ethanol) diluted to 40-60% is great. It is possible to use a universal cleaning solution, such as TEK1960. Always dilute alcohol Undiluted alcohol can damage delicate parts and the surface of the model. nine0004
Thoroughly rinse the model in alcohol, rinsing vigorously for 1-2 minutes. Next, use a soft toothbrush to clean up any remaining material.
Use an ultrasonic cleaner (bath) to achieve the best cleaning results. Put the model in the sink for 2-3 minutes at a power of 40-60 W, then dry it. Intermediate drying is necessary so that the photopolymer resin product absorbs as little alcohol as possible. After drying, repeat rinsing, also 2-3 minutes.
If the model is left in alcohol for more than 5 minutes, it is possible to partially wash out the polymer between the layers, since the material is not yet completely cured - a barely noticeable network may appear on the surface of the model. nine0002
Drying and warming up
After washing, the model must be dried. Ideally, with compressed air, a powerful hair dryer without heating is suitable at home. Pay special attention to drying hard-to-reach places such as small holes.
After drying, it is recommended to warm the product, this step further increases the strength. Warming up can be done by placing the model in a dry oven, or in any other oven capable of maintaining a temperature of 70-80°C for 30 minutes. This is necessary in order to evaporate alcohol from the surface layers of the model, as well as to remove stresses in the material that have arisen during the printing process. This step is especially important for models used in dentistry with direct contact with the patient. nine0002
Removing supports and blowing out
It's easier to remove supports before the final blowout. However, for large models, high-precision engineering parts, and hulls, it is recommended to remove supports after exposure, as this will increase the bending strength.