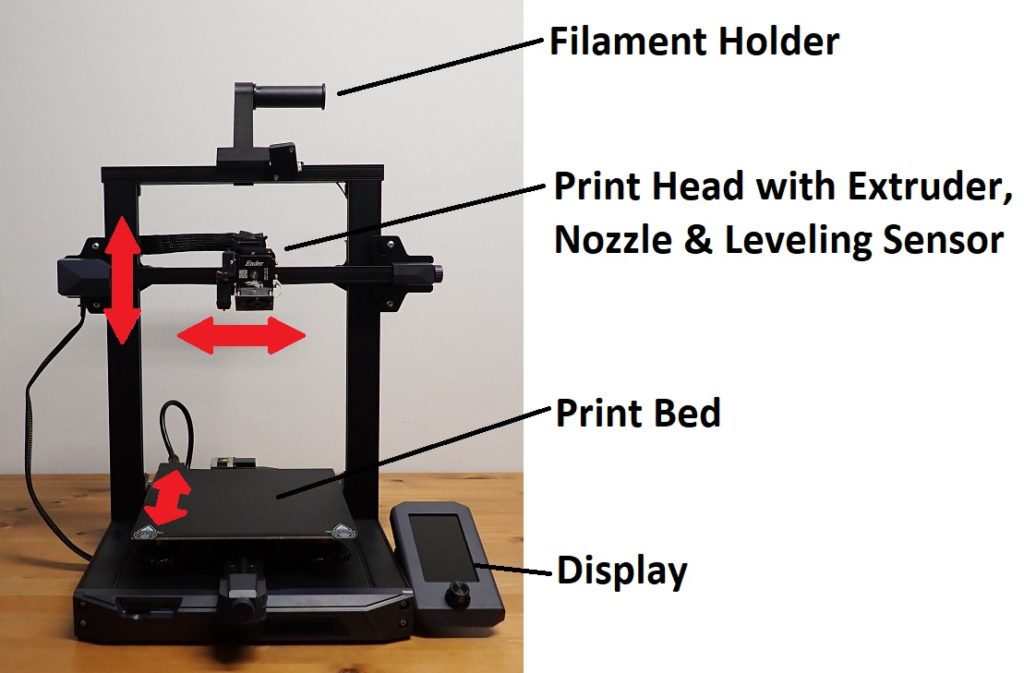
How to take filament out of 3d printer
How to properly change 3D printer filament?
Treat your printer nicely, and it'll print you nice models
When you are changing filament, did you ever experienced one of the following problems below?
- Filament stuck in the hotend.
- Need to use excessive force to pull out the filament.
- Having a hard time feeding the filament back in the right place.
- Having bad print result after changing filament.
If so. STOP! You are damaging your hotend. Not only you will have poor quality prints, one day your hotend will give up and stop extruding. I learned it the hard way and have to throw out few hotends. To avoid all this from happening all you need is to follow our step by step guide for changing filament. I promise you that you will be glad you take the time to read this article. This video show you how I change filament.
BotFeeder - How to properly change filament? 1280HD
Article you might be interested: How to properly print first layer?
Before you start you should have the below information and tools ready.
Information:
The extrusion temperature settings for both the current & replacement filaments (based on manufacturer’s recommendations)
Below is the BotFeeder temperature guide:
Material - Recommended Extrusion Temperature
- ABS - 150 to 260C
- PLA - 200 to 220C
- NEO-PLA - 188 to 200C
- Filaglow Glow in the Dark - 205 to 225C
- Filastic Flexible - 220 to 240C
- Filatron Conductive - 200 to 220C
- reFilactive Reflective - 230 to 240C
Tools:
- A pair of scissors
- A pair of tweezers
- Current filament
- Replacement filament
Removal of current filament
Step 1: Preheat your hot end based on the temperature guidelines of your current filament.
Step 2: Wait until the hot end heats up to the required temperature.
Step 3: Manually extrude a small portion of the filament.
- Unclamp the filament
- push the filament through the hot end until melted filament squeezes out from the nozzle.
 This process ensures easy extraction of the filament.
Step 4: Push down the coupling to release the filament from the hot end.
Step 5: Gently unplug the filament from the hot end.
Step 6: Clip off the blob-like end of the filament.
Step 7: Unwind the filament back to the spool holder.
- Unclamp the filament
- slowly wind them back on to the spool holder. Please note: secure the loose end at all times.
Step 8: Secure the loose end through the hole of the spool holder or by binding it with filament clip or tape.
Step 9: Remove the current spool.
LOAD REPLACEMENT FILAMENT
Step 1: Load the replacement spool on the filament slot.
Step 2: Preheat your hot end based on temperature guidelines of your replacement filament.
Step 3: Unclamp the filament and feed the filament through and up to the hot end.
Step 4: Prepare approximately 10cm of filament ready to be fed into the hot end.
Step 5: Wait until the hot end heats up to the required temperature.
Step 6: Start feeding the filament into the hot end until melted filament begins to squeeze out of the nozzle.
Step 7: Secure the coupling.
Step 8: Manually force down 3-4cm of filament through the hot end to flush out the old filament. Please note: flexible material may take more filament to flush out completely.
Step 9: Carefully clip off any excess filament from the nozzle with a pair of tweezers. Please note: do not touch the brass nozzle tip.
Step 10: Cool down your hot end.
How to Remove Broken Filament From Your 3D Printer – 3D Printerly
One of the most frustrating things in 3D printing has to be experiencing broken filament in your 3D printer’s extruder and not being able to get it out. You might have tried many solutions, but they just aren’t working.
That’s the reason I wrote this article today to help you solve this problem and learn how to remove the broken filament from your 3D printer.
The best way to remove the broken filament from your 3D printer is to take off the PTFE tube and pull the filament out manually. This should be easy to remove because the filament is still attached through the Bowden tube, but if not, it should be loose in the extruder, which can be removed with tweezers.
That’s the basic answer, but there is a little more to learn about why this happens in the first place, more in-depth solutions, and prevention methods for the future, so read on.
Causes of Filament Getting Stuck In PTFE Tube or Broken
Many people have had filament stuck in the PTFE Tube, so you definitely aren’t alone!
Some of the primary reasons that cause the filament to get brittle or broken in the tube are described below. Knowing the causes will help you to prevent this problem in the future.
- Mechanical Pressure from Curling
- Moisture Absorption
- Using Filament of Low Quality
Mechanical Pressure from Curling
The spool of the filament has to bear a lot of constant pressure of being straight because it was curled around the reel for a long time.
This is just similar to when you open your fist after being clenched with power, you will find that your fingers look curled more than usual. With the passage of the time, the filament can be snapped off in the tube because of the extra pressure on the filament.
Most of the filament broke during print that is placed in the spool or has a lack of flexibility can be affected in the same way due to extreme stress. The parts of the filaments that are held straight have higher chances of getting broke.
Using Filament of Low Quality
There are plenty of filament brands available in the market, some will have more flexibility than others depending on the manufacturing process.
New and fresh filaments show a high degree of elasticity allowing them to bend more easily but over time they begin to become more prone to breakage.
Looking at the quality of a big print, poor quality filaments that do not take care of uniform production are more likely to suffer the problem of getting broke.
Expensive filament is not always the best, you should choose a filament by evaluating the online positive reviews, comments, and rankings.
Moisture Absorption
Filaments usually absorb moisture that’s why it is recommended by the experts to keep the filament at a place where the absorption amount can be reduced.
Many 3D printer users prevent their filament from breaking by placing it into a large plastic bag that has a valve to pull out the air just like a vacuum.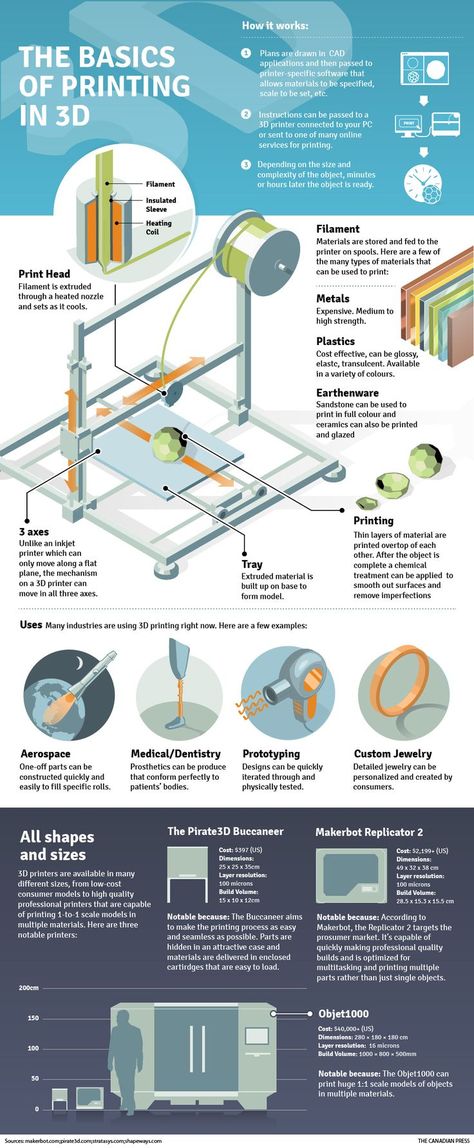
This is a great thing because it mitigates the chances of getting filament broke below extruder gear.
How to Remove/Unjam Broke Off Filament on 3D Printer?
There are two main methods to remove the broke off filament on the 3D Printer. The choice of method depends on the spot where it broke.
If the filament broke just along the edge of the PTFE tube, you should go for the first method where you try to remove the broken filament through the heat.
But if the filament spread 0.5 to 1 cm, try to reach the extruder filament pulley using the second method in which we remove the broken filament from the nozzle using tweezers.
Sometimes you might get filament in the heat break which can be a real pain to remove. One method that you can see in the video below uses a vice grip and a drill bit to push the filament out of the heat break.
You may find 3D printer filament stuck in the extruder of your Prusa MK3S+ or Anycubic 3D printer, but regardless of what machine you have, you can follow the tips in this article to fix the problem.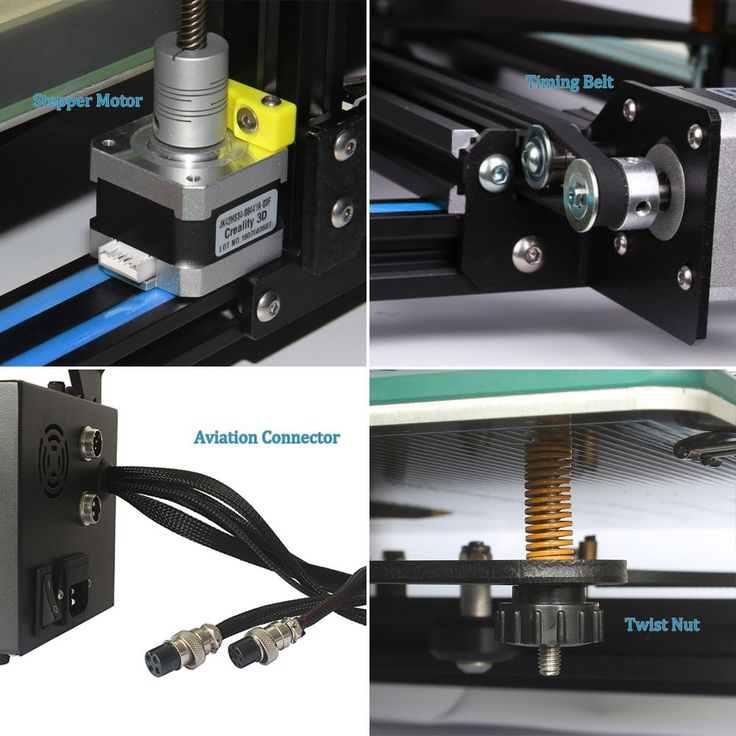 If you can’t pull filament out of the extruder, you want to make sure your nozzle is heated to normal printing temperatures.
After that, you should be able to pull the filament out of the extruder.
Take Off the PTFE Tube and Pull it Out Manually
Depending on your situation where the filament is broken, remove the Bowden from the print head only, or on both sides. Then heat up the nozzle to 200° and pull out the filament. That’s it, no need to do more.
You should first take the clips off the Bowden tube from both ends, then you can manually push or pull the filament out enough to get a firm hold of, then remove it.
Depending on how deep the filament is in, you may need to do some extra work.
You can remove the filament manually using any tool such as another piece of filament or a thin wire. The tool should be of 5 to 6 cm in length and 1 to 1.5 mm thin. Now:
Push the tool you have chosen from the top side of the extruder passing it through the extruder on the top of the broken filament.
Keep on pushing the tool until you see that all the broken filament has extruded and the nozzle is completely clear.
If the filament is broken at the spot where the filament cannot be removed using wire then you should:
- Heat up the nozzle up to 200°C.
- Handle the filament using tweezers or pliers.
- Pull out the filament slowly out of the extruder.
- Keep on pulling it until it is completely removed from the PTFE tube.
How to Remove Broken Filament from Ender 3
The Ender 3 is a well-known and reputable 3D printer that can be used by almost anyone, having amazing printing features without any hassle. It is popular because it is affordable, versatile, and highly customizable.
However, if you are new to Ender 3, the first thing people usually ask is how to remove the filament from Ender 3.
The easiest and most efficient way to get this job done properly is described below. If the filament broke in Bowden tube/extruder Ender 3, then removing it requires a lot of care.
At first, you will need to heat your 3D printer’s nozzle temperature to the usual printing temperature of the filament in the Ender 3.
You can set your temperatures within the 3D printer’s control panel.
Tap on the “Temperature” tab in “Control Settings” and then click on the “Nozzle” button and set temperature.
Wait till the hot-end reaches the desired temperature.
Now squeeze the Extruder lever to release the grip on the filament and pull out the first half of the filament if needed.
Next, you can unscrew the PTFE tube attachment that goes into the extruder with the gears, then pull out the other half of filament.
how to change, insert and eject
Modern 3D printing allows you to create objects and models of amazing complexity. However, the process requires experience and knowledge. Improper maintenance of the equipment, including changing the filament if necessary, may damage the device or result in loss of quality when printing products. In order to avoid such a problem, it is necessary to carefully study the nuances of the procedure before proceeding to change the filament. As a rule, for home 3D printing, plastic is used, which manufacturers have shaped into a filament, supplied in spools. It is about the replacement of this type of material that will be discussed in our article.
How to prepare the 3D printer for plastic replacement?
Since refilling is one of the most difficult tasks in 3D printing, it deserves more attention.
A key task for a user who needs to change the bobbin filament in their 3D printer is device preparation. The printer must be prepared in a strictly defined order:
- First of all, make sure that the device is connected to the computer with a USB cable. It is necessary to check how tightly the cord is inserted into the input jacks, and then check the operation of the device and its “visibility” to the system.
- Use the control panel of the 3D printer to start warming up the device to operating temperature.
 It is almost impossible to remove the old filament from an unheated printer without damaging the mechanism.
 - After the printer is warm enough, inspect the extruder outlet for visible damage and excessive drips, and prepare the necessary materials and tools for changing the spool.
How to remove the plastic?
When changing the filament, most of the breakdowns occur when the remnants of the old plastic filament are removed from the working head of the extruder.
IMPORTANT! Do not remove filament residue until the printer has warmed up sufficiently. Otherwise, the operating mechanism may be damaged and print quality may be noticeably reduced.
In order to remove the filament from the extruder, you will need:
- Turn on the heat of the 3D printer.
- Wait until the desired temperature has been reached. The temperature regime parameters must be set based on the characteristics of the replaced and refilled materials.
 For example, ABS and PLA plastics have different melting points, so replacement must be done as quickly as possible. When exposed to elevated temperatures, PLA deforms quickly and can clog the nozzle.
 - Next, if the installed software supports the reverse function, you must enable this option and wait for the thread to exit from the corresponding hole.
- If the software does not have a reverse function, you must manually clear the channel, cutting the old thread as close as possible to the outlet and inserting a new one.
- During the run, the plastic from the old spool will gradually come out of the extruder nozzle and the new filament will take its place.
IMPORTANT! When old material is replaced by new material during a run, it is recommended to adjust the head heating temperature based on the characteristics of the new plastic.
Replacing plastic
In order to replace the old plastic filament in the extruder with new material, you must:
- Remove the remnants of the old filament.
- Set the extruder head to Maintenance mode.
- Remove the channel tube by pulling it up.
- Pull the filament rod out of the extruder head by pressing the clamping mechanism and gently pulling the plastic filament up.
- Thread the end of the plastic filament from the new spool, loosening the pressure mechanism and gently pressing on the end of the rod.
- When new filament is threaded into the feeder, the channel tube must be returned to the extruder.
- The final stage is the drawing of the filament. It is recommended to eject 30 to 50 units of material by warming up the printer to the required temperature and immediately removing the ejected material. You can perform this action from the control panel by selecting a command.
- The signal that the replacement of the plastic filament in the 3D printer was successful will be the uniformity of the emitted material and the absence of streaks in the process.
Resuming work
In order to resume work after changing the filament spool, the 3D printer must be returned to its original position.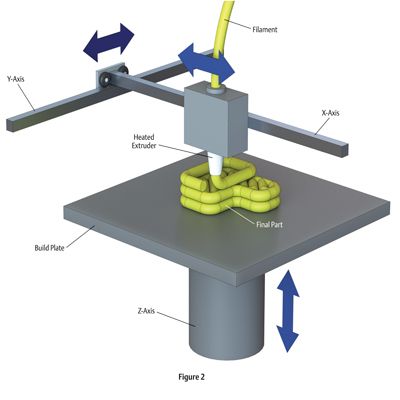 To do this, you will need to reuse the RepetierHost control panel section and the Home command.
In the event that all actions have been performed correctly, printing can be resumed.
3D printing technology has opened up new possibilities for users around the world. But equipment that allows 3D printing requires careful setup and competent maintenance. Replacing the bobbin filament is an important step in the work. When changing the plastic thread, it is necessary to strictly follow the manufacturer's recommendations. This will avoid many errors that can occur due to incorrect plastic replacement, and poor quality printing later.
- May 17, 2021
- 8224
Get expert advice
How to 3D print from the platform without destroying anything or injuring yourself
what you have to contend with is when the printout sticks tightly to the platform on which it is printed. The materials for covering the surface of the platform are different.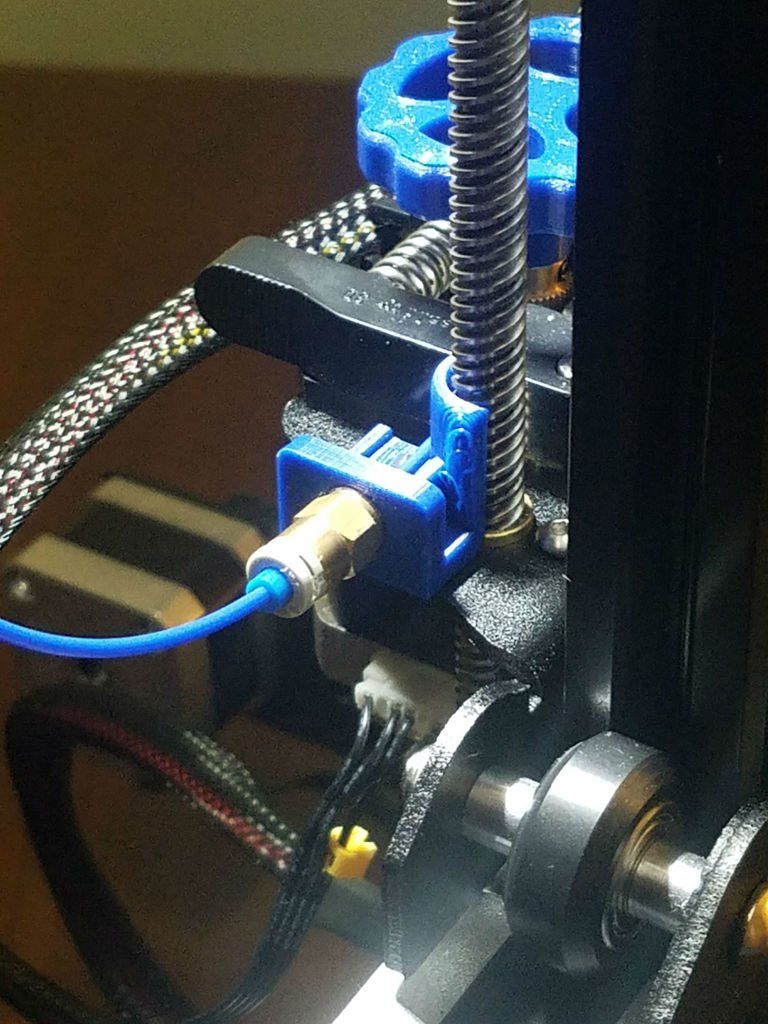 Blue masking tape, Kapton (polyamide film) and borosilicate sheets (which break easily) are the most common options. Some tricksters when printing with ABS plastic lubricate the surface with a glue stick, which helps to avoid distortion of the printout (when the outer edges begin to protrude after cooling).
But it seems that no one has paid attention to the best ways in which even the most stubborn objects can be separated from the base. We drew, we bring to your attention 6 such best methods.
Do you have more? Feel free to write.
Method #1. Shoot 3D prints with reasonable effort
Be careful with fragile objects and your brute force (Photo: learn.adafruit.com )
The first thing to do is try to move the printed 3D object . Grab it carefully and try to separate it from the platform. Stretching, twisting and rotating usually help.
If not, you need to put in a little more effort. If the object is not too fragile, the process turns into a kind of game. If you have a rubber mallet, you can pull out the build platform and try (carefully!) tapping the sides of the object. Aim for solid surfaces, otherwise you always run the risk of radically solving the problem by hitting a weak spot.
If there is a small gap where a screwdriver can be slipped, a light tap on the handle of the screwdriver will give a good amount of force and the printout may come off.
Method #2. Use a sharp, flat object
A palette knife is a painting tool that visually resembles a spatula or spatula.
A razor blade will always slip through It can be anything from a spatula to something thinner, like a palette knife, the stuff that is sold in art stores. This is a special knife.
The thinnest blade available is usually a razor blade, but you have to be very, very careful not to injure yourself. In such a case, it is useful to have a blade holder. This one, for example.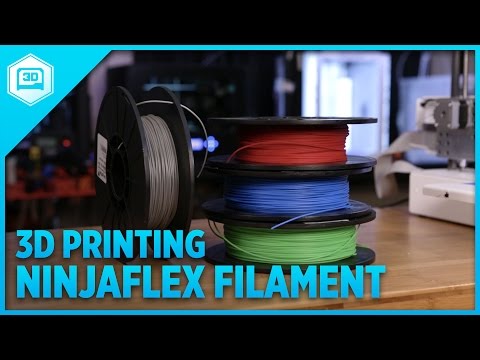 It has been designed specifically for taking 3D prints from the platform.
The disadvantage of this method is that you will most likely damage the surface. You can cut off the top layer of the desktop, wrinkles may form, which will negatively affect subsequent printouts. If you leave everything as it is, i.e. scratched, next time you will definitely need to replace the film.
Method #3. Take advantage of the temperature difference
There's always room in the fridge for 3D printing
This method is thinner than the previous ones. When it comes to heated tables, sometimes the printout can stick completely, it would seem, tightly.
Therefore, the first thing to do when printing is finished is to allow both the printer and the table to cool completely. If you're lucky, the printout will then pop off by itself. If you're not lucky, you can take advantage of the fact that the physical properties of the plastic and the platform (glass, aluminum or other plastic) are different. When bodies are cooled, they contract, and because they contract differently, the bonds are broken.
You can take advantage of this effect, even at lower temperatures than in a conventional refrigerator. You can take a special cooling bag (try to cool either the platform or the object). Containers containing CO 2 are also suitable and are available from hardware stores. If such a vessel with carbon dioxide is turned upside down, liquid will begin to flow out. It will change its state of aggregation from liquid to gaseous, absorbing energy and quickly cooling the surrounding space. It will also help if you put the platform with the object in the refrigerator or freezer for half an hour or an hour.
Method No. 4. Thinner to the rescue
Thinners can be ordered from any decent online 3D printing shop
Thinners can help in the worst case, but then the next time you print, you will need a new tape to cover the desktop. You can try pouring a little isopropyl alcohol around the edges of the printout and let it soak into the tape. Then it will be easier to separate the object. But if in doubt, you can simply remove the entire tape.
On platforms where glue stick has been used, warm water works great as a solvent.
Method #5. Dental floss
It would seem, what does dental floss have to do with it? (Photo: Instructables)
You probably don't know, but flossing isn't just good for your teeth, it's also good for taking printouts. It is necessary to fit the thread under the edge of the printout and begin to move it, the thread, back and forth, like a saw.
Depending on how much material is stuck, it may be necessary to “saw off” the whole bottom. The good thing is that the tape remains intact and the method works for all platforms.
Method #6. Buy a flexible printing platform
Screenshot from the video about the properties of Tiko (Kickstarter)
Do you think that all the described methods are complete bullshit? Then you need to move to a flexible platform.