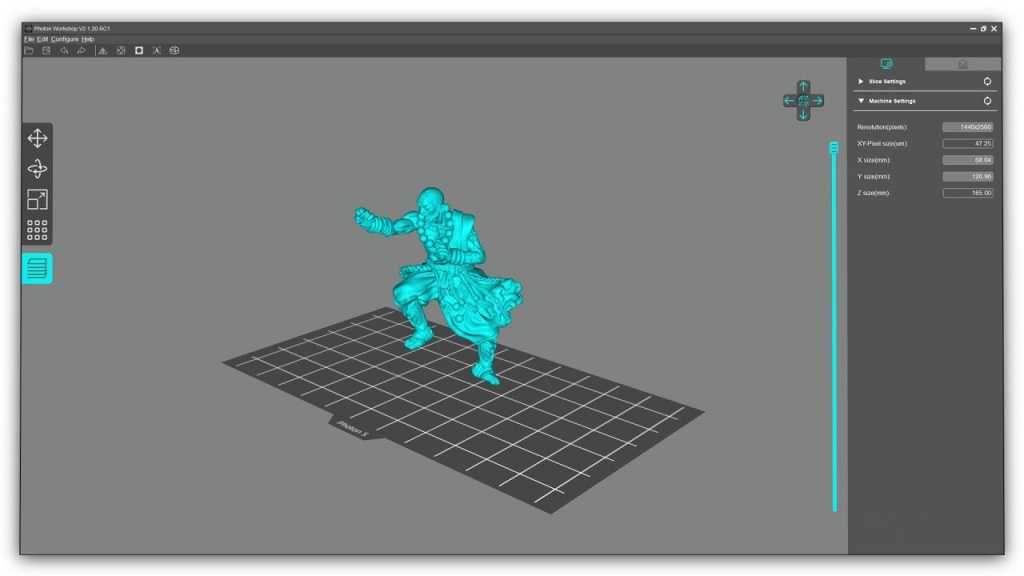
How does fdm 3d printing work
Compare Filament and Resin 3D Printers
The 3D printing and additive manufacturing market has undergone rapid change in recent years. No longer primarily the domain of hobbyists, highly capable desktop machines have developed into essential tools for businesses. After becoming the go-to tool for prototyping and product development, 3D printing use has expanded across manufacturing, dentistry, jewelry, and much more.
Fused deposition modeling (FDM) and stereolithography (SLA) are the two most popular types of 3D printers on the market. Both 3D printing technologies have been adapted and refined for the desktop, making them more affordable, easier to use, and more capable.
In this comprehensive buyer's guide, we take a closer look at FDM and SLA 3D printers (also known as filament and resin 3d printers), and how they compare in terms of print quality, materials, applications, workflow, speed, costs, and more, to help you decide which technique is ideal for your business.
Video Guide
Having trouble finding the best 3D printing technology for your needs? In this video guide, we compare FDM, SLA, and SLS technologies across popular buying considerations.
Watch the Videos
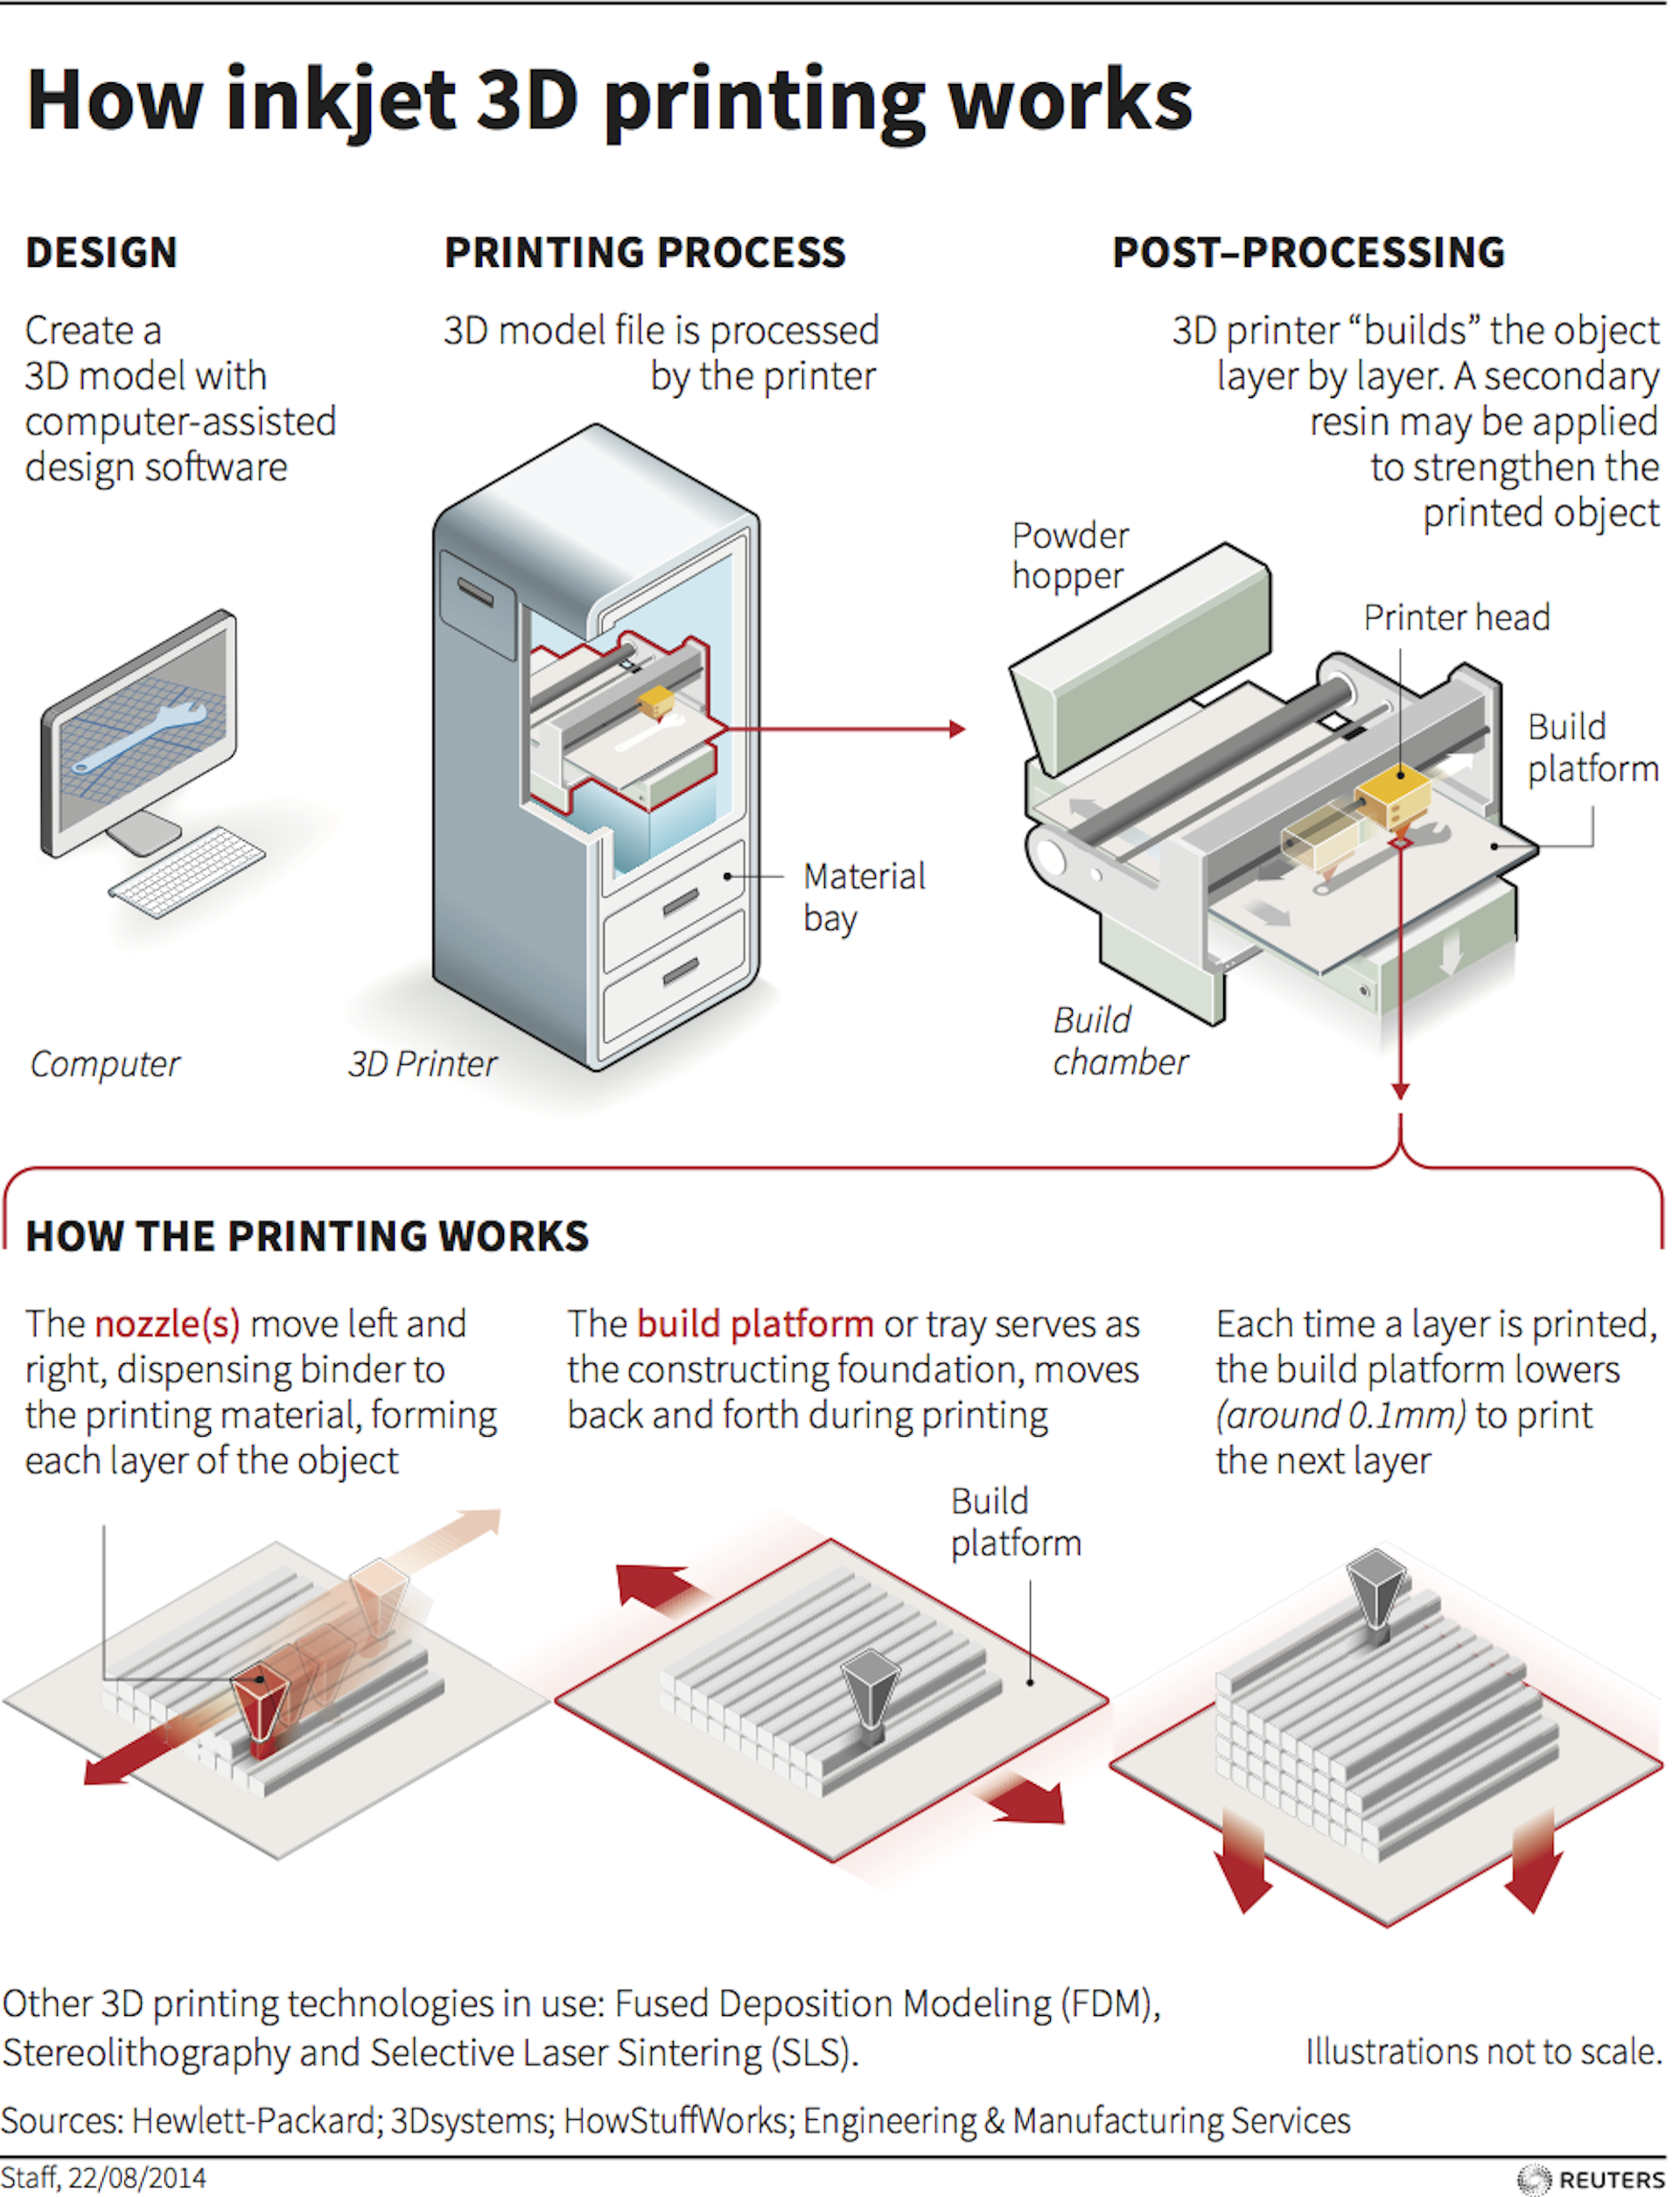
Fused deposition modeling (FDM), also known as fused filament fabrication (FFF), is the most widely used type of 3D printing at the consumer level. FDM 3D printers work by extruding thermoplastic filaments, such as ABS (Acrylonitrile Butadiene Styrene), PLA (Polylactic Acid), through a heated nozzle, melting the material and applying the plastic layer by layer to a build platform. Each layer is laid down one at a time until the part is complete.
Watch how FDM 3D printing works.
FDM 3D printers are well-suited for basic proof-of-concept models, as well as quick and low-cost prototyping of simple parts, such as parts that might typically be machined.
Stereolithography was the world’s first 3D printing technology, invented in the 1980s, and is still one of the most popular technologies for professionals.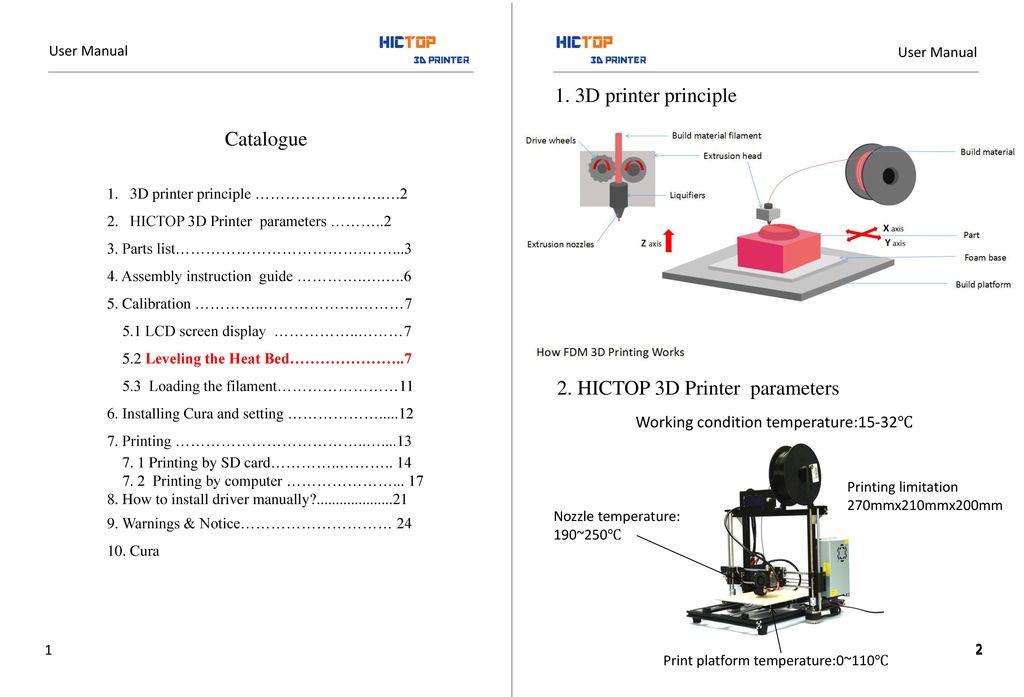 SLA 3D printers use a laser to cure liquid resin into hardened plastic in a process called photopolymerization.
See how SLA 3D printing works.
SLA resin 3D printers have become vastly popular for their ability to produce high-accuracy, isotropic, and watertight prototypes and parts in a range of advanced materials with fine features and smooth surface finish. SLA resin formulations offer a wide range of optical, mechanical, and thermal properties to match those of standard, engineering, and industrial thermoplastics.
Resin 3D printing a great option for highly detailed prototypes requiring tight tolerances and smooth surfaces, such as molds, patterns, and functional parts. SLA 3D printers are widely used in a range of industries from engineering and product design to manufacturing, dentistry, jewelry, model making, and education.
White Paper
Looking for a 3D printer to realize your 3D models in high resolution? Download our white paper to learn how SLA printing works and why it's the most popular 3D printing process for creating models with incredible details.
Download the White Paper
When additive manufacturing processes produce parts layer by layer, each layer also introduces an opportunity for inaccuracy. The process by which layers are formed affects the surface quality, level of precision, and the accuracy of each layer, and consequently, the overall print quality.
FDM 3D printers form layers by depositing lines of molten material. With this process, the resolution of the part is defined by the size of the extrusion nozzle and there are voids in between the rounded lines as the nozzle deposits them. As a result, layers may not fully adhere to one another, layers are generally clearly visible on the surface, and the process lacks the ability to reproduce intricate details that other technologies can offer.
In SLA 3D printing, liquid resin is cured by a highly-precise laser to form each layer, which can achieve much finer details and is more reliable to repeatedly achieve high-quality results.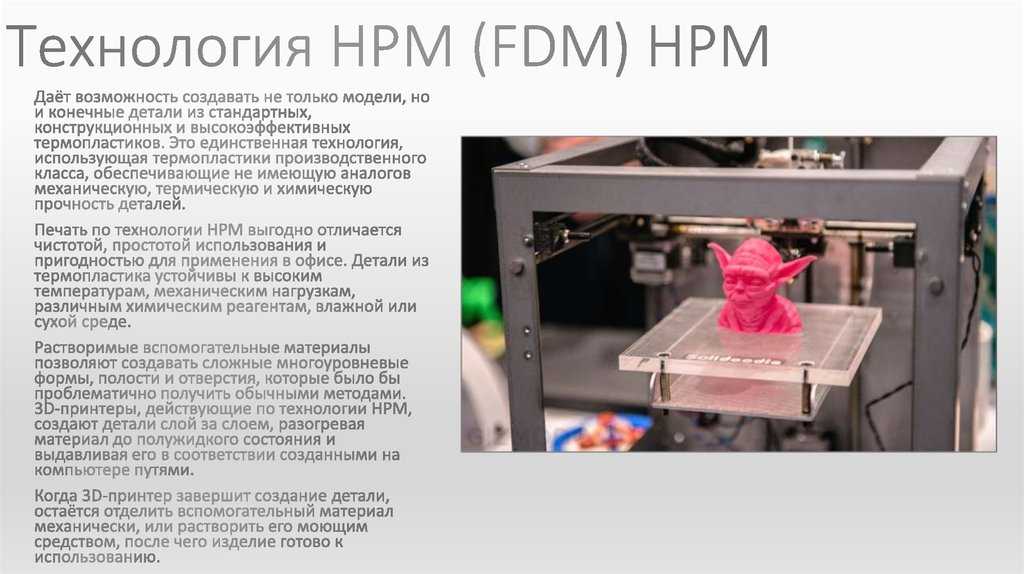 As a result, SLA 3D printing is known for its fine features, smooth surface finish, ultimate part precision, and accuracy.
Accuracy, precision, and tolerance in 3D printing are complex and often misunderstood terms. Learn more about their meaning to better understand 3D print performance.
SLA parts have sharp edges, sleek surfaces, and minimal visible layer lines. This example part was printed on the Formlabs Form 3 desktop SLA 3D printer.
The use of light instead of heat for printing is another way SLA printers guarantee reliability. By 3D printing parts at close to room temperature, they don't suffer from thermal expansion and contraction artifacts, which can happen during the FDM printing process.
Thanks to the highly precise laser, SLA 3D printers are better for manufacturing complex parts (FDM part on the left, SLA part on the right).
While FDM printers produce a mechanical bond between layers, SLA 3D printers create chemical bonds by cross-linking photopolymers across layers, resulting in fully dense parts that are water and airtight.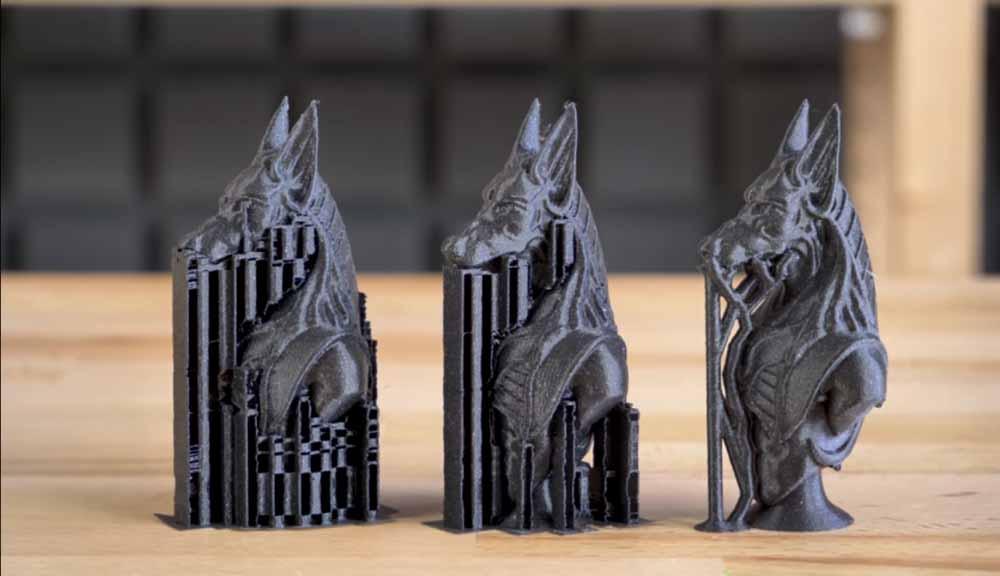 These bonds provide high degrees of lateral strength, resulting in isotropic parts, meaning that the strength of the parts does not change with orientation. This makes SLA 3D printing especially ideal for engineering and manufacturing applications where material properties matter.
The difference in quality is less visible on relatively simple parts. However, SLA parts are dense and isotropic, which makes them better suited for many engineering and manufacturing applications (FDM part on the left, SLA part on the right).
Sample part
See and feel Formlabs quality firsthand. We’ll ship a free sample part to your office.
Request a Free Sample Part
Plastic extrusion 3D printers work with a range of standard thermoplastic filaments, such as ABS, PLA, and their various blends. The popularity of FDM 3D printing in the hobbyist space has led to an abundance of color options. Various experimental plastic filaments blends also exist to create parts with wood- or metal-like surface.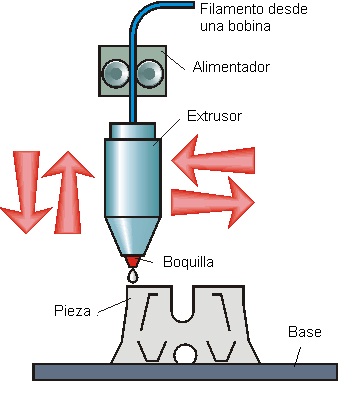
Engineering materials, such as Nylon, PETG, PA, or TPU and high-performance thermoplastics like PEEK or PEI are also available, but often limited to selected professional FDM printers that support them.
FDM filaments and blends offer various color options. (source: All3DP.com)
SLA resin materials have the benefit of a wide range of formulation configurations: they can be soft or hard, heavily filled with additives like glass and ceramic, or imbued with mechanical properties like high heat deflection temperature or impact resistance. Various resin formulations offer a wide range of optical, mechanical, and thermal properties to match those of standard, engineering, and industrial thermoplastics.
SLA 3D printers offer diverse materials for engineering and manufacturing applications.
In some cases, it’s this combination of versatility and functionality that leads to companies to initially bring SLA 3D printing in-house. After finding one application solved by a specific functional material, it’s usually not long before more possibilities are uncovered, and the printer becomes a tool for leveraging the diverse capabilities of various materials.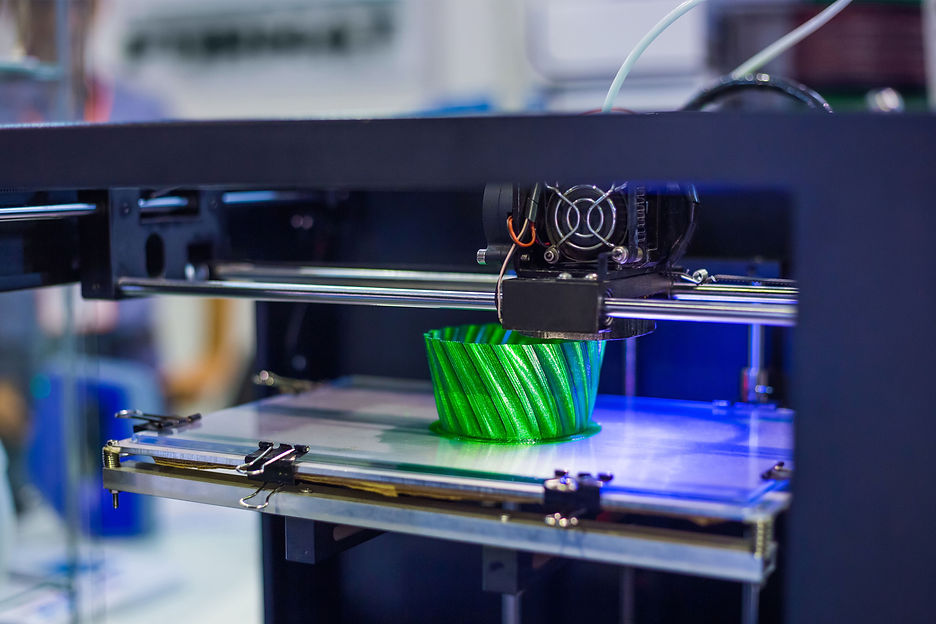
Some material properties that are unique to SLA include:
SLA is the only 3D printing technique that can produce transparent parts on the desktop. Ideal for getting visibility into complex assemblies, (micro)fluidics, mold making, optics, lighting, and any parts requiring translucency.
Learn More
Parts printed in this material look and behave like a molded silicone part, and are durable enough to use for multiple cycles.
Learn More
Offers a heat deflection temperature (HDT) of 238 °C @ 0.45 MPa, the highest heat resistance of any material in desktop 3D printing.
Learn More
A 20% wax-filled material for direct investment casting and pressing for dental and jewelry applications.
Learn More
Specialized materials for dental applications like biocompatible surgical guides, splints, fixed patterns and models, clear aligner models, and full dentures.
Learn More
3D print parts with a stone-like finish and fire them to create a fully ceramic piece.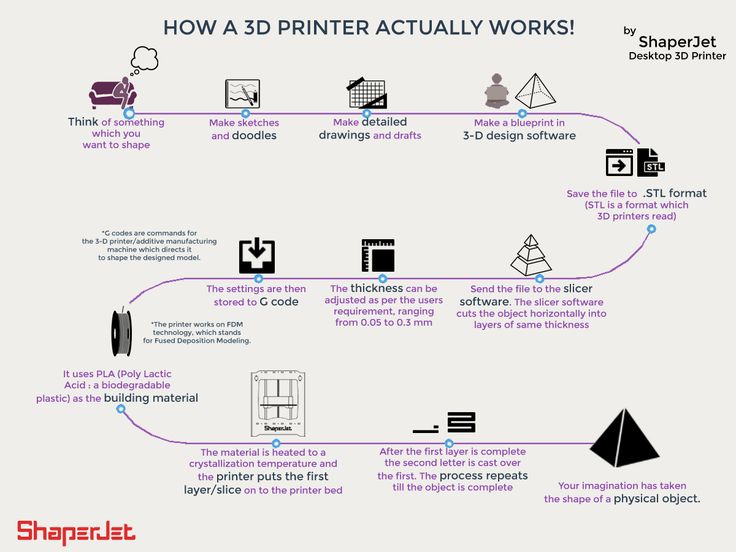
Learn More
Interactive
Need some help figuring out which 3D printing material you should choose? Our new interactive material wizard helps you make the right material decisions based on your application and the properties you care the most about from our growing library of resins.
Recommend Me a Material
See how to go from design to 3D print with the Form 3+ SLA 3D printer. This 5-minute video covers the basics of how to use the Form 3, from the software and materials to printing and post-processing.
The workflow for both FDM and SLA 3D printing consist of three steps: designing, 3D printing, and post-processing.
First, use any CAD software or 3D scan data to design a model, and export it in a 3D printable file format (STL or OBJ). 3D printers then require print preparation or slicer software to specify printing settings and slice the digital model into layers for printing.
Low-cost FDM or SLA 3D printers are not really user friendly and often require many hours of tweaking and experimenting to dial-in the correct print settings.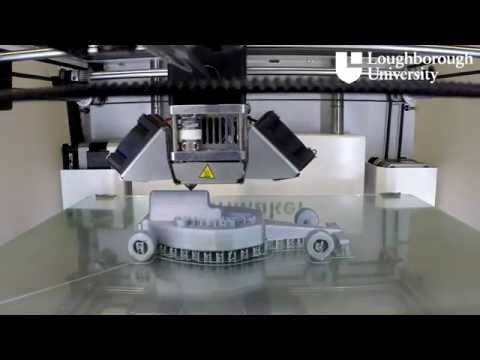 Still, the results might change with each new design or material and the chance of failed prints remains high. This not only delays projects, but can also lead to messy failures that require a lengthy cleanup process.
Professional SLA 3D printers, like the Form 3, and some other professional FDM printers come with their own proprietary software and predefined settings for each material that have been thoroughly tested to ensure the highest print success rate.
Setting up prints with advanced print preparation tools like PreForm is plug and play. PreForm is a free download, try it now.
Once the 3D printing process begins, most 3D printers can run unattended, even overnight, until the print is complete. Advanced SLA 3D printers like the Form 3 offer a cartridge system, that refills the material automatically.
The final step of the workflow is post-processing. SLA parts require rinsing in isopropyl alcohol (IPA) or alternative solvents to remove any uncured resin from their surface.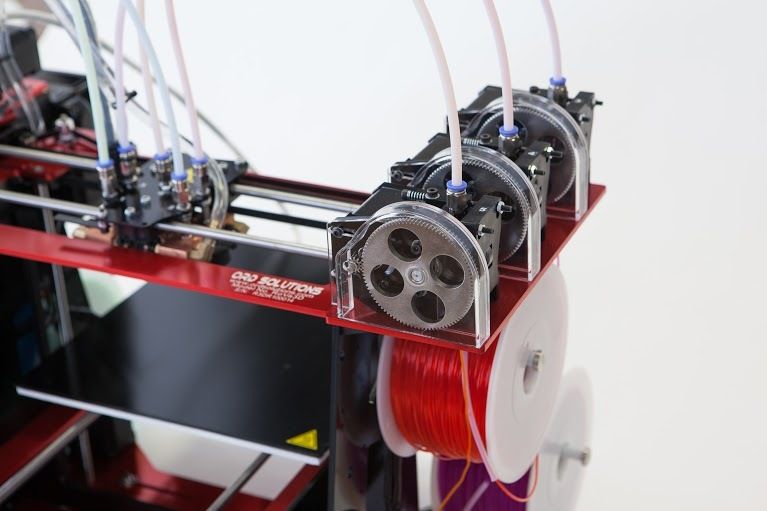 Using the standard workflow, this involves first removing parts from the build platform, then manually soaking them in a bath of solvent to clean off excess resin.
Professional solutions such as the Form Wash automate this process. Parts can be transferred directly from the printer to Form Wash, which agitates the solvent around the parts to clean them and automatically raises parts out of alcohol bath when the process is finished.
After rinsed parts dry, some SLA materials require post-curing, a process which helps parts to reach their highest possible strength and stability.
The FDM process has the benefit that it doesn’t require cleaning; unsupported finished parts are ready for use or further post-processing once the printing process is complete.
Both FDM and SLA processes use support structures to facilitate 3D printing more complex geometries and their removal represents the last step in post-processing.
Supports on FDM parts need to be manually torn away or dissolved in water, depending on the support material.
Supported FDM prints require additional post-processing to achieve a high-quality finish (source: 3D Hubs).
Support removal for SLA parts requires cutting away the support structures and lightly sanding the parts to remove support marks. Formlabs’ Low Force Stereolithography (LFS)™ technology offer light-touch supports, which allow an entire object to be torn away from its support base in seconds, leaving minimal markings and reducing time spent post-processing.
When further post-processing is required, both FDM and SLA parts can be machined, primed, painted, and assembled for specific applications or finishes. FDM parts, however, require additional sanding before priming or painting and need higher infill levels to be machined or bored.
Webinar
In this webinar, Matt Lewis and Ricky Hopper walk you through an overview of the improved SLA line, and give a hands on demo of the new products.
Watch the Webinar Now
How much does an FDM or SLA 3D printer cost and how much time and cost can you actually save with it for your business? Calculating cost per part requires accounting for the costs of equipment ownership, material, and labor. It’s helpful to understand the factors that influence each of these cost components, and the questions to ask to evaluate alternative production methods and uncover hidden costs.
One of the main selling points for FDM 3D printers is the low machine cost. With entry-level FDM printers available for only a few hundred dollars, hobbyists and small businesses can try FDM to see if 3D printing is something worth adding to their toolset. For those unsure of where to start, the lower cost of an entry-level FDM machine is often persuasive enough to justify a purchase. However, these low-cost FDM printers can be unreliable and often require an expert to keep running in the long term.
Professional desktop FDM printers are easier to use and more tailored to businesses, with prices ranging from $2,000-$8,000. These 3D printers generally provide better reliability, higher print quality, and larger build volumes. While these machines are suitable for producing functional parts, competition at this price point is fierce, as SLA machines offer a wider range of applications and better quality prints.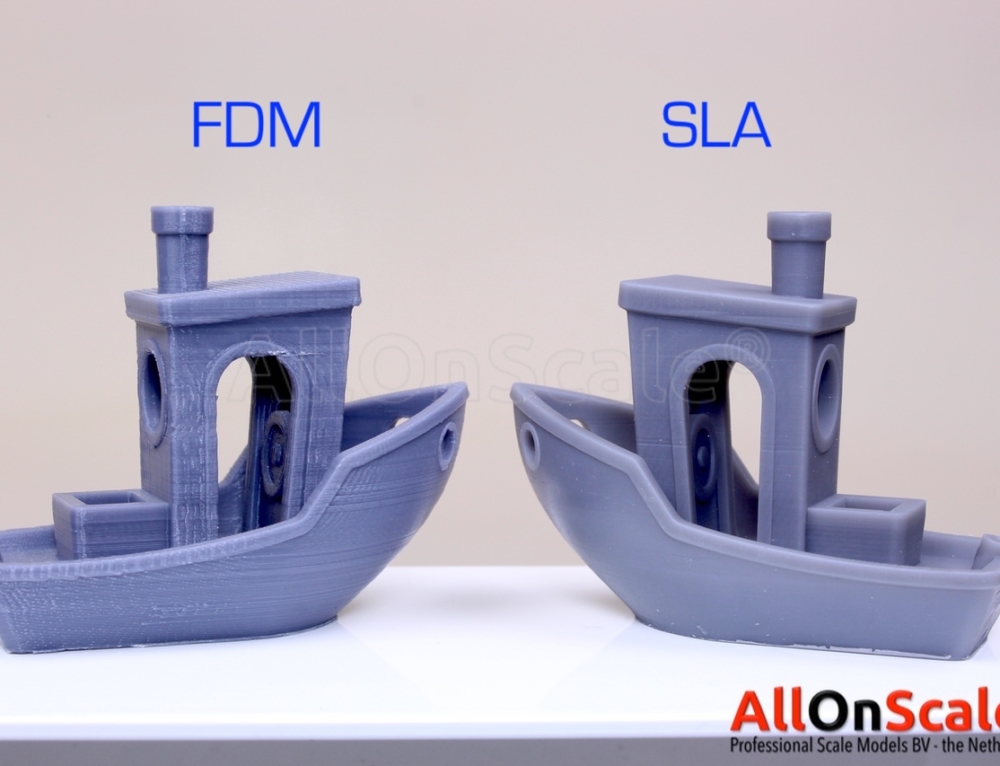
SLA 3D printers start around $3,750 with Formlabs offering the only accessible large SLA 3D printer solution starting at $11,000.
In terms of materials, FDM filaments are also relatively low cost compared to materials for other 3D printing technologies. Common FDM materials like ABS, PLA, and their various blends generally start around $50/kg, while specialized FDM filaments for engineering applications can be $100-150/kg. Soluble support materials for dual extrusion FDM 3D printers sell for $100-200/kg. In comparison, most standard and engineering resins for SLA 3D printers cost $149-$200/L.
Labor costs are the final—often forgotten—part of the equation. For simple designs that require no supports to print, FDM requires almost no post-processing. Supported FDM prints and parts that require a high-quality finish, however, require lengthy manual post-processing.
SLA parts require washing and, depending on the material, also post-curing, but both of these processes can be mostly automated with accessories to minimize labor time. Supported SLA prints only require a bit of sanding to remove support marks and achieve a high-quality finish.
As a rule of thumb, FDM 3D printers will create the cheapest parts if you’re printing only relatively simple prototypes in limited numbers. SLA resin 3D printers offer higher resolution, better quality, and a wide variety of 3D printing materials at a slight premium, but the difference quickly diminishes when you print complex designs or larger batches due to the less labor-intensive post-processing.
Interactive
Try our interactive ROI tool to see how much time and cost you can save when 3D printing on Formlabs 3D printers.
Calculate Your Savings
Draft Resin is a fast-printing SLA material that can create parts up to 5-10X faster than FDM 3D printers. With a 200-micron layer height, Draft Resin is accurate enough to meet prototyping needs while enabling faster design iterations. Larger models that take up most of the build volume of an SLA printer (around a 15 cm cube) take only around nine hours to print with Draft Resin. Printing the same part at 200-micron layers on an FDM printer can take 80-90 hours. This is ideal for applications like rapid prototyping, where it allows users to quickly evaluate success and move on to another print or project.
FDM and SLA printing speed becomes comparable when printing parts at similar layer heights with other materials. But note, that a part printed at 100-micron layers on an FDM printer looks vastly different from a part printed at 100-micron layers on an SLA printer, because of the way the layers are built. Achieving comparable quality with FDM parts will require lower layers height —thus two to four times longer printing time— or significant and time-consuming post-processing to improve surface finish.
Webinar
Looking to learn more? Listen to the product managers who helped develop Draft Resin materials in this on-demand webinar.
Watch the Webinar Now
One area where FDM printers traditionally reigned used to be build volume. Due to the differences in technology, developing larger FDM machines is less complex. There are numerous larger FDM solutions on the market for applications that require 3D printing bigger parts.
The inverted SLA process behind desktop SLA printers reduces footprint and cost, but heightened peel forces introduce limitations around materials and build volume, and larger parts require sturdy support structures to print successfully.
With the introduction of the Low Force Stereolithography (LFS) print process that powers the Form 3 and Form 3L, Formlabs has completely re-engineered our approach to resin-based 3D printing to drastically reduce the forces exerted on parts during the print process. Uniform linear illumination and the low forces from the flexible tank mean Low Force Stereolithography technology can seamlessly scale up to a larger print area built around the same powerful print engine.
The first affordable large format resin printer, the Form 3L delivers large parts fast, using two staggered light processing units (LPUs) that work simultaneously along an optimized print path. Delivering a build volume five times larger than current SLA printers, the Form 3L removes size restrictions that sometimes hinder workflows on smaller desktop devices, while maintaining a competitive price point.
The Form 3L offers five times larger build volume than current SLA printers while maintaining a competitive price point.
Webinar
Want to learn more about the Form 3L and Form 3BL ecosystem, and the new large format post-processing machines?
In this demo, Kyle and Chris will expain how to navigate the Form 3L end-to-end workflow, including post-processing.
Watch Now
Each 3D printing technology has its own strengths, weaknesses, and requirements, and is suitable for different applications and businesses. The following table summarizes some key characteristics and considerations when comparing resin vs. filament 3D printers.
| Fused Deposition Modeling (FDM) | Stereolithography (SLA) | |
|---|---|---|
| Resolution | ★★☆☆☆ | ★★★★★ |
| Accuracy | ★★★★☆ | ★★★★★ |
| Surface Finish | ★★☆☆☆ | ★★★★★ |
| Throughput | ★★★☆☆ | ★★★★☆ |
| Complex Designs | ★★★☆☆ | ★★★★☆ |
| Ease of Use | ★★★★★ | ★★★★★ |
| Pros | Low-cost consumer machines and materials Fast and easy for simple, small parts | Great value High accuracy Smooth surface finish Fast printing speeds Range of functional applications |
| Cons | Low accuracy Low details Limited design compatibility | Sensitive to long exposure to UV light |
| Applications | Low-cost rapid prototyping Basic proof-of-concept models | Functional prototyping Patterns, molds, and tooling Dental applications Jewelry prototyping and casting Modelmaking |
| Price | Budget printers and 3D printer kits start at a few hundred dollars. Higher quality mid-range desktop printers start around $2,000, and industrial systems are available from $15,000. Higher quality mid-range desktop printers start around $2,000, and industrial systems are available from $15,000. | Professional desktop printers start at $3,750, large-format benchtop printers at $11,000, and large-scale industrial machines are available from $80,000. |
| Print Volume | Up to 300 x 300 x 600 mm (desktop and benchtop 3D printers) | Up to 300 x 335 x 200 mm (desktop and benchtop 3D printers) |
| Materials | Standard thermoplastics, such as ABS, PLA, and their various blends. | Varieties of resin (thermosetting plastics). Standard, engineering (ABS-like, PP-like, flexible, heat-resistant), castable, dental, and medical (biocompatible). |
| Training | Minor training on build setup, machine operation, and finishing; moderate training on maintenance. | Plug and play. Minor training on build setup, maintenance, machine operation, and finishing. |
| Facility Requirements | Air-conditioned environment or preferably custom ventilation for desktop machines. | Desktop machines are suitable for an office environment. |
| Ancillary Equipment | Support removal system for machines with soluble supports (optionally automated), finishing tools. | Washing station and post-curing station (both can be automated), finishing tools. |
After comparing the two technologies, we can conclude that FDM and SLA printers both have similar, often complementary features. But the two types of 3D printers are not always competing; many businesses use both as FDM and SLA 3D printers alongside one another. This can mean the best of both worlds: low-cost rapid prototyping coupled with high quality, functional parts for a wider range of applications.
A few practical examples:
-
In product development, FDM parts, or SLA printing with Draft Resin are both ideal for basic proof of concept models and rapid iterations. As a project moves forward in the development, SLA 3D printing is ideal for detailed concept models or functional prototypes might require better quality and materials with different properties.

-
Both FDM and SLA 3D printing are commonly used in manufacturing to create jigs, fixtures, and other tooling. FDM is better for large, simple parts, while SLA is a better solution for complex jigs, highly accurate tooling, and molds.
-
The education industry has seen success in deploying both FDM and SLA machines. Many education institutions start with FDM printing as its low cost is ideal for students who need quick drafts and some hands-on experience with the technology. SLA is the preferred choice for many technical schools, universities, research institutes, and in dental and jewelry education due to the higher quality and wider range of applications.
The University of Sheffield Advanced Manufacturing Research Centre (AMRC) uses a fleet of 12 SLA 3D printers for most engineering and manufacturing applications and reserve five industrial FDM printers for larger parts.
Download our white paper for a detailed overview of SLA ecosystems and the step-by-step 3D printing workflow.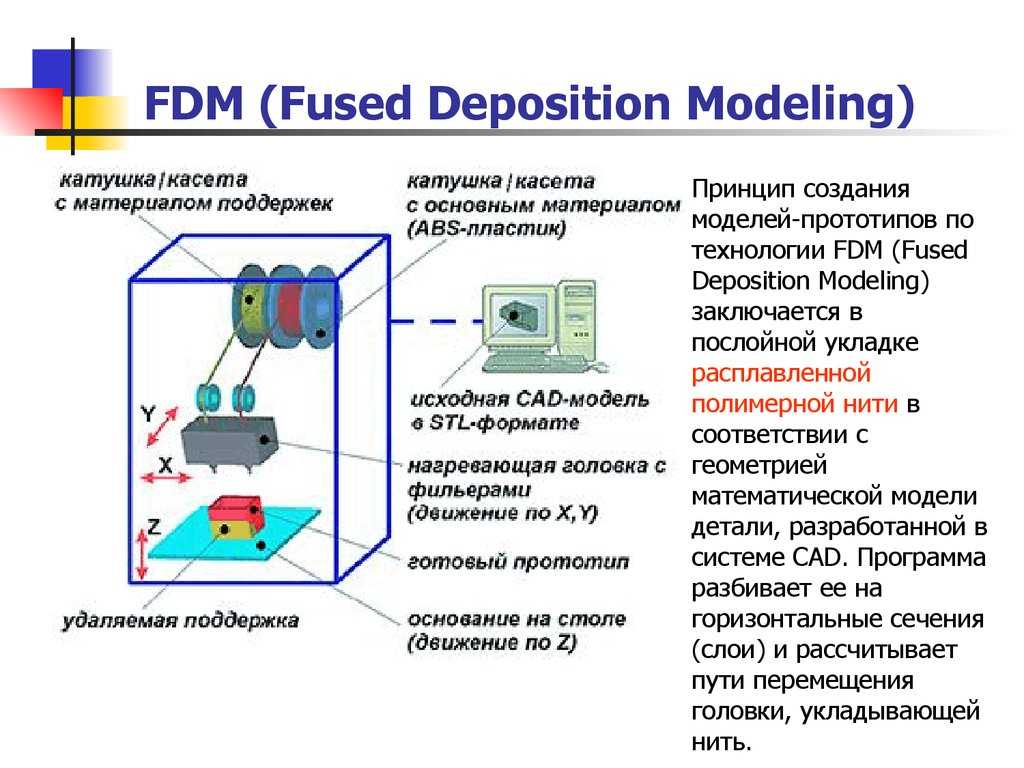
Curious to see the SLA quality firsthand? Pick from our list of applications and request a complimentary sample part to find a material that meets the requirements for your project.
Request a Free Sample Part
What is an FDM printer and how does it work?
[Image from Kaleidoscope Innovation]
Pulkit Verma, Design Engineer, Kaleidoscope Innovation
What is an FDM printer?
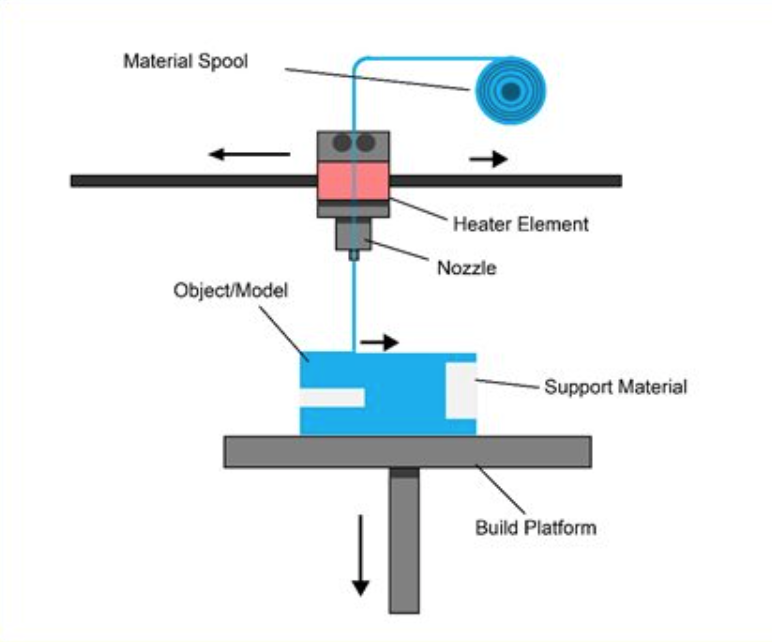
An FDM (fused deposition modeling) printer is a 3D printer that is often used in early concept development and prototyping for medical device design. FDM refers to how the 3D model is formed. The material (molten plastic) is deposited by a three-axis system in single layers, and multiple layers fuse together to form the 3D model.
How does an FDM printer work?
The process begins with a 3D CAD (computer-aided design) model. Slicing software divides the digital model into numerous slices (layers) and outputs a G-code file for the printer.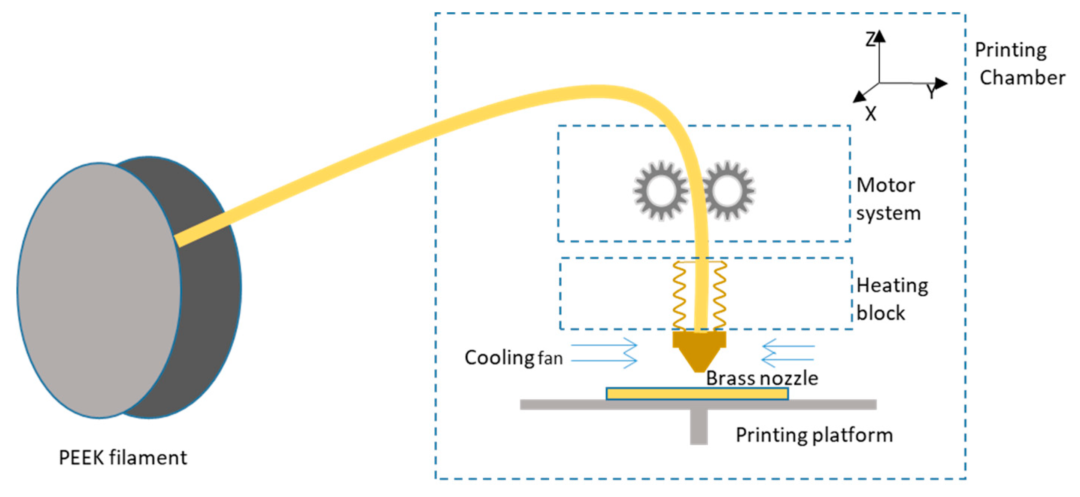 The FDM printer heats solid plastic filament, and melts and extrudes it from a nozzle — layer upon layer — onto a build tray to form the 3D object. Each layer can be 0.1mm to 0.5mm thick based on the desired resolution.
What are the most common materials used in FDM printers?
The two most common materials in FDM printing are ABS (acrylonitrile butadiene styrene) and PLA (polylactic acid). Both are inexpensive and available in a variety of colors.
- ABS, a common household plastic, offers good strength and thermal characteristics, but requires good ventilation as it emits strong odors. It requires a heated build platform to avoid warping.
- PLA offers great surface quality, is one of the easiest materials to print and is also biodegradable but lacks impact strength.
Higher-grade FDM printers can print engineering and higher performance materials including Nylon, TPU (thermoplastic polyurethane), and PET (polyethylene terephthalate) or PETG (polyethylene terephthalate glycol).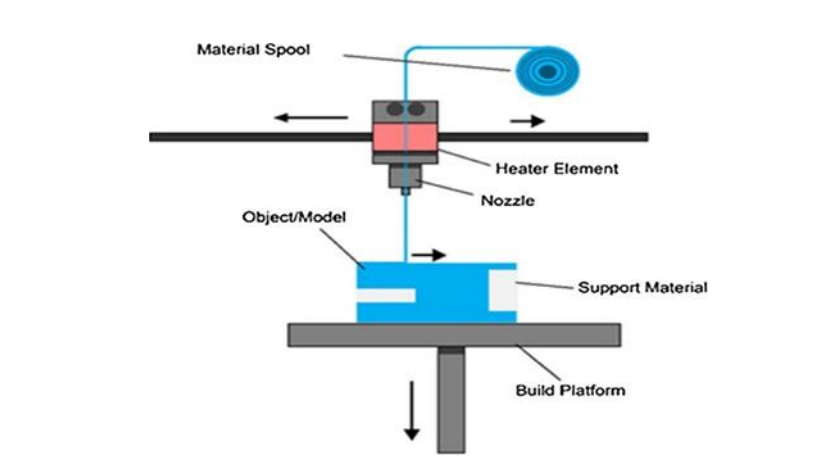 Frequently used in disposable plastic bottles, PET can be used for pieces that come in contact with food and it does not release odors when printing.
How are FDM printers used?
Medical device designers and engineers often use FDM printers in early concept exploration and medium fidelity prototyping stages.
- Early concept exploration stage: FDM printing allows users to easily print multiple concepts to examine form and fit of the actual piece before pursuing detailed features.
- Medium fidelity prototyping stage: For testing or for prototypes that resemble actual production parts, users often print at medium fidelity. This resolution uses thin 0.1mm layers. This option is ideal for obtaining feedback on feel and performance.
What are the advantages and disadvantages of FDM printers?
Advantages: The most significant advantage that FDM printers offer is the low cost to purchase and operate. Because they are popular in the consumer market, low-end FDM printer models start at $150. FDM printers are easy to operate and offer fast concept to prototype lead time.
Disadvantages: FDM printers do not offer the high quality, dimensional accuracy or reliable operation that some other 3D printers offer. Reliability can be an issue with failed parts or clogs in flowing plastic. FDM is not the best choice for printing parts that need to be “close to perfection.”
What size 3D models do FDM printers build?
In general, the average-size FDM printer can print models approximately 120 mm x 120 mm x 200 mm while some printers can print as large as 500 mm x 500 mm x 500 mm.
Pulkit Verma is a design engineer at Kaleidoscope Innovation in Cincinnati, with a focus on product design. Prior to earning his master’s degree in mechanical engineering, Verma studied product design and intellectual property rights. He has experience working at a law firm in New Delhi, India, where he provided technology-focused legal support to global clients.
FDM technology.
 How it works.
 Hello everyone, 3DTool is with you!
In this article on 3D printing, we will look at the basic principles of FDM (Fused Deposition Modeling) technology. Let's deal with the basic mechanics of this process. Its advantages and limitations.
FDM technology
Overlay printing (FDM) is an additive manufacturing process that is realized through the extrusion of materials. In FDM, an object is built by applying molten material according to a predetermined algorithm, layer by layer. The materials used are thermoplastic polymers and are filament-shaped.
FDM is the most widely used 3D printing technology. FDM printers are on the market in a wide variety. It's basically the first technology people come across when they start working with 3D. The following will introduce the basic principles and key aspects of this printing method.
An engineer who designs a 3D model should take into account the possibilities of technology when manufacturing a part with FDM, this knowledge will help him achieve the best result.
Process FDM printing
Here is how the FDM process works:
A spool of thermoplastic filament is loaded into the printer. Once the nozzle reaches the required temperature, the filament is fed into the extruder and into the nozzle where it is melted.
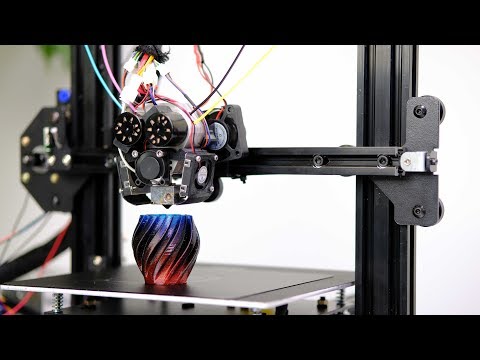
The extruder is attached to a 3-axis system that allows it to move in the X, Y and Z directions. The molten material is extruded in thin filaments and melted in layers at predetermined locations where it then cools and solidifies. Sometimes the cooling of the material is accelerated by the use of fans attached to the extruder.
The extruder requires several passes to fill the printable area. When the layer is finished, the platform moves down (or, as in some printer models, the extruder moves up), and a new layer is welded onto the already set one. This process is repeated until the entire model is printed.
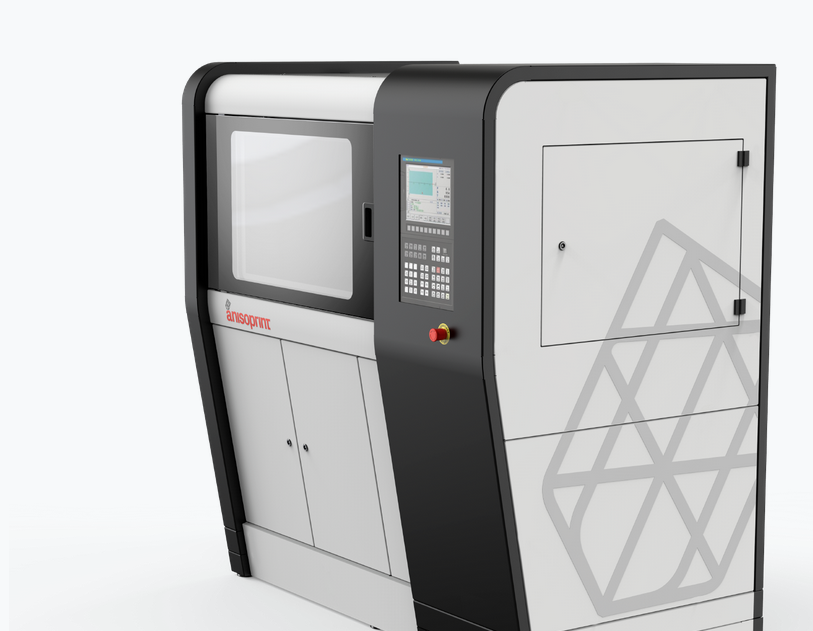
FDM printer specifications
Most FDM systems allow you to adjust several parameters of the printing process. Such as nozzle temperature, platforms, print speed, layer height and cooling fan speed. These are usually set by the printer operator and do not bother the modeler.
What is important from a modeling standpoint is to consider the size of the table and the layer height of the part itself:
The standard printable area of a desktop 3D printer is usually 200 x 200 x 200 mm, while for industrial machines it can be up to 1000 x 1000 x 1000 mm. If a desktop 3D printer is preferable (e.g. for cost reasons), the large model can be broken down into smaller pieces and then reassembled/glued together.
The typical layer height used in FDM varies from 50 to 400 microns and can be determined during the software slicing step. A lower layer height will provide a smoother detail and more accurately represent complex geometry, while a higher layer height will print the part faster and at a lower cost. The layer height of 150-200 microns is optimal in terms of the ratio of printing time and its quality.
Part deformation
Warp is one of the most common defects in the FDM printing process. Some plastics shrink during cooling after extrusion. Since different regions cool at different rates, their dimensions can also change at different rates. Differential cooling causes an accumulation of internal stresses that pull the layer, the one from the bottom - up, deforming it, as shown in the figure below. From a technical point of view, deformation can be prevented by more careful control of the temperature of the platform and the chamber as a whole. By increasing the adhesion between the part and the platform.
The modeler can also reduce the chance of peeling and other warp-related defects:
Large flat areas (such as a rectangular box) are more prone to deformation and should be avoided if possible.
Thin protruding elements (for example, battlements, spiers) are also prone to deformation. In this case, it can be avoided by adding some support material around the edge of the thin element (for example, a 200 micron thick rectangle) to increase the contact area.
Sharp corners deform more often than rounded shapes, so smoothing the corners slightly can achieve a good result.
Different plastics are more susceptible to deformation: ABS is generally more sensitive to this factor than PLA or PETG due to its higher glass transition temperature and relatively high coefficient of thermal expansion.
Adhesion between layers
Good adhesion between layers is very important for an FDM printed part. As the molten plastic is extruded through the nozzle, it is pressed against the previous layer. High temperature and pressure remelt the surface of the previous layer and allow the new layer to bond with the old one.
The strength of the bond between different layers is always lower than the basic strength of the material.
This means that FDM parts are inherently anisotropic: their Z strength is always less than their X/Y strength. For this reason, it is important to keep the orientation of parts in mind when designing.
For example, tensile test specimens printed horizontally with ABS at 50% infill were compared with test specimens printed vertically and found to have nearly 4 times higher tensile strength in the X, Y axis compared to the Z axis ( 17.0 MPa compared to 4.4 MPa). Such a part is stretched to failure, almost 10 times more (4.8% compared to 0.5%).
Moreover, since the molten material is pressed against the previous layer, its shape is deformed to an oval. This means that parts will always have a wavy surface, even at low layer heights, and that small features, such as small holes, may need post-printing post-processing.
Supports
The support structure is essential for creating tab geometries. Because plastic cannot be applied to air, some geometries require a support structure.
Surfaces printed with supports are usually of lower quality than the rest of the part. For this reason, it is recommended that the part be modeled in such a way as to minimize the need for support.
Supports are usually printed from the same material as the part. There are also special materials that dissolve in a liquid, but they are mostly used in high-end desktop or industrial 3D printers. Printing on soluble supports greatly improves the surface quality of the part, but increases the overall cost of printing because a special printer with two print heads is required and because the cost of soluble material is relatively high.
Filling and shell thickness
FDM parts are usually not printed full in order to reduce printing time and save material. Instead, the outer perimeter is made with several passes, it is called a shell, and the inner part is filled with a low density structure called infill.
The filling and thickness of the body greatly affect the strength of the part. For desktop FDM printers, 25% infill density and 1mm body thickness are mostly suitable. Usually, these are the standard settings for fast printing and a good compromise between strength and speed.
Above you can see the internal geometry of parts with different degrees of filling
FDM Essential Consumables
One of the strengths of FDM printing is the wide range of materials available. They can range from conventional plastics (such as PLA and ABS) to engineering plastics (such as TPU and PETG) and high strength materials (such as PEEK).
Below is a pyramid of materials most available in FDM printing.
The material used directly affects the mechanical properties and accuracy of printing, as well as its price. The most common FDM printing materials are listed below. We will also consider the pros and cons of certain plastics. An overview of the main differences between PLA and ABS, and a detailed comparison of all common types of filament is a very extensive topic and can be found in special articles on the Internet and on thematic forums.
ABS
pros
· Durability
Good temperature resistance
Minuses
Shrinks when printed
PLA
pros
Excellent visual quality
Easy to print
· Unharmful. May come into contact with food
Minuses
· Low impact strength
· Longevity
Nylon
pros
· Very high strength
Excellent wear and chemical resistance
Minuses
· Actively absorbs water
PET-G
pros
· Unharmful. May come into contact with food
Sufficiently strong
Minuses
Capable of precise temperature print settings
TPU
pros
· Very flexible
Minuses
Printing accuracy is very difficult to achieve
PE EK
pros
· Extremely durable and lightweight
Excellent flame retardant and chemical resistance
Minus
· High price
Need a specialized 3D printer whose extruder is capable of reaching temperatures above 300C
Postprocessing
FDM parts can be processed to high standards.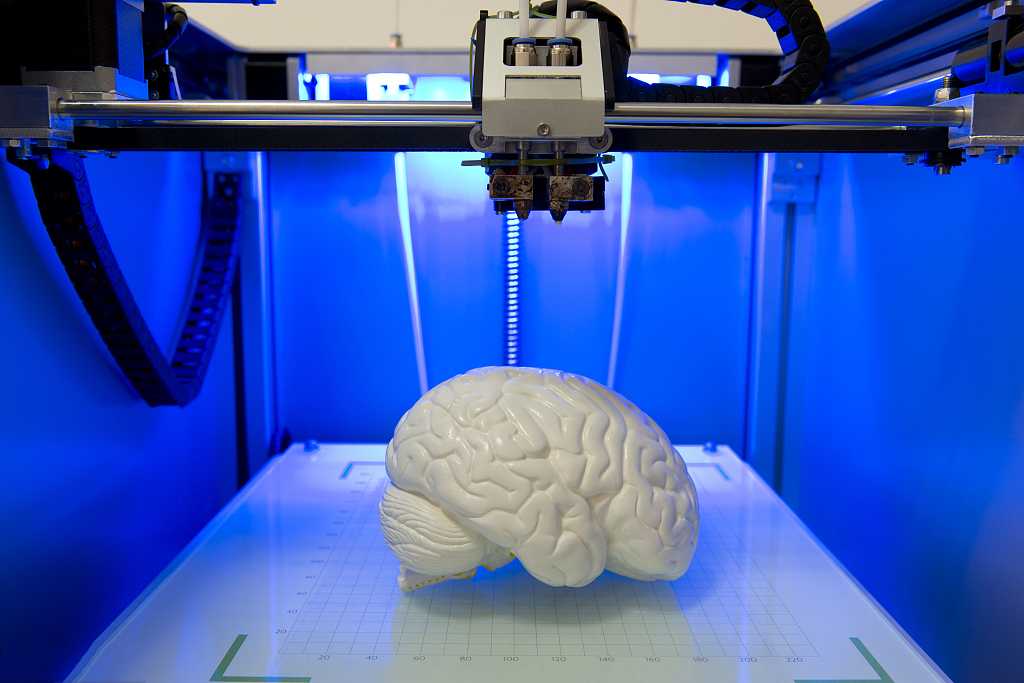 When using various methods such as: sanding, polishing, priming, painting, cold welding, acetone bath (to smooth the surface and create a glossy surface), epoxy coating and plating.
Advantages and disadvantages of FDM printing
+
· FDM printing is the most economical way to produce custom thermoplastic parts and prototypes.
· FDM printing lead time is acceptable. The technology is quite affordable these days.
Wide range of materials suitable for both prototyping and some non-commercial functional applications.
-
FDM printing has the lowest dimensional accuracy and resolution compared to other 3D printing technologies, so it is not suitable for models with complex geometry and fine details
The final product will have visible layer lines, so post-processing is required for a better look
Layer adhesion mechanism makes FDM printed parts anisotropic
Highlights
· With FDM printing, prototypes and functional parts can be produced quickly and at a low cost. There is a wide range of filaments on the market with different physical properties.
· The typical platform size of a desktop FDM 3D printer is 200 x 200 x 200mm. Industrial machines are much larger. From 1000 x 1000 x 1000 mm
· To prevent part warping, cornering, etc., on plastics that have a shrinkage percentage, avoid large flat areas and add support at sharp corners greater than 45 degrees.
· An FDM printed part is inherently anisotropic, so it is not recommended to use such parts for mechanically important components.
Well!, And that's all we have! 3DTool was with you, see you in the next articles!
See 3D printers powered by FDM technology here
You can make a purchase, ask a question, or track your order on our website,
By mail: [email protected]
Or by phone: 8(800) 775-86-69
Don't forget to subscribe to our YouTube channel:
And to our groups in social networks:
In contact with
FDM 3D printing technology
FDM (Fused Deposition Modeling) is the most common 3D printing technology in the world.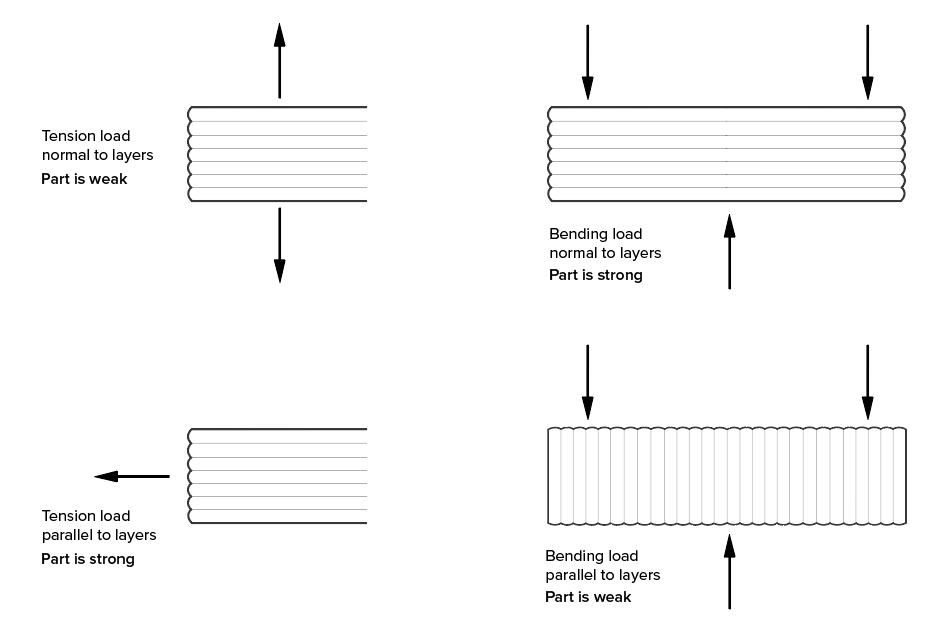 With its help, both cheap home printers and industrial high-precision 3D printing systems grow products. The principle of building according to FDM technology lies in the layer-by-layer growth of a product from a pre-melted plastic thread.
- How it works
- Printing examples
- Construction accuracy
- Choice of 3D printer
- Principle of operation
- Examples of print
- Construction accuracy
- Select 3D -printer
What is better to print: large products, which must be reliable in reliable properties ( ).
Advantages: strong wear resistant products, low material cost, high post-processing capabilities.
Alternative: MJM and PolyJet technologies, which with the help of special materials (ABS imitation) provide higher accuracy and surface quality of finished products (at a higher cost of printing).
What to print better: large items that must have reliable mechanical properties (strength, wear resistance, flexibility).
Advantages: strong wear resistant products, low material cost, high post-processing capabilities.
Alternative: MJM and PolyJet technologies, which with the help of special materials (ABS imitation) provide higher accuracy and surface quality of finished products (at a higher cost of printing).
How it works
The 3D model in STL format is transferred to the 3D printer software. The program automatically (or the operator manually) places the model in the virtual space of the working chamber. Then the program automatically generates elements of auxiliary structures (from a special support material) and calculates the amount of consumables, as well as the prototype growing time. Before starting the printing process, the model is automatically divided into horizontal layers and the paths of the print head are calculated.
Then the direct 3D printing process starts: a heating head with dies (extruder) melts a thin plastic thread (fishing line) and lays it in layers according to the data of the mathematical 3D model.
After completion of the product building process, auxiliary structures are removed (manually or dissolved in a special solution). The finished product can be used in printed form or subjected to any post-processing method.
FDM Product Examples
Prototype air intake, ABS
Part of the engine cover
Master-model of dynamics, PLA
Prototype for tests, Ultem 9085
Copping for reverse engineering, ABS
Part of the case with support, ABS
of the airborne recruiter, prototype of the airborne collection. ABS
Motor housing part
Speaker master model, PLA
Test prototype, ULTEM 9085
Reverse engineering housing copy, ABS
Housing part with support, ABS
Building accuracy
The accuracy of building models using FDM technology largely depends on the thickness of the printed layer. This value can be from 0.127 to 1 mm. The surface of finished objects is usually slightly ribbed (stepped - within 0.