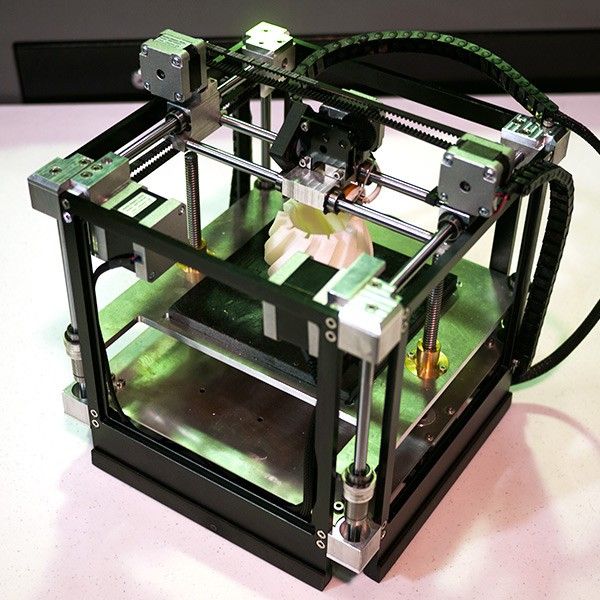
How do resin 3d printers work
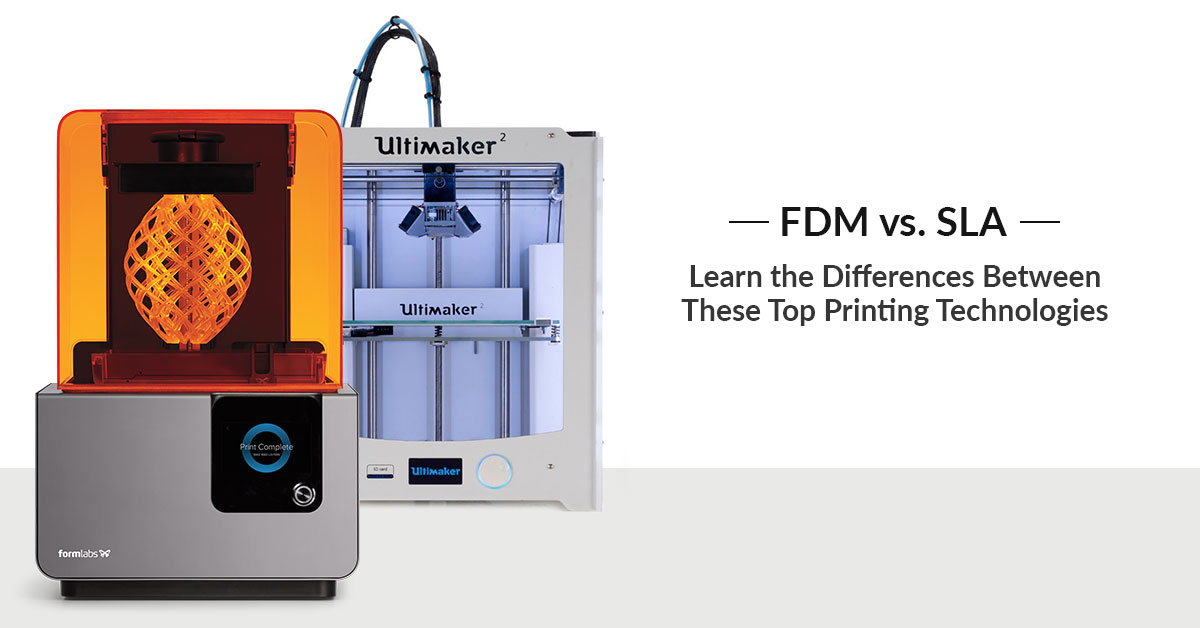
Resin vs. Filament 3D Printer: Which is Best for You?
Research Hub > Resin vs. Filament 3D Printer
June 27, 2022
Article
4 min
Resin and filament are the two most common materials used in 3D printing. But which is better for your project, and what equipment do you need?
What's Inside
- What is Stereolithography (SLA) 3D Printing?
- What is Digital Light Processing (DLP) 3D Printing?
- What is Fused Deposition Modeling (FDM) 3D Printing?
-
Filament vs.
Resin Printers
- Which 3D Printer Should You Buy?
SLA and DLP are two different types of resin 3D printers, while FDM are filament 3D printers. Read our breakdown below to compare.
What is Stereolithography (SLA) 3D Printing?
Stereolithography (SLA) is the oldest form of 3D printing. It works by exposing a layer of photosensitive liquid resin to a UV-laser beam; the resin then hardens in the desired pattern, and the object is built layer by layer until it is complete. This allows you to print a model with extremely fine detail.
Objects printed by SLA 3D printers have smooth surfaces, but often the quality depends upon the printer type. SLA resin printers tend to have smaller build plates, so you can't make larger pieces on them. Printing via SLA involves a longer process as printed objects need to be rinsed using a solvent and then put into an ultraviolet oven to complete processing.
What is Digital Light Processing (DLP) 3D Printing?
Digital Light Processing (DLP) is the fastest of all 3D printing methods. A layer of hardened material can be printed in a few seconds and quickly transferred to allow for printing of the next layer. Like SLA, DLP 3D printers use liquid plastic resin, but instead of a UV-laser beam, the resin is melted with arc lamps. This light source causes the impressive printing speeds because the amount of light allows the resin to quickly harden. DLP is a robust technology that produces high-resolution models every time, even allowing you to use cheaper materials for complex and detailed objects.
What is Fused Deposition Modeling (FDM) 3D Printing?
Fused Deposition Modeling (FDM) is filament 3D printing, the most popular and readily available form of 3D printing available on the market. Developed and originally implemented in the 1980s, FDM allows you to print operational prototypes as well as ready-to-use products as such LEGO, plastic gears and much more
All components printed with FDM can go in high performance and engineering-grade thermoplastic, which makes this technology useful for mechanical engineers and manufacturers. Printed pieces have excellent mechanical strength and heat resistance. FDM printers construct 3D objects layer by layer, starting at the bottom and moving upwards by heating and extruding thermoplastic filament. This form of 3D printing is useful in all fields, from new product development to prototyping to end-product manufacturing.
Filament vs. Resin Printers
There are several key factors to consider when deciding whether an FDM or SLA/DLP printer is the right choice for you.
- Cost - When purchasing a 3D printer, it is not only the printer cost that you must take into account; it is the filament or resin cost, as well as other accessory and time demands. On printer cost, FDM printers easily win over SLA/DLP printers at every level. Especially for novices, budgetand entry-level SLA/DLP printers are few and far between.
In addition, you must consider the upkeep of the printer. A spool of filament will cost you $25 or less, with infrequent nozzle replacement given regular cleaning and maintenance. With resin printers, you will need to replace both resin and resin tanks frequently. A tank costs $40 or so, and a liter of resin is around $80.
 When comparing costs, an FDM printer is far more affordable.
- Quality - A major consideration in 3D printing is the quality of objects that you will be printing. FDM printers rely on several factors, such as extruder precision, nozzle size and adhesion between layers. Warping, shrinkage and shifting are not uncommon as the layers are slowly squeezed together. However, these issues can be cleaned up in post-processing.
On the other side, SLA/DLP printers provide superb quality because the laser determines fine details, leading to extremely precise, high-quality print jobs. When comparing finished products, resin 3D printing yields better final results.
- Ease of Use - There is a definite learning curve no matter if you choose a filament or resin 3D printer. For filament printers, you will need to remove the final print from the print bed using a palette knife and then perform some post-processing snipping off of excess plastic, as well as a bit of sanding.
For resin printers, removing the final print is a bit more cumbersome as there is a lot of excess resin leftover. In addition, objects will need to be wiped with isopropyl alcohol and sometimes put into an ultraviolet oven for final processing. Both printer types require postprocessing, though filament printers might be a little easier to use.
- Durability - Both types of printers have been shown to form pieces offering high durability. Alternatively, materials such as PETG and ABS can be exposed to heat and UV rays, adding more durability to filament printing. This means that anything from a children’s toy to an outdoor coaster can be printed and they will stay intact if left outside for an extended period.
- Build Volume - Resin printers can vary from smaller build volume to much bigger based on the printer. Many of the entry level printers are standardized at 130 x 80 x 160 mm, printing anything an individual or business could need. 192 x 120 x 150 mm is a smaller size in which more advanced resin printers can produce products at, much smaller than that of your everyday resin printer.
- Print Speed - For most resin printers, a print speed of around 100mm/hour is a good speed if an individual or business has the time on their hands and does not worry too much about efficiency. DLP and SLA printers can achieve a top speed of 720 mm/hour if the details do not matter as much. Those printers tend to be the most effective amongst the rest, so normally the job will be done at a high rate of print speed and look great.
Conclusion: Which 3D Printer Should You Buy?
Choosing the 3D printer that is right for you depends on your needs and the objects that you are creating. Filament and an FDM printer is the right choice for hobbyists and makers, those building low-cost materials, when strength and durability are important or when precision and surface finish aren’t crucial. Resin and an SLA/DLP printer is the right choice when high precision and smooth finish is of utmost importance and cost isn't a factor.
Looking for a 3D printer? Find what you need on CDW.com.
How do Resin Printers Work: SLA, DLP & More
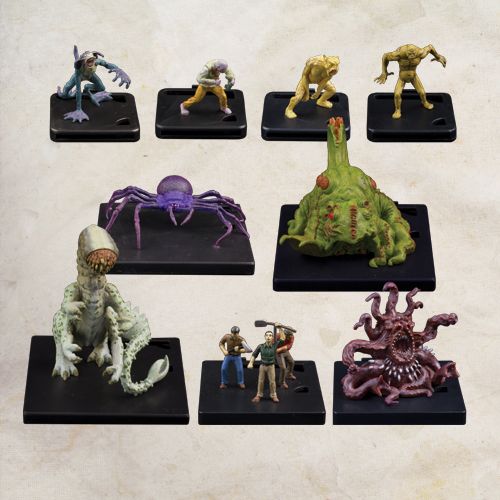
When we talk about resin 3D printing—or vat photopolymerization—we are referring to any 3D printing process that uses a liquid resin as its build material and a light source to solidify the liquid resin. As we’ll see, there are different variations on resin 3D printing (i.e. SLA, DLP, LCD), but generally speaking resin printing technologies are incredibly versatile and are used for many types of applications that require a high resolution and fine details. Hobbyists and gamers use resin printing technology to create highly detailed miniatures; jewelry designers use it to create prototypes and patterns for casting; dental labs use it to create patient-specific models and molds; and more.
In this article we’ll look at the different methods of resin 3D printing, as well as how to safely store, handle, and dispose of photopolymer resin materials. We also cover how to clean and post-process resin 3D prints for the best quality and optimal properties.
Technologies for 3D printing resin
There are several different resin 3D printing processes and many different hardware solutions on the market today. Let’s take a look at some of the most common resin 3D printing methods.
Stereolithography (SLA)
Stereolithography, also known as SLA, is one of the most widely used 3D printing techniques today. It is also one of the oldest: the first SLA 3D printer was invented in the 1980s by 3D Systems founder Charles Hull. In the SLA 3D printing process, a UV laser “draws” a cross section of a part on a thin layer of liquid photopolymer resin. When the resin is exposed to the UV laser light it is cured and solidifies. From there, another thin layer of resin is applied and the laser process is repeated until a solid 3D printed object is created.
One of the main reasons SLA 3D printing is so popular is its ability to print high-quality isotropic parts with very smooth surfaces. Unlike FDM prints which are porous, SLA parts are also watertight. Additive manufacturing users are also drawn to SLA for its diversity of materials: the technology is today compatible with a wide range of resins, including standard resin, transparent resin, tough resin (ABS-like), flexible resin, biocompatible resin, and filled resin (i.e. ceramic-filled resin).[1]
Over the years many different industries have adopted SLA 3D printing technology, including the medical and dental industries, the jewelry sector, the consumer segment (particularly for product development), and engineering for high-quality prototyping.
Recommended reading: What is Resin 3D Printing
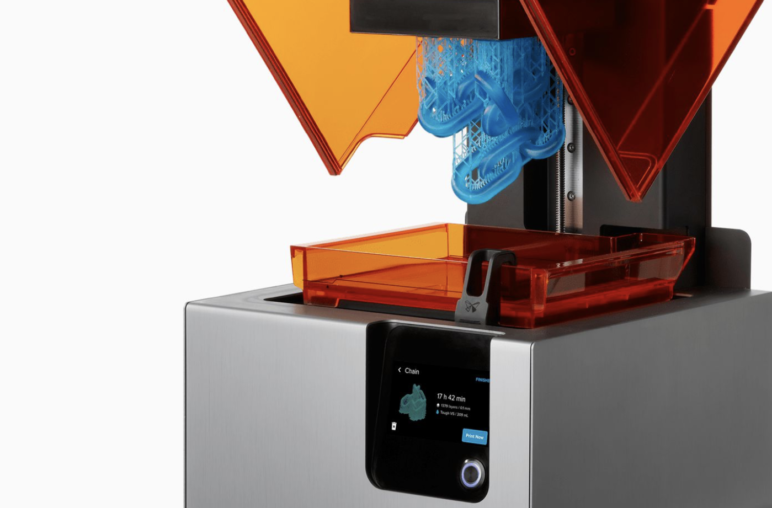
Many resin 3D printing technologies use a bottom up approach, where the build plate lifts up from the resin vat.
https://www.shutterstock.com/image-photo/sla-stereolithography-dlp-digital-light-processing-2005613639
Digital Light Processing (DLP)
Digital Light Printing, aka DLP, is also among the most popular resin 3D printing processes. DLP is similar to SLA in many ways: it too uses a light source to selectively cure layers of liquid resin photopolymer. Unlike SLA, which uses a single UV light to draw on the layers of resin, DLP uses digital projection to expose segments of the liquid resin to light. More specifically, for each new layer of liquid resin, the DLP projection system emits a 2D pattern (the cross section of the 3D model) which cures the entire resin layer at once.
One of the benefits of DLP 3D printing is its printing speed: because the digital projector can cure an entire layer of resin at once, the DLP process can be significantly faster than SLA, which relies on a laser to draw out the 3D model cross section. SLA, however, is typically capable of achieving higher resolutions than DLP.
Like many SLA 3D printers, DLP systems are built on a bottom up approach. This means that the projection system is placed below the vat of resin and the build plate lowers itself into the resin. The digital projector then flashes and cures a pattern onto the layer of resin through the transparent tank. As each layer is printed, the build platform moves up a layer.
Another critical element that is particular to the DLP process is the digital micromirror device (DMD). The DMD is a system made up of thousands of tiny mirrors. These mirrors are responsible for directing the light emitted from the digital projector to the resin layer. The DMD also has a big influence on the resolution of the DLP printers.
Recommended reading: Digital Light Processing 3D printing explained
Liquid Crystal Display (LCD) / mSLA
Liquid Crystal Display (LCD) 3D printing, sometimes known as masked stereolithography (mSLA), is very similar to DLP 3D printing: both processes use a light source to cure layers of resin material using a bottom up approach. The key difference between the two technologies is the type of light source: DLP uses a digital projector and DMD, while LCD uses a combination of LEDs and an LCD screen. In the LCD printing process, an array of LEDs positioned below the 3D printer resin vat emits light, which is passed through an LCD screen. The LCD screen essentially controls the pattern of the LED lights and enables the resin layers to cure with a high degree of accuracy. Like DLP, the LCD 3D printing process is capable of curing an entire layer at once.
Another difference between DLP and LCD is how the 3D printer resolution is determined. In DLP, the maximum print resolution is influenced by the size of the micromirrors in the DMD. In LCD, the resolution is determined by the number of pixels and the size of the LCD screen. To find the resolution of a LCD 3D printer, you simply have to divide the length of the LCD screen by the number of pixels along the same length.[2]
How to print with resin and what to consider
If you are new to resin 3D printing, the good news is that many SLA, DLP and LCD 3D printers are designed for plug-and-play use. This means it is relatively easy to get the 3D printer up and running. Where things can get a bit more complicated, however, is the material handling. Unlike FDM filaments, which can be stored easily and are safe to touch, photopolymer resins must be handled and stored carefully.
Storing resins
As is the case with any 3D printing material, proper storage ensures the quality and longevity of the material. In the case of 3D printing resins, one of the most important things to remember is that they are sensitive to UV light. They must therefore be stored in opaque containers and preferably in a dark environment. SLA 3D printing manufacturer Formlabs recommends using containers made from HDPE or polypropylene.[3]
If you are storing resins over the long-term, it is important to check for an expiration date. While a resin will not “go bad” so to speak, it will start to lose its photoreactivity properties over time, which can influence print quality.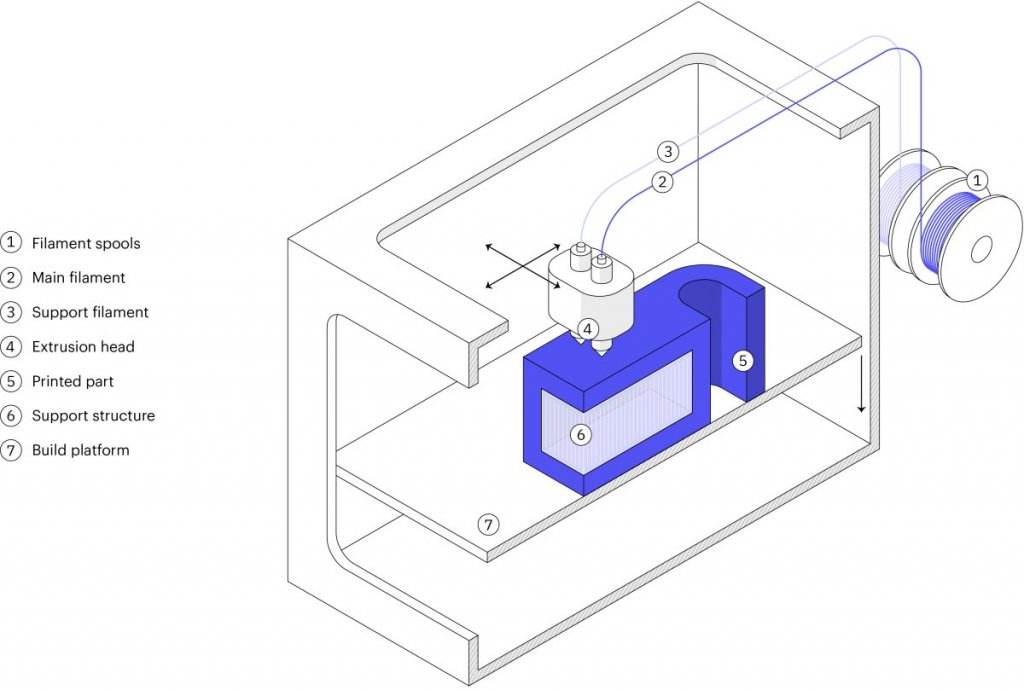 To improve their lifespan, it can also be advantageous to shake resin containers every couple of weeks to ensure they remain well mixed.
Temperature is another key consideration when storing resin materials: many are best stored between 5°C and 30°C. However, the temperature range may vary depending on the brand and type of resin you are printing.
Resin 3D printing is great for producing parts with a high level of detail and smooth surface finishes.
https://www.shutterstock.com/image-photo/kiev-ukraine-october-7-2017-objects-751599910
Handling resins
While fully cured resins are perfectly safe, when the material is in liquid form it is considered toxic. It is therefore crucial to follow certain safety measures when handling uncured resins—both when filling the resin tank or disposing of leftover material.
First, be sure to wear protective gloves and clothing when handling liquid resin. This will ensure your skin is safe from any irritation that may occur if you spill resin on yourself. For the best protection, chemical-resistant nitrile gloves or neoprene gloves are recommended. If your skin does come into contact with liquid resin, it should be washed thoroughly with soap and water—avoid using alcohol-based cleaners.[3] Wearing eye goggles is also a good idea to protect yourself in case of any resin splashes.
Some makers also choose to wear a mask when using a resin 3D printer due to smells emitted during the process. However, most types of resin are not volatile when printed and do not require users to wear a mask; printing in a well ventilated space should be sufficient. As a rule of thumb, read the manufacturer’s safety data sheet (SDS) for each resin material you print.
Cleaning resin prints
One of the benefits of resin 3D printing technologies is that parts do not require significant post-processing. SLA, DLP and LCD systems are all capable of printing models with smooth surface finishes and fine details. That being said, 3D printed resin parts do need to undergo a cleaning process to remove the sticky uncured resin residue from their surface.
There are a few different cleaning methods available for resin prints, including dedicated washing stations sold as accessories for 3D printers. One of the most common methods, however, is to use a bath of Isopropyl alcohol (IPA). Simply submerge your 3D print in IPA and agitate it for about 30 seconds. You can also let the print soak in the IPA solution. Continue this process until the sticky resin residue is gone. Typically, a double rinse should be sufficient.
If you are using IPA to remove uncured resin, be sure to take the necessary precautions, such as wearing protective gloves and eyewear and protecting your workstation from potential spills. It is also a good idea to invest in some silicone tools for cleaning, since resin residue won’t stick to them. If you can’t get your hands on IPA, denatured alcohol, acetone or Mean Green are suitable cleaning alternatives.
Post-processing resin prints
Besides cleaning resin prints, there are a few other post-processing steps to be aware of. Post-curing, for example, is an optional step that further cures 3D printed resin parts and results in superior mechanical properties. Post-curing is a great option when producing functional parts or prototypes that require greater strength and is a requirement for biocompatible resins. Many SLA and DLP 3D printer manufacturers offer dedicated post-curing stations, however it is possible to make your own using a UV light source and rotating platform. It is also possible to post-cure resin prints in the sun.
Recommended reading: Knowing How Long to Cure Resin Prints
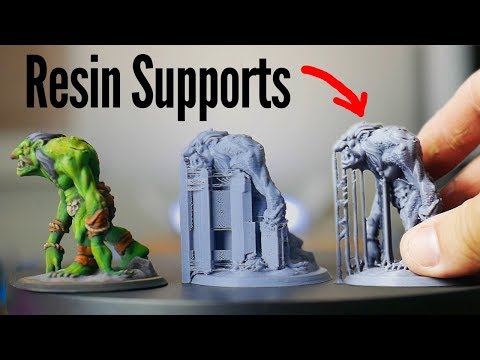
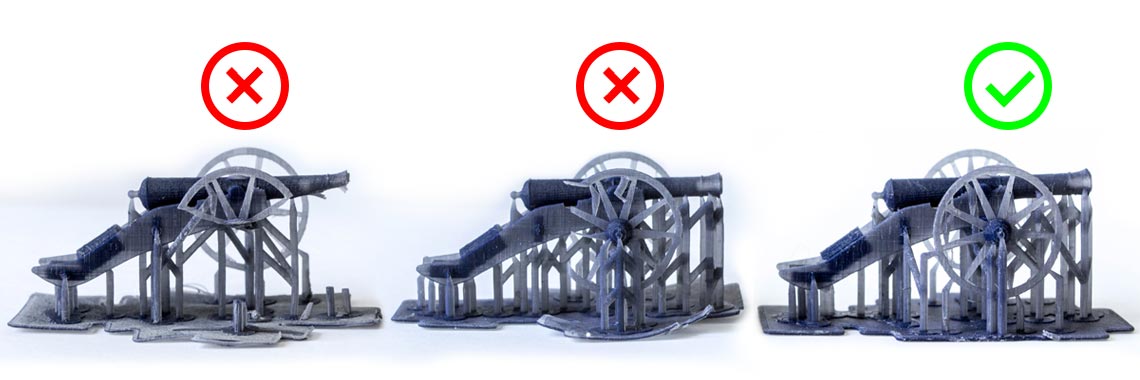
If your printed part was made with support structures, support removal is an important post-processing step. Support removal is fairly straightforward: after the cleaning process, clip away supports using flush cutters. By placing the cutters as close as possible to the print surface, you will minimize the amount of sanding required to ensure a smooth surface finish. For supports located at delicate junctures, use tweezers to carefully pry them away. If you do need to sand the 3D print to remove support marks, start by using a low grit sandpaper and gradually transition to finer sandpaper. Using strategic support orientations can also minimize the need for support structures and make them easier to remove.
Use flush cutters to remove supports from the resin 3D print. Use sandpaper to gently smooth out any remaining marks.https://www.shutterstock.com/image-photo/3d-printed-denture-base-dentures-support-2129431247
Resin disposal
Last but not least is resin disposal. Because uncured resins are considered toxic, leftover resin must be disposed of carefully and safely, in compliance with environmental regulations. This means you should never pour resins or cleaning solvent (which has traces of resin) down the drain or put them into your household waste. To properly dispose of leftover resin and contaminated cleaning solutions, follow instructions laid out by local waste management organizations for chemical waste.
Another option is to cure leftover resin and throw out the solidified (and thus non-toxic) pieces with your regular trash. To be safe, it is also a good idea to place any contaminated paper towels or gloves that have liquid resin on them in the sun. Only when the resin residue has cured will it be safe to throw the paper towels or gloves away. The same goes for empty resin containers. To ensure that no toxic residue ends up in the trash or recycling, cut open resin containers and expose them to UV light. This will cure any traces of resin, which can then be safely removed and thrown out.
Key Takeaways
Ultimately, resin 3D printing technologies like SLA, DLP, and LCD are great for producing high resolution prints with good surface quality and fine features. Here are some of the main takeaways about resin 3D printing that we covered:
The main difference between resin 3D printing process is the light source used: SLA uses a laser beam, DLP uses digital projection, and LCD uses a combination of LEDs and an LCD screen.
Storing photopolymer resins away from sunlight is critical to ensuring their quality over time.
Uncured resins are toxic and must be handled with care. Be sure to wear nitrile gloves and protective clothing when filling resin tanks or disposing of unused material.
Uncured resin cannot be disposed of down the drain or in household waste. Either cure leftover resin before throwing it out or follow proper chemical waste protocols.
References
[1] https://www.hubs.com/knowledge-base/sla-3d-printing-materials-compared/#overview
[2] https://phrozen3d.com/blogs/guides/sla-vs-dlp-vs-lcd-which-resin-3d-printer-is-the-best-for-you
[3] https://support.formlabs.com/s/article/Resin-Care?language=en_US#storage
Photopolymer 3D printer, technologies, materials, working principle – 3dprofy
Turch October 21st, 2014
Resin-based printing is carried out using SLA stereolithography method . I printing process applied liquid polymer. The printer itself consists of a powerful laser, as well as a bath in which the base platform is located.
Features of the printer for SLA
The essence of the 3D printer is as follows. The platform is lowered into the bath to a depth that depends on the thickness of the print layer. Then a layer of the future model is projected onto it with a laser. Under its influence, the photopolymer hardens, that is, the formation of the part begins. The platform is then lowered to begin forming the second layer. And so on until a three-dimensional model is obtained. After the printing is completed, the product is treated with special compounds to remove excess material. In the final stage of work, the part is placed in an ultraviolet chamber, in which it hardens. nine0003
Pros and cons of the SLA printer
Resin cures only 20% during printing, which is caused by difficulties in choosing the laser power. The advantages of this printer include the high accuracy of every detail and the ability to create prototypes for various fields.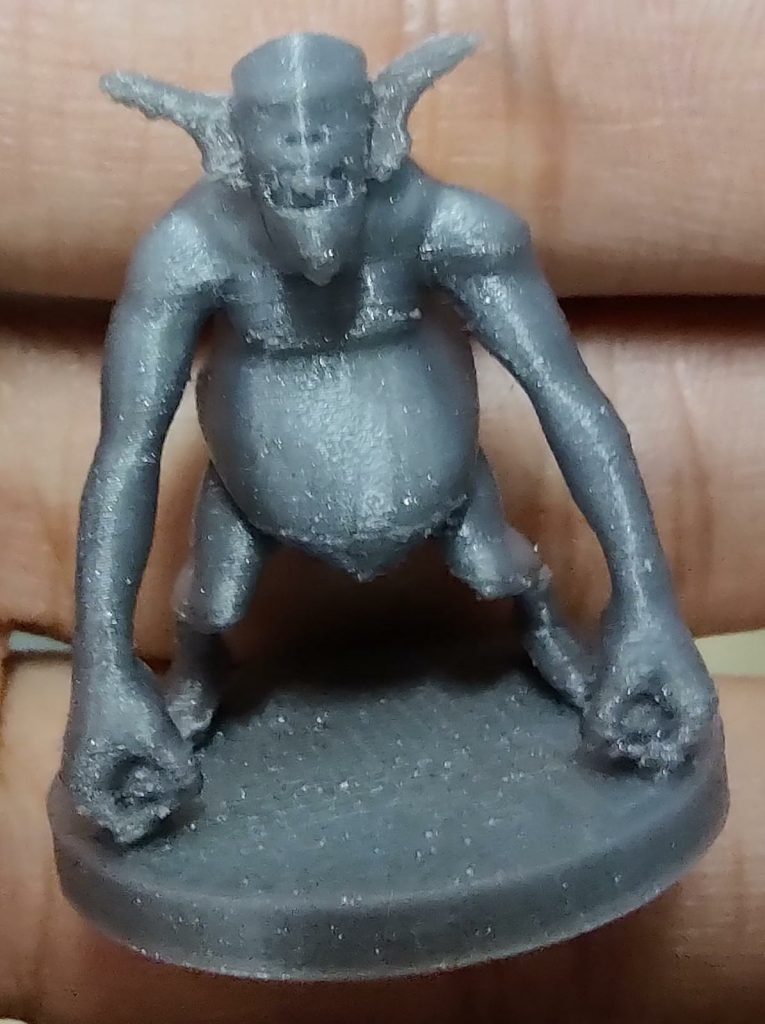 On the other hand, the equipment is quite expensive, and the printing itself takes too much time. In addition, the created parts require additional work, which is expressed in washing and hardening of the product. In addition, the liquid polymer is expensive. nine0003
How is printing done?
The prototype is grown on a special mesh platform. The first photopolymer layer is thin, but during the process, under the influence of a laser, it gradually hardens. The hardening of the model occurs in those areas that are specified on the computer model. At the final stage of work, an almost finished model is lowered into a container with a chemical solution - in it, unnecessary artifacts are removed from the product, and it is also cleaned. The printing process will require the preparation and alignment of auxiliary structures that will achieve optimal physical and chemical properties and will be removed upon completion of the prototype. nine0021 What is good about 3D printing using the SLA method? Firstly, the speed of the process - you can grow an object in just one day. Secondly, on the basis of this method, it is possible to create structures with complex relief. Thirdly, you can pick up a large number of materials that will allow you to conduct a high-quality and fast printing process.
Objet Printer
One of the popular devices that can be used for printing with photopolymer materials is the Objet brand. The peculiarity of the technology is that the layer thickness is slightly higher, while the finished product is durable and reliable. Objet brand printers can work with two materials at once, while they can be used to create one or two prototyping models. Each printing process can be given specific characteristics so that the final models meet the necessary requirements. nine0003
The Objet24 allows you to create highly detailed prototypes that can be equipped with moving parts. The final part will be durable, despite the thin walls, and the smooth surface will be an opportunity for further painting in the desired color scheme. This printer model is suitable for designers or engineers who need to create high precision models. This device works with VeroWhitePlus hard photopolymer, which is easy to use: it can be painted, drilled, machined. nine0003
More advanced SLA printer model - Objet30 Pro . Based on it, you can create prototypes from eight different materials, each of which is characterized by heat resistance, different structure and texture. Most importantly, the print quality will be excellent. The printer has a capacious tray, which allows you to print large quantities of goods, for example, for medicine.
Professional printers
Professional printer model 9 can be used0005 Objet Eden260V . This is a truly profitable investment because you can quickly create prototypes from 18 materials. The ultra-thin layers of the 3D model allow for exceptional detail, complex shapes and very thin walls. The device works silently, so it will be an excellent solution for office premises.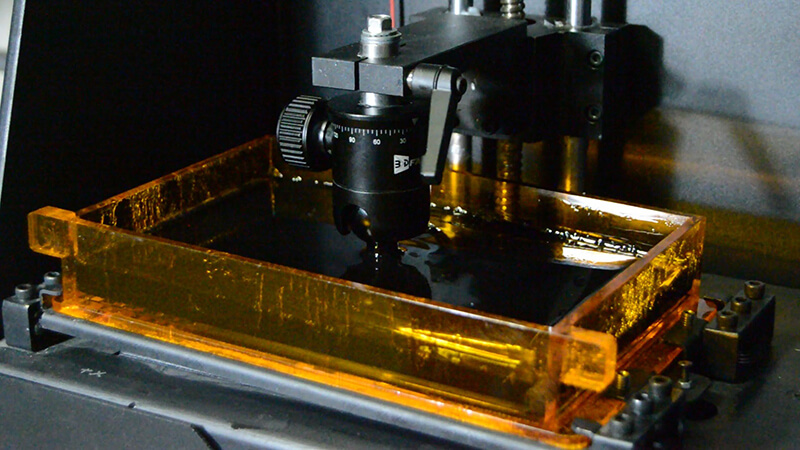 This printer model works with several types of materials:
- transparent, on the basis of which you can create parts of strong shapes and with a smooth surface,
- opaque rigid materials in various colors,
- with polypropylene based raw material, which is flexible yet strong so you can prototype with moving parts,
- elastic materials that allow you to print parts with a non-slip or soft surface,
- with heat-resistant materials to create functional parts.
The main distinguishing feature of the finished product is a radiant color, which is ensured by the use of materials of various colors. nine0003
Objet500 Connex3 3D Printer is a prototyping device that can combine up to 46 colors. Several durable photopolymers can be combined in this printer.
Photopolymers: types and applications
This type of plastic is characterized by high temperature resistance and high strength. Based on the material, high impact resistance and toughness models can be printed. Based on Digital ABS , you can create:
- functional prototypes,
- molds,
- housing parts that operate at low or high temperatures,
- housings for electronic parts, e.g. for mobile phones,
- engine parts, covers.
High Temperature Material - White RGD525 Material . It is dimensionally stable. On the basis of a photopolymer, it is possible to create simulations of the thermal characteristics of industrial plastics. Ideal for functional testing, for example in hot air or hot water. This material is useful for shaping, fitting and functional testing of static parts, which require high quality in terms of surface and clarity. Photopolymer RGD525 is used to create models for the exhibition, moving parts, pipe taps and household appliances. nine0021 In the dental field, photopolymers are used, which have rigidity and an opaque structure. When creating prototypes, excellent detail and high accuracy play an important role. Based on VeroDent, VeroDentPlus and MED610 photopolymers, you can create plaster models, removable mouthguards, surgical guides and other devices for dentistry and orthodontics.
Tango elastic photopolymer 3D prints prototypes that are extremely hard and tear resistant. Based on them, you can print products for exhibitions, various pens, hoses and shoes. Thus, photopolymer 3D printing based on SLA technology is an opportunity to obtain high-quality models that can be used in various fields. nine0003 3D printers can be sorted not only by the printing technologies used, but also by the consumables used. In this section, we will look at devices that use photopolymer resins to build models. Photopolymer resins are liquid polymers that harden when exposed to light. Photopolymer resin loaded into Form 1 3D printer The physical properties of resins after polymerization vary widely. Both rigid and flexible options are available, transparent and matte. A wide selection of colors is also available. Resin consistency and exposure times also vary, so a range of compatible media should be considered when choosing a printer. The last aspect to consider when choosing a material is its toxicity. There are both quite toxic options and biologically safe ones. nine0003 The cost of consumables can be considered the Achilles' heel of photopolymer printing. SLA Model The firstborn of photopolymer printing and modern 3D printing in general. The technology was developed in 1984 by Charles Hall, who later founded 3D Systems. SLA printers use laser emitters to cure the photopolymer supply. A typical SLA printer consists of a consumable tray sitting under a build platform driven vertically by a raise/lower mechanism. Alternatively, the cuvette itself can be driven - what matters is the relative movement of the platform and the container. Above the cuvette is a laser emitter and a mirror system for deflecting the laser beam. During printing, the platform is immersed in the consumable for the thickness of one layer of the digital model. Since photopolymer resins can be quite thick, a leveling mechanism is often used to speed up the process. SLA printer operation scheme After leveling, the process of illumination of the material begins. Illumination is produced by laser irradiation. Most photopolymer resins are designed to cure (polymerize) when exposed to ultraviolet light, which determines the choice of laser frequency. The movement of the beam along the X and Y axes is determined by the operation of the deflecting mirrors. nine0003 After the drawing of the layer is completed, the platform is immersed in the material for the thickness of one more layer, and the process is repeated with the drawing of the next layer of the digital model. Animation of the build process SLA printing takes quite a long time, and printers using this method tend to have relatively small build areas. This is mainly due to the high cost of laser emitters: printing large objects with a single laser will take too much time, and installing additional emitters and mirrors will complicate the design, increase the installation dimensions and raise the price to a level unacceptable for most users. nine0003 Despite the success of this technology, projected stereolithography is considered to be a more promising, albeit very similar, method. Formlabs Form 1 Desktop DLP Printer A close relative of laser stereolithography, this method uses digital LED projectors instead of laser machines with mirror deflection systems. The method became popular due to the development of technology for the production of low-cost high-resolution digital projectors by Texas Instruments. nine0003 Layers are illuminated using a digital projector that highlights the patterns of the entire layer, which distinguishes this method from SLA, where the “picture” emerges progressively using an ultraviolet laser. A similar approach was previously used on SGC-type plants, but this technology used physical photomasks, making the process expensive, time consuming, slow and noisy. FTI continues to exist, a development of SGC that is virtually indistinguishable from DLP printing, as it also uses digital LED projectors. nine0003 DLP printer design Simultaneous illumination of an entire layer using projectors allows you to significantly speed up the printing process even compared to SLA printers that have a high scanning speed (ie beam movement). In addition, these printers are less sensitive to rough physical impact due to the absence of delicate mirror systems. The absence of mechanical mirror systems improves accuracy. Finally, the cost of projectors sets them apart from laser systems. nine0003 Projection size can be quite significant, reaching the average of popular FDM printers. An interesting feature of DLP printers is the ability to "reverse" or "reverse" printing. In this case, the projector is installed under a transparent (material choice for transparency in relation to ultraviolet light) cuvette, and the platform does not sink into the material, but gradually rises, pulling out the layers of exposed polymer. nine0003 This approach eliminates the alignment mechanism and achieves even higher Z resolution than SLA printers. In addition, the size of models in height is not limited by the depth of the cuvette, which favorably affects the dimensions of the printer and the possibility of increasing the build area. 3D Systems ProJet 3500HDMax MJM printer MJM and PolyJet technologies are practically indistinguishable from each other. The name difference comes from the respective patents: Multi Jet Modeling is owned by 3D Systems, while PolyJet is owned by rival Stratasys. nine0003 The very principle of multi-jet polymer printing was developed by the Israeli company Objet, which eventually became a division of Stratasys. Multi-jet printing technology combines features of 3D inkjet printing (3DP) and projection stereolithography (DLP). How the MJM PolyJet printer works Models are built by spraying photopolymer using linear arrays consisting of multiple nozzles. The applied layer is immediately exposed to ultraviolet lamps - as a rule, two processes occur simultaneously. By the time the array reaches the end of the build chamber, the previously deposited material is hard enough to print a new layer. Composite models created on the ProJet 3500 DP dental printer This approach allows to achieve very high printing speed, but is characterized by high design complexity, which negatively affects the cost of such installations and limits their distribution to professional use. nine0003 One of the advantages of MJM and PolyJet technologies is the ability to create composite structures from photopolymer resins with different physical characteristics. It is thus possible to create models with easily removable supports, use several colors and use flexible and rigid materials in parallel within one model. CreoPop 3D Resin 3D Pen Recently, there has been a craze for hand-held printing devices called 3D pens. At the moment, there are three main options for such devices: drip-jet pens (DOD), called BioPen and used in the development of new methods for treating damaged tissues, FDM 3D pens, which are manual extruders (essentially similar to the usual hot glue guns, but using thermoplastics) and developments in 3D-drawing with photopolymer resins. CreoPop 3D pen was the first "handheld resin printer". The design of this device is quite simple, because the most complex function, positioning, is performed by the user himself. The pen only extrudes resin through the tip surrounded by LED emitters. nine0003 CreoPop 3D pen in action This way the resin hardens immediately after application, allowing you to literally draw on air. The advantage of such handles over FDM-analogues is the low operating temperature - there are no heating elements in the device. As a result, with such pens you can even draw on the skin. In addition, a wide range of photopolymer resins with different physical properties can be used with such devices, which greatly expands the range of possible applications. At a minimum, this is a relatively inexpensive, but entertaining toy. nine0003 The only drawback is the relatively high cost of consumables, but such devices are unlikely to require large volumes of photopolymer resin for domestic use. Final Lighting of Resin Models in a Homemade Camera Full curing of models can take quite a long time, so models during SLA and DLP printing are only partially polymerized, sufficient to maintain the physical shape of the part. nine0003 After production, the models are usually placed in chambers equipped with ultraviolet lamps until fully cured.
Photopolymer 3D printer
Consumables
 As a rule, such materials are sensitive to the ultraviolet range, which determines the design of photopolymer printers. One of the common design elements is a transparent colored cap or housing made of a material that filters ultraviolet radiation. This is done both to protect the user's eyes and to protect the supplies inside the printer from exposure to sunlight and background lighting. nine0003
 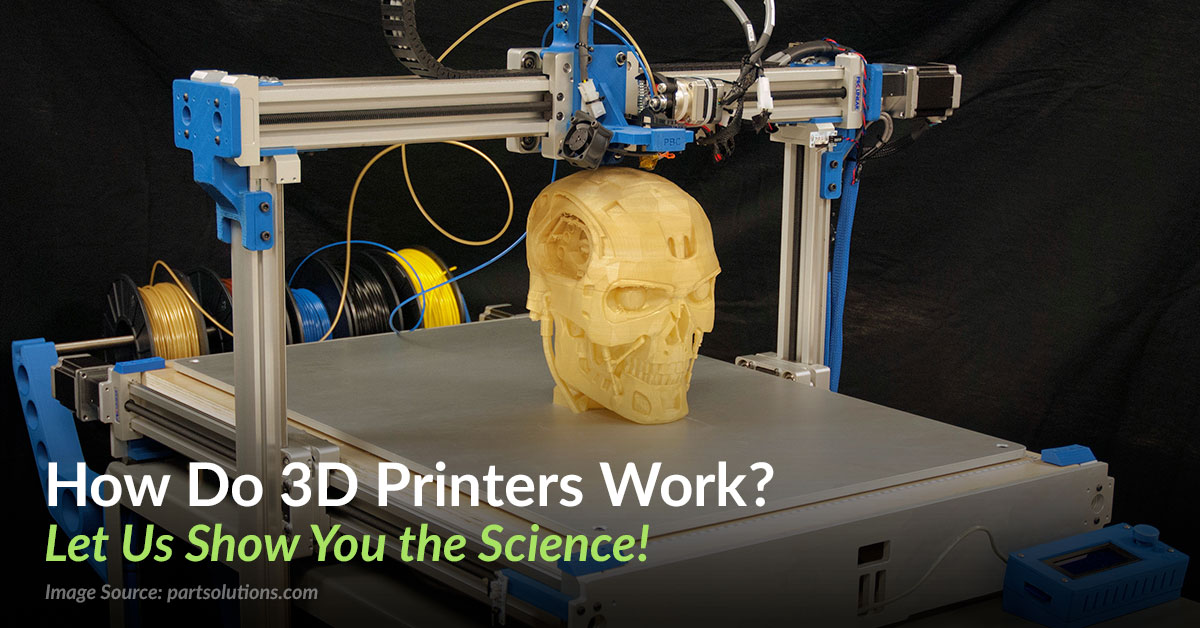 The plants themselves are already reaching quite acceptable price levels, but it is still quite difficult to find inexpensive photopolymer resins. It is hoped that the proliferation of inexpensive photopolymer printers will lead to an increase in the production of consumables and lower prices.
 Laser Stereolithography (SLA)
 nine0003
Projector Stereolithography (DLP)

Multi-jet printing (MJM and PolyJet)

3D Pens

Additional Lighting

Learn more