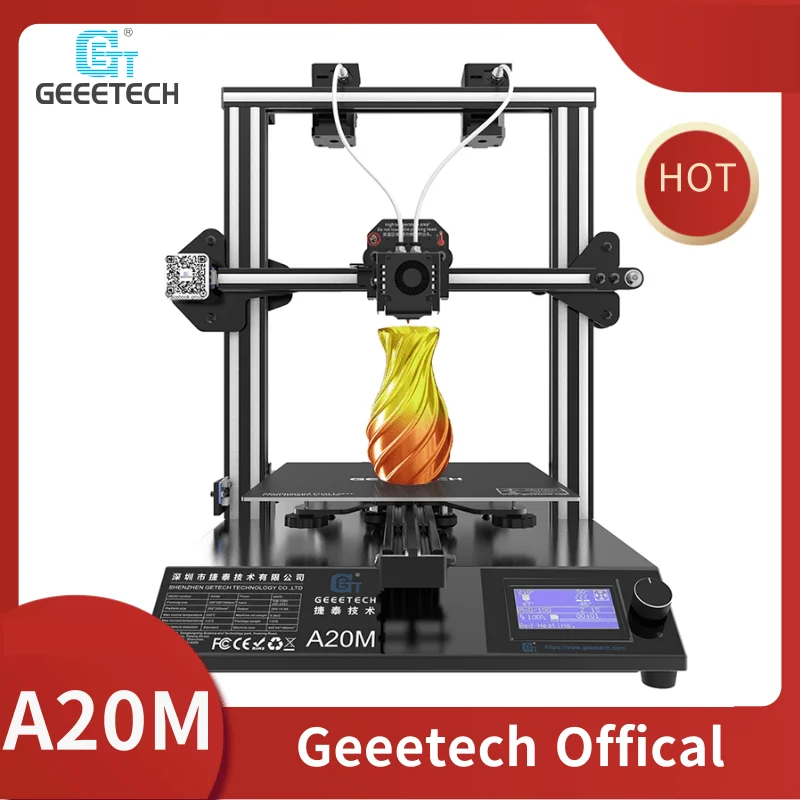
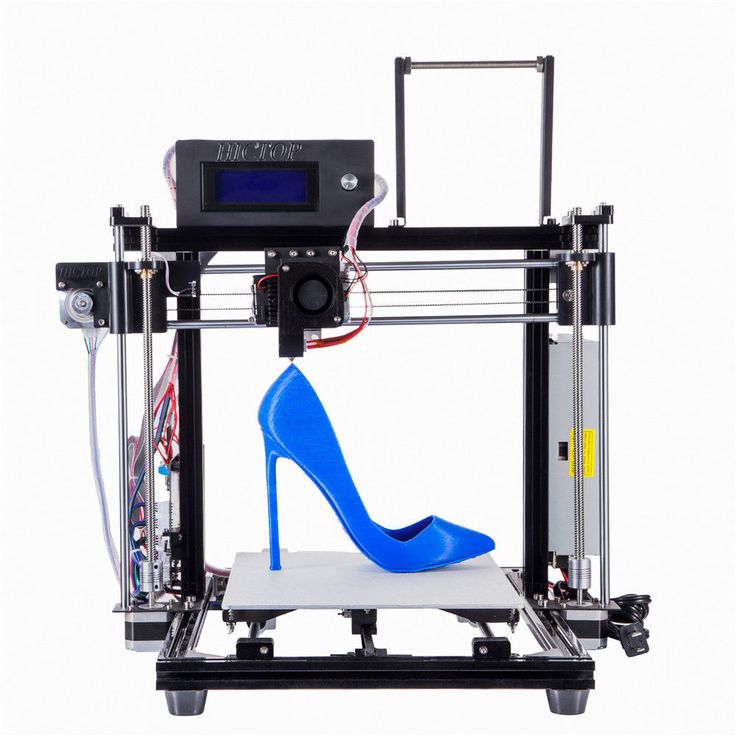
Geeetech a20m 3d printer
Geeetech A20M Review - Specs, Features, Pro & Cons
- Author
- Recent Posts
Martin
Martin has a M.Sc. in physics and has gained many years of experience in industry as a lab manager and quality assurance manager. He has now tested dozens of 3D printers and is happy to share the collected experience with each new article.
Latest posts by Martin (see all)
- BQ-Hurakan vs. Ender-3 V2 Neo | Comparison, Pros & Cons - November 10, 2022
- Mouse Ears (Brim Ears) vs. Warping in 3D Printing – Guide - November 10, 2022
- Ender-5 S1 vs. Ender-5 Pro | Comparison, Specs, Pros & Cons - November 9, 2022
Disclosure: Links marked with * are Affiliate Links. I earn from qualifying purchases if you decide to make a purchase through these links – at no additional cost for you!
Since its launch in November 2018, the Geeetech A20M* has made many friends around the world. The printer is affordable, offers a large build volume and is equipped with numerous features that you would otherwise only find in much more expensive 3D printers. Find out what you can expect from the Geeetech A20M in our detailed review.
Check Price at:
Amazon*
Table of Contents:
- 1 Specifications
- 2 Unboxing
- 3 Setup
- 4 Design, Equipment and Processing
- 5 Operation
- 6 Connectivity
- 7 Software
- 8 Print Resume
- 9 Auto-Leveling Optional
- 10 Gradient Prints
- 11 Dual Color Printing
- 12 Noise Level
- 13 Optional Accessories
- 14 Related Questions
- 14.1 Can the Geeetech A20M be operated with a smartphone and app?
- 14.2 Is the Geeetech A20M available with 2 print heads?
- 14.3 Is there a cover available for the Geeetech A20M?
- 15 Our Conclusion about the Geeetech A20M
Specifications
Let’s first take a look at the technical specifications of the Geeetech A20M*. According to the manufacturer, the printer offers the following technical features:
- Printing technology: FDM
- Construction volume: 255 x 255 x 255 mm
- Printing accuracy: 0.1 mm
- Positioning accuracy X/Y: 0.011 mm
- Positioning accuracy Z: 0.0025 mm
- Print speed: 120 mm/s (max.)
- Filament diameter: 1.75 mm
- Nozzle diameter: 0.4 mm
- Heating bed: max. 100 °C
- Extruder: max. 250 °C
- Filament: ABS / PLA / Wood Polymer* / PVA* / HIPS* / PETG etc.
- Operating system: Windows, MAC, Linux
- Control software: EasyPrint 3D, Repetier-Host, Simplify 3D, Cura, Slic3r, etc.
- App: EasyPrint 3D App (with optional 3D WLAN module)
- File format: .stl, gcode
- Power supply: Input 110V/220V
- Power supply output DC 24V/15A
- Connectivity: SD memory card (max. 32 GB), WLAN (optional), USB cable
- Screen: LCD Display
- Frame: Aluminum profile
- Dimensions: 442 x 447 x 480 mm
- Weight: approx.
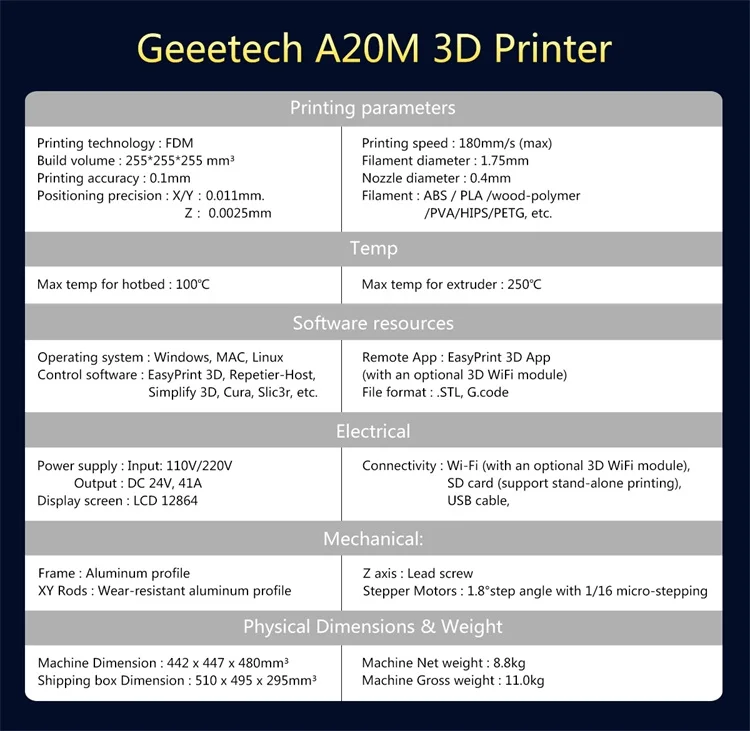 8.8 kg
The Geeetech A20M is a very affordable FDM 3D printer with a large build volume and good features. However, it also has a few weaknesses.
Pro:
- Affordable price
- Large construction volume
- High printing accuracy
- Two-color printing is possible
- Color gradients can be printed
- Filament detectors
- Heatable print bed
- Compatible with many filaments
Contra:
- Open construction
- Automatic leveling only optionally available
- Plastic extruder gearbox
- WLAN module only optionally available
Unboxing
The Geeetech A20M is delivered as a mostly pre-assembled printer. The delivery is very well packed in a sturdy cardboard box with styrofoam inserts. The box contains everything you need to assemble the printer – including tools, cable ties and screws. A good assembly manual with numerous pictures is also included.
In detail, the delivery contains the following things:
- Portal frame (pre-assembled)
- Printer base with power supply, display and card reader
- 2 extruders
- 1 hotend
- 2 filament detectors
- 2 filament holders
- 1 power cord
- 1 SD card
- 2 filament samples
- 1 USB cable
- 1 mouse pad
- 1 assembly instruction
- several cable ties
- all screws
Setup
Assembling the Geeetech A20M* is really easy. In principle, you can assemble the printer on your own. However, the assembly is easier if you have someone to help you. The printer comes with a detailed illustrated and clear assembly manual.
Even without much experience in assembling 3D printers, you should not need more than 15 to 30 minutes to assemble the printer ready for use. The setup is assisted by the fact that the motherboard, the display and the power supply are firmly installed in the base of the printer. The cables are clearly pre-assembled and labeled.
The main task is to screw the gantry frame onto the base of the printer and attach the two extruders to the crossbar. For this, you need only 4 screws each. If you are alone, it is best to lay the print base on its side so that you can screw the portal frame in place. To do this, you must insert the screws through the print base from below.
If you have someone to help you, it is easier to move the printer with one side a few inches beyond the edge of a table so that you can insert the screws from below. Loosely tighten all screws at first to make sure that all screws are gripped.
You can then tighten the screws alternately from left to right. The two holders for the filament rolls are screwed to the crossbar with two screws each, both lengthwise and crosswise. Then the two filament detectors are mounted and the printer is wired. The final step is to mount the print bed on the heating plate. No more effort is required to set up the Geeetech A20M ready for operation.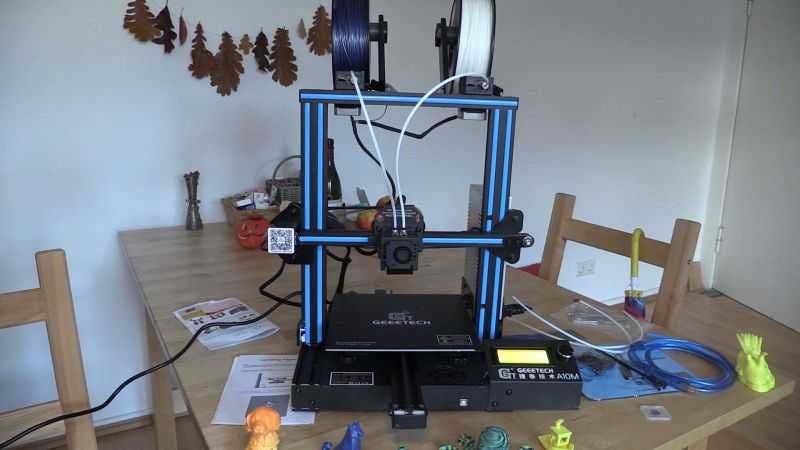
During assembly, you should check whether the screws of the already preassembled components are tightened properly. The Geeetech A20M takes a long time to get to you, so screws can come loose. Some buyers report that they had to retighten various screws during assembly so that the printer is really stable.
A very important point to pay attention to before you switch on the Geeetech A20M for the first time is the position of the voltage switch on the back of the printer. Here you can set whether the printer is powered by 110 volts or 220/230 volts. If the switch is set to the wrong voltage, you run the risk of destroying the printer’s electronics immediately when you turn it on.
Geeetech A20M*Check Price at:
Amazon*
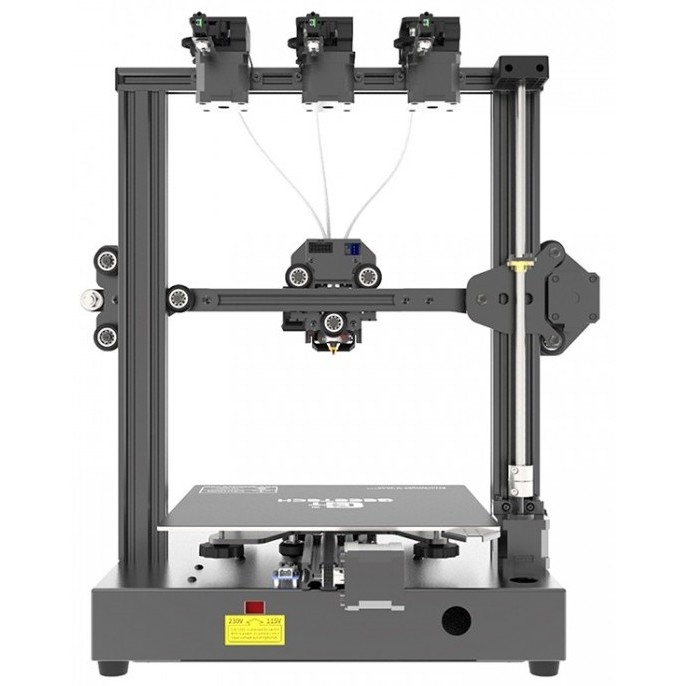
Design, Equipment and Processing
The Geeetech A20M is a 3D printer whose design has been reduced to a minimum. It basically consists of only a printer base, a gantry frame and three movable axes. It is a printer with the classic gantry structure of the Prusa I3 3D printers and can make optimal use of the build platform.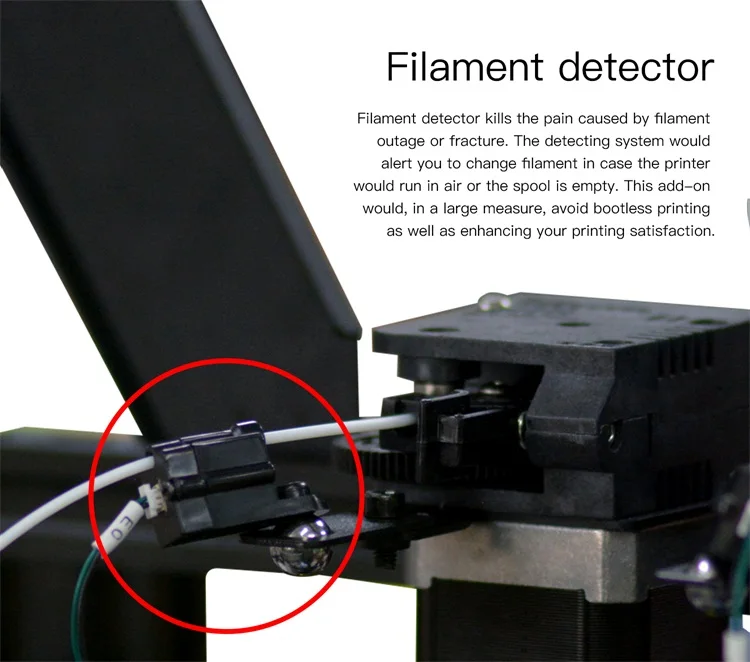
The design is open in all directions. The frame of the Geeetech A20M, which is made of extruded aluminum profiles, is very sturdy and torsion-resistant. Overall, the build quality of the printer is high and leaves a solid impression. It is positive that the display, the power supply and the motherboard are located in the stable printer base. This is exactly the area where other inexpensive 3D printers leave the available space unused.
One shortcoming is the somewhat difficult access to the y-axis under the print bed. It is not uncommon for the axis to require readjustment. If the adjustment is too tight, the bed cannot move freely. If the adjustment is too loose, the bed wobbles during printing.
The heated print bed heats up very quickly. It is equipped with a glass cover. One side provides a protective layer that leaves a small pattern on the models during printing. However, you can turn the glass plate over so that the smooth side is facing up.
You can process a variety of filaments with a diameter of 1. 75 mm with the printer. The printer is compatible with HIPS, PLA, ABS, PETG, PVA and WOODFIL. The positioning accuracy of the xy-axis is 0.011 mm and for the z-axis 0.0025 mm. The hotend has a diameter of 0.4 mm.
To prevent finished printed models from being melted again by the hot end, the print head automatically moves away from the model when printing is complete. The finished printed model can cool down completely.
As standard, the Geeetech A20M is equipped with 2 extruders and two filament detectors. Two-color prints or the printing of models with color gradients are thus possible without changing filaments. The two plastic strands are mixed in the hotend or printed one after the other.
The extruder drives work with a reduction ratio of 1 to 3. Unfortunately, some of the gears are only made of plastic gears. If you print a lot, it is advisable to replace them with metal gears.
Operation
The Geeetech A20M is operated via an LCD display in the beveled front of the printer base.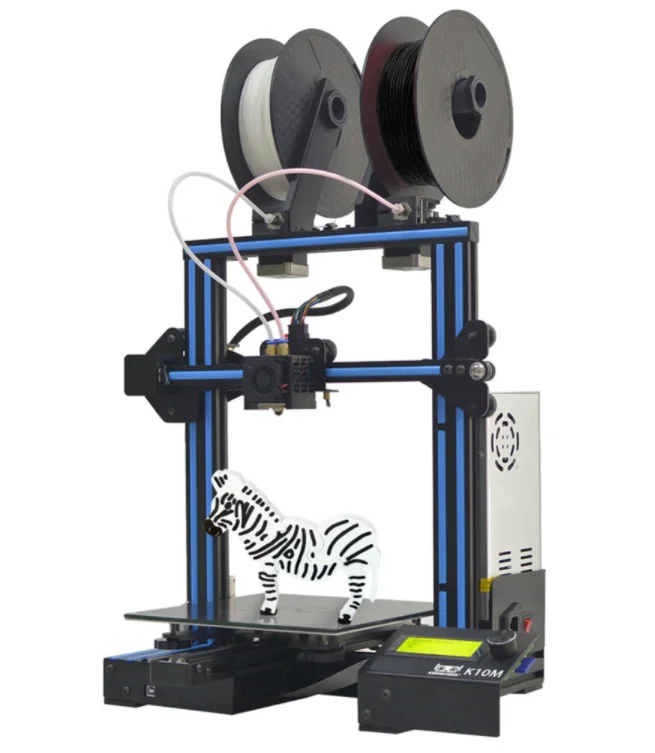 This is not a touchscreen. Menu items are selected with the rotary control placed to the right of the display. The menu navigation is not always intuitive but does not require a long training period.
A reset button is installed under the rotary control. By pressing this button, you reset the printer to the factory settings. The bright font on a blue background is easy to read on this display. You can also use the display to change settings while printing.
Connectivity
The Geeetech A20M is equipped with a card reader for SD memory cards as standard. You can use memory cards with a maximum capacity of 32 GB for the printer.
With the help of this card, you transfer the print data to the printer. Stand-alone or offline printing is thus possible without any problems. A USB port is available as a further connection. The printer is compatible with most Windows, Mac and Linux operating systems.
The connection with your PC or notebook should therefore not cause any problems. A WLAN module is only optionally available.
Software
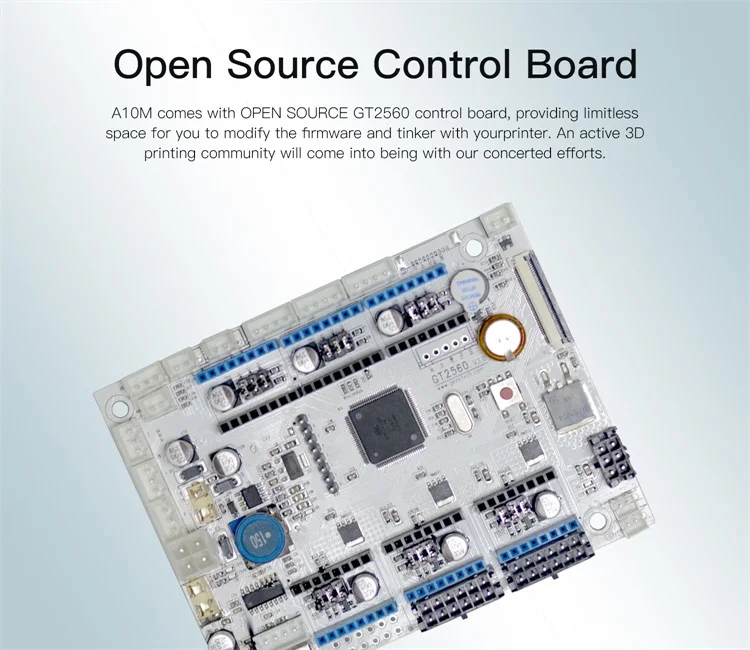
The Geeetech A20M comes with the latest version of the Marlin firmware installed. This software is open-source and has already been extended for the A20M with the mixer. For slicing and creating your models, you can use almost all known slicing programs. For example, Repetier-Host, Simplify 3D, Cura, Slic3r and others. The printer can read files in .stl and gcode format.
Print Resume
The Geeetech A20M is equipped with a print resume function. Resuming printing after a power failure or filament breakage works flawlessly with the Geeetech A20M.
Print-Resume (source: geeetech)However, it can sometimes happen that, depending on the position of the nozzle, a small hump is formed by the residual filament running out of the nozzle. This bump can sometimes be so large that the print head cannot subsequently pass over it. The possible consequence is a layer shift in your model. However, with a very sharp knife or a scalpel, you can easily cut off this bump before you continue printing.
The printer finds the last print position precisely and continues printing at this point. If a layer shift appears, pull the power plug again, remove the hump and then continue printing. At the end, the spot should no longer be visible or barely visible.
Geeetech A20M*Check Price at:
Amazon*
Auto-Leveling Optional
The mainboard of the Geeetech A20M is programmed to support auto-leveling. However, to use this feature, you will need to purchase a 3D Touch* sensor separately. Installing the sensor on the print head is quick and easy.
You then only need to activate the automatic leveling in the software of the printer. After installation and activation of the auto-leveling function, the Geeetech A20M always moves to 9 points of the print bed during leveling.
3D Touch*Check Price at:
Amazon*
Auto-Leveling (source: geeetech)Gradient Prints
With the Geeetech A20M, you can easily create gradient prints. For example, from red to orange. The ratio of the two colors of the right and left extruder to each other is controlled.
For example, you start with a ratio of 100% to 0%. Then you gradually reduce the ratio of the left extruder and increase the ratio of the right extruder. For example, 90 % to 10 %, 80 % to 20 %, 70 % to 30 % and so on. You can change these settings at any time during printing via the display. When printing color gradients, you should only use compatible filaments. However, the two filaments are not actively mixed in the hotend.
For best results, you’ll usually need to experiment a bit with the temperature settings, the amount of color in each, and the number of layers you print with a setting.
Dual Color Printing
You can produce two-color prints with the Geeetech A20M without changing filaments and without much effort. For example, a red and white striped lighthouse. To make the color change really abrupt, however, you must either print a purge tower, also called a prime tower, or use a purge basket.-750x930.jpg)
The Purge Tower has the disadvantage that it grows in height at the same rate as your model. This means that the printer prints a layer of your model and then a layer of the Purge Tower.
When changing colors, the printer prints the hotend on this tower empty, so that the next layer on your model has the other color and the color change takes place seamlessly. Because the Prime tower always grows with the model, you consume a lot of filament.
The second option, the so-called purge basket, is much more economical. With this method, the print head simply moves to the side to change colors, empties the hotend until the other color appears, and then prints the next layers of your model.
Noise Level
As far as the noise level during printing is concerned, the Geeetech A20M is in the midfield. Some inexpensive 3D printers are significantly louder, while others are audibly quieter. The noise level depends on various factors, such as the printing speed and the number of direction changes.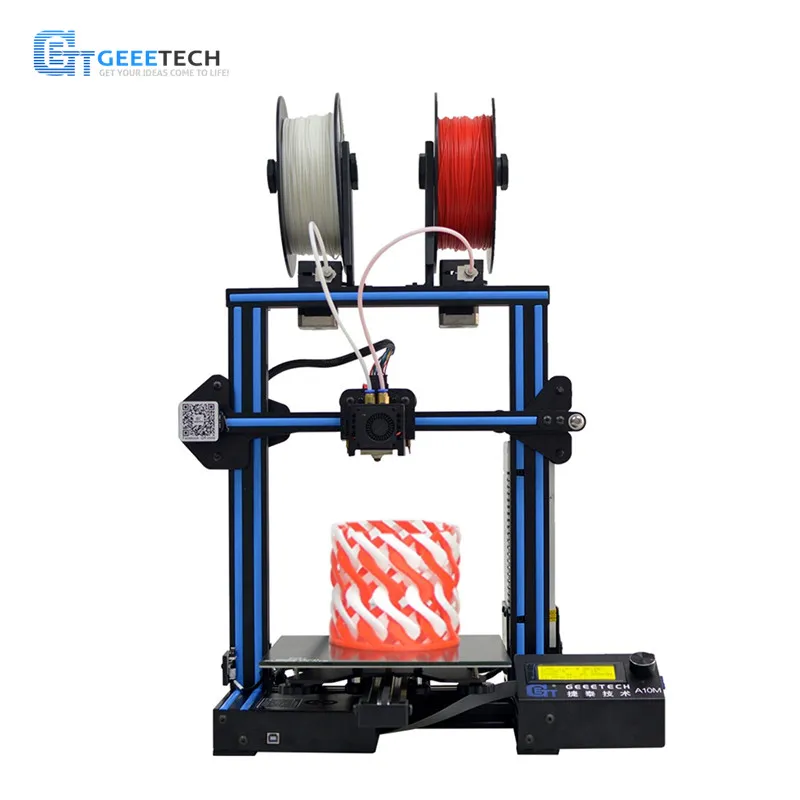
In general, the noise is not disturbing or annoying. You can place the printer in the office and keep an eye on it while doing other work. However the Geeetech A20M’s printing noise is too loud to place the printer in the bedroom.
Optional Accessories
You can easily expand the functionality of the Geeetech A20M with various accessories. The accessories include the already mentioned 3D sensor for automatic leveling of the printer.
Also available as an accessory is a Wi-Fi module so you can control the printer with your smartphone or tablet and print files from a cloud. The Wi-Fi module comes with the Easyprint app, which you can download for free.
Related Questions
Can the Geeetech A20M be operated with a smartphone and app?
In principle, yes, but you have to purchase the optional Wi-Fi module and install the free Easyprint app on your smartphone or tablet. Thus, you can integrate the printer into your Wi-Fi network or print files from the cloud.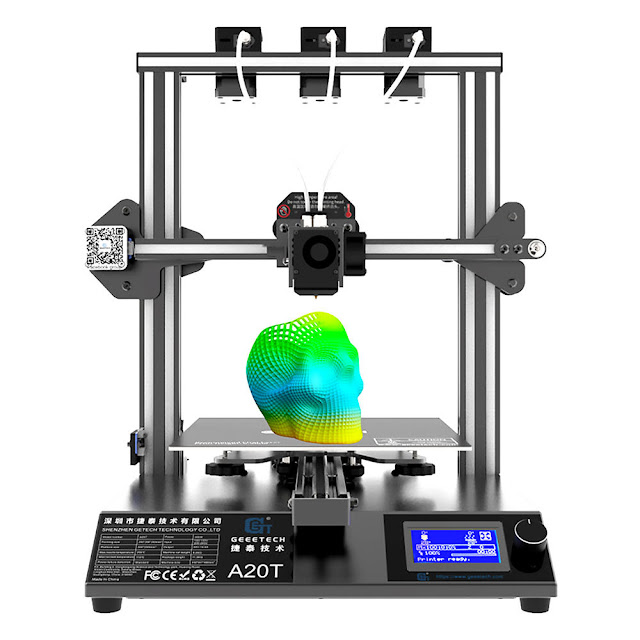
Is the Geeetech A20M available with 2 print heads?
No, unfortunately not. The Geeetech A20M comes with a print head by bringing the two filaments together and printing them at the same time. This facilitates the printing of color gradients. However, printing 2 models at the same time is not possible.
Is there a cover available for the Geeetech A20M?
No, the manufacturer does not offer a cover. However, it is possible for you to make your own side walls and a door from Plexiglas or a similar material to protect the installation space and your models from temperature fluctuations caused by drafts.
Our Conclusion about the Geeetech A20M
With the Geeetech A20M*, you get an inexpensive but very well-equipped FDM 3D printer with an exceptionally large build envelope for this price range. The print quality is very good with a minimum layer thickness of 0.1 mm.
However, the printer’s optimal setting is not always easy to find. The ability to produce color gradients and two-color prints without much effort is particularly pleasing.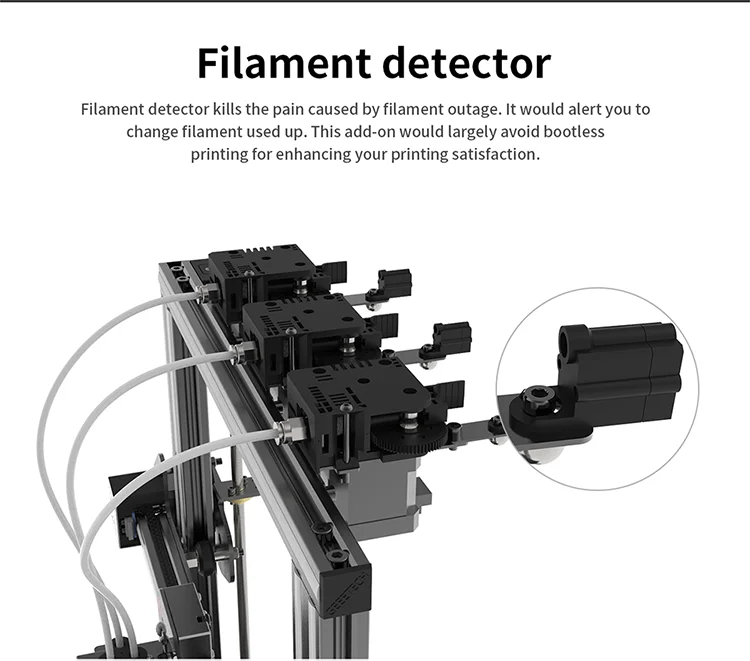 The heated large print bed and the two filament sensors are further plus points of this printer.
The only real drawbacks are the two extruders that are mainly made of plastic, which you should probably replace with metal extruders early on. All in all, the Geeetech A20M 3D printer offers a very good price-performance ratio and can convince with its qualities.
Geeetech A20M*Check Price at:
Amazon*
Disclosure: This website is the property of Martin Lütkemeyer and is operated by Martin Lütkemeyer. Martin Lütkemeyer is a member of the Amazon Services LLC and other Affiliate Programs. These are affiliate advertising programs designed to enable websites to earn advertising revenue through advertising and linking to Amazon.com and others. Links marked with * are affiliate links.
Geeetech A20M Review: A Large 3D Printer
Ash(
362
)
0
This is the Geeetech A20M large scale 3D printer. It comes with loads of cool features, extra goodies, and exciting end results. It features a heated glass bed and even supports multiple filaments.
Are you looking for a new 3D printer? It's time to check out the A20M — this printer is not one to be looked over!
| Feature | Spec |
|---|---|
| Build volume | 255 x 255 x 255 mm |
| Filament types | PLA, PETG, ABS, HIPS, PVA, Wood Filled |
| Filament diameter | 1.75mm |
| Nozzle diameter | 0.4mm |
| Construction | Aluminum Alloy |
| Extruder type | Bowden |
| Heated bed | Yes |
| Weight | 19.4 lb |
| Dimensions | 17.4" x 17.6" x 18.9" |
| Price | Under $400 on GearBest |
Pros
- Big build volume
- Excellent fine detail quality
- Multiple filament support
- One unit
Cons
- Bed wobble on delivery
- Difficult to adjust Y-Axis wheel alignment
| Geeetech A20M 3D printer | × | 1 |
Howchoo is reader-supported.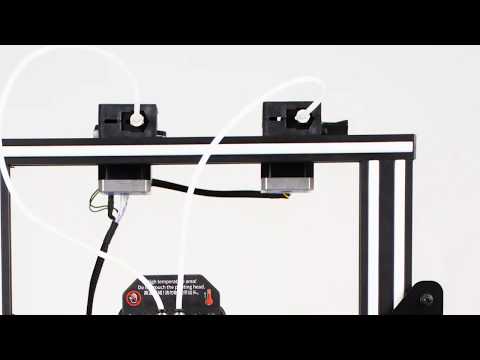 As an Amazon Associate, we may earn a small affiliate commission at no cost to you when you buy through our links.
The Geeetech A20M arrives very well packed in a styrofoam bed. They provide a few extra tools to go along with the printer, along with a set of instructions to get started. I didn't have any problems with shipping and everything arrived in great condition.
Used here
See all
Check Price on GearBest
In the box
- Geeetech A20M 3D printer
- Gantry frame
- Bottom frame
- 2 Extruder motors
- Ejector Nozzle
- 2 Filament detectors
- 2 Filament brackets
- Power cord
- SD card
- 2 Wrenches
- 2 Filament samples
- USB cable
- Cable ties
- Screws
- Mouse pad
The assembly process looked simple on paper, but was much harder to pull off in real life. I highly recommend a second pair of hands to help when assembling the gantry frame to the base.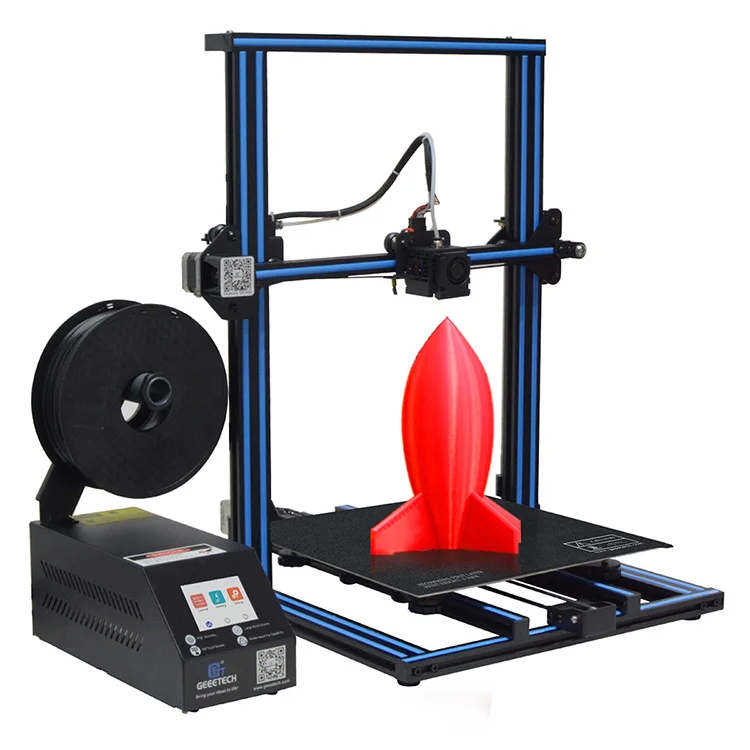 Beyond the awkward logistics of holding everything in place, the printer came together without much hassle.
The biggest problem came when it was time to level the bed. There was a serious bed issue—making it nearly impossible to level. To solve this issue, I removed the bed and tightened the Y-Axis wheels. After some adjustment, the bed glides without a wobble.
I really appreciate the all-in-one construction of the A20M. There's no separate box for the power supply or main screen, everything is assembled into one unit. The frame, constructed using aluminum, is very sturdy.
If one area could be improved, it would be a redesign of the components underneath the bed. It's very difficult to reach the Y-Axis wheels. Easing that access would make the adjustment process easier.
The final build feels very high quality–it's sturdy and doesn't have any extra wobble when printing. The metal frame is has a black matte finish and even comes with some decorative white stripes. I really appreciate having the power supply and electrical components housed in one box under the bed.
The biggest problem you'll have with the motion system involves the Y-Axis wheel system. If the adjustments are too loose, the bed wobbles. If the adjustments are too tight, the bed can't move. The X and Z movements, however, present no issues and have delivered some impressive end results.
I love the heated bed! It heats very quickly and serves its purpose well. While the bed is made of glass, there is a protective layer on top which leaves a pattern imprinted on everything you print. It's impossible to flip the bed for a smooth glass finish.
The printer supports multiple filaments through a bowden extrusion system. You can use a wide variety of filaments 1.75mm in diameter. The filament system feeds to one 4mm extruder nozzle. If you're after a printer with dual filament support, this is definitely a feature you don't want to overlook.
When it comes to 3D printing, safety features can be a huge deciding factor. No one wants a printer that overheats or melts your final prints. The A20M tackles those concerns: when your 3D printed item is finished, the nozzle removes itself and moves away from the item to immediately cool down.
Printing on the A20M is exciting! The bed is huge and the detail quality is impeccable. The trick, as always, seems to be dialing in the best settings. It supports so many types of filaments PLA, PETG, ABS, and more. If that wasn't enough, you can use two spools at once for dual color printing.
The print quality of the A20M is surprisingly intricate. From big prints to teeny projects, this printer can make some beautiful things with seriously fine details. Compared to my previous review of the Alfawise U20, the detail quality of the A20M is definitely superior.
The example picture shows the printed head of Robotica, a doll created by Shira. You can see thin design lines, eye details, and even tiny dimples in her cheeks.
The bed size for this printer is huge! It comes with a build volume of 255 x 255 x 255 mm.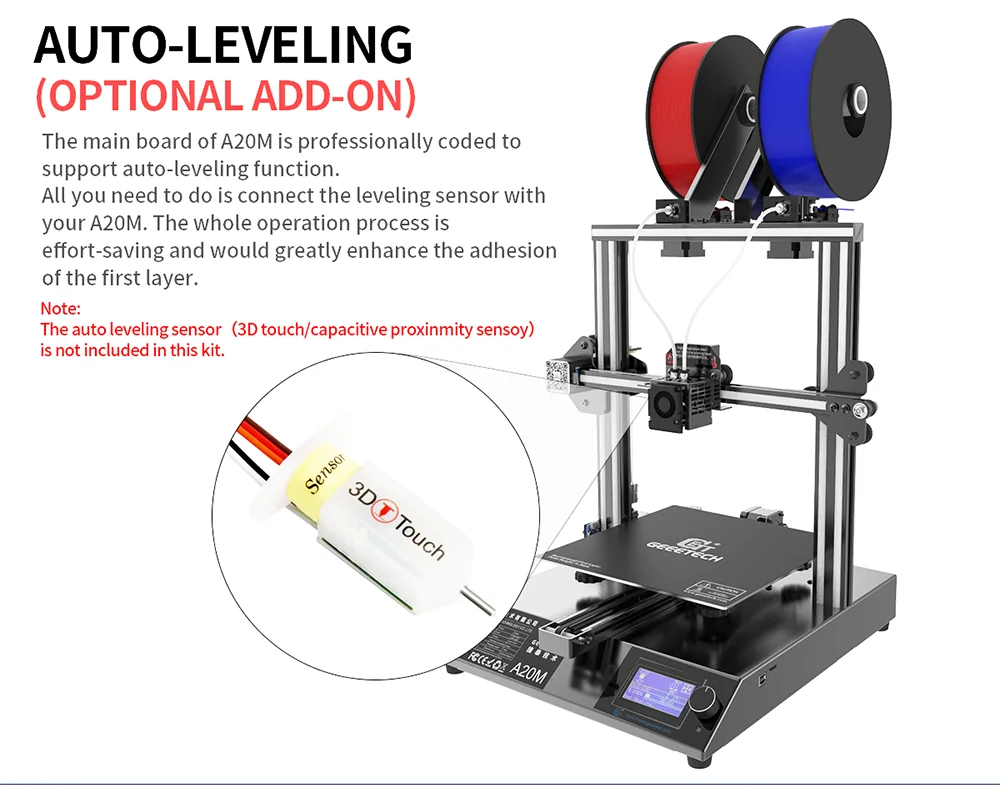 You can make some big things using the A20M, perfect for big projects. There are bigger printers on the market, but you'll find this build space to be relatively flexible for most projects.
The interface takes a little getting used to. The LCD screen is controlled using a knob button. Finding the feature you need isn't always intuitive, but it's something you can master within a few minutes. I appreciate the location and ultimately it does give you all of the basic controls you would expect like leveling tools and extruder settings.
Prints can be sliced using Cura and drop easily onto your SD for printing. You don't need anything extra to get started—just find some stl files, make some gcodes, and boot up the A20M to get started.
The A20M features an SD port next to the LCD screen. It's very easy to load prints into the A20. Using a computer, drag and drop the gcode files onto your SD card. With the card in the printer, select the file you want to print on the screen.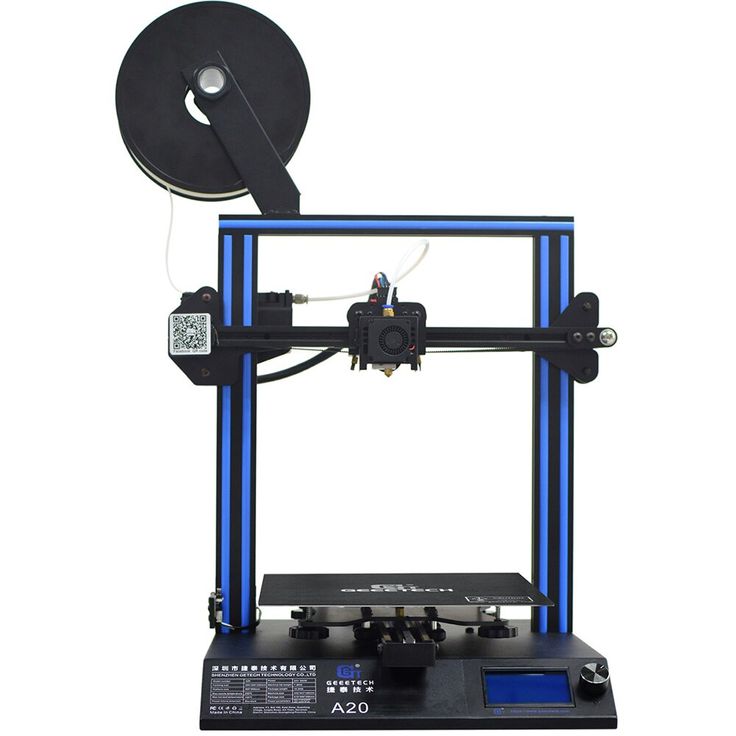
It's a fun printer to experiment with. You can use TONS of different filament types with this printer. It supports: PLA, PETG, ABS, HIPS, PVA, and even wood filled filament! Most of my A20M experience so far has been with PLA.
The coolest feature of the A20M is the super versatile color mixing abilities. The printer comes with software to slowly (or abruptly) transition between two filaments of your choosing. Using the LCD display, you can adjust what level the transition begins and how much of each filament to push through. It takes a little bit of tinkering as there are no instructions provided covering this process. But with a little patience, you can really take advantage of the mix settings to make some beautiful prints.
Overall this is a great printer! The print quality is wonderful and definitely worth a closer look. Compared to other 3D printers on the market, it is not the most affordable. Whether or not this printer is worth the investment depends on your budget and what kind of specs you want out of a 3D printer.
If you're interested in other large 3D printers, check out my CZ-300 review!
NEXT UP
John(
304
)
0
The Prusa i3 is an open-source, self-replicating printer. There are many great 3D printers on the market that are based on Prusa's designs.
Continue reading
features, photos and customer reviews
315.96 ₽The product is not available now, look similar
Go to the storeThe product is no longer for sale, look similar
Link copied, share it
Or send via social networks
- 9015 9011
- on the site for more than 8 years
- High total rating (2940)
- Customers are described by the Complex
- Sends goods quickly
- 1.2% of customers were dissatisfied for the last 3 months
- Brand name: GeeTech
- Origin: China
- Type of Product 200022
Dual extruder 3D printers will save you from single color slumber.
 3D printing using multiple colors, multiple materials to reinforce specific areas, or using dissolvable filaments such as PVA or HIPS to achieve a smooth finish.
 We've been lucky enough to try a few dual extruder 3D printers first hand and have come up with our recommendations for the best dual extruder printers available in 2022. We also explain the differences between different types of dual extruders (IDEX, mixed color 3D printing, dual extruder upgrade) and whether you should upgrade your printer.
Contents
- What are the advantages of a dual extruder 3D printer?
- What is the best dual extruder 3D printer?
- Budget Dual Extruder 3D Printers (under $1,000)
- 1. Geeetech A20M / A10M - Best Budget Dual Extruder 3D Printers
- 2. BIBO 3D Printer (Touch Laser if purchased with laser engraver) 4 3. Flashforge Creator Pro 2 - Affordable IDEX
- 3D Printer 4. BCN3D Sigma D25 - IDEX
- 3D Printer 5. Ultimaker S3 - Highly Accurate Dual Extruder 3D Printer
- 6.
 Raise3D Pro2 / Pro2 Plus
 - 7. Ultimaker S5
- Best Dual Extruder Upgrades
- 8. Mosaic Palette 2S / 2S Pro - Best Dual Extrusion Filament Splicer Upgrades -
- Prusa Material Upgrade 9. Prusa Material Upgrade 9. Upgrade Kit
- Dual Extruder 3D Printer Q&A
What are the advantages of a dual extruder 3D printer?
The main advantages of the dual extruder 3D printer include:
Better for supports: one extruder prints your material of choice, such as ABS or PLA, while a second extruder prints water-soluble supports, such as PVA filament. These supports dissolve easily in water and produce smoother prints without having to manually remove them.
Multiple colors: Dual filament 3D printers can print multiple colors of the same filament type, such as PLA, for stunning multicolor details.
Multiple parts at the same time (IDEX): IDEX 3D printers such as the BCN3D Sigma D25 have two extruders that work completely separately and can print different parts at the same time.
What is the best dual extruder 3D printer?
That's why we've ranked the best dual extruder 3D printers on the market. We rated these printers for value for money, reliability, build volume, ease of use, and various other features.
Budget Dual Extruder 3D Printers (under $1,000)
- A20M price: $379
- Assembly volume: A10M = 220 x 220 x 260 / A20M = 255 x 255 x 255 mm.
- Dual extruder 3D printer cost: $599
- Assembly volume: 214 x 180 x 160
- Creator Pro 2 price: $649
- Assembly volume: 200 x 148 x 150 mm
- Manufacturer: Spain
- Price: $3,995
- Assembly volume: 210 x 297 x 210 mm
- Manufacturer company Holland
- Ultimaker S3 price: $3,850
- Assembly volume: 230 x 190 x 200 mm
- Price: $3,999
- Assembly volume: 305 x 305 x 300 mm
- Price: $5,995 - Available at Dynamism Store
- Assembly volume: 330 x 240 x 300 mm
- Palette 2S Price: $599
- Palette 2S Pro Price: $799
- Price: $299
This product is currently not available, but there are similar and similar
Price decreased by 2.
 08 ₽ Cheaper than average, slightly
 -0.7
%
Reliable seller -100 %
you can safely buy, GeeTech Electronics Flagship Store
Prices from other sellers from 460.08 ₽
460.08 ₽
Found 47 similar goods
-5
9000 %345.06 ₽
GeeTech 3D Printer Module A20 A10 A20M A20M A20T A20T
1
9000 8 9000 9000.4 9000.4 9000%
616.67 ₽
GeeTech 2 pcs a cooling fan 24V 30x30x10 mm mounting on a printing head is suitable for A10/A20M/A20M/A30M/A30 PRO 3D printers
9000 10 9000 9000 9000 Relief of seller 100 % 9 % 9 % 9 % 9 % 9 % 9 % 9 % 9 % 9 % 9 % 9 % 9 % 9 % 9 % 9 % 9 % 9 % 9 % 9 % 9 % 9 % 9 % 9 %0003
-9
%
315. 96 ₽
96 ₽
Geetech 0.4 mm nozzle for 3D printer GeeTech A10, A20, A30
0
0
Reliability of the seller 89 %
1 379 -2 418 ₽ 9000 ₽ 9000 ₽ 9000 ₽ 9000 ₽ 9000
Geeetech high stability 3d power supply 12v/24v for a10/a10m/a20/a20m/a30 3d printers
3
5
for a10 a10m a20 a20m a30
2
0
The reliability of the seller is 100 %
-0.3
%
712.98 ₽
3D printers of accessories, a brass head of the nozzle, suitable for A20M A20M A10T A20T (5 pcs.)
1
2
The reliability of the seller is 25 %
-0.9
%
770. 49 ₽
49 ₽
Accessories for a 3D printer, a brass head of the nozzle 0.4 mm, suitable for A20M A20M A30T A20T (5 pcs.)
1
1
The reliability of the seller 36%
1 316 ₽
A10M A20M A30M Titan Submit for a thread of 1.75 mm
1
2
Reliability of the seller 89%
196.78 ₽
9000 GeeTECH 3D PRICE PRIVE PREPER 1.75 filament0
2
Reliable seller 100%
1472 ₽
3d printer accessories 2 in 1 extruder kit mixed color extruder nozzle for a10m 903
06 1
2
The reliability of the seller 25 %
9000 -3%
771.18 ₽
3D printer accessories, 0.4 mm brass head of the nozzle, suitable for A10M A20M A30T A20T (5 pcs)
0
0
The reliability of the seller 89 %
9000 -1%
1 330 ₽
accessories for a 3D printer, a brass head of the nozzle 0.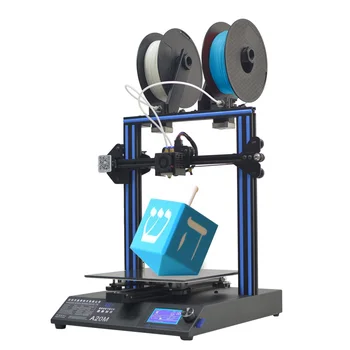 4 mm, suitable for A10M A20M A30M A10T A20T (10 pcs. )
0
0
The reliability of the seller is 89 %
-1
%
1 231 ₽
Accessories for a 3D printer, a brass head of the nozzle 0.4 mm, suitable for A10M A20M A30M A10T A20T (10 pcs.)
0
6 0
The reliability of the seller 61 %
9000 -4%
1 236 ₽
New -3D accessories for printer, 0.4 mm brass nozzle, suitable for A10M A20M A30M A10T A20T (10 packages)
0
0
Reliability of the seller 15%
-6
%
1 245 ₽
Accessories for a 3D printer, brass head of the nozzle 0. 4 mm, suitable for A10M A20M A30M A10T (10 pcs)
0
9000 0The reliability of the seller 89%
-1
%
645.08 ₽
Geeetech cleaning nozzle 10 pcs/box 0.5mm 3d printer drill j-hand hotend nozzle
0
0
Seller Reliability 89%
-0.6
%
842.55 ₽
GEEETECH 3D LCD LCD 2004 Non -integrated display for GT2560 V3.1 Mortherboard A10/A10M 3D Printer
1
Reliability of the seller 100 %
9000.9000 9000 % 9000 % 9000 % lcd2004 lcd screen for a10 a10m mecreator 20
5
Seller reliability 89%
17 253 ₽
0003
0
1
The reliability of the seller 100 %
9000 -7%
1 299 ₽
Components for a 3D printer, a set of an extruder of a mixed -colored mixed color for A10M A20M
0
0
Reliability of the seller 59%
-1
%
0003
0
The reliability of the seller 100%
-0.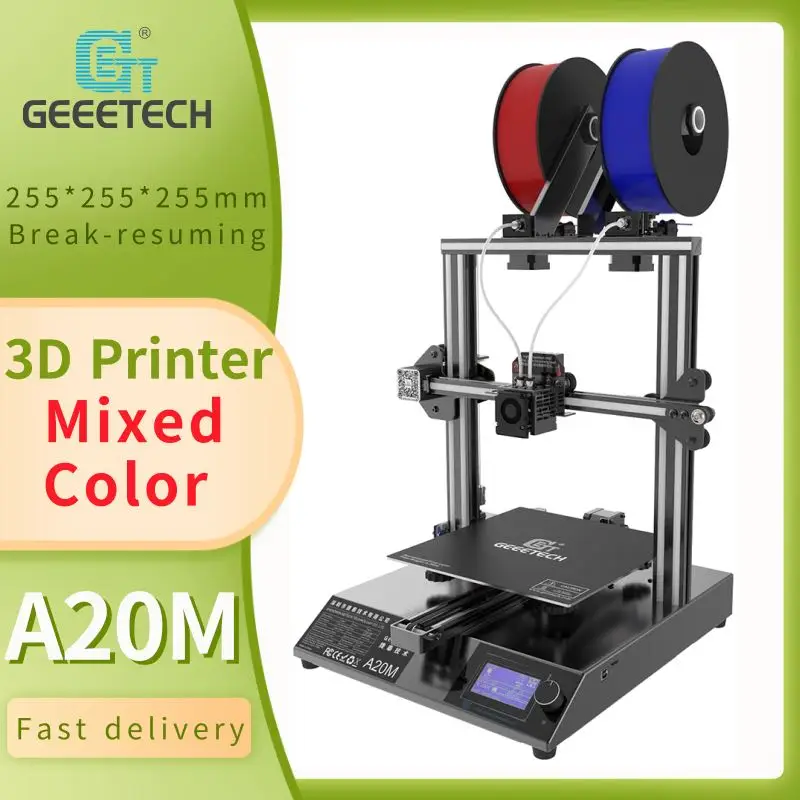 5
5
262.60 ₽
Button control control button for 12864 2004 for A10 A10 A20 A20m I3 9000 0
9000 0 9000 9000-8
%
15 719 ₽
geeetech a10m 2 in 1 3D Printer DIY Quick Assembly Machine with Superplate and Filament Detector
1
3003
The reliability of the seller is 100 %
-4
%
13 788 -15 174 ₽
Geetech 3D Print 2 in 1 mixed color 3D printer A10M support ATUO -VIFI Function 3D CE FDM 3D 3D Stream
2
3
The reliability of the seller 89 %
9000 -2 9000 %335.36 ₽
4 pcs., The nozzle MK8 M6, dumb, 0.4 mm, is suitable for the 3D printer GeeTech A10/A20/A20
2
4
The reliability of the seller is 100%
-5
9000%3 943 ₽
2K screen components + FEP Filted film (suitable for LCD 3D printers) for GeeTech
0
1
The reliability of 89% 9000%
- 3
%
Geeetech 3d printer accessories lcd2004 screen display kit replacement for geeetech 3d printers gt2560 v4.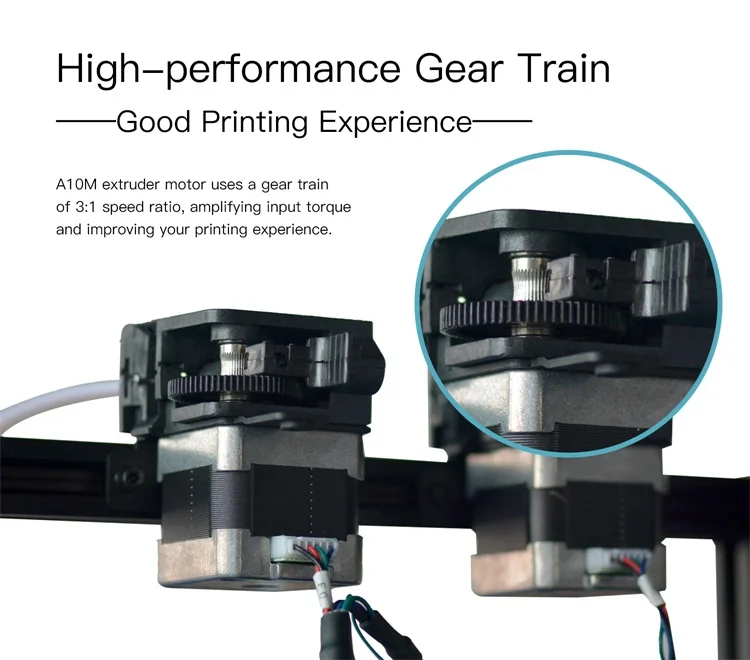 1b version
0
1
0006 -16%
1 137 ₽
Accessories for a 3D printer, 2 in 1 set of extruder, mixed color, an extruder nozzle for A10M A20M
0
0
Reliability of the seller 55 %
1 614 1 614 ₽
Accessories for a 3D printer, a set of extruder 2 in 1, an offset of an extruder of a hot end of a mixed color for A10M A20M
0
0
The reliability of the seller is 89 %
9000 -15 9000 %616.67 ₽
GeeTech 3D Printer 4020 24V cooling radial turbo fan with a 120 mm cable for GeeTech 3D Printer S
1
1
The reliability of the seller is 89 %
9000 -2 9000 %210.64 ₽
GEEETECH for 3D
0
0
100% Seller Reliability
842. 55 ₽
55 ₽
display (new) for geeetech new version a10 3d printer
1
1
Seller reliability 100%
-0.3
%
447.61 ₽
2 pcs. M7 with a sharp nose of 0.4 mm A10M of a remote type “Two-in-one” from an attachment for a print head
0
1
The reliability of the seller 89 % 9000 -3
9000 % 9000 %434.44 ₽ 9000 GeeTECH MK8 is hot hot hot end 3d printer extruder nozzle 0.4mm for 1.75mm filament special for mexetor 2
3
11
The reliability of the seller is 100%
-2
%
322.19 ₽
Hot Sale GeeTech 3D Printer Accessories Bolt M8 for the extruder Stop Volodymyr 9000 9000 0 9000 0
9000 OF SELLECTION 100%3 160 ₽
Gta2 titan extruder dc 1. 68a; 1.8° pitch angle: 1.75mm large torque remote feed pellet extruder for pla, abs tpu for a10m a20m
0
0
The reliability of the seller is 89 %
-0.2
%
6 451 ₽
GeeTECH extruder with a double head, 0.3 mm nozzle and 1,75 mm thread for a 3D printer RePrap Produca Mendel
0
0
The reliability of the seller is 100 %
-6
%
1 467 ₽
GeeTech 0.4 kg 1.75 mm tpu Filament Material Material Material Materials Abroad Warehouse
0
1
The seller's reliability 100 %
-1
%
6 451 ₽
geeetech 0. 3mm-1.75mm nozzle makerbot dualstrusion hot end replicator for reprap mendel 3d printer
0
0
%
394.25 ₽
9000 GeeTech 3D parts of the printer 0.35-1.75 mm J-head Hotend Hotend Worm and Cartridge Heater with real tracking of1
0
Relief of the seller 100 % 9000-9000 -12 9000 % 9000 % 9000 % 9000 %0003
29 725 ₽
FDM 3D Geeetech Offcial A30M Printer, integrated construction base, automatic leveling, rupture recovery, fast assembly, 320*320*420 mm
10
1
The reliability of the seller 89%
433.75 - 565. $
geeetech Aluminum Underlay 3mm Hot Bed/Mylar Part 235mm*235mm 260*260 330*330 for geeetech a10.a20.a10m.a20m.a30.a30m
1
3 160 ₽
Gta2 titan extruder dc 1.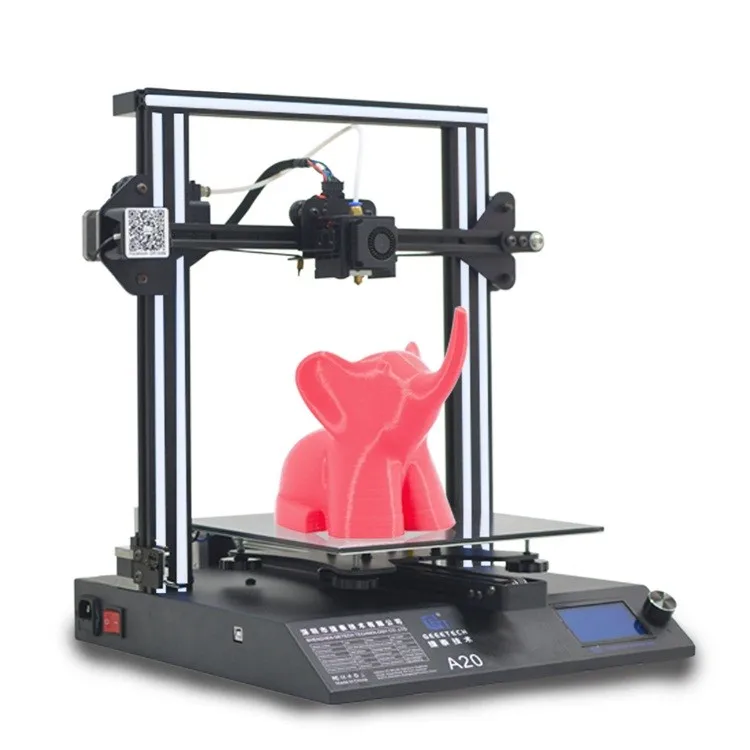 68a; 1.8° pitch angle: 1.75mm high torque remote feed pellet extruder for pla, abs, tpu, etc.
0
2
3d hotend a10m, parts parts
1
0
Seller Reliability 89%
3 877 ₽
0003
0
1
The reliability of the seller is 100 %
9000 -8%
1 218 -2 072 ₽
EXTROICAL 3D printers Pay Buid surface 235*235*1 mm with 3 m 468MP tape for ender -3, cr-20, geeetech a10, a10m 3d printers s
1
1
6 a
0
0
Reliability of the seller 100%
0 OTO TELAS
1 price
photos from buyers not yet
characteristics of the product
These amazing 3D printers break the rules of the definition of "dual extruder 3D printing". To be clear, they can be loaded with two separate filaments, such as red and yellow PLA, but they will come out of the same nozzle, mixing the two colors during the printing process. Some call it dual nozzle 3D printing.
The results are amazing. Connect red, orange and yellow threads and watch your printed vase look like an exotic cocktail. The printers offer four dual 3D printing modes: single color, dual color, gradient and mixed. This provides a huge selection of print designs for such an inexpensive dual extruder 3D printer.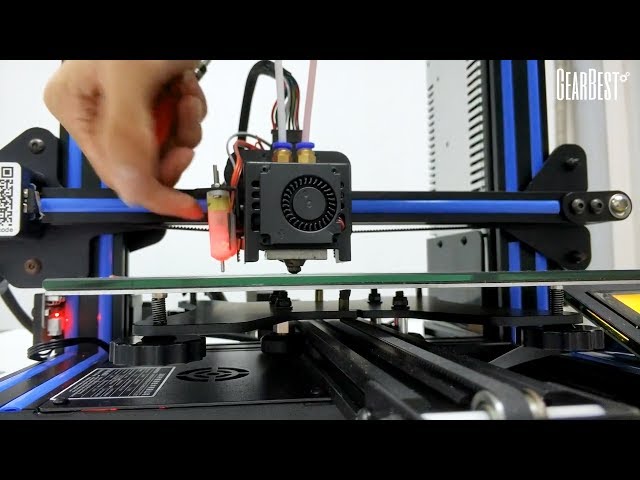
In terms of specifications, the A20M has a good working volume of 255 x 255 x 255 mm, while the A10M is only slightly smaller. The A20M also boasts improved stability as it is better anchored. Overall, this is an accurate (layer resolution down to 0.1 mm), interesting and inexpensive two-color 3D printer that combines colors and filaments through a single nozzle.
single nozzle geeetech a20m filament mixer.
2. BIBO 3D printer (touch laser if purchased with laser engraver)
How do we get started with the BIBO eccentric printer? Well, the most important thing is that it also performs another function. It can be used as a laser engraver! The engraver can permanently carve your favorite designs on wood, as well as cut paper or felt materials - and print in 3D!
You can purchase BIBO as a 3D printer kit or pre-assembled, with or without a laser engraver.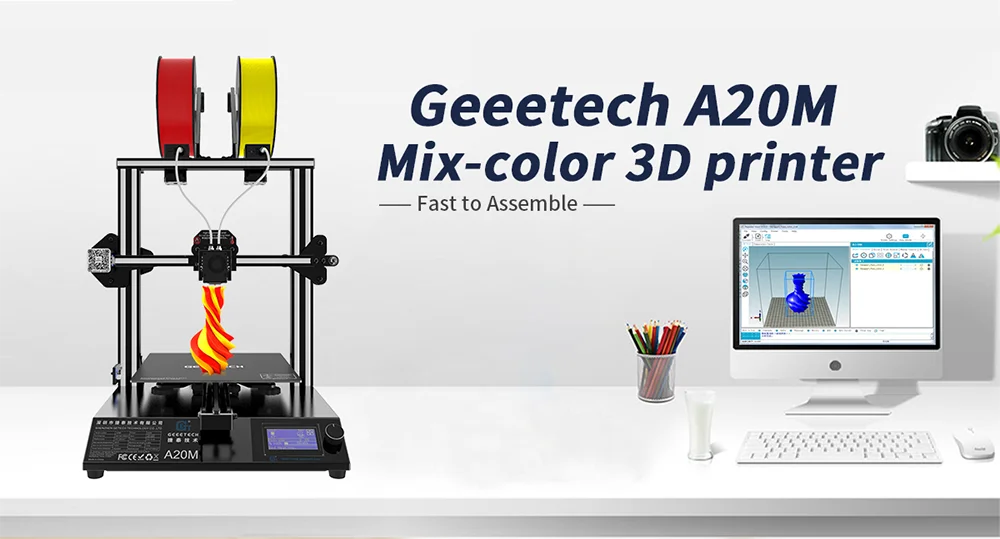 And if he performs another function, this does not mean that he cannot succeed in both. In fact, this is a very efficient multi-extruder 3D printer with a minimum layer height of 0.05 mm and stable printing in a closed working chamber.
This is a great printer, crazy and ambitious. Even the product images on Amazon showcase the machine's character and personality. We love it.
3. Flashforge Creator Pro 2 - Affordable IDEX 3D printer
The popular and loved Flashforge Creator Pro has started to show its age since it was released in 2016, so Flashforge followed it up with the vastly improved Creator Pro 2. assembly volume on the x-axis. It retained a minimum resolution of 100 microns and a Teflon tube extruder for 3D printing of PLA, ABS and nylon in a closed working chamber.
However, the main change that makes this printer so profitable is undoubtedly the IDEX upgrade.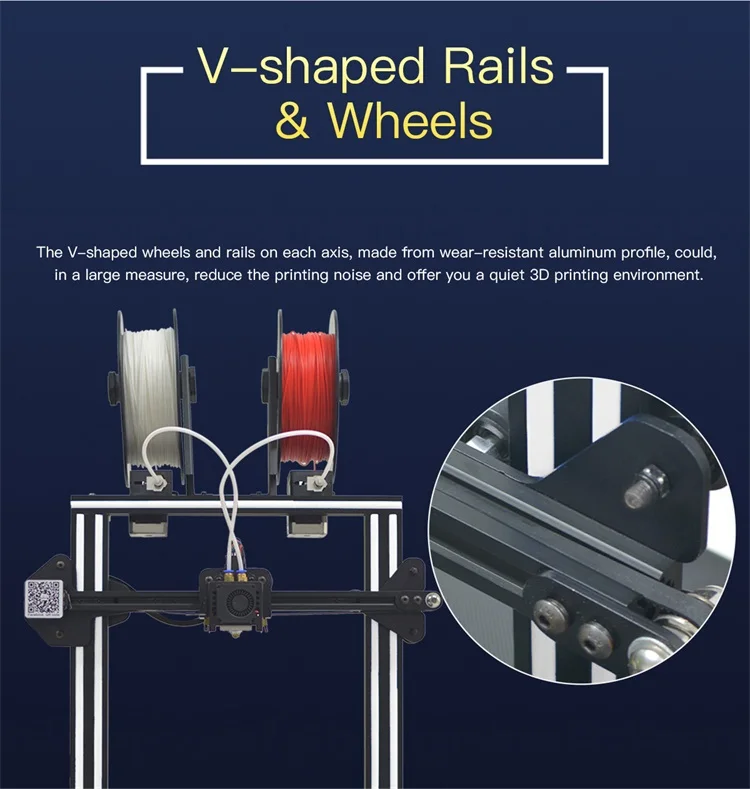 In the IDEX 3D printer, the nozzles work independently, unlike the dependent, attached nozzles on the original Creator Pro, with different modes such as Mirror Mode for 3D printing multiple identical models at the same time - a big time saver, trust me.
Other quality-of-life improvements include an improved touch screen interface, as well as important nozzle updates that prevent unused nozzles from oozing out and messing up the print bed or even causing errors. You won't find a more affordable IDEX printer.
4. BCN3D Sigma D25 - IDEX 3D printer
Spanish 3D printer manufacturer BCN3D has made a name for itself with reliable dual extruder 3D printers. All of their printers, including the Sigma and Epsilon series, use BCN3D's IDEX (Independent Dual Extruder System) 3D printing technology, a unique and key advantage.
IDEX 3D printing allows each extruder to move completely independently, not limited to working on the same model at the same time as in other 3D printers. Two different parts can be created at the same time, cutting the time required to create several small parts in half. The Sigma D25 also features high quality E3D hot ends for quality printing on a variety of materials, including stiffer filaments, and a filament low sensor informs you when the filament has run out.
For those who need a 3D printer for rapid prototyping, being able to print multiple parts for testing at the same time is a huge advantage. The BCN3D Sigma D25 uses 2.85mm filaments instead of the standard 1.75mm so be aware of this, but is compatible with any 2.85mm filament. You can use a variety of 3D printer nozzle sizes, from 0.3mm to 1.0mm, and a clear and easy-to-navigate touch screen interface.
Interestingly, Sigma D25 is also an open source 3D printer: printer firmware, workflow, software and other files are available on BCN3D GitHub. It works seamlessly with the Cura 3D slicer and is easy to set up and use right from the start. Overall this is a great, reliable and efficient dual extruder 3D printer. With a resolution of 50 microns, this is a high quality, high resolution 3D printer for accurate rapid prototyping.
5. Ultimaker S3 - very precise dual extruder 3D printer
Ultimaker is another behemoth of desktop 3D printing, producing award-winning deposition modeling printers. With a dual extruder and incredible precision down to 20 microns, the Ultimaker S3 is a fantastic option for small businesses, manufacturers and prosumers.
For precision multi-material 3D printing, nothing beats the Ultimaker S3. It is widely used to create accurate architectural models as building design prototypes, to create accurate industrial and engineering prototypes, and in many other industries. Upon release, it won dozens of awards and is still one of the best dual extruder 3D printers.
With a print volume of 230 x 190 x 200 mm, the Ultimaker S3 can handle most printing needs.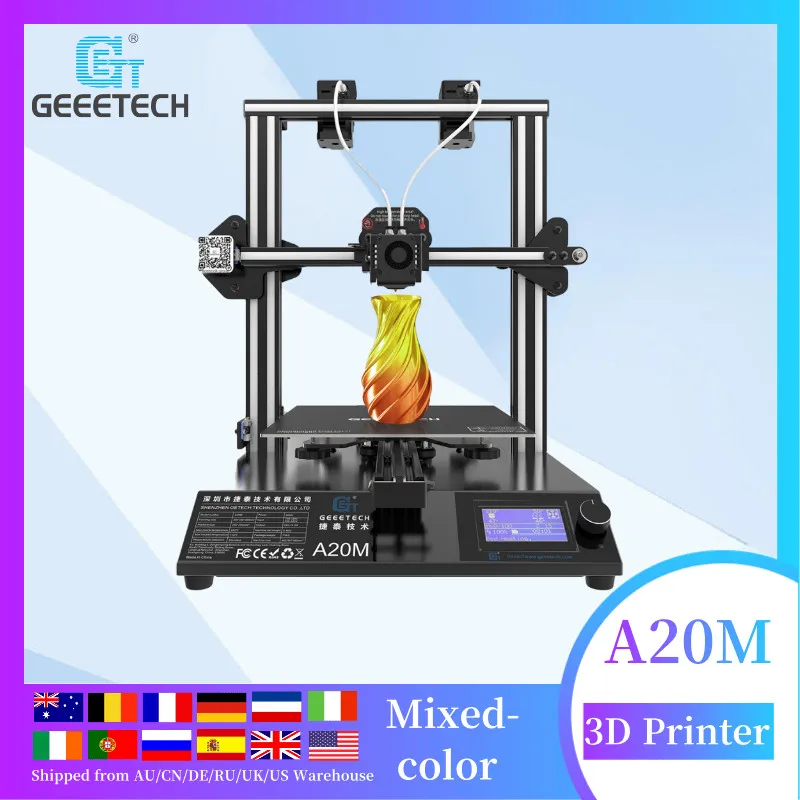 It also has a built-in camera that allows you to monitor the printing process remotely.
Connected via WiFi, Ethernet or USB stick, the Ultimaker S3 is designed to be easy to use. While the Ultimaker 3 doesn't come cheap at $3,850, it's accurate, fast, reliable, and easy to use. This makes it overall one of the best dual extruder 3D printers on the market today.
6. Raise3D Pro2 / Pro2 Plus
Also featured in our overall ranking of the best 3D printers, the Raise3D Pro2 series impresses with its reliability, size and range of printable materials. In addition to standard PLA, ABS, and PETG printing, the Pro2 and Pro2 Plus 3D print with nylon, polycarbonate, carbon fiber, ASA, and metal-filled filaments on either of the two extruders.
Its big brother, the Raise3D Pro2 Plus, costs $5,999
The Raise3D Pro2 also boasts a fantastic build volume of 305 x 305 x 300mm, enough for everyday and industrial printing.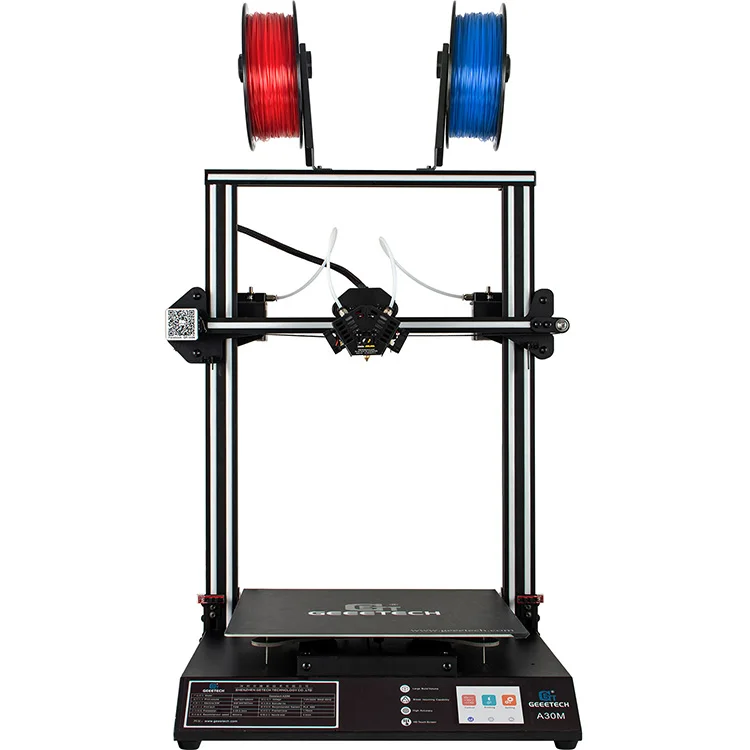 The printer is also very accurate, with a minimum layer height of 0.01mm, and is equipped with a 7-inch touch screen for easy printer control. The Raise3D Pro2 costs just under $4,000 and overall is a fantastic dual-extruder printer for the price.
7. Ultimaker S5
Ultimaker is highly regarded, and for good reason - the company can't go wrong. After the Ultimaker 3, the Ultimaker S5 is an updated, improved and slightly more expensive dual extruder 3D printer that will compete with the Makerbot Method.
A 330 x 250 x 300mm large-format 3D printer built for more scalable production, the Ultimaker S5 already has satisfied customers at Volkswagen, Decathlon and many more. It features a very advanced print leveling system, an improved touch screen, and can be connected to a phone via the Ultimaker app, which notifies you when a print is complete. The Ultimaker S5 is undoubtedly a great dual extruder 3D printer.
Best Dual Extruder Upgrades
8. Mosaic Palette 2S / 2S Pro - Best Upgrades for Dual Extrusion Filament Splicer
If you want to print multiple colors without a dual extruder, consider Palette as well. Instead of 3D printing with two multi-colored filaments from separate extruders, the Palette 2S and 2S Pro fuse up to four multi-colored filaments - or different materials - together during printing to create multi-color or multi-material parts.
They work by running your model through specially designed software - CANVAS for Palette - to assign different colors to different areas of your model before printing. When a particular area needs to be printed, the Palette software splices the colored filaments to print that particular area in the material or color you choose.
This makes Palette ideal for creating architectural models for construction projects, colorful desktop models of your favorite designs or D&D models, and multicolor prototyping businesses. The standard Palette 2S model includes all of these features, while the Palette 2S Pro can also splice up to 20% faster and comes with an extended 2-year warranty and replacement parts.
Palette is compatible with hundreds of 3D printers, including almost all of the most popular options. For more information, you can check your printer's compatibility here, and as for choosing between the Palette 2S and 2S Pro: The 2S Pro cuts filament 20% faster and comes with a longer warranty - so if that's important to you, spend the extra money on 2S Pro.
9. Prusa Multi Material Upgrade 2S - Prusa Upgrade Kit
While you can upgrade the palette for most 3D printers, Prusa printer owners can purchase a similar Multi Material Upgrade kit that allows you to print up to 5 different materials at the same time. Prusa printers are some of the best 3D printers under $1,000 and this upgrade turns your Prusa into a multi-color or multi-material 3D printer.
MMU2S is an improvement over the previous version of the Multi Material Upgrade Kit 2.0, key changes include a material feed sensor, buffer and a much improved overall calibration process.
The Filament Sensor goes further, checking not only for the presence of filament, but also to see if it has reached the Bondtech gears for printing. This provides much more reliable extrusion and makes filament calibration and loading easier.
The filament buffer also saves you the hassle because each of your filaments (especially if you're using all 5!) won't get tangled or tangled. Organizing and separating each filament also saves space on your desk or 3D printer table.
Double extruder 3D printer FAQ
What is a dual extruder 3D printer?
Dual extruder 3D printers have two print heads or nozzles instead of one print head like standard FDM 3D printers. Dual printing frees you from the limitations of using only one type of 3D printer filament and allows you to create multicolored parts with ease.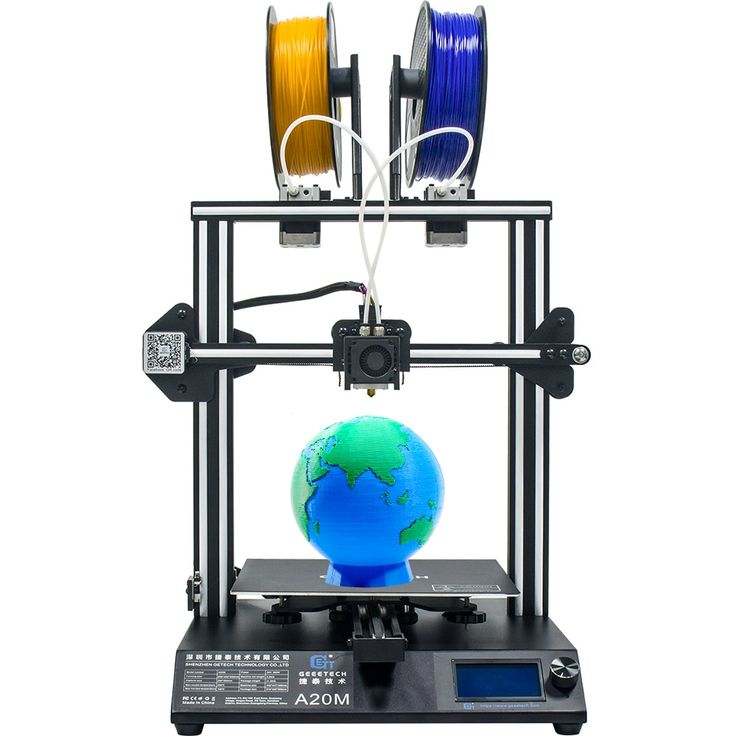
Dual head 3D printing improves printing with soluble supports such as HIPS and PVA and also allows multi-color parts to be printed.
Most budget dual extruder 3D printers are dual nozzle printers, meaning they have two nozzles but extrude from a single head, but we also include more advanced printers. These advanced options include IDEX 3D printers with two printheads that move completely independently for efficient and versatile printing.
What are the main types of dual extruder 3D printers?
The main types are:
1. Dependent Dual Extruder 3D Printers - Most low-cost multi-extruder 3D printers are dependent, that is, two nozzles that extrude separate filaments are attached to one print head. They follow the same path, filling areas (such as a support or main part) in turn.
2. Dual Extruder Independent 3D Printers (IDEX 3D Printers) - IDEX extruders use two printheads independently of each other, doubling productivity when printing multiple parts at the same time.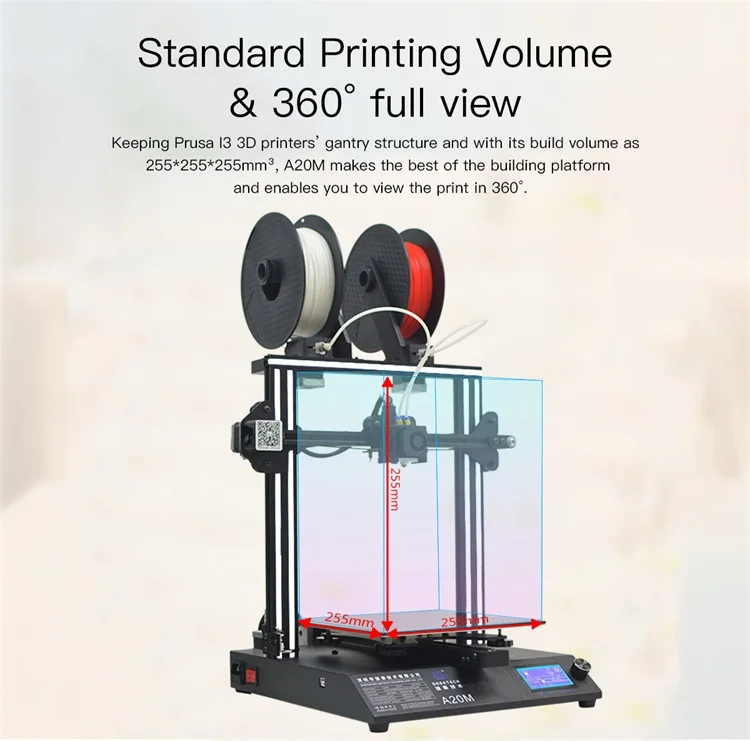
3. Dual Extruder Printer Upgrades - These upgrade kits, such as the Palette 2S series and Prusa Multi Material Upgrade 2.0, transform a single extruder 3D printer into a printer that can print up to 5 colors at once using splicing systems and dedicated software and plans for filling 3D models.
4. Mixed color 3D printers are some of the cheapest dual extruder 3D printers, and maybe not even dual extruders. They use one printhead and one nozzle, but two filaments to mix the colors while melting. You can print models in half color, or mix colors like red and blue to create a purple tint.
Can the 3D printer be upgraded with a dual extruder?
Yes, you can. Dual extruder upgrades such as Palette 2S (compatible with most popular 3D printers) and Prusa Multi Material Upgrade 2.0 (for Prusa 3D printers) will turn your standard FDM printer into a multi-color 3D printer.
However, manually modifying a 3D printer and adding a second extruder is more difficult.