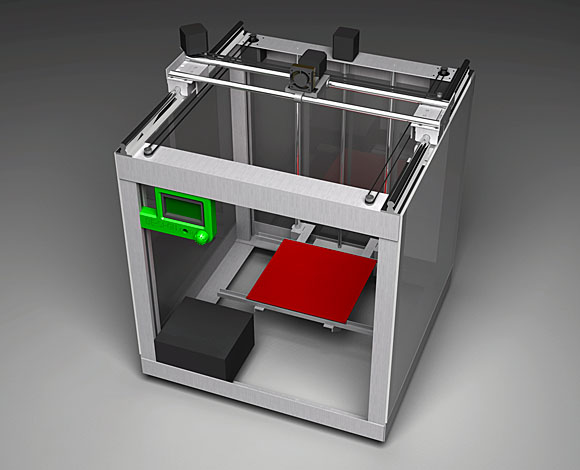
Extrusion width 3d printing
3D Printer Line/Extrusion Width | Best Settings & Examples
- Author
- Recent Posts
Martin
Martin has a M.Sc. in physics and has gained many years of experience in industry as a lab manager and quality assurance manager. He has now tested dozens of 3D printers and is happy to share the collected experience with each new article.
Latest posts by Martin (see all)
Disclosure: Links marked with * are Affiliate Links. I earn from qualifying purchases if you decide to make a purchase through these links – at no additional cost for you!
Many factors play a role in 3D printing, each component in itself and many functions in combination. One of the most important components for the best possible print result is the extrusion width (or line width).
The extrusion or line width is normally set between 100% and 120% of the nozzle diameter. However, values between 60% and 200% are possible. Small extrusion widths provide more accuracy with longer print times. Large extrusion widths offer more stability with shorter printing times.
This article explains how to find the right settings for your project and how the extrusion width influences the results in a practical test.
Table of Contents:
- 1 Extrusion / Line Width
- 2 Tables for Extrusion Widths
- 2.1 Extrusion Width vs. Printing Time
- 3 Influence of Extrusion Width on Your 3D Printing Result
- 4 Extrusion Width & Slicer
- 5 The Importance of Extrusion Width in 3D Printing, Illustrated by 5 Examples
- 6 Extrusion Width vs. Quality
- 7 Setting the Perfect Extrusion Width – Here’s How!
- 7.1 The two most important points you need to adjust:
- 8 Advantages With Other Nozzle Diameters
- 8.1 Advantage 1: print up to 4 times faster
- 8.2 Advantage 2: more layer height
- 8.3 Advantage 3: Improved support of the print object
- 8.4 Advantage 4: Influence on the mechanical properties of your printed object
- 9 Related Questions
- 9.
 1 What connects the extrusion width and the flow rate?
 - 9.2 Why do brittle lines come out of the nozzle?
- 9.3 Do I have to set different extrusion widths for each type of filament?
- 9.
- 10 Tips for Extrusion Width
- 10.1 Tip 1
- 10.2 Tip 2
- 10.3 Tip 3
- 10.4 Tip 4
- 11 Calibration
- 11.1 Step 1: Requirements
- 11.2 Step 2: Optimal preparation
- 11.3 Step 3: Check printer setup exactly
- 11.4 Calibration of the Extrusion
- 12 Conclusion
Extrusion / Line Width
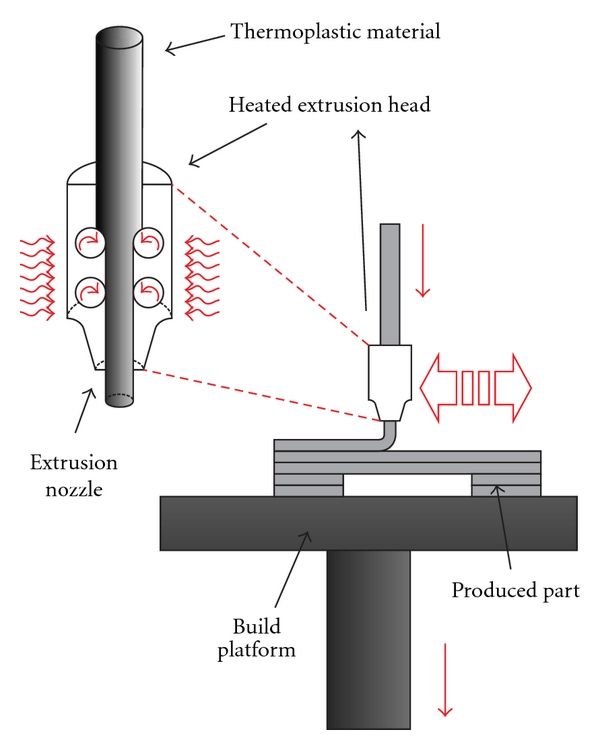
In simple terms, the extrusion width or line width is equal to the width of the line that gets extruded from the nozzle to the printing plate by heating the filament.
With a 0.4 mm nozzle, you can print extrusion widths from 0.24 mm to 0.8 mm. A high extrusion width produces stable, fast printed objects. A small extrusion width creates slow printed objects with finer details.
1 = Nozzle Diameter2 = Extrusion Width / Line Width
If the extrusion width of the filament line flowing from the nozzle is considerably thinner than the nozzle diameter, irregularities may occur on the printed object.
In this case, the lines are not printed close enough together. The print object becomes leaky, porous or even the first layer is not stable. If you notice this too late, the entire print object could sink in on the printing plate or even tip over.
This is annoying, leads to faulty results, higher time and costs, and the 3D printing experience leads to frustration and dissatisfaction, at least for a short time.
In doing so, this small error component can be excluded from the beginning.
Even some 3D printing experts still assume that the extrusion width necessarily corresponds to the width of the nozzle diameter.
But this is only partially correct. The extrusion width depends additionally on the following factors in 3D printing:
- Type of printed object (shape, purpose, etc.)
- Filament type
- Filament flow
- Printing plate
- Printing temperature
- Nozzle temperature
There is no general rule of thumb for the best extrusion width.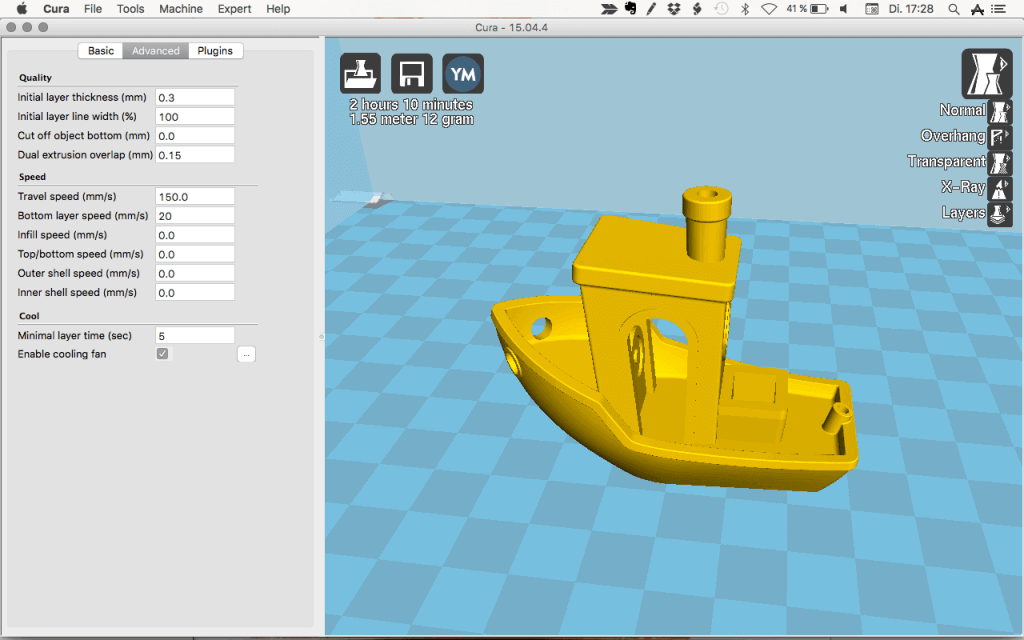 However, it has been found that the extrusion width should be between 100 and 140 % of the nozzle diameter.
Some experts also advise a slightly higher extrusion width, which depends on the size and type of printed object.
In principle, the extrusion width can even range between 60 and 200%, but various problems occur at the extreme points.
Tables for Extrusion Widths
To make clear what exactly is meant by the percentages, here is a table with common nozzle diameters and the corresponding smallest and largest extrusion or line widths:
| Nozzles Diameter | Smallest Extrusion Width (60%) | Largest Extrusion Width (200%) |
|---|---|---|
| 0.1 mm | 0.06 mm | 0.20 mm |
| 0.2 mm | 0.12 mm | 0. 40 mm 40 mm |
| 0.3 mm | 0.18 mm | 0.60 mm |
| 0.4 mm | 0.24 mm | 0.80 mm |
| 0.5 mm | 0.30 mm | 1.00 mm |
| 0.6 mm | 0.36 mm | 1.20 mm |
| 0.7 mm | 0.42 mm | 1.40 mm |
| 0.8 mm | 0.48 mm | 1.60 mm |
| 0.9 mm | 0.54 mm | 1.80 mm |
| 1.0 mm | 0.60 mm | 2.00 mm |
Extrusion Width vs. Printing Time
With a larger extrusion width, you print faster. This is simply because more volume is extruded from the nozzle per second.
To illustrate this, I adjusted only the extrusion width in Cura on one model with a 0.4 mm nozzle to see how the print time changes:
| Percent | Extrusion Width | Print Time |
|---|---|---|
| 60% | 0.24 mm | 00:44 |
| 70% | 0.28 mm | 00:38 |
| 80% | 0.32 mm | 00:34 |
| 90% | 0.36 mm | 00:30 |
| 100% | 0.40 mm | 00:28 |
| 110% | 0.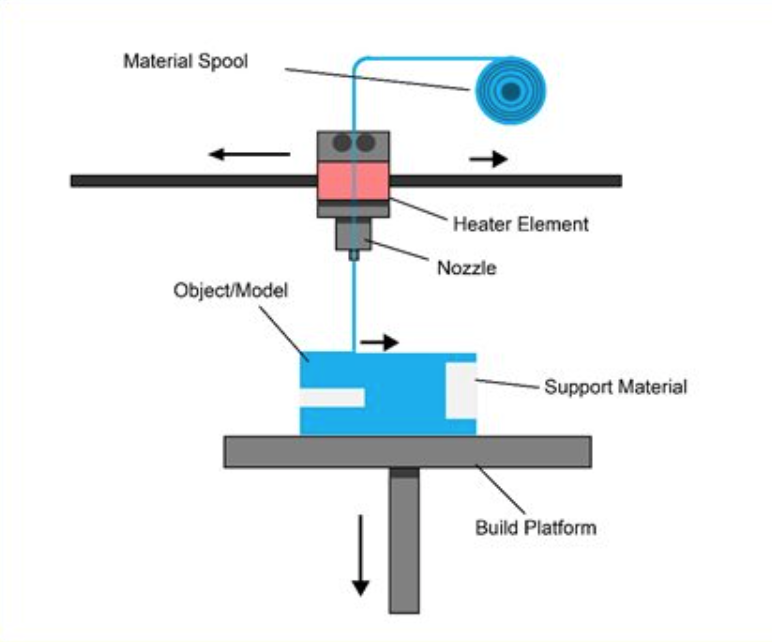 44 mm 44 mm | 00:26 |
| 120% | 0.48 mm | 00:25 |
| 140% | 0.56 mm | 00:21 |
| 160% | 0.64 mm | 00:19 |
| 180% | 0.72 mm | 00:18 |
| 200% | 0.80 mm | 00:15 |
As you can see, the printing time decreases massively when the extrusion width is reduced.
Especially below 100%, the printing time increases heavily the smaller the extrusion width becomes – quality has its price!
Influence of Extrusion Width on Your 3D Printing Result
The extrusion width contributes decisively to the print quality and, provided the correct settings are made on the printer, influences 6 important components of 3D printing, which contribute enormously to improving the print quality:
- Print speed
- Print quality
- Strength and thickness of the printed object
- Adhesion of the printed object to the printing plate
- Printing with different types of filament
- Support structures
In addition to the components listed, a well-designed extrusion width has a positive effect on the entire printed object.
When printing, make sure that the same amount of filament always flows out of the nozzles. If the amount of filament flow constantly changes during the creation of your 3D printed object, this will have a negative impact on the 3D print quality, which requires extreme precision.
If the extrusion width or line width is sometimes thicker and sometimes thinner, your print object will also show small to large irregularities, which can go as far as complete instability. Consistent extrusion width is therefore of utmost importance if your 3D printed object is to succeed.
The only exception is that, depending on the construction of your 3D printed objects, the extrusion width of the lines may be somewhat thicker and denser for the first and, possibly, the second layer than for the remaining layers.
Thus, the entire print object adheres better to the printing plate and gains stability throughout the 3D printing process.
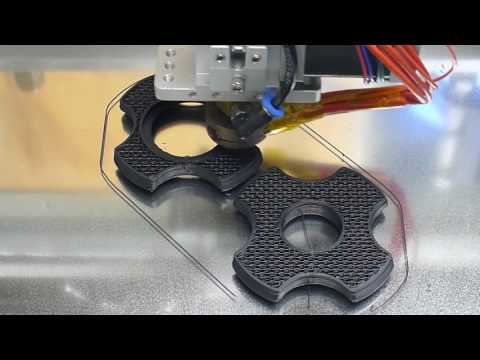
Here is a very good video about the influence of extrusion width on the stability of 3D printing:
Extrusion Width & Slicer
All the settings you need for successful 3D printing are made on the slicer of your 3D printer.
The same applies to the extrusion width. If this is set incorrectly, you will recognize this immediately.
Here is the Line Width setting in Cura and all the settings that are affected by it:
If the extrusion width is considerably less than the nozzle diameter, much too thin filament lines will flow out of the extruder.
With, for example, 0.2 mm extrusion width at a 0.4 mm nozzle, it is difficult to generate a uniform filament flow. The filament lines ‘trickle’ unevenly onto the printing plate and can melt in the process.
The adhesion properties of the print object suffer considerably. If the extrusion width of your printer’s nozzle is 0. 4 mm, the extrusion width should also be set to at least 0.4 mm on the slicer, possibly somewhat higher for the first two layers.
Since the nozzle diameters can vary from 3D printer to 3D printer, adjust the extrusion width according to your printer type for regular precise printing results.
With the correct extrusion width, which you set on the slicer, you have laid an important foundation for a successful 3D printing result.
On the slicer, in addition to the best possible extrusion width for your 3D printed object, you can also set the following printing instructions to achieve the best possible print quality for your print model:
- Print speed
- Print temperature
- Layer height
- Thickness of the bottom layer and the top area of your 3D printed object.
- Type of bed adhesion
- Nozzle size
- Infill density
- Shell thickness
Only these components together with the optimum extrusion width result in an accurate and visually appealing printed object.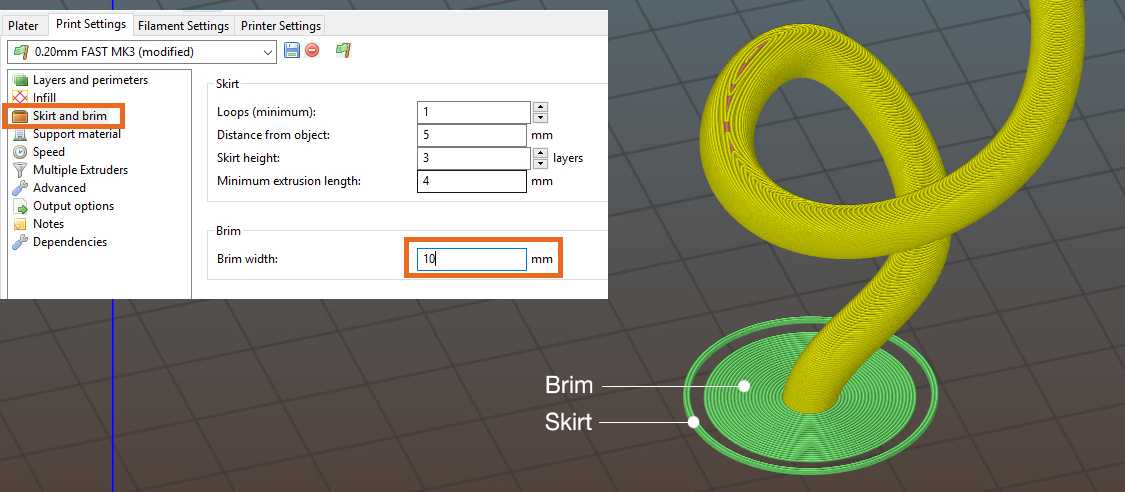
The Importance of Extrusion Width in 3D Printing, Illustrated by 5 Examples
The optimum extrusion width is of particular importance for the following printed objects:
- Screws with matching nuts
- Tools, such as special pliers
- Airtight sealable medicine packages
- Lamp holders, lamp rods and sockets
- Children’s toys (without uneven rough spots)
As important as the extrusion width is, a correctly set extrusion width alone does not prevent misprints.
There are many annoyances in 3D printing. Sometimes the filament sticks, sometimes the extruder clogs. Then you only notice during printing if the filament is of poor quality.
You may also have set the extrusion width correctly and the printer still does what it wants. These are all points that you can only influence to a limited extent.
You have set up your printer optimally for your 3D printed object, use the best materials and your 3D printer is also a good quality device. Why do complications still occur?
One component of your printer that you also – like many others – pay too little attention to is mechanical problems with the extruder.
A possible fault: the extruder is operated via gear wheels with sharp teeth. These sometimes bite too hard into the filament, so that the filament flow is interrupted at times or is irregular.
This also leads to a change in the extrusion width despite correct settings. Very few people are aware of this fact, since the gearwheel problem is reported on rather rarely.
In high-quality 3D printers, the extruders have a setting that allows you to determine how strongly the gears bite into the filament.
Be careful not to set this function too low, otherwise, the filament will lack grip and flow out of the nozzle almost uncontrollably. With some experience, you will know better which setting is the best for your print objects.
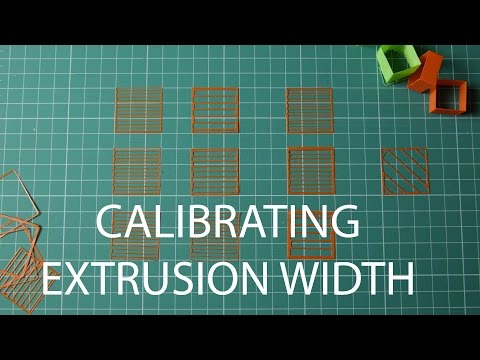
Extrusion Width vs. Quality
To show the effect of extrusion width on surface quality, I made 11 test prints.
I left all settings the same except for the extrusion/line width. This ranged from 60% to 200% of the nozzle diameter of 0.4 mm.
The result is obvious: the Z accuracy or the layer resolution did not change at all. Only the accuracy in X and Y direction suffered the larger the extrusion width was:
Setting the Perfect Extrusion Width – Here’s How!
There is no single, perfect extrusion width setting. However, it is clear that different nozzles require different profiles, which can be set via the slicer.
Many (including me) use an extrusion width of 110% of the nozzle diameter at the beginning. From there, you can approach the perfect value for the respective nozzle and the filament used.
So, as a rough direction you can stick to this as well:
- High accuracy: 60% to 100%
- Compromise/Standard: 110%
- High stability: 150% to 200%
On some 3D printers, the slicer settings for the nozzles (extruders) are more conveniently aligned than on others.
Setting up the extrusion width can be illustrated particularly well using the Anycubic 3D printers as an example. However, calibration of the extrusion width and associated modifications is similarly successful with most other modern 3D printing devices.
The Anycubic printers already have pre-installed profiles for their nozzles in the slicer.
The standard nozzle diameter for almost all common 3D printing devices is 0.4 mm. If you want to use a nozzle that has a different diameter than the built-in profiles, then you create a new profile yourself on the slicer.
This is less complicated than many 3D printing users assume. Of course, this also depends a bit on the slicer software you’re using. If it is Cura, then this should not be a major problem.
The two most important points you need to adjust:
- Nozzle diameter in printer settings
- Extrusion/line width in printing settings
For you, this means that in addition to a new printer profile, you will also need to adjust new print profiles to achieve the desired result for the extrusion width. However, keep in mind that the Prusa printer already offers you different profiles before you bother to set them up or adjust them.
This is how you set a new nozzle diameter in the extruder settings:
Step 1:Go to Printer Settings + Extruder 1 + Nozzle Diameter and enter the exact diameter of your nozzle.
This value you enter is the machine limit for the printer. For your 3D print, this means that the layer height to be printed cannot be greater than the nozzle diameter. The layer height should not be greater than 75% of the nozzle diameter and not less than 25%. That is, if you use the standard 0.4 mm nozzle, then you should have a maximum layer height of 0.3 mm and a minimum layer height of 0.1 mm.
Attention:
Changing this value alone does not yet result in wider extrusion lines being printed. Other essential points come into play here.
Step 2:
The extrusion width in the print settings:
- To set the extrusion width, go to Print Settings + Advanced.
- Now a list with different settings of the extrusion width appears.
- If you want to enter the extrusion width manually, use preferably 110% of the nozzle diameter at the beginning. Experience shows that this value leads to good printing results.
Setting the extrusion width is one of the essential points in profile creation when you use a new nozzle with different values than the existing ones.
Advantages With Other Nozzle Diameters
If you are just getting into 3D printing, the recommendation is clearly to use the standard first, that is, nozzles with a standard nozzle diameter of 0.4 mm.
However, if you have some experience, it is fun to work with other nozzles and new extrusion widths and layer heights that deviate from the standard.
You’ll also gain experience of how the different nozzle types and extrusion width settings affect your printed objects. Changing the nozzle is a matter of minutes.
The printer and print settings also do not take much time, but they bring many advantages. You’ll notice the better print results as soon as you apply the first few layers.
Many simply take the matter of extrusion widths and nozzles as a given according to the following motto:
- a smaller nozzle is great for details, but prints slower;
- larger nozzles print faster, but quality suffers.
But the reality is different. Only 20% of 3D printing users dare to change the nozzle, let alone adjust the extrusion width differently.
It is a pity that far too few users still make use of these possibilities.
Some see this critically, others find it too complicated. But if you just learn a little about the technology and matter of your printer, you will appreciate the advantages of different extrusion widths.
The most significant advantages after replacing a nozzle and appropriate printing and extrusion width settings listed for you:
Advantage 1: print up to 4 times faster
3D printing is a process that requires a lot of patience. Even a small printed piece, such as a small cube, can sometimes take hours.
Printing with a large nozzle diameter and increased extrusion width can significantly improve the printing speed.
Advantage 2: more layer height
A nozzle with a larger diameter understandably also enables printing with extended layer height. This also leads to a reduction in printing time. In addition, your print object gains stability.
Advantage 3: Improved support of the print object
For some 3D printed objects you need supports. In most 3D printers, these are already extruded from the manufacturer’s side. The main reason for this is that the support can be removed more easily. The printer nozzle has an enormous effect on the support walls. Just make that work to your advantage.
With a smaller nozzle opening and smaller extrusion width, the support beam also becomes thinner and can be removed correspondingly easily. Conversely, larger nozzle diameters and an adapted higher extrusion width ensure more stable support walls. However, these are then somewhat more difficult to remove.
Advantage 4: Influence on the mechanical properties of your printed object
There is no doubt that the nozzle diameter and the width of the printed lines have a considerable influence on the mechanical characteristics of your printing unit.
Objects printed with a 0.6 mm nozzle absorb far more energy and thus have higher impact resistance than printed pieces created with a standard nozzle of only 0.4 mm.
Virtually all printed objects that, due to their application, should be impact and break resistant, can therefore be printed with a higher extrusion width.
This means for you: the larger the print diameter of a nozzle and the wider the lines, the more density your print object gets and makes it more resistant to external influences.
Related Questions
What connects the extrusion width and the flow rate?
The flow rate determines how much of the filament is pressed through the nozzle, which has a significant influence on the print result. The entire printing process is also calculated according to the flow rate.
The flow rate is determined by various factors. One of them is the extrusion width.
Extrusion Width x Layer Height x Print Speed = Flow Rate
It is also worth experimenting with this, but only plausible values should be used.
Why do brittle lines come out of the nozzle?
This phenomenon is called ‘under extrusion‘. In this case, your 3D printer may not recognize what the actual diameter of your filament is.
Therefore, be sure to check if your printer configuration is compliant with the slicer settings. Also, check the filament you are working with. Does the configuration you are using match?
Print configuration and printer configuration form an inseparable ‘team’ for successful 3D printing. The print command in your 3D printer is the G-code. The correct material flow is calculated by your printer’s slicer software according to the nozzle and filament diameter information you enter and stored in the G-code.
Do I have to set different extrusion widths for each type of filament?
The extrusion width alone does not play a direct role in the various filaments. Rather, the filament flow is also decisive here, which also reacts to the settings of the extrusion width.
Even if the entire calibration is set 100% correctly, you will find that with each filament grade, the filament will not flow 100% out of the extruders.
It is therefore true that the filament type is a decisive factor for the final extrusion width.
The best way to do this is to fiddle around a bit with your 3D printer to see how it behaves with different configurations. It turns out that even 3D printers of the same brand and type react completely differently to the print and printer configurations.
Therefore, it is very important that the 3D printer and the user get used to each other in order to find optimal configuration solutions, also with regard to the extrusion width.
Tips for Extrusion Width
Tip 1
To print 3D objects that don’t require special requirements, choose an extrusion width equal to 110% of your nozzle diameter.
Tip 2
If you select the extrusion width for the first layer, and possibly the second, of your printed object much higher than the nozzle diameter, about 120 to 140% of the nozzle diameter, your printed object will adhere much better to the printing plate. The first printed layer in 3D printing is decisive for whether the printed object finds and retains the necessary adhesion to the printing plate during the entire printing process.
Tip 3
If you fear that your print object will not adhere properly to the printing plate, for example due to the material or the printing plate properties, or that warping will occur, you will need an auxiliary print that bonds with your print object and holds it firmly on the plate.
The Brim, an excellent auxiliary print, can consist of one or more lines arranged in a row. For the brim, a higher line width/extrusion width is definitely worthwhile, as this increases the adhesion of the object to the plate and warping, the unsightly fraying or rolling up of corners and edges, is absent.
If that doesn’t help either, a Raft should ensure adhesion!
Tip 4
If you need to print supports for your print object, they can be weaker and easier to remove if you choose an extrusion width that is smaller in percentage than the nozzle diameter.
Calibration
Now you have a wealth of information from our guide at your fingertips, you know your way around better, and you have in-depth knowledge about the importance of the optimum extrusion width in 3D printing.
Like many other 3D printing users, you may still be struggling a bit with the right slicer settings that will allow the best line or extrusion width to work to its full potential.
Therefore, we would like to provide you with a small calibration roadmap including optimal preparation in the form of a step-by-step guide. Make it easy for you to bring together the right components for a pleasing print result:
Step 1: Requirements
You should already have some knowledge of 3D printing. You should also have a good command of the technical terms used in 3D printing.
It would also be advantageous if you have already executed a print via a terminal using G-code. However, many functions can now also be performed on the display. The best way to achieve optimal 3D printing is to follow these step-by-step instructions exactly.
Step 2: Optimal preparation
- It is essential that you enter the printer and slicer in the fields provided in your profile.
- Get the best filament material for setting, preferably in the color dusty gray.
Reason: Experienced 3D printing experts have found that when setting the correct line width or extrusion width, the dust gray color provides the best visual view to more accurately perceive errors, especially in line width or extrusion width.
In addition, the dusty gray color is optimal for easier detection of machine defects on the printed parts and for facilitating the learning process in the settings through better defect detection.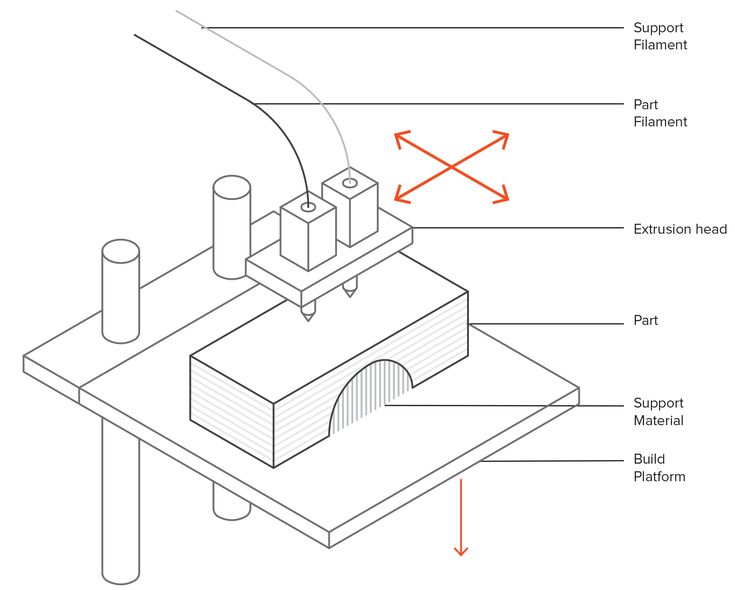 This result came out of tests conducted by 3D printing experts together with various filament manufacturers.
However, we use orange for our test prints, because it is the color of the 3DPrinterBee 😉 - The material should provide for consistent quality.
Step 3: Check printer setup exactly
The control of the printer setup includes the following points:
- Right angle correct
- Stability
- Axes work easily, especially the Z-axis
- Screw connection sits tightly
- Good belt tension
- on a professionally, possibly pre-assembled hotend? If not, you should take the time to disassemble it once and then reassemble it again.
- Hotend cooling (could and should replace the fan)
- Leveling of the print bed (taking into account bed spacing and brim)
- check if feeder/extruder are in usable condition (e.g. because of correct adjustment of extrusion width)
- Recommendation: always leave the steps of the X, Y and Z axis at factory settings (even if you hear about other setting suggestions)
Once you’ve made all the settings and checked everything again, it’s time to get down to the nitty-gritty:
Calibration of the Extrusion
This is where you make most of the settings that generate the appropriate extrusion width for your desired print result.
It is best to follow the suggested values and settings in this guide, which should be reflected positively in your final 3D printed work.
In addition to the aforementioned setting tips, the expert level has a lot of other advice ready, which the end user can hardly implement and is not always necessary.
With the correct printer and print settings, which also include the values of the appropriate extrusion width for your 3D print object, you have already done the best preparatory work.
Conclusion
If the interaction of the extrusion width with other printing configurations sounds like a scientific Sisyphean task at first glance, it is not.
If you follow the tips and advice in this little guide and work intensively with your 3D printer, the nozzles and the filaments, you can look forward to beautiful and reliable printing results. In the attached descriptions for your printer, you will only find smaller sections on the topic of extrusion width.
This guide will make your life with 3D printing a little easier.
Disclosure: This website is the property of Martin Lütkemeyer and is operated by Martin Lütkemeyer. Martin Lütkemeyer is a member of the Amazon Services LLC and other Affiliate Programs. These are affiliate advertising programs designed to enable websites to earn advertising revenue through advertising and linking to Amazon.com and others. Links marked with * are affiliate links.
The effect of Extrusion Width on Strength and Quality of 3D prints — CNC Kitchen
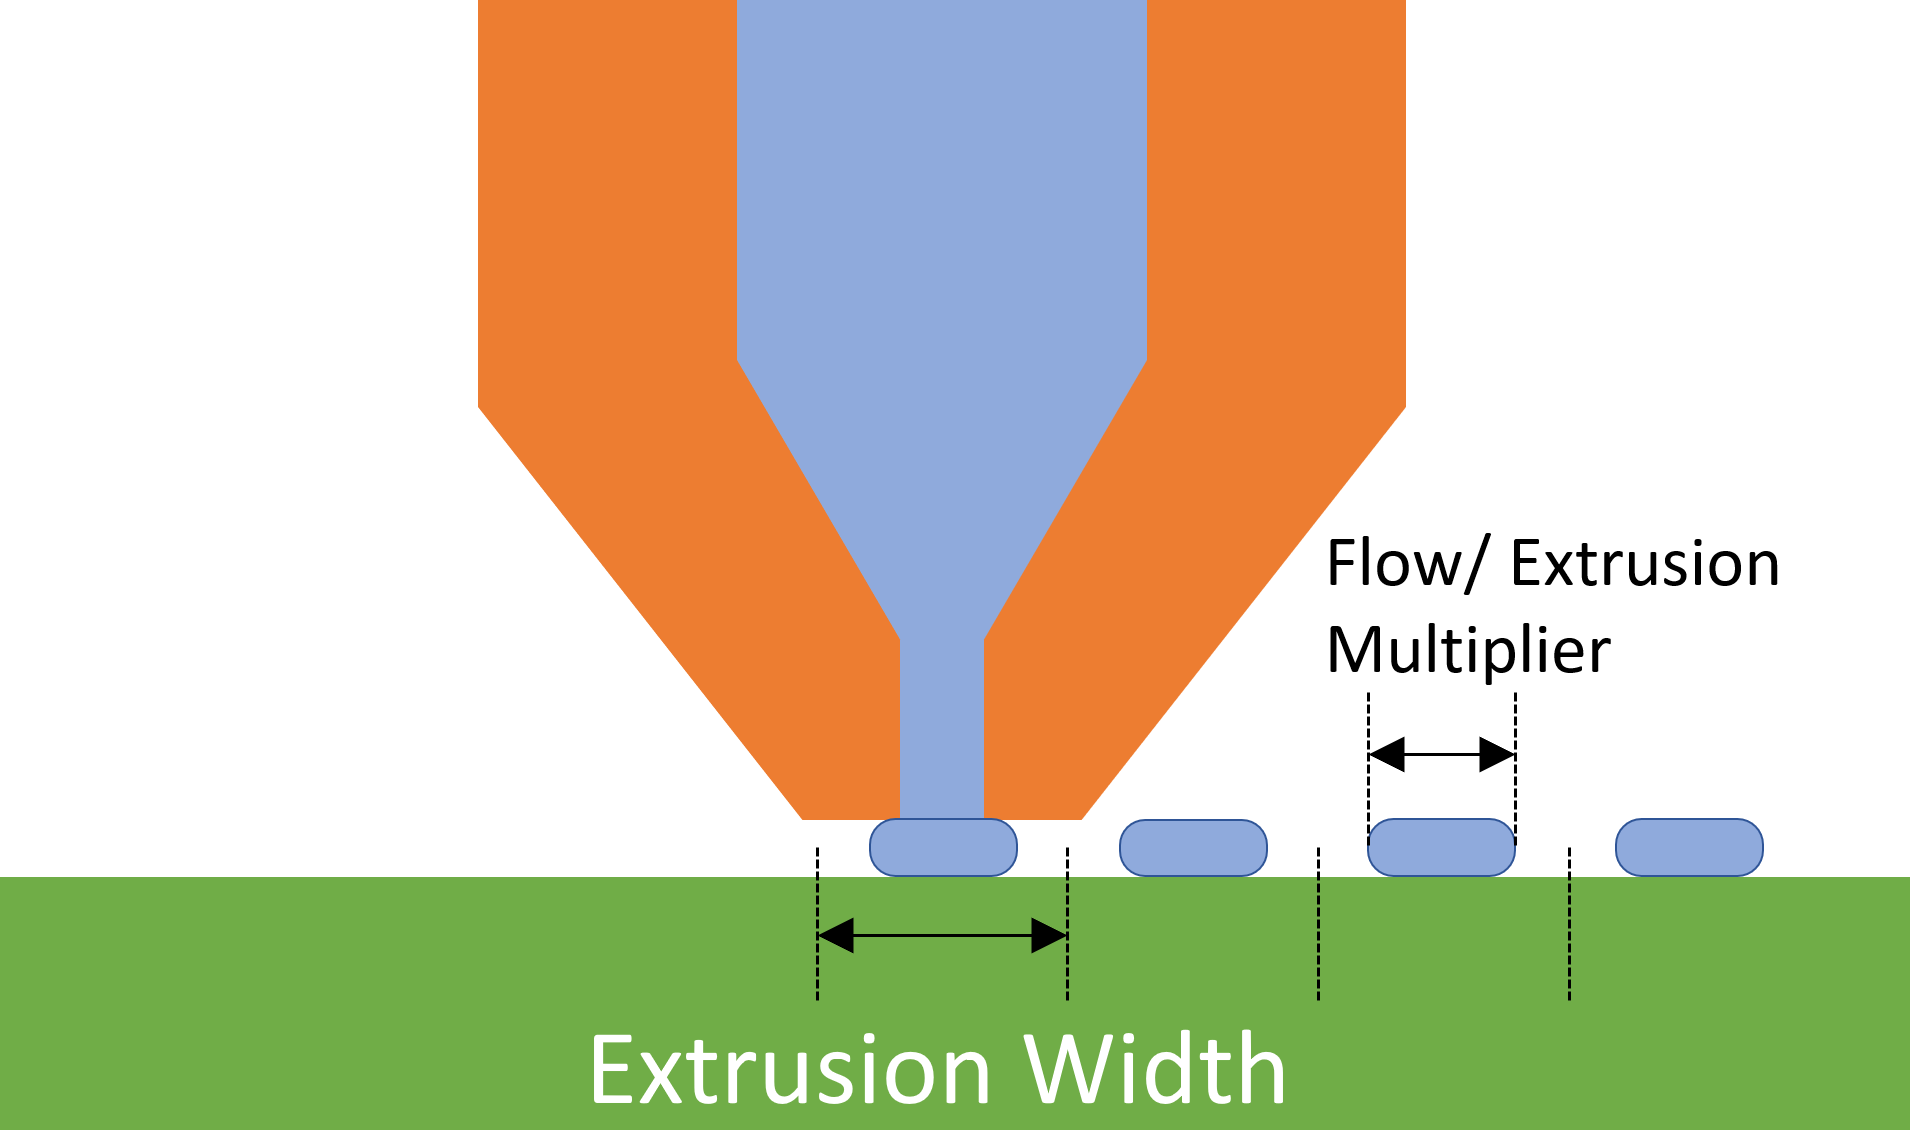
Most of us probably change the layer height we print with quite a bit and adjust it depending on if we want something fast or nice. A parameter that I don’t see many adjust is the extrusion width the slicer uses. And at this point I’d be really interested if you ever touched it and why. Let me know in the comments! The extrusion width is how wide the line of material that is printed is.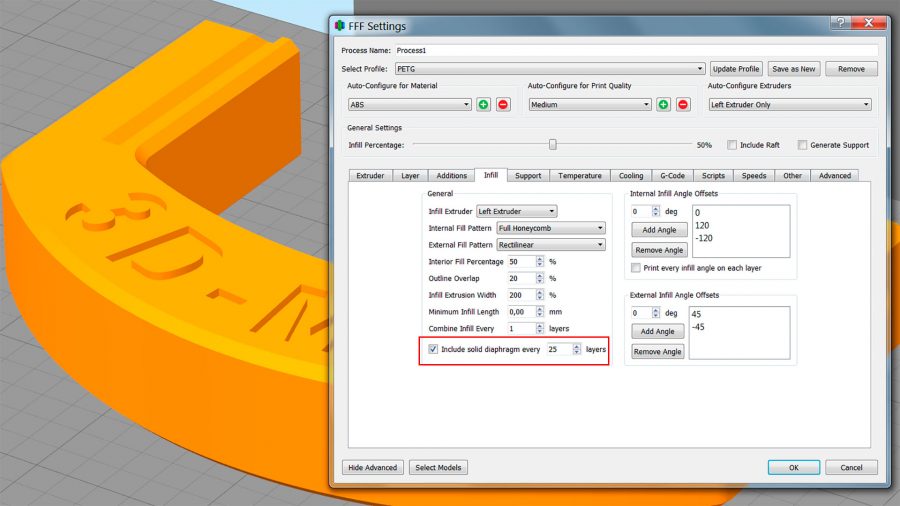 Please don’t mix that up with the extrusion multiplier! The extrusion multiplier only adjusts the flow of material but keeps the distance between tracks the same, extrusion width sets the distance between extruded lines and adjusts material flow accordingly. Most of us probably use a 0.4mm nozzle on our machines and the width of the filament line doesn’t necessarily need to be exactly that value. Going smaller might seem a bit counterintuitive but is actually possible and can even be beneficial for quality. Most slicers use a standard value of 100 to 120% of the nozzle diameter. This means the material extrusion is as wide as nozzle orifice or just a bit wider. Since the nozzle tips have a bit of flat area around the hole the layer height will be kept and the material will not be squeezed upwards. Also, if I later talk about extrusion width, I will usually use the percent value which means what percentage of my 0.4mm nozzle diameter. Some slicers like Cura hide extrusion width by default and let you define the wall thickness which doesn’t necessarily need to be a multiple of the extrusion width.
 For full control over that value I used PrusaSlicer 2.1 for all prints.
Extrusion Width VS Extrusion Multiplier / Flow
With higher extrusion widths the pressure inside of the nozzle needs to be higher as well to squeeze the material to the sides after it leaves the nozzle. This additional pressure does not only squeeze the material to the side, it will also press the individual layers together more which poses the question if that also helps with the layers bond together better?
This is exactly the task of todays video. In order to investigate that question I printed 3DBenchys for quality assessment and layer adhesion samples as well as my test hooks for strength testing. I thought it would be interesting to even start from extrusion widths smaller than the nozzle bore up to really high values. I printed all parts with a 0.4mm nozzle and started at 90% extrusion width and went all the way up to 250%. That’s 0.36mm to 1mm and the latter is the diameter of the nozzle tip of a standard E3D nozzle. Pay attention if you use different nozzles for example the MK8s of the CR-10 and all its variants and clones because their nozzle tip looks different which has advantages and disadvantages. The parts were printed on my Original Prusa i3 MK2S in SpoolWorks PLA at a nozzle temperature of 210°C, 50% fan and 0.16mm thick layers. In order to have ambient temperatures as constant as possible I had the printer in my basement where I have a quite consistent temperature of 20°C. Each printjob for one extrusion width consisted of one 3DBenchy and a pair of 3 layer adhesion specimens. The 3DBenchy and the test samples were printed sequentially so that the layer times were consistent and didn’t jump.
At first, let’s take a look at the print quality. It was very interesting to see how all 3DBenchys looked basically the same up to 140% extrusion width. Even the model with 90% width didn’t look differently. At 160% I was slowly able to spot artefacts in the overhanging regions probably because the material is squeezed out that much. At 250% the whole surface was even strangely textured. At 200% and higher the flag pole base just vanished not because of printing problems but because the part just had too thin walls to be printed with a 0.8mm extruded line. At higher extrusion widths some areas looked as if they were a bit underextruded though I think was only the overlapping areas with the perimeter that needed tuning. All in all, the printable range is way bigger than I initially thought and 150% width still seems reasonable. You have to keep in mind that especially thin areas might suffer faster in quality, because the additional extrusion pressure will create a downward-force on the part, squishing it together. Also, the additional material will add drag between the nozzle and the part and therefore might deform it due to the shear forces or cause other issues. Another thing that you have to keep in mind is that with thicker extrusions you also pump out more material in the same amount of time that needs sufficient cooling.
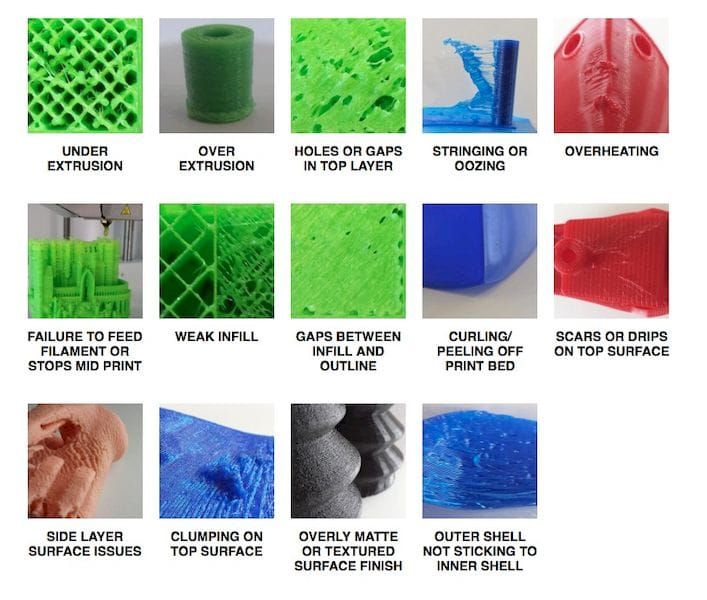 In the worst case you might even get to the limit of your hotend where it’s not able anymore to melt the material properly causing even more issues. In such a case it might be a good idea to take a look at hotends like E3Ds Volcano or just bump the temperature up a little.
3D Benchies printed at different extrusion widths
Let’s now continue with the layer adhesion tests. The samples that I printed were measured and then mounted in my DIY universal test machine where they were are all loaded at a constant speed until failure. This should give us very comparable values because it removes the human factor. Here again, the samples up to 140% extrusion width looked very similar and only at wider extrusions some problems seem to occur. For statistics I tested 3 samples for each setting and I didn’t test them in order to avoid any systematic error. The results are very interesting because we can clearly see that the layer adhesion slowly rises from 90% to the maximum probably at 150%.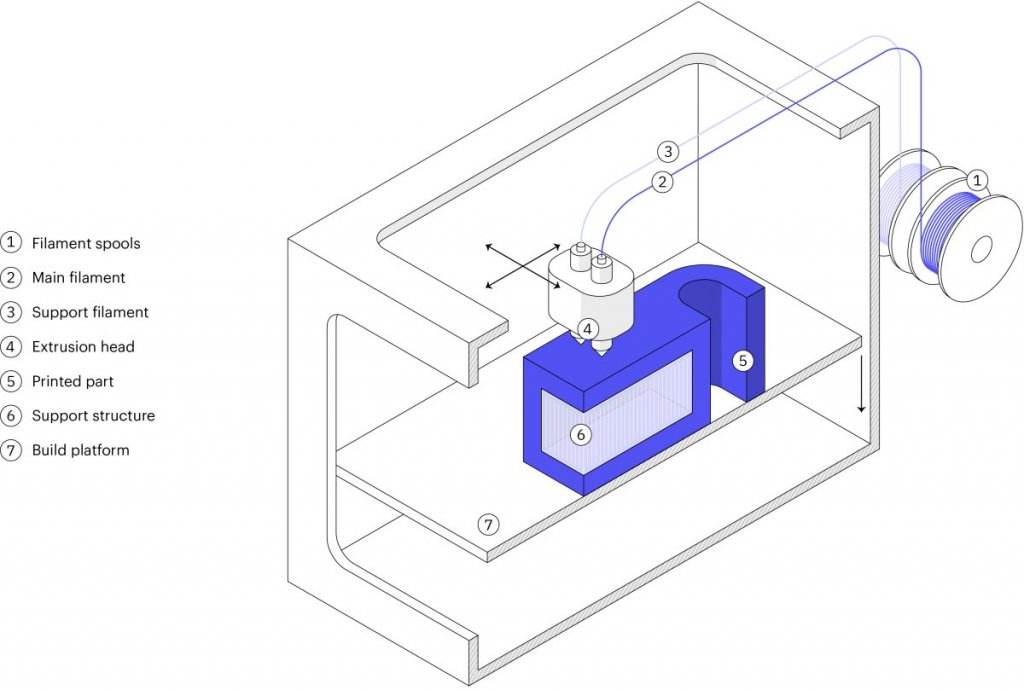 After that it falls again but the reason for this behavior might also just be that the samples got really rough and the stress risers on the surface caused premature failure. Just for a reference, the pure material strength is at around 60MPa so even though the layers seem to adhere better we are still a bit away from perfect fusing of the layers but again, a bit closer. As I already mentioned in the last video this is actually a video series where I analyze the influence on strength of different printing parameters and then ultimately want to combine them to get the maximum strength out of our 3D printed parts. Design of Experiements if you know what I mean. If you don’t want to miss that, make sure that you’re subscribed and have also selected the notification bell!
Strength of layer adhesion samples printed with different extrusion widths
At the lower extrusion widths, the crack planes are only over one or two layers and they become more un-uniformly the more material is squished out. Another indication that we’re on the right track.
Cracked sample printed with 100% extrusion width
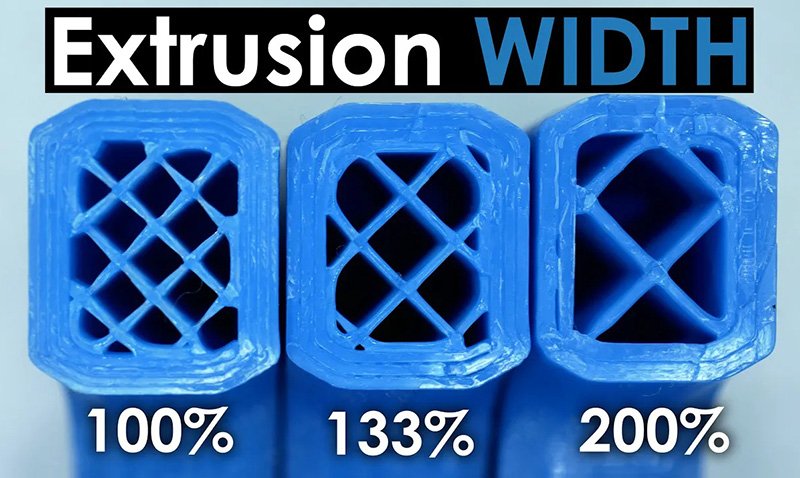
Next, in order to apply that to a real problem I also printed a couple of my test hooks to see if our findings on the simple layer adhesion samples also hold true here. All in all I printed 12 parts, all standing. 3 had 2 perimeters and 100% extrusion width. 3 had the same number of perimeters but at 200% width, doubling the wall thickness. 3 were printed with 4 perimeters and 100% width resulting in the same wall thickness. 3 were right in-between with 3 perimeters and 133% extrusion width. Of course, the parts with thicker walls will be stronger, but is it better to use more perimeters or thicker extrusions. By the way, I did a whole video on why you should make your parts stronger by adjusting perimeters instead of infill ratio. Card up here! Besides strength I also noted down printing time and weight. I, for my part work in aerospace and am impatient.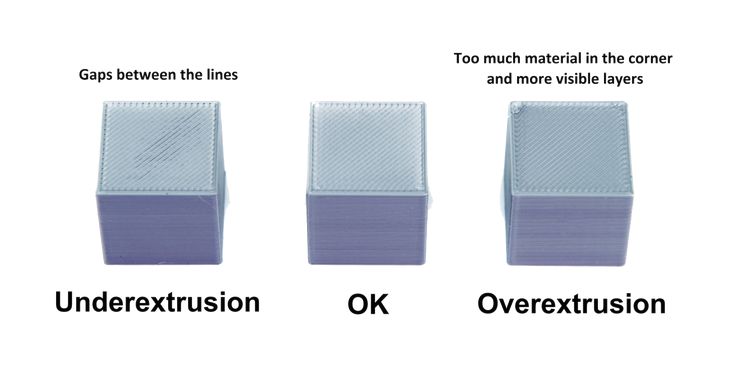 That means that for once, I want the most strength per weight and the strongest print in the shortest amount of time. Some might argue that print time doesn’t play a role for them so by just using more perimeters and infill they make their parts stronger. But still if you’re someone like this then having even stronger parts with wider extrusions might be a bonus on top.
The quality of the hooks wasn’t as different as with the 3DBenchies and the layer adhesion coupons. Even the 200% sample still looked okay. Since I only used 20% infill there always was a bit of space left the push the surplus of material. So as suspected, the hooks with only two perimeters failed at first at around 20kg of load. Next were the hooks with 4 perimeters and 100% extrusion width at 33kg but with quite some scatter. Second came the parts with 3 perimeters and 133% extrusion width at 37kg of failure load and the strongest ones were actually the ones with only 2 perimeters and double the normal extrusion width at 39kg on average. This is almost double the strength with the same printing time when we compare it to the first sample. The printing time was even lower because the infill is thicker so less lines need to be extruded. So, if you are as impatient as I am, then thicker extrusions will give you stronger parts in the same amount of time. If you are looking for parts that use the given material as efficiently as possible, thicker extrusions will help you in this regard as well because layer bonding will be better. Pretty cool, huh!
Strength of the test hooks printed at different extrusion widths
So, what’s the verdict? We have once again learnt that the strength of our 3D prints is not only a result of the materials we use but also the settings. Using wider extrusion seems to help layer adhesion because the material is squished more into the previous layer. At some point you run into quality problems but to be honest, that’s usually not the biggest concern with mechanical parts. If you need a strong part quickly then upping the extrusion width is almost directly proportional to the gain in strength, which is really cool! You might have the same advantage with a bigger nozzle, but this method saves you the hassle to switch all of the time. Just keep in mind that you will extrude more amount of material in the same timeframe so make sure your hotend and cooling setup is able to handle that.
Stefan Hermann4 Comments
0 LikesHow to achieve clarity in a 3D-drug using the FDM method. 3Dplast
company statistics We have chosen a number of basic reasons that are based on our knowledge of work, and we believe that they will help you reach the level of your creativity.
Speak about your filaments And then we can seriously add the material to the whole process of 3D-friend. nine0003 It is important to rewind that the filament is wound correctly on the bobbin. As you save a large amount of materials, do not forget to provide them with a suitable place for saving. There it is not guilty to be supra-mundane, otherwise your filaments may waste their power. For safety, you can use hermetically sealed containers or plastic boxes with vlogs. Deyakі modifikuyut boxes, shchob filament podavavsya directly from them. nine Choose the right temperature Leather material may have recommended extrusion temperatures, for example ABS melts best at around 240 degrees Celsius and PLA at around 200 degrees Celsius. The temperature parameters vary depending on the type of harvest, so you should check the exact recommendations on the packaging as soon as possible. Our evidence shows that it is possible to “grow” with the temperature within the range of plus or minus 10 degrees Celsius, as recommended by the picker. Change the number of degrees higher for everything to reduce the quality of each other. Too low a temperature can bring the balls to a boil, or wind up to the point of impossibility to see the threads, at that hour, as hot materials can pour out, bend, or fold. nine0003 Another important parameter related to temperature is that the platform is heated up correctly (so your printer supports this option). ABS is 100 degrees Celsius, while PLA is only 60 degrees Celsius. Build with ease Keep in mind the importance of supporting designs, especially for larger folding and less detailed designs. The key parameters are the optimal thickness and width of the supporting elements. From one side there is a larger support over the top, but we sweat and more importantly vodokremiti. The sharpness of the pitch can also be found in software for 3D-friends, which in different versions can generate more or less fine pitch. If you need materials, then for some materials you can use a different filament, but if you need an extruder for two nozzles, it is not available for everyone. Adjust the reserve coefficient The occupancy coefficient describes the percentage of spivvіdshnennja plasticity and again, scho zapovnjuє your vibrіb in the middle, under the big zvnіshnіm ball. nine0003 Low cost to save material and speed up the process, but to make the whole object less costly and costly, it is easier to slander. It is especially important to reach more great objects. Residual adjustment of the deposit ratio is often deposited according to the knowledge of the person who prepares files for others. Set correct ball height and extrusion width The standard height of each other is 0.1 to 0.3 mm, but if the double nozzle and the duct thread are present, this range can be increased from 0.05 to 0.35 mm extrusions. The thinner the ball, the more accurate and detailed the 3D-druck, and the balls are less visible. Ale Tim is more friendly, don't forget about it. nine0003 Width of extrusion can be set according to nozzle size. The widest nozzles are 0.3 and 0.4 mm. Please note that extrusion widths of 0.3 to 0.6 mm can be seen as a safe range for experimentation. Theoretically, more thin contours can lead to more accurate results, but in reality it can only achieve more detailed versions and models with a higher level of detail. Change the smoothness of the other Reduced the smoothness of the robotic motor by lowering the level of the screwing can be significantly improved by the FDM method. The extruder will have more time to work on his work, especially on the corners and edges. The thread will also stick together more quickly, and it will have more time for cooling, so that hanging threads can change. This race is especially important, as you will win PLA-plastic. Adjust the extruder ( retraction) Vіdkat, but also retraction, is an important worker of the extruder robot. Vіn vіdpovіdaє for pulling the thread, if it won't wink. The installation of a larger swedish vіdkatu zapobіgaє utavlennyu bulbashok at virobi. The thread will also not hang from the nozzle - if the extruder moves over the object without harm, it does not leave thin “hairs” made of plastic on the pile. Stop, where the retraction can get in, the tightness of the seams, where one ball ends, and the other begins. Don't be afraid of post-processing Remember that you can always beat a variety of post-processing and brewing techniques to enhance the vibrancy of your 3D vibes. It is best to work with ABS plastic - this way you can sand and polish. Whiskers are heated by hot heat, you can attach cracks from the surface, and finish with acetone to grind the surface smooth and glossy. There are significantly fewer options for post-processing PLA threads. Hot air is the only tool that we can recommend for removing hairs and slight sagging. nine0003 Threads of both types can also be spun, if our testimonial shows that it is easier to use spun with ABS, at that time PLA often leads to the application of a thick ball of primer. 3DPrintStory 3D printing process How to choose nozzle size for 3D printer? Advantages and disadvantages When choosing your 3D printer, the nozzle size of your 3D printer may have been the last thing on your mind. In this article, we'll take a look at the different 3D printer nozzle sizes and why you should consider this assembly, what materials it's made of, understand the relationship between nozzle size and layer height, and how to measure the actual nozzle diameter. nine0003 Nozzle diameter affects the extrusion width of the 3D printer line. This affects some elements of your model. If you are 3D printing for business (make a lot of orders), you need to make sure that your extruder is feeding the right amount of material. If too much material is fed, then more filament is used than is actually required for successful 3D printing. Well, a smaller number can simply lead to marriage. nine0003 Or maybe you're printing different models, some of them very detailed and intricate, and some more practical (like a replacement doorknob) that just needs to be printed quickly and with maximum durability. In any case, you will need the correct setting to save time, material and ensure the normal quality of the 3D model. There is no easy answer to what is the best nozzle size for a 3D printer. You need to weigh what you want to achieve and what elements of the 3D model are most important to you. nine0003 Depending on your 3D printer, the nozzle can be quite easily replaced (most of them are mounted on screws), and buying a package with different sizes will cost you a lot. The most common standard nozzle size is the 0.4mm (or 0.35mm) nozzle used by most modern 3D printer manufacturers. The reason for this is that it is a rather large and yet versatile nozzle size. This means that you can print with exceptional detail in no time. nine0003 With the 0.4 mm 3D printing nozzle you can print up to a layer thickness of only 0.1 mm or up to 0.3 mm. The lower the layer height, the better the detail (on the Z axis) and the larger the layer height, the faster your 3D print will be, but with worse detail quality. A common misconception is that if someone doesn't get good enough 3D print quality on their printer with a 0.4mm nozzle, they immediately think they need a smaller 3D print nozzle. Another common smaller size is 0.25 mm. Some 3D printers offer 0.2mm, 0.15mm, and Mass Portal is even experimenting with 0.1mm 3D printer nozzles. And the experiments are really interesting. Thanks to this miniature nozzle, they were able to print the clock mechanism with excellent detail. nine0003 Theoretically, smaller 3D printer nozzles allow for greater precision. But for many 3D printers, especially cheaper or older models, a smaller extruder nozzle won't necessarily make a difference if your printer doesn't support the higher resolution you need. It's like putting low-profile, high-performance tires on an old classic car - it doesn't make it go faster, and it doesn't necessarily make it better cornering. nine0003 This is also similar to how the specifications of a 3D printer on paper (eg claimed resolution) do not always result in the best print quality of the finished product. smaller nozzles as resolution across the board is getting better every day. nine0003 Let's look at the pros and cons of 3D printing with smaller nozzles. Some are less obvious than others. Next, we'll look at the larger, underpriced nozzles available. I hope after reading this article you will be able to answer the question: "What nozzle size should I print?". You probably already guessed that the smaller the size of the nozzle in the extruder, the more detailed model you can get as a result of 3D printing. The thin nozzle is great for complex figures, or if you need to print very thin walls for aircraft skins, or high transparency models, etc. nine0003 The photo below shows the printed skin of a model aircraft, which was made with a standard 0.4 mm diameter nozzle. If the same skin is printed with a nozzle with a diameter of 0. It is worth noting that a 3D printer with a 0.2 mm nozzle feeds half as much material as a 0.4 mm nozzle. And this actually leads to an increase in print time by the same two times. It should be noted that strength and detail are reciprocals of time. So to get high-quality 3D models using a thin nozzle and high resolution, you will have to be patient (2 times more than when printing with a standard 0.4 extruder :)). In some cases this is justified, in others it is a waste of time... As a general rule, the smaller the nozzle size, the higher the chance of problems with the 3D printer. Especially if you are using cheap materials - they can work well with low models and thicker nozzles, but if you need detailed models that are printed using a thin nozzle, then you should also be puzzled by buying quality filaments for 3D printing. Other factors are less obvious when 3D printing with a thin diameter nozzle - for example, protrusions can be a problem. But there is good news too! Where overhangs form, the caliper material will be much easier to remove if printed with a thin nozzle. Due to the increased accuracy, your slicer can use a minimum amount of material between your model and supports, so they will break off more easily and have fewer damaged pads that need to be sanded. And finally, the most annoying thing about a thin nozzle is the ease with which it clogs. If you downsize to 0.2mm or even 0.1mm, you'll need a small particle to clog the hotend. You need to be very careful about the cleanliness of your 3D printing material and regularly clean the nozzle of your 3D printer. Otherwise, you will not end up with additional unnecessary problems. nine0003 It is also worth taking the time to understand the relationship between nozzle size and layer thickness. In short, the first parameter determines the horizontal detail (along the x and y axes), and the second adjusts the resolution along the vertical or z axis. Although the actual nozzle diameter should be engraved on the side of the nozzle, it is not always possible to read this value if it is already installed in the extruder or if you have been printing with it for some time. After all, there is the concept of wear and you may not be sure that the nozzle is the same size as before. nine0003 To determine what size your nozzle really is, very slowly extrude some material into the air (high speed may change shape or size) at the lowest setting you can feed material at (approximately 1 mm/s). Once cool, use a micrometer if you have one. They are generally more accurate than digital calipers. Keep in mind that the filament will probably expand after being extruded. Poor quality material or an extruder that is too hot (especially if you extrude at 1mm/s) will cause the material to expand more, resulting in inaccurate readings. nine0003 It is also useful to know the size to which your material expands after extrusion if you are working on getting a really nice and accurate model. In simple terms, this is the thickness of each line of extruded material that makes up each layer of your model. The thinner the layer height (or layer thickness), the finer the print detail in the Z-axis (the vertical dimension of your model), but the more layers will be required. Increases print time. nine0003 These characteristics are related, but not completely. For example, you can print using a thinner, thicker nozzle if vertical resolution is less important to you. Or you can use a thicker nozzle with a very small layer height. Although in this case, do not get too carried away. To maintain adequate pressure, your layer height should be at least 20% less than your nozzle width - and in most cases, for best 3D printing results, it should be around 50%. nine0003 With the correct setting of the distance between the table and the nozzle, the base of the finished model should have an almost perfectly smooth, glassy surface. You don't necessarily need a layer height calculator on your 3D printer, but typically the maximum layer height is 50% of the nozzle width. In some cases, you can go higher (perhaps 75%), but in this case, you must be aware that you can sacrifice reliability. It's best to experiment with the parameters of your model if you understand the relationship between the 3D printer's nozzle size and the layer height you'll be using to print. In most cases, it is worth printing thinner layers with smaller nozzle diameters and generally thicker layers with thicker nozzles. Just note that if you are printing with a thicker nozzle diameter and very thin layer height, you will need to lower the extrusion settings in your slicer to prevent overfeeding. It's also worth noting that regardless of size, you should always make sure you always have a clean nozzle. One of the easiest ways to do this is to use a high quality cleaning floss. You only need to use a few grams of it each time you brush, but this will prevent carbon buildup over time. nine0003 Similar nozzle sizes were more common on older 3D printers but are making a comeback. If you need strength and speed, but detail is less important, then you should use a 0.8 mm or even 1.0 mm nozzle. And don't forget that models printed with a 0.8mm nozzle can be very detailed, since a lot also depends on your 3D printer. nine0003 The only slight disadvantage may be that you use more material, but with thicker part walls you can probably compensate with less infill. There is no single optimal nozzle size for all models, you just need to take all factors into account and decide which nozzle size is best for you. It is worth noting that composite materials (any particulate filament such as wood filler, copper filler, carbon fiber nylon, or glass reinforced nylon) will cause extrusion problems when using a thinner nozzle. If it’s not so, if it’s possible to correct it - build it up. However, do not select the materials as a postal worker, it is better to buy from us at 3D-Plast. Also, pay attention to the mill of the thread - the knots that open up can block the supply of material to the extruder or block it, which will cause even greater damage.
 nine0003
  An indication of 10% and less will definitely be a pardon, and a rіven more than 60% will no longer repair the total investment in the longevity, but only increase the object's vag. Everything that is between two signs is a field for your experiments. nine0003
  nine0003
  Shvidka retraction can be remembered less. To the point, change your mind that your software security does not place all the seams one on top of the other. nine0003
 How to choose nozzle size for 3D printer? Pros and cons
 This is a detail that is often overlooked. But depending on what you need to print, the wrong nozzle diameter can get in the way.
 How does nozzle size affect 3D printing?
Most common 3D printer nozzle options
How is nozzle diameter related to 3D printer resolution?
 Just like Ultimaker and Zortrax have very similar resolutions on paper, but in many actual tests Zortrax produces better models than Ultimaker 2.
  2 mm, then the weight (and strength) would be halved.
  This is because each layer has a smaller width for the next layer. Crossing bridges can also be difficult. nine0003
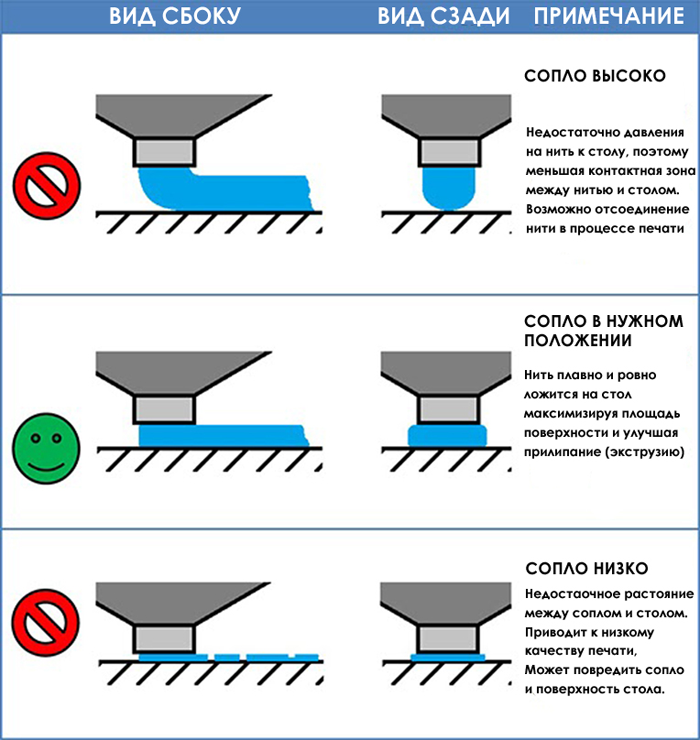
How to measure the nozzle size of a 3D printer?
 So feel free to experiment with higher speeds that are a bit more like your actual 3D printing.
 What is the relationship between 3D print layer height and nozzle diameter?
How to determine the correct distance from the nozzle to the desktop of a 3D printer?
 Many people assume that you need to use a stylus to properly set the distance between the nozzle and the 3D printer bed, but in fact, even that can be too thick. So it's worth thinking in the direction of the already proven table calibration with a piece of paper. You should use thin paper. For example, check paper is a great choice. Place the receipt paper under the nozzle and gradually lower the nozzle down until the receipt paper resists a little when you try to push it out. 3D printing at this height will give the bottom of the model a great look, and in the case of tall models, the print will definitely not go astray. nine0003
 What is the maximum 3D print layer height compared to the nozzle size?
 So for a 0.4mm nozzle, you will need to print with a layer height of 0.2mm, or up to 0.3mm. Your minimum should be around 0.1mm. If less, then in fact you just increase the waiting time without much benefit (on the same 0.4 mm nozzle). nine0003
 So why should I use a 0.8mm nozzle or thicker?
 It's all about using what you need and nothing more. For a large number of models, the 0.4mm headroom that your 3D printer probably comes with may be overkill in terms of detail.
 What nozzle size should I use for composite materials?
Learn more