Diy wood 3d printer
DIY 3d printers made from wood
Wood is very cheap. Wood is easy to obtain. Wood is easy to work with and many shaping technologies are available. It comes in many forms with different properties from flexibility to strength. It is renewable resource. It can be easily recycled.
There were entire generations of printers like Ultimaker based on laser cut plywood, but full wood was never in fashion. probably because it is not high-tech and not self-replicating.
I would like to see more projects with wooden parts. I like the texture and natural aesthetics of wood contrasted to technology.
Here are some designs that use wooden parts, some are fully functional, some are under development:
Wood frame Mendel90
Mendel90 is great design and it is often built with wooden frame. One of the great success stories with wooden parts. Design is custimizable based on your input and generates paper printable cutting and drilling guides for the frame.
Adapto 3d printer
It can have aluminum beams and low cost wood frame.
http://diy3dprinting.blogspot.com/2013/11/adapto-diy-3d-printer.html
Ikea RepRap
While surfing around I found this reprap with wooden / particleboard frame (maybe made from Ikea furniture). Further information is unavailable. Let me know if you have any additional information about this printer.
http://aeons.phrenzy.org/~berserk/reprap/printer/
Gunstrap
Source: RepRap wiki
The Gunstrap is a plywood repstrap that is based on the Mantis CNC design. It has a build area of 200x200x100mm (comparable to the Mendel) and is employs a heated build platform and a heated build chamber. Unlike other wood based repstrap's, no ball bearings are required for its construction, excluding the extruder and all parts can be obtained from scrapped printers and scanners. In addition, its build chamber can be heated up to 100 degrees Celsius as most stepper motors are contained out side of the build chamber and no thermoplastic is used in its construction. The only stepper motor within the build chamber is the extruder stepper motor which is actively cooled using a peltier.
Advantages
- Has a very low build cost (around $50USD), excluding the cost of the electronics.
- Does not require any bearings apart from the extruder.
- Can be constructed with only a hack saw, drill, screwdriver and epoxy resin adhesive.
- Has a larger build area as compared to the Mantis 9.1
- Due to its fold open construction it is easy to access for cleaning and changing tool heads.
- Uses a heated build chamber which has been seen to improve the quality of prints for large objects.
Disadvantages
- Requires active thermal management in order to keep the extruder stepper motor at a safe operating temperature as its located in the heated build chamber.
- Due to the use of stainless steel sleeves instead of ball bearings, this design will ware slightly with time.
- Due to the design of the zaxis the gunstrap may not be able to achieve the same resolution as a Mendel.
- This design requires more parts to be fabricated than the original [[Mantis 9.1] in order to accommodated the heated build chamber.
- Requires the procurement of stainless steel shafts, stepper motors, belts, ect from old printers and scanners.
- Can not currently print any of its own parts.
http://reprap.org/wiki/Gunstrap
WoodRap
http://reprap.org/wiki/WoodRap
http://repraprock.blogspot.com/
RepStrap
Many bootstraped RepStraps are made from wood:
http://diy3dprinting.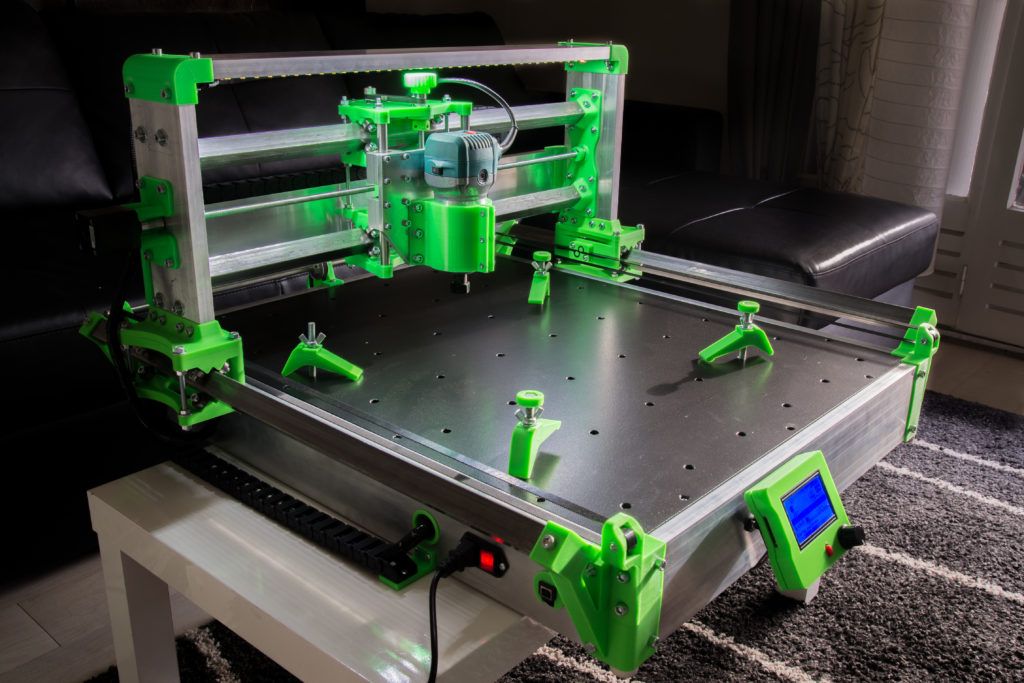 blogspot.com/2013/10/repstrap-bootstrapped-3d-printer.html
There is well documented Wolfstrap from Germany.
http://reprap.org/wiki/WolfStrap
There are several other designs at:
http://reprap.org/wiki/Category:Wood
World needs YOU to use more wood in 3d printing!
Update:
Links to other DIY 3d printer projects made from wood:
Here are some new Delta printers with wooden frames:
DeltaTrix with detailed build instructions:
http://diy3dprinting.blogspot.com/2013/12/deltatrix-3d-printer-with-detailed.html
Custom Delta made from Ikea furniture pieces:
http://diy3dprinting.blogspot.com/2013/12/custom-delta-3d-printer-built-from-ikea.html
Wood A-frame Mendel with very detailed construction guide:
http://diy3dprinting.blogspot.com/2014/02/wood-framed-mendel-detailed.html
Kiwi Remix delta: http://diy3dprinting.blogspot.com/2014/03/kiwi-remix-delta-3d-printer.html
Delta Twister, 400 USD low cost delta with no CNC or printed parts:
http://diy3dprinting.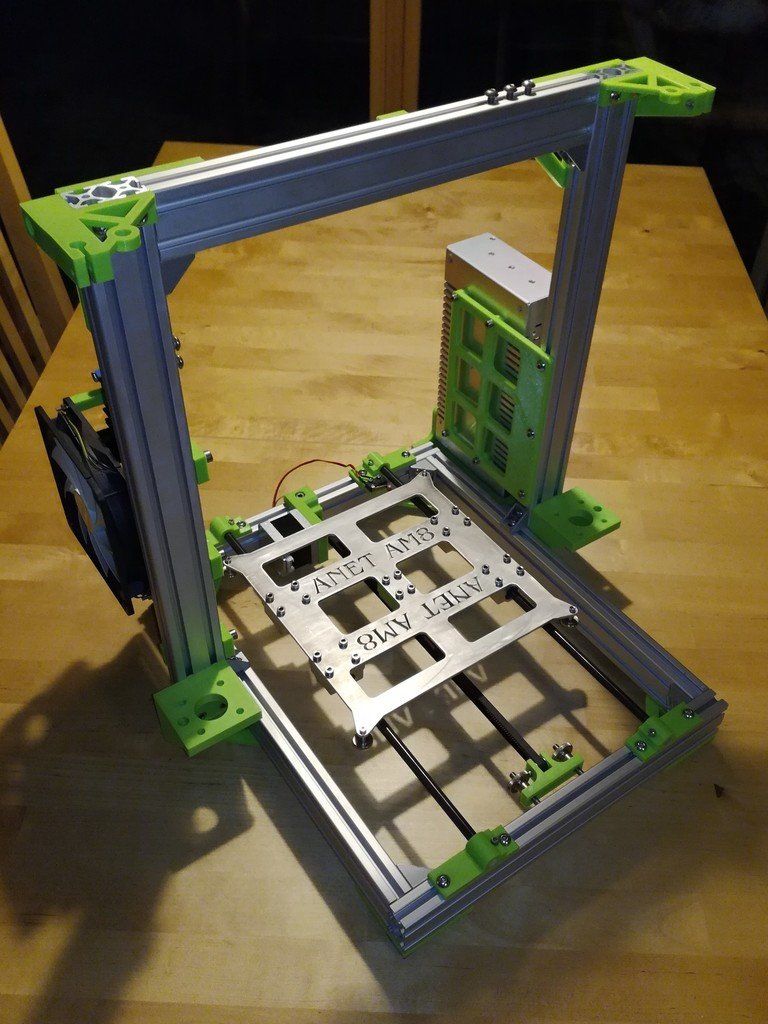 blogspot.com/2014/03/delta-twister-ultra-low-cost-diy-3d.html
MSF is ultra low cots wooden Repstrap that can be made for 100 USD:
http://diy3dprinting.blogspot.com/2014/10/msf-3d-printer-is-work-of-repstrap.html
Very simple Repstrap with timber pieces and plywood frame, with only 3d printed extruder:
http://diy3dprinting.blogspot.com/2014/10/repstrap-3d-printer-that-is-easy-and.html
BYQ if Polish design of 3d printer made fully out of 8mm plywood with no 3d printed parts:
http://diy3dprinting.blogspot.com/2014/01/extruder-made-from-plywood-by-pawel.html
You can also make 3d printer enclosures from wood:
http://diy3dprinting.blogspot.com/2014/12/how-to-design-and-cnc-cut-wooden.html
Qirky Bot has plywood base:
http://diy3dprinting.blogspot.com/2014/12/quirky-bot-is-simple-diy-3d-printer.html
IcePick is a delta 3d printer that could theoretically also be pick-and-place robot for home manufacturing. It is make with no metal liner bearings or rods.
http://diy3dprinting.blogspot.com/2014/12/icepick-delta-3d-printer-made-with-no.html
Steampunk style suitcase 3d printer based on Printrbot Go, with analogue gauges, handles and mechanical switches.
http://diy3dprinting.blogspot.com/2015/02/steampunk-style-diy-3d-printer-based-on.html
SmartCore simple, easy to make 3d printer with wood box frame:
http://diy3dprinting.blogspot.com/2015/02/smartcore-low-cost-wooden-box-3d-printer.html
TRINT plywood 3d printer (two different models):
http://diy3dprinting.blogspot.com/2015/06/loww-cost-plywood-diy-3d-printer-by.html
Instructables guide on how to design wood frame 3d printer:
http://www.instructables.com/id/How-to-Design-a-3D-Printer/?ALLSTEPS
IKEA footstool made into a 3d printed based on Prusa i3:
http://diy3dprinting.blogspot.com/2016/05/ikea-footstool-hacked-into-3d-printer.html
3d Printer Enclosure Wood Frame
-
Loading
Click to zoom
Star Seller
Star Sellers have an outstanding track record for providing a great customer experience—they consistently earned 5-star reviews, shipped orders on time, and replied quickly to any messages they received.
| 624 sales |
5 out of 5 stars€28.05
Loading
VAT Included
Explore related categories & searches
Listed on Oct 9, 2022
385 favorites
Report this item to Etsy
Choose a reason…There’s a problem with my orderIt uses my intellectual property without permissionI don’t think it meets Etsy’s policiesChoose a reason…
The first thing you should do is contact the seller directly.
If you’ve already done that, your item hasn’t arrived, or it’s not as described, you can report that to Etsy by opening a case.
Report a problem with an order
We take intellectual property concerns very seriously, but many of these problems can be resolved directly by the parties involved. We suggest contacting the seller directly to respectfully share your concerns.
If you’d like to file an allegation of infringement, you’ll need to follow the process described in our Copyright and Intellectual Property Policy.
Review how we define handmade, vintage and supplies
See a list of prohibited items and materials
Read our mature content policy
The item for sale is…not handmade
not vintage (20+ years)
not craft supplies
prohibited or that use prohibited materials
not properly labeled as mature content
Please choose a reason
Tell us more about how this item violates our policies.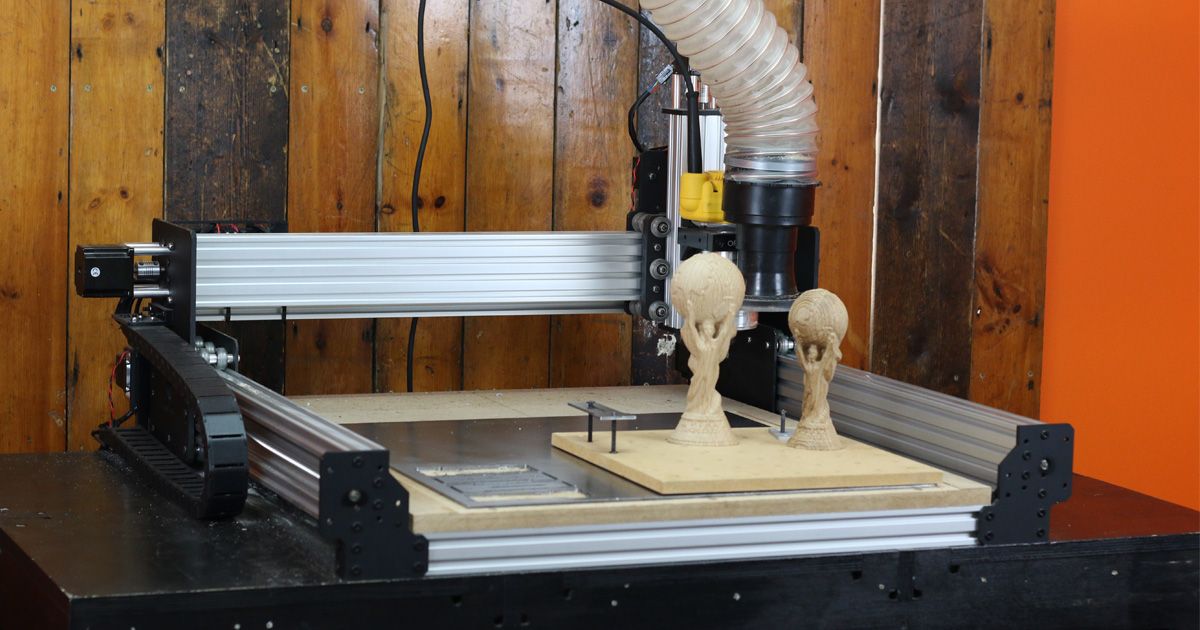 Tell us more about how this item violates our policies.
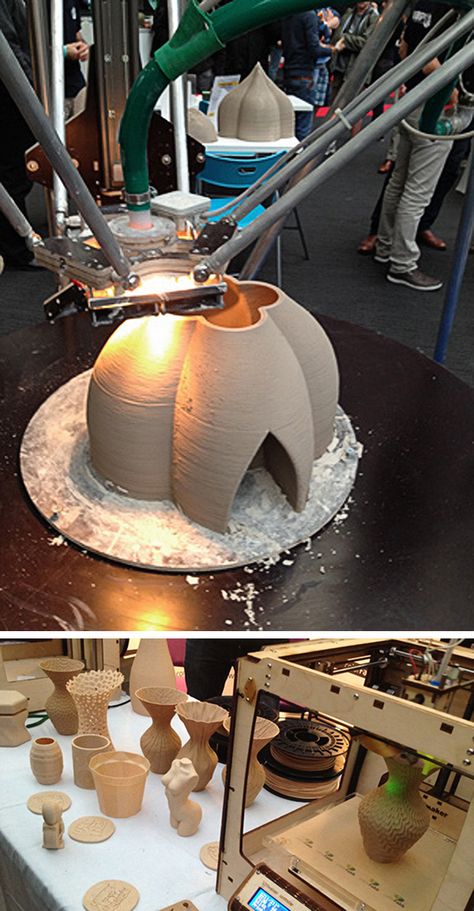
3d wood printing on a 3d printer
Varieties of 3D wood printers: ideas for making money
Wood remains one of the most popular craft materials in various fields of human activity. Modern processing devices expand the possibilities of creating wooden masterpieces. One of their best representatives is the wood printer, which deserves special attention.
3D wood printer: what is it?
The wood printer is an electronic device capable of transferring any image directly onto a wood surface from a computer without intermediate steps. Modern models can form a relief pattern, but are not intended for the manufacture of three-dimensional products. In fact, this device is designed to replace expensive hand-painting or woodcarving, while providing high image quality.
When printing with a printer, the composition (ink) penetrates into the surface fibers of the wood, which securely fixes the pattern on the material and increases its durability. A colorful image can be preserved for a long time without fading and without losing color.
3D wood printer capabilities
Wood printers are designed for printing images on solid wood, plywood, chipboard, fiberboard, MDF, furniture boards and other wood materials. By applying various design solutions, you can unrecognizably transform the interior of a residential or office space, shopping and exhibition halls, beauty salons and restaurants. Prints on furniture fronts turn standard items into exclusive pieces. With their help, highly artistic panels and billboards are created.
A special effect is provided by 3D printers, which are capable of applying any images and multi-color coatings to three-dimensional figures of any complexity. You can provide a special decor not only, for example, on the countertop, but also on the legs of tables, the backs of chairs. This ability expands the possibility of manufacturing exhibition and advertising products. Using printers, you can create a relief pattern by applying the composition in layers.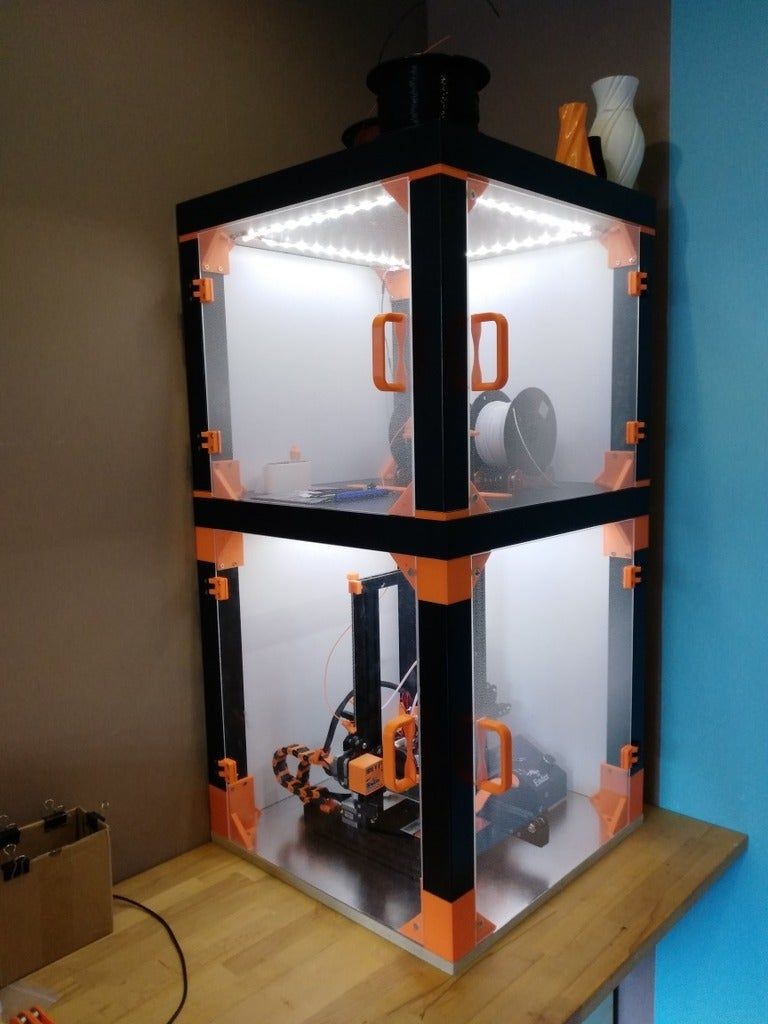
Which 3D printers are suitable for printing on wood, MDF, chipboard, solid wood and veneer?
There are different types of wood printers:
- Laser. A tinting powder is applied to the surface, which is sintered using a laser beam.
- Jet. A special paint is squeezed out onto a wooden surface with microdrops, which instantly hardens with slight heating.
- Sublimation printer. This is a high performance professional machine. It is much more expensive than the previous varieties, but provides the highest quality, allowing the production of printed products.
The choice of equipment is made on the basis of the intended use, i.e. a realistic assessment of the photographic accuracy of the image. The most important criteria: the size of the working area, resolution, performance, dimensions and cost.
What can it be used for?
The wood printer offers great opportunities for developing your own business. We can recommend the following decorating and design business ideas:
- cabinet fronts;
- table tops, chair seats and other pieces of furniture;
- original, exclusive elements for interior design;
- entrance and intermediate doors for residential and office premises;
- bar counters;
- ceiling and wall elements, partitions for room zoning, false panels;
- signboards, banners, posters, information stands and signs, various advertisements and information announcements;
- exhibition structures;
- various 3D figures, figurines, souvenirs;
- panels and paintings.

Woodcarving can be imitated with the printer. It is allowed to transfer any photographic image to a wooden surface. It creates the opportunity to qualitatively repeat the products of folk art, while maintaining a highly artistic style.
Natural wood will never go out of style in interior design. Wood printers empower designers and help create original products at home. It is important to choose the right reliable model and have the desire to express yourself in creativity.
- March 14, 2021
- 4319
Get expert advice
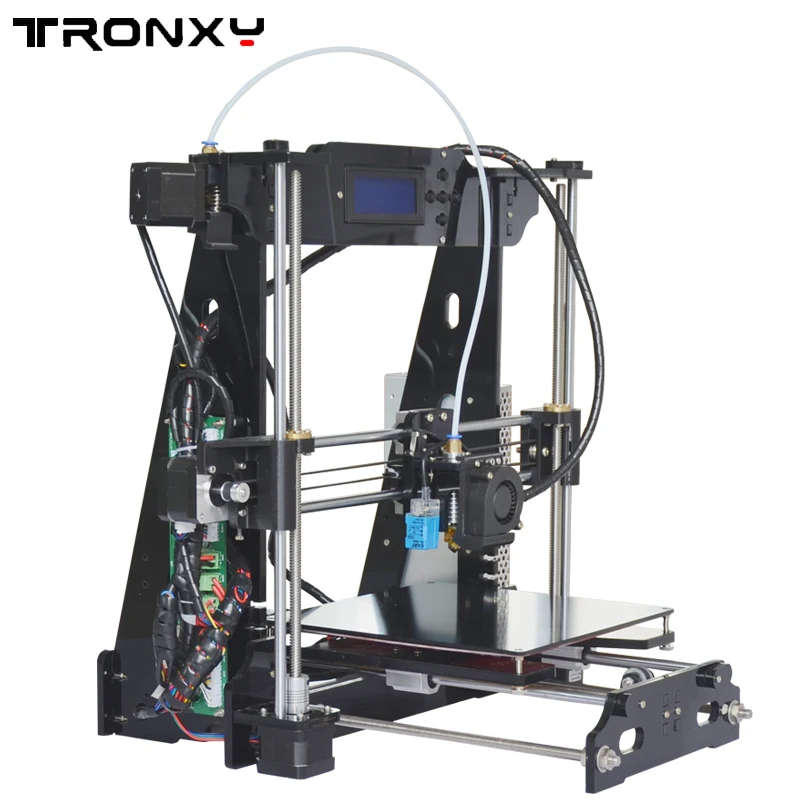
DIY 3D printer
Skip to content
Admin Electronics
You can buy a ready-made 3D printer with free shipping in this Chinese store. Radio components, arduino at this link.
Contents
- Is it possible to make a 3D printer with your own hands?
- How to build a 3D printer from scratch | 3D printing from scratch
- Plywood 3D printer
- 3D printer design
- Electronics
- Table for 3D printer
Is it possible to make a 3D printer with your own hands?
How to build a 3D printer from scratch | 3D printing from scratch
3dprintingfromscratch.com
If you're reading this article, it means that you've probably decided to join the 3D printing enthusiast community and learn more about 3D printers, or maybe you already have some experience with it and are ready to try making your own. 3D printer. printer from scratch.
Items for inventors Link to the store.
In this article, you will find a general idea of how 3D printers can be built, as well as links to really useful resources where you can find more detailed information with a step-by-step description.
There are now a large number of 3d printers on the Internet, already assembled and ready to print immediately after unpacking them from the box, of course, you also need buy filament for 3d printer . Keep in mind that not all 3D printers can use the same types of filament, so please read the instructions before purchasing.
DIY electronics in Chinese store.
But for some people who like to do something new with their hands, it might be more interesting to build your own 3d printer from scratch . Based on our research, the 3D printing community is filled with many enthusiasts, so-called do-it-yourselfers, who are passionate about building 3D printers literally from scratch.
You can find plenty of examples of how to make a 3d printer on the RepRap website, but we also want to cover some of the more important steps to give you a general idea of what to expect if you do decide to make your own printer.
The first step is to find and buy a 3D printer kit. Kits usually contain most of the parts needed to assemble a printer and can be divided into two main types:
Scratch Built 9 3D Printer0121 - This kit is for those who prefer to build things from scratch or in other words go the DIY RepRap route.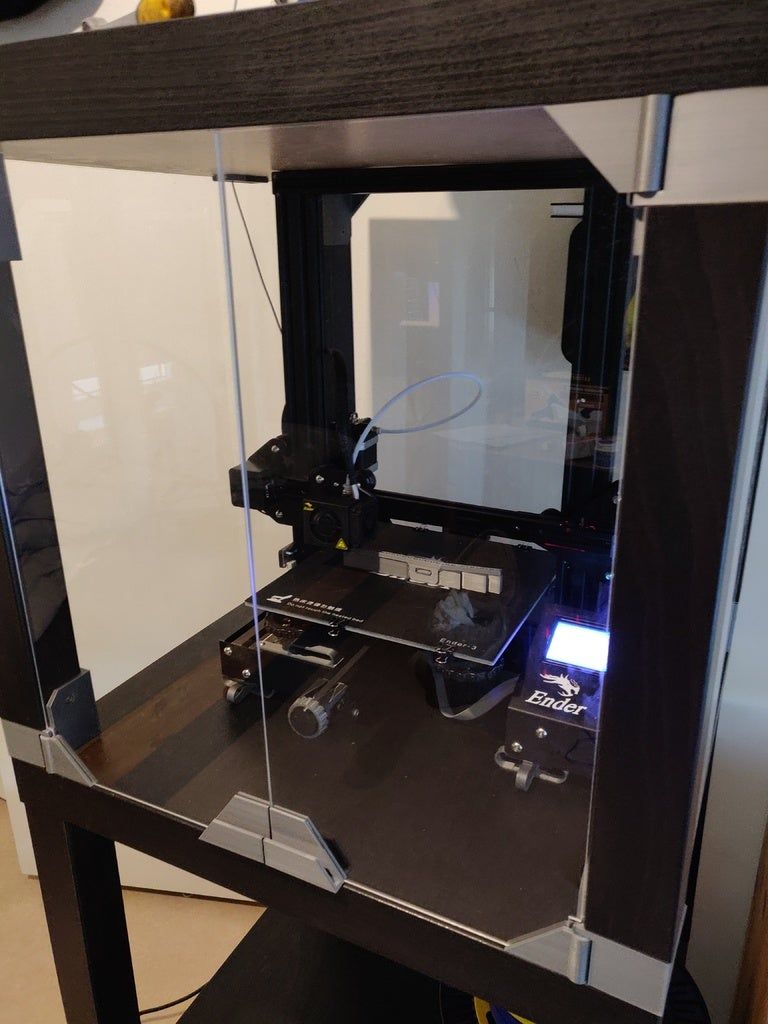 In addition to some significant advantages, this approach also has its drawbacks. In theory, this could save you some money, and since you're building it from scratch, you'll know all the nuts and bolts in it by the time you can use it and successfully print your first object. The main disadvantage of this method is time. It literally takes a long time to sort through all those hundreds of bolts, wires, belts and more. In the end you still have to choose and buy or build a controller board, but it depends on your skill level.
3D printer - This type of kit is good if you want to save money and at the same time not deal with all the problems described in the first type of kit. Many manufacturers sell such kits with "easy to assemble" instructions. I doubt it will be as easy as putting together an IKEA chair, so you still have to have a mechanical tilt and be able to understand the basic geometry. Some of these kits do not contain all the parts, and you may need to buy something extra.
The next step is to define the design of your 3D printer. In my humble opinion, most DIY 3D printers don't have very exciting and futuristic designs compared to MakerBot and other brands. But it's also a matter of taste, for some people the design is not very important.
Once you've purchased your 3D printing kit and selected a design, you can start building the most fun and time-consuming part - building your own 3D printer. Get ready for sleepless nights and lots of fun. Perhaps you will come up with something new and present your results to the RepRap community.
When the 3d printer hardware is ready, you also need to add the software component. It mainly performs the following functions: allows you to view and modify 3D graphics objects, as well as convert 3D images into instructions that a 3D printer can understand.
Finally, you can 3d print your first object! If you don't have anything to print, you can find a wide variety of items on dedicated marketplaces like Shapeways, Thingiverse, and more. Before printing, make sure the object you want to 3d print is the correct size and fits on the printer frame.
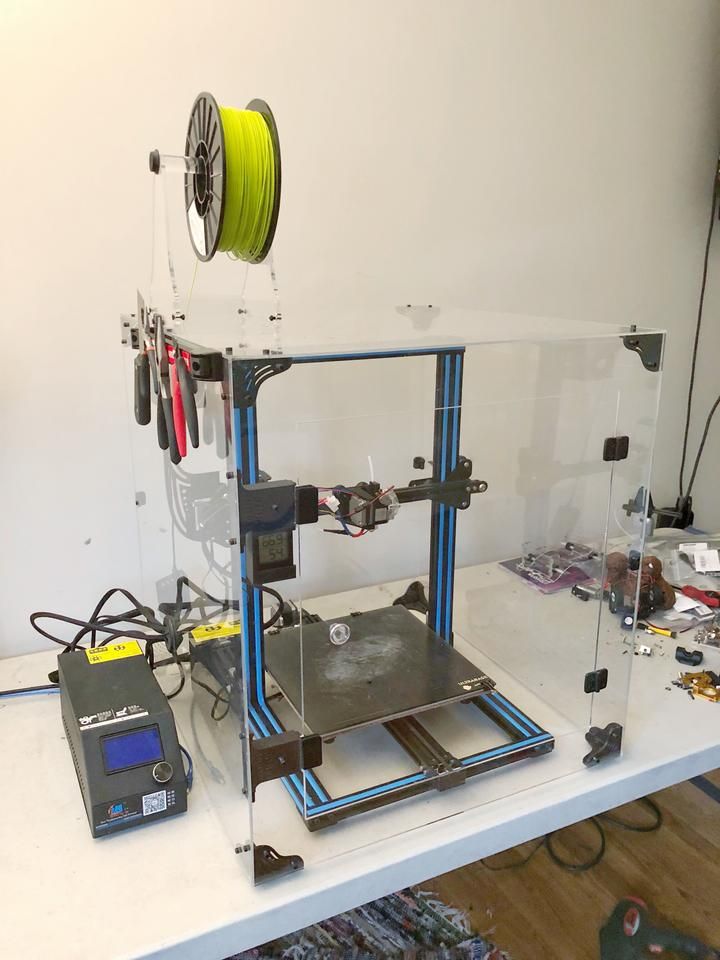
Plywood 3D printer
First, see how this printer works
Now in detail how the device was assembled
Recently, the author of the Yar channel promised to show in detail the design of his 3d printer and tell where you can get components for it. Today it will not be possible to make a video on how to build a 3d printer from start to finish, because the printer is already ready. But maybe in the near future a video will appear on the channel on how to make a 3d printer from wood from scratch. Because it will be redone.
Construction of the 3D printer
Basically, the printer is made of wood, for its construction a single board was used, which the author had. He doesn't have a circular, so the board isn't loosened narrower, it's so big and heavy. In order to assemble the frame, I sawed the board into several parts, glued it here, twisted it with self-tapping screws here, and this made up the frame design of this printer. The board is thick, so stiffness with a margin.
Parts from old scanners are used for axes. More precisely, for two axes of three 3d printers. That is, there are two guides for the Z axis. And for the X axis, two guides.
The Y axis hangs on an aluminum profile, quite thick too. And homemade carriages from ordinary ball bearings. This is what was in the garage just.
In fact, this part should have been used on the Z axis, this will be taken into account when reworking.
Homemade 3D printer
The carriages are also driven by motors from scanners, with native gearboxes, with native belts. Here, however, I had to use a gearbox from one scanner, and a motor from another, so that the movement of this axis coincided in steps with the Y axis.
There is also a motor from the scanner on the Z axis. It was unipolar, that is, five wires sticking out of it, now four wires are sticking out of it. To do this, I had to cut the jumper there. With a converted gearbox that has the ability to turn just such an M5 stud.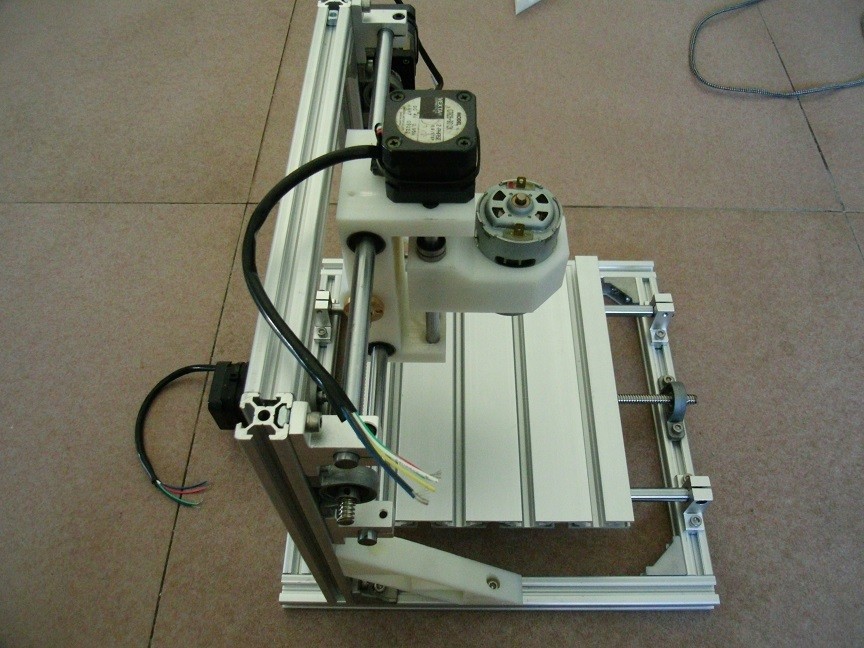 And there are two of these pins: one on the right side, the other on the left. They are tied together with a belt.
For some reason, other printers have two motors. But the master decided that there was no difficulty in using the belt. It’s not even clear why they make two motors.
In order to align the axis, I used paper pads. That is, a lot of small paper sheets that I put under the fulcrum of the guides in order to bring them in parallel with each other. They are, as already shown, right here, right here, right here.
These pads are also used for rough adjustment of the table.
Electronics
Homemade electronics. It is definitely better to buy it, because in the end I got a lot of crap. But that's not the point. The bottom line is that the electronics are made by Arduino Uno Chinese. Here, with a margin, are field-effect transistors. Here are two even with a radiator. Because before it was already at 200 watts. And, of course, four drivers are worth it. Arduino can be bought at this link.
There is currently no extruder on the 3D printer, or rather, its cold end. There is only the nozzle itself with a heating block. All this is because he started reworking it for a lighter motor. Initially, this motor was here, everything worked perfectly. To be able to fly them faster, you need to reduce weight. Plus, I freed this motor for one of the axles, and bought another one for it. All this is done in order to make the printer a little faster in the future.
Speaking of speeds. Scanner motors for 12 V allow you to reliably have a speed of about 25 millimeters per second. At higher speeds, they may begin to lose steps.
Table for 3D printer
In the previous video you could see another table, it is quite large and made only of glass. But this is a big problem, because the glass cracks from strong uneven heating. So I had to give up this table.
Made from scanner glass with steel tie wire underneath. And on the other hand, it is to some extent insulated with glass tape.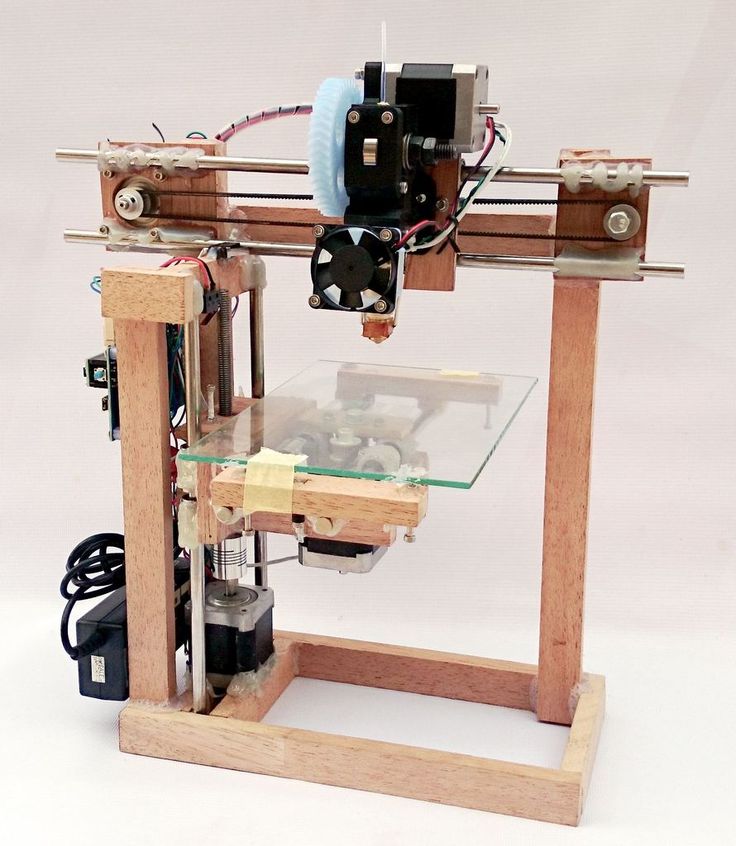
The second table is much smaller, because there was just such a large piece of metal. Already made under replaceable glass. It can be attached here with clothespins. By the way, it also cracked, it was originally in size.
Standard 5 watt resistors are screwed to this sheet of steel.
It is held on the carriage with the help of these trimmer bolts 3 pcs., with nuts screwed on them. They sit on the thread lock, spinning quite tight. Due to this, they can be adjusted in relation to the axes of the printer.
This is one of the few parts printed on this printer. This is the Z axis bearing support. Why did the craftsman print it, because the one that was made of wood was quite skewed. Due to which, on the parts that were printed on this printer, a noticeable unevenness of the layers appeared. That is, with layers 0.1 mm or 0.2 mm thick, they looked like they were about 0.7 thick. And the bonding strength between the layers was low.
One of the serious shortcomings of this 3D printer is the lack of ends. That is, the axes do not know where the beginning is, and you have to set them manually.
If this does not cause any problems with the X, Y axis, and the author of the model probably did not even make endings on them. For the reason that you can manually set the center of the printer to any place, and thus print several parts in succession from one G-code. But setting the Z-axis manually is very inconvenient. This takes about 5 minutes each time before each print.
Another disadvantage that is common to many printers is that it is open. What is printed is accessible to any drafts and is accessible to external cooling at room temperature. And it is desirable for printing, so that it twists less, so that it has less internal stress, it is desirable to have the printer closed and maintain a temperature of about 70 degrees inside. This is something that needs to be corrected in the future. You need to completely redo the printer, make it an H-bot (H-bot).
If the author of a homemade 3D printer model remakes it, then a video about this will definitely appear on the Yar channel.