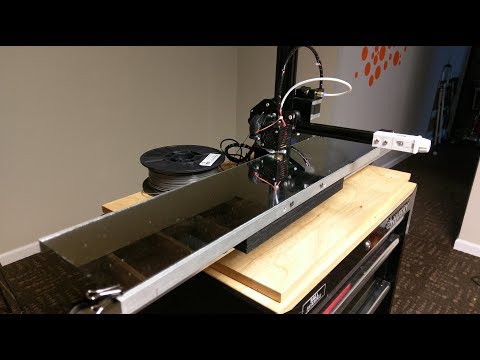
Cs10 3d printer
Buy Creality CR-10S Pro V2 3D Printer-Creality CR-10 Series
Home Collections CR-10S Pro V2 3D Printer: with BL Touch 95% Pre-Assembled$ USD
$ USD
11 Reviews Pricing Not Include Tax
Ship From
United KingdomCzech Republic
Model-2
CR-10S Pro(V2)
Ship to
It is expected to arrive within and will cost $ USD to ship
This item can't be shipped to this Country/Region
Bundles
Quantity
28 Available
Add To Cart Buy It Now
Continue To Shopping View Cart
People who bought this item also bought
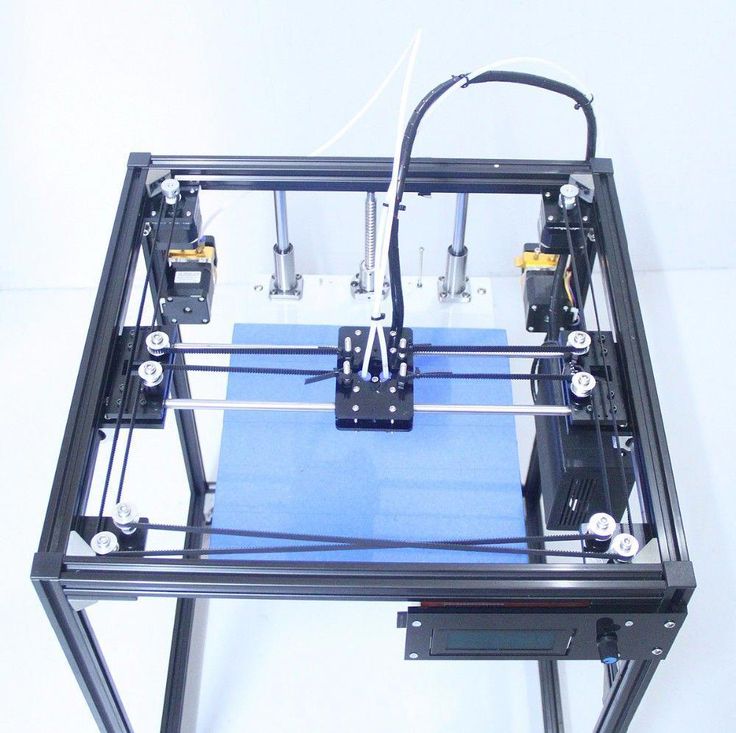
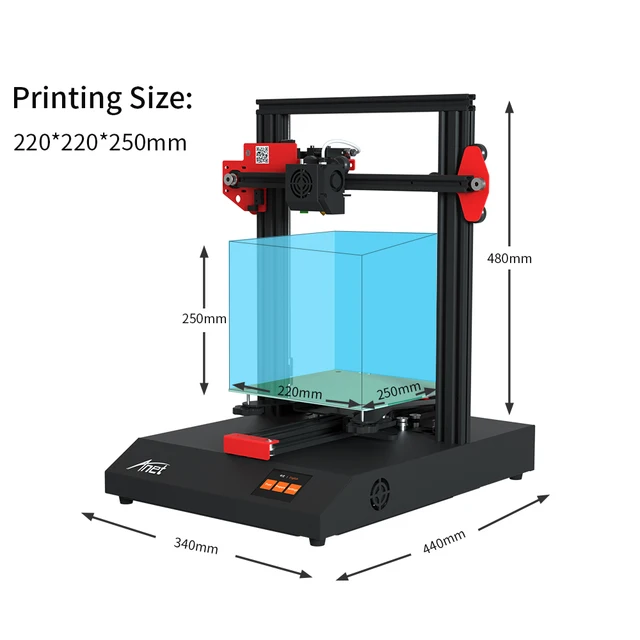
Features of CR 10S Pro V2
BL Touch Auto Leveling
Matrix Automatic Leveling, quality Bill Touch automatic leveling device. And the CR-10 Pro V2 will automatically measure the height of 9 unique points on the heated bed to determine the ideal settings for perfect prints every time.
Filament Detection:
CR-10S Pro V2 has a newly-added innovative material shortage detection switch, Even also highly sensitive to detect transparent materials;
Upgraded Silent Board
CR-10S Pro V2 adopts V2.4.1 motherboard independently developed stable performance TMC ultra-quiet drive 256 subdivision for finer printing
500W Meanwell Power Supply
Comes with a UL Certified Meanwell power supply. 500W large power and wide voltage power supply. 100V-240V can be used, no need to adjust. It's convenient and fast, ensuring long-term stable printing.
Teflon Tube & Bondtech Gear Extrusion
Imported high temperature resistant blue Teflon tube ensure great printing texture, Bondtech Gear extrusion Structure has two high-density gear and big extrusion force for smooth feeding
-CR-10S Pro(V2): FAQ & Troubleshooting-
1. Does this printer include filament in the package?
Yes, it contains a small roll of 200 g's of PLA 1.75 white filament which is more than enough to get several projects made. You can do some small test prints with this.
2. What is the print table made of? How hard is it to get a large print off of the table?
It is an Aluminum plate with a PC sheet glued on top. which has a very strong adhesion especially on PLA.
The size of bed is: 310*320mm(about 12.20in x12.6in)
Parts For CR-10SProV2: Spring Steel PEI Bed Plate; Removable Cmagnet Plates; Tempered Glass Build Plate
3. What is the size of the base (footprint) ?what is the total size dimensions of the whole unit?
16" W x 21.5" D It is on 4 rubber feet.
We recommend the 23” Depth(Space) with the bed all the way back.
4. Does the printer have a resume function in case of power outage?
Yes
5. Is the pro v2. Still the 8-bit board?
Yes.
6. Looking for a replacement nozzle for this, which nozzle works with this printer?
This item nozzle is 0.4mm. h23mm, D6-d0.4mm, M6-0.75 fine pitch thread.
Links to: CR-10S Pro V2 Original Nozzles Kits, MK Brass Nozzles Kit(16Pcs)
7. Can this print ABS type materials?
Yes, the CR-10S Pro V2 can print ABS. Both the bed and the nozzle get to the appropriate temperatures. Keep in mind, when printing ABS you do want to vent it outside.
Download
Customer Reviews
Based on 11 reviews
82%
(9)
18%
(2)
Write A Review
Ask A Question
Reviews (11) Questions (1)$ USD
$ USD
ADD TO CART BUY IT NOW
Write a review
Ask a Question
Bed Leveling For Your Creality Printer — Creality Experts
Leveling a 3D printer is the process of calibrating the height of the print bed to ensure it is the correct distance from the print nozzle across its entire surface. Having a level bed will result in fewer print failures, higher quality prints, and is the key to getting a great first layer on all of your prints.
In this guide, we will show you how to level the print bed on your Creality CR-10, Ender 3, CR10 S5, or other Creality 3D printer.
When do you need to level the bed?
If you’ve just assembled the 3D printer
When prints are not sticking (e.g. dislodging mid-print, or curling up at edges)
After changing the nozzle or hot end
After moving the 3D printer between locations
Fortunately, leveling the bed on Creality 3D printers is a straightforward process and will only take you a few minutes. Once the bed has been leveled, you shouldn’t need to re-level it unless you make a change to your printer’s hardware or notice issues with prints not sticking to the bed.
This process applies to the Ender 3 series, Ender 5 Series the CR-10 S4 and CR-10 S5 printers, and all other Creality FDM 3D printers.
Note: Creality Experts receives a commission for items you purchase from this page, at no additional cost to you. For more information, please see our affiliate link policy.
The only thing you really need to level the bed is something you probably already have: a sheet of paper. Since the width of a sheet of paper is the correct distance between the nozzle and print bed, you’ll be using the paper as a feeler gauge, which we will describe in detail later. However, there are a couple upgrades we’ve found are nice to have both for adjusting the leveling, and to make sure your print bed stays level for longer.
We really like adding these large bed leveling knobs on our standard CR-10s since they provide much finer control of the bed height, and are easier to access. Note that Similar Plastic knobs already come standard on the Ender 3, and they won’t fit the S4 or S5. (For the S4 and S5, you can 3D print these knob covers which are as large as will fit on these printers)
We also suggest upgrading your bed springs to more rigid flat springs. These are included with CR-10 series printers, but not the Ender series which uses standard springs. These less rigid springs do not provide as much tension, which can cause the leveling knobs to move slightly during operation .
These larger metal leveling knobs are much easier to access and allow for finer leveling adjustment than the ones included with the CR-10
The Ender 3 series 3D printers include large plastic knobs, but use less rigid springs that we recommend replacing
The 3D printer uses an endstop, or a small switch,to know when it is at home or ‘0’ for the Z axis. We will be adjusting the bed to be just below the nozzle when it is at the home position.
Preparation
heat the nozzle to 210C and the bed to 60C (or the temperatures you most commonly print with)
Auto Home the 3D printer.
Disable the Stepper Motors, which will allow you to adjust the X and Y position by manually moving the hotend
Move the the hotend so that the nozzle is nearly above the front left leveling nut
Adjusting The Bed Height
This is where you will actually adjust the bed to make sure it is the correct distance from the nozzle. You will repeat this process in many positions to ensure the entire bed is the correct distance from the nozzle
Slide the piece of paper between the nozzle and the bed
Turn the knob to adjust the bed height, while continuing to move the piece of paper back and forth between the nozzle and bed.
Looking down from above, turn the knob clockwise to move the bed upward, counterclockwise to move downward
At the desired position, you should still be able to move the paper back and forth, but with some resistance.
 If the paper slides easily under the nozzle, the nozzle is probably not close enough to the bed. If it doesn’t fit, rips, or is very hard to slide under the nozzle, the nozzle is too close to the bed.
Tip: We really like this set of upgraded bed leveling knobs for the CR-10. They’re much larger and easier to adjust than the small knobs that come on the printer. Note that these won’t work on the CR-10 S4 or S5, though.
Move the hotend above each of the other bed screws, and repeat this process.
The nozzle is too far from the bed in this picture.
The nozzle is too close to the bed
The nozzle is at the correct height above the bed in this picture.
Making Fine Adjustments
The center of the bed is the most important spot to check during the bed leveling process. Many prints will not extend all the way to the edges of the print bed, but every print will use the center part of the bed.
We like to go back to each of the four corners and check the height one more time after homing the printer again, and verify that the center of the bed is also level.
Auto home the printer
Disable the stepper motors
Repeat the leveling process at each of the four corners to verify the level and make any fine adjustments
Move the hotend to the center of the print bed, and check that the printer is level here as well. If the center is not level:
Double check that all four corners are level
Ensure that the bed is fastened tight with the bed clips.
 Over time, the clips can lose their tension, and should be replaced when they do. (you can get more from Amazon here)
If the center gap is too large, you can adjust the center upwards by placing a small piece of paper (such as a post-it note) under the glass in the middle
if the center gap is too small, place a small piece of paper under each corner, and level the corners again
Check Your Work with a Test Print
Once you’ve leveled the print bed, print a test piece to confirm that the bed is level and the nozzle is at the correct height above the bed. We like to use this 3D model made for checking bed leveling. It covers the entire print bed and will print quickly because it’s only one layer.
Note: To make sure you have great bed adhesion, we have found that applying hairspray to the bed every 10-15 prints is very helpful. Hold the can about 8 inches away and do one continuous spray in a "Z" motion across the bed. Let the hairspray dry for a minute or two before trying to print. We have had the best results with AquaNet Extra Super Hold Hairspray, which is available on amazon or at any grocery store.
Checking the First Layer
You should watch the printer during the printing process. As the model is printing, pay attention to whether the plastic is sticking to the bed correctly.
If the nozzle is at the correct height, you will notice that the nozzle will slightly “squish” the plastic down onto the print bed, spreading it out slightly as the nozzle moves across the bed.
If the nozzle is too close to the bed, the layer will be so flat that the extrusion will be inconsistent and you may see roughness where the nozzle is grinding against previously printed lines. You may hear clicking sounds from the extruder or see no extrusion in severe cases.
If the nozzle is too far away, the plastic will create thin lines and appear to drop out of the nozzle and fall onto the bed. This is undesirable because it will cause prints to not stick to the bed. In extreme cases, the plastic will not adhere to the bed at all.
Use the images below to help you determine if your print bed is leveled correctly.
If the nozzle is too close, the lines may appear unusually thin or wavy. As the infill on the first layer prints, you will see it bubble up and form a rough texture.
If the nozzle is too far, the infill on the first layer lines will not be touching, and in many cases will not stick to the print bed. The lines will often delaminate from the bed if touched lightly
When the leveling is correct, infill lines on the first layer touch and form a smooth surface. The plastic will not delaminate from the bed from a light touch.
When too close, the base of the print will have ugly defects
When too far, the layer will have large gaps, if the print succeeds at all
The perfect first layer, both solid and smooth
On-The-Fly Adjustments
You can use the thumb wheels to make small adjustments to the bed height during the printing process. This is a great way to fix leveling issues that may occur over time since you’ll get immediate feedback on your changes. This type of leveling can take some practice, but will allow you to keep your bed level quickly and easily.
As a general rule, you should always watch the first layer, or at minimum the first perimeter of any print. Most print failures occur due to incorrect leveling or other issues with the first layer, and this will drastically reduce your chances of walking in to a print bed full of spaghetti.
Optional Upgrade: Auto Bed Leveling
If you find yourself needing to level the bed often, you should consider upgrading your printer to use auto bed leveling. While we have found Creality’s printers to hold their leveling between prints, you will still need to adjust the leveling any time you change the nozzle or extruder. Additionally, if you are attempting to print at small layer heights, you may need to tweak your bed leveling more often.
The auto bed leveling kit from Amazon uses a BLTouch sensor to detect exactly how far away the nozzle is from the bed. By measuring this distance at different points on the bed, the printer can automatically adjust its Z height when printing to account for any variations in the bed’s height at different positions. This ensures extremely consistant first layers across the entire print surface. Some of Creality’s higher-end printers come with an auto bed leveling system pre-installed; you can find information on those printers on this page. For example, the CR-10S Pro V2 includes a BLTouch probe. However, if you’re using a printer such as the Creality CR-10, Ender 3, or S4, this BLTouch auto bed leveling kit will add auto bed leveling to your existing printer.
Use the table below to find the BLTouch upgrade kit that corresponds to your 3D printer. Take a look at our guide for upgrading your 3D printer with a BLtouch sensor for more information on how to install the sensor.
With an auto-leveling sensor, the 3D printer can probe the bed height at many points on the bed, and account for small inconsistencies, such as the higher back corners on this print surface.
| Ender 3 / Ender 3 Pro | - | ISP Adapter | connects via provided adapter | Kit 1 | |
| Ender 3 V2 / Max | - | SD Card | plugs into dedicated port on mainboard | Kit 2 | |
| Ender 5 | - | ISP Adapter | connects via provided adapter | Kit 1 | |
| Ender 5 Pro | - | SD Card | plugs into dedicated port on mainboard | Kit 2 | |
| Ender 5 Plus | Yes | - | - | - | - |
| Ender 6 | - | SD Card | plugs into dedicated port near Z motor | Kit 3 (+ printed bracket) | |
| CR-10 / CR-10 Mini | - | ISP Adapter | connects to pinboard and Z endstop | Kit 1 | |
| CR-10 S / S4 / S5 | - | ISP Adapter | connects to pinboard and Z endstop | Kit 1 | |
| CR-10 Max | Yes | - | - | - | - |
| CR-10S Pro V2 | Yes | - | - | - | - |
| CR-10 V2/V3 | - | USB Connection | plugs into dedicated port near Z motor | Kit 4 | |
| CR-X | - | ISP Adapter | connects to pinboard and Z endstop | Kit 1 | |
| CR-X Pro | Yes | - | - | - | - |
Success!
After completing this process, you can be confident that your bed is properly leveled and prepared for printing. The bed leveling process takes some time but is well worth it to ensure successful prints when you start using your Creality printer.
Buying Guide: The Best Filament for Creality 3D Printers
Ready to start printing? Check out our guide to buying filament for your printer.
Buying Guide: Repair Parts
Need parts to repair or upgrade your Creality printer? Check out our guide for recommendations on what to buy to get your printer running again.
Article: Changing the Nozzle on Creality 3D Printers
Need to change the nozzle on your Creality printer hot end? Check out our step-by-step process.
Contents
0003 Town Frankfurt Am MainAach B TrierAach, HegauAachenAalenAarbergenAasbuettelAbbenrodeAbenbergAbensbergAbentheuerAbrahamAbsbergAbstattAbtsbessingenAbtsgmuendAbtsteinachAbtswindAbtweilerAchbergAchernAchimAchslachAchstettenAchtAchtelsbachAchterwehrAchtrupAckendorfAddebuellAdelbergAdelebsenAdelheidsdorfAdelmannsfeldenAdelschlagAdelsdorfAdelsheimAdelshofen, Kr FuerstenfeldbruckAdelshofen, MittelfrAdelsriedAdelzhausenAdenauAdenbachAdenbuettelAdendorfAderstedtAdlersteigeAdligstadtAdlkofenAdmannshagen-BargeshagenAdorf/Vogtl. AebtissinwischAerzenAffalterbachAffingAffinghausenAfflerAgathenburgAgethorstAglasterhausenAhamAhausAhausenAhlbeckAhlden (Aller)Ahlefeld-BistenseeAhlenAhlerstedtAhlsdorfAhlstaedtAhnatalAhnebyAhnsbeckAhnsenAholfingAholmingAhorn, BadenAhorn, Kr CoburgAhorntalAhrbrueckAhrensboekAhrensburgAhrensfeldeAhrenshagen-DaskowAhrenshoeftAhrenstedtAhrenvioelAhrenvioelfeldAicha Vorm WaldAichachAichelbergAichenAichhaldenAichstettenAichtalAichwaldAidenbachAidhausenAidlingenAiglsbachAilertchenAindl ing
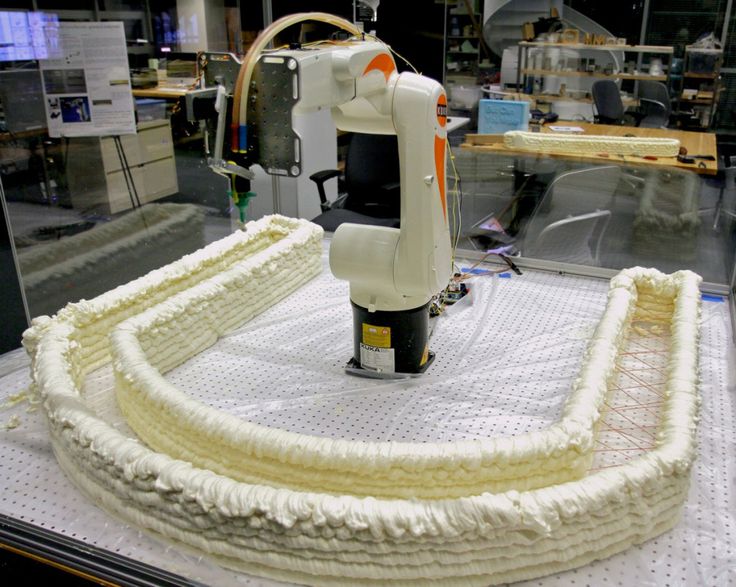
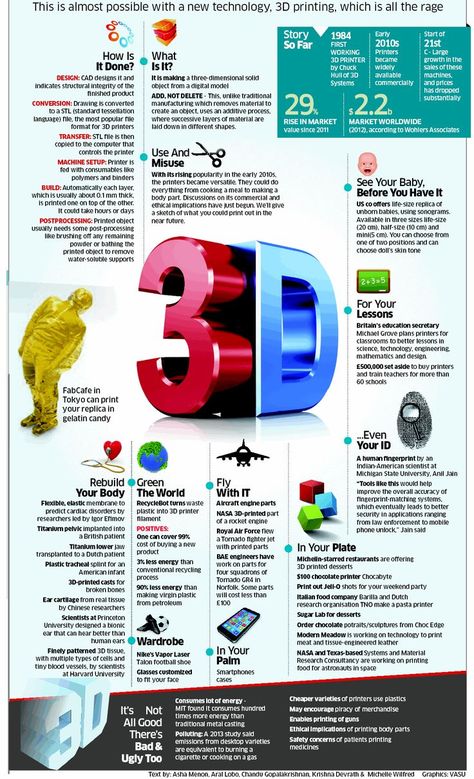
13 BEST CONSTRUCTION 3D PRINTERS OF 2019
A 3D construction printer is a machine that can build houses by applying material (concrete) layer by layer. The paste type material used, in this case concrete or earth, is forced through the nozzle in layers to print buildings.
Concrete 3D printing in the construction industry saves time, effort and material when compared to traditional methods. However, it is important to note that 3D printers are not yet capable of creating a fully functional home, only the frame and walls can be created, other elements such as windows, electricity or plumbing must be installed separately.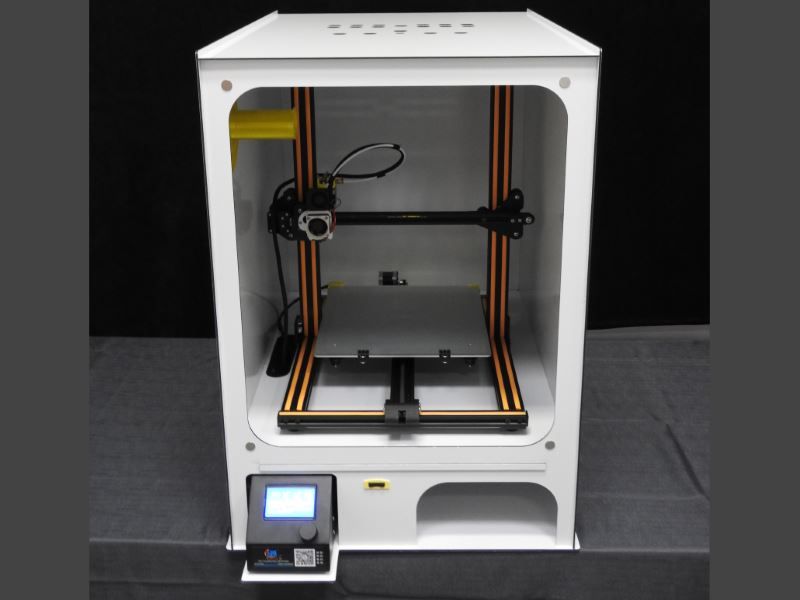 Concrete 3D printers can also be used to print bridges, benches, or simply outdoor decorations. nine0016 To provide a complete overview of the construction 3D printer market, we have listed the top 12 construction 3D printing solutions. Some of them are 3D printers already available for sale, while others are still in the prototype stage or provide 3D printing services for external structures.
HOW TO BUILD A 3D PRINTED HOUSE?
Construction 3D printers use extrusion technology. Some construction 3D printers are similar to FFF/FDM desktop 3D printers, only larger (gantry style), while others consist of a rotating mechanical arm. nine0016 In both cases, paste-type components such as concrete are used as the filament. The material is ejected from a special nozzle to form layers. In simpler (very) extrusion of pasta is like using a bag to dispense frosting on a cake.
The printer builds foundations and walls layer by layer. The base is literally the printer's build plate. However, some concrete 3D printers are used to 3D print brick molds. Once molded, the bricks are stacked on top of each other manually (or with a robotic arm). nine0016 Benefits of building 3D printing
• Eco-friendly : 3D printed houses can be built with sustainable materials. What's more, some construction 3D printers use solar energy and emit little CO2.
• Affordable: 3D construction printers can build affordable housing, providing great relief to people in poor areas or after natural disasters.
• Scalable: 3D construction printing reduces certain construction costs. For example, the cost of 1 square meter of wall using traditional construction methods is approximately $75, while for an Apis Cor house 3D printer it is only $27. nine0016 • Efficient: Because materials are 3D printed on demand, machines produce less waste. In addition, 3D construction printers can complete the foundation of a house in less than a few days, while traditional construction methods take weeks or even months.![]()
• Design flexibility: Curved walls and unique facades can be easily created with a 3D printer
Disadvantages of 3D construction
• Expensive initial investment: These 3D printers can sometimes cost up to a million dollars. nine0016 • Partially Built Houses : Only house frames are built. The 3D printing process is usually paused to manually install plumbing, wiring, and fittings.
• Rough Appearance : The exterior of most 3D printed houses is not as smooth as traditional houses.
• Lack of Certification: Construction sites are regulated by law and there are important safety standards that must be met, which can be difficult with 3D printing methods (different repeatability, dimensional stability, etc.). nine0016
CONSTRUCTION 3D PRINTERS: OVERVIEW
We divide construction 3D printers into three categories: house building 3D printers that you can buy, prototype concrete printers, and concrete 3D printing services.
Home 3D printers available
AMT printers
Pictured: AMT S-6044 Long and AMT S-300
), 11 x 31 x 80 (maximum)
• Material : Concrete / Clay / Gypsum
• Country : Russia
Equipment manufactured by AMT-SPETSAVIA - workshop and field portal construction 3D printers (COP-printers, Construction Objects Printing): and from small-format (for printing small architectural forms ) to large (for printing buildings up to 30 floors high). Productivity from 0.5 to 2.5 cubic meters per hour, management by 2 people. AMT printers are capable of printing with any kind of concrete, clay and gypsum.
BetAbram P1
• Assembly size : 1.6 x 8.2 x 2.5 m
• Material : Concrete
• Country : Slovenia
BetAbram is a small Slovenian team that has been working on building 3D printing equipment since 2012. Their flagship home 3D printer, the BetAbram P1, is currently in its second iteration and is available with additional printheads: basic, "Orto" for smoother layers, and rotatable for more design options.
COBOD BOD2
• Assembly size : 11.98 x 45.07 x 1.53 m
• Material : Concrete
• Country : Denmark
This construction 3D printer is fast, with a speed of up to 18 meters per minute. BOD2 is modular and can be adapted to various sizes. COBOD is a 3D Printhuset company.
Constructions-3D 3D Constructor
• Build size : 13 x 13 x 3. 8 m
8 m
• Material : Concrete
• Country : France
Constructions-3D is a subsidiary of French 3D retailer Machines. Their 3D Constructor machine is mobile thanks to its rubber tracks and fits in a 20ft shipping container for easy transportation from one construction site to another. nine0003
CyBe Construction CyBe RC 3Dp
• Assembly size: 2.75 x 2.75 x 2.75 m
• Material: Concrete
• Country: Netherlands This easy-to-use 3D printer is capable of reaching heights of up to 2.75 meters and only requires two people to operate.
ICON Vulcan II
• Build Size : 2.6 x 8.5 x ∞ m
• Material : Concrete
• Country : United States
ICON wants to revolutionize the construction industry with its Vulcan II printer. The whole process is designed to be user friendly with a tablet-based interface, and the ICON Lavacrete concrete mix is optimized for easy printing.
MudBots Concrete 3D Printer
• Build Size : 1. 83m x 1.83m x 1.22m (Minimum)
• Material : Concrete
• Country : United States of Concrete is
Mud3D Printers USA. Their smallest model (approximately 1830 x 1830 x 1220 mm) is available for $35,000. Large build sizes are also available, reaching up to 30 meters in length. nine0016 According to MudBots, their 3D printers can print a small house in just 12 hours and cut costs by 70% compared to traditional building methods.
Stroybot2
Build Size : 10m x 15m x 6m
Material : Concrete
Country : United States
StroyBot, also known as the Rudenko 3D Printer, is a versatile mobile design printing system supplied as a build kit user. On average, he can print a 100 square meter house in 48 hours (walls only). nine0003
WASP Crane WASP “Infinity 3D Printer”
• Assembly size : Ø 6.3 x 3 m
• Material : Concrete / Earth materials
• Country : Italy
Crane 12MT. This open source builder is modular and multiple Crane printers can work together on the same project, giving theoretically endless 3D printing possibilities.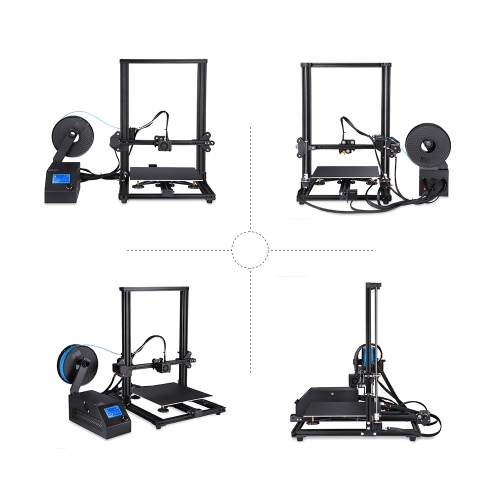
Concrete printers work projects
Apis Cor 3D printer
• Assembly size : 8.5 x 1.6 x 1.5 m
• Material : Concrete
• Country : United States Francisco and claims to be able to 3D print a house in less than 24 hours. Their Apis Cor printer is similar to a robotic arm and won first place in NASA's 3-stage 3D printing competition.
Batiprint3D 3D Printer
• Build Size : -
• Material : Concrete / Other
• Country : France
Batiprint 3D made headlines internationally when it completed the Yhnova 3D print shop in Nantes, France. Their 3D printer not only prints cement but also insulating foam, making it one of the most complete 3D building solutions.
S-Squared ARCS VVS NEPTUNE
• Build Size : 9.1 x 4.4 x ∞
• Material : Concrete
• Country : United States
S-Squared, also known as Q3D scale project "4D printing", which aims to provide fast, reliable, environmentally friendly and affordable housing for poor areas.