Clog 3d printer
How to Clean 3D Printer Nozzles and Prevent Clogs
Choosing the right method for cleaning 3D printer nozzles is important. A clogged 3D printer nozzle can lead to all sorts of problems, from under-extrusion and missing layers to no filament coming through at all. Keep reading to learn how to identify if your nozzle is clogged, figure out what is causing the problem, and how to clean the 3D printer nozzle and prevent clogs in the future.
How to identify a clogged nozzle
There are a few telltale signs that your 3D printer nozzle could be clogged. Material stringing, missing layers, clicking sounds in your extruder gears, and inconsistent extrusion patterns—specifically thin layers—are all symptoms of a partially clogged nozzle. And if no filament is coming through your extruder onto the build platform, you could be dealing with a fully clogged nozzle.
If you suspect your 3D printer nozzle is clogged, but want to be sure that is what is causing defects in your 3D prints, disable the extruder gear and try to manually feed filament through the hot nozzle. If the nozzle is not clogged, this should be a fairly easy task and the filament should move through the nozzle consistently. If you experience resistance, you are likely dealing with a clog. Similarly, if the filament does extrude through the nozzle hole but appears thinner than it should be or starts to curl up onto the exterior of the nozzle, there is likely some obstruction inside the nozzle that is stopping the full material flow.
Recommended reading: 3D printer stringing: How to fix it
What causes a clogged nozzle?
There are a few culprits when it comes to a clogged 3D printer nozzle. Often, the cause is related to something fairly simple and easily preventable, such as dust contamination. Sometimes, the problem can be more complex and related to the printing temperature and temperature of the nozzle. Let’s take a closer look at the leading causes of a clogged 3D printer nozzle.
Dirty filament: Particles of dust or dirt in the printing environment can get stuck to filament if it isn’t properly stored.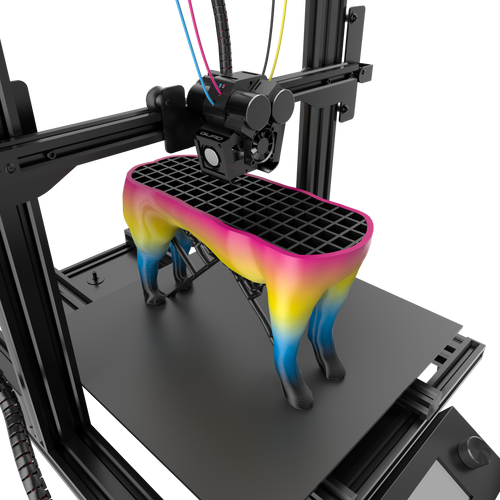 These contaminating particles are then carried into the nozzle as filament is fed through. Inside the nozzle, the dust particles burn eventually causing a buildup of carbonized material and a blockage. This is also a risk if the 3D printer itself collects dust.
Switching materials: Another cause of nozzle jams is not cleaning your nozzle in between material transitions. For example, if you 3D printed PLA and want to switch to ABS, you should always clean the nozzle in between. There are a few techniques for cleaning the nozzle in between filament changes to remove residue, including cold pulling or using a wire brush to remove residue from the outside of the hot end.
Printing temperature: Setting your 3D printer extruder to the wrong temperature can also lead to clogs. On the one hand, if the nozzle temperature is too low, the filament will not melt properly, which can lead to material buildup and pressure inside the nozzle. On the other hand, if the printing temperature is too hot, it can lead to a phenomenon called heat creep. This is when the heat from the nozzle extends farther up the extruder mechanism, which starts to melt the filament before it reaches the hot end. If this happens, the 3D printer’s extrusion gears will not be able to feed the filament through properly leading to clogs.
Nozzle height: If your 3D printer nozzle is set too close to the print bed, it can result in clogging. This is because the nozzle will not be able to properly deposit the first layer of melted filament onto the print bed. Instead, the melted thermoplastic will coat the outside of the nozzle and adhere to it. This can cause an external blockage as well as lead to filament to retract inside the filament, which can cause an internal clog.
Printing temperatures and contaminated filament are common causes for 3D printer nozzle clogs.
How to clean the 3D printer nozzle
If your 3D printer is showing the signs of a clogged nozzle, there’s no need to fret. You can often fix a clogged hot end using a combination of easy techniques, which we’ll explore below. It is also worth mentioning that the cleaning method will vary depending on whether your 3D printer is experiencing a partial clog (i.e. material is still being extruded but at inconsistent rates) or a full clog (i.e. no melted filament is being extruded). Here’s how to clean a 3D printer nozzle:
Partial Clog
Cleaning filament: If you are dealing with a partial clog, using a dedicated cleaning filament is an effective way to clear away nozzle debris. Cleaning filaments are often nylon-based but they are specifically designed for cleaning, not for 3D printing. To use cleaning filament, simply heat your 3D printer to a slightly higher temperature than you used for your most recent print job. Be wary of setting the temperature too high as this can cause the filament clog inside the nozzle to burn.
When the nozzle is at the right temperature, feed the cleaning filament through the nozzle. You should notice traces of the original filament coming out with the cleaning filament, which means the cleaning is working. Keep extruding the cleaning filament until it comes out clean. Your 3D printer should be good to go from there.
Wire brush: If the surface of your 3D printer nozzle is dirty and coated with melted filament, removing this residue should be the first step. To do this, use a brass wire brush (steel brushes are too abrasive) to scrub away any filament residue or dirt from the nozzle. Be sure to heat the nozzle up before using the brush so the filament is easier to remove. You can also try to wipe away any leftover filament using an alcohol wipe.
Full Clog
Needle: This method is one of the easiest ways to remove debris from inside the 3D printer nozzle. Start by heating the hot end to the temperature that corresponds to the last material you 3D printed. Then, use a fine needle or wire, such as an acupuncture needle or a fine steel guitar string, to gently poke upwards through the nozzle hole. This should break up the filament debris that is blocking the nozzle so that it can be easily extruded.
If you are using the needle method, be sure that you are using a needle that is finer in diameter than the nozzle itself, otherwise you can damage the nozzle. It is also recommended to use an acupuncture needle instead of a drill bit because they are less prone to breaking inside the nozzle.
Cold Pull: To use the cold pull method, begin by heating up the 3D printer extruder to about 250°C. (If you are using this method with PLA, use a lower temperature, like 200°C.) When the nozzle is hot, push the filament through the print head. Next, let the nozzle cool and the filament solidify. Then, reheat the extruder to a lower temperature (like 115°C) and when the temperature reaches 90°C quickly pull the filament up and out of the extruder nozzle. Soft filaments like nylon filament tend to work best for cold pulls.
You can tell the cold pull worked if the end of the 3D printer filament is shaped like the inside of the nozzle. This method is effective because the particle buildup inside the nozzle adheres to the filament as it solidifies. However, sometimes it takes a few cold pull tries to get a fully cleaned nozzle.
Atomic Pull: The atomic pull, also known as the atomic method, is similar in principle to the cold pull method for cleaning the nozzle. However, instead of letting the nozzle cool to room temperature, it remains heated the entire time. To use this method, start by removing the original filament from the 3D printer. Next, set the nozzle temperature to 250-260°C (or 220°C if you are using PLA). When the nozzle has reached the right temperature, manually feed filament through the hot end until it starts to extrude. From there lower the nozzle temperature to 160°C for ABS or PETG or 90°C for PLA. When this temperature has been reached, tug the filament up out of the nozzle.
Similar to the cold pull method, you know the atomic pull will have worked if the tip of the filament is shaped like the inside of the hot end. Again, you may need to repeat this process a few times to remove the debris that is causing the clog. The atomic pull method is recommended by Ultimaker for its desktop 3D printers. If you are working with an Ultimaker system or another 3D printer with a bowden tube that feeds into the nozzle, you may have to remove bowden tube before manually inserting the filament.[1]
Acetone: If the pulling methods are not unclogging the nozzle sufficiently, the next step would be to remove the hot end from the 3D printer and clean it. A common method for cleaning the nozzle is to use a solvent like acetone. Using acetone is most effective with ABS filament. PLA, for its part, can be dissolved using ethyl acetate.[2] With this method, simply submerge the nozzle in the acetone or solvent for a few hours. From there it should be easy to remove what is left of the filament particles that caused the clog.
In general, you should replace your brass 3D printer nozzle every few months.
Replacing the nozzle: If none of the aforementioned 3D printer nozzle cleaning methods work, it might be time to replace your nozzle. In general, it is a good idea to replace your 3D printer nozzle every three to six months, especially if you are using cheaper brass nozzles. When swapping out a 3D printer nozzle, start by heating up the hot end and removing any filament in the 3D printer. The heat will make it easier to unscrew the nozzle using a wrench or pliers. From there it’s as simple as screwing on the new nozzle onto the printer head.
Recommended reading: Nozzle diameter and layer height explained
How to prevent a clogged nozzle
Cleaning the 3D printer nozzle is only one part of the solution, it is also critical to prevent clogs from happening in the first place. Fortunately, achieving clog-free 3D printing is pretty straight forward.
First, keep your 3D printing environment clean and dust-free. This consists of dusting and wiping down surfaces near your 3D printer, as well as the 3D printer itself. It also consists of keeping your 3D printer filaments safe from contaminants. Proper filament storage, in airtight containers with desiccant packets, will prevent dust or dirt from adhering to the materials and finding their way into your nozzle. You can also wipe your filament with a soft cloth or paper towel before 3D printing to remove any dust particles.
Another key step in preventing clogs is to use good quality filament. Low-quality filaments can have inconsistent diameters, which can lead to inconsistent extrusion. Some filaments have also been found to contain foreign particles that can clog your 3D printer’s hot end. Reputable filament brands with high-quality, high-purity printing materials should print reliably and smoothly.
There are also good habits that can ultimately help to prevent filament buildup and nozzle clogs, such as cleaning the nozzle whenever you switch the type of filament you are using, and ensuring the correct printing temperature and settings for a given material.
Recommended reading: How to Dry Filament
Conclusion/Key Takeaways
In the end, a clogged 3D printer nozzle is a fairly common problem for FDM 3D printer users, but it is avoidable. By taking the right preventative steps—like keeping your 3D printing area free of dust and using good quality filaments—you can reduce the risk of nozzle clogs from the get-go. That being said, if you ever find yourself dealing with a blocked 3D printer nozzle, there are solutions. We saw how to clean a 3D printer nozzle in the event of a partial or full clog, using techniques like cleaning filament, cold pulling, and acetone solvents. For more 3D printing troubleshooting, see our article on solving first layer adhesion problems.
References
[1] 3DVerkstan, 2016. “The Atomic Method” [Internet] https://support.3dverkstan.se/article/10-the [Accessed April 28, 2022]
[2] Thomas Sanladerer, December 29, 2016. “Basics: Cleaning out a clogged nozzle” [Internet] https://www.youtube.com/watch?v=g8uvh6kvr54 [Accessed April 29, 2022]
What to do When your 3D Printer Nozzle Keeps Clogging
3D Insider is ad supported and earns money from clicks, commissions from sales, and other ways.
We’ve said it many times: 3D printing is basically a never-ending process of troubleshooting. So many things can go wrong, especially if you’re trying out a new filament or when some of the parts of your 3D printer need some maintenance.
The nozzle is easily one of the most important parts of your printer. After all, it acts as the transition between the hot end and the print bed – the very thing that turns the filament into an object in 3D space. As such, having your nozzle clog in the middle of printing can be very frustrating. If this keeps on happening to you, then this guide will help you get to the bottom of the case and look for ways to solve it.
What goes on in the extruder?
The nozzle is merely the last component of a 3D printer’s extruder assembly. To understand why clogging of the nozzle happens, it is better for us to understand exactly what happens inside the extruder.
The extruder assembly has three major components: the extruder, the hot end, and the nozzle. A successful print relies on these three components working together in a perfectly synchronized manner. Any miscalculation or settings that don’t match up can result in several problems, such as a clogged nozzle.
The extruder is a series of gears that “grab” onto the filament and push them forward in a controlled and consistent manner. Increasing the printing speed settings compels the stepper motor of the extruder to rotate faster. This increases the rate of delivery of the filament to the next step, which is the hot end.
The hot end is basically a heating element integrated with a heat sink, a heat break, and a thermistor. This component of the extruder is responsible for melting the filament so it can be forced through the narrow opening of the nozzle. The printing temperature is one of the most important settings in 3D printing, especially when changing from one filament type to another.
With the pressure created by the continuous rotation of the extruder gears, the molten filament is forced through the nozzle. The opening of the nozzle is much smaller than the diameter of the filament. This helps maintain a steady pressure in the extruder assembly so that the molten filament oozes out of the nozzle at a consistent rate.
What causes nozzle clogging?
1. Hot end temperature is too low
If your printing temperature settings are too low for the filament you are using, the filament may not get completely melted in the hot end. This leads to pressure buildup in the extruder assembly as the filament cannot easily flow out of the nozzle opening. Aside from your print probably suffering due to under-extrusion, the pressure buildup can get so bad that the extruder gears end up stripping the filament. When this happens, you almost certainly need to take apart the extruder assembly and clean out the stripped plastic from the gears of the extruder.
2. Hot end temperature is too high
Strangely enough, setting your printing temperature too high can also lead to clogging problems. Although you shouldn’t have a problem with the melting of the filament, the excess heat can actually start creeping up backward and softening up the filament before it enters the hot end. This phenomenon is called “heat creep” and can make it really hard for the extruder gears to grab onto the filament.
You can typically hear when this starts to happen as the stepper motor starts to make a clicking sound. Eventually, the extruder can no longer keep up and completely fails, resulting in a clogged nozzle. When a jam of this nature happens, you typically have to push the clogged filament through manually.
3. Nozzle is too close to the bed
The most common cause of nozzle jams, having the nozzle set too close to the bed can prevent the filament from flowing out freely. Aside from the fact that your print quality will almost certainly suffer as the molten filament gets smeared and dragged by the print head, but this can also result in “retrograde extrusion.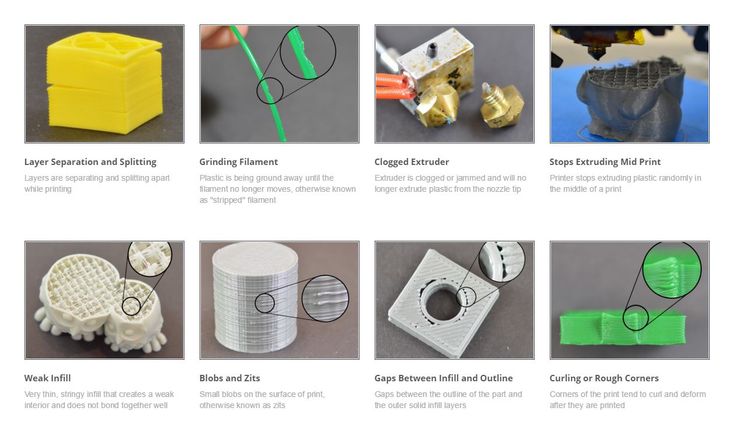 ” When this happens, filament starts to go back up the nozzle. The pressure buildup because of retrograde extrusion can very easily result in a clogged nozzle.
4. Dust or dirt in the filament
Any material on the filament that does not melt, such as loose dust or particles, will almost certainly burn as it passes through the hot end. As these small particles, the charred remains can stick to all manners of surfaces inside the extruder assembly. Eventually, the buildup of burnt particles can increase pressure and cause a jam at some point in the extruder assembly. When a jam of this nature happens, you definitely need to take the assembly apart and manually clean off the burnt particles.
5. Filament diameter is inconsistent
Even if the diameter of your filament looks the same all throughout the length of the filament, minor variations in the filament diameter can really mess up the steady-state flow that you want to achieve in your extruder. Sections of the filament that are too thin can be hard for the extruder to grab onto, while thicker sections can lead to filament buildup in the nozzle.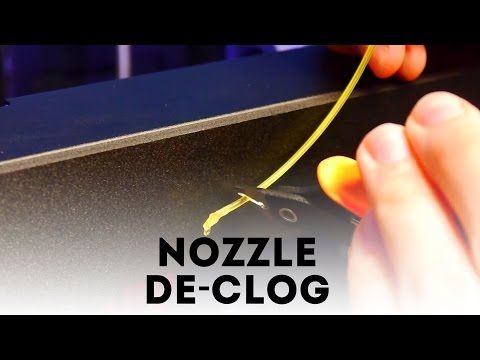 Either way, you’re going to have a clogged nozzle.
Steps to prevent nozzle clogging
1. Clean the nozzle when switching between filaments
When it comes to jammed nozzles, any sort of residue is your enemy. In most cases, there is always a small amount of filament left over on the nozzle that you cannot pull out after your print has finished. Fortunately, the leftover filament can easily be removed by brushing the nozzle from the outside using a wire brush. You can also use a brush with brass bristles if you want to make sure that your nozzle does not get damaged.
2. Use clean and high-quality filament
Always store your filament spools in airtight bags. Not only does this prevent any dust buildup, but it also prevents moisture absorption. The effects of moisture in the filament on the 3D printing process deserve a whole article of its own. For now, just take our word for it – moisture is bad news.
More importantly, only buy your filament from trusted sellers. Problems with diameter consistency are typically only encountered when you buy those really cheap filaments from unknown retailers.
You can easily check for diameter consistency by using a caliper to take measurements at multiple points of the filament. Thicker filaments – those with 3-millimeter diameters – are less prone to variations in diameter. For instance, a margin of error of 0.0 millimeters is okay for a 3-millimeter filament but should be enough to reject a 1.75-millimeter filament.
3. Print at the right temperature
Getting the sweet spot of printing temperature for a filament, especially one you haven’t worked with before, can take a lot of trial and error. Setting the print temperature too high or too low can lead to a host of problems – including a clogged nozzle.
Always take note of the recommended printing temperatures from the manufacturer. We suggest starting at the lowest value and working your way up by 5 °C increments until you are satisfied with the printing performance.
4. Level your print bed
If you are still running into problems with a clogged nozzle despite dialing in all the necessary settings and using the best filament you can find, then it may be time to calibrate your print bed. This is because an unleveled bed will almost certainly result in a sub-optimal nozzle height.
Build height leveling is a built-in feature in most 3D printers. You’ll most likely have to do it manually, with the software helping you out with step-by-step instructions. If you have a really high-end model, it may come with an auto-leveling feature. In any case, bed leveling is something you should be doing on a regular schedule.
5. Set the optimal nozzle height
Once you’ve ensured that your bed is level, you can easily set the initial Z-setting of your nozzle at the optimal height. Setting it too high can cause poor bed adhesion as the filament cools down before it hits the print bed while setting it too low largely increases the chances of your nozzle clogging up.
Determining the optimal height is a function of the diameter of your nozzle. As a rule of thumb, the nozzle must be set at a height that is 50% to 70% of the nozzle diameter. This allows the nozzle to exert just enough pressure on the filament to aid bed adhesion, while also not being too close to result in retrograde extrusion. We recommend setting it at 70% and lowering it gradually should you run into bed adhesion problems.
Final thoughts
Having a clogged nozzle can be one of the most frustrating problems you can encounter in 3D printing. Not only are your forced to stop the current print and start over, but you’ll very likely also need to take apart the extruder assembly to remove the filament or particles that have caused the clog.
The best precautions against clogging are buying a good-quality filament, making sure that your filament and nozzle are clean, and double-checking the optimal printer settings for your filament. You should also include bed leveling as part of your regular pre-printing checklist.
Despite these precautions, clogged nozzles can happen to the best of us. If the problem’s already there, then check out our article on how to clean your clogged nozzle. Have you had problems with clogged nozzles? Tell us all about them in the comments section.
Warning; 3D printers should never be left unattended. They can pose a firesafety hazard.
How to clear a clogged extruder nozzle
A clogged extruder nozzle is a problem that inevitably needs to be addressed immediately, and this article will help you diagnose it correctly, as well as solve it in the simplest and easiest way.
Drill set for cleaning the extruder nozzle in case of blockages.
Unlike many other problems that arise during 3D printing, nozzle clogging negatively affects not only the quality of the print result, but, more often than not, the ability to print at all. Let's take a look at the main causes of a clogged extruder nozzle, and how you can quickly and easily fix this situation. nine0003
- 1 Causes of clogging
- 1.1 Extruder temperature too high
- 1.2 Dust and debris caught in the extruder nozzle
- 2 Step-by-step solution to this problem
- 3 Comments of experts (Mikhail Shchekochikhin)
Causes of clogging
Excessive extruder temperature
When using PLA plastic, the optimal extrusion temperature can be from 160 to 220 degrees Celsius. Trying to print at too low a temperature will most likely result in no extrusion at all, but the reverse can become more problematic. In fact, if you are trying to print at too high a temperature for a given material, your filament may simply vitrify right in the extruder and thus clog it. nine0003
Vitrify - turn into a glass or vitreous substance, especially when exposed to high temperatures
Vitrification is a process that causes PLA or other plastics to become extremely hard and clog the nozzle.
The same is true for ABS, nylon, PVA and other plastics.
Dust and debris caught in the extruder nozzle
This often happens after a few jobs, as dust and other debris gets into the nozzle along with the filament. Accumulating, they begin to clog the extruder nozzle. This debris can stick to the inside walls of your extruder and obstruct the flow of plastic, eventually clogging the nozzle. nine0003
Step-by-step solution to this problem
Cleaning the nozzle with a fine drill.
This problem is fairly easy to solve, but requires the right tools.
You will need a small <0.35mm drill bit or something else that can serve as a drill but is thin enough to fit into your extruder hole.
It is very convenient to use a 0.33mm thick guitar string for this purpose, which can be easily found in any musical instrument store. nine0003
Another alternative is to use resistor or LED legs, as they are thin enough to fit through the hole in the extruder nozzle.
- Remove any remaining filament from the extruder.
- Heat the extruder to the optimum temperature for the material.
- Insert a small drill bit into the nozzle opening and clean it of debris by turning the bit slightly (be careful not to break it!). nine0066
- stop extruder
- clean the heated nozzle, preferably with a special drill
- start the extruder so that the melt flushes the nozzle
- repeat this several times. Can even on the go extruder
- as a result, the nozzle opening will be cleaned and flushed
Now you can print again!
Experts' comments (Mikhail Shchekochikhin)
The advice is necessary, but not technologically correct.
The procedure is as follows:
If you act as indicated in the article, then you can push the carbon plug into the depth of the extruder, and after starting the extruder, it will clog it again.
Go to the main page of the 3D Printing Encyclopedia
Cleaning the 3D Printer's Extruder Nozzle if Clogged
There are several reasons why you might need to clean the 3D printer's nozzle. Firstly, foreign particles present in the inclusion filament itself, dust, overheated and burnt plastic - all this gets stuck in the nozzle and prevents normal extrusion. In addition, burnt plastic can stick to the inner surface of the nozzle, not directly blocking it, but interfering with the progress of the material. Clean the nozzle whenever you see any obstruction to the extrusion, and even better, do it regularly. nine0003
When 3D printers first came out, cleaning was a rather complicated procedure. Often the printer had to be disassembled, and in order to remove the stuck plastic, it was necessary to heat the parts with an open flame. As a result, the plastic sometimes burned even more, which in some cases eventually led to the most serious consequences (the nozzles even broke), and assembly and disassembly did not always end without problems. Some craftsmen immersed the nozzles in the solvent. The problem here is that the reagent does not immediately reach the plastic inside the nozzle, and even with the strongest reagent, the plastic can still remain viscous and difficult to remove. nine0003
The safest and most effective way to completely clear plastic and debris from the nozzle is an operation sometimes referred to as "cold pulling". Its meaning is to pull the filament through the nozzle at such a temperature at which it is guaranteed not to break, does not melt in the hot zone, but is already heated enough to stretch, filling the space inside the nozzle, but not getting stuck in it. This works best with polished stainless steel nozzles. Those with a Teflon coating inside have more problems, because the pressure inside the nozzle slightly deforms the Teflon layer, and bumps that are difficult to overcome appear. nine0003
Cold drawing can be successfully used with both ABS (which has long been the best material, with a cold drawing temperature of 160-180 °C) and PLA (it is much more difficult with it due to its transitional temperature characteristics, but cold drawing at 80-100 °C sometimes succeeds).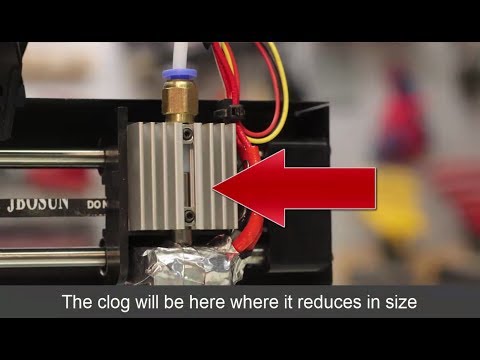 Today, PA Nylon (Polyamide Nylon) can be recognized as the best materials for this procedure - the broach temperature is 180 ° C - they are stronger, more flexible and glide better. The given temperatures are the maximum, above them the plastic is already starting to melt. For best results, the temperature of the plastic should be as low as possible, and an attempt can be made to bring the nozzle to a much cooler state first and heat it up gradually. For nylon filament, you can use trimmer line, which is sold at a hardware store. nine0003
Good ABS cold drawing. Air got inside and exited through the tip of the thread, as a result of which it became empty and could break.
Successfully cold drawn PLA. The air came out on the sides of the thread. As a result, it stretched out, became too thin, and the process would continue until the thread broke.
Good Nylon Cold Draw. Due to its strength and low coefficient of friction, the thread was able to stretch at low temperatures without dangerous deformations.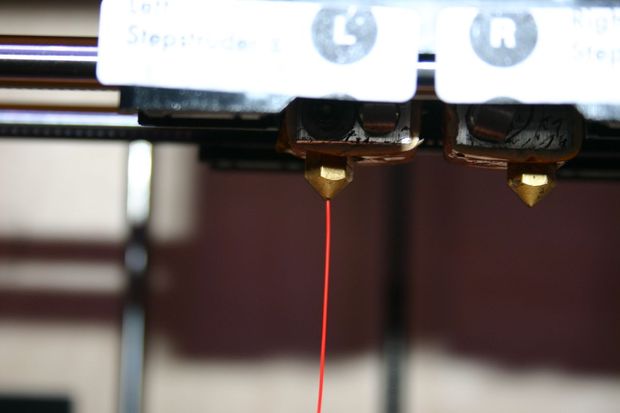 nine0003
First of all, remove as much of the accumulated plastic as possible. To do this, you can try stretching ABS or PLA at the indicated temperatures. Next, the nozzle should be heated to 240 ° C so that the nylon is completely melted and the thread can be squeezed out. Extrude material slowly. Most clods (especially those formed due to dust) do not completely block the nozzle, but enlarge and clog it with increasing pressure, and then it is very difficult to remove them. If your blockage is not strong, i.e. these are not large foreign particles deposited in the nozzle, slow extrusion, through pauses, will allow the old material to be squeezed out of it. As soon as nylon appears at the tip of the nozzle, you can begin to cool the nozzle to the drawing temperature. nine0003
A rough or colored filament coming out indicates that the old plastic has not completely come out, and it makes sense to repeat the process for a complete cleaning.
If you have a serious blockage that completely prevents extrusion, it must be loosened before further processing.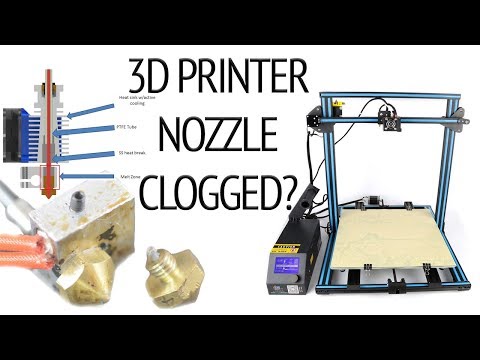 This is usually done with thin steel or brass wire (regular aluminum or copper wire is too soft). Bristle from a wire brush or brush or a thin string will also work. nine0003
Of course, it is best to use special tools. And there are. They are called extruder cleaning drills or extruder cleaning needles and are essentially a miniature steel drill with a holder. (It must be warned that the drills are quite fragile and can break, the needles only bend). It is also convenient to check the diameter of the nozzle outlet with a needle.
Preheat the extruder to 200°C, push the drill into the nozzle and stir up the scale there, then try to extrude again. The most insidious foreign particles will have to be picked out long and hard. When the wire has done its job, you can try to push through the nylon to push out the old material. nine0003
If the injected nylon filament has a rough, dark, discolored or black dotted surface, this indicates that overheated and burnt plastic is still in the nozzle.