Clean 3d printer extruder
How to Clean and Maintain Your 3D Printer Nozzle
A previous article discussed the importance of keeping a 3D printer clean and well maintained to achieve maximum accuracy and reliability when printing. However, it didn’t go into detail about maintaining optimum functionality of one of the most vital components of a 3D printer: the nozzle. With that in mind, this article discusses a few problems a clogged or dirty nozzle could lead to and some methods that help you maintain the perfect performance of your 3D printer.
How Often Should I Clean My 3D Printer’s Nozzle?
Like every other part of the 3D printer, it’s natural that the nozzle gets dirty over time while using the printer. However, a clogged or dirty 3D printer nozzle can introduce various problems and lead to more trouble further down the road.
As the nozzle is the last part the filament travels through before it gets added to a printed piece, it’s crucial to keep it clean to ensure good results. A dirty nozzle can lead to cosmetic blemishes: for example, burnt, dark spots in the finished part, and misaligned layers.
It can also cause more severe problems, such as failed prints when the nozzle clogs mid-print. A clogged nozzle also puts more strain on the other mechanical components of your printer, as they need to work harder to push the filament through the hot end, which means they may need more maintenance in the future.
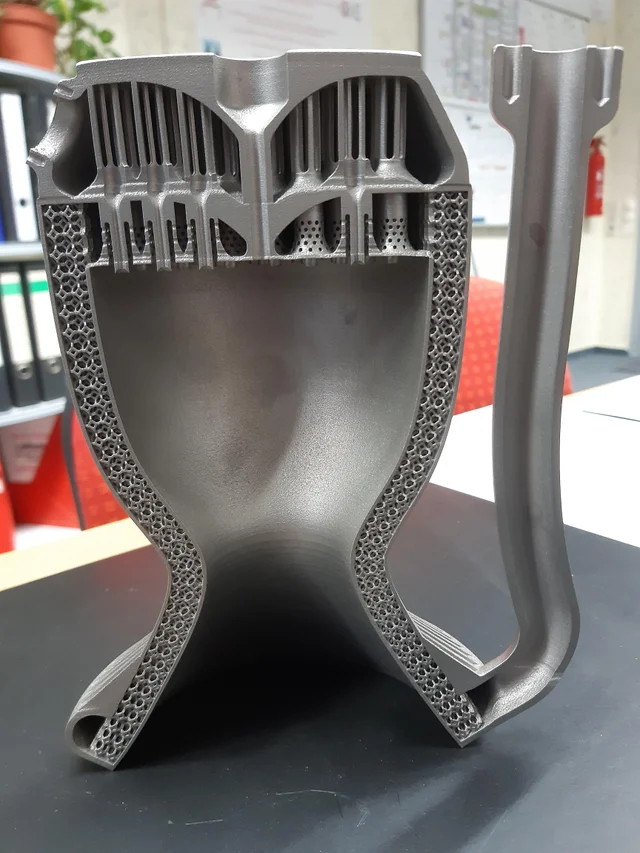
A dual-extruder print head shows how dirty the hot end and nozzle can get with regular use. For example, the main extruder on the left is yellowed due to the vapors the material emits during printing. However, you can also see how regularly cleaning the hot end before every print effectively removes stuck and burnt material residue.
Always inspect the nozzle as part of your regular printer maintenance schedule. First, visually inspect whether you can see any dirt on the outside of the nozzle - for example, burnt plastic stuck to the side of the nozzle or the hot end. In addition, pay attention to unusual sounds. For example, scraping and clicking may indicate that the printer has a hard time pushing the filament through the nozzle and that it may be time to give it a clean.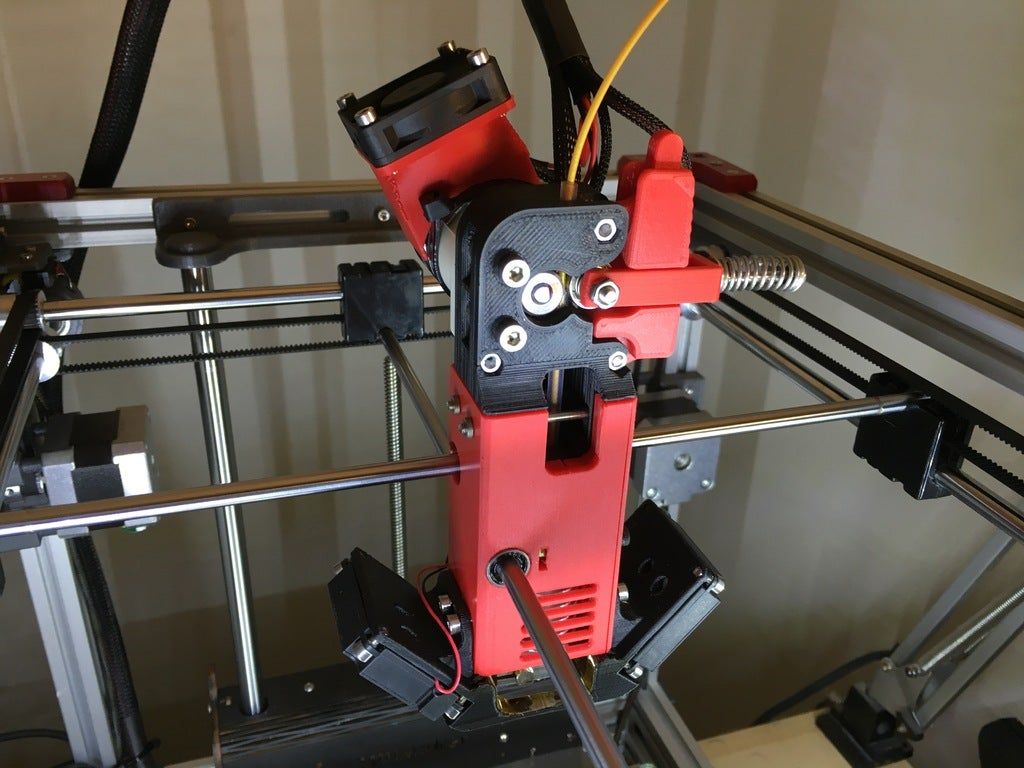
Routinely Cleaning the Nozzle
When you’re ready to clean the nozzle, get a brass wire brush or a light abrasive pad. Then, put the printer into pre-heat mode and lightly scrub the outside of the nozzle using the brush or pad. Don’t rub aggressively and stay clear of any heater or sensor wires in the hot end, as you might otherwise damage or short them. This cleaning technique will remove material stuck to the outside of the nozzle and the hot end, which reduces the chance of dirt building up and subsequently clogging the nozzle.
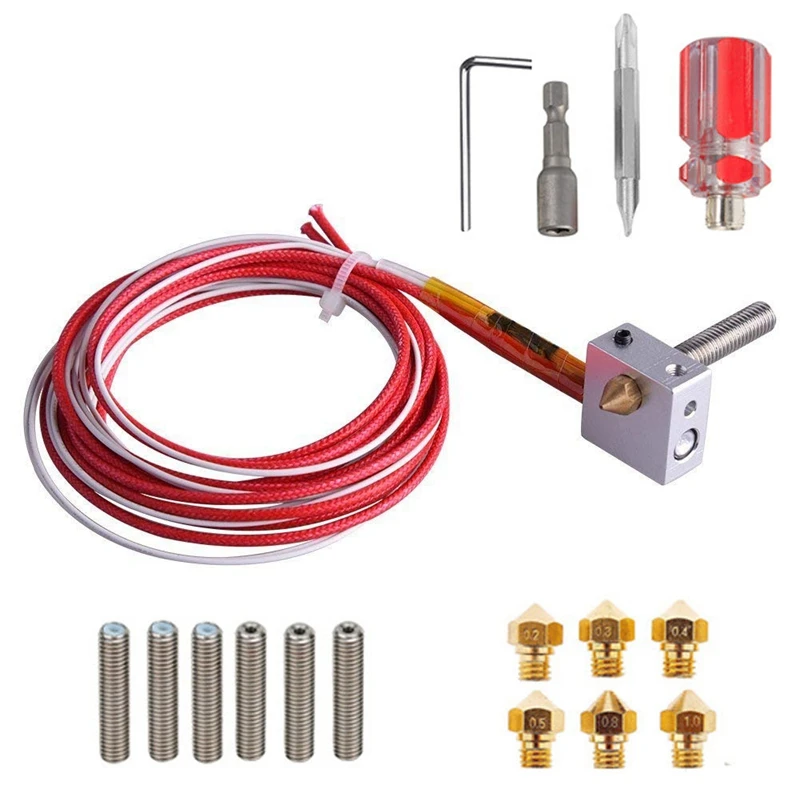
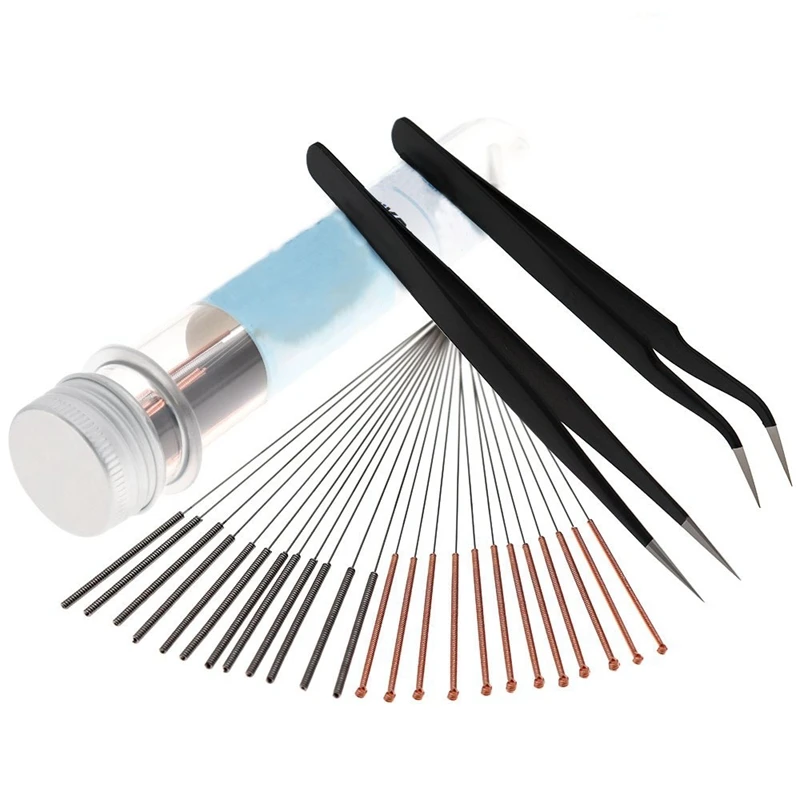
Use these tools for routinely cleaning and maintaining the extruder.
Unclogging a Jammed 3D Printer Nozzle
Unfortunately, it may still happen that the nozzle clogs after a while due to various factors. Sometimes, the filament snaps in the wrong place and gets stuck in the nozzle. Other times, dirt builds up due to neglected maintenance. However, not all hope is lost in these cases. Depending on the material, you can try a few techniques to unclog that nozzle. Either way, these techniques require you to disassemble the hot end and nozzle of the printer. You can usually use a wrench to unscrew the nozzle from the hot end, and this mechanical movement alone may be enough to unclog the nozzle. However, you should always follow your printer’s manual to find out how to disassemble the machine.
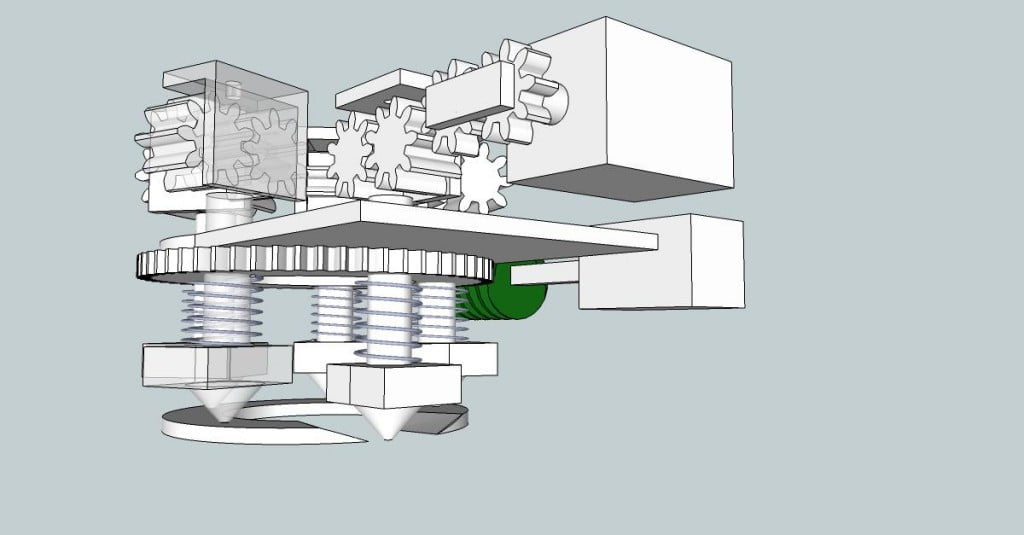
Most 3D printer hot ends contain at least these three parts. You can see that the nozzle could use a good cleaning in this example. However, the heater block and heater element are in pristine condition.
Next, pour a bit of acetone into a glass jar and submerge the disassembled hot end and nozzle in the liquid, which works wonders when you mostly use ABS filament. Acetone will usually dissolve ABS after a few minutes in most cases. However, sometimes, the chemical solvent only softens the ABS enough to make it easier to remove. You can then use a metal wire brush to clean any residue still stuck to the outside of the nozzle and hot end. Finally, if the nozzle is clogged, try using a fishing line, guitar string, or a thin needle and thread it through the nozzle to unclog it.
For other materials (such as PETG, PLA, and Nylon), you can carefully heat the hot end and nozzle for a few minutes using a heat source, such as a household oven, a blowtorch, or a heat gun. Make sure to place the metal parts on a fireproof and heat-resistant surface away from flammable materials before you begin and use caution to avoid burns or injury. Usually, the heat is enough to melt the material and free up the jammed nozzle. However, you can also use a thin needle to remove any blockages carefully.
Using the Cold Pull Method to Free Up a Clogged Nozzle
Finally, you can also employ a special cleaning filament that you feed through a clogged nozzle while the printer is hot. Once cooled, the cleaning filament solidifies. Next, you repeat the heating process to soften the cleaning filament. During this phase, the cleaning filament grips onto any dirt and residue left in the extruder, which allows you to remove unwanted particles when pulling out the cleaning filament in the final step.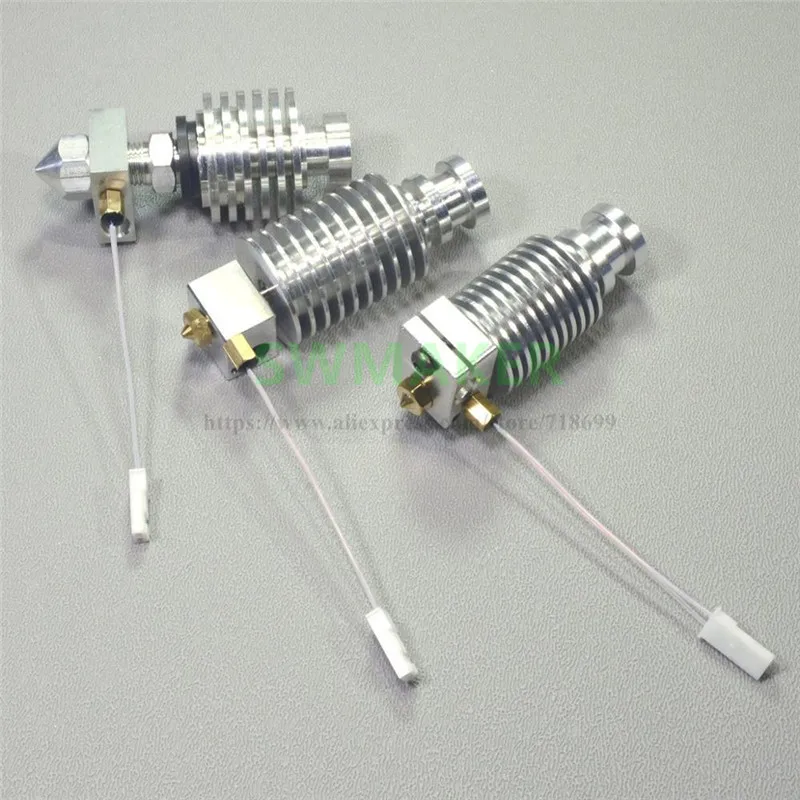 You can refer to this detailed video guide that leads you through the process of this method.
Conclusion
Cleaning the nozzle should become a part of your routine 3D printer maintenance schedule. Visually inspect the extruder to catch any problems before the nozzle clogs. Also, listen for unusual scraping and clicking sounds whenever the printer operates, as they might indicate a problem with the filament.
You can use heat, mechanical abrasion, and chemical solvents to clean a clogged nozzle. There’s no universal solution to resolve all clogs, but you’ll gain more experience once you clean out a few extruder nozzles. However, acetone is typically good for removing ABS, and heat works wonders on many other materials, such as PLA, PETG, and Nylon.
How to Clean a 3D Printer Nozzle (5 Methods) – Clever Creations
Our site is reader-supported. When you buy via the affiliate links on this site, we will receive a commission at no cost to you. All opinions remain our own. Learn more
Using a nozzle cleaning kit and a cleaning filament is the most effective way to clean your 3D printer nozzle. You can remove the nozzle and soak it in acetone to remove any traces of filament impurities. A brass wire brush with soft bristles will help eliminate any leftover filament residue.
A 3D printer nozzle is a crucial element in the 3D printing process, and it is responsible for the smooth extrusion of your filament. Any clogs or blockages in the nozzles will directly affect your print quality. Clogged nozzles will lead to under extrusion, inconsistent filament flow, and uneven layers.
Even though cleaning a blocked nozzle is easy, it can be challenging to identify the clog in the first place. In this article, we’ll explain how to recognize a nozzle clog, go over the various cleaning methods and what you can do to prevent nozzle clogging in the future.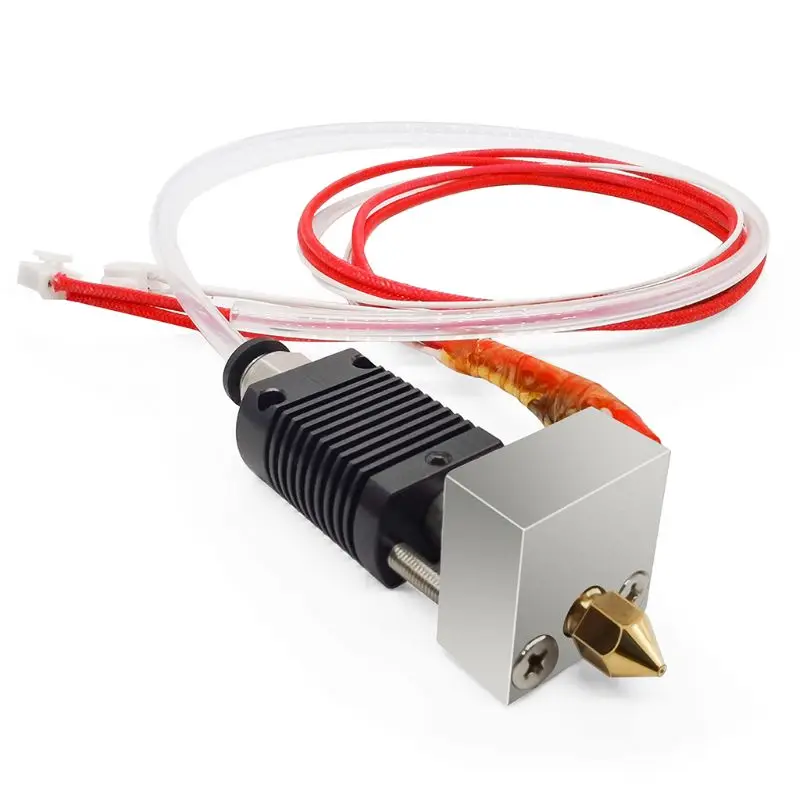
Read on to learn how to clean a 3D printer nozzle and get a smooth 3D printing experience!
How Can You Tell If a Printer Nozzle Is Clogged?
Image: squid-do via Reddit
It can be tricky to attribute print defects to clogged nozzles. However, a few notable indicators will quickly tell you whether you are dealing with nozzle clogging.
The easiest way to detect a nozzle clog is if you notice a decrease in the overall print quality. Inconsistent extrusion, missing layers, and under extrusion are a few of the side-effects of a blocked nozzle. A partial blockage in the nozzle can cause all of these problems. Similarly, a complete jam can occur due to clogged material stuck in the nozzle.
An improper first layer is another sign of nozzle clogging. If the nozzle does not extrude filament during the first layer or there’s an uneven filament flow, you might have a clog in your nozzle. However, it is helpful to eliminate any bed leveling and Z-offset issues before you check for a nozzle clog.
Additionally, filament curling right after extrusion and thinner print lines are also signs of a clogged nozzle. Recognizing these signs will help you quickly clean your nozzle and prevent further degradation of your 3D prints.
How Do You Clean a 3D Printer Nozzle?
If you start to see filament deposits on the outer surface of your nozzle, it is time to clean it. 3D printer nozzle cleaning is easy, and all you need is a brass wire brush and a wiping cloth.
The brass brush prevents damage to your brass nozzles and lets you scrub any stuck printed material from your dirty nozzle.
Before starting the cleaning process, it is helpful to first heat your 3D printer nozzle. Heating the nozzle softens any stuck filament bits and lets you wipe them off more quickly.
Once you’ve scrubbed the nozzle thoroughly, you can wipe away any leftover material from its surface. A soft microfiber cloth is our go-to equipment for this.
3D printer nozzle cleaning is now complete, and you can start printing again.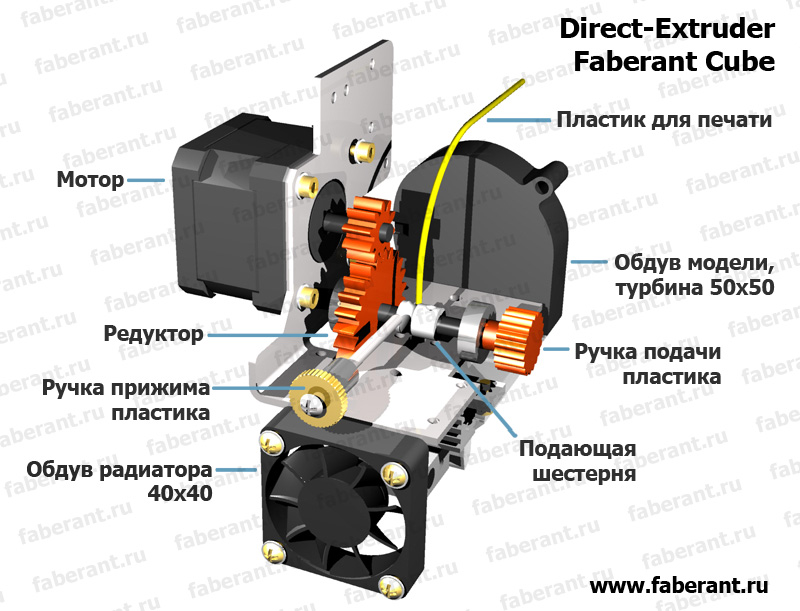 Remember to always keep an eye on the state of your nozzle and clean it regularly to maintain optimal print quality.
Turboom Wire Brush Set Scratch Brush Set for Cleaning Welding Slag...
Check PriceHow Do You Unclog a Clogged 3D Printer Nozzle?
If your nozzle is already clogged, don’t worry! Cleaning a nozzle is an easy process that can be done through a couple of different methods.
Nozzle Cleaning KitA standard nozzle cleaning kit consists of thin metal needles, tweezers, and a brush. You can use this method to clean out your nozzle by following these steps:
- Start by heating up your nozzle to right under its maximum temperature. This will help to soften any filament that is stuck inside the nozzle.
- Next, use the metal needles to pick out any larger pieces of filament that may be blocking the nozzle.
- Once the larger pieces have been removed, use the nozzle brush to clean out any smaller bits of filament.
- Finally, use the tweezers to remove any final pieces of filament or debris.
3D Printer Nozzle Cleaning Kit - 0.4mm Needles and Tweezers Toolkit...
Check PriceCold Pull
A cold pull or an atomic pull is often used to unclog the nozzle and remove any debris inside it. It is an easy technique and requires no disassembly or cleaning tools to remove the clog.
Using Nylon filament will give the best results. However, you can also use PLA, ABS, or a dedicated cleaning filament (more on this later) if Nylon is not available.
First, you need to heat the nozzle to the printing temperature of your filament. After that, you will have to manually push the filament until it extrudes out of the nozzle. You can now let your hot end cool down while pushing the filament into the nozzle.
In the final step, you need to first remove the extruded material from the nozzle tip. Then set the printer temperature to 85-90 °C. Once it reaches this temperature, slowly pull the filament out of the nozzle completely.
You might have to perform this procedure several times to remove any dirt and filament bits from the inside of your nozzle. You can stop once you notice the cold pulled filament is free from debris.
Soaking the Nozzle in Acetone
A nozzle cleaning kit and cold pull might not always be practical with filaments like ABS, and your nozzle might still be clogged. When it comes to ABS, removing the nozzle and soaking it in acetone is a good way to clear clogs.
Start by heating the nozzle before removing it from the hot end.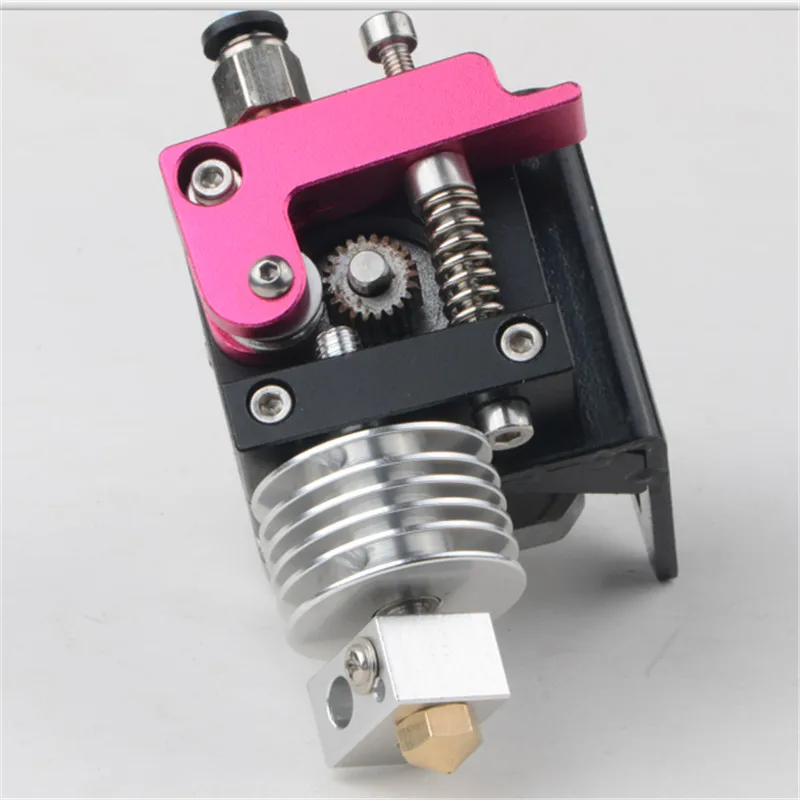 Heating the nozzle frees it up slightly from the heater block and makes it easy to unscrew. You can use a spanner or a nozzle removal tool to remove the nozzle safely and efficiently.
After you’ve removed the nozzle, soak it in a cup with a layer of acetone for around 30 minutes. The acetone will help to dissolve any ABS filament that is stuck inside the nozzle.
Recommended:
How to Melt and Dissolve PLA Filament
Once the soaking is complete, you can use a wire brush to remove any final bits of filament. Be sure to also clean the nozzle tip as this is where most of the clogs occur.
You can now reassemble your 3D printer and start printing again. Make sure to properly dry the nozzle first. A paper towel or soft cloth is just fine for this.
Remember to always keep an eye on your nozzle and clean it regularly to maintain optimal print quality.
Using a Heat Gun
While an acetone soak is helpful for ABS filament, it is not as effective on other filament materials.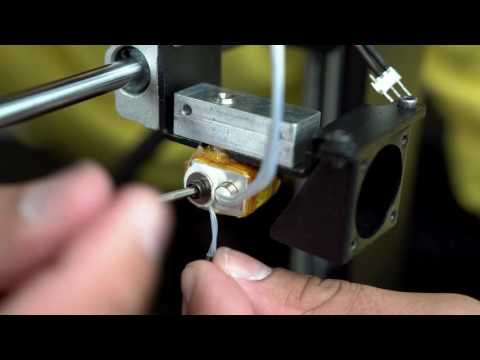 Especially PETG and Nylon are fairly non-reactive to acetone.
When dealing with these filaments, a heat gun will help clear your nozzle clog.
The first step is to remove the nozzle from the 3D printer hot end or extruder assembly. This is the same as what you would do for ABS soaking.
Next, you will need to heat the nozzle with the heat gun until the filament inside melts.
Once the filament has melted, you can use a thin needle or a wire brush to remove any debris from the nozzle. Be careful, the nozzle is hot at this point.
After cleaning the nozzle, you can now reattach it to the hot end assembly and start printing again. Make sure that the nozzle is properly cooled down before reattaching it.
Wagner Spraytech 0503038 HT400 Heat Gun, Dual Temperature Hot Air Tool...
Check PriceHow Often Should You Clean a 3D Printer Nozzle?
At a minimum, you should clean your 3D printer nozzle when you change filament materials.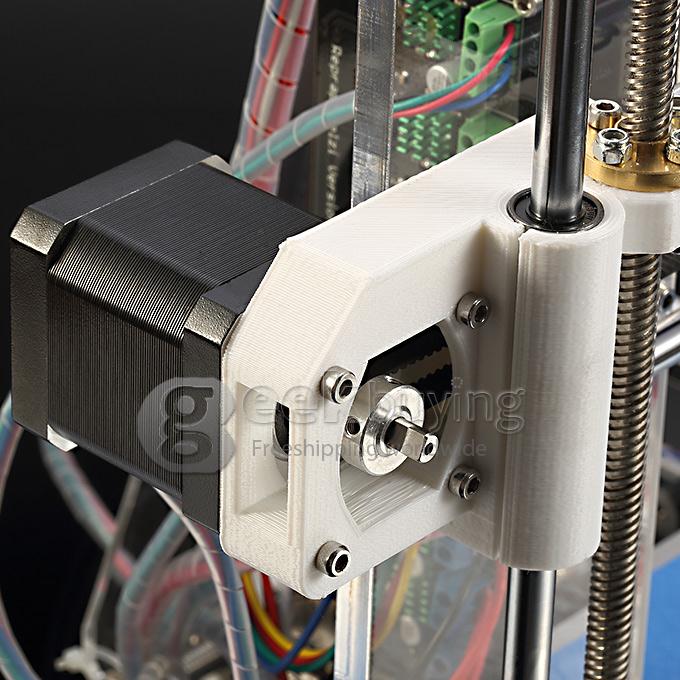 It is easy for nozzles to clog from leftover material after a filament change.
For example, when you switch from ABS filament to PLA, some ABS material might be left in the nozzle. As PLA prints at a lower temperature than ABS, the leftover ABS will not melt and result in a nozzle clog.
Another reason for nozzle clogs is dirt and dust particles that enter along with the filament. If you continuously print with dirty filament, the debris can accumulate in the nozzle over time and clog the nozzle.
Because it can be a challenge to keep your filament free from dust and dirt, you can clean the nozzle after every 100-200 printing hours as prevention.
Generally, if you notice a decrease in print quality, that is usually a sign that your nozzle is starting to get clogged and needs cleaning. You can do this regardless of how long or with which materials you have been 3D printing.
How to Prevent 3D Printer Nozzle Clogs
Regularly Use 3D Printer Cleaning Filament
3D printing cleaning filament is the easiest way to clean your nozzles from the inside.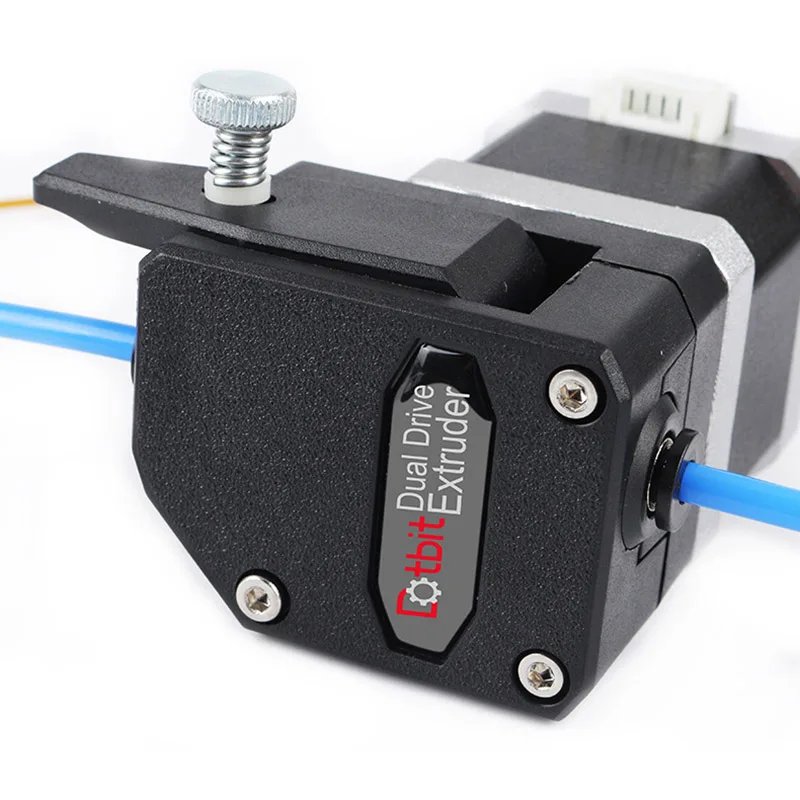 It is made up of a material specifically used to clean and purge plastic out of injection molding machines. You need to extrude it at the printing temperature of your filament until you notice a clean white strand of material coming out of the nozzle, free of any debris or filament color.
Even though cleaning filament may seem slightly expensive, it does work effectively and clears out any partial clogs. And you only need a small amount. You can use it after every 100-200 hours of printing for effective cleaning of your nozzles and to prevent nozzle clogs.
NovaMaker 3D Printer Cleaning Filament 1.75mm Natural,...
Check PriceReplace Worn-out Nozzles
You want your nozzle opening to look round.This nozzle is already showing some signs of wear, but still has some print hours left in it.
Brass nozzles undergo a lot of wear due to the constant friction of the filament. This wear accelerates when you use abrasive filaments like glow-in-the-dark, carbon fiber, and metal-filled filaments.
Not only do abrasive filaments wear out the nozzle opening, but the tiny metal particles of the nozzle material can start accumulating. This can block filament flow and lead to filament jams.
If you regularly use abrasive filaments or notice a lot of nozzle wear, it’s a good idea to replace your brass nozzle more often.
Alternatively, you can use stainless steel or other hardened nozzles. These are more resistant to abrasive filaments and have a higher lifespan than your typical plain brass nozzles.
Fix the PTFE Tube Hot End Gap
In a PTFE-lined 3D printer hot end, the tube goes all the way inside and sits right on top of the nozzle. If the gap is not flush between the PTFE tube and the nozzle, the melted filament will ooze out of it. Eventually, there will be a build-up of plastic filament within the hot end, leading to filament jamming.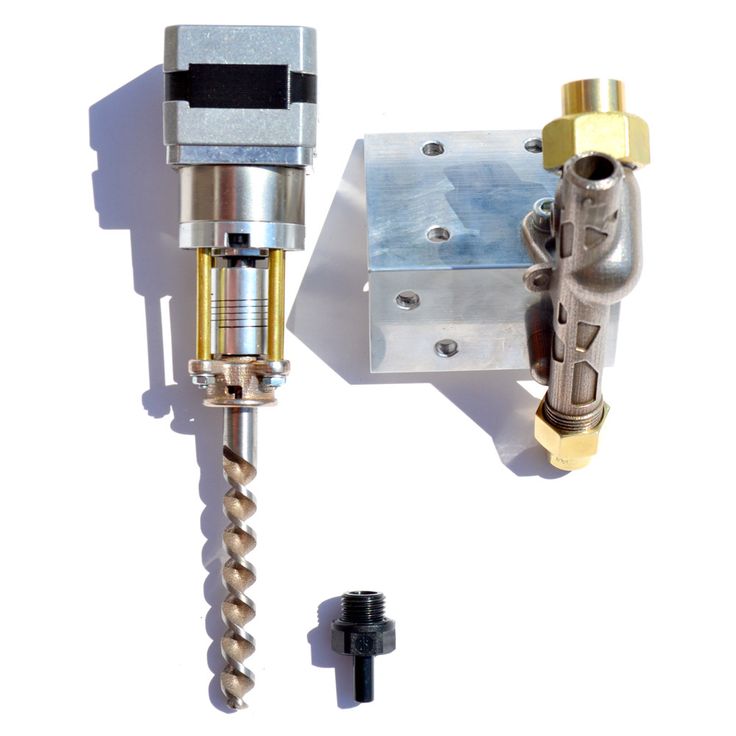
The gap is caused due to faulty PTFE tube couplings. As the couplings wear out, the PTFE tube starts sliding in and out of the hot end, creating a gap between itself and the nozzle. Extruder skipping and under extrusion are signs of a filament jam in the hot end.
You should immediately rectify the PTFE tube gap within the hot end if you notice these issues.
The first thing here is to make sure that the PTFE tube has been cut flush at a 90° angle. If it has a slope to it, it will never perfectly align with the hot end.
Secondly, it helps to use replace worn-out pneumatic couplings with new ones on both the extruder assembly and the hot end assembly. This ensures that the PTFE tube stays in place over time.
PTFE Bowden Tube (1M) 1PCS+ 6pcs KJH04-M6 Fittings + 6pcs JP4-01...
Check PriceUse High-Quality Filament
A high-quality filament will reduce nozzle clogs while also giving you high print quality. Manufacturers of high-quality filament ensure that their product contains little to no impurities, is produced in a dust-free environment, has a consistent diameter, and is properly vacuum packed to reduce as many imperfections in the material as possible.
We have created an overview of the highest quality filament in our Best PLA, Best ABS, and Best PETG articles. We recommend you check these brands out if you suspect your clogged nozzles are caused by low-quality filament.
While these filaments may be more expensive than budget materials, they are often worth the extra money.
They don’t only save time, but their results are better too. If you are looking to sell your 3D prints and make money with your 3D printer, quality filaments can be a worthwhile investment.
Keep Filament Clean and Dust-Free
A clean 3D printing space contributes significantly to preventing nozzle clogs. If your plastic filament is exposed to the outside environment while printing, it will pick up dust particles that clog your nozzle. After printing with it, you need to store it away from sunlight and in a storage box to prevent the accumulation of dust on it.
Another way you can protect your 3D printing setup from dust and dirt is by using a 3D printer enclosure. These don’t only keep the current filament in the printer clean, but also the 3D printer itself.
Frequently Asked Questions
How do you clean a clogged nozzle with PLA?
In order to clean a clogged nozzle with PLA, you will need to disassemble the printer and remove the nozzle. Once the nozzle is removed, you can use a small wire, needle, or other small pointed tool to clear any debris that may be blocking the opening. You might need to heat the nozzle up with a lighter to melt the plastic filament.
Be careful not to damage the nozzle while cleaning it.
How do you clean an Ender 3 nozzle after printing?
It’s important to clean your Ender 3 nozzle regularly to prevent clogs and ensure quality prints. After every print, it is advisable to clean the nozzle with a brass wire brush.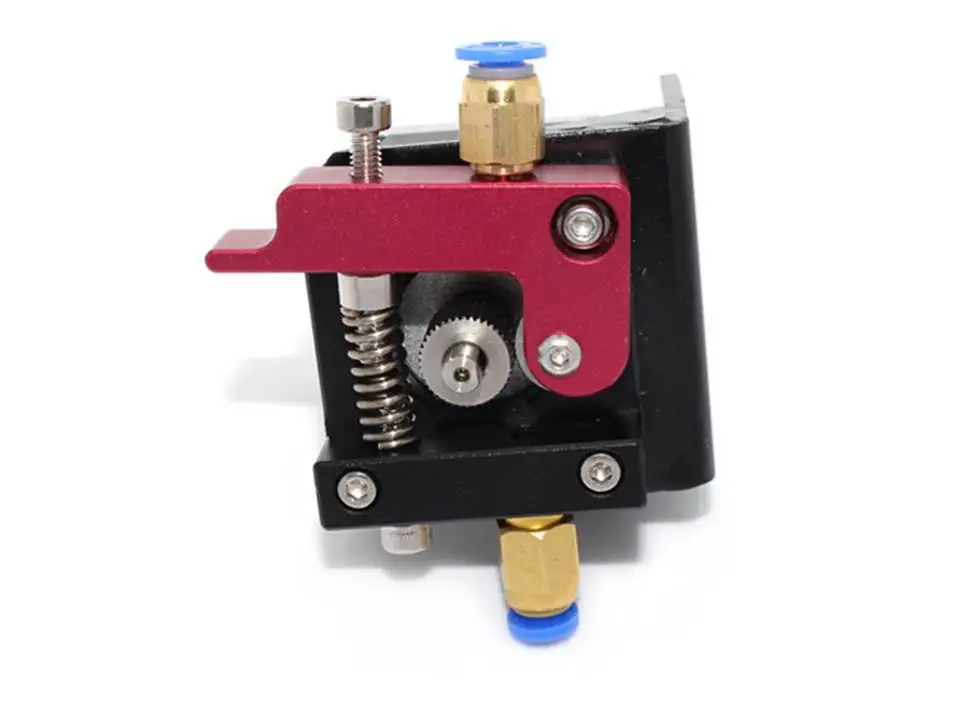 This will remove any debris or build-up that may have occurred during the printing process.
A clean nozzle will ensure that your prints are of the highest quality and avoid any potential issues such as clogging or poor adhesion.
Conclusion
A clean 3D printer nozzle gives you the best print results and helps prevent damage to the 3D printer caused by clogs. Periodic cleaning of your 3D printer nozzle ensures fewer chances of sudden breakdown and prevents downtimes.
Degradation in the print quality, coupled with under extrusion and inconsistent filament extrusion are some of the indicators of a blocked nozzle. You can quickly unclog the nozzle using a nozzle cleaning kit and a wire brush and periodically use a cleaning filament. Especially the cleaning filament is useful for keeping nozzles clean.
When dealing with ABS filament, you can soak the nozzle in an acetone bath to soften the filament. This makes it a lot easier to remove.
Let us know your experience with 3D printer nozzle cleaning.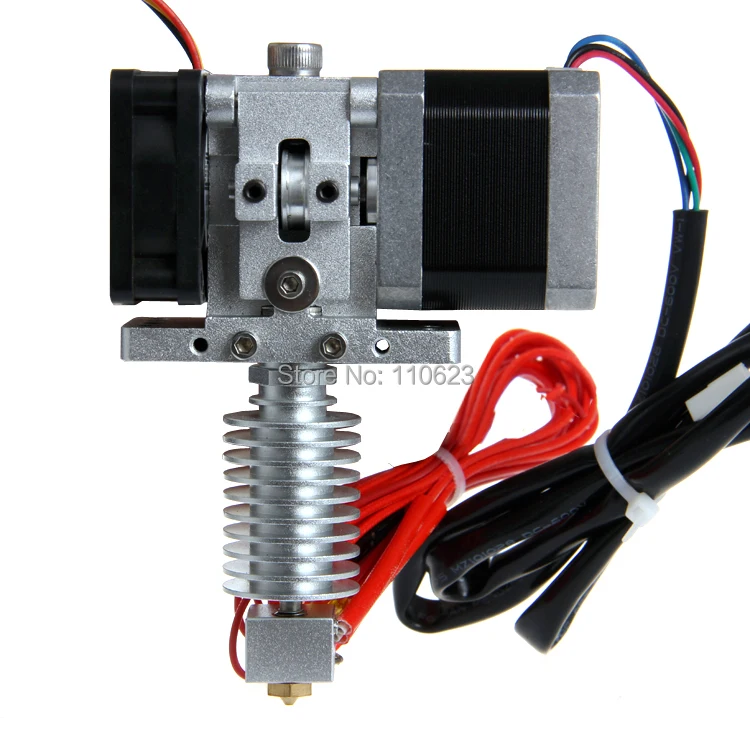 If you find this article helpful, share it with your peers to help them prevent nozzle clogs and keep their 3D printers running smoothly.
Extruder cleaning with all the nuances
Dear 3D lovers, I greet you!
In this post we will touch on the topic of disassembly, cleaning and assembly of the extruder, taking into account all the nuances. The sequence of operations is described for the bowden plastic supply system (long-range)
P.S.
For those who do not have the desire / time to read the entire post, I have prepared a video for your attention below at the link.
Before disassembling the extruder, it is recommended to have spare parts on hand. Namely: thermal barrier, nozzle and thermistor. This is the minimum set of those elements that can be easily damaged.
Also, if you are disassembling the extruder for the first time, it is recommended that you carefully analyze each step before doing anything.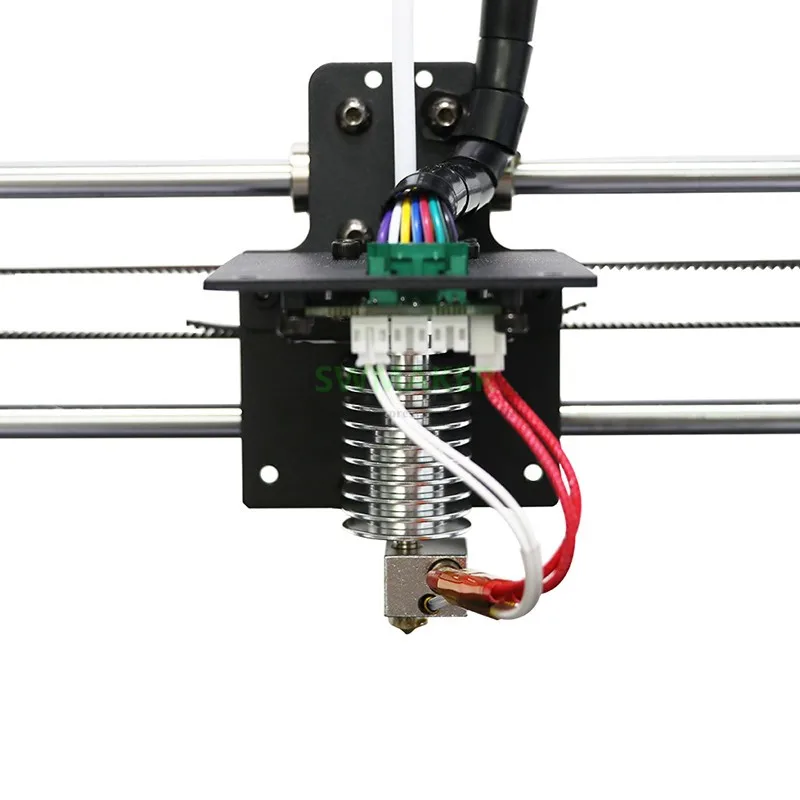 Prepare all the necessary tools, find out exactly what your extruder is called, what model the thermistor costs, what power the heating element costs, where you can quickly purchase them in case of unforeseen circumstances. It is also better to allocate yourself an empty window for a couple of days without printing. All these actions are necessary so that you do not have a situation with a disassembled and disabled extruder, and at the same time, tomorrow you already need to put the printer on a new print.
Let's start. First of all, you need to warm up the extruder to operating temperature. The temperature should correspond to the plastic that was last printed. You can heat the extruder using a command either through the display or by connecting the printer to a computer and giving the appropriate command.
Warm up the extruder, remove the plastic from the supply system, then remove the retaining ring from the fitting on the extruder (if any) and pressing on the fitting cap, remove the Teflon tube.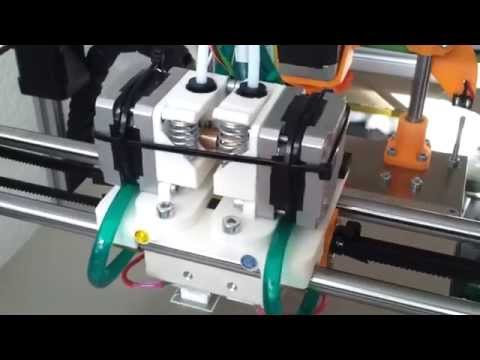
Here, a situation may arise that the Teflon tube cannot be removed from the extruder (it will jam). The reason for this lies in the fact that the tube is held by the fitting using harpoon-shaped metal teeth, which, during the operation of the printer, slowly bite into the tube itself. This is due to the fact that during the supply of plastic, pressure appears in the tube and the tube tends to be released, but at the same time it is held by the fitting, then the plastic retracts, which relieves the pressure in the tube, then the plastic is again supplied, which again increases the pressure in the tube. system and this cycle is repeated many times. This creates an imperceptible reciprocating movement of the tube, which is why the fitting bites into it. And traces appear on the tube itself - a specific circular incision. This is an inherent disadvantage of any system that has fittings. So that after assembling the extruder there is no play in the area of the gnawed area, you should cut the tube a little so that the place of contact with the fitting falls on a fresh area.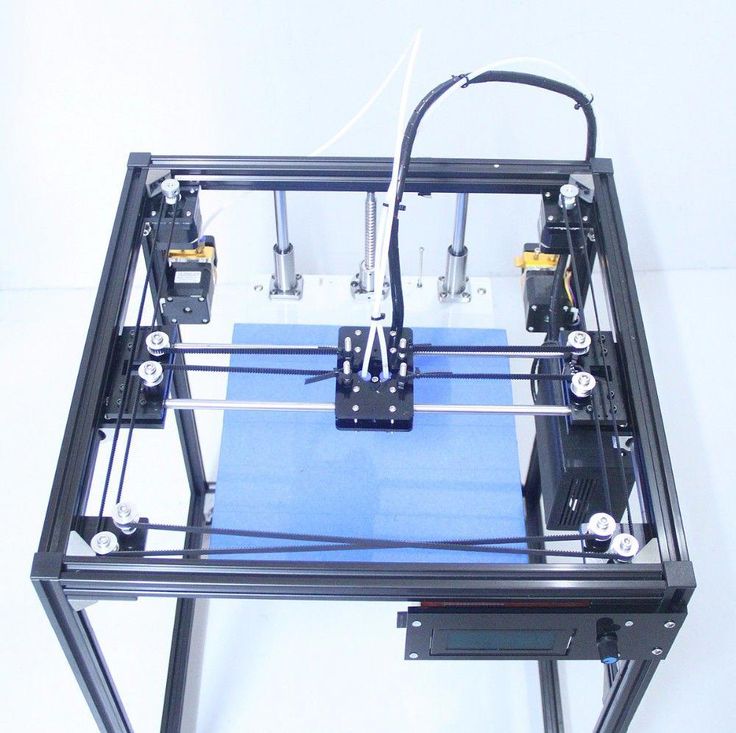 Cut the tube with a sharp blade. It is not recommended to cut the tube with scissors, because. they work to crush the material and the end will turn out to be deformed, and the cut should be even. After repeatedly overhauling the extruder, the tube may become too short and will need to be replaced.
Now, if the Teflon tube is not accessible, you can unscrew the fitting and take it out with the fitting, but this will leave spiral marks on it. The second method is also possible - because. the fitting blocks movement in only one direction, you can get to the point where you need to unscrew the nozzle and after that, pass the entire tube from the side where the nozzle was. Do not forget to disconnect the tube from the side of the plastic supply system.
And so at the moment we got the phone. After that, if you do not have a silicone cover / sock on your extruder, then you can unscrew the nozzle. To do this, you need to hold the aluminum block with one hand (for the E3D V6 Volcano extruder, it is convenient to use a 13 wrench) and use a ring wrench or a 7 head to unscrew the nozzle. You need to unscrew carefully, because. extruder is hot.
If you have a silicone sleeve/sock, you won't be able to unscrew the nozzle now. In any case, at this stage, with the nozzle unscrewed or not, the extruder should be removed from the printer. The only thing before this is to reduce the temperature of the extruder to room temperature. Also, before removing the extruder, you need to make sure that all possible wires with connectors are disconnected. When the extruder is in our hands, we will have the opportunity to remove the silicone cover / sock, which we do. After it is removed, you need to warm up the extruder again and unscrew the nozzle. While the extruder is warm, all actions must be done carefully so as not to burn yourself. Now we unscrew the thermal barrier with an aluminum radiator. After that, again reduce the temperature of the extruder to room temperature.
Now it's time to inspect all parts of the extruder. If you see sticky plastic anywhere, it should be removed.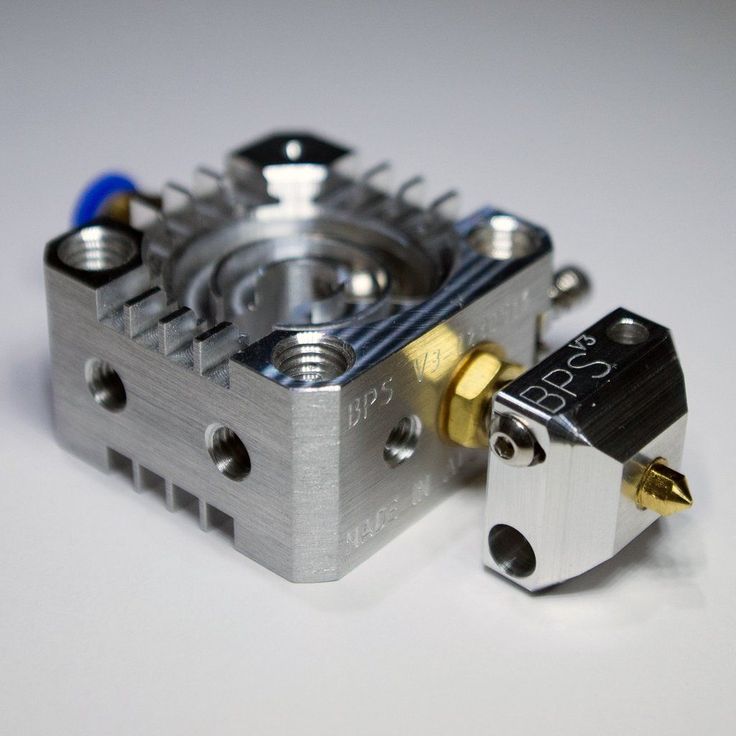 You should also make sure that there is no plastic inside the thermal barrier. If it is, it must be removed, but first unscrewing it from the aluminum radiator. It must be unscrewed carefully so as not to damage the thread, and also not to deform the thin-walled groove, otherwise the Teflon tube will not be able to completely pass through it (it may get stuck in the thermal barrier if you have it through) already during assembly of the assembly. A plastic plug in the thermal barrier appears mainly due to the fact that the Teflon tube, biting into the fitting, slightly moves away from the end of the nozzle and a gap slowly appears between the nozzle and the tube, which is filled with plastic. The more the tube bites into the fitting, the larger this gap becomes. The plastic plug formed at this place is just one of the factors that makes it difficult for the filament to move through the extruder. After all the plastic inside the thermal barrier is removed, remove the plastic (if any) from the outer thread of the thermal barrier using an M6 die.
Having dealt with the thermal barrier, now you need to make sure that there are no traces of plastic on the internal threads of the aluminum block and the external threads of the nozzle. If dirt is visible, you can clean the internal thread of the aluminum block with an M6 tap, and the external thread of the nozzle, as in the case of a thermal barrier, with an M6 die. By the way, at the expense of the latter - this is true for the E3D V6 and E3D V6 Volcano extruder. If you have another extruder, then check it out for yourself and determine what threads it has and what tools you will need.
When working with an aluminum block, be extremely careful with the wires leading to the thermistor. Both the thermistor itself and the wires are very easy to damage. If, however, the thermistor or its wires are damaged, it will not be able to read the temperature from the extruder. In this case, the display will show a temperature error. (TEMP ERROR). The error is displayed both on the display and when the printer is connected to the computer (M999).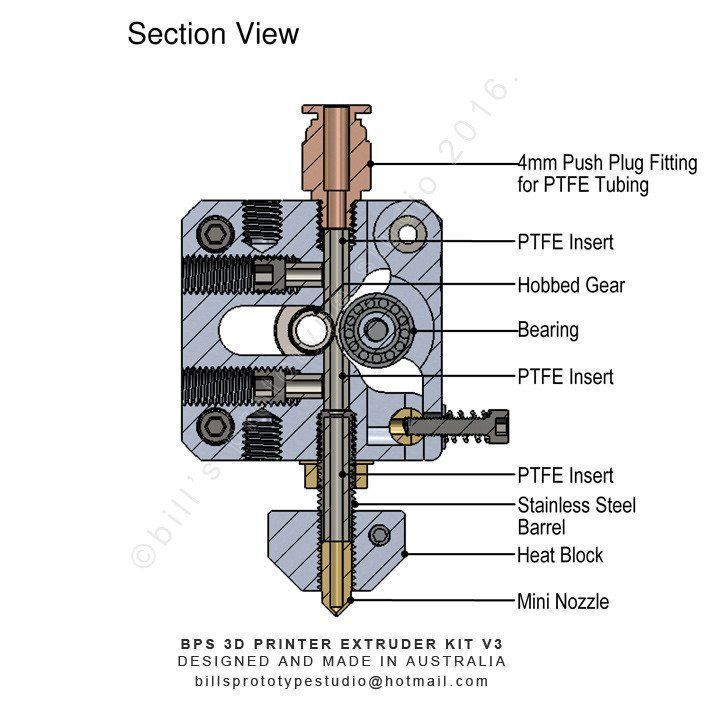
Now let's move on to the nozzle. The nozzle can be replaced with a new one, or the old one can be cleaned. When replacing with a new one, you should make sure that there are no inclusions inside the nozzle, and you can also check with a drill of the appropriate diameter (if any) whether the diameter of the hole corresponds to that declared by the manufacturer (I had experience when a new nozzle turned out to be not completely drilled). When cleaning the old one, it is necessary to remove the plastic from the thread, from the end and inside the nozzle. After you need to make sure that the hole is visible through. If you do not remove the remaining plastic inside the nozzle, and there will be some inclusions in it, for example, larger than the diameter of the nozzle, then the plastic will not be able to extrude immediately after assembling the extruder and all the work will be done in vain. By the way, the ingress of foreign inclusions into the extruder is larger than the diameter of the nozzle, this is one of the reasons that the extruder clogs sharply.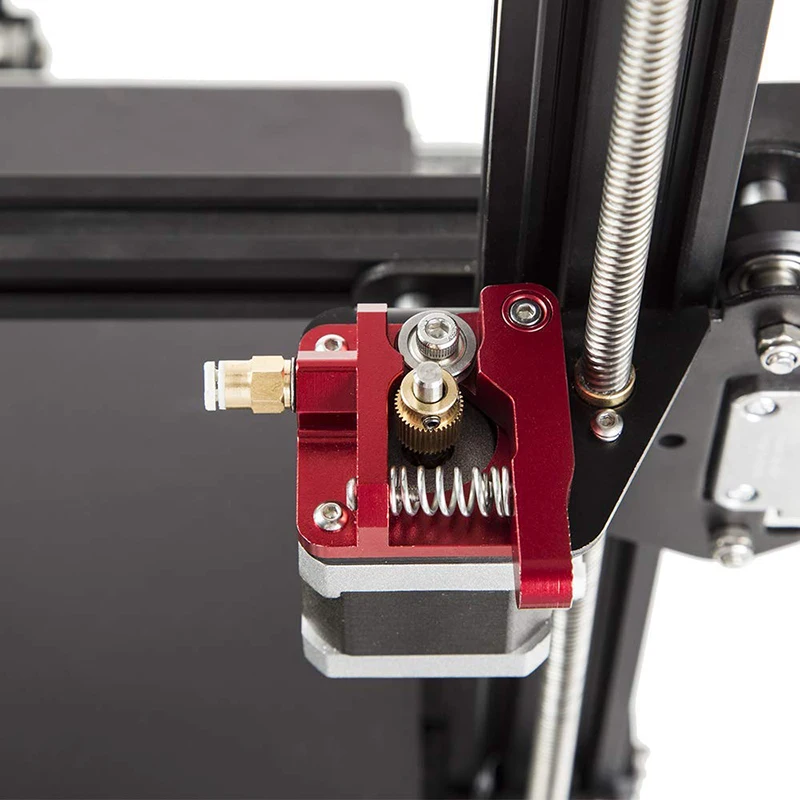
Now comes the critical tightening torque. We screw the thermal barrier into the cooling radiator. Next, we screw the nozzle into the aluminum block until it stops, after which, ATTENTION, unscrew the nozzle a third of a turn. Now we screw the thermal barrier from the back until it stops. After that, you need to lock the nozzle and thermal barrier together to prevent the plastic from flowing out from under the thread. It was for this that it was necessary to unscrew the nozzle a third of a turn. The tightening force, if possible, is better to find out from the manufacturer of your extruder. But here I would like to note that if you overdo it with effort, you can both strip the thread in the aluminum block and break off the nozzle. But if you do not tighten it, then the plastic can seep out from under the thread. Because of this, you will again have to disassemble the extruder and clean everything where the plastic has got. Now we wind the aluminum radiator onto the thermal barrier. Then, on one side, holding the aluminum block with a 13 wrench, and on the fitting with a 10 wrench on the other, ATTENTION with a slight effort tighten the threads of the fitting and the aluminum radiator. Effort here cannot be applied much, because. it is easy to damage the thermal barrier in its thin-walled zone (in the place of its groove).
After tightening the extruder, put on the silicone cover, if available, and install the extruder in its place. The next step is to insert the Teflon tube. It must be inserted tightly and until it stops. If the tube is not fully inserted, the empty area will fill with melted plastic, which in turn will prevent the filament from moving through the extruder. Next, you need to fix all the wires in their original state and make sure that the solder wires (if any) are not in the bend area. Due to the fact that the loop of wires is constantly bent during printing, soldering points are not allowed in the bend area, because. otherwise, this will inevitably lead to a breakdown of the soldering site.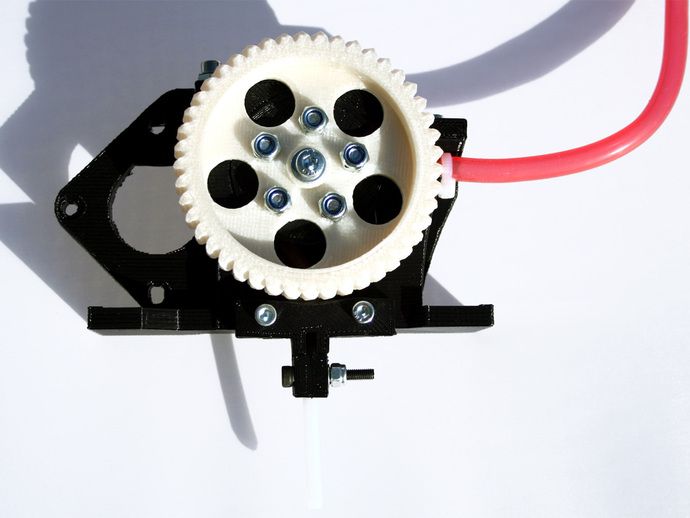 Also, do not forget to insert a Teflon tube into the plastic supply system, if it was removed. We connect all previously disconnected connectors.
As a result, the extruder is assembled and installed in place. After that, it is also recommended to calibrate the table.
Before finishing, I would like to repeat the main nuances: 1) After assembly / disassembly, the assembly must be clean and without any plastic inclusions 2) Do not forget to lock the nozzle and thermal barrier between each other. 3) You can cut the Teflon tube a little so that the place of contact between the Teflon tube and the fitting is “fresh” 4) Perform all work very carefully and with an understanding of what you are doing. 5) Plan everything you need to do in your head so that you have a clear understanding of the sequence of all actions 6) Think about what spare parts you need to buy in addition 7) Prepare the tool that you will need during the work 8) schedule the cleaning of the extruder so that on the eve of you did not need to set the printer to print.
Thank you for your attention. I hope the material was useful for you, I wish you all the best.
3D wax printing on an FDM 3D printer. Recommendations and settings on the example of a 3D printer PICASO Designer X.
- 1. First, a little history of
- 2. What is Filamentarno Wax Base?
- 3. Which printer is suitable for printing?
- 4. Why is Picaso Designer X good for Wax Base printing?
- 5. Preparing Picaso Designer X for Wax Base 9 printing0055
- 6. Printing process
- 7. Result and output
Hello friends, 3DTool is with you!
Investment casting is a fairly popular method of manufacturing metal products. Most of the jewelry is produced in this way, this method is used to create parts of mechanisms, cases and other elements and assemblies that require increased strength. The starting point in the casting process is the original model or ready-made matrix, from which a copy is made from wax or other easily melted material to create shell molds into which the metal is already poured. But what if we bypass the initial model creation phase and make an immediately meltable wax model? This is where 3D printing and new material from 9 come to the rescue.0072 Filamentarno - Wax Base .
1. A little history first
The idea of printing wax on a 3D printer is far from new, initially, the technology appeared in the camp of photopolymer 3D printers, was used, and is still used today, for example, by such giants as 3D Systems and Solidscape . Entire lines of devices have been honed to produce high-precision lost wax printouts with a perfect surface. However, such printers had and still have one tangible minus - what if the desired object is much larger than the size of the working area of the device, and the quality of the surface, in general, does not matter much within reasonable limits? The first thing that comes to mind is to find a device with a larger working area, however, among photopolymer printers, there are negligible models that meet this requirement and, basically, they are sharpened precisely for high quality and miniaturization.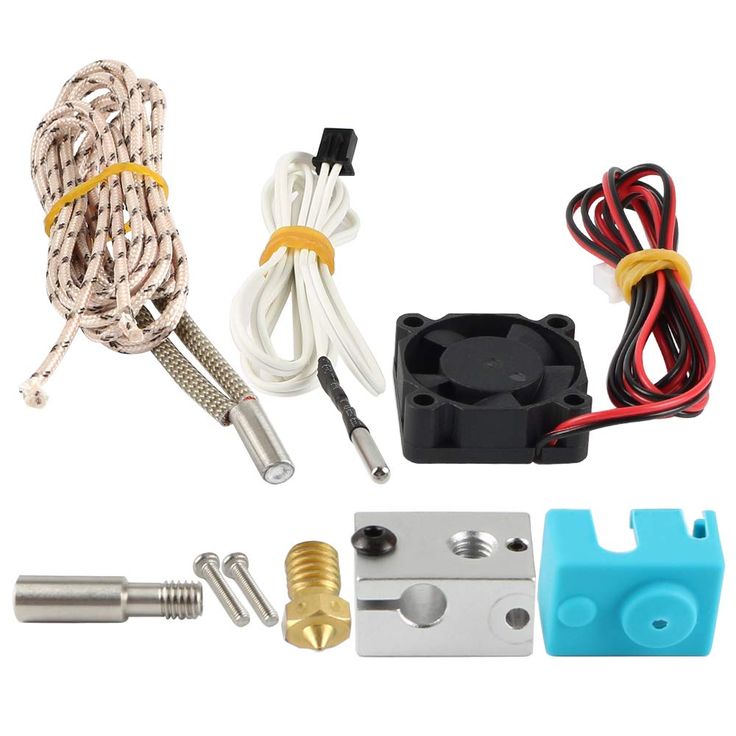 Or too expensive to maintain. What to do? But what if you use FDM for these purposes?
Photo from open sources, site sapr.ru
The first experiments with FDM 3D-printed/lost-waxed models used PLA and PMMA, the relatively low ash content of which, in theory, promised to achieve good casting quality, and some enthusiasts actually achieved quite good results. Instead of smelting, however, the technique of burning the material was used. However, widespread practice has shown too high a dependence of the result on the quality of the material, the presence or absence of a dye, the correct temperature regime and a strong limitation on the equipment and materials forming the shell form, not all of which withstand subsequent annealing and do not burst. Moreover, the crust-forming compound is able to transfer even the smallest defects and artifacts on the surface and any spills, cavities and flaws immediately appear on the final result. And avoiding the formation of unwanted gases when burning PLA is very difficult.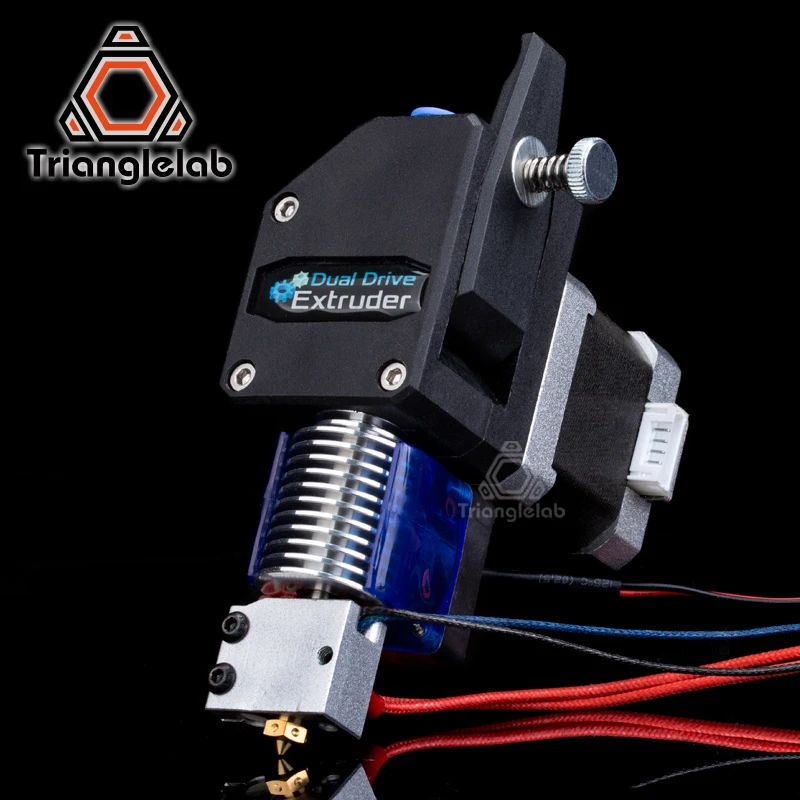
Photo from open sources, site sapr.ru
And if large-format casting in industrial, factory conditions allows the use of PLA and PMMA, due to the complication of production technology (there is a wide practice of using such giants of the world of FDM printers as BigRep for these purposes), then medium-sized workshops and small studios equipped with conventional boilerclaves require more flexible approach. And it is in this case that the Wax Base is perfect for them.
2. What is Filamentarno Wax Base?
Filamentarno WAX Base is a filament for 3D printing using FDM technology for subsequent investment casting from metals, the bulk of which is real jewelry wax. Of course, the composition contains other impurities to stabilize the rod and meet its characteristics in accordance with the requirements of fdm 3d printing, however, the final result is fully compatible with any melting techniques of conventional wax compositions and is easily glued to them, for example, to form sprues.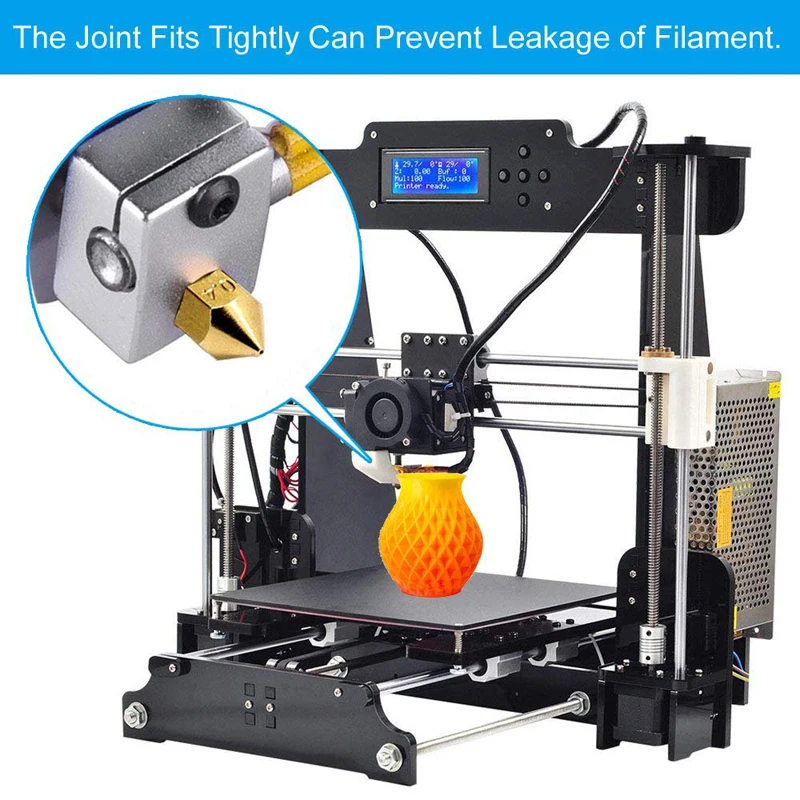
The company F ilamentarno took a long time to produce this material, the idea appeared a relatively long time ago, but the results were achieved only in the last couple of years, nevertheless, the sensation was such that the company even had to open a small 3D printing studio in order to gain experience applications and respond to the market demand since there were no analogues to this material before.
The material turned out to be promising, among its advantages there is a sharp increase in the maximum possible size of wax waxes, and printing speed, as well as the ability to greatly reduce costs, because the cost of melted wax in the form of a thread turned out to be much more profitable than photopolymer, not to mention the price of photopolymer 3D printers.
This material also has certain features that can hardly be called obvious disadvantages, but they impose strict requirements on the device on which it is planned to print.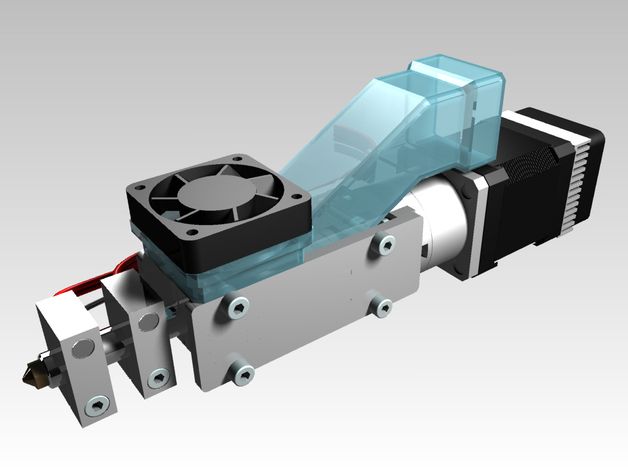 More about them below.
3. Which printer is suitable for printing?
Due to the physical characteristics of the raw material, Filamentarno Wax Base is printed at significantly lower temperatures than other materials. Softening occurs already at ~ 45 degrees, and melting, from ~ 95 degrees Celsius. Because of this, it can be easily smoothed out in post-processing using hot air guns, torches or soldering stations. The recommended print range is from 110 to 130 degrees, while most standard 3D printers do not allow the extruder temperature to drop below 190, less often 170 degrees Celsius, which is excessive in the case of Wax base .
Owners of simpler and cheaper models of 3D printers, as a rule, have the opportunity to correct the corresponding parameters in the printer's hardware firmware, or lower the temperature using special control commands. Meanwhile, expensive brands usually do not provide such opportunities and completely close both the firmware and the “console” commands from users from changes. Here is what the manufacturer writes on its website in the description of the material in this case:
“Most often printing on a 3D printer with a nozzle temperature below 170°C is prohibited by the printer firmware. To bypass this limitation, use the G-Code command: "M302 S80" - it can be inserted into the starting G-Code in the slicer settings. This command will lower the print temperature limit to 80°C."
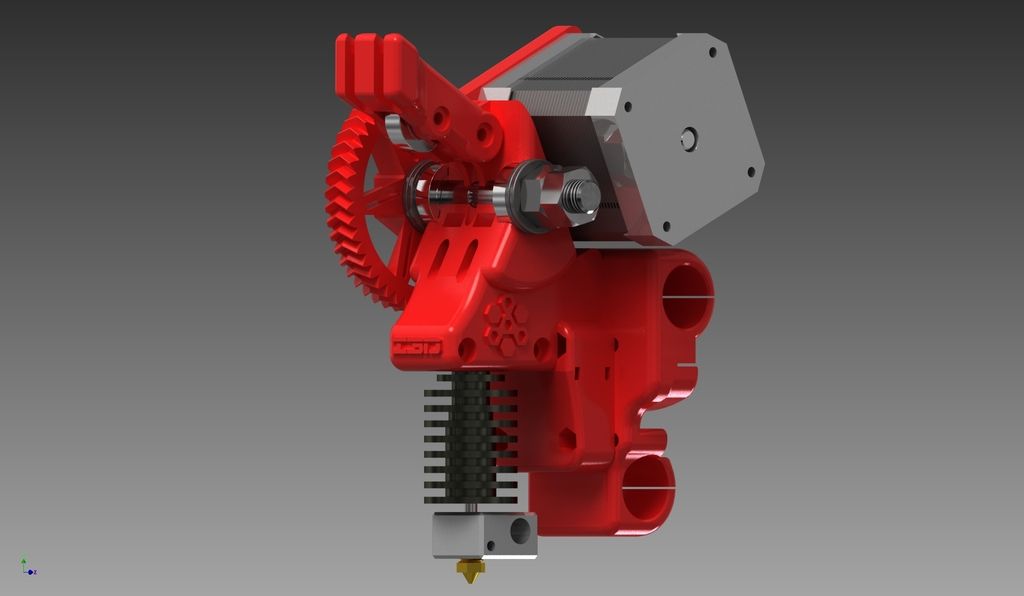
Also, since the material is quite easily torn, soft and melts easily even at low Cold End heating temperatures, you will need to use a direct extruder drive (Direct) for printing, a remote (Bowden) broaching mechanism will not cope with the task and, at best, will “jam » material.
Nevertheless, at least one manufacturing company that took care of printing with low-temperature materials “out of the box” and has printing units equipped with direct drive, we can definitely name. Of course, we are talking about the manufacturer of 3D printers Picaso3D and line of 3D printers Designer Series X .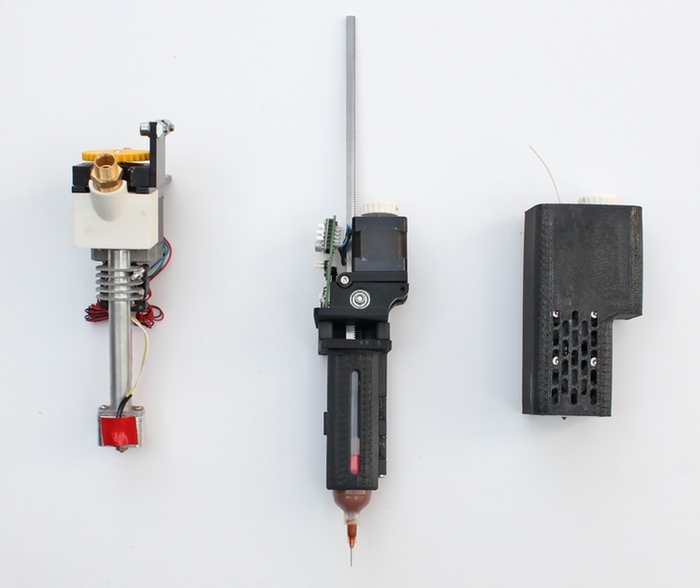
Let's take a look at the benefits of the Series X line for wax printing using the example of the Picaso 3D Designer X .
4. Why is Picaso Designer X good for Wax Base printing?
In addition to being able to set extremely low extruder temperatures for FDM 3D printing in material profiles, the Series X platform has a number of features that make working with the Wax Base even easier.
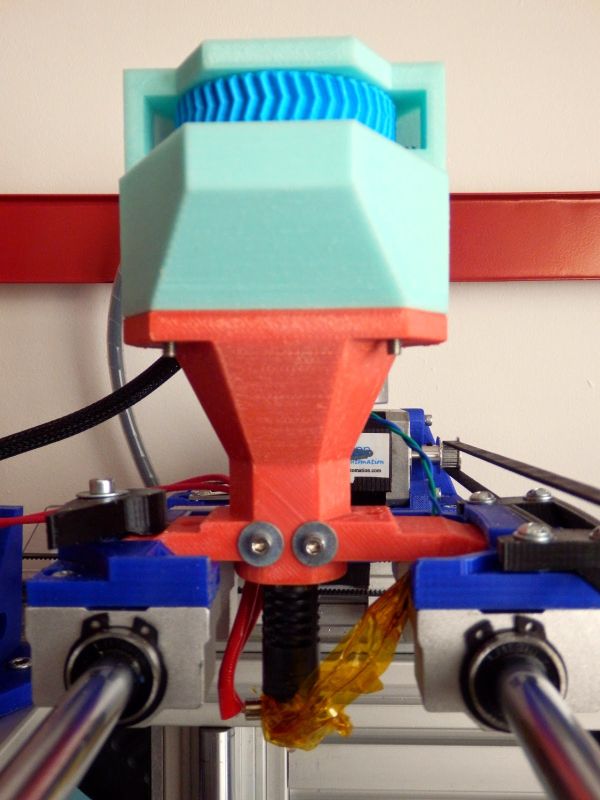
First of all, it is the adjustable temperature of the cold zone (thermal barrier) of the printing unit. It has another temperature sensor that allows you to monitor and adjust peak performance by increasing and decreasing the cooling cooler speed.
This feature prevents the formation of plugs in the extruder tube above the melt zone. The special structure of the receiving "neck" in the pulling mechanism also plays into the hands, which eliminates the bending of the material during filling and printing.
In addition, the system of active “purging” of the working area, thanks to several turbine fans, allows you to quickly cool the material during printing, which also has a positive effect on the quality of the surface when printing roundings and overhanging elements.
And sensors for the presence of filament and control of the upper layer will help prevent damage to many hours of printing in the event of a break or end of the thread.
5. Preparing Picaso Designer X for printing Wax Base
To confidently print Wax Base on your device, you need to stock up on a clean, preferably new, extruder block with a new or carefully cleaned copper nozzle with a diameter of at least 0.4mm. In our case, the most suitable in the Picaso Designer X line is the 0.5 nozzle.
It is also necessary to take into account the following nuances:
-
A rubber scraper is installed on Picaso 3D printers to clean the PG - when printing WAX, it smears the material and harms rather than benefits, it must be removed.
-
For normal adhesion, the heating table on the first layer must be heated to 85-90 degrees, subsequent layers must be set to 0-30 degrees so as not to deform the wax. To do this, you need to have two different material profiles.
-
Airflow - required when printing overhanging elements, the main thing is not to overdo it, otherwise the layers will not bake well.
-
Wax, like many elastomers, does not like retracts, this parameter must be set to 0.
-
Refilling plastic takes place in two stages. The first is filling at an elevated temperature of 190-200 degrees, to eliminate a possible wax plug. The second stage is filling at the extrusion temperature - 110-130C
-
It must be remembered that plastic is very sensitive to extrusion temperature, too high clogs the nozzle, too low gives poor interlayer adhesion. The optimum temperature for picaso designer x is 115 degrees for the first layer, 120-125 degrees for subsequent ones.
-
Periodically, it is necessary to check whether the plastic thread wound on the spool does not stick to itself, this can cause material slippage, because. it pulls out easily.
-
It is very important to correctly set the height of the nozzle above the table, because if the nozzle is pinched, a plug will quickly form in the extruder, which can be eliminated only by refilling the plastic again.
Before printing for the first time, be sure to replace the entire hot end or nozzle with a new / clean one, otherwise the desired result will not be achieved.
When preparing a 3D model for printing at Polygon X , you must adhere to the following rules, try not to make the outer wall very thin, the material may burst. The ideal option is 2 perimeters, approximately 1.2 mm, with a nozzle of 0.5
Percentage of filling, not less than 15%, if the geometry of the model allows.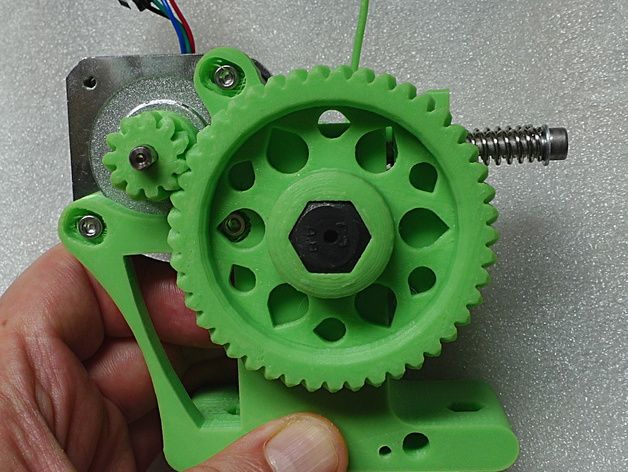
Otherwise, the requirements for the material are the same as for conventional plastics. It should be noted that the supports come off very easily and, if necessary, the attachment point can be treated with a burner or a building hair dryer in order to achieve a smooth surface.
We printed the current models at the following settings (pictured above).
It remains to create two print profiles for printing the first and subsequent layers, send them to the printer and wait for the print results.
6. 3D printing process
Before printing, be sure to thoroughly rinse the glass stage bed and apply fresh adhesive to it. In our case, a regular spray adhesive from PICASO 3D is suitable, however, the manufacturer also offers a proprietary adhesive:
Next, you need to prepare two print profiles according to the following settings, experimentally they showed the best result when printing.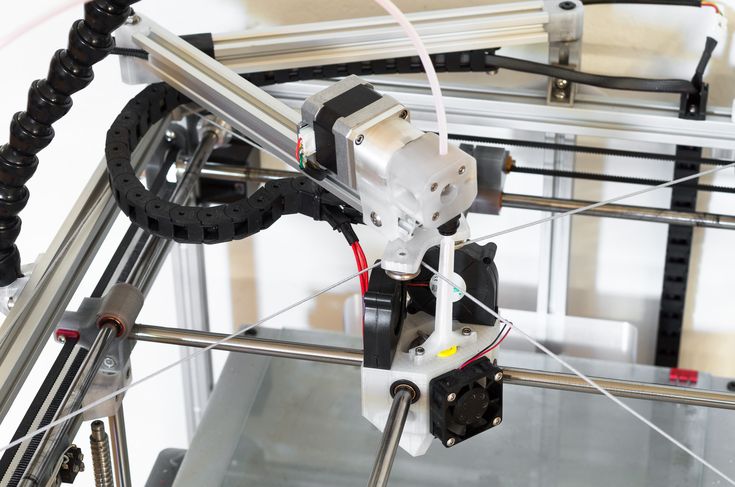
Wax3D_F - profile for subsequent layers, Wax3D(1Layer) for the first.
When rendering the model, be sure to manually set a pause after the second layer in order to have time to switch print profiles.
If you have previously printed with wax on the current printer, you need to start another profile with a higher temperature and load the material only after the old material has “melted through”.
Leaving material in the nozzle at high temperatures is not recommended. This is fraught with traffic jams.
7. Result and conclusion
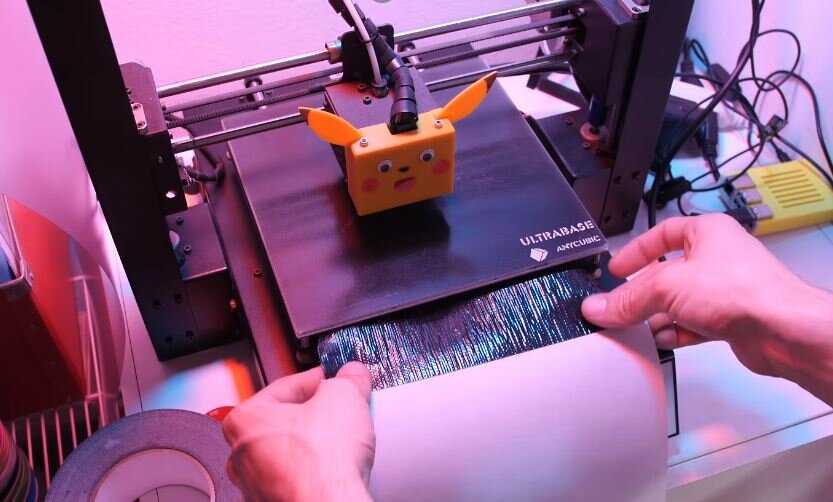
When printing, we encountered several times the delamination and peeling off of the material from the heating table during the printing process and the selection of parameters.
As you can see in the photo, the material diverges in layers and it may feel that the temperature is insufficient for sintering.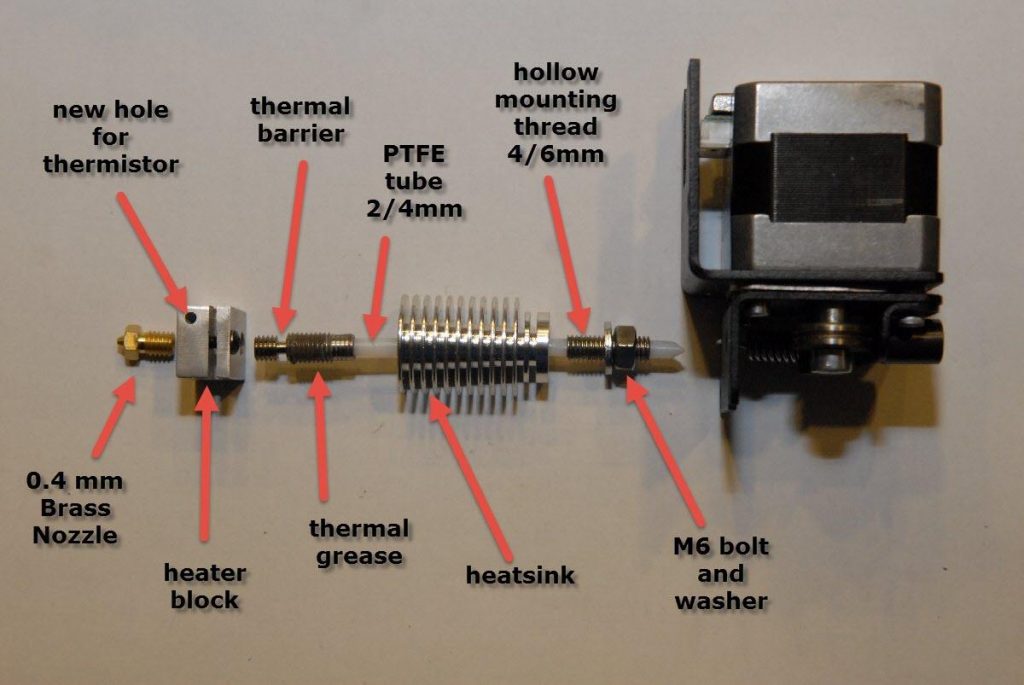 However, this is not the case, because when the temperature rises, the material does not extrude, but flows out of the die, which disrupts the layer structure, and the wax does not have time to cool. The difference is clearly visible in the photo below, on the left the temperature is too high.
However, after several reprints, we managed to achieve good print quality. Both with and without support.
The material withstands rather steep angles of inclination "perfectly", as can be seen from this flange in the photo.
The artistic approach is not alien to the material, we printed the head of this character for about a day and, as you can see, the result is excellent.
In general, when printing products with low detail, it is best to select a slow (quality profile) or medium (standard profile) print speed setting so that the material has time to properly form and cool during extrusion. Otherwise, sagging "pulling" of the thread may form.