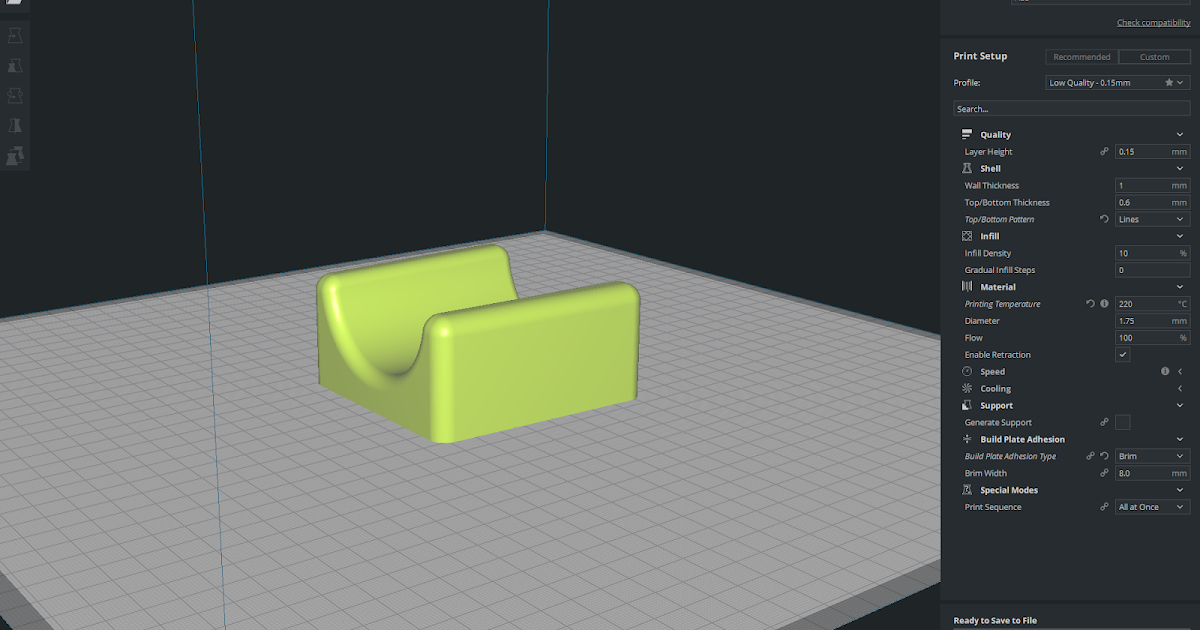
Brim width 3d printing
3D Printing Rafts vs Brims vs Skirts: How to get started
If you’re struggling with proper bed adhesion and warping when 3D printing, there are some tried and true techniques for improving print results—especially for ABS and higher temperature materials. If used correctly, rafts, brims, and skirts each have their benefits and can make the difference between a successful or failed print. In the following article, we illustrate what each 3D printed feature is and when and how to use it for the optimal result.
3D Printing Raft
What is a Raft?
A raft is essentially a 3D printed platform on which parts are printed. A raft usually consists of a grid-like 3D printed structure, which sits underneath and extends beyond the borders of the first layer of the 3D model, acting as a base.
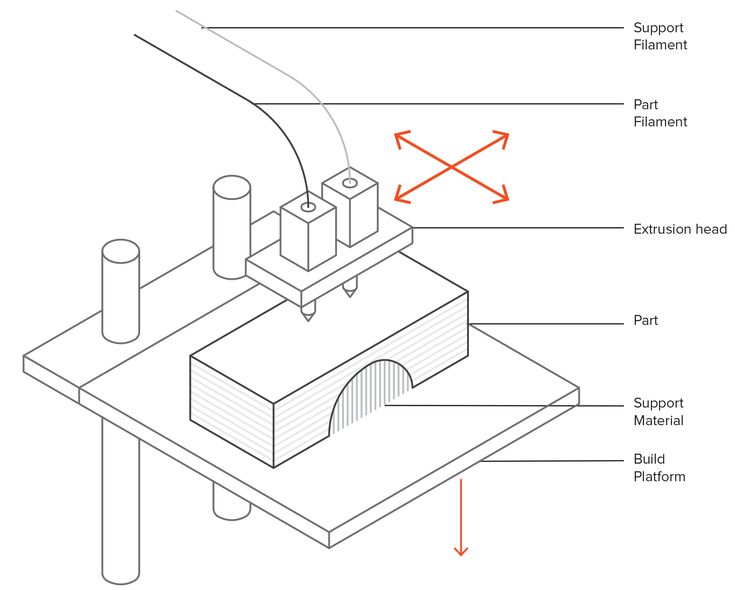
In FDM 3D printing, first layer adhesion to the build platform is vital to ensuring that your 3D prints turn out well. Poor adhesion can lead to warped and defective parts. Rafts are a technique used by makers to improve first layer adhesion and stabilize parts throughout the printing process.
When you Should use Rafts
Rafts can be very effective in certain circumstances. First and foremost, if you are 3D printing with ABS filament—a material prone to warping—a raft can improve adhesion by ensuring your print’s first layer sticks to the top layer of the raft. Higher temperature thermoplastic filaments like ABS are also more likely to warp without a printed heat bed. Using a raft if you don’t have a heated build platform can help lessen the chances of warpage.
Rafts can also be used in cases where the 3D model has an unbalanced structure–for example, a part with a heavier top and smaller footprint. In this case, using a raft can stabilize the object as it is printed. Another scenario in which a 3D printed raft has benefits is if your build platform is damaged or warped. A raft can create a flat, level base for your part to be printed on. [1]
[1]
Rafts are 3D printed underneath the part, acting as a platform that anchors the part to the build platform. (Image: Simplify3D)
Slicer Settings for Rafts
Most slicer software programs, like Cura and Simplify3D, have raft integrations built in, so you don’t have to design them yourself. That being said, you may want to adjust some settings for the best outcome. The main slicer settings for rafts are:
Layer Thickness: There are three distinct layer thickness settings when it comes to rafts: base layer thickness, middle thickness, and top layer thickness. The former is the first layer of the raft to be printed. To promote optimal bed adhesion, this layer should be thickest (i.e. 0.36 mm).[2] Raft middle thickness will be smaller than the base layer and larger than the top layer. The top layer thickness should correspond to the layer thickness of the printed part (0.12mm is standard).
Air Gap: When printing a raft, there is the option to integrate an air gap in between the raft top layer and the first layer of your 3D print.
 This gap encourages raft removal.
 Extra Margin: In raft generation, the extra margin determines the surface area of the raft on the build platform. The larger the raft, the better the adhesion. Raft offset may also come up. This is the width of the raft from the edge of the printed model.
Print Speed: This setting determines how quickly your raft will be 3D printed. To maximize bed adhesion, a slower printing speed is suggested.
The Pros & Cons of 3D Printing Rafts
Pros
Improves bed adhesion, especially for materials prone to warping like ABS.
Can create a level printing surface if the build plate is uneven or damaged.
Minimizes the risk of warping for parts made on non-heated build platforms.
Cons
The bottom layer of your 3D printed part may have a rougher surface than if it was 3D printed directly on a smooth build surface.
While removal of the raft can be easy, simply peeling away from the 3D printed part, that is not always the case. Removal of the raft can be difficult and time-consuming. In worst-case scenarios, it can even damage or break the final printed object.
Increases the overall amount of printing time.
Materials used for printing rafts typically end up in the waste.
An object is 3D printed using both a skirt and a raft.
3D Printing Brim
What is a Brim?
A brim is a 3D printed border that extends from the edges of the 3D printed part. Unlike a skirt, the brim is actually connected to the 3D printed part, effectively giving it a greater surface area to adhere to the print bed. Unlike a raft, the brim does not go underneath the 3D printed part’s first layer.
Brims are an effective technique for securing a part to the build platform for better first layer adhesion, which in turn can minimize the risk of warping and part failure. Brims can also help to anchor the outer edges of the print to the build surface for better stability.
When you Should use Brims
There are a number of situations in which you might employ a 3D printed brim. For instance, if you are using a higher temperature filament with a greater ratio of shrinkage and warping—like ABS or PP (polypropylene)—activating a brim can promote better layer adhesion and subsequently reduce warping.
Brims are also handy for increasing the footprint of 3D printed parts. This is especially useful for parts with a small base or footprint that might become unstable in the printing process. Integrating a brim will effectively anchor the part to the print bed and stabilize it as the extruder deposits more layers.
Slicer Settings for Brims
Depending on the slicer software, generating a brim around your 3D model might fall under the Skirt settings. If this is the case, simply set the skirt offset (the distance of the skirt from the edge of the part) to zero. Below are some of the key slicer settings to be aware of for using brims:
Brim Width: This measurement designates how wide the brim around your 3D printed part will be. In most slicer settings, the default width will be about 8 mm. In general, the wider the brim, the better the first layer adhesion.
Brim Lines: This setting is also related to the brim width. Here, you can choose how many lines your print head extrudes to create the brim.
3D printed brims anchor the edges of a 3D printed part to the build platform, reducing the risk of warping.
The Pros & Cons of 3D Printing Brims
Pros
Can prevent warping by anchoring the part to the build platform through a wider surface area.
Improves first layer adhesion for the printed part, especially for warp-prone materials like ABS and PP.
Compared to rafts, parts printed with brims have a smoother first layer surface finish.

Brims consume less filament than rafts.
Cons
Brims must be removed from the actual print. In some cases, removal consists simply of peeling the brim away from the part. In others, however, you may require a tool to remove it.
Printed parts with brims may need post-processing, such as sanding, to smooth out the contact points on the edges where the brim was connected.
While using less material than rafts, brims still generate material waste.
3D Printing Skirt
What is a Skirt?
In 3D printing, a skirt is a printed border around the 3D printed object, which does not touch the printed part. If you opt for a skirt, the 3D printer will begin by extruding filament lines to create the border before starting to build the rest of the part.
This technique helps to prime the nozzle ahead of printing the 3D model and can lower the risk of filament blobs, which can cause defects in final prints. [2] Printing the skirt as a border around the part’s perimeter is also helpful for checking calibration. It allows makers to identify any potential problems with a level bed before the real printing begins.
Skirts are 3D printed before the part is deposited, allowing for the nozzle to be primed.
https://www.shutterstock.com/image-photo/3d-printer-prints-white-plastic-model-1758751424
When you Should use Skirts
Skirts can improve printing results for most FDM 3D print jobs. The printed border on the build surface allows the melted filament to start flowing smoothly before the critical initial layer of the part is deposited. In other words, any filament inconsistencies in the first minutes of printing will be in the skirt, not your final part, leading to better first layer adhesion and minimizing the chance of warping.
Unlike rafts and brims, skirts do not offer any physical support to your 3D printed part. So, while they do encourage better first layer adhesion thanks to nozzle priming, they may not provide the support needed for certain part geometries.
Slicer Settings for Skirts
Slicer programs allow users to customize a number of settings related to skirts to control the distance of the skirt from the part, the thickness of the skirt, and more. These are the main skirt slicer settings to be aware of:
Line count: you can choose how many lines you want your skirt to consist of. While some slicer software programs have one line as the default, it can be beneficial to choose more. This allows you to confirm any leveling or setting changes made after the first line are working.
Distance: Skirt distance determines the separation distance between the perimeter of the printed part and the skirt.
Layers: You can set the number of layers your skirt should consist of.
 Usually one layer is sufficient, but adding another can make the skirt easier to remove from the print bed.[3]
The Pros & Cons of 3D Printing Skirts
Pros
Skirts are effective for priming nozzles and ensuring that by the time the first layer of the print is extruded, the filament is flowing smoothly.
Can also be used to validate bed adhesion and surface levels. Inconsistencies can be detected before the print starts, preventing failed prints before they occur.
Cons
Conclusion
Rafts, brims, and skirts are helpful tools in every maker’s toolkit. Now that you know what each 3D printing feature does and where it offers the most advantages, you’ll be able to improve your 3D printing outcomes.
References
[1] ModBot, August 7, 2021. “How And When To Use Skirts, Brims, And Rafts For 3D Printing”. [Internet] https://www.youtube.com/watch?v=p4R3F1as-1I [Accessed March 23, 2022].
[2] The 3D Printer Bee. “Cura Raft | Best Settings to Ensure Good Bed Adhesion”. [Internet] https://the3dprinterbee.com/cura-raft-settings/ [Accessed March 24, 2022].
[3] Simplify3D, 2022. “Rafts, Skirts and Brims”. [Internet] https://www.simplify3d.com/support/articles/rafts-skirts-and-brims/ [Accessed March 24, 2022].
Skirt and Brim | Prusa Knowledge Base
Relevant for
:
Plus 1.75 mmMK2.5MK2.5SMK3MK3SMMU1MMU2SMINIMK2SMINI+
Last updated
8 months ago
This article is also available in following languages:
Some options will only appear when Expert mode is selected.
Skirt
The skirt is a printed outline of all of the models on the print bed. It's printed before any of the models and its purpose is mainly to stabilize the flow of the filament through the nozzle.
The skirt is also useful to verify the adhesion of the first layer to the print bed. Since it's printed before the models, you can quickly change the Live Z adjust if you see the first layer not sticking properly or being too squished by the nozzle.
Loops (minimum)
The number of loops of the skirt. If the Minimal filament extrusion length parameter is set, the number of loops may be higher than the one configured here.
Set to 0 to disable the skirt completely.
Distance from object
Distance between the skirt and object(s).
Skirt height
The number of skirt layers to be printed.
One-layer tall skirts can be difficult to remove from the print bed. Prusa profiles typically use a three-layers tall skirt for this reason.
Draft shield
If enabled it creates a skirt as tall as the tallest object in the scene. This can be used to protect ABS, ASA, and other materials from warping by creating a micro-climate around the printed part and protecting the print from draft/wind.
Minimal filament extrusion length
Forces more skirt loops when necessary to ensure the minimum amount of filament set here is extruded before the skirt is finished. For multi extruder machines, this minimum applies to each extruder.
Brim
Before you consider applying extra adhesion materials onto the bed, consider using the Brim option in PrusaSlicer which increases the surface area of the first layer. You can set the brim size manually in PrusaSlicer by going into Print settings - Skirt and brim - Brim.
You should consider using the brim option when printing:
- Tall objects with a small base
- Multiple small objects at once
Brim type
You can select to print Outer brim only, Inner brim only or both Outer and inner brim.
Brim width
The horizontal width of the brim that will be printed around each object on the first layer. Generally, it is advised to use at least a 3 mm brim to increase the adhesion.
Brim separation gap
The offset of brim from the printed object for easier brim removal. The offset is applied after the Elephant foot compensation.
Brim for individual objects
You can turn on brim just for some of the objects and customize brim settings for each object separately. This feature is only available in the Advanced and Expert modes.
Right-click on a model and select Add settings - Skirt and brim. You can then pick which brim settings you wish to adjust for the selected model. These settings will appear in the right panel and override the global brim settings.
Raft "Rafts", Brim "brims" and Skirt "skirts" - why they are needed and how to use them in 3D printing
Our first layer is the most important
It is widely believed in the 3D printing community that how smoothly and correctly the printing of the first layer went, determines the success or failure of the object as a whole. In most cases, achieving proper adhesion of the first layer to the work surface is 90% winning the battle.
We all know this feeling when you carefully follow how the first layer is laid out, look at how it looks, whether it adheres well, whether the filament flows smoothly ... And now it's time to invite such tricks to the stage as “ rafts", "fields" and in some way "skirts". nine0005
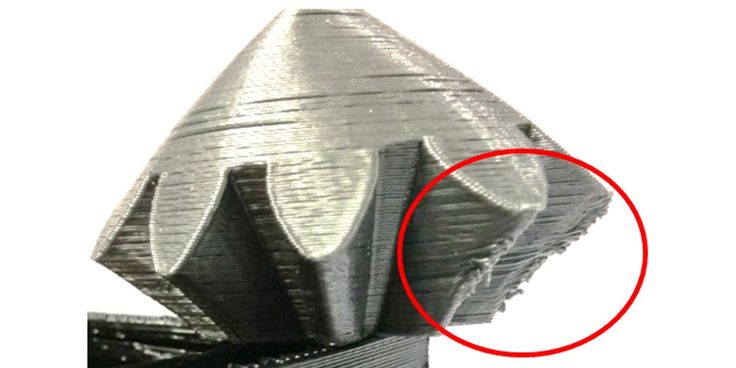
Of course, you know that a filament that does not adhere well to the work surface can cause a lot of problems, and an ambush can happen, if not at the very beginning, then at the very end, when you remove from the work surface, it would seem , a beautifully printed object, but only to see that it is somehow skewed, that its corners are somehow strangely twisted.
It's a waste of filament, a waste of money and finally a waste of your time.
And here you may ask: "So how can "rafts" or "fields" radically improve the quality of the first layer in this way?". In this article, we will look at "rafts", "fields" and their sister, "skirt", what they are and how they are best used.
We'll also talk about lesser-known ways to help you deal with other printing problems, such as over or under extrusion and even internal cracking.
From left to right: "raft", "fields" and "skirt" (Simplify3D screenshot)
What is a "raft" in 3D printing?
Raft A "raft" is essentially a temporary horizontal surface that sits underneath your object.
It consists of a set number of layers with a specific infill percentage and covers an area slightly larger than the base of the printed object.
The main task of the "raft" is to increase the grip on the work table. Some materials such as ABS benefit greatly from the use of a "raft". Then, first, a “raft” consisting of a certain number of layers is laid out on the desktop, and a printed object is already being built on it. nine0005
You don't have to worry about how to separate this plot from the printout: there is a small gap between the plot and the object, so if you set the plot parameters correctly (we'll explain how later), with its separation after cooling there will be no problems.
Since the printed area of the raft is larger than the base of the object, the cohesive forces generated are also greater. This also reduces the risk of the object being skewed, because the edges of the raft are more likely to be bent, but the bottom of the printout itself will remain flat. nine0005
Raft can also be used to provide more stability for objects with a small footprint. In this case, the "raft" acts as a "normal" base. This technique is also useful when printing large objects or objects that can end up quite heavy.
The "raft" can also compensate for small inaccuracies in the calibration of the desktop and even bumps, scratches and dents in the coating.
Here are a few slicer parameters you can play with to get a quality raft without using too much material to create it. nine0005
- Separation Distance. This is perhaps the most important parameter. It defines the width of the gap between the surface of the "raft" and the base of your printout.
 It is necessary to achieve a balance between ensuring that the printed object is held securely enough on the “raft”, and making it easy to separate it later. Usually 0.1 mm is sufficient, but for more ductile materials this distance can be increased.
 - Above Raft Speed. We are talking about the speed with which the first layer will be laid out on the surface of the "raft". The speed must be low to ensure good grip. nine0048
- Raft Top Layers. This is the number of layers on the surface of the raft. The base of your object will be in contact with this surface, so you need 2-3 coats to get the surface smooth enough. You can increase the number of layers if you get blistering on the bottom of the printout.
- Raft Base Layer. This is the very first layer of the "raft", it prints slowly. It is important that it sticks well to the desktop, otherwise everything will be pointless.
It should be noted that for some FDM printers the use of "rafts" is always mandatory, and for some it is not required at all. For example, Zortrax printers use a heated perforated work surface. Due to the presence of perforation, the "raft" should be used when printing any objects.
On the other hand, solid surface printers very often do not require a "raft" because the temperature of the desktop is already so high, which contributes to a significantly better adhesion and, accordingly, a reduction in spatial distortion of the printout. nine0005
Certain drawbacks of the "rafts" are that with some slicer settings these "rafts" can be difficult to separate, especially from objects made of more plastic materials, and also that the bottom of the object is not as glassy smooth as in the case of a solid working surface.
And, of course, the fact that you have to print some kind of “raft”, which is then immediately thrown away, can be annoying – and the filament was of high quality! But it must be borne in mind that in some cases, without the presence of a "raft", the path to the wastebasket is prepared for the entire printout in general.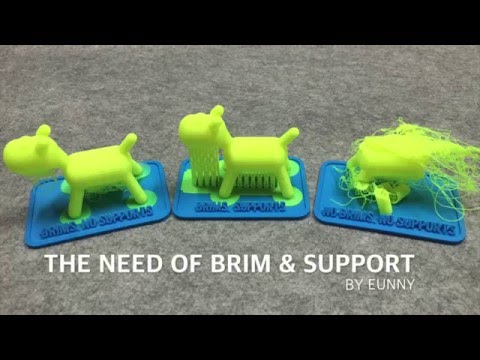 nine0005
It is best to separate the "raft" from the finished object with the same tool as the one with which you separate the printout from the work surface. Slide a thin plate or wide knife between the base of your object and the "raft" and gently lift from one side. Once one end of the "raft" has come off, the rest will come off more easily.
If the separation process was not without difficulty, you may need fine sandpaper, about 400 grit, to sand the base of the printout. nine0005
In some cases, it turns out that the only way to make the printed object stick to the desktop is with the help of a “raft”, nothing happens when printing directly onto the surface. This can happen because, at default settings, the raft prints more slowly, has a thicker first layer, and the fans are turned off.
In this situation, you can try to print without a "raft", simulating its settings when printing the first layer, which should increase adhesion. nine0005
What is a "margin" or "side track" in 3D printing?
Brim "Fields" can be considered close relatives of "rafts".
As mentioned earlier, a "raft" is a stabilizing base on which the printed object is placed completely in order to improve adhesion.
"Fields" take place only along the perimeter of the object, not in contact with its base. It turns out that "Fields" is like a hat that a person puts on so that a clever thought comes to his head. nine0005
Both "rafts" and "fields" promote cohesion, sticking. Any of these techniques can be used to stabilize an object that has very little contact with the work surface. However, for smaller and more fragile objects, "fields" may be preferable, since they are in contact with the object only along the outer edge of a very thin layer.
Margins work better for some materials than others. For example, ABS, if the print settings are inaccurate or there are issues with the work surface, may warp (the same effect is achieved when working with just cheap ABS). Therefore, in order to increase grip, it makes sense to reprint the ABS-parts of the “field”. And even more so in the case of supporting structures, if they are installed closely and low. nine0005
The "margins" are easily separated from the work surface, so it's better to print with "margins" just in case of supports. This is especially true for props with weak adhesion. As you might guess, the “fields” are made in such a way that they can be easily broken off from the model after printing is completed, and it would not be necessary to grind or solvent-treat its base, as, for example, in the case of soluble supports made of PVA or HIPS.
In other words, it is easier to separate the "fields" from the object than to separate the "raft" from it. This, in turn, means that there is less chance of damaging the object during detachment. nine0005
And if there are any rough spots on the printout, they are very easy to clean up. Margins are also excellently removed with special deburring tools.
What is a "skirt" in 3D printing?
Skirt "Skirts" are more common than the two previous options.
The slicer most likely adds a "skirt" at the start of any printing process. The "skirt" is nothing more than "fields", which, however, do not come into contact with the printed object.
"Skirts" have a couple of uses and are usually a couple of layers thick. Firstly, the “skirt” is good for getting an idea of how the equipment works, how the material flows, i.e. before starting to print the model. it allows you to make sure that everything is fine with extrusion and the filament is laid out on the work surface correctly. nine0005
You simply lay out the “skirt” with a few lines at a relatively low speed and, by the way it turned out, make a diagnosis. If the "skirt" is printed clearly, you can continue. If not, it is better to interrupt the process and what needs to be adjusted, thus saving time and money.
"Skirts" can also serve as a temperature barrier. The "skirt" can be laid out over the entire work surface to thermally insulate it, leaving only the place where the higher temperature should be maintained. nine0005
Or another option: if, for example, you need to isolate the printed object from temperature fluctuations in a draft.
Rafts, brims and skirts are some of the easiest ways to avoid bad grip and skewed print.
For example, printing with ASA UV-resistant filament (like ABS) is very sensitive to rapid cooling, and if there is a draft during cooling, the part may simply crack.
The height of the “skirt” is also possible, it can even be as high as the object itself. This kind of "skirt" will protect the printout from drafts, ensuring uniform cooling. If a "skirt" is used in this way, it may be called a "draft screen". nine0005
Finally, if the printer has a dual extruder, an object-high "skirt" can be used to avoid "spider webs" and "blobs". The "skirt" will catch any material that may be escaping from the second extruder before it travels to the object. Then the "skirt" can be called a "leak shield".
Rafts, brims and skirts are some of the easiest ways to improve print results. Yes, you will have to spend more filament, but you will also have to spend it on unsuccessful printouts, which can be avoided with rafts, fields and skirts. nine0005
If you're interested in improving print reliability, you might like our Quality Printing Cheat Sheets, which will come in handy when working with any 3D printer and any material. In them you will certainly find some very useful tips that will improve your printouts, no matter how experienced you are in this matter.
In short, a few supportive preventive measures in the form of "rafts", "fields" or "skirts" give a good chance that your efforts will result in a great result. nine0005
How to achieve clarity in 3D-friend using the FDM method. 3Dplast
company statistics We have chosen a number of basic reasons that are based on our work, and we hope that they will help you reach the level of your ideas.
Speak about your filaments And then we can seriously add the material to the whole process of 3D-friend. It is important to rewind that the filament is wound correctly on the bobbin. If it’s not so, if it’s possible to correct it - build it up. However, do not select the materials as a postal worker, it is better to buy from us at 3D-Plast. Also, pay attention to the mill of the thread - the knots that open up can block the supply of material to the extruder or block it, which will cause even greater damage. As you save a large amount of materials, do not forget to provide them with a suitable place for saving. There it is not guilty to be supra-mundane, otherwise your filaments may waste their power. For safety, you can use hermetically sealed containers or plastic boxes with vlogs. Deyakі modifikuyut boxes, shchob filament podavavsya directly from them. nine Choose the right temperature Leather material may have recommended extrusion temperatures, for example ABS melts best at around 240 degrees Celsius and PLA at around 200 degrees Celsius. Our evidence shows that it is possible to “grow” with the temperature within the range of plus or minus 10 degrees Celsius, as recommended by the picker. Change the number of degrees higher for everything to reduce the quality of each other. Too low a temperature can bring the balls to a boil, or wind up to the point of impossibility to see the threads, at that hour, as hot materials can pour out, bend, or fold. nine0005 Another important parameter related to temperature is that the temperature of the platform is correctly selected (as your printer supports this option). ABS is 100 degrees Celsius, while PLA is only 60 degrees Celsius. Take care of the support Keep in mind the importance of supporting designs, especially for more folding and less detailed designs. The key parameters are the optimal thickness and width of the supporting elements. Pidtrim brightness can also be found in 3D software, which in different versions can generate more or less tint. If you need materials, then for some materials you can use a different filament, but if you need an extruder for two nozzles, it is not available for everyone. Adjust the reserve coefficient The occupancy coefficient describes the percentage of spivvіdshnennja plasticity and again, scho zapovnjuє your vibrіb in the middle, under the big zvnіshnіm ball. nine0005 Low cost to save material and speed up the process, but to make the whole object less costly and costly, it is easier to slander. It is especially important to reach more great objects. Residual adjustment of the deposit ratio is often deposited according to the knowledge of the person who prepares files for others. An indication of 10% and less will definitely be a pardon, and a rіven more than 60% will no longer repair the total investment in the longevity, but only increase the object's vag. Everything that is between two signs is a field for your experiments. nine0005 Set correct ball height and extrusion width The standard height of each other is 0.1 to 0.3 mm, but if the double nozzle and the duct thread are present, this range can be increased from 0.05 to 0.35 mm extrusions. The thinner the ball, the more accurate and detailed the 3D-druck, and the balls are less visible. Ale Tim is more friendly, don't forget about it. nine0005 Width of extrusion can be set according to nozzle size. The widest nozzles are 0.3 and 0.4 mm. Please note that extrusion widths of 0.3 to 0.6 mm can be seen as a safe range for experimentation. Theoretically, more thin contours can lead to more accurate results, but in reality it can only lead to smaller sizes and models with a higher level of detail. nineFDM method The extruder will have more time to work on his work, especially on the corners and edges. The thread will also stick together more quickly, and it will have more time for cooling, so that hanging threads can change. This race is especially important, as you will win PLA-plastic. Adjust the extruder ( retraction) Vіdkat, also due to retraction, is an important worker of the robotic extruder. Vіn vіdpovіdaє for pulling the thread, if it's not victorious. The installation of a larger swedish vіdkatu zapobіgaє utavlennyu bulbashok at virobi. The thread will also not hang from the nozzle - if the extruder moves over the object without harm, it does not leave thin “hairs” made of plastic on the pile. Stop, where the retraction can go in, as if the seams are tight, where one ball will end, and the other will start. nine0005
 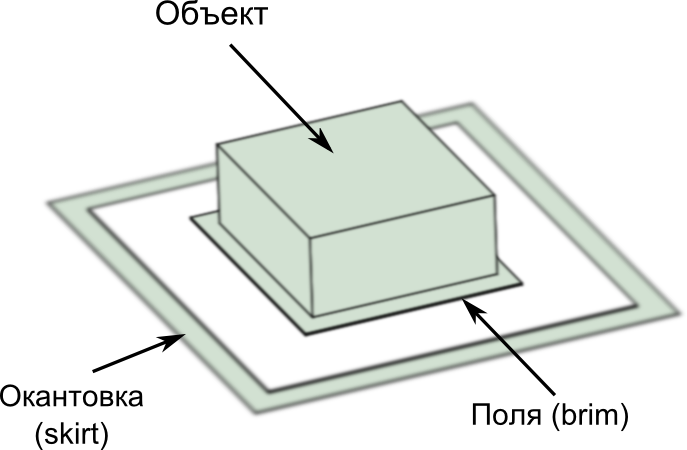 The temperature parameters vary depending on the type of harvest, so you should check the exact recommendations on the packaging as soon as possible.
 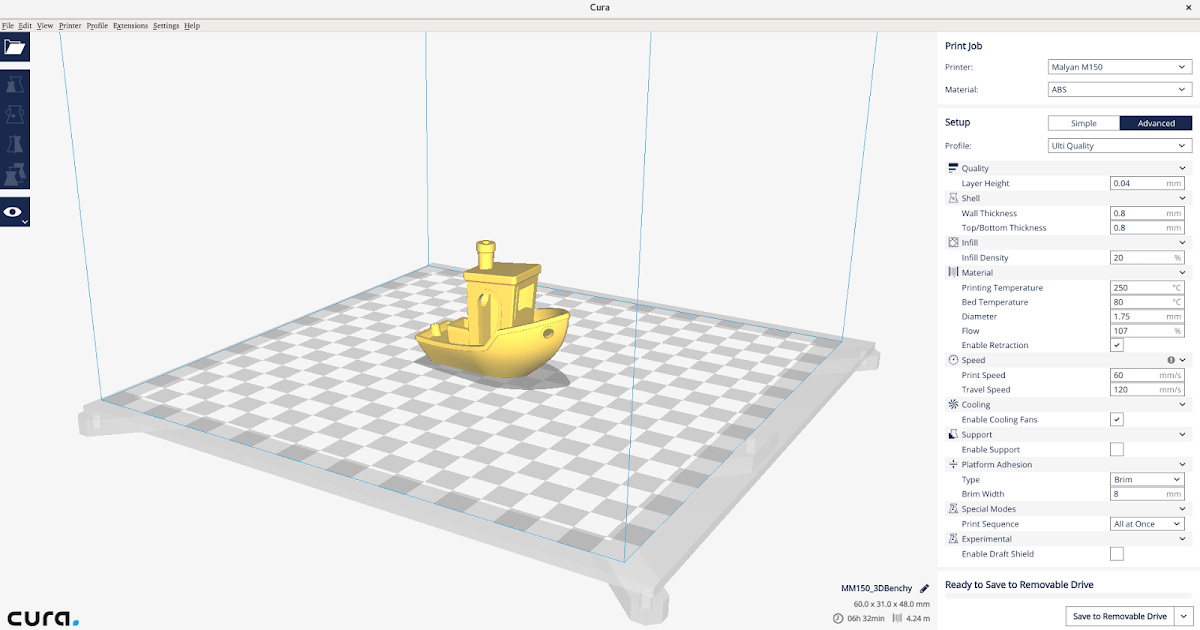 From one side there is a larger support over the top, but we sweat and more importantly vodokremiti. nine0005