Binder jetting 3d printing
What is Binder Jetting 3D printing?
In this introduction to Binder Jetting 3D printing, we cover the basic principles of the technology. After reading this article you will understand the fundamental mechanics of the Binder Jetting process and how these relate to its benefits and limitations.
How does Binder Jetting work?
Here is how the Binder Jetting process works:
I. First, a recoating blade spreads a thin layer of powder over the build platform.
II. Then, a carriage with inkjet nozzles (which are similar to the nozzles used in desktop 2D printers) passes over the bed, selectively depositing droplets of a binding agent (glue) that bond the powder particles together. In full-color Binder Jetting, the colored ink is also deposited during this step. The size of each drop is approximately 80 μm in diameter, so good resolution can be achieved.
III. When the layer is complete, the build platform moves downwards and the blade re-coats the surface. The process then repeats until the whole part is complete.
IV. After printing, the part is encapsulated in the powder and is left to cure and gain strength. Then the part is removed from the powder bin and the unbound, excess powder is cleaned via pressurized air.
Depending on the material, a post-processing step is usually required. For example, metal Binder Jetting parts need to be sintered (or otherwise heat treated) or infiltrated with a low-melting-temperature metal (typically bronze). Full-color prototypes are also infiltrated with acrylic and coated to improve the vibrancy of colors. Sand casting cores and molds are typically ready to use after 3D printing.
This is because the parts are in a "green" state when they leave the printer. Binder Jetting parts in the green state have poor mechanical properties (they are very brittle) and high porosity.
Schematic of a Binder Jetting 3D printerWhat are the characteristics of Binder Jetting 3D printing?
Printer Parameters
In Binder Jetting, almost all process parameters are preset by the machine manufacturer.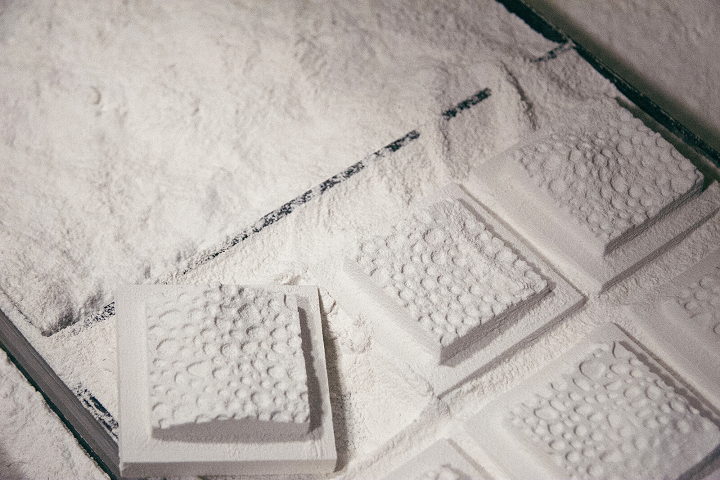
The typical layer height depends on the material: for full color models the typical layer height is 100 microns, for metal parts 50 microns and for sand casting mold materials 200-400 microns.
A key advantage of Binder Jetting over other 3D printing processes is that bonding occurs at room temperature. This means that dimensional distortions connected to thermal effects (such as warping in FDM, SLS, DMSL/SLM or curling in SLA/DLP) are not a problem in Binder Jetting.
As a result, the build volume of Binder Jetting machines are amongst the largest compared to all 3D printing technologies (up to 2200 x 1200 x 600 mm). These large machines are generally used to produce sand casting molds. Metal Binder Jetting systems typically have larger build volumes than DMSL/SLM systems (up to 800 x 500 x 400 mm), which allows the parallel manufacturing of multiple parts at a time. The maximum part size though is restricted to a recommended length of up to 50 mm, due to the post-processing step involved.
Moreover, Binder Jetting requires no support structures: the surrounding powder provides to the part all the necessary support (similar to SLS). This is a key difference between metal Binder Jetting and other metal 3D printing processes, which usually require extensive use of support structures, and allows for the creation of freeform metal structures with very few geometric restrictions. Geometric inaccuracies in metal Binder Jetting come mainly from the post-processing steps, as discussed in a later section.
Since the parts in Binder Jetting do not need to be attached to the build platform, the whole build volume can be utilized. Thus, Binder Jetting is suitable for low-to-medium batch production. To take advantage of the full capabilities of Binder Jetting, it is very important to consider how to fill effectively the whole build volume of the machine (bin packing).
Small metal Binder Jetting with fine holes of great dimensional accuracy.
Image courtesy ofDigital Metal
Full Color Binder Jetting
Binder Jetting can produce full color 3D printed parts in a similar way to Material Jetting. It is often used to 3D print figurines and topographical maps, because of its low cost.
Full-color models are printed using sandstone powder or PMMA powder. The main printhead first jets the binding agent, while a secondary print head jets a colored ink. Inks with different colors can be combined to produce a very large array of colors, in a similar way to a 2D inkjet printer.
After printing, the parts are then coated with cyanoacrylate (super glue) or a different infiltrant to improve part strength and enhance the vibrancy of the colors. A secondary epoxy layer can then also be added to further improve strength and color appearance. Even with these extra steps, full-color Binder Jetting parts are very brittle and they are not recommended for functional applications.
To produce full-color prints, a CAD model that contains the color information must be provided. Color can be applied to CAD models via two methods: on a per face approach or as a texture map. Applying color on a per face basis is quick and easy to implement, but using a texture map allows for more controls and greater detail. Refer to your native CAD software for specific instructions.
Sand Casting Cores and Molds
The production of large sand casting patterns is one of the most common uses for Binder Jetting. The low cost and speed of the process make it an excellent solution for elaborate pattern designs that would be very difficult or impossible to produce using traditional techniques.
The cores and molds are generally printed with sand or silica. After printing, the molds are generally immediately ready for casting. The casted metal component is usually removed from them after casting by breaking the mold. Even though these molds are used only once, the time and cost savings compared to traditional manufacturing are substantial.
Image courtesy of ExOne
Metal Binder Jetting
Metal Binder Jetting is up to 10x more economical than other metal 3D printing processes (DMSL/SLM). Moreover, the build size of Binder Jetting is considerably large and the produced parts require no support structures during printing, enabling the creation of complex geometries. This makes metal Binder Jetting a very appealing technology for low-to-medium metal production.
The main drawback of metal Binder Jetting parts are their mechanical properties, which are not suitable for high-end applications. Nevertheless, the material properties of the produced parts are equivalent to metal parts produced with Metal Injection Molding, which is one of the most widely used manufacturing methods for the mass production of metal parts.
Infiltration & Sintering
Metal Binder Jetting parts require a secondary process after printing, like infiltration or sintering, to achieve their good mechanical properties, as the as-printed parts basically consist of metal particles bound together with a polymer adhesive.
Infiltration: After printing, the part is placed in a furnace, where the binder is burnt out leaving voids. At this point, the part is approximately 60% porous. Bronze is then used to infiltrate the voids via capillary action, resulting in parts with low porosity and good strength.
Sintering: After printing is complete, the parts are placed in a high temperature furnace, where the binder is burnt out and the remaining metal particles are sintered (bonded) together, resulting in parts with very low porosity.
An oil and gas stator printed from stainless steel and infiltrated with bronze. Notice the surface finish, which is typical for Binder Jetted parts.Image courtesy of ExOne
Characteristics of metal Binder Jetting
Accuracy and tolerance can vary greatly depending on the model and are hard to predict as they are greatly dependant on the geometry. For example, parts with length up to 25 - 75 mm shrink between 0. 8 to 2% after infiltration, while larger parts have an estimated average shrinkage of 3%. For sintering, the part shrinkage is approximately 20%. The dimensions of the parts are compensated for shrinkage by the machine's software, but non-uniform shrinkage can be an issue and must be accounted for during the design stage in collaboration with the Binder Jetting machine operator.
The post-processing step can also be the source of inaccuracies. For example, during sintering, the part is heated to a high temperature and becomes softer. In this softer state, unsupported areas might deform under their own weight. Moreover, as the part shrinks during sintering, there here is friction between the plate of the furnace and the lower surface of the part, which may lead to warping. Again, communication with the Binder Jetting machine operator is key here to ensure optimal results.
Sintered or infiltrated Binder Jetting metal parts will have an internal porosity (sintering produces 97% dense parts, while infiltration approximately 90%). This affects the mechanical properties of metal Binder Jetting parts, as the voids can lead to crack initiation. Fatigue and fracture strength and elongation at break are the material properties that are most affected by internal porosity. Advanced metallurgical processes (like Hot isostatic pressing or HIP) can be applied to produce parts with almost no internal porosity. For applications where mechanical performance is critical though, DMLS or SLM are the recommended solutions.
An advantage of metal Binder Jetting compared to DMLS/SLM, is the surface roughness of the produced parts. Typically, metal Binder Jetted parts have a surface roughness of Ra 6 μm after post-processing, which can be reduced to Ra 3 μm if a bead-blasting step is employed. In comparison, the as-printed surface roughness of DMLS/SLM parts is approximately Ra 12-16 μm. This is particularly beneficial for parts with internal geometries, for example internal channels, where post-processing is difficult.
The table below summarizes the differences in the main mechanical properties of Stainless Steel parts, printed with Binder Jetting and DMLS/SLM:
| Binder Jetting Stainless Steel 316 (sintered) | Binder Jetting Stainless Steel 316 (bronze infiltrated) | DMLS/SLM Stainless Steel 316L | |
|---|---|---|---|
| Yield Strength | 214 MPa | 283 MPa | 470 MPa |
| Elongation at Break | 34% | 14.5% | 40% |
| Modulus of Elasticity | 165 GPa | 135 GPa | 180 GPa |
What are the benefits & limitations of Binder Jetting 3D printing?
The key advantages and disadvantages of the technology are summarised below:
Binder Jetting produces metal parts and full-color prototypes at a fraction of the cost compared to DMLS/SLM and Material Jetting respectively.
Binder Jetting can manufacture very large parts and conplex metal geometries, as it is not limited by any thermal effects (e.g. warping).
The manufacturing capabilities of Binder Jetting are excellent for low to medium batch production.
Metal Binder Jetting parts have lower mechanical properties than DMSL/SLM parts, due to their higher porosity.
Only rough details can be printed with Binder Jetting, as the parts are very brittle in their green state and may fracture during post processing.
Compared to other 3D printing process, Binder Jetting offers a limited material selection.
The main characteristics of Binder Jetting are summarized in the table below:
| Binder Jetting | |
|---|---|
| Materials | Metals, Ceramics (sand) |
| Dimensional accuracy | Metal: ± 2% or 0. 2 mm (down to ± 0.5% or ± 0.05) Full-color: ± 0.3 mm Sand: ± 0.3 mm 2 mm (down to ± 0.5% or ± 0.05) Full-color: ± 0.3 mm Sand: ± 0.3 mm |
| Typical build size | Metal: 400 x 250 x 250 mm (up to 800 x 500 x 400 mm) Full-color: 200 x 250 x 200 mm (up to 500 x 380 x 230 mm) Sand: 800 x 500 x 400 (up to 2200 x 1200 x 600 mm) |
| Common layer thickness | Metal: 35 - 50 μm Full-color: 100 μm Sand: 200 - 400 μm |
| Support | Not required |
Ready to transform your CAD file into a custom part? Upload your designs for a free, instant quote.
Get an instant quoteThe Complete Guide to Binder Jetting in 3D printing
Published on July 29, 2019 by Alexandrea P.
There are currently multiple additive manufacturing technologies that exist in the industry, each focusing on different materials and sectors. Today, we present to you our complete guide on Binder Jetting, a technology used for ceramic materials, metals and more recently plastic polymers. How does this technology work? Which materials are used? Who are the manufacturers? We tell you everything below!
Binder Jetting technology was invented during an MIT project in 1993. Due to the quality of the results, the American company Z Corporation acquired it two years later, taking over all rights to this technology. Years later this corporation was acquired by one of the well-known giants in the industry, 3D Systems. Regarding Binder Jetting technology for metals, it was developed by the American company ExOne in 1996.
A metal piece manufactured using Binder Jetting technology | Credits: Sculpteo
What is 3D printing using Binder Jetting?
The printing process with this technology consists of spraying a liquid binder onto a bed of powder, solidifying the cross section of the piece, layer by layer. The materials that solidify thanks to the binder are usually gypsum, sand, ceramics, metals or polymers in granular forms.:quality(80)/images.vogel.de/vogelonline/bdb/1324400/1324475/original.jpg)
As with any 3D printing technology, the first step is to model the object in CAD software, before slicing it and sending it to the 3D printer. A Binder Jetting 3D printer is normally composed of two tanks and a printing platform. At the beginning of the printing process, one of the tanks is empty, whilst the other holds the powdered printing material. The levelling roller spreads a first layer of powder over the platform. The print head, similar to those of 2D printers sprays the binding agent in the form of droplets of 80 μm. As a result, the powder is unified and the piece is formed, layer after layer. It is possible to print in colour using this technology. For example, in the case of ceramics, the colour is added at the same time as the binder. As the binder and colour is added to the successive layers of powder, the piece is formed in full-colour.
The Binder Jetting process as illustrated above | Credits: Additively
Once printing is complete, the pieces must be freed from the unsolidified powder that covers them. They also need to be cured to increase their resistance and revive the colours. The powder residue is removed with a brush or using pressurised air. Depending on the material used, be it ceramics or metals, a further step is necessary. In the case of metal Binder Jetting, the pieces must be sintered or infiltrated with a low-melting-temperature metal such as bronze. In the case of coloured ceramic pieces, it is also necessary to cover them by adding acrylic in order to improve the colours and mechanical resistance of the pieces.
The finished piece needs to be cleaned from the powder surrounding it | Credits: 3DHubs
Materials used with Binder Jetting technology
Binder Jetting technology has been widely used for ceramic 3D printing because it can work with all materials belonging to this family. Moreover, this technology even enables 3D printing with sand, the only material that does not require additional post-processing. As far as metals are concerned, the Binder Jetting technology allows the production of various types of metal alloys such as 420SS/BR and 316 inxodibal steels, titanium, and others such as Inconel 625 or copper. Recently the possibility of printing with some thermoplastic polymers and polyamides has also been added.
You can print with different materials, such as metals, ceramics, sand, and plastic polymers in granular form | Credits: ExOne
Actors and Developments
The Binder Jetting technology can produce metal parts or colour prototypes at a lower cost than using other technologies such as DMLS or Material Jetting, although there is greater porosity in the parts which could affect the mechanical properties of them. This technology is valued for producing batches of parts due to the large printing volume of most machines.
Currently the main manufacturer of 3D printers that use Binder Jetting technology for ceramic materials continues to be 3D Systems, using the term ColorJet Printing to refer to this technology. We also find companies such as the German manufacturer Voxeljet AG, supplying machines that also allow printing with thermoplastics. And finally, CONCR3DE, the manufacturer from the Netherlands. Recently the Taiwanese company ComeTrue was founded, offering Binder Jetting desktop 3D printers. With regard to metal technology, the leader continues to be ExOne, and other players have emerged such as the Swedish company Höganäs with its Digital Metal machine.
Pieces manufactured using 3D Systems’ technology, ColorJet Printing | Credits: 3D Systems
Another company that can be considered to use Binder Jetting is the giant HP, their technology is called Multi Jet Fusion. Since HP’s arrival in the additive manufacturing industry in 2016, it has been increasing the opportunities of its technology. It started with plastic materials such as polyamides, and expanded to full-colour 3D printing and is now reaching the metal AM market. Undoubtedly, contributing to the evolution of Binder Jetting technology.
In the following video from the CegepTR team, you can find some further information about Binder Jetting:
Was this guide on Binder Jetting useful? You can find the rest of our guides on 3D printing technologies HERE. Don’t hesitate to leave a comment below, or on our Facebook and Twitter pages! Sign up for our free weekly Newsletter, all the latest news in 3D printing straight to your inbox!
3D Inkjet Printing (3DP) – 3dprofy
Turch October 21st, 2014
3DP stands for Three-Dimensional Printing , and translates as three-dimensional printing. This technology is one of the varieties of systems for the additive construction of a product according to its CAD model and differs from numerous similar schemes in that the process is carried out according to the principle of a conventional printer - through print head nozzles. Thus, 3D inkjet printing is a natural continuation of the development of conventional 2D printing technologies. To date, it has achieved fairly good results, such as color printing.
Products printed on the Z Corp's Spectrum Z510 color 3D printer
The history of the emergence and development of 3DP
For the first time, the idea of \u200b\u200brealizing equipment using this printing scheme was proposed by two students at the Massachusetts Institute of Technology Tim Anderson and Jim Bredt in 1993. It is thanks to them that the term 3D printing has spread around the world. And this is quite fair, because the first model of the device was a modification of a conventional 2D printer. Instead of ink, he used a special adhesive composition, which applied layer by layer to the surface of the bonded substance, the boundaries of the future three-dimensional product.
In 1995, Tim and Jim formed the Z Corporation, which brought this technology to market, improving it to such an extent that in 2012 3D systems Corporation wished to acquire it along with the company. Under her brand, former Z Corporation models are now sold worldwide.
One of the directions of the ExOne company (USA) is the production of 3D printers that use the same technology. This firm was founded in 2005 as a subsidiary of the Extrude Hone Corporation. Using the patents obtained by Anderson and Bedt, they launched a line of printers that even print metal products today.
3D inkjet printing technology
Today there are more than thirty 3D printing technologies, which in one way or another duplicate each other, although each has its own characteristics. The American Society for Testing and Materials (ASTM International) has divided 3D inkjet printing technologies into two categories:
- Material jetting - material jetting.
- Binder jetting Binder jetting.
In the first case, the building material itself is fed directly through the nozzles, which hardens after application. In the second, an adhesive is sprayed onto a thin layer of gypsum, polymer or metal powder. 3DP technology in its original form represented exactly the second method.
If we consider it in more detail, then printing occurs in the following way:0003
- To begin with, a CAD model is loaded into a computer connected via an Ethernet cable to the printer, which is “cut” into layers, about 0.1 mm thick.
- Next, a thin layer of powdered material (gypsum, polymers, sand, metal) is applied with a roller on a special platform.
- The print head sprays the binder (glue, water, special mixture) along the coordinates of the boundaries of the first layer received from the computer.
- After that, the platform with the model is lowered by the thickness of the layer down, and the chamber with the building material is lowered by the same distance.
- Next, the roller unrolls the next layer and the process repeats.
- After the end of 3D printing, the product is removed from the powder layer and thoroughly cleaned of its residues.
When making models from metal powder, a firing process in a special furnace is added. Let's take a closer look at this process.
The figure above shows 4 stages of his stage:
- First, according to the above scheme, the so-called "green model" is formed from the matrix powder and binder (1,2).
- Next, the article is placed in an oven filled with a protective gas, usually nitrogen.
- When the temperature rises to 1000-1100 degrees, the binder is removed, and the free space around the powder particles is impregnated with bronze (or other metal) previously placed next to the "green" model.
 This process is called infiltration.
Materials used for 3DP printing and their cost
Gypsum has traditionally been used in 3D printing, and water played the role of a binder in this case. However, technology has stepped forward and, as is clear from the previous section, metals (bronze, copper), sand and polymer mixtures are now also used. Dyes are mixed into the binder, which makes it possible to carry out color printing on such a 3D printer.
The cost of the simplest powders is on average 600-700 euros for a 10 kg bucket (8200 cm3), the price of the binder is about 660 euros for 3.8 liters.
Characteristics of finished products and their application
Models made of gypsum and polymers are not too strong to be used in the production cycle as a mold, however, they are quite suitable for rapid visualization of prototypes of various parts and products . It can also be used in various architectural and design works or in the manufacture of souvenirs.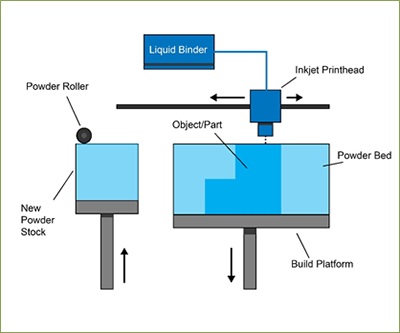
Products using metals have the best properties, however, their strength is still at an average level: tensile strength 610 MPa, hardness HRC = 10-20.
Such characteristics are quite suitable for the manufacture of plastic injection molds, which can withstand from 200 to 500 thousand production cycles. They are also used to make parts that work under friction conditions - shafts, bushings, gears, etc.
Disadvantages
- Gypsum-based products are quite fragile and can only be used in a narrow field of activity. As a mold, it can only be used once, after which it is destroyed.
- When working with gypsum powders, a lot of dust is generated, so a good extraction is necessary.
Advantages
- High speed of building parts - about 6 mm in height per hour, with a working area of 780 x 400 mm it will be 1780 cm3, which is an order of magnitude superior to laser rapid prototyping technologies.
- Relatively low cost of consumables.
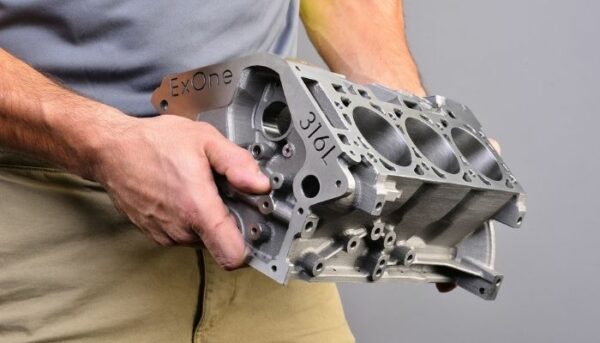
ExOne offers the following 3D printer models:
M-Flex printer model from ExOne.
Results
Printers using inkjet 3D printing technology is one of the possible solutions to implement the problem of rapid prototyping. It should be noted that despite some shortcomings, it still found a place in the market today and continues to develop actively along with many of its competitors.
Powder bed 3D printing with jet head HiSoUR – Hi So You Are
Powder bed 3D printing with inkjet, variously known as "inkjet" and "drop-on-powder" - or simply "3D printing" (3DP) - is a rapid prototyping and additive technology for creating objects, described by digital data such as a CAD file.
history
This technology was first developed at the Massachusetts Institute of Technology in 1993, and in 1995, Z Corporation received an exclusive license. The term "3D printing" has been a trademark of the same.
Description
As with many additive manufacturing processes, the part to be printed is created from many thin cross-sections of the 3D model. The inkjet print head moves through the powder bed, selectively depositing the liquid binder material. A thin layer of powder is spread over the completed area and the process is repeated with each layer adhering to the last one.
When a model is completed, unbound powder is automatically and/or manually removed in a process called "de-powder" and can be used to some extent.
The powder portion may optionally be subjected to various infiltrates or other treatments to obtain the desired properties in the final portion.
Technologies
In 3D printing, blanks are placed one after the other. 3D data (such as CAD data) is used to calculate the geometry generated for each individual layer. In 3D printing, a layer of powder or granules is placed on a height-adjustable table and glued together with a binder at points that belong to the workpiece. This is similar to a conventional printhead inkjet printer that uses a binder instead of ink. Subsequently, the table is lowered to the thickness of one layer and a new layer of powder is applied. This is repeated until the part is fully formed and then completely hidden by the surrounding powder. After that, the supernatant powder is returned for further use, the workpiece is removed from the printer and freed from powder residue.
The principle of the process is therefore similar to selective laser melting, in which metal powder is locally melted by a laser.
materials
In the original implementation, starch and gypsum plaster fill the powder layer, the liquid "binder" is mainly water to activate the plaster. The binder also includes dyes (for color printing) and additives to adjust viscosity, surface tension and boiling point to match print head specifications. The resulting plasters generally do not have "green strength" and require infiltration with melted wax, cyanoacrylate adhesive, epoxy, etc. before regular treatment.
Although it is not necessary to use conventional inkjet technology, various other combinations of powder binders can be deployed to form objects by chemical or mechanical means. The resulting parts can then be subjected to various post-processing regimes such as infiltration or baking. This can be done, for example, to eliminate the mechanical binder (eg by burning) and densify the core material (eg by melting) or to form a composite material mixing the properties of the powder and the binder. Depending on the material, full color printing may or may not be an option. Since 2014, inventors and manufacturers have developed systems to form objects from sand and calcium carbonate (forming synthetic marble), acrylic powder and cyanoacrylate, ceramic powder and liquid binder, sugar and water (for candy making), etc. One of the first commercially available products that included the use of Graphene were the powdered composite used in powder bed inkjet 3D printing.
3D printing technology has limited potential to change material properties in a single assembly, but is generally limited to using a common core material. In original Z Corporation systems, cross-sections are typically printed with solid outlines (forming a solid shell) and a lower density internal pattern to speed up printing and ensure dimensional stability during the curing process of the part.
Characteristics of
In addition to volumetric color using multiple print heads and a color binder, the 3D printing process is generally faster than other additive manufacturing technologies such as fused deposition simulation alloy, which requires 100% building material and carrier materials have been deposited at the required resolution. In 3D printing, the bulk of each printed layer, no matter how complex, is deposited by the same fast distribution process.
As with other powder bed technologies, no supporting structure is usually required because loose powder supports overhanging features and stacked or suspended objects. Eliminating printed support structures can reduce assembly and material usage times and simplify both equipment and post-processing. However, being a dezorist herself can be a delicate, messy, and time-consuming task. Some machines thus automate de-powder and powder recycling as much as possible. Since the entire volume of the assembly is filled with powder, as in stereolithography, means for evacuating the hollow section must be placed in the structure.
As with other powder bed processes, surface finish and accuracy, object density and, depending on the material and strength of the process, may be inferior to technologies such as stereolithography (SLA) or selective laser sintering (SLS). Although "stepped" and asymmetrical dimensional properties are features of 3D printing, like most other multi-layer manufacturing processes, 3D printed materials are usually combined in a way that minimizes the difference between vertical and flat resolution. The process also lends itself to rasterizing layers at target resolutions, a fast process that can accommodate intersecting solids and other data artifacts.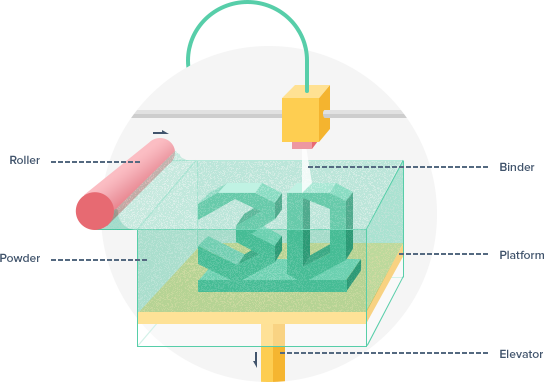
Powder and inkjet 3D printers usually range in price from $50,000 to $2,000,000, but there is a DIY hobby kit that sells from $800 to convert a consumer FDM printer to a powder/inkjet printer.
Advantages and disadvantages of
In theory, all materials can be used as long as they can be adhered to the binder. In particular, foods or temperature-sensitive substances such as drugs can be processed. In addition, different binders can be used in the same preform to create regions with different mechanical properties. Numerous substances can be used as a binder. For example, those based on water, synthetic resin or living cells. In principle, the powders do not have to be the same in every layer.
In addition, in Binder Jetting, like laser sintering, no carrier material is required because the workpiece is treated with powder during the manufacturing process.
However, 3D printing does not provide a very strong workpiece. Especially when metals are used as materials, the blanks must subsequently be removed from the binder and sintered to provide sufficient strength.


