3D printing small figures
A Guide to Bringing Digital Models to Life
Over the last few years, 3D printers have become more affordable, easier to use, and more reliable. As a result, professionals in the entertainment industry, game designers, and hobbyists have embraced these technologies to create 3D printed miniatures.
This comprehensive guide to 3D printing miniatures and custom 3D figurines will show you how to bring your hyperrealistic digital models to life, which processes to use, how to post-process and paint your 3D prints, and where you can source 3D models for miniatures. Plus, the post will highlight other companies already using 3D printing to bring their digital models to life.
In several industries, 3D printing is emerging as a go-to technology for creating custom models. In the model-making and entertainment fields, 3D printing allows designers to create realistic, detailed, unique, and replicable figurines, miniatures, action figures, character models, sculptures, film props, stop-motion models, art, and decoration, all at a sustainable cost and with a fast turnaround.
The artists from Modern Life Workshop create hyper-realistic sculptures of actor Daniel Craig with ZBrush and 3D printing.
3D printing is also playing a transformative role in the movies and series industry. Props masters, such as Russell Bobbitt for Marvel movies and Jaco Snyman for the first season and the second season of the Raised by Wolves series, as well as visual effects (VFX) and design studio Aaron Sims Creative for Stranger Things, have adopted the technology, as it significantly saves time in prop making and fuels creativity in the design process. The creation becomes more flexible and fluid, and props and models can be created in an efficient manner.
A behind-the-scenes look at visual effects (VFX) and design studio Aaron Sims Creative’s process to design of Stranger Things’ Demogorgon.
“The Demogorgon was one of the first prints that we did. The first results were just amazing. The level of detail was something that I couldn't even imagine that you could get in a printer”
—Aaron Sims, Founder of Aaron Sims Creative
In gaming, online communities have sprung up around tabletop games like Dungeons & Dragons, for which gamers use 3D printers to create one-of-a-kind D&D 3D printed miniatures, figurines, terrains, landscapes, and other board game accessories.
A half-scale hand gripping a PlayStation controller designed and printed for an internal awards event at Sony Fabrication Arts.
Global play and entertainment company Hasbro also uses the technology to create Hasbro Selfie Series figures—a groundbreaking endeavor to use 3D printing to manufacture personalized action figures at scale. For the first time, fans are now able to scan their face with a smart device and have a custom-made look-a-like action figure delivered to their door.
Additive manufacturing offers great design and engineering opportunities for professionals and miniature-making enthusiasts, who will be thrilled to see the designs of their imaginations come to life in a 3D printer.
All 3D printing technologies use a process called additive manufacturing. 3D printers create three-dimensional parts from computer-aided design (CAD) models by successively adding material layer by layer until a physical part is created. Prop makers, game designers, and hobbyists can use the following 3D printer technologies to create various props, miniatures, and figurines.
Creature and concept designer Jared Krichevsky uses a stereolithography (SLA) 3D printer to facilitate bringing digital models to life at Aaron Sims Creative.
Fused deposition modeling (FDM), also known as fused filament fabrication (FFF), is the most widely used form of 3D printing at the consumer level, fueled by the emergence of hobbyist 3D printers. FDM 3D printers build parts by melting and extruding thermoplastic filament, which a printer nozzle deposits layer by layer in the build area.
Compared to other 3D printing processes, FDM creates larger and more visible layer lines, leading to less-detailed end products. An FDM 3D printer is good for cheaply and quickly 3D printing miniatures for applications where fine surface details are less important.
Depending on your model, post-processing for FDM printing might only require support removal. However, complex figurines printed with an FDM printer require extra support structures, which can be difficult to remove and require sanding to get support marks off finished miniatures.
FDM printers are the least expensive option. A low-end hobbyist desktop FDM printer can cost less than $500, while a more professional FDM printer for 3D printing figurines can cost on average from $2,000-4,000.
A side-by-side comparison on FDM vs SLA 3D printed parts.
Stereolithography (SLA) printers are the most versatile and precise desktop 3D printers on the market. SLA printer technology uses vat photopolymerization, or resin printing, to cure liquid resin into hardened plastic using a laser. Resin 3D printing produces finely detailed miniatures and figurines with high surface quality using a range of advanced materials.
SLA 3D printers can create finely detailed miniatures and figurines with a smooth surface finish. Part printed on a Form 3 SLA 3D printer.
Resin 3D printers bring high-resolution for miniatures, figurines, and models. Even the smallest prints have a high level of detail.
A 3D printed figurine from an SLA printer will require a medium-length post-curing process, but automated post-curing options are available. Support structures from SLA printers, especially from low force stereolithography (LFS) printers like the Formlabs Form 3 and Form 3L, are easy to remove.
SLA 3D printers also offer a wide range of materials, empowering applications outside of traditional 3D printing like silicone molding, pewter casting, or lost-wax casting.
A high-resolution quality desktop SLA 3D printer from Formlabs for miniatures and figurines price starts at $3,499, while large-format SLA 3D printers start at $10,999.
Jaco Snyman, founder of Dreamsmith Studio, shows how he used 3D printing behind the scenes for the HBO Max’s Raised by Wolves series.
“For bigger, less detailed things or as part of mold-making workflows, I use FDM 3D printers. I mostly use Formlabs [SLA] 3D printers to print final parts, because you get such a nice finish.”
—Jaco Snyman, founder of Dreamsmith and lead Prosthetics Designer of the Raised by Wolves series
Sample part
White Resin is one of the most popular resins for model making. See and feel White Resin for yourself by requesting a free sample part.
Request a Free Sample Part
Selective laser sintering (SLS) uses a high-powered laser to fuse small particles of polymer powder. As the unfused powder supports the part during printing, there’s no need for dedicated support structures. This makes powder 3D printing ideal for intricate models and complex geometries, including interior features, undercuts, thin walls, and negative features.
SLS 3D printing is ideal for intricate models and complex geometries. Part printed on a Fuse 1 SLS 3D printer.
SLS parts have a slightly grainy surface finish, but almost no visible layer lines. The most common material for selective laser sintering is nylon, a highly capable engineering thermoplastic for both functional prototyping and end-use production.
Because SLS printers are industrial machines, the entry price used to be higher, starting at around $100,000 and making it inaccessible for many businesses. However, Formlabs has recently introduced the Formlabs Fuse 1 to bridge this gap with the first benchtop industrial SLS 3D printer that offers high quality at a fraction of the cost of traditional industrial SLS systems, starting at $18,499.
Binder jetting is similar to SLS printing, but uses a binding agent to bond the powder material instead of heat. In model making, binder jetting is most commonly used for creating full-color 3D printed figurines and miniatures out of sandstone material.
Just like SLS, binder jetting requires no support structures, as the surrounding powder provides the necessary model support. However, parts that come off a binder jetting printer are very brittle and have high porosity. This means that the process is not ideal for complex designs, as the parts may fracture in the post-processing due to the brittleness of the material.
Binder jetting 3D printers are expensive industrial machines, with prices ranging from $30,000 to $100,000+.
Figurines 3D printed with binder jetting. (source: Shapeways)
| Fused Deposition Modeling (FDM) | Stereolithography (SLA) | Selective Laser Sintering (SLS) | Binder Jetting | |
|---|---|---|---|---|
| Resolution | ★★☆☆☆ | ★★★★★ | ★★★★☆ | ★★★☆☆ |
| Surface Finish | ★★☆☆☆ | ★★★★★ | ★★★★☆ | ★★★★☆ |
| Complex Designs | ★★★☆☆ | ★★★★☆ | ★★★★★ | ★★★☆☆ |
| Ease of Use | ★★★★★ | ★★★★★ | ★★★★☆ | ★★★☆☆ |
| Ideal for | Low-cost, simple models with less details | Finely detailed miniatures and figurines with high surface quality at an affordable price | Complex geometries and durable end-use parts | Full-color 3D printed figurines out of sandstone |
| Cost | $500-$2,000 starting equipment cost | $3,750 starting equipment cost | $18,500 starting equipment cost | $60,000 starting equipment cost |
Video Guide
Having trouble finding the best 3D printing technology for your needs? In this video guide, we compare FDM, SLA, and SLS technologies across popular buying considerations.
Watch the Videos
The level of detail and precision needed for printing miniatures can be challenging. Beyond the printing process, post-processing will have a high impact on the final miniature. Here are some tips on how to better 3D print and prepare miniatures.
Highly detailed Hulk figurine done with 3D printing by Aarom Sims Creative.
Two major factors impact the quality of your 3D prints: layer lines and support structures.
The thicker the layers you use for your 3D printed figure, the more visible your layer lines will be. Thick layer lines create a “staircase” effect on a flat or slanted surface or cause round surfaces to appear “pixelated.” Smaller layer thickness will lead to higher surface quality and more polished prints.
FDM printing tends to use thicker layers and the layer lines are more visible even at the same layer height due to the way the parts are formed. SLA printers can print at a variety of layer thicknesses, including incredibly thin 25-micron layers, depending on the desired print quality, which makes it the ideal choice for showcasing the best details. SLS and binder jetting printers print at around 100-110 micron layers, but the layer lines are mostly invisible on final parts.
In FDM and SLA printers, 3D prints include support structures to scaffold the part during the print process. You will need to remove these support structures, which can be difficult for FDM prints and fairly easy for SLA prints (depending on part orientation). A more complicated support removal will leave marks on the finished product, which you must sand and polish for high-quality finishes.
Support removal with a part printed on the Form 3 SLA 3D printer.
Your models will not be complete without the perfect finish. After printing, post-processing the miniatures with priming and painting will give a final flawless touch and the customization to make them truly unique.
Priming a 3D printed miniature before painting.
You can finish a 3D printed figurine in whatever way supports the end goal of your 3D print. Many models look great straight out of the printer, but you can enhance your miniatures by painting them.
Before you paint, remove all support structures from your 3D printed figurines, and then sand the figurines to eliminate support-structure marks. The amount of sanding and polishing will depend on the object’s finish. For FDM prints, you may have to do some extra sanding to reduce the “staircase” effect of layer lines, while SLA prints should have a smooth surface right away.
After you sand your 3D miniature, we recommend applying a primer. Choosing the right primer will help your 3D printed miniature achieve a professional-grade finish.
See why priming makes painting 3D printed parts effortless and helps create a flawless final surface.
Side by side comparison on the before and after painting a 3D printed dinosaur miniature.
For detailed hand painting of your 3D printed miniature, acrylic paint is a versatile option. Acrylic paint usually binds well to plastic, but always check that the paint you have selected lists “plastic” or “multisurface” functionality, and always prime before you paint.
Spray paint, when applied correctly, can also give your custom miniature a smooth, glossy, and consistent finish. Your spray paint finish can approach professional quality if you apply a good primer and a thick undercoat for color consistency. Always finish with a blemish-resistant topcoat.
See how to transform your miniature from a simple 3D print to a colorful model ready to display with spray painting.
3D printing always starts with a digital model. You can download a free or paid miniature model, design the model yourself, or even scan an existing object and turn it into a 3D file.
If you are at the beginning of your 3D printing journey, downloading premade designs can make printing easy. Huge online communities exist around gaming miniatures, such as Dungeons & Dragons figurines. Checking communities like Pinshape, MyMiniFactory, Cults, or Thingiverse is a great way to find free 3D miniature model designs for your own prints.
Forest Dragon 3D model, available for free download in Pinshape (Design by Dutchmogul).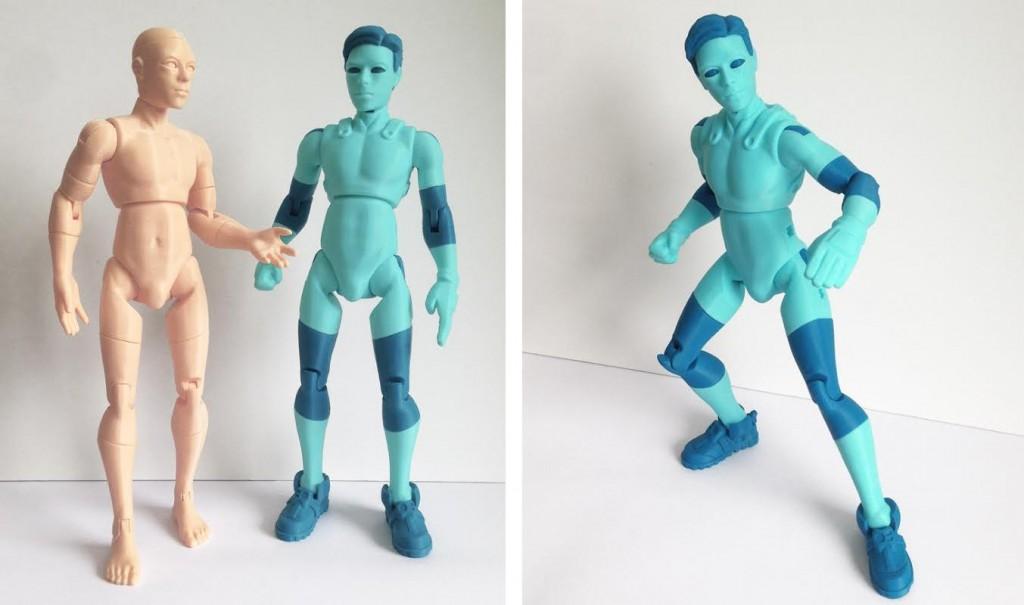
Aaron Sims Creative creating the Stranger Things’ Monster digital 3D assets for 3D printing.
The right 3D modeling software will help you design your own custom miniatures that are ready for 3D printing. If you are creating miniatures, you need detailed design capabilities. CAD software that specializes in video game design or animation often provides the granular tools necessary for creating realistic miniatures.
For example, ZBrush is a digital sculpting tool that combines multiple artistic techniques to create high-resolution models. Users mainly design for movies, games, and animations on ZBrush, making it ideal for realistic figurines. You can learn more about how ZBrush is used for digital sculpting, modeling, and rapid visualization in this webinar.
Webinar
ZBrush gives artists the freedom to push the limits of digital modeling. Until recently, the power to bring complex concepts beyond the computer screen has been inaccessible and cost-prohibitive.
Watch the Webinar
A custom 3D print does not need to be based on a completely original digital design. Instead, you can also 3D scan an existing object. There are many scanning options available, from low-cost depth-sensing cameras and photogrammetry to high-definition professional scanners.
Before 3D printing a part, you’ll often need to adapt, optimize, and finalize 3D scans. With Meshmixer, it’s not only possible to optimize a triangle mesh but also to resculpt entire sections, stylize the model, or add useful features to it.
Whether you are a professional sculptor, a model maker, an enthusiastic hobbyist, or a gamer, SLA 3D printing is an ideal tool to bring hyper-realistic digital models to life in a matter of hours, right on your desktop.
Start 3D printing your own custom miniatures and figurines with the Form 3 with incredible detail at an affordable price point, and bring your biggest ideas to life with the Form 3L.
See the Form 3See the Form 3L
Guide to Accurate 3D printed Custom Miniatures
Miniatures are small scale replicas or models of something else. Sometimes these are toys, props, demonstrational pieces, or collectibles. Due to their tiny size and precise details, minis may be complicated to handcraft, especially in a larger quantity. 3D printing, on the other hand, provides a way to manufacture miniatures with decent quality and production time. But in order to make it work for your needs, there are a few facts to consider in regards to 3D printing small figurines and minis.
- 3D Printing Technologies comparison
- Materials Rundown
- Post-Processing for printed Minis
- Quick design tips for each Printing tech
- Why should I choose to 3D print miniatures?
- How to order 3D printing of miniatures
Different types of miniatures
There are several areas, where small scale replicas and models are used, each sphere with its intricacies respectively. Here is a quick rundown of the small size figurines we are touching upon:
- Tabletop wargaming minis
- Action figures
- Model figures
- Scale models
- Diorama pieces
- Landscape models
- Rail transport models
- Dollhouse props
- Educational models
Though all miniatures have much in common, they differ not only in size but also in the functionality of pieces as well as accuracy and stiffness requirements. As a result, certain production methods and 3D printing materials will suit each type of piece better.
Miniatures and figurines can potentially be 3D printed using any available method. However, depending on the application and requirements, some techs are more suitable than others.
| Technology | Material type | Affordable | Detail Quality | Stiffness | Color |
| FDM/FFF | Plastic | 5/5 | 2/5 | 4/5 | Usually monochrome |
| [Resin] SLA | Resin | 3/5 | 5/5 | 3.5/5 | Monochrome |
| [Resin] DLP | Resin | 3/5 | 4.5/5 | 3.5/5 | Monochrome |
| [Resin] DUP | Resin | 4/5 | 4/5 | 3.5/5 | Monochrome |
| [Resin] MJ/Polyjet | Resin | 2/5 | 5/5 | 4/5 | Full-Color |
| SLS | Nylon Powder | 3/5 | 4/5 | 4/5 | Monochrome |
| CJP | Sandstone | 2/5 | 3/5 | 2/5 | Full-Color |
3D Print your Miniature
FDM/FFF
One of the most affordable methods works by heating up plastic strings and using it to form a piece layer by layer. The big downside of the technology is that it leaves some layer lines as well as marks under overhanging parts. In order to print minis with FDM, it is usually required to have a separate, thinner nozzle, and slower printing time to ensure better details. Fused deposition modeling, though, can work fine for bigger scale models, some educational models, and rail transport models of larger size.
Figurine 3D printed on FDM machine by OKSharPei 3D
VAT polymerization/Resin printing
Resin 3D printing is a family of technologies that cures liquid photopolymers layer by layer by laser, LEDs, or projectors. These methods suit miniatures really well as they allow preserving intricate details while keeping a smooth surface. However, you should take into consideration that some resins or technologies suit it better. For example, laser-based machines commonly help avoid voxelization of a piece. And for high-detailed minis, special HD resins are recommended. Overall, SLA miniatures are suggested for tabletop wargaming that doesn't require functioning parts.
3D print by Brandon's 3D Printing
MJ/Polyjet
This set of 3D printing technologies works with UV-activated resins. But contrary to vat polymerization methods, it works with droplets of resins, which allows mixing them to get different colors and properties. These advantages make MJ a good method for educational and demonstration models.
3D print by AllgaeuTec
Laser Sintering
Powder sintering is usually a professional manufacturing method that relies on sintering nylon-based powders. It is capable of making sturdy and accurate minis free of layer lines. Aside from costly production, laser sintering has some limits to its precision, but overall allows a great quality of figurines. If preceding through sintering, it is a good idea to order a small batch rather than a single piece to save some money as nesting (printing a batch) is usually more cost-efficient. This method should suit action figurines, props, and landscape models.
3D printed chess set from a personal portfolio of Rapid 3D Parts
Color Jet Printing
CJP technology uses sandstone powder and a binding agent that fuses grains together layer by layer. In the process, inks add color to a part. Through combining several primary colors, these machines commonly deliver a wide range of shades. End results are full-colored, they have a medium quality of details. Compared to other methods, CJP provides more brittle minis. Consider choosing Color Jet Printing for colored landscape models, model figurines that won't be actively used or memorabilia pieces.
3D print by Make it 3D Manufacturing Center
Within each 3D printing technology, there are always several material options. Choosing a suitable one for your mini makes or breaks the results.
FDM Plastic
PLA is one of the most common and user-friendly plastics out there. There are many interesting options available as well as colors. It is one of the best filaments in terms of details, and medium choice in regards to stiffness and temperature resistance. With right post-processing and coating, PLA will be serving you decently.
Other FDM options include ABS, PETG, Wood-filled plastics, and many more. However, these are usually the types of plastic printed with higher temperatures, which raises chances of failures and artifacts such as echoing and warping.
Generic resin
All-purpose resin is a standard photopolymer used. It is easy to find, and it produces fine results in terms of detailing. It is a bit brittle in thinner areas and prone to warping in unsupported small overhangs.
High-detail resins
With a bit different formulation, these resins allow getting more details to come out. Even when a machine’s resolution allows it to go to 25-50 microns precision, other resins may not support that tolerance. HD resins, on the other hand, are designed to allow 3D printing such fine elements.
SLS Nylon
PA 12 is a pretty standard material used in Laser sintering. It combines good detail transition and technical parameters. Other grades of nylon are okay to use for minis, too. Such materials are pa 6, pa 6/69, and more. For miniature printing, composites or flexibles would be a bad choice, so sticking to usual polyamide is the best you can do.
Sandstone
Sandstone is one of the primary materials used in CJP along with powders like gypsum or nylons.
Polyjet polymers
MJ processes use UV-activated polymers close to the resins in SLA and DLP printers. However, these machines are able to combine and blend together different grades of their own polymers to get complex results. Some common materials include Rigid opaque resins and Clear ones, Vero, Agilus, Tango, and more. They can either provide a glossy-looking smooth surface finish or matte texture.
All 3D printed miniatures require post-processing and finishing touches, though some may need less work than others. Key steps for all printed figurines are likely to include:
- Supports removal
- Sanding
- Smoothing or Polishing
- Sealing
For 3D printing processes except for powder-based ones (SLS, CJP), a miniature will probably require cleaning the surface from supporting structures. This process is usually easy but requires accuracy and patience when it comes to small pieces. The main goal is to ensure intricate details will not be damaged. Many 3D printing services offer support removal but can charge an additional fee for smaller models or large quantities since it is a time-consuming task.
Supporting structures can be removed at home as well without much special skills or tools required.
Check out custom tabletop miniatures:
Another step to getting a good-looking miniature is to ensure you have a proper 3D design. Certain metrics and clearance must be included in a model with technology in mind. Thus, it is a good idea to settle on a printing method before making or optimizing a file. Here are some general tolerance guidelines for the mentioned technologies.
FDM
- Try to reduce the number of overhangs and angles less than 45 degrees;
- Model design details to be larger than 1.15 mm or at least 0.5 mm;
- Ensure a model's wall thickness of 1.2 mm at least;
- For text, prefer thicker fonts and opt for 1 mm depth/height for it.
Resin Printing
- Model figurines hollow if you want to reduce cost;
- Include escape holes to the design to avoid uncured resin inside your piece;
- If possible, keep the detail size greater than 0.05mm.
SLS and CJP
- Hollow enclosed parts are not possible, thus, include holes or model parts solid;
- Recommended detail size is bigger than 0.8 mm;
- Suggested wall thickness is around 0.7 mm - 2.0 mm;
- For text details, ensure depth/height about 2 mm.
For beginners, it can be a good idea to use someone's designs that were tested for 3D printing before. Or, as an option, you can hire a designer to either create a custom model or rework the one you have on hand to suit the process.
3D printing is a good method of getting custom parts in low quantities. With a ready 3D model, turnaround times for printing figurines are also quite short. FDM and DUP printing methods are usually affordable as well. More precise methods have a competitive advantage of accuracy when it comes to thin details and allow to create smaller figurines.
3D printed D&D miniatures will not be able to fully replace outstanding handmade pieces, however, it they are a fine alternative or a base for painting and customizing.
Additionally, when several similar models are required, a 3D printed master model will come in handy for casting purposes.
3D print by 3D Printer Filaments
There are 2 main options you can use to order 3D printing of miniatures through Treatstock:
- Instant Order
- Getting a Quote
If you already have a printable 3D miniature and know for sure what material suits your application, then instant order will probably be the easiest way for you.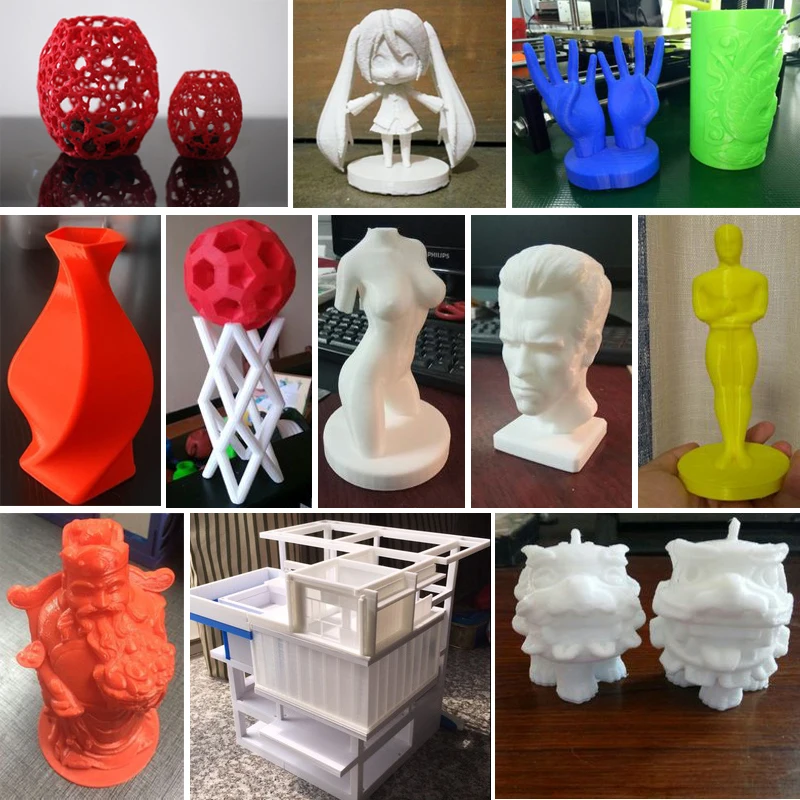 Upload your model, choose specifications, and fill in delivery details to get the cost estimation and order 3D prints:
For more complicated models or projects without optimized 3D models, we recommend using the “Get a Quote” option. A quote allows contacting a print service before setting up on a price and specifications. That way you can get help with choosing proper settings and technology to achieve the goals or order additional services like post-processing, painting, and coating.
To search for vendors that offer 3D printing, visit the catalog for miniature printers here. This way also helps to find a specific technology like SLA printing service or Material Jetting.
You can also check out design on-demand offers to have a starting point and apply for a 3D model first or find a suitable 3D printed tabletop pieces in our store.
Create miniatures using 3D printing. What 3D printer?
3D printing is used not only on an industrial scale and professional tasks, but also in a hobby. A prime example of this is the creation of thumbnails.
What is it?
Miniatures are small figurines that have an amazing appeal. The thumbnail size is from 6mm, and the most popular and demanded format is 28mm. The creation of miniatures is almost a jeweler's work. Each figurine has its own story. Based on the figurines, entire game locations, dioramas are created. Every smallest detail is worked out so carefully that it turns the product into a real work of art.
A diorama is a special kind of art, a piece of the universe frozen at a certain moment in time. The size can be very different, but the detail and elaboration is always amazing. The diorama consists of individual miniatures and objects that merge to give rise to a certain landscape.
The creation of miniatures is currently possible in several ways: modern technology and classics. It is on these options that we decided to dwell in more detail.
Yesterday
Even at the dawn of this type of hobby, figurines were very, very expensive. But it was far from always possible to purchase the desired “hero”, and sometimes it simply was not on sale. In such cases, they resorted to modeling.
Self-hardening or bakeable plastics were used. To begin with, a wire frame was formed, which served as a reinforcing basis. This guaranteed the high strength of the future figurine. The frame is fixed on a stand, which guarantees the stability of the figurine and the convenience of working with it.
Layer by layer plastic is built up on the frame. In this case, each layer is dried (self-hardening plastic) or baked (baked plastic). Gradually, with each layer, they begin to work out the details. The process is very painstaking, complex, requiring perseverance. For work, special tools for sculpting are used. The result is a thumbnail.
This principle is used to create various figures, including large table figures, as well as dioramas.
Another option is to work with plasticine. The figurine is molded from plasticine, placed in a silicone mold, which is then used for casting. In this case, most often the figure is divided into several parts, which are subsequently connected. For ease of assembly, parts are made with a special “lock” that fixes individual parts into a figure. As a result, the miniature is assembled like a puzzle.
Miniatures are also made of fusible metals, in particular lead. Casting takes place using plaster molds. Sometimes silicone can also be used, but it is much more difficult to achieve good and high-quality pouring of a metal product in it.
Another option for creating thumbnails is conversion. This technology involves the alteration of an already finished figure. This method is used by many hobbyists, especially those who do not have good sculpting skills and do not know how to create miniatures from scratch.
With the help of conversion, you can achieve high detail, add missing elements to the figures. So you can create characters that are not on sale.
Modelers create colorful and interesting locations for complete immersion in their favorite world. This is a very difficult and painstaking work. In this case, various means, both special and improvised, can be used.
Today
Currently, 3D printing is actively used to create miniatures. The Internet offers users a huge range of different models, both paid and free. There are also options for elements of locations: houses, trees, fences, mechanisms ... 3D technologies allow you to change existing models, add or remove details. "Digital clay" is even more malleable than regular clay, and people with creativity and sculpting skills shouldn't have any problems.
The main advantage of 3D printing is high detail. Another advantage is repeatability. Printing a batch of miniatures is much easier than creating each individual model by hand. Casting is a complex process that requires not only skills, but also equipment. It is extremely difficult to achieve good repeatability with this approach.
A 3D printer can replace many tools and materials. You can combine materials, getting different options. Manually, such models are almost impossible to achieve. A striking example is printing with transparent materials. Such materials can imitate glass.
3D printing technologies are different and options are possible here. FDM is a cheaper and easier 3D printing technology, but it takes time to post-process. In addition, such printers, as a rule, have a large print area. The materials are inexpensive and there are many options for taste and color. LCD and DLP are more complex and expensive printing technologies, but they allow for maximum precision and detail. The choice of materials is large, but they are not cheap. The surface of the finished figurines is always perfect. Photopolymer printers most often have a small print area.
Technology does not stand still. Every day they become more accessible and perfect, so the hobby is also improving. We are sure that tomorrow we are waiting for new discoveries!
3D printed figurines with their own appearance for board games
I've always wondered what it would be like if I had a board game figure that looked like a mini version of me. I finally found an easy way to do this with 3D printer, in this tutorial, I'll show you in detail how you can print your figurine! All you need is the EM3D app (only works with iPhone X or later), a Tinkercad account, Meshmixer software, and a 3D printer. Let's start!
Note: This article is a translation.
Step 1 Download EM3D
Go to the App Store and download the EM3D app. We will use this application to scan ourselves and get a 3D model. Again, make sure your iPhone is model X or newer. You will need to pay a small fee to upload your 3D scans, I purchased the scan pack for a whole year and I can say it's worth it.
Step 2: Scan yourself
Now you will need to ask someone to scan you. For our purpose, scanning from the shoulders and above will do, but if you start scanning lower, it will also work. Using the app is very simple, just move slowly until all the pieces you want to add turn green. Some important areas that people miss are the very top of the head and under the chin.
When you're done, don't worry if the resulting model looks a little distorted or if there are extra pieces on the side. We will get rid of them when polishing the design in Meshmixer.
Step 3: Import the 3D model into Meshmixer
Click the blue action button in the lower left corner of the scan and click Export OBJ. You can then download the file to your computer or email it to yourself to download to your computer. Download Meshmixer on your computer. Click the Import button and select your 3D model. Now you need to edit your model in Meshmixer.
Step 4: Polishing the Scan
Now we are going to polish your scan in Meshmixer. The video above demonstrates the entire process. The steps will also be explained here:
- Click Edit, Transform, and then drag the red arc to rotate the scanned image until it is aligned straight.
 Then click "Accept".
 - Click Edit, Flat Cut, and then drag the red arrow down until you cut out the bottom half you don't want. Then click "Accept".
- Click Edit, Close Cracks to bring the parts of your 3D scan together.
- Click Edit, Individual Skins, and then toggle each skin on and off to see which ones are redundant and which ones you don't need. Then click on those shells and click delete in the bottom right corner.
- Click Edit, Make Solid to prevent the figure from being hollow when 3D printed.
- See if you like it, and when you're happy with the end result, click Export. Name the file, choose a location, and export it as a .stl or .obj file. I chose .stl for this, but it doesn't matter which one you choose.
Step 5: Import the scan into Tinkercad
Open Tinkercad and create a new design. Click "Import" in the top right corner and select the file you exported from Meshmixer.
Note: The model exported from Meshmixer is huge, so change the scale to 10% when importing into Tinkercad.
Tip: You can hold Shift while dragging one of the corners of the model to resize the scan to fit the scale.
Step 6: Make Play Figure
If you want, you can print the scan now. Once you get the dimensions you want, just click "Export" in the top right corner and send it to your 3D printer.
However, if you want to make it look a little more like a play figure, follow these steps. If you scroll down there is also a video demonstration of this process.
- Import the scanned image into Tinkercad.
- Drag an empty box to the work plane and set the height to the model's neck.
- Group the box and your model.
- Drag the cylinder to the workplane and make the height equal to the height of your box.
- Drag the torus to the workplane and make it the same height as your cylinder; make the length and width a few mm larger than your cylinder.
- Make a hollow torus, align it with the cylinder and group them; I will call this shape the stand.

- Align the base with your head model; if necessary, adjust the size of the stand so that it supports your head well.
- Lower the head 0.5 mm so that the stand and head are well connected when printing; group them together.
Step 7: Video Demonstration of Creating a Game Element
Here is a video demonstration of creating a game element, if it makes it easier for you.
Note: In the video at 3:18 I accidentally moved the crown 0.5mm instead of -.5mm, make sure you move it down.
Step 8: 3D Print
Here are some images of my 3D figurine on the game board.
Step 9: Extending the concept
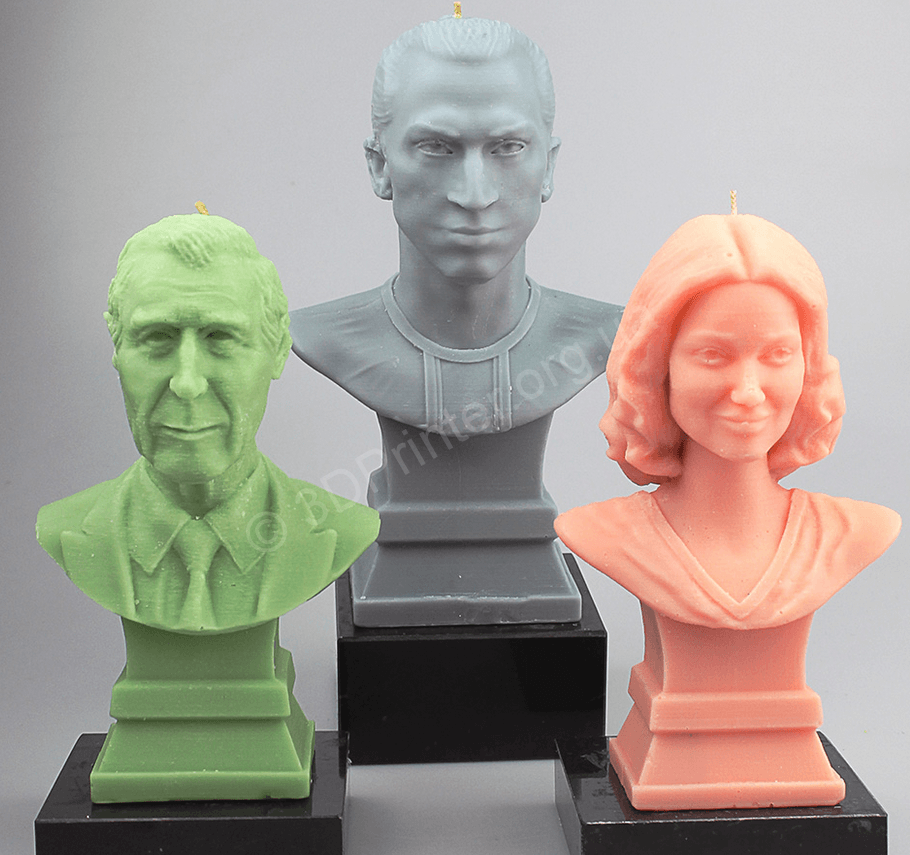
This concept of scanning yourself and getting a 3D figurine can be extended to many other ideas. The possibilities are almost endless! Here's an example where I printed myself as a monument :)
Step 10: Closing Words
Overall, I'm very happy with how the figurines turned out.