3D printing good first layer
3D Printing 101: How to Succeed with a Perfect First Layer for Every 3D Print
The first layer of your 3D print is the foundation of everything that comes after, which makes it such an important part of the 3D printing process.
Alec Richter
October 8, 2020
At MatterHackers we want to equip you with the knowledge and confidence to succeed with each and every print. To start - let’s discuss the initial layer that is printed for any part - we refer to it as, not surprisingly, the “First Layer.” Let's dive into the details.
Preparing the Bed Surface
The first layer of any 3D print is the foundation all subsequent layers are built on, which makes it important - it is also critical to remember that bed surface and material compatibility play a role in the outcome of the first layer. There isn't a universal bed surface material that every 3D printing filament will work with; some can handle most filaments, but others are targeted for the success of specific filaments. Take a look at our articles about how to succeed with any 3D printing material to gain the knowledge you need for the 3D printing filament you are struggling with and see a deep dive of the bed surface materials that are compatible.
Once you know that the bed surface material and printing material will work together, you are ready to clean and prepare the bed for maximum adhesion. Generally, a little rub down of the highest strength isoproyl alcohol (99% is best) will help remove any old residue or oils left by your fingers that would hinder the ability of the freshly laid filament from sticking to the bed. Some bed surfaces can get more extreme and require you to scuff it with sandpaper or more lightly with steel wool. Be sure to follow the recommendations for each material because you wouldn't want to use sandpaper on a glass bed, but it is recommended to use 220 grit on a LayerLock Garolite bed.
Depending on the surface, you may even need to use an adhesive as well in order to get the 3D print to stick. Printing PETG and its derivatives on LayerLock Powder-coated PEI doesn't require any adhesive, but printing PLA will necessitate a thin layer of PVA glue stick to keep everything locked down. Don't apply the adhesive too thick! On any surface you want just enough to keep your 3D prints in place and not so much that it adds considerable thickness or that it's nearly impossible to remove a 3D print, completed or otherwise.
What is a Z-Offset?
In the far off year of 2016, 3D printers didn't really use Z-offsets. The print job was started, the printer was homed (send to the minimum or maximum of each axis), and then got to printing the supplied gcode. Overall the 3D printing user experience, along with the technology, has made major improvements. Now, when you start your 3D print, you will often have the ability to "baby-step" the first layer, that is "adjust the first layer, during a running print job, to bring the nozzle as close or as far from the bed as necessary."
Originally, when your 3D printer would "home" it would move to Z0, the theoretical height that the printer's bed is at. You would then adjust the bed (usually with wingnuts or thumbscrews below each of the four corners) to raise or lower the bed so it is uniformly the same distance from the nozzle everywhere across the build plate. After that if you started your print and it was too far or even too close, you would have to adjust each of those screws to bring your bed into alignment. If you got good at it you could adjust it while the printer is busy printing the skirt, but often it meant canceling the print, making adjustments, and trying again.
Now, with Z-offset functionalities like baby-stepping you are essentially telling the 3D printer to add "0.05mm" to where it thinks Z0, instantly adjusting the print head to bring it closer or further from the print bed for a better first layer.
What Makes a Perfect First Layer
Now that you have an understanding about how you can affect your first layer it's time to take a look at what makes it perfect. We’ve compiled some examples of a small square at various Z offsets to show you the right way to adjust your printer settings to achieve a perfect first layer for your parts every time.
The perfect Z-offset will have a first layer with a top surface that looks like the top surface of a finished 3D print; neatly laid out extrusions that overlap each other without pushing up previous extrusions or bunching up at the edges. Underneath, its bottom surface has a clean and uniform pattern. If you were to print a cube with this setting, you wouldn’t see any flare out or tapered in at the base from the Z-offset being too far or too close, respectively.
A calibration 3D print with the Z-Offset set perfectly.
Below, you can see the “0.1mm too close” print has ripples along the top where each pass of solid infill slightly pushes up the previous pass of solid infill. On the bottom, it is clean and smooth but has a cell-like pattern to it. While it looks fine, this will cause the bottom face of the 3D print to flare out, which means if it needs to fit in another part it will need to be trimmed back in order to fit, and the ripples from above can eventually catch on the nozzle and peel up the entire first layer.
A calibration 3D print with the Z-Offset set approximately 0.1mm too close.
A first layer that is “0.05mm too close” is almost perfect. This sort of first layer is acceptable and isn’t likely to lead to complications, other than creating a tight fit if it needs to fit in a different part. There is some bunching up of filament near the edges, but not enough to cause any major issues.
A calibration 3D print with the Z-Offset set approximately 0.05mm too close.
“0.05mm too far” and you start to see between the infill as the solid infill is only slightly squished into each other. You may not be able to see through the gaps in this layer, but with this offset you are beginning to lose surface area touching the build plate, and therefore bed adhesion.
A calibration 3D print with the Z-Offset set approximately 0.05mm too far.
At “0.1mm too far”, you will begin to experience lifting, maybe at the corners or at thin features. At this point, the infill lines are easily seen without fully adhering to each other and are able to be split apart from the perimeters or even each other. If you're lucky your part stays adhered to the bed throughout the print. Even so, that print may be slightly too tall as the first layer wasn't squished down enough. It may only be 0.1mm too tall, but that may be enough to provide complications for joinery that doesn't have that sort of wiggle room.
A calibration 3D print with the Z-Offset set approximately 0.1mm too far.
Bed Leveling Methods: Manual vs Automatic Leveling
Your printer either has manual or automatic bed leveling hardware capabilities, and it may also have some helpful wizards and features to make it easier to set your first layer, while others often lack those features and require a more attentive touch. Even if your printer doesn’t have an automatic bed leveling sensor doesn’t mean it can’t be upgraded. The BL-Touch is one of the most commonly chosen bed leveling sensors for upgrades as it works on nearly every bed surface and is easy to install and test.
What is a Wizard?
Just like computers and other electronic devices, 3D printers often have built-in wizards to help guide someone with any level of 3D printing knowledge - even those that are brand new to 3D printing. These wizards will usually take the form of a guided walkthrough of the different steps you will need to take to make a change, like prompting you to adjust some thumbscrew for the heated bed or moving some sensor out of the way. Not every printer has one, but in general these are used on printers that have the room on their screens for a verbose and coherent explanation of what you need to do.
A Calibration Wizard on the Craftbot FLOW IDEX XL that walks the user through setting a perfect first layer.
What is an Automatic Bed Leveling Sensor?
Automatic Bed Leveling sensors (ABLs) are used in the place of setting the first layer by a user’s sense of touch and calibrating by eye and instead calibrate the first layer consistently with some electronic sensor. They come in many different forms with some better at detecting materials than others, like inductive probes being able to consistently detect metallic objects from nearly the same distance every time, but they are not able to detect anything non-metallic whatsoever. Or there are IR sensors that don’t require touching the bed surface to detect the bed, but have a tough time registering bed materials that are too reflective. Because there is so much variety in how they work, installing them differs for every form factor if you are choosing to upgrade a printer.
Without Wizards, Auto Bed Levelling
While most 3D printers that include a bed leveling sensor will also feature some code in the firmware to make it easier to use, in the form of a wizard, not all 3D printers will have additional aids. Some home built 3D printers may have a sensor but no wizards to back them up, which requires a hands-on approach to successfully adjust the first layer Z-Offset. It’s not often that users will need to consider this approach, but if you’d like to learn more about how this process differs, you can read more about it here.
Without Wizards, Manual Adjustment
Without any additional features to make setting your first layer easier, you will have to recalibrate your level bed. A bed that is perfectly leveled but is 1mm too far away from the nozzle at the start of a print is as good as a bed that starts 100mm away, so you need to know how to level your bed properly, and for that it’s important to watch our bed leveling guide here.
With Wizards, Manually Adjusted
The Craftbot Plus Pro features a guided leveling procedure, moving the print head over the bed leveling screws as you manually turn the thumbscrews to adjust the bed. Some printers can get complex with their wizards and take even more of the guesswork out of first layer calibrations. The BCN3D Epsilon W27’s wizard will print multiple lines side by side and ask you which one looks best, then remember the Z-Offset used to produce that result and apply that to the firmware, saving the offset for all Gcodes printed on that specific machine.
The Craftbot Plus Pro being levelled utilizing a guided manual bed levelling process.
With Wizards, Automatic
This is one of the most hands-off processes that you can have for your first layer. The sensor will detect the relative mesh of the bed using the probe, then apply the currently saved Z-offset before running through a test print that you can adjust with babystepping to create a clean first layer. It’s really that easy.
A Pulse E-Series 3D printer utilizes wizards and an automatic bed levelling sensor to achieve a perfect first layer.
After a few runs it will be easy to identify a perfect first layer, but this guide should offer guidance to point you in the right direction to become an expert in troubleshooting your 3D prints and calibrating your 3D printers in no time. If this guide has proven helpful to you and gives you a better understanding of what to look out for in a first layer and how to diagnose whether or not you need to make adjustments to your 3D prints, be sure to check out some of our other 3D Printing Essentials tutorials to help you develop your 3D printing skillset.
Happy Printing!
3D Printing - The Perfect First Layer – 3DMaker Engineering
Prerequisites:
-Clean Build Plate (Isopropyl Alcohol 90% or higher recommended)
-Flat Build Surface (we recommend our 3DMaker Polypropylene Build Plate)
-Quality Filament (we recommend our 3DMaker Pro Series Filament)
-Precision Printer Nozzle (we recommend our 3DMaker Printer Nozzles)
-Digital Calipers (we recommend Neiko 0-6" Digital Calipers)
-Calibrated Extruder esteps (Step-By-Step Tutorial)
-Download free Bed Level Wizard and First Layer Test STL from Downloads section
The most important step in 3D printing is a great first layer. When I read forums I see many posts about different issues that people are having from adhesion issues to warping. I would estimate 90% of those 3D printing issues could be traced back to an incorrect first layer. For 3D printing, it is vital that your first layer is perfect...or close to it. If you don't get that part right, you print is destined for failure.
There are several steps to getting a great first layer but if you break them into sequential steps it is extremely easy to achieve. We will go over each of these steps to get your print off on the right foot:
- Bed Leveling
- Hotend Temperature
- Bed Temperature
- First Layer Speed
- First Layer Height
- Fan Speed
- Calibrating Z-Offset
At the end of this guide you will feel confident knowing your first layer will lay down perfect ensuring your print succeeds.
The first step is to make sure you have a level bed. Some machines come with a bed level wizard built into the machine. This automatically moves the nozzle to the four corners and center of the bed. It will typically raise the Z axis between moves to ensure you don't scratch your bed. This makes life easier but it is not completely necessary. You can also download our free Bed Level Wizard in the download section which can be configured for your specific printer. The steps will be the same regardless of which method you go with.
- Set your print bed to your normal operating temperature before doing any leveling. Heat can alter the level so doing this on a cold bed could give poor results. While your bed is heating verify that the tip of your nozzle is clean from any filament. All filament must be removed from the tip prior to leveling
- Once the bed is heated and the nozzle is clean, begin the leveling process by running the g-code you generated from our Bed Level Wizard or with your printers built in wizard if it has one.

- Regardless of which method you choose, the nozzle should "home all" and then go to one of the corners of the bed and lower close to the build surface. Once nozzle has stopped moving, slide a piece of paper between the nozzle and bed. If you are unable to fit paper between them you might need to tighten your bed adjustment knobs to lower the bed until it fits.
- Wiggle the paper in and out while at the same time loosening the bed adjustment knobs until the paper just starts to get pinched between the nozzle and build surface.
- Do this for each corner and then verify the center is roughly the same.
- Repeat this process again until all four corners have the same resistance when paper is placed between the nozzle and bed. You will find that each of the four bed level knobs will need slight adjustments during the second round. This generally takes a minimum of two times going around to get a good level. Note: If you get the four corners level and the center is too low you may need to put a piece of tape under the center of your build surface to compensate for an uneven bed.
 If it is too high in the middle, you can try flipping the build surface (ex. glass) over and using the tape method.
The temperature you print at will affect both layer adhesion (part strength) and also first layer adhesion to the build surface. 3D filament can extrude from the nozzle at a much lower temperature than what is recommended by the manufacturer. The problem with this is it will extrude "dry" instead of "molten." You want your filament, especially on your first layer, to come out molten so that it fuses to the build surface. For example, if the PLA you're using recommends 190-220, I recommend trying to stay around 210-215 for the first layer and then lower to 205 the rest of the print if necessary. This will ensure the filament will bond with the build plate but on later layers it will still perform well on overhangs and bridging. As mentioned, PLA will likely still extrude at 190 just fine but your layer adhesion will suffer at these low temperatures. Keep in mind you want the layers of your print to merge into one cohesive body.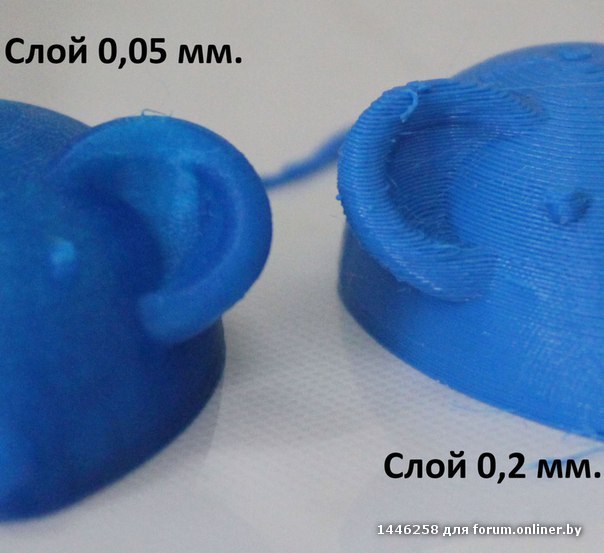
For this I typically follow the filament manufactures recommendation. If they say that a heated build plate is optional I still turn on my heated bed because it allows the part to pop off on its own after it has cooled when the print is complete. It beats accidentally damaging your print trying to pry it off the build surface. One thing to watch out for is overheating your bed. This tends to soften the bottom layers causing it to sag which causes the "elephant foot."
This is a topic many hobbyists will disagree with me on. I print every material, every time, at 15 mm/s for the first layer. This is very slow but you want to make sure your filament has time to fully melt in the hotend before getting extruded. This avoids "extruding dry" which can make your initial layer adhesion suffer. Sure, I know some materials I could get away with double this speed but at 15 mm/s I know for certain I won't have to restart a print from a failed first layer. When you think about how many layers you are printing, slowing just one down changes your print time by a negligible amount so why rush it? You can push the following layers all you want, but keep your first layer slow.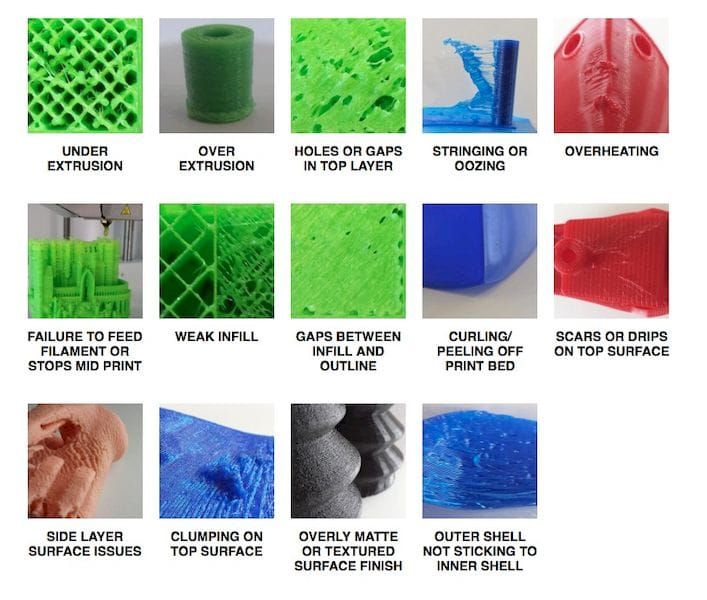
90% first layer height? Nope. Regardless of what layer height I am printing with I usually stick with a 0.24mm initial layer height for a 0.4mm nozzle. The exception is for PETG which tends to build up on around the nozzle during the first layer. For PETG I like a first layer height of 0.28mm which seems to help with the build-up issue PETG is known for. There are a lot of users that swear you need to "squish" your first layer with a layer height of less than 0.20mm. This is normally to cover up another issue like incorrect speed or hotend temperature. A thicker layer will hold more heat and allow it to adhere to the surface better before cooling down. Also, a super-thin first layer will likely cause a lot of issues if your printer build plate isn't perfectly flat or your X and Y axis doesn't run completely true.
Regardless of filament type you should always leave your fan off during the first two layers. Again, you want the filament to stay molten as long as possible to allow it to fuse to the build plate to reduce the chances of the part coming off during the print. For filament that does recommend using a fan I like to use the profile below:
Layer 1: 0%
Layer 2: 0%
Layer 3: 50%
Layer 4: 75%
Layer 5+: 100%
I used to think that leveling my bed was the same thing as setting my Z-offset. For years I would assume that by leveling I was at the same time making sure my Z0 was also correct. In order to do this next step, it is necessary to have a set of digital calipers. You can get a nice set off Amazon for cheap. If you are in this hobby for the long haul it is truly an invaluable tool to have. I use mine every day and recommend anyone with a printer to get one. I personally use the Neiko 0-6" Digital Calipers and for around $20 you cannot ask for better.
After downloading, load the First Layer Test STL file from the downloads section into your slicer to create the g-code for this step. Make sure your first layer height is set to 0.24mm before slicing. If your slicer shows more than one layer in the preview then you have something set incorrectly. This print should only take a few minutes which makes it ideal for doing several iterations if required. Once the print is complete carefully peel it off the build plate and use your digital calipers to measure the layer height in several places. Ideally, you should be close to 0.24mm in all places but if not then you need to adjust your Z-offset. For example, if you measure 0.20mm then you need to raise your Z-offset by 0.04mm.
Repeat this process until you get a reading close to the First layer height you set of 0.24mm. If you find that your readings are extremely different depending on where you measure on the circle you may need to re-level your bed.
Now that you have tuned your first layer you will find that you very rarely have a failed print. As tempting as it is to just jump into a print, it's a good idea to go through these items before your first print. After many hours of printing, you may also find that you need to revisit some of these adjustments. Things can become uncalibrated from the heat, vibrations, and the force required to remove larger prints. It is usually pretty easy to know when it is time to make adjustments again. You can reference the image below for help identifying when your printers first layer needs work:
Image: Peter Soloman, Wham Bam Systems
-3DMaker Engineering
Top 7 factors for a perfect first 3D print layer・Cults
The importance of the first layer is of paramount importance and usually determines whether the rest of your 3D print goes well or not.
Typically, people don't pay enough attention to all the details to get the first coat of print right. Once you pay more attention to the first layer of printing, things are sure to get better and you will have even more fun with 3D printing!
1. Well tuned machine
It's not so much the first layer as it is good preparation for the rest of the 3D printing process.
Machine setup is to make sure all components are at 90° to each other, this does not mean leveling with a spirit level. This means that all vertical components must be at a 90° angle to the horizontal components, the X axis is parallel to the bed and at 90° to the Z axis. then you have solved your problems, but you will print all the vertices at an angle and get bad geometric patterns.
Take the time to set up the machine correctly, loosen the screws, apply a square to line up the seams perfectly, and tighten again. This will make a difference in the long run!
2. Clean Plate
You really need to get in the habit of wiping the print tray frequently, perhaps even between each 3D print, as finger grease, ambient dust, and residue from used tools and filaments can contaminate the surface and interfere with sticking parts. I recommend keeping a roll of paper towels and a bottle of isopropyl alcohol near the machine and making sure a clean cloth is always part of the prep routine.
3. Flat printable surface
As we will see in the following steps, minor changes such as hair thickness or even 0. 1mm can remove the first layer. If your platen is skewed, you may get good levels at some points, but there will be others where the platen is too far or too close to the nozzle. The best way to check for flatness is to take an accurate steel ruler, place it on the edge of the bed and lower your eye to the height of the surface while shining a torch from the other side. If you notice a problem, look at how the light reflects off your surface, you will immediately see if it is curved or not. Repeat this in all directions, diagonally and in X and Y.
If your stand is not flat, you can either place it under the print surface with thin strips of aluminum, very carefully, or find a tray material that is perfectly flat, such as borosilicate glass or MIC6 Tool grade aluminum foil.
4. Well-Leveled Print Surface
Align the print tray with the good leveling program that stops right above each adjustment knob. Take your time adjusting the height, never move too much one knob at a time as this can bend your bed!
Continue with the program, as adjusting one knob may cause a slight shift in the other point of the tray.
Walk around the entire machine several times until you can rotate around all points without touching the alignment knob.
Once you have leveled well, do the real test. This can be built into the model you are about to print by having the slicer create a single layer skirt of 2-4 rings, as far away from the model as possible, but still on your building surface. As the machine prints layers of this outline, watch and adjust the buttons slightly in areas that are too high or too low. With this method, you will be able to set the parameters correctly.
Image by Peter Solomon
Prusa Image Printers
5. Gap Setting
Once you have a clean, flat print surface and leveled the machine, the gap is very important!
See illustration above. If the gap between the nozzle and the print surface is too large, the filament has a chance to cool slightly before falling onto the bed, and it may or may not snag. The cross section of the thread will be ROUND. There is a chance that the filament will not stay where you print it, but will follow the nozzle around the corners and eventually curl up. This is not optimal. The first layer must be pressed against the print tray so that it adheres well and remains glued. You will need to reduce the gap.
If the thread is creased or even does not come out anymore, you are probably too close, so increase the gap (a little at a time). If the printed filament is pressed against the print surface so that it is slightly wider than when printed in air and has a flat top but a constant width, you have probably found the perfect gap! When the distance is perfect, the solid areas will be completely filled, your prints will be glued together, and you will love 3D printing!
There is no single measurement for the exact distance, it depends on the filament used (e.g. PLA can be very flimsy, PETG doesn't like the nozzle sliding over it), it also depends on the material of the print tray, it depends on the size of the nozzle, movement speeds, etc.
6. The right print surface
There are many ways to get a good print surface. You can use glue, varnish, or tape to help the filament stick, but none of this is necessary if you follow the right steps, and removing them can speed up cleanup and prep time, keep the bottom of your models clean, and save you money on consumables over time. . However, you can keep using them if you're getting good results and don't want to change a thing!
You can print on commonly sold surfaces, usually made of PC. They provide good adhesion, but be careful, they do not hold up to filaments that reach high temperatures, even PETG tends to fuse with them too well. You can also try polypropylene sheets. You can print directly on very clean glass, but you need space and the perfect level to do so. You can print on kapton tape or PEI sheet, this is one of the best options as it is much more heat resistant than PC so it can be printed on PETG, ABS and other materials. PEI also cleans up well with alcohol, even resistant to acetone, and can be revived with a little steel wool and alcohol.
7. Bed temperature and print speed
Make sure you heat the bed to the recommended temperatures for best adhesion, turn off the bed fans for the first few layers to allow them to fuse properly, and reduce the print speed for the first few layers. If for the main model I print an average of 60 mms / s, then I print the first layer at a speed of 40% or 25 mms / s. This will give it a chance to stick without dragging the print head. This will help thin areas and backings adhere well to the plate.
This article was written by Peter Solomon, founder of Wham Bam
This page has been translated using machine translation. Suggest the best translation
Previous
ShareNext
Similar publications
A 3D printer can be a complex machine, and you don't want to run into filament issues or breakage in the middle of creating a great 3D print. Like any car, it needs to be taken care of.
Read moreNot surprisingly, the quality of 3D printing filament can affect the quality of your 3D prints. That is why there has been much debate about how best to maintain and store the thread. But what there is no dispute about is the main enemy of 3D filament - moisture.
Read moreThe first layer does not stick when printing on a 3D printer?
Home » Articles » Problems with 3D Printing » First layer not sticking when printing on a 3D printer?
First coat not sticking?
This problem needs to be urgently solved, since the quality of the model construction depends on the first layer serving as the basis, or rather on the reliability of its fastening to the desktop. There are several reasons for its appearance, consider the most common of them.
1. Skewed print platform.
The print platform must be in an absolutely flat horizontal position before starting the 3D printer, otherwise the distance between the nozzle and it will be uneven. To align it with the design of the printer, screws and handles are provided, as well as a special function - the "Bed leveling wizard". It can be found in the "Tools" menu and can be used to step-by-step configure the platform by setting the required parameters.
2. Wrong working distance calibration.
Leveling the worktable is only half the battle, it is important to place the extruder nozzle over it correctly so that there is enough free space for the filament to exit, but at the same time the filament seems to be pressed into it. To do this, you need to use the calibration function of the working platform, which most modern models have. If your 3D printer does not have this feature, then you will have to manually calibrate the desktop - fix the print head in a static position and stop the motors, and then adjust the distance by moving the print unit.
Another way to calibrate the 3D printer desktop is software adjustment, which is highly accurate and easy to use. You will find all the necessary parameters for it in the menu. All you need to do is to correct the indicators in the slicer G-Code. Initially, it is better to set small distance values, and then control them by test printing and, if necessary, make changes to them.
When calibrating the 3D printer desktop, please note the following:
- If the nozzle is at a considerable distance from the build platform, there will always be a risk of the filament coming off during printing due to insufficient pressure on it.
- Insufficient clearance between the build table and the nozzle can cause damage to them and poor print quality due to lack of space for the filament to exit and form a 3D model.
- A normal distance between the nozzle and the work table will ensure that the layers are formed correctly over the entire surface area and that they adhere well to each other.

Consider the above recommendations and do not ignore the need for calibration.
3. Print speed selected incorrectly.
An incorrectly selected print speed can break the adhesion between the layers of the model being grown. This is especially true for the output of the first layer. Its insufficient adhesion to the working surface indicates too high a print speed. The output of the filament thread can and should be slowed down using the corresponding First Layer Speed function from the Edit Process Settings menu. When printing the first layer, reduce the speed settings set by the program by half.
4. Incorrect operating temperature setting.
A 3D model may warp if it cools quickly. High-temperature ABS plastics “sin” with this, which need to be given more time to cool than other materials. Cooling models provide special fans. They have their own operating parameters, which users can change on their own. With rapid cooling, there is a risk of plastic peeling off the desktop, which provokes deformation of the 3D model. Switching off the fan is usually enough to prevent this. This will allow the first layers of the model to cool slowly and reduce the risk of deformation to zero. To turn off the fans, the Cooling function is provided from the Edit Process Settings menu. Some models even allow users to specify a different fan speed for the first layer and each subsequent layer. When printing a 3D model with high-temperature ABS plastics, the fan can be completely turned off and the platform heating turned on, which eliminates the risk of deformation of the first layer. This feature is found in the Edit Process SettingsTemperature menu. To turn on the platform heating, you need to specify the temperature parameters of the first layer of the future model. In order not to make a mistake with them, we recommend using the established material heating standards that are used for 3D printing. In the presence of drafts, additional protection of the working platform from cooling is required.
5. Wrong material selection for platform protection.
For both professional and amateur 3D printing, different filaments are used, so their reaction to the consumables used - tape, glue, etc. difficult to predict. To avoid poor quality printing, you should use a material that is ideal for covering the work surface, which can be purchased at a specialized store. It is allowed to perform 3D printing directly on the desktop without auxiliary materials, provided that it is perfectly clean. To enhance the adhesion of 3D plastic to the desktop, it is allowed to use pieces of tape, glues, sprays, hair sprays and other similar materials.
6. Printing a model with a small bottom surface.
If you want to grow a 3D model with a small bottom surface, use the brim function from the Additions ---> Use skirt/brim menu, which will allow you to artificially enlarge it by printing a "hat" around it. An alternative would be to use a previously printed substrate, which will serve as the basis for a future 3D model.