3D printing enclosure
How to build a simple, cheap enclosure for your 3D printer
Maybe you have already seen some of those fancy enclosures people build for their printers. How do they work? And do they work? Today, we will shed some light on this matter! Plus, we are going to dive into patent wars and explain why not all printers come with an enclosure. To top things off, we will even give you a full guide with information on how to build an enclosure for your own printer. But first, let’s start with the fundamental question: what is it good for?
- Stable printing environment – Drafts can negatively impact your print. An enclosure will keep the temperature stable and high. Big differences in ambient and printing temperatures can lead to warping and shrinking of the printed object, especially when printing with ABS. Layer adhesion may also improve with higher ambient temps.
- Reduce and contain smell – Some filaments (looking at you, ABS!) can release unpleasant fumes during printing.
An enclosure will contain these fumes, and you can quickly vent them outside through an open window when the print finishes.
- Noise reduction – As if you needed the MK3 to be any quieter 🙂 But another level of sound isolation can’t hurt, especially if you place the enclosure next to your work desk or in a living room.
- Dust collection – The bearings and smooth rods will appreciate the reduced amount of dust that settles on your printer.
- It’s fun to build 🙂
However, if you’re not printing with ABS or other high-temperature filaments that suffer from warping, you won’t see much of a difference. You might actually want to keep the enclosure open with, for example, PLA to ensure there’s enough cool air around the printer for the part cooling fan.
Enclosure for the MMU2S
If you own the MMU2S, we created a modified version of the enclosure – check it out here.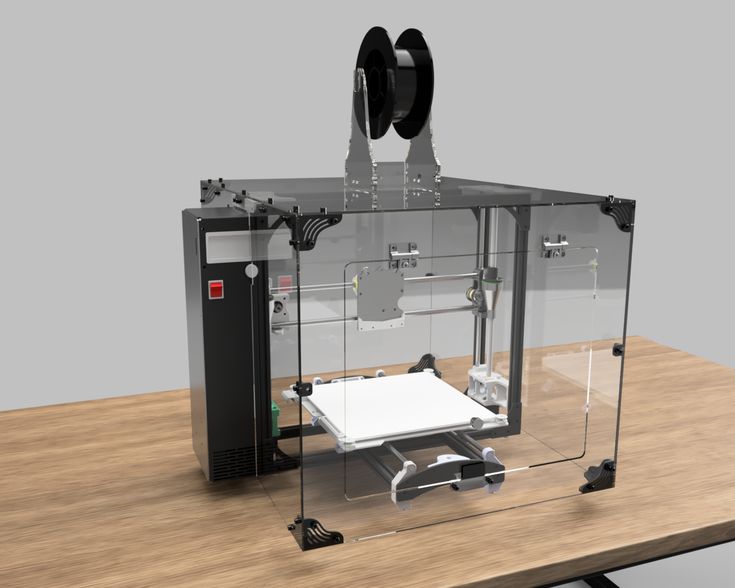
Why aren’t all the printers on the market enclosed by default?
There are two factors here – price and patents. There is no doubt that the rise of consumer 3D printers was delayed by patents. Companies like Stratasys, Zcorp or 3D Systems have patented nearly every 3D printing technology you can think of. It’s pretty crazy when you look at the sketches from 1980s-1990s and realize just how much some of the current 3D printers are similar to them.
It was only after these key patents expired in 2009 (20 years after application) that the RepRap movement started. And cheap, easy-to-build 3D printers quickly started to be developed. Even though most of these basic patents have already expired, some of them (most importantly the ones owned by Stratasys) are either still active, or have just recently expired. For example, Stratasys’s (still active) patent describes an apparatus “That builds up three-dimensional objects in a heated build chamber” (…) “The motion control components of the apparatus are external to and thermally isolated from the build chamber.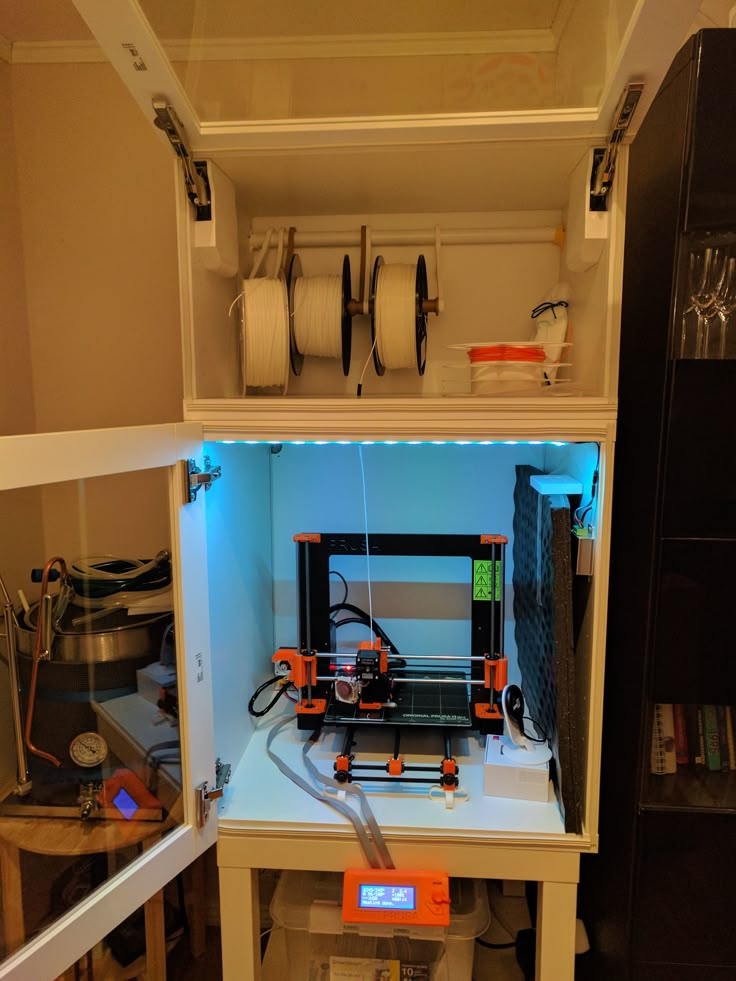 ” That means if you put the stepper motors outside of an enclosure, you can’t sell the product, as it would violate the patent.
Another obstacle is the price. We have considered and even developed a Prusa enclosure quite a while ago. It was made mostly of Plexiglass. Our target was $90 price tag and considering the packing, shipping and material cost, we just couldn’t make it work. It makes much more sense to build the enclosure yourself from locally sourced materials.
How hot should the enclosure be and can the PSU stay inside?
Let’s get something straight, we are not targeting really high temperatures inside the enclosure.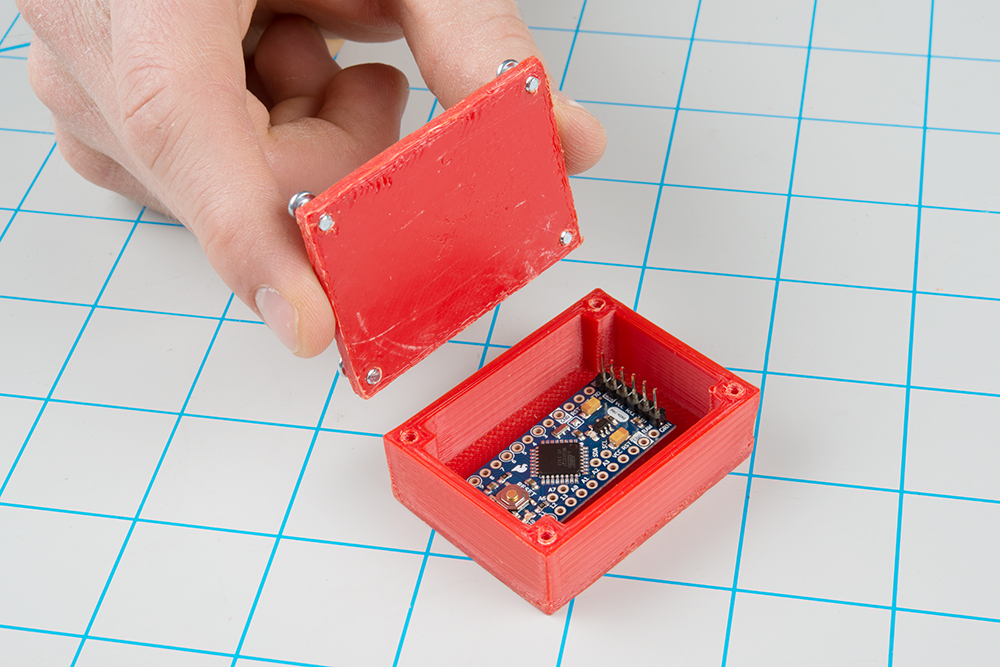 You don’t need an extra heater. The printer itself produces a lot of heat and all you have to do is to not let it escape. The goal is to achieve stable temperatures without any sudden changes from wind or draught. Even just 35°C inside the enclosure will make a massive difference, increase layer adhesion and may prevent ABS from warping.
The PSU is not made to work in extremely hot environments. By keeping the PSU in temperatures above 40-50°C can significantly shorten its lifespan. Ideally, you’d place the PSU outside the enclosure. You can even place the LCD outside to be able to control the printer without letting the hot air out.
2 simple enclosures
Photo studio tent – no work required at all
An enclosure can often be created from an object originally made for a completely different purpose. This photo (80×80) tent can be bought on eBay or Aliexpress for about $15-20. And all you have to do is place the printer inside the tent.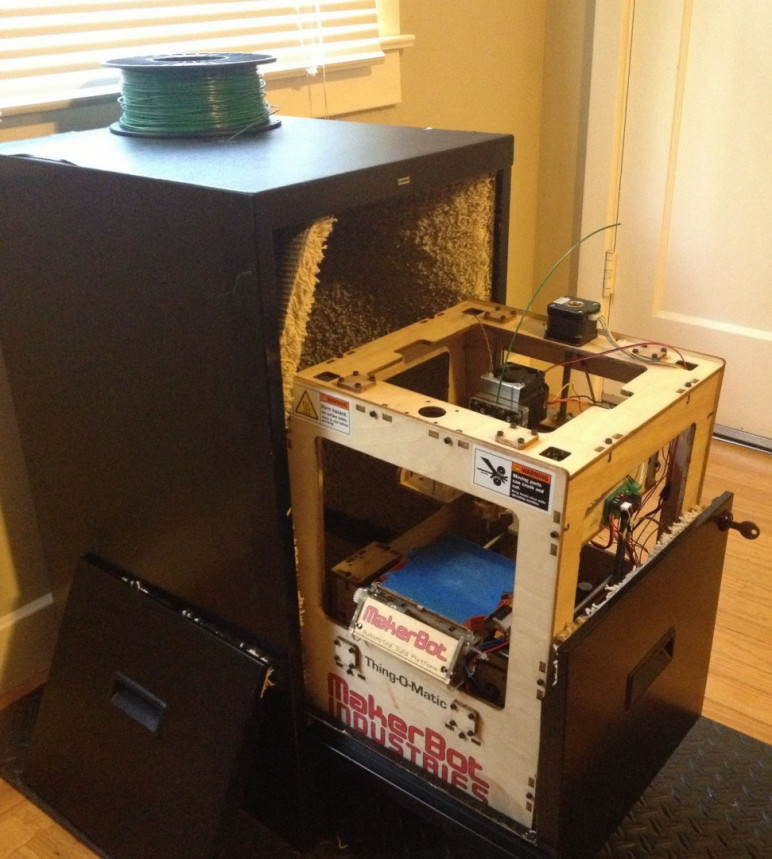 It’s made of textile material, which means it’s porous. A textile enclosure won’t let you reach crazy high temperatures, so you can even keep the PSU inside. We reached temperatures around 38°C after 10 minutes of printing inside a room with the ambient temp. of 26°C – that’s a significant improvement. And as a bonus, you have a photo tent for your prints 🙂
Ikea Lack – when you care about looks as well
Using Ikea Lack as an enclosure is the most popular choice among the 3D printing community. If you search online, you’ll find dozens of Ikea Lack enclosure designs. The table can be bought for under $10 and has almost the perfect size for Prusa printers. You can stack the tables on top of each other to create bays for multiple printers, or use one as filament and tools storage. Even though some of the existing enclosure designs are pretty good, we wanted to give it our own spin.
Advantages of our enclosure
- PSU placed outside in a clip-on holder, but easily placed back if you need to move the printer
- LED lighting connected to the printer’s PSU
- Hinges built into corner extensions
- Double-door opening
- Individual tables can be lifted at any time
What you’ll need
Printable parts
Ikea Lack enclosure main parts
Frame brace replacing the PSU for the MK3 (silver PSU)
Frame brace replacing the PSU for the MK3 (black PSU)
Frame brace replacing the PSU for the MK2/S (remix by Martin Schnur)
60 degree heatbed cable cover for the MK3
45 degree heatbed cable cover for the MK2/S
Construction
- 2x or 3x Ikea LACK table
- 4x Neodymium magnets 20mm x 6mm x 2mm
- 3x Plexi 440 x 440 mm, 3mm thick (if you’re in the US, try Queen City Polymers)
- 2x Plexi 220 x 440 mm, 3mm thick
Electronics
- Fire/smoke detector
- Indoor/Outdoor Thermometer
- LED stripe 24V, 30 cm
- 24V for MK3, 12V for MK2/S
- If you want to use a 12V LED strip with the MK3, use a separate power supply.

- Twin cable, 100 cm
- 2x WAGO 221 or similar compact lever connector
Screws
- 12x 6×20 mm (12 x 3/4″)
- 4x 6×50 mm (12 x 2″)
Printed parts
- Upper table (enclosure box)
- Lower table (support table)
- Spool holders
Tools
- Philips screwdriver
- Allen keys
- Super Glue
- Drill + 3 mm wood drill + 10 mm wood drill
- Measuring tape
- Marker
Enclosure (upper table) assembly
Upper corner standoffs installation
Attaching the legs
LED stripe
For about $12, you can buy an LED strip with a power supply, like this one. However, if you’re feeling a bit adventurous and have some experience with wiring up electronics, you can power the LEDs directly from the printers power supply. Remember, that the MK3 runs on 24V, whereas MK2/S runs on 12V, so make sure you buy the correct LEDs.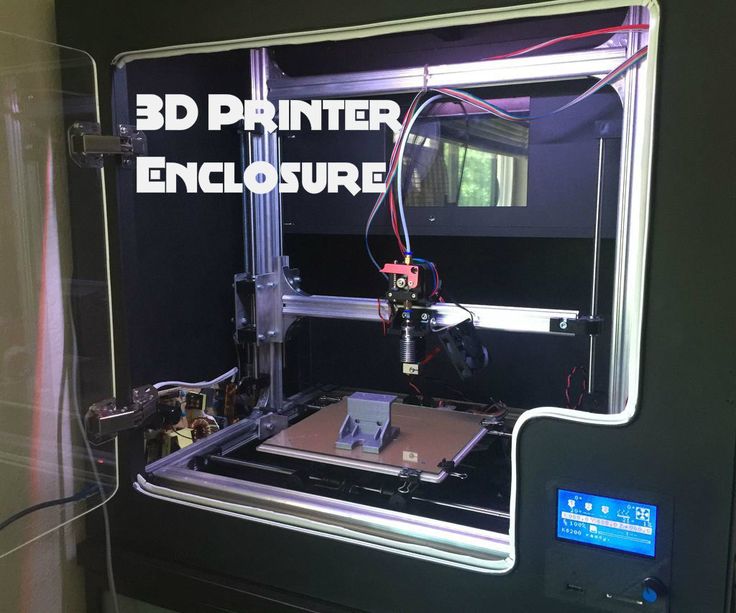
Spool holders
Smoke detector installation
Place the smoke detector in the rear part of the table so it will not obstruct filament insertion or won’t get in the way when you’re taking the printer out from the box.
Bottom corner standoffs installation
Before you start screwing the bottom standoffs, make sure you place the Plexiglass in first. As soon as you tighten the standoffs, the Plexiglass will be fixed in place, and you won’t be able to remove it. This means you can easily lift this section of the enclosure without worrying that the glass would fall out. Note, that one of the four standoffs has a hole for cable pass-through. Make sure you place this standoff on the left side so that the cables can be routed directly to the EINSY board.
Support table (lower table) assembly
PSU holder
Electronics do not thrive in higher temperatures inside the enclosure.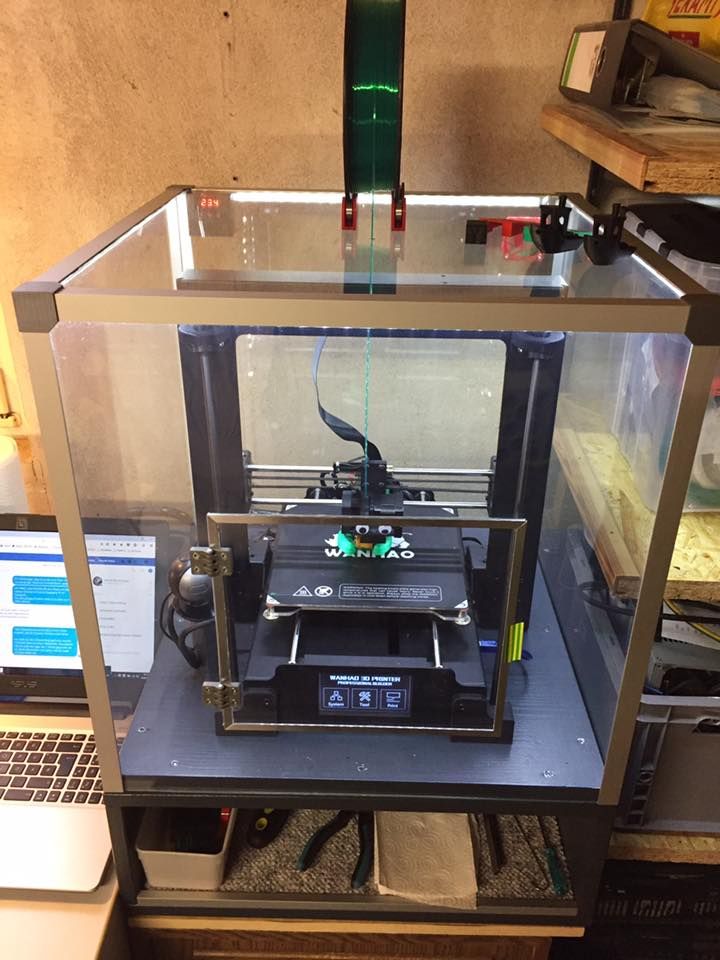 To preserve PSU in good condition, it’s better to place it out of the box. It is even safer!
- Unplug the printer from the power socket. Remove zip ties on the frame to release PSU cables. (Tighten the rest of the cables with new zip ties.)
- Disconnect the cables from the EINSY board. Do not forget to unplug the Power panic sensor as well.
- Unscrew the PSU form the frame.
- Hold the PSU next to the rear left leg (the one with the cable pass-through). Tighten the PSU holder printed part with two screws and then install PSU catcher printed part.
- PSU is now fixed, but it is possible to slide it out when you need it.
- You can replace the PSU on the frame with this printed part to ensure the rigidity of the frame.
Frame brace and right-angle cable cover
After removing the power supply from the frame, it’s possible to replace it with a printed part and ensure frame stiffness. The heatbed cables may hit the plexiglass in the back of the enclosure. To prevent this from happening, print an alternative 60 degree heatbed cable cover. (EDIT: Users reported several problems with the right angle one shown in the video and on the pictures below, so we switched the suggestion to the 60 degree one).
Plugs fixing and magnetic handles
Fix the four bottom plugs. One of them has a hole for cable pass-through. Place it in the rear left corner of the enclosure. Glue two magnets to the door stopper and screw it to the front of the table. Leave enough space for the plexiglass and the handles (1 cm).
Finished enclosure
Now just stack the two tables on top of each other and the enclosure is complete. Optionally, you can add another Ikea Lack table to the bottom to raise the printer to a more comfortable height.
9 Amazing DIY 3D Printer Enclosure Ideas – Clever Creations
Open-frame 3D printers, like the Ender 3, have become a common sight amongst consumer printers. Open frames help to keep the manufacturing costs low but make it difficult to 3D print with high-temperature filaments such as ABS and Nylon.
A 3D printer enclosure is an ideal solution for this issue. It increases the safety of your printer and isolates it from the external environment. 3D printer enclosures can be bought off-the-shelf, but there are also plenty of DIY enclosures made of cardboard, plastic, or metal.
Let’s take a look at some of the best DIY 3D printer enclosures that you can build for your printer that do not cost a fortune!
Why Use a 3D Printer Enclosure?
Open-frame hobbyist 3D printers offer limited material compatibility and safety. They expose components to dust and dirt and have no air-filtration system. There is also a risk of pets and children interfering with the 3D printing process or touching the hot elements of the printer.
An enclosure minimizes these drawbacks by isolating the 3D printer in an enclosed space. It helps to maintain a constant temperature which comes in handy when 3D printing with high-temperature filaments like ABS and Nylon. It further aids in noise reduction, making 3D printing at home or in offices more convenient.
You can also add an air filtration system to the enclosure to filter out any 3D printer fumes, thus increasing the safety of your 3D printing area. Not to mention, enclosures also make 3D printers more aesthetically pleasing and easier to integrate into your workspace.
To summarize, a 3D printer enclosure increases the material compatibility, print quality, and usability of your printer.
Which Enclosure to Get?
There are a few options when it comes to 3D printer enclosures. You can buy an enclosure off-the-shelf or make your own from scratch.
DIY 3D printer enclosures can be cheap if you want them to be, but they do require a bit of effort and time to put together. The best enclosures are made from materials that are both sturdy and have good thermal insulation properties.
If you’re looking for an enclosure that is easy to set up and does not require any DIY skills, then we suggest buying an off-the-shelf 3D printer enclosure.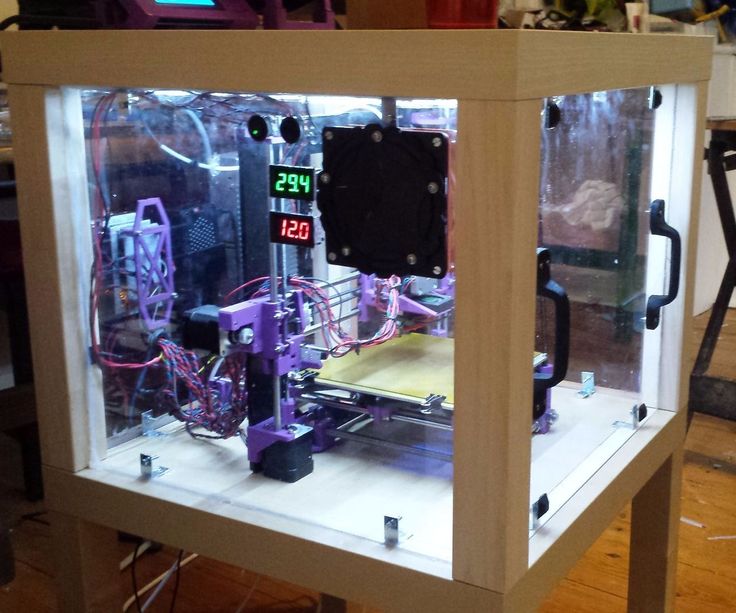 These are typically made out of plastic or aluminum and come with all the necessary fixtures and fittings.
Another alternative is to simply buy an enclosed 3D printer, but those come at a significantly higher cost.
Recommended:
The 9 Best Enclosed 3D Printers
Whichever direction you choose to go in, make sure to measure if you have enough space on your 3D printer table or workbench.
If you want a 3D printer enclosure that is fully customized to your 3D printer model and specific needs, then you will have to make your own. Now let’s look at some cheap and creative DIY 3D printing enclosures!
Cheap 3D Printer Enclosure Ideas
DIY Enclosures
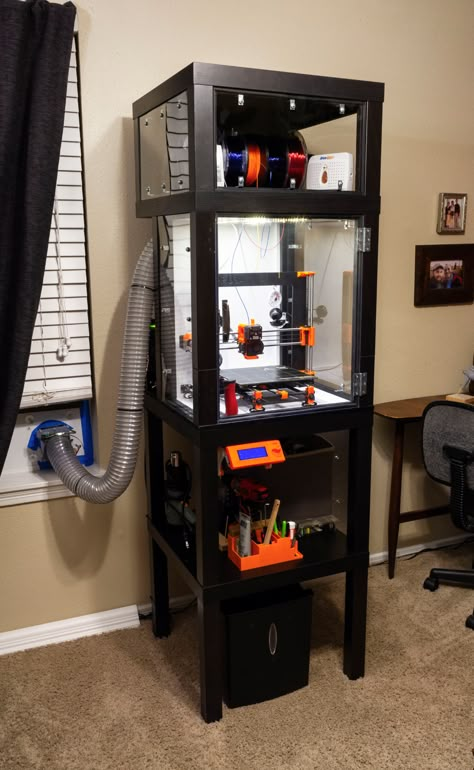
IKEA LACK 3D Printer Enclosure
Image: Mikolas Zuza via Prusa3D
The IKEA Lack enclosure is a recognizable and robust DIY 3D printer enclosure. It is cheap, easy to build and customize, and is modular enough to accommodate any future changes in the enclosure design.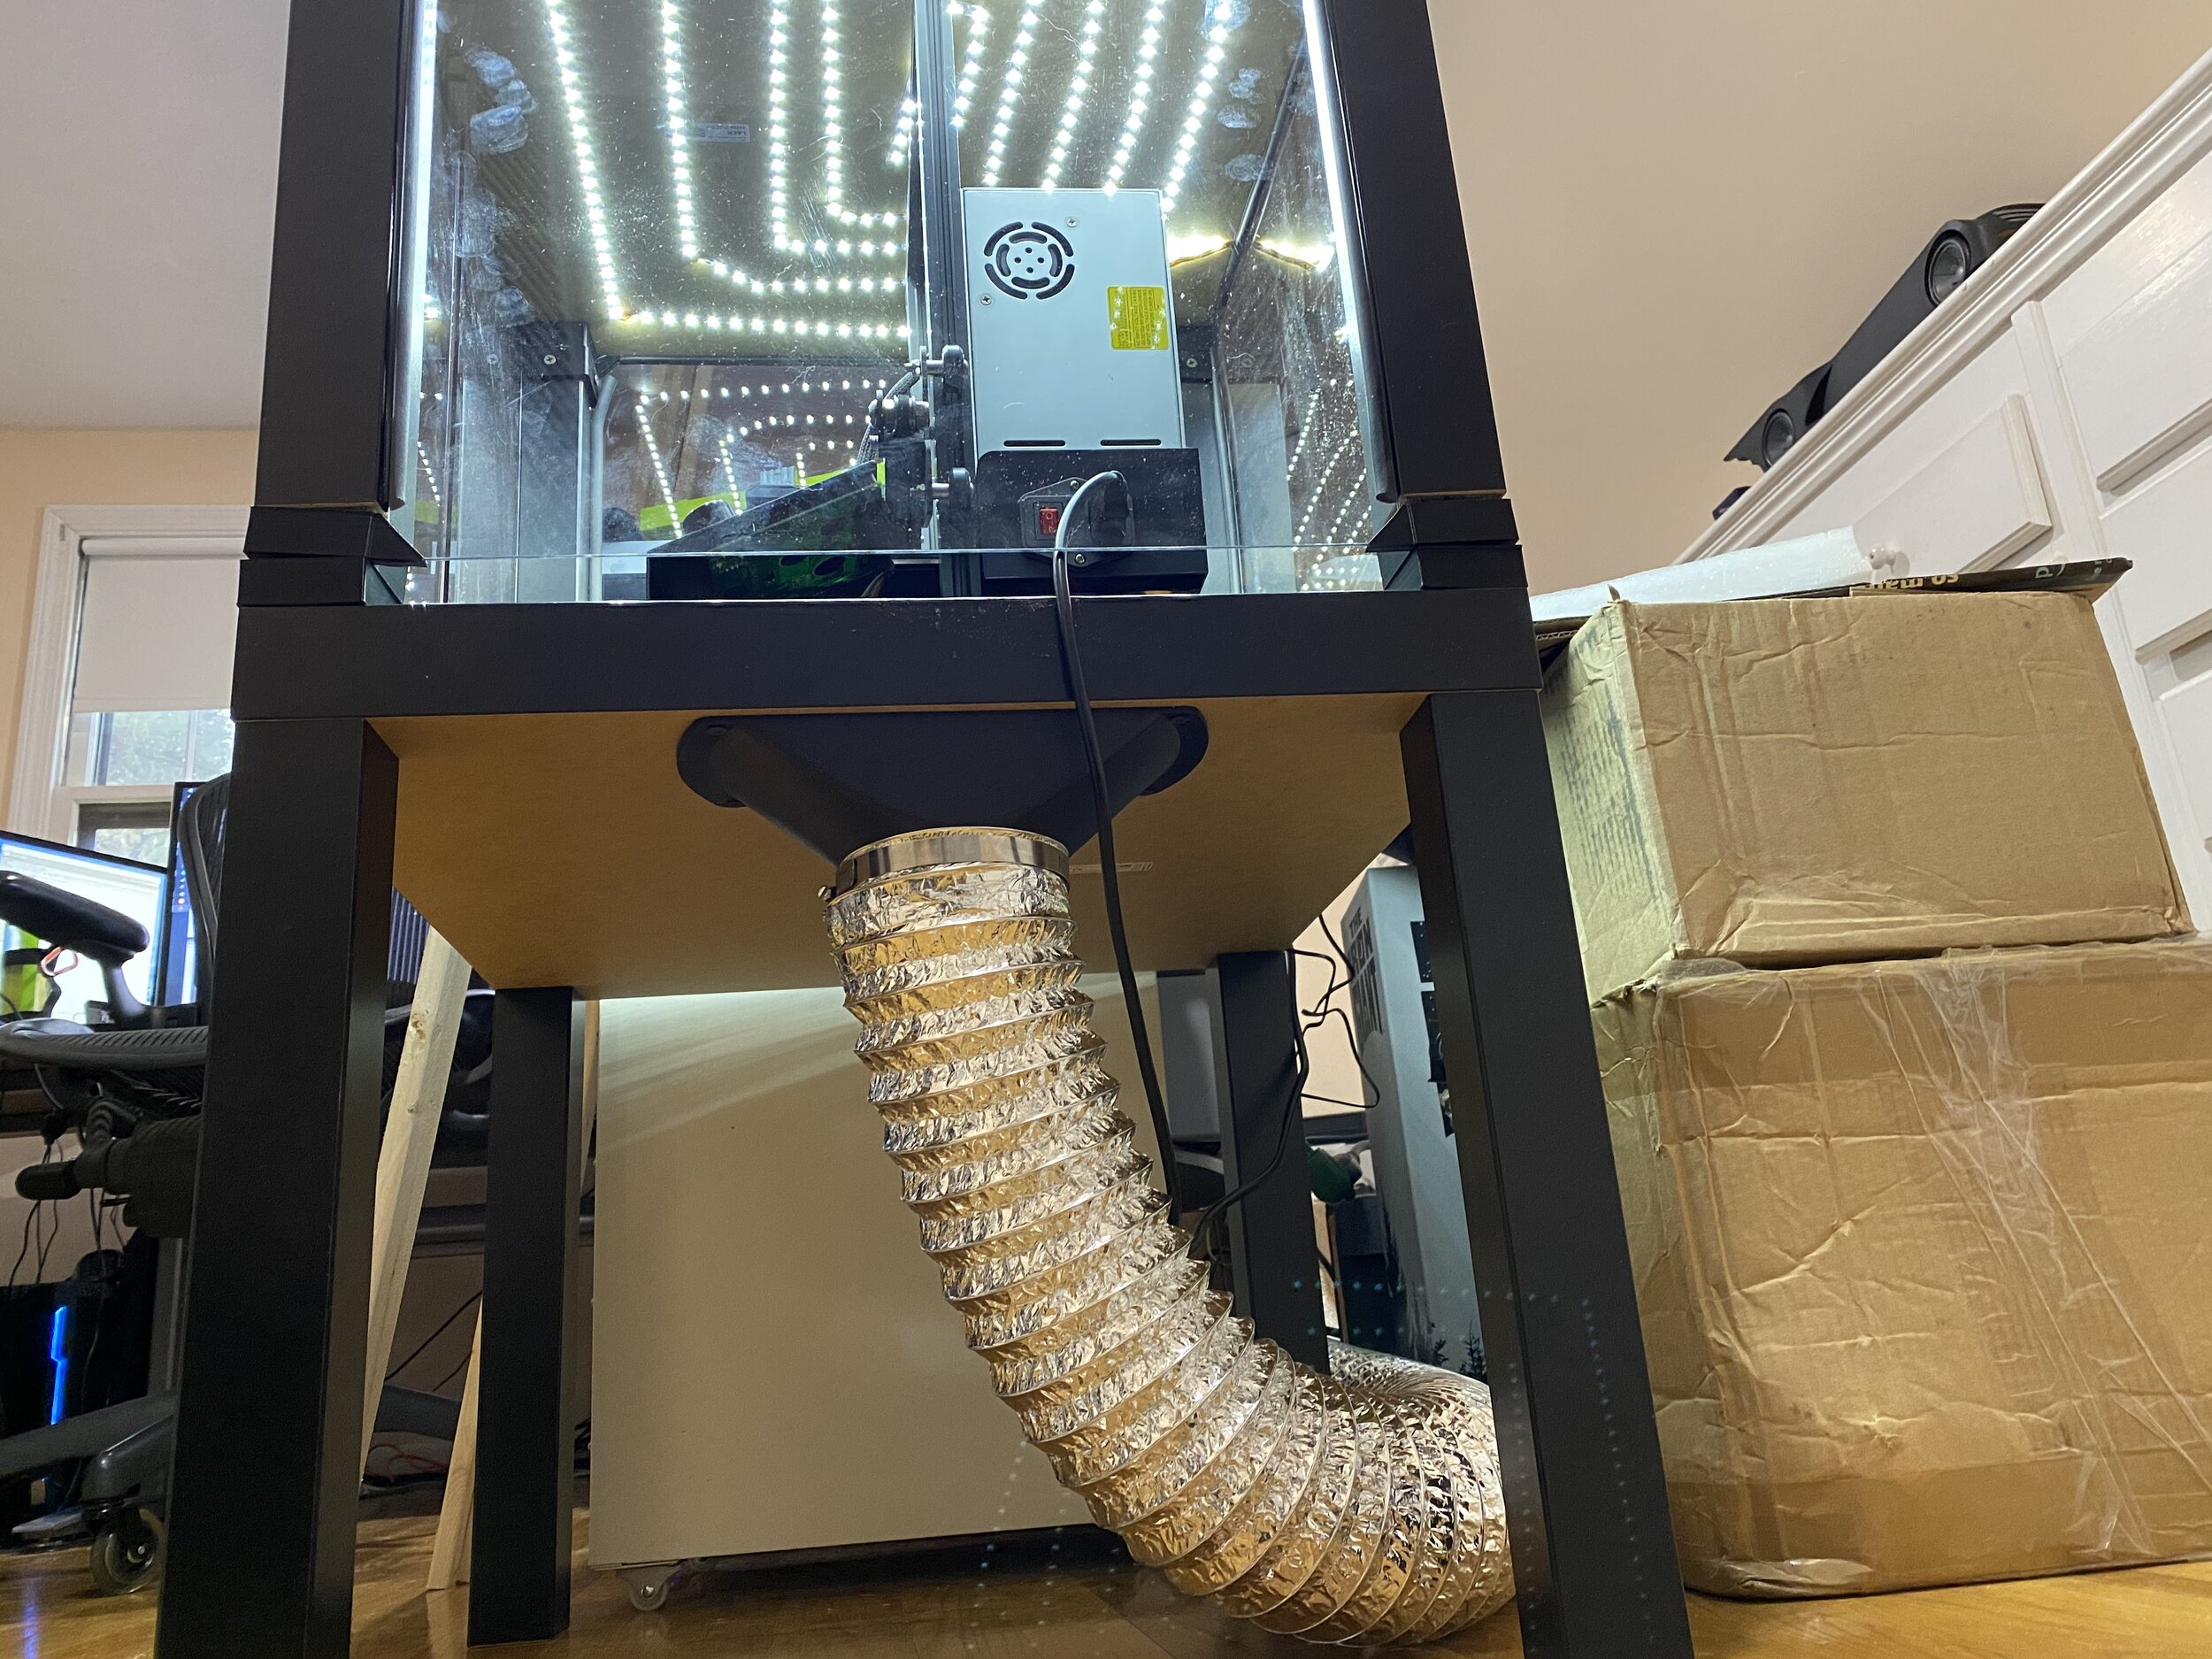
This enclosure uses a couple of IKEA Lack tables stacked on top of one another. You can use these tables as per your preferences. Usually, though, the top one is used as a 3D printer bay, with the bottom one for storing tools. The design allows you to move your power supply outside and protects the electronics from high temperatures.
There are a variety of designs available for free with detailed guides, and you can build them within a day. The IKEA Lack table enclosure is great for small to medium-sized 3D printers like the Prusa i3 MK3S+ and Creality Ender 3 as it is. And with some 3D printed leg extensions, you can even fit taller printers like the Creality CR-10 Smart Pro.
If you want to make things as easy as possible, you can even buy the required plexiglass panels as a pre-made kit.
DIYE Pack of 5 Plexiglass V1 1/8 Acrylic Sheet for IKEA Lack 3D...
102 Reviews
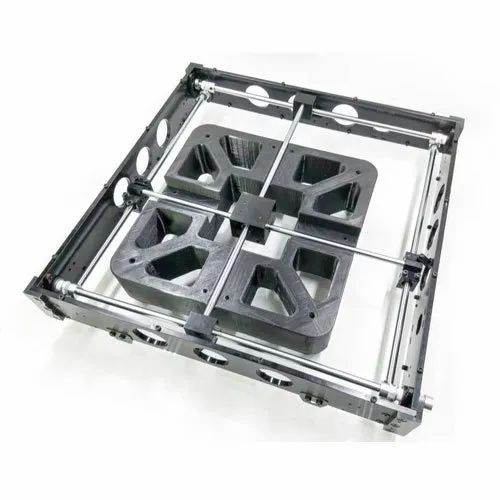
Check PriceAluminum Extrusion Enclosure
Image: Namsted via Imgur
Aluminum extrusions are a great and easy way of building a structural frame. These are lightweight, strong, and easy to machine, making them ideal for building a 3D printer enclosure.
This aluminum extrusion enclosure gives better stability and durability than the IKEA Lack design. The maker has used custom-sized aluminum extrusions to accommodate a Prusa i3 MK3S+ 3D printer in the middle. The top is used for filament spools, and you can store your tools in the bottom section.
The enclosure is covered up with acrylic panels on all four sides, giving the print chamber good visibility. You can adjust the height of all four feet to get a leveled horizontal plane.
The project is not for beginners, as you will need to have some experience with machining and building things. But, if you’re up for it, it will prove to be an excellent learning project for you. An aluminum enclosure is very customizable, lasts longer, and acts as a perfect house for your 3D printer.
DIY Smart 3D Printer Enclosure
Image: Jure Korber
This smart 3D printer enclosure comes with a suite of electronics and sensors.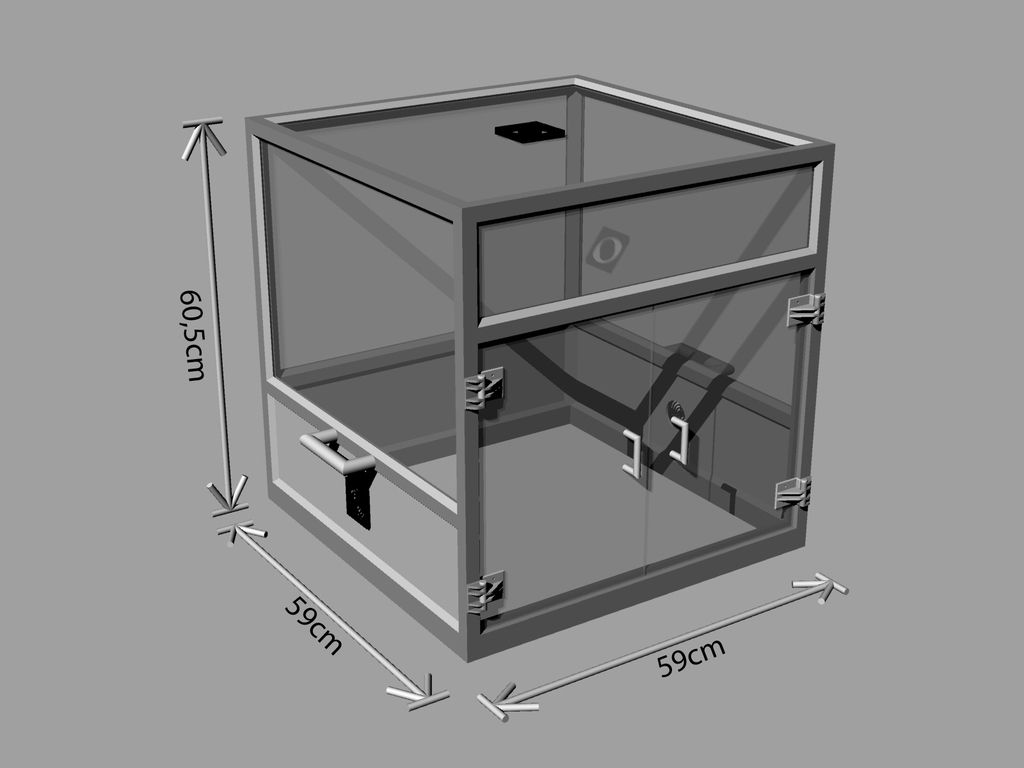 It has a 3.5 inch LCD screen, a smoke detector, door sensors, air filtration, temperature, humidity sensor, and controllable LED lighting.
The 3D printer enclosure is divided into two compartments. The bottom one is explicitly designed to fit a Prusa printer and the top one to store eight spools of 1 kg filaments at a time. The enclosure has a custom PCB board that lets you easily wire up and control its various features.
You can get the STL files of certain 3D printed parts for free on Thingiverse. But if you want a detailed guide, along with BOM, build photos, and other aids, you will have to pay a fee to the designer. If you have the time and money, a smart 3D printer enclosure like this is an excellent DIY 3D printer enclosure for most popular open-frame 3D printers
Sound-Insulated Enclosure
Image: Spare Time Shop via YouTube
Open-frame 3D printers can get noisy, and the constant buzzing and the whirring of stepper motors can get irritating after a while.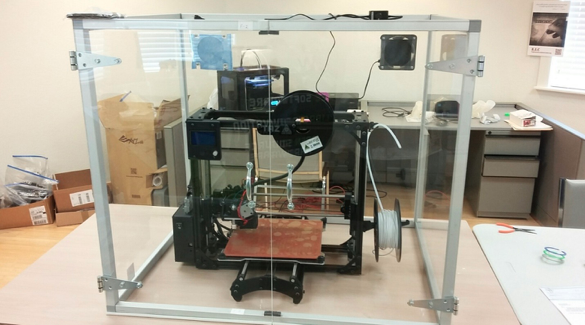 This issue is most relevant if you 3D print in a living space or an office environment. This is where this sound-insulated enclosure steps in.
As far as traditional enclosures go, they reduce noise up to a certain extent; yet, a sheet of acrylic can only do so much in terms of noise reduction. This sound-insulated enclosure, on the other hand, is made of wood, which has an acoustic foam lining to absorb the 3D printer noises.
This enclosure is big enough to accommodate a Creality CR-10 with filament spool and has dual doors and a transparent window to easily view your 3D printer. You can place the electronics of the CR-10 on the outside of the box, letting you control your 3D printer without opening the build chamber.
The enclosure is relatively easy to build and reduces noise considerably. The sound-insulated enclosure is a great option to get rid of any noises and 3D print in your living areas.
IKEA Pax 3D Printer Enclosure
Image: DollaSign via Reddit
This IKEA Pax enclosure is a wardrobe for your 3D printers.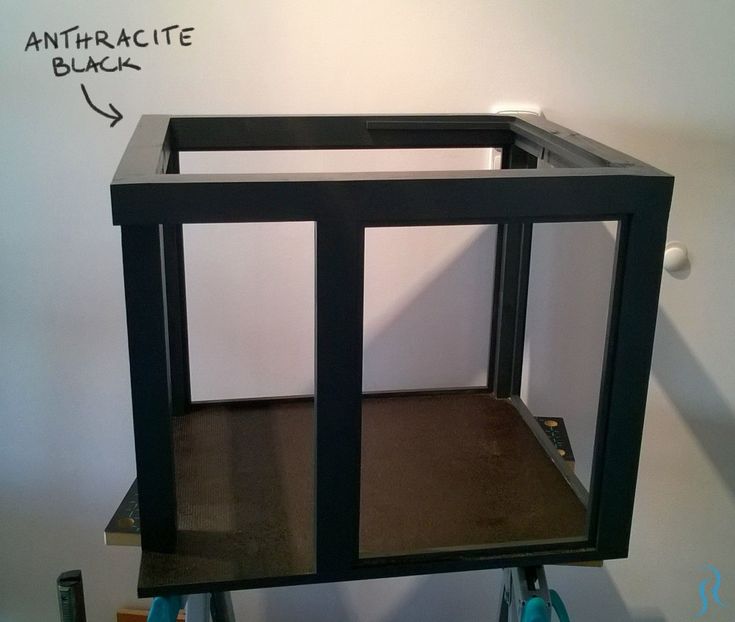 It is cost-effective and saves a lot of floor space when you want to enclose many 3D printers. Compared to the Lack enclosure from above, it offers similar functionality, albeit in a smaller footprint and relatively budget pricing.
You can stack up to three 3D printers in the PAX enclosure and still have some room left for filament spools, tools, and other electronics. All power supplies can sit outside the enclosure, thus protecting them from high temperatures. To add to its functionality, you can include some Neopixel LED lights.
Adafruit NeoPixel Digital RGB LED Strip - Black 30 LED [ADA1460]
72 Reviews
Check PriceBecause the shelves are modular, you can easily move them around to fit 3D printers of varying heights. The major drawback of the PAX design, however, is its lack of transparent panels. Other than that, the IKEA PAX enclosure is an easy, quick and cheap solution for enclosing many 3D printers at once.
Resin 3D Printer Enclosure
Image: majorbrogains via Reddit
Even though resin 3D printers come with an enclosure, you need a separate space to store the printers, resin bottles, and prints like your 3D printed miniatures. This enclosure is an IKEA BRIMNES cabinet with ample space to store and display all your resin 3D printing equipment and minis.
The entire cabinet is divided vertically into two separate parts, giving you the ability to efficiently sort out your goodies. You can store the 3D printer itself in one half, while the other half can take in a washing station. And with a bit of DIY, you can vary the shelves’ heights and customize them to perfectly fit your minis’ collection, resin bottles, and other resin 3D printer accessories.
There is air ventilation within the enclosure with the exhaust on the top. It helps to throw out harmful 3D printer fumes and keep away the foul smell. You have enough space to accommodate popular resin printers like the Elegoo Saturn S and Phrozen Sonic Mighty 4K.
Considering the price, ease of use, and accessibility, using an IKEA BRIMNES as DIY 3D printer enclosure is an excellent solution for clearing up your resin workplace.
Repurposed Dishwasher Enclosure
Image: antialiasedpixel via Reddit
Repurposing things is an excellent avenue in the DIY area, and what better way than to use an old dishwasher as a 3D printer enclosure.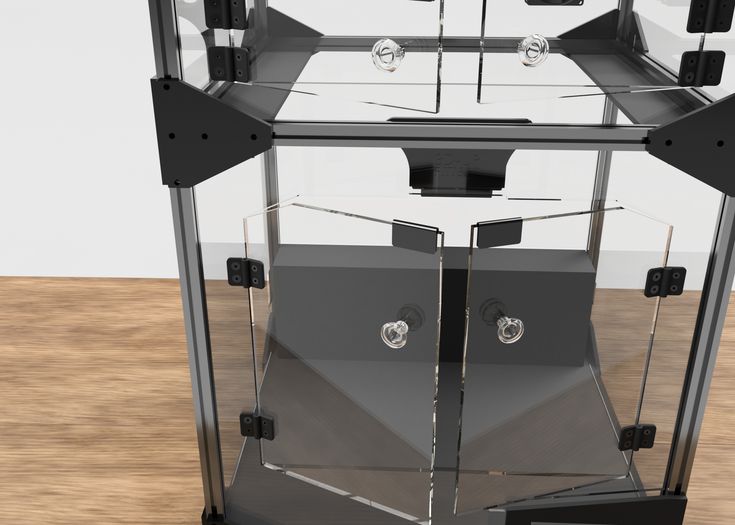 This one easily fits an Prusa i3 3D printer and still has room at the top to mount a filament spool.
The Prusa’s footprint is 16.5×16.5×15 inches, while the area within the dishwasher is 21x23x25 inches. This dishwasher has enough room to fit in the Creality Ender 3 (Pro/V2) and others of similar sizes. And the spare room that’s left can be utilized to fit in some LEDs, a Raspberry Pi, and a webcam for remote monitoring and control of the 3D printer.
The main disadvantage is that there is not much room for further customization. You will need to change the dish washer to accommodate any future updates to the 3D printer, not very practical!
Otherwise, the enclosure is one of the best ways to repurpose an old machine into something useful and save some money.
Ready-to-Buy Enclosures
Official Creality Enclosure
The official Creality enclosure is one of the best ready-to-use designs to cover up your 3D printer. While it is designed for Creality 3D printers, you should have no issues using it for other 3D printers of similar sizes.
The enclosure uses aluminum rods for its structural strength and an aluminum-lined fabric to enclose the 3D printer on all its sides. The internal aluminum lining is made up of flame-retardant material.
The Creality enclosure does a good job at keeping hot air inside and maintains stable temperatures well. It also comes with a single window on the front of the box to view your 3D prints in progress.
With a little bit of wiring, you can move out the LCD controller and power supply to the outside of the enclosure to work with even higher temperatures. For just under $70.00, the Creality’s Enclosure is an effective solution to print with warping filaments while keeping fumes in and dust out.
Creality Ender Enclosure for 3D Printer, Fireproof Dustproof 3D...
Check PricePhotography Lightbox
Image: Make360
While a photo lightbox is not designed for 3D printers, it does a great job as a 3D printer enclosure. It doubles as both a photo studio tent and an enclosure and gives you great lighting for pictures of your 3D prints.
This lightbox has two adjustable LED bars that cumulatively house 126 LED lights giving you a bright and well-lit inside area. It also gives you four PVC backgrounds for shooting various scenes and highlighting different shades of your 3D prints. And you can adjust the front cover to either fully cover up the 3D printer, or keep it open for ventilation.
It is a decent step up over the Creality enclosure and aids in photographing and taking videos of your 3D prints. The enclosure is easy to assemble and use, while also being convenient to store when necessary.
This enclosure is an ideal choice for enclosing your 3D printer and still having the flexibility to use it as a photo lightbox when you need it.
Photo Box, SAMTIAN Photo Light Box 32x32x32 Inches 126 LED Light...
Check PriceBuying or making a DIY 3D Printer enclosure: What to consider
Size
The size of the DIY enclosure should be just enough to fit your 3D printer. It should not be too big, as this makes it more difficult to heat the print area and makes it harder to move around if you need to.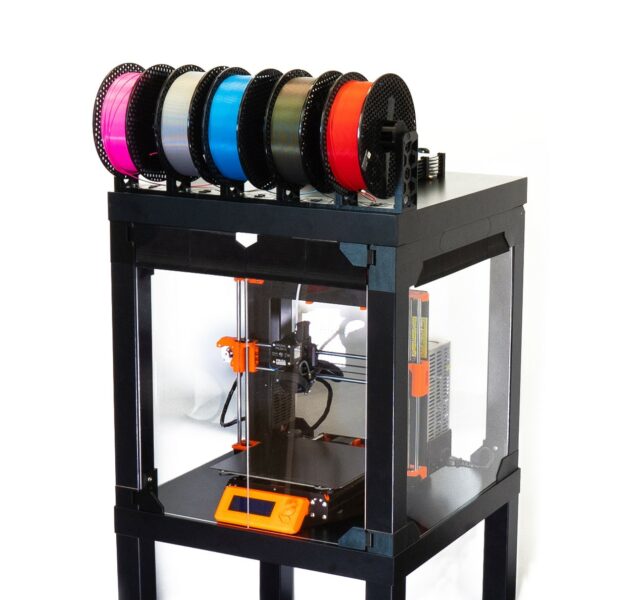
Ease of Access
You should be able to easily access your 3D printer when it is in the DIY enclosure. Locking latches are a great addition that lets you lock and open the enclosure at will
Material
A DIY 3D printer enclosure should be made of a durable and heat-resistant material. The material should also be easy to clean. Plexiglass is a good option for 3D printer enclosures as it is durable, easy to clean, and heat resistant.
Smoke Alarm
Installing a reliable smoke alarm at the top of the enclosure can alert you in time if your 3D printer catches fire. It is a worthwhile investment that can help keep you safe.
First Alert SCO501CN-3ST Wireless Interconnected Combination Smoke...
Check PriceFire Suppression
If you want to be extra safe, you can install a fire suppression system that kicks in when the 3D printer enclosure gets too hot. A popular choice is the Blazecut T-series.
Soundproofing
One of the main disadvantages of 3D printing is the noise it produces.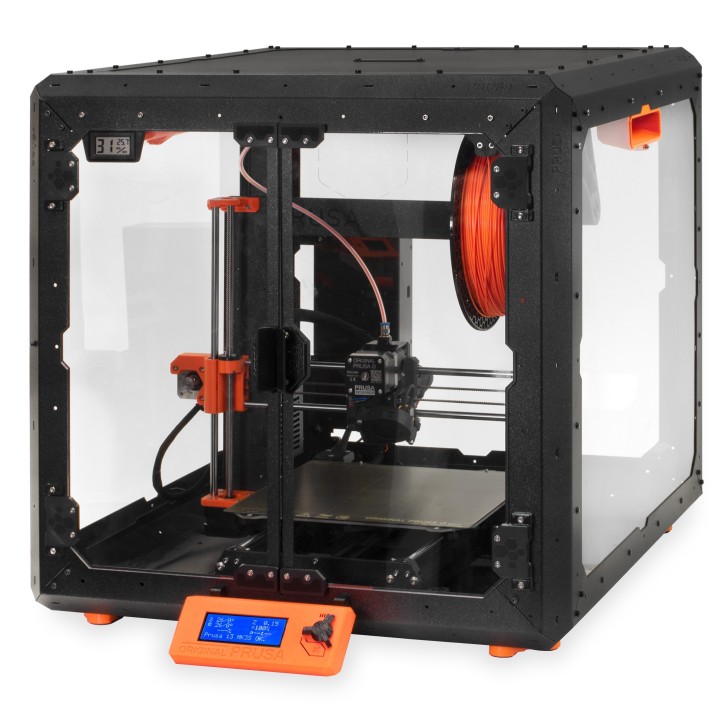 This can be a problem if you are trying to print in a shared space or if you just want to keep the noise down.
3D printer enclosures can help with this by soundproofing the area around the printer. Adding acoustic foam panels to your enclosure will help reduce sound levels significantly. Always make sure you get fire resistant ones, however.
TroyStudio Acoustic Studio Absorption Foam Panel, 12 X 12 X 2 inches...
1,412 Reviews
Check PriceWindows
Adding a window to the 3D printer enclosure can help you monitor the progress of your 3D prints.
Lighting
You might want to consider installing LED lights inside the 3D printer enclosure. This will help you see the 3D prints better and also aid in taking pictures or videos of them.
Price
The price of 3D printer enclosures can vary depending on the size and features. 3D printer enclosures can be bought or made. If you are making your own 3D printer enclosure, you will need to factor in the cost of all the materials as well as your time.
Frequently Asked Questions
Is a 3D printer enclosure necessary?
A 3D printer enclosure is not strictly necessary, but it can be beneficial in terms of safety and maintaining optimal printing conditions. Enclosures can help to minimize drafts and other external factors that can impact the print quality, and they also provide a barrier between the hot printer components and curious fingers (especially important if you have young children or pets in the home).
If you are interested in purchasing a 3D printer enclosure, there are many different options available on the market to suit a variety of budgets and needs.
How do 3D printer enclosures work?
3D printer enclosures work by creating a controlled environment for the 3D printer. This helps to protect the 3D printer from dust, debris, and fumes. It also helps to maintain a constant temperature around the 3D printer, which is important for preventing warping of high-temperature filaments.
How do you enclose a 3D printer?
A 3D printer can be enclosed in a variety of ways.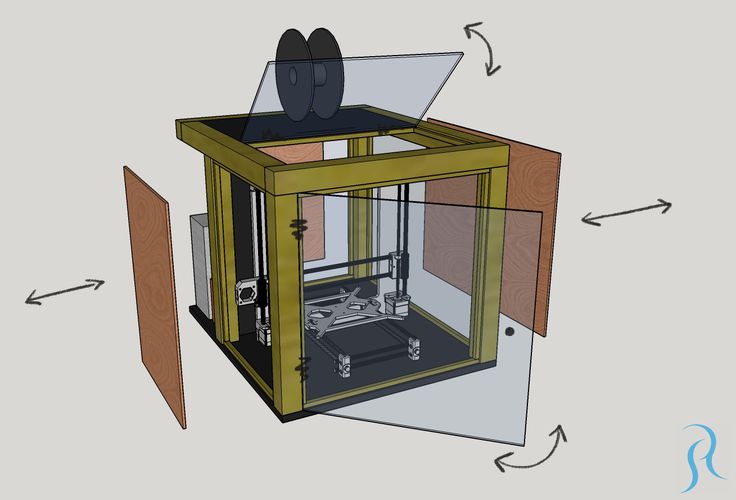 Some printers come with an enclosure that is already built in, while others use the addition of an enclosure for safety reasons.
One common way to enclose a 3D printer is by using a box made out of cardboard or plastic. The box should be large enough to fit the printer and the printing material, and it should have openings for the print head, filament feeder, and other cables. The box can be sealed shut with tape or clamps to keep fumes and heat from escaping.
Another option is to build an enclosure out of plywood or acrylic sheeting. This type of enclosure is more permanent and can be customized to fit the specific needs of the user and 3D printer.
Do 3D printer enclosures need ventilation?
3D printer enclosures do not need ventilation if the material being printed is not fumes-emitting. If you are printing with PLA, for example, there should be no issue with keeping your enclosure sealed. However, if you are printing with ABS, it is recommended that you provide some form of ventilation to deal with the build-up of fumes.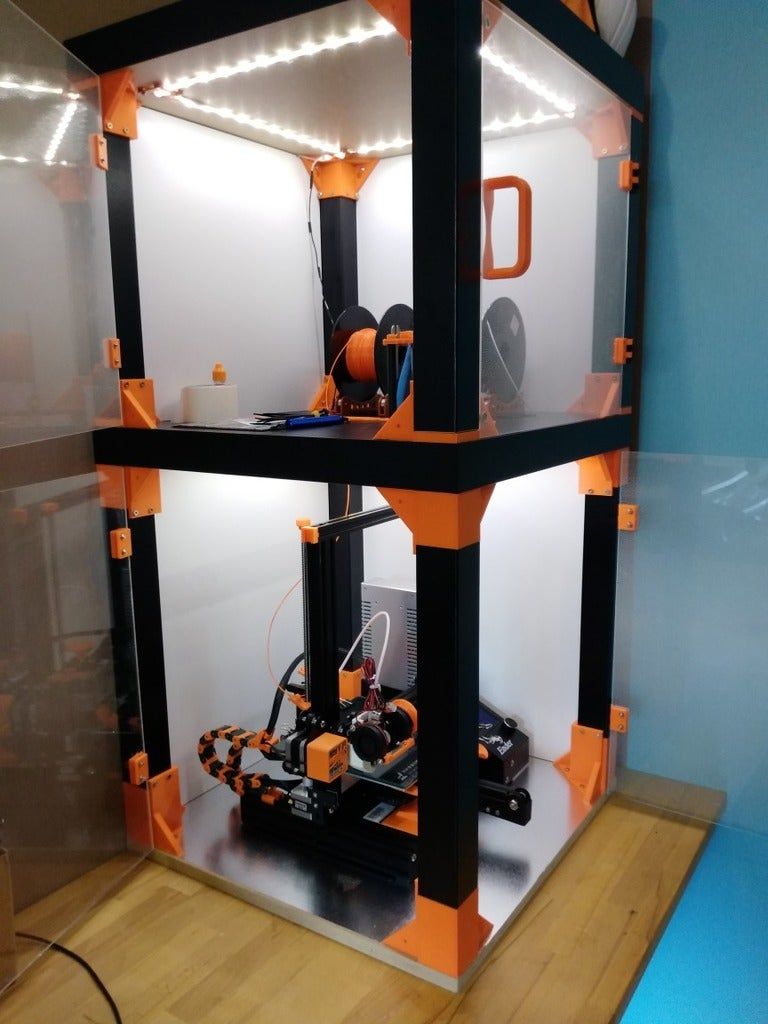
Do I need an enclosure for PLA printing?
PLA prints very well without an enclosure, so you likely don’t need one unless you’re printing in extremely cold temperatures. If you do want to use an enclosure, make sure it’s well-ventilated so your print doesn’t overheat.
How hot should a 3D printer enclosure get?
There is no definitive answer to this question as it depends on the specific 3D printer and filament being used. As a ballpark range, a temperature somewhere between 30 and 60 degrees Celcius is the right range for FDM 3D printer enclosures.
Should I enclose my Ender 3?
You should enclose your Ender 3 if you want to protect it from dust, dirt, and other debris. Additionally, enclosing your printer will help to maintain a consistent temperature and protect against accidental contact.
An enclosure is one of the top Ender 3 upgrades we recommend people to start with when modding their printer.
Recommended:
The Best Ender 3 (V2 / Pro) Upgrades
Should a 3D printer enclosure be airtight?
There is no single answer to this question as it depends on the specific printer and application. In general, though, airtight enclosures can be helpful in preventing fumes and particles from escaping the printer and contaminating the environment. They can also help protect the printer from dust and other debris.
However, if the enclosure is too tight, it can create problems with heat retention and airflow, which could lead to a decrease in printing quality or even damage to the printer. It’s important to find a balance between creating an effective enclosure and maintaining optimal printing conditions.
Conclusion
A 3D printer enclosure is an effective way to increase your 3D printer’s material compatibility. It further aids in printing with warping filaments like ABS and Nylon by maintaining a constant temperature. It saves the printer from external dirt and dust and improves the print quality.
With DIY 3D printer enclosure designs, you have the flexibility to customize the enclosure to your specific needs and install as many features as you’d like in it.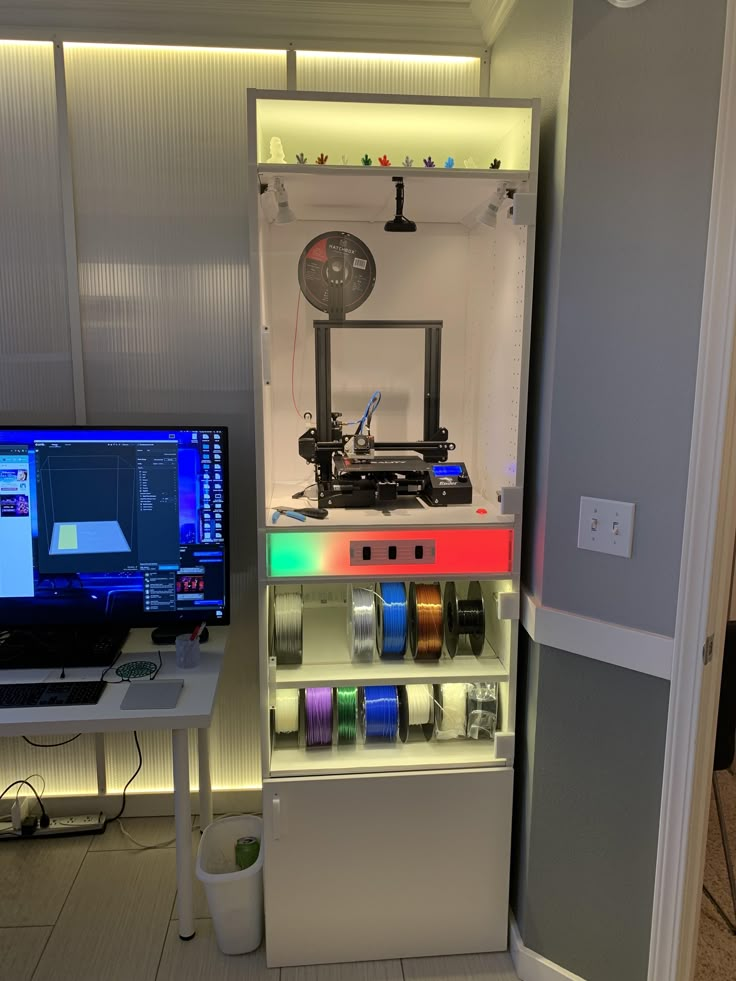 It is also relatively easy to build a cheap, low-cost solution, for example with a simple cardboard box.
But, it can be tedious for many users, requiring lots of time, effort, and money. Whereas the ready-to-buy designs lack customizability but offer an easy, quick, and cheap solution.
Let us know your thoughts on the list, and if you have anything else to add, feel free to comment below.
how to optimize design and speed up production
Rapid prototyping
Experts recommend
Author: Viktor Naumov
Author: Viktor Naumov
Benefits of 3D Printed Cases | Developing custom electronics cases: what material to choose for 3D printing? | How to design enclosures for 3D printing | Access to components | The strength of the 3D printed case | Quality and precision | Order a 3D printing service
Implementing additive manufacturing can bring more value to your business than you might think. The production of electronics requires a lot of effort, but thanks to 3D printers, this process can be simplified.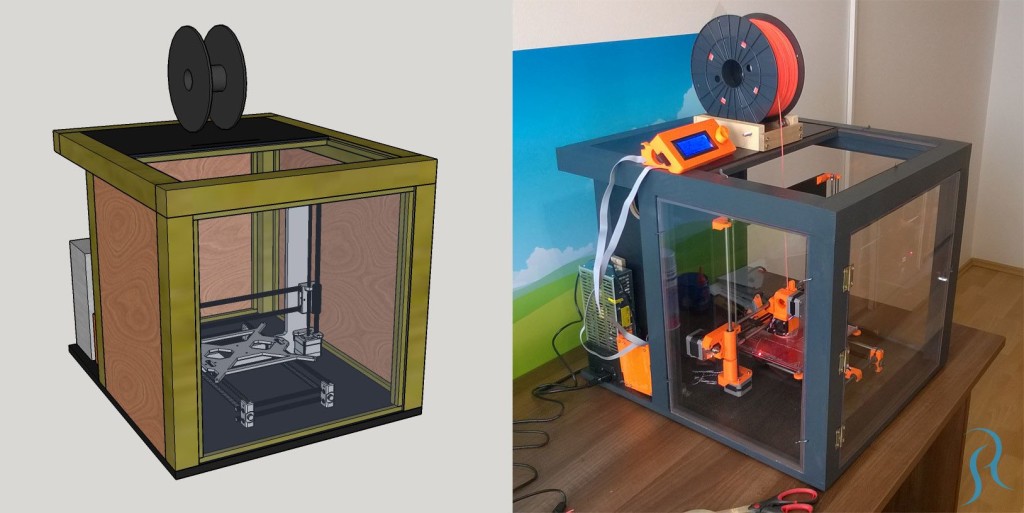 We will look at one particular detail: the body of an electronic device. How can it be improved and thereby optimize the entire production process? This will be discussed in the article.
Scalable Electronics Manufacturing
The manufacture of electronic devices is associated with certain difficulties. How can the creation of electronics cases affect the success of related projects and business as a whole?
See the benefits of scalable and adaptable enclosures. When designing electronic devices, you must keep pace with changing market demands, including record-breaking project turnaround times. This is made possible by an optimized and scalable manufacturing process. Implementing Just-In-Time principles in part manufacturing can also be a huge business benefit.
In the electronics industry, additive manufacturing opens up many opportunities. Consider the example of a plastic case. This is where 3D printing technology can bring significant benefits.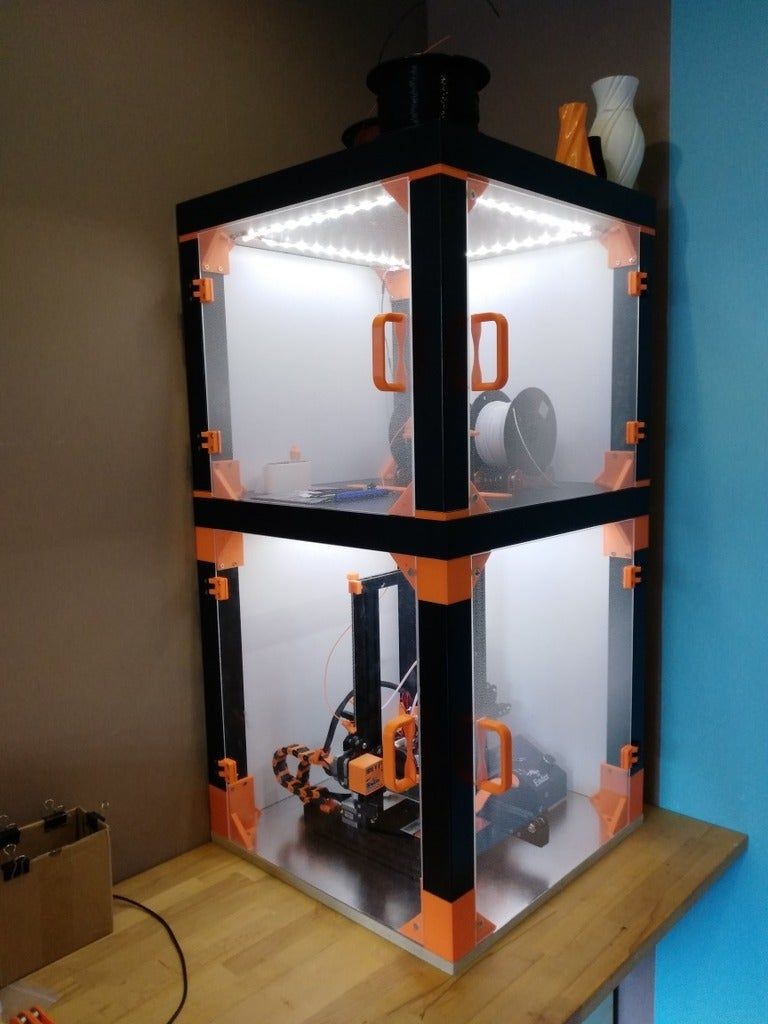 The introduction of 3D printing is a solution that can speed up production processes and increase competitiveness. But that's not all. Additive technologies will also enable innovation and improved hull design.
iQB Technologies Experts Recommend Article: 14 Frequently Asked Questions About FDM Production Printing
Benefits of 3D Printed Cases
Adaptability
Additive manufacturing provides almost limitless freedom of action. In the manufacture of cases on a 3D printer, it is possible to provide for latches, locking connections, threaded connections and flexible hinges. Thanks to thoughtful functionality, the case will become more versatile.
3D printing provides design flexibility not available with injection molding. Indeed, it is almost impossible to make changes to the design of the finished mold. If you want to change the project, you will have to start all over again.
With 3D printing, everything is different: you just need to make changes to the 3D file, which will not stop the manufacturing process for a minute.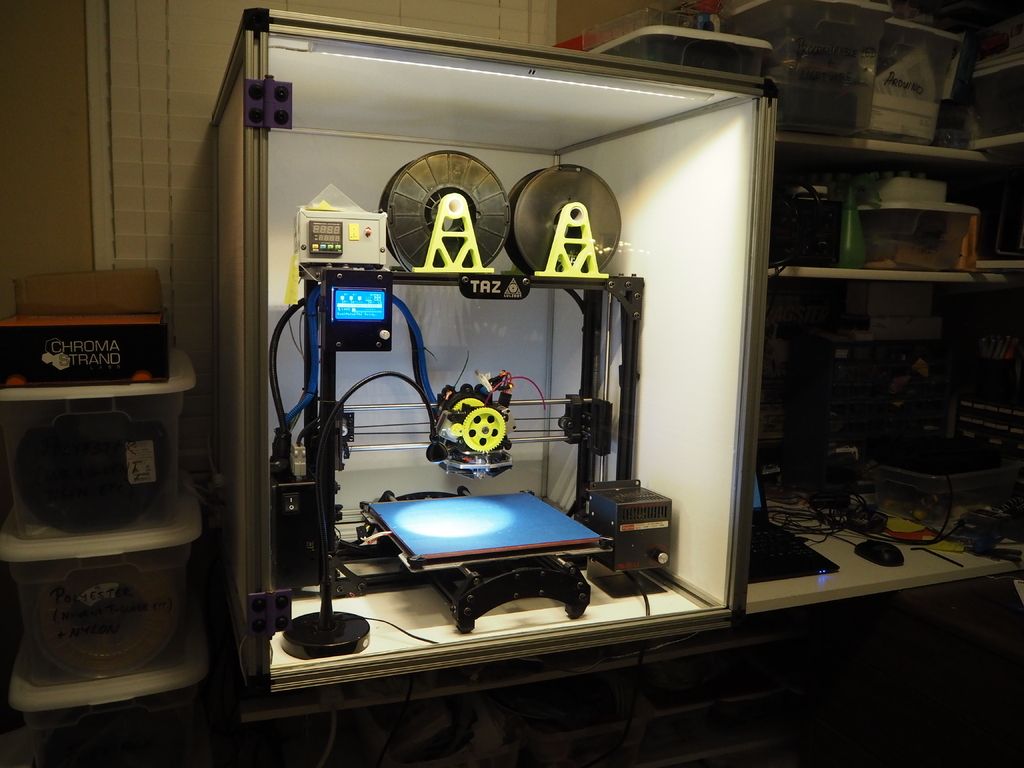 The ability to quickly adjust workflows increases production agility at no extra cost. Thanks to 3D files, there is no need to worry about the service life of the body structure or other part. Changes can be made at any time as needed.
Another significant advantage of additive manufacturing is mass customization. You can customize the work files according to the client's needs. Making several iterations of the case on a 3D printer will not increase the cost of production!
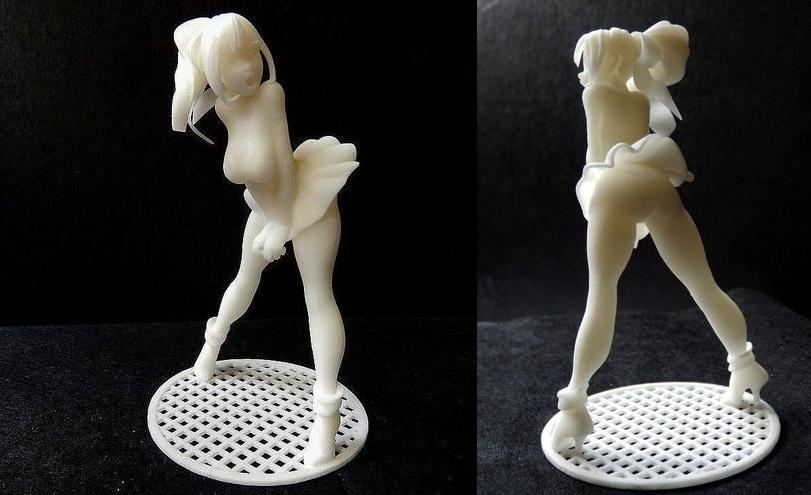
Prototype laser housing 3D printed by TWIZE
3D printer: ProtoFab SLA600 DLC
Material: photopolymer Formula W
Layer thickness: 100 microns
Print time: 12 hours
The result of the work: a laser body suitable both for checking the assembly and as a master model for casting in silicone
Want to try 3D printing prototypes or functional products? Test service is free!
Order a 3D printing service
Innovations
Additive manufacturing provides an opportunity to innovate and improve designs.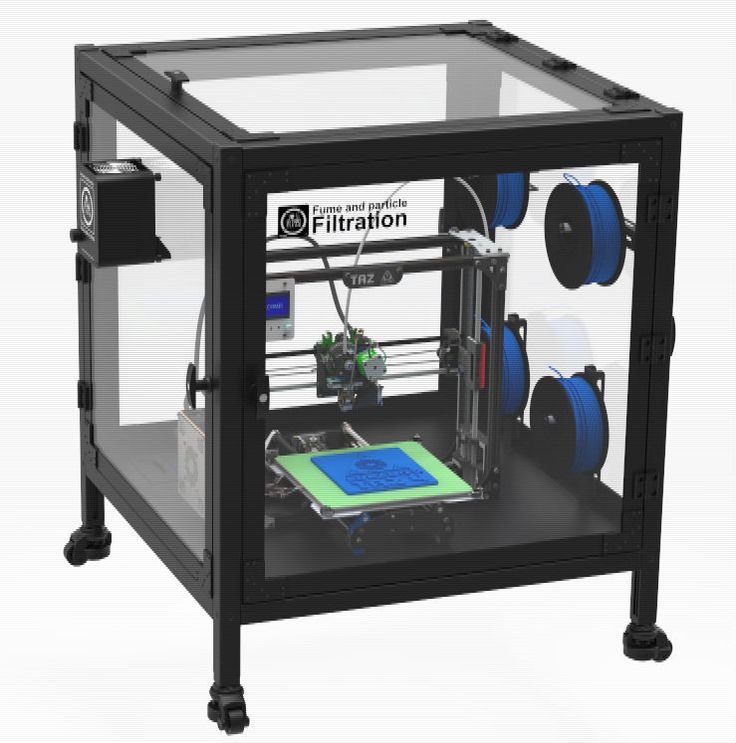 With 3D printing, you can focus on what you want to create, rather than what you can, given the limitations of traditional manufacturing. Experiment and improve your designs with cutting-edge technology.
You can take into account all the functional features of the part and integrate them directly into the device.
Acceleration of production processes
Speeding up processes drives business growth. When creating an electronic device, the design and ergonomics of the case are just as important as its performance. This requirement is easily implemented due to the ability to create complex forms very quickly. 3D printing is the fastest prototyping technology: unique prototypes can be produced without a mold, resulting in low part cost.
With 3D printing, the price does not depend on the number of parts, but on the amount of material used. By making multiple iterations of the same case, 3D printing will be a much more sustainable and sustainable manufacturing method than traditional ones.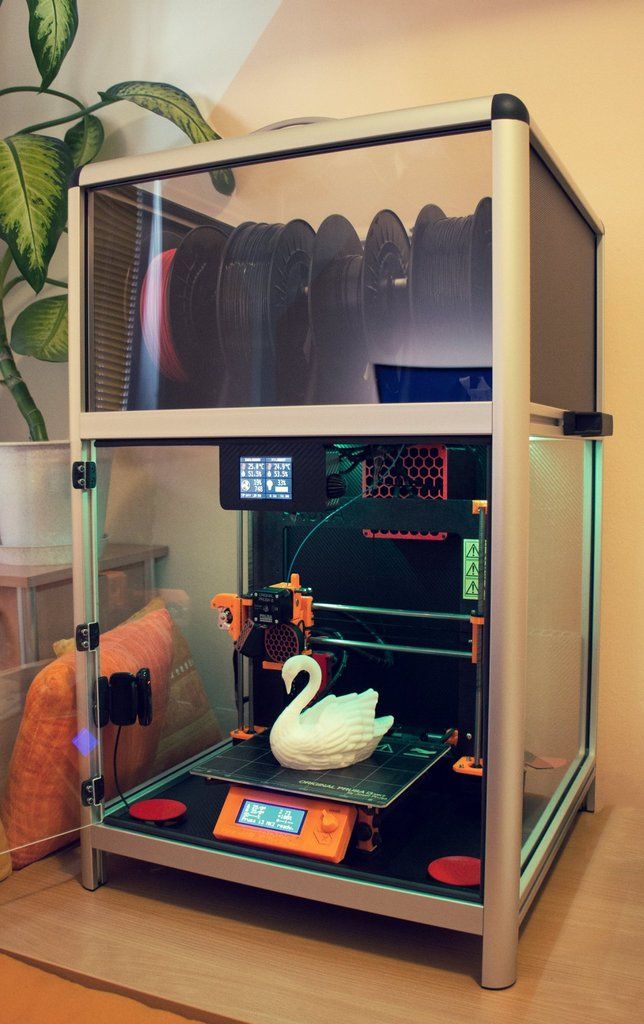 Using a 3D printed prototype, you can check the ergonomics, material features, as well as the fit of internal components or additional elements. With a wide range of 3D printing materials, you can evaluate their benefits and build quality based on project requirements.
3D printing is ideal for making plastic cases. Whether you need to customize a product or follow Just-In-Time principles, the benefits of this technology for your business are undeniable.
iQB Technologies Experts Recommend Article: From Aircraft Prototype to Biomedicine: Sharebot Unleashes New Opportunities
Development of customized electronics enclosures
Which 3D printing material to choose?
What is the best material for case making? To develop a project and start 3D modeling, you must select the material and take into account the design parameters.
Plastic enclosures for electronics can be developed through additive manufacturing using adapted materials.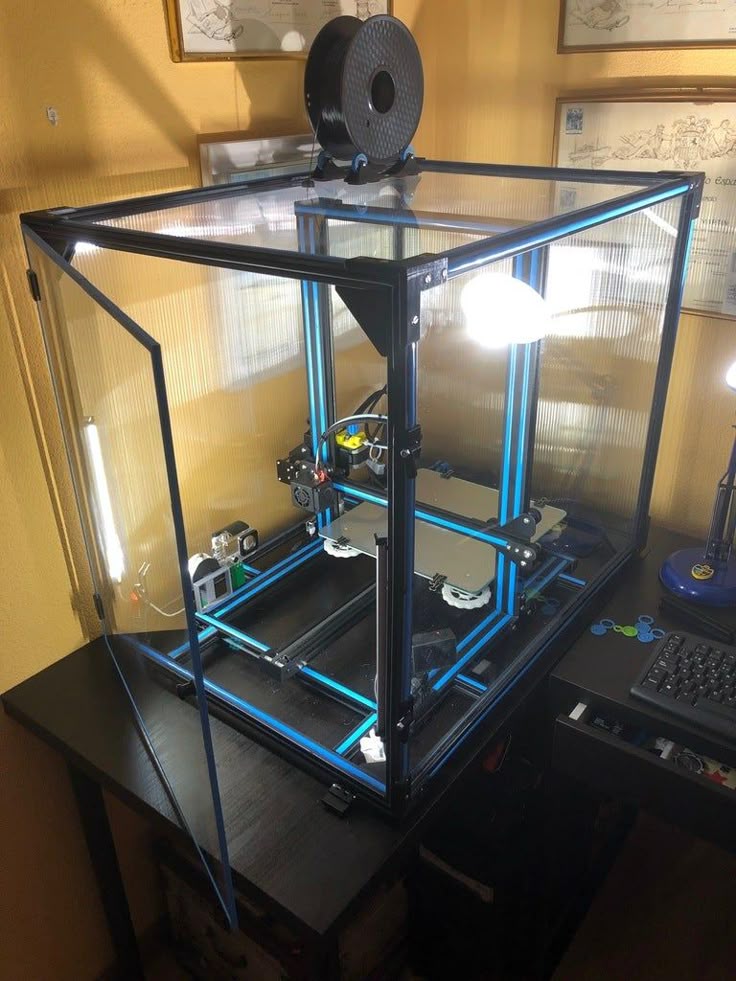 Nylon-based materials such as Nylon PA12 or Nylon PA11 are especially suitable for 3D printing plastic cases. These are low-cost materials that can be used to make prototypes, as well as small or large series. Photopolymers with a variety of mechanical properties are also suitable for printing prototypes and finished products.
How to design enclosures for 3D printing
Before you start modeling a case, it is recommended that you start designing with the components that it will contain. This way you can place components and make sure everything fits, as well as provide clearance for connectors or cables. To ensure that all components will fit, we recommend leaving a gap of 0.5mm between the components and the 3D printed elements.
Access to components
The first thing to think about when designing a case is what to put in it and how to access it later. If access to the components is not required, you can design special fasteners or use adhesive during assembly of the case to completely seal it.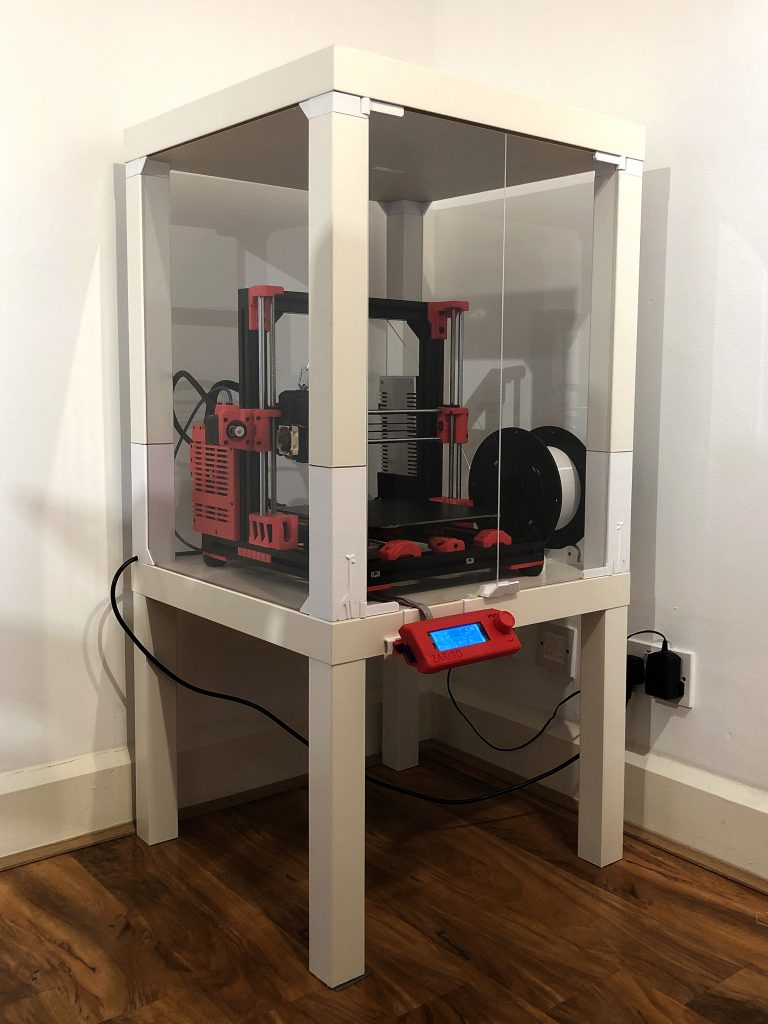
If access to the components of the case is necessary, the following mechanisms can be used:
-
semi-rigid eyelets;
-
sliding panels;
-
screws;
-
conventional and flexible hinges;
-
prefabricated structures.
Eyelets, slots and flanges help with assembly and alignment of parts. In addition, if the minimum dimensions of these elements are observed, they can increase the strength of the hull.
Durability of 3D printed case
The main thing to consider is the thickness of the walls of the case. This parameter determines the weight, stiffness, strength and possible applications of the hull. Even if the 3D printer is capable of printing small parts and thin walls, we recommend keeping the minimum wall thickness of 2mm. This value provides structural strength while keeping the weight of the part light. The optimum thickness can also be determined using the design guide for the material used.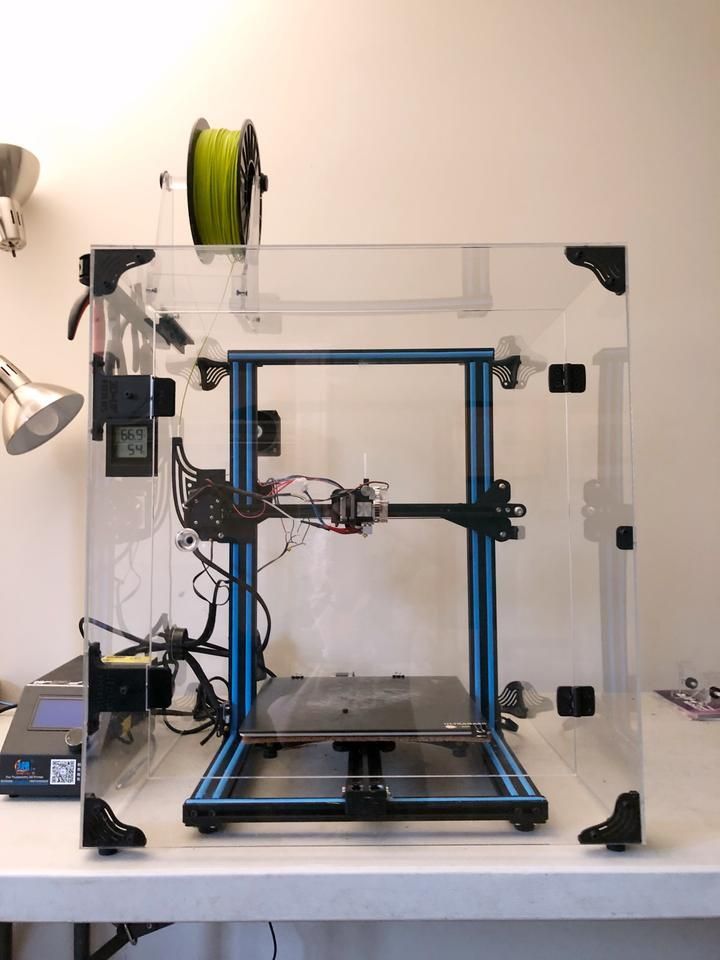
However, be careful, because depending on the length of the casing, the 2 mm thick walls can bend, which can lead to some shrinkage.
Corner rounding is a key feature of 3D printing because hard corners can be printed poorly. Roundings are necessary both inside the case and outside.
Roundings avoid sharp corners and reduce stress
For external corners, a slight rounding (1 or 2 mm) can be used on the housing surface.
Inside the case, the corners can be reinforced with thickenings and roundings. A very small radius simplifies 3D printing and reduces stress concentration at corners.
Thickening and rounding inside the body reduce stress around the hole
3D printed housing: quality and precision
If the design contains gaps or holes for fasteners, select a material that provides the desired accuracy. 3D printing plastic provides high precision, but we recommend drilling or punching holes after printing with special tools.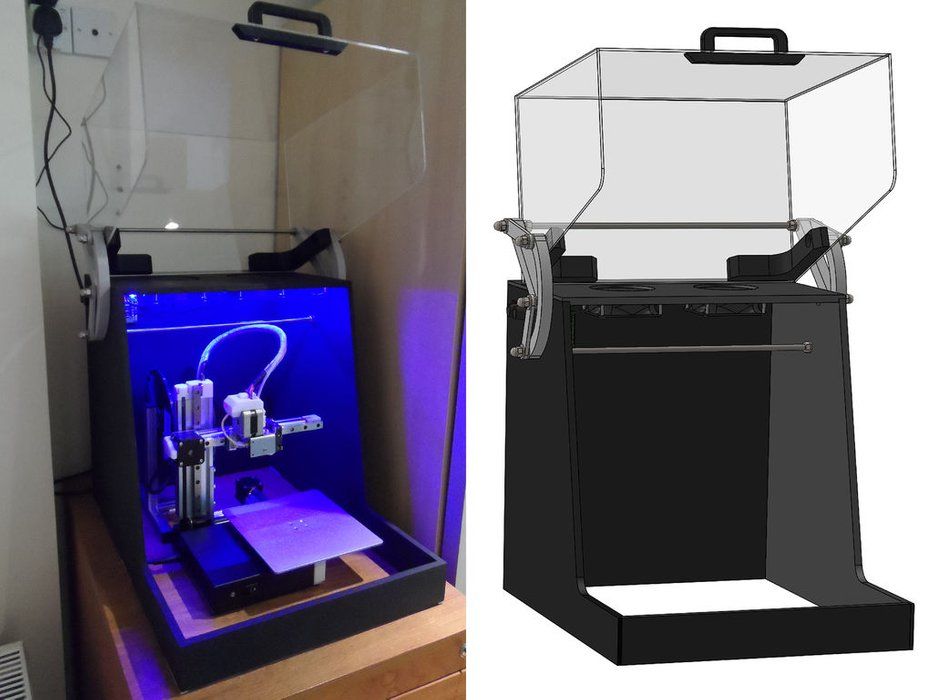
If you slightly increase the diameter of the holes for the fasteners, the result will be better.
At the same time, for a tighter connection of the fasteners with the body, the diameter of the holes should be reduced.
Small walls and thin-walled elements are often added to the housing to hold components. These elements must meet the minimum thickness of the material used, and in addition, we recommend adding structures such as corners or stiffeners, which will make the element more durable and ensure correct 3D printing.
Corners and stiffeners reduce stress and make thin-walled elements and the case itself stronger
Finally, remember that in addition to rapid iteration and prototyping, 3D printing can be used to mass-produce cases.
The article uses materials from Sculpteo
Article published on 03/25/2021, updated on 06/15/2022
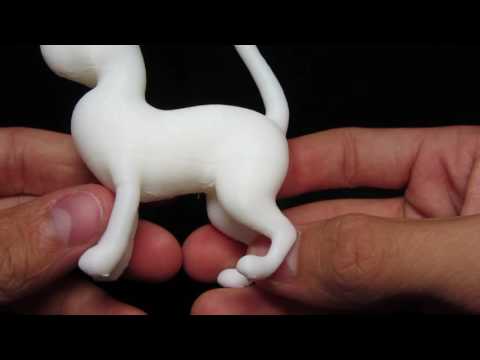
We print the simplest case for a homemade device / Sudo Null IT News0001
Printing a suitable case for your device is probably the most popular thought when introducing any inventor to 3D printing technology. But in practice, everything turns out to be not as simple as in an advertisement for a 3D printer, and under the cut, I will tell you in more detail what conclusions I came to in trying to compose a convenient case design.
Everything is fine with 3D printing - it's just a magic wand for the craftsman, except that most will only be able to afford models of printers in the lower price range. And after taking possession of a 3D printer, most, like me, will face the imperfection of budget 3D printing technology, namely FDM technology (layer-by-layer deposition - uses most of the available printers), regardless of whether you assembled the printer yourself or bought it in a store. The main problems are the shrinkage of the material after cooling, which causes deformations and inaccurate linear dimensions of the printed parts. If you came up with some cool design in the likeness of mass-produced cases, then the case of your device will be generously saturated with neat bevels, holes or snaps exactly in size for ease of assembly .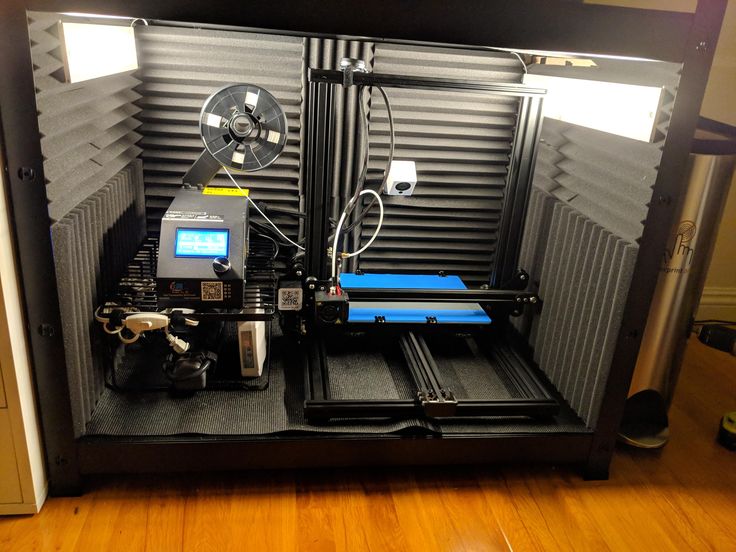 .. even being a professional in modeling and taking into account the problems listed above when printing, you will get tired of mixing all these sizes and think in what position it is better to print each detail so that nothing bends during shrinkage, as is often the case. Shrinkage is evil, especially frustrating and time-consuming when your design has many dimensions that need to be accurately maintained for assembly and a beautiful look. But not everything is so bad and this is not a reason to retreat).
Based on my printing experience, I came up with a simple design for a prototype device box that will be easy to print on any fdm printer and suitable for many projects.
The design consists of two parts: the chassis - on which we will mount the parts, and the casing itself - which will hide all the shame that we soldered) One is easily inserted into the other and, for reliability, is fixed with a single screw at the back of the case.
The chassis is printed in a horizontal position to easily accommodate horizontal component mounting locations. Then I just glue them in the corners with droplets of hot glue, it's faster and easier to disassemble them later if necessary.
Chassis I recommend to generously pierce the bottom and sides to save material, less deformation during shrinkage and easier peeling off the table. I just extrude circles, do you remember what bubbling is?)
And I print the casing vertically. In this position, you can make thin even walls and the texture on almost the entire visible part of the body is obtained in one direction, it looks neat. If necessary, you can finish the mounting ears or legs.
Even if you can't exactly maintain the size the first time and you have to grind off the edges of the chassis a little with a file, there will be absolutely no traces of processing from the outside of the device.
The tapered feet on the bottom of the body are printed without support, eliminating post-processing and saving material/time.
If you print on adhesive tape or glue, the surface that sticks to the table is usually uneven and needs to be processed.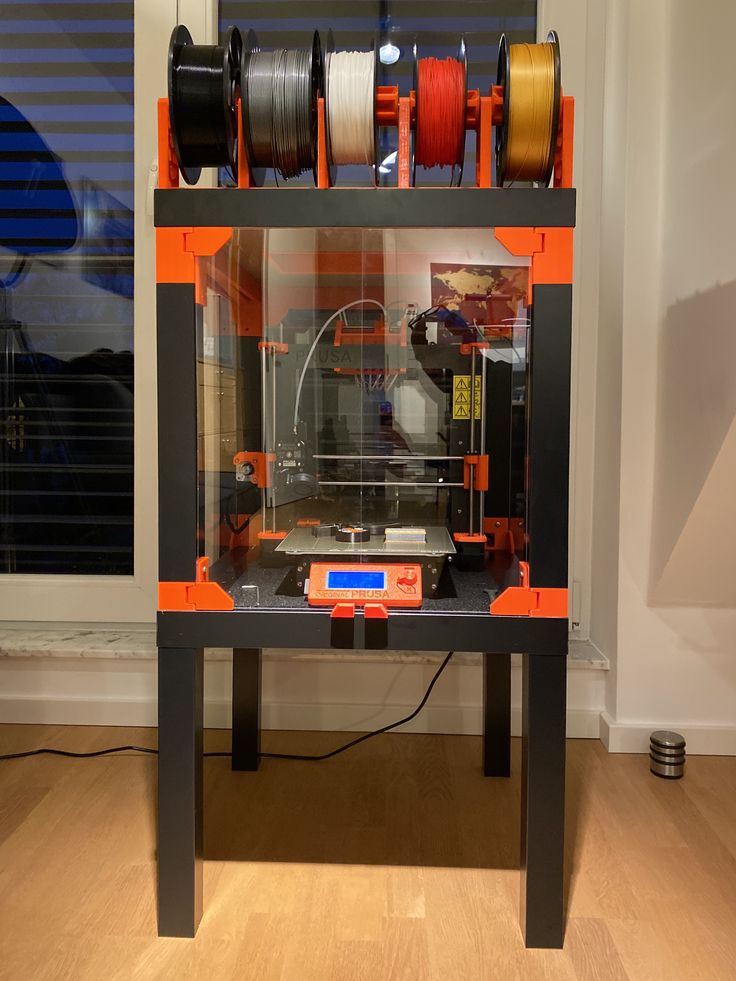 With this approach, it will be on the back side of the case (on the side of the interface connectors), which no one usually sees.
I printed this case from PLA plastic with a 0.3mm nozzle on a Russian-made MZ3D-256 printer with the following structure settings: wall thickness 0.6mm, infill 23%, without substrate printing.
The size of the case in my example allows you to place inside an arduino uno, a pair of relays, a stepper motor driver, a voltage converter, various communication connectors and control / indication elements.
Of course, you will draw the chassis of the required size for your modules, as long as the printer's printable area is enough to print the casing in one piece. In my opinion, this design will be the most simple and convenient.
The benefit from the case is obvious) The design does not fall apart, wires do not stick out of the device, it does not look like a bomb, no one knows that it works on an arduino and it is not a shame to show it at an exhibition or give it to programmers to write firmware.