3D printer vase mode
3D Printing Hack Leverages Vase Mode Structurally
- by: Dave Rowntree
Conceptually, FDM 3D printing is quite a simple process: you define a set of volumes in 3D space, then the slicing software takes a cut through the model at ever-increasing heights, works out where the inner and outer walls are, and then fills in the inside volume sparsely in order to tie the walls together and support the top layers that are added at the end.
But as you will find quite quickly, when models get larger and more complex, printing times can quickly explode. One trick for large models with simple shapes but very low structural needs is to use so-called ‘vase mode’, which traces the outline of the object in a thin, vertical spiral. But this is a weak construction scheme and allows only limited modelling complexity. With that in mind, here’s [Ben Eadie] with a kind-of halfway house technique (video, embedded below) that some might find useful for saving on printing time and material.
The idea is to use vase mode printing, but by manipulating the shell of the model, adding partially cut-through slots around the perimeter, and critically, adding one slot that goes all the way.
First you need a model that has an inner shell that follows the approximate shape of the outer, which you could produce by hollowing out a solid, leaving a little thickness. By making the slot width equal to half the thickness of the nozzle size and stopping the slots the same distance from the outer shell, vase mode can be used to trace the outline of shape, complete with supporting ribs in between the inner and outer walls of the shell.
Because the slot is narrower than the extrudate, the slot walls will merge together into one solid rib, tying the objects’ walls to each other, but critically, still allowing it to be printed in a continuous spiral without any traditional infill. It’s an interesting idea, that could have some merit.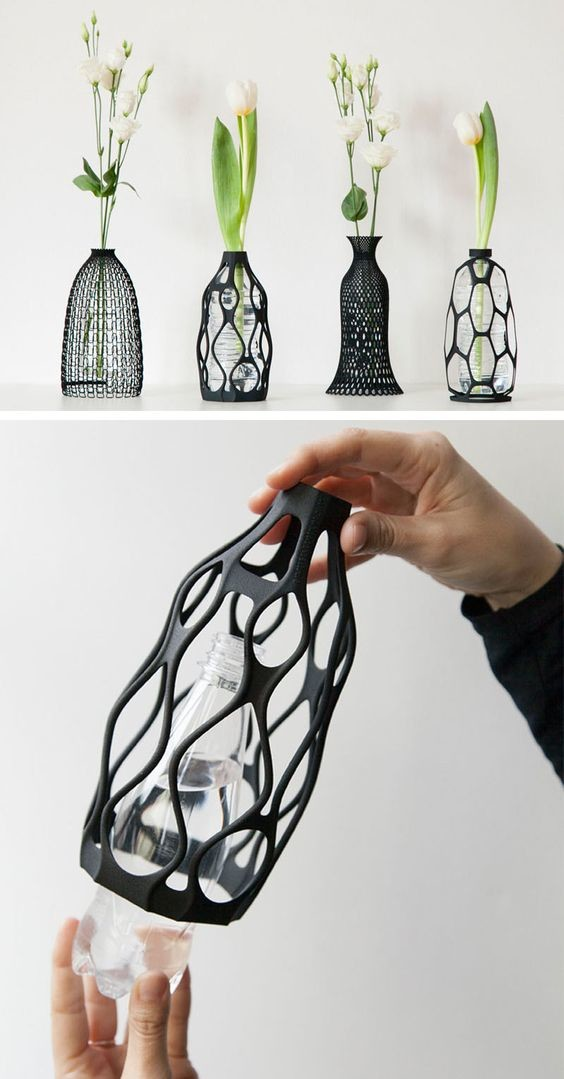
There are other ways to stiffen up thing printed parts, such as using surface textures, But if you’re fine with the thin shell, but want to have a little fun with it, you can hack the g-code to make some really interesting shapes.
Vase Mode - Experimenting with Design and Settings
3D Design Software
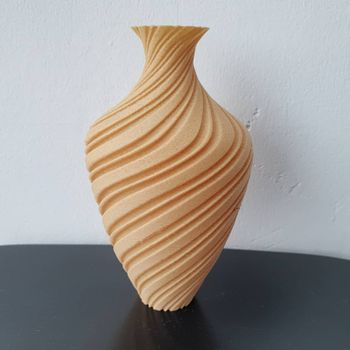
Vase mode, also known as spiral mode, is a slicer setting that tells your printer to print the outer edge of your model in a continuous single extrusion.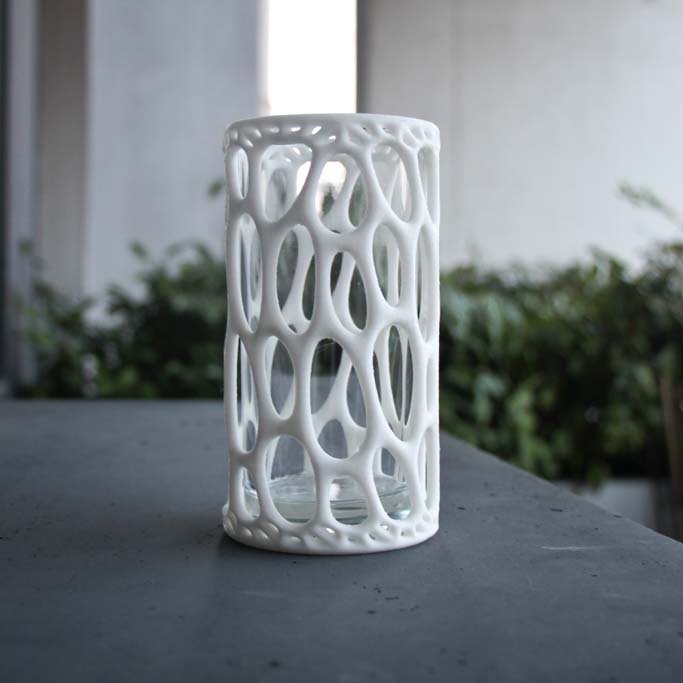 It can produce spectacular models with low print times and very little filament expenditure.
Table of Contents
- Common Issues with Designs
- Playing with Different Slicer Settings
- Layer Height
- Layer Width – Wall Thickness
- Playing with Designs
- Intentional Holes
- Loops
The models and designs featured in this guide were printed on Original Prusa MK3S and Creality Ender 3 (affiliate links). Follow 3DPrintBunny on Patreon to get early access to exclusive designs and generally to support creative 3D printing.
3D Printing in Vase Mode
Vase mode settings can be found in your slicer by searching ‘vase’, ‘spiral’ or ‘spiralise’, check the box and your slicer will do the rest. Models printed in vase mode have no z seams and no infill.
Julia Vase 004 – Bloom by virtox(Photo: Natalie Cheesmond)
The majority of models designed for vase mode are completely solid but you don’t actually need a solid model. Slicers use the outside contour of the model to generate the gcode so many ‘normal’ vase and container models will also print well in vase mode – Give it a try.
Common Issues with Designs
Vase mode relies on a continuous single outer contour so models that have several bed anchor points or that split into multiple parts will not print correctly in true vase mode. Looking at my box pig in Prusaslicer’s spiral mode you can see that only one of his legs will be printed and that the near horizontal top of his head will also cause problems.
Common Design Issues for Printing in Vase Mode(Screenshots: PrusaSlicer)
The Cura slicer software, when faced with slicing a model with multiple anchor points in vase mode, will print ALL anchor points, in this case my box pig’s legs. It achieves this by converting that part of the print to ‘normal’ mode with 1 perimeter and no infill.
Ok so that is standard vase mode but what happens when we start to play with the slicer settings or the design characteristics and when (and why!) might we want to do this?
Playing with the Slicer Settings
Layer Height
The first slicer setting we can play with is the layer height and we see that larger heights produce more obvious layer lines and can reduce the detail of the model the same as when using other slicer profiles. These vases were printed at 0.1mm and 0.35mm layer height.
(Photo: Natalie Cheesmond)
WHEN to use and WHY.
– Use a small layer height for models with a lot of detail or to produce a smoother less ‘printer’ look.
– Use a large layer height for a faster print or if you love your layer lines.
Layer Width – Wall Thickness
We can also change the width of the extrusion and this can be very useful when printing in vase mode. Models printed with a larger width are sturdier with thicker walls. Width can also influence the models depth of colour and translucency. The two pictures show the same vase printed at 0.4mm and 1.0mm extrusion widths.
Layer (Extrusion) width comparison – 1.0mm vs 0.4mm(Photo: Natalie Cheesmond)
WHEN to use and WHY
– Use a larger extrusion width for a sturdier print, a deeper colour and less translucency.
– Use a smaller extrusion width for a more delicate print with increased translucency – (example lightshade or tealight holder).
Playing with design
Intentional holes
You might think that because vase mode prints as a continuous extrusion it would be impossible to print models with holes in. In general this is the case but there is an exception and it utilises the limitation we saw on the top of my box pigs head. Vase mode cannot print flat or close to flat surfaces. If we purposefully design a model with flat sections we know these surfaces will not print and therefore we can utilize this limitation to create holey models. I had a go at designing a Volcano vase.
Volcano Vase – design with intentional holes(Photo: Natalie Cheesmond)
WHEN to use and WHY
– Use flat surfaces in your model designs to create vases and containers with multiple openings. The technique is also useful when designing tealight holders or lampshades to create gaps for the light to shine through.
Loops
We know that any 3d print model with a significant overhang will need supports, but vase mode cannot be printed with supports, so what happens when we add overhangs into a vase mode model? Well, as long as we use sharp and sudden promontories and each layer has some cross over with the one above, the model will print, and it will print with loops! If you imagine that any long thin sold block you add to your model will become a series of downward drooping loops you can begin to visualise how your model will print, so give it a go! Let’s look at my flower model as an example. The flower model has a solid centre with petals protruding. The petals are not on every layer and do not touch each other and this is what ensures the model will maintain its integrity.
WHEN to use and WHY
– Use sharp promontories to create loops across the surface of your design to soften, ‘fuzzify’, or add fun to your models.
– You can also add loops to specific parts of your design as edgings, patterns or characteristics such as hair or petals.
(Photo: Natalie Cheesmond)
Conclusion
I love 3D Printing and I love experimenting. Tweaking slicer and design settings can produce unexpected results and sometimes they are really cool. So have a play with Vase mode – it’s soooo much fun.
Read more: 3D Scanned Tree Vases
Let’s use 3D scanning and vase mode 3D printing to achieve a real tree texture effect for functional or decorative items.
3D Scanned Tree Vases – Oak, Birch, and Pine Textures(Photo: Max Funkner)
AUTHOR
Natalie Cheesmond
Natalie Cheesmond is a 3D print artist/designer and all-round 3D printing addict.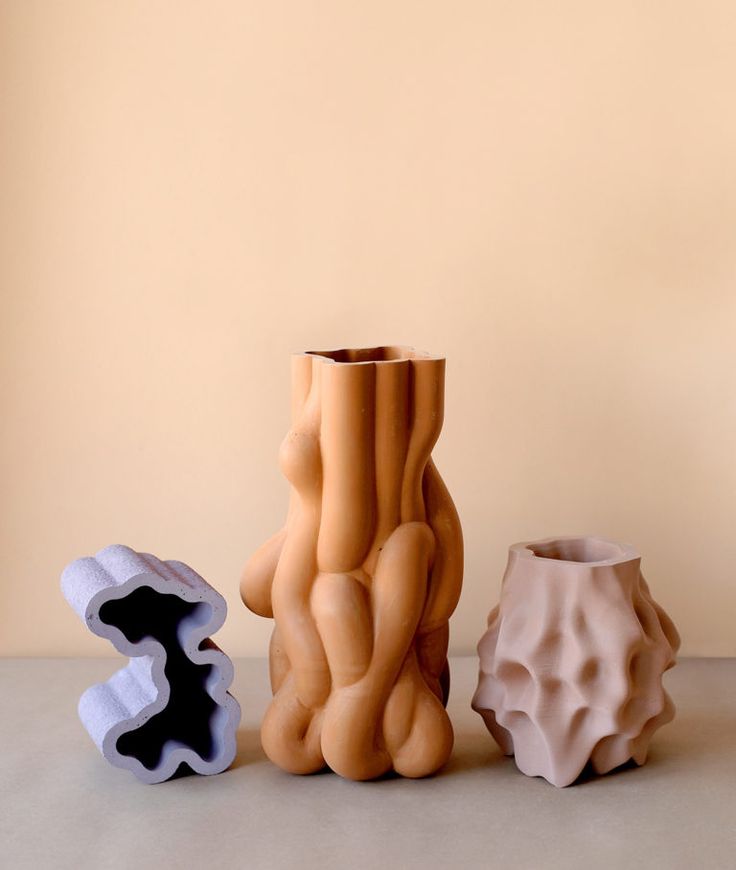 Find her on Instagram as @3DPrintBunny.
Vase Mode for 3D Printer
01/20/2020 in Expert's Blog, How To, Articles
Vase Mode in 3D printing is a special mode that allows you to print products in one wall with maximum speed and strength. We are not talking about printing vases on ordinary personal 3D printers. We are talking about industrial equipment, when using this mode you can save a huge amount of material and time for the manufacture of final products.
For example, when 3D printing this product using FGF technology :
Or 3D printing this product using technology Metal arc 3D print welding :
:
900 mode Vase Mode I propose to consider one of our projects for 3D printing of a huge sculpture 5 meters high.
Please note that the item that was made in Vase Mode is highlighted in the picture. The height of this element is 1.5 meters. As a comparison, we note that 3D printing of this element from a figure in mode Vase Mode was 30 hours, which is 12 times less than 3D printing without using this mode, which directly affects the cost of the final product.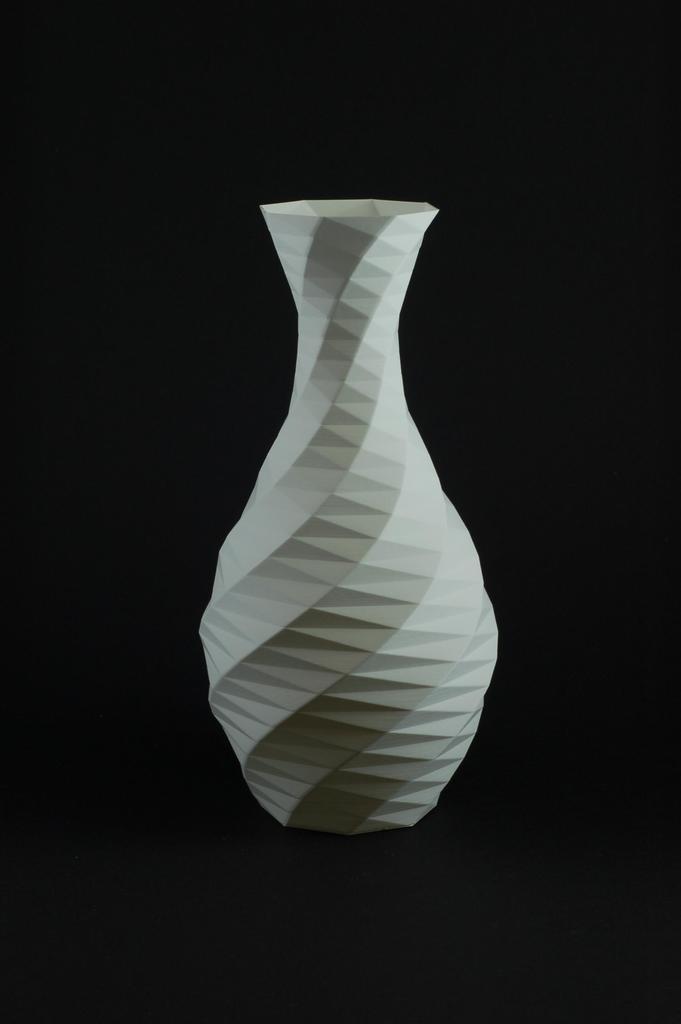 Time is money, as they say. In terms of strength, of course, the part has less strength and stiffness compared to the normal printing mode. To do this, we use special composite materials that are several times stronger than conventional thermoplastics.
If the difference with and without this mode is clear, let's move on to basic rules to follow when creating a 3D model for this mode :
1. No support material.
If you want to save money by using Vase Mode, then you first need to learn how to save money by designing your 3D model correctly, which ensures that there is no support material. As a rule, 95% of models can be adjusted in such a way that there is no support, while the functionality and visual component of the product does not change. As an example, consider one of our projects for a reception desk that was designed specifically for 3D printing without any supporting material.
In order to make sure that the product is prepared correctly for 3D printing without supports, you need to check the 3D model for the absence of overhanging elements, the angle of which relative to the vertical is no more than 35 degrees. At the same time, it is permissible to have angles up to 45 degrees in a small zone, with a length of no more than 20 cm horizontally, when using a large width of the actual 3D printing line.
The original design did not meet the required angles. Therefore, the program for preparing the G-code showed the need to build supporting material.
However, after making changes to the model, the support material was no longer needed.
As you can see, visually nothing has changed. As in most cases, if you approach the design correctly.
2. Correctness of the polygonal mesh.
Although Vase Mode prints to a specific wall thickness equal to the actual 3D print line, you do not need to define this wall in the model. In fact, it is necessary to make the outer surface, which will be limited from above and below by a plane in such a way that the surface is solid and the polygonal mesh is closed. It is important to remember that for 3D printing in mode Vase Mode Nobody canceled the requirements for 3D models for 3D printing.
3. Correct design of the “bottom” and “lid” of the product.
In the case of designing the top and bottom floor in terms of designing a 3D model that will be produced in Vase Mode , no special steps are taken to build the bottom or cover . However, this fact must be discussed with the technologist separately, because in the process of preparing the control program, the technologist will set different 3D printing modes. It is important to understand only the fact that if we go to make a “bottom” of the part (Variant 1 in the picture), then the increase in cost will be insignificant, since when 3D printing this bottom, the material will fit on the 3D printing platform. And if we want to make a “lid” (Variant 2 in the picture), in other words, if we want to provide a top overlap while maintaining a void in the product inside, then the increase in cost will be significant. Because the first layers of overlap will fall into the part. It is necessary to have several layers of this overlap to completely fill the top layer. Exactly how many topcoat layers are needed, only a 3D printing technologist can tell.
4. 3D printing options.
It is worth considering the need for the correct selection of the working tool in the 3D printing process and the 3D printing parameters. It is necessary to discuss with the technologist the actual line width and layer height for 3D printing of your product. Otherwise, you can get holes, the presence of which at a minimum will mean marriage, and at the maximum it will lead to incorrect laying of the upper layers. Let's show on an example:
Initial parameters: nozzle 5 mm, layer height 2 mm.
As you can see, in the picture, these parameters are not suitable for this product, because holes will appear in the model. Therefore, we try to increase the actual line width (we take the widest nozzle that we had at the time of writing): nozzle 7 mm, layer height 2 mm.
In this case, the “hole” is gone, but not completely. Trying to decrease the height of the layer. And in order to save as much as possible on the material, let's go from smaller to larger. We try: nozzle 3 mm, layer height 1 mm.
Almost, but not quite. Let's blow to increase the diameter of the nozzle: nozzle 5 mm, layer height 1 mm.
Hooray. Happened!
How to properly enable Vase Mode when 3D printing?
If you have correctly prepared a 3D model and selected a working tool, then for high-quality 3D printing you will only need to complete the last step: correctly configure the Vase Mode both in the software and in the hardware.
1. Consider Vase Mode in the slicer.
Usually the slicer has a special setting that activates the Vase Mode. For example, in Simplify3D it looks like this:
This mode activates the void inside the model, and builds the outer perimeter using the “spiral” method.
NO! It is important to understand the fact that we mean by Vase Mode the mode that will keep the void inside. In other words, any provision of a cavity inside is already mode Vase Mode . Simplify3D has a huge amount of settings that allow you to get a good result in a huge number of ways. For example, such a mode can be set without activating Vase Mode, with the following settings:
The difference is that sometimes there is a need to print 2 or even 3 perimeters. Therefore, the activation of the item (Vase Mode) will not work.
2. Turn on the 3D printer.
In addition to the correct preparation of the code, it is necessary to understand that for the correct construction of the model in the hardware, many manufacturers provide this mode as an add-on. For example, in the Colossus 3D printer, there is such a button in the control center.
In fact, this setting does not activate any special Vase Mode in the 3D printer itself, but removes accelerations in all axes. That is, the printer prints at a uniform speed in all directions. Of course, this allows you to save a lot of printing time, but the main danger of this mode is that if the model has sharp corners along the cut in the horizontal plane, the printer may give an error, move along the layer, break the trajectory, and much more. So always clarify exactly what functions this or that button carries, even if everything seems very obvious in the name.
If you want to get some ideas for yourself, you can get acquainted with the work of other designers on the official Colossus page.
Note that this approach works in any 3D printing technology where material is fed from a head that moves with the material supply system.
Tags: 3d print, 3d printing, 3d printer, big, big 3d printing, colossus, mode, vase, Large 3d printing, large 3d printing
Cura and vase mode.
Several times on various resources I have come across the question “How to print a vase?”, “How to set up Cura to print a vase?”.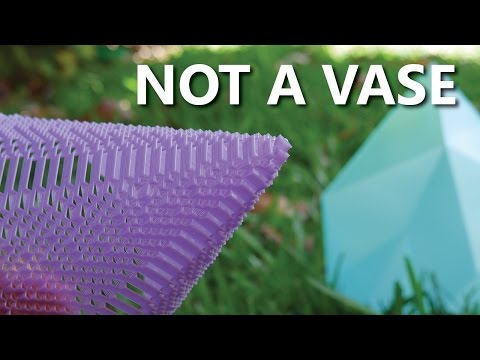 But I haven't been able to find a definitive recipe anywhere. As a result, as always in this life, I had to deal with this thing myself. Well, so that my knowledge is not wasted, I want to share it with the public. Who cares, welcome under cat.
And so, first we need a vase model. The Internet is full of them. Sometimes it seems that most people buy a 3D printer specifically for printing vases. If you are reading this article, then most likely you already have a model that you want to print. If not, then you can take a vase from the project “WS2812B LED Strip Lamp“. But it's like an option.
What is “Vase Mode”? This is a special mode in which a 3D printer prints an object in one layer in a spiral. Those. Naturally, there are many layers, but they are printed, how should I say it ... in one continuous line. Without retracts and movements. Well, let's say how the thread is wound on the spool, only there are many layers on the spool, and we print in one layer. When printing vases, there is no such thing as filling. More precisely, this mode is almost completely turned off. Only the outer outline of the part is printed. It is for this reason that many models of vases are not hollow, but monolithic. Why take a steam bath and cut out the inner surfaces if the printer will not print them anyway and no one will appreciate this work?
Now let's talk about the hardware. In order for the vase to turn out good, durable and maybe even airtight, it is worth changing the nozzle in the printer. A standard nozzle with a hole diameter of 0.4 mm is not suitable for printing vases. The printer will print a vase, but it will be too fragile. Well, one careless movement and you are the father :). It makes sense to print a vase with nozzles with a diameter of 0.8 mm. I like to print vases with a nozzle with a diameter of 1mm. (In the article “What to buy for a 3D printer Anycubic i3 Mega and Anycubic Mega-S” you can find links to nozzles of different diameters). It is worth considering that when using a nozzle of such a large diameter, much more plastic comes out of a 3D printer nozzle with a diameter of 1 mm per unit of time than through a 0. 4 mm nozzle. Accordingly, this must be taken into account when setting up a print profile. If you are used to printing in normal PLA mode with plastic at a speed of 60-70 mm / s, be prepared for the fact that the print speed will have to be reduced to 20-30 mm / s, primarily due to the fact that the printer may not have time to melt the increased volume of plastic. Also, please note that the vase is printed in one layer. Therefore, to obtain sealed products, it is necessary to increase the extrusion by 5-10%. More precisely, you need to look at the results of printing. In general, do not be lazy and calibrate the printer. Don't forget about table calibration! Here it is a must.
Now let's talk about the day. The bottom of the vase is the only part that is not printed in a spiral in the printer. So the filling parameters affect it partially. The “number of cover/bottom layers” parameter is in effect. I do not recommend making both too thin and too thick bottom. The bottom, printed in one layer, can fall off, stupidly not peeling off the printer table. Too thick bottom can behave in the same way. in practice, it turned out well when the bottom was 2-3 layers.
And so, now let's talk about Cura.
As you know, in version 3,4,1, the nozzle diameter is specified in the printer properties. In order not to reconfigure or create a printer, I recommend creating exactly the same one, but specifying a different nozzle diameter in the settings. I did so. But if you don't like it, you can simply change the nozzle diameter in your existing printer.
Now for the basic settings. Usually I take a plastic profile that I am going to print with, clone it and refine it.
- Turn on the “Vase mode” in the profile for this In the “Special modes” section, check the box next to “Print outer contour spirally”. Thus, we turn on this very vase mode.
- Now let's move on to the “Fence” section In this section, when printing in vase mode, only 2 parameters are configured, these are bottom layers. I recommend to start with 2.
 And the Cover/Bottom Pattern. See how you like it here. I prefer zigzag. The parameter “Initial layer template” also works, but I set it the same as the cover / bottom template. The remaining parameters are usually ignored by the slicer.
 - Quality section. Because we replaced the nozzle and instead of 0.4mm we have a 1mm nozzle, then the quality parameters change. It is necessary to increase the height of the layer in proportion to the increase in the diameter of the nozzle. If we assume that the minimum layer height for a 0.4 nozzle is 0.1 mm, then for a 1 mm nozzle, it will be 0.25 mm. I put 0.3 mm. Consider almost minimal. In theory, less is possible. But I haven't tried it, so I can't guarantee results. Because If we increase the diameter of the nozzle, then the width of the line increases. My printer with a nozzle of 1 mm has a real line width of 0.94 mm. This is a real freeze :). Well, set the line width of the first layer as a percentage, as usual for your plastic. I did well with those settings.
 But for good, you need to calibrate the printer for the nozzle.
Well, now we take our model. We throw in Cura and get this result:
The model was monolithic. But if we slice it and look at it in layer view, we will see that it prints hollow. It will only have the bottom with the number of layers that we set:
Well, that seems to be all. I hope that the article was useful for you.
If you did everything right, the vase will be printed as shown in the video:
Do you like it? Then like the video and subscribe to the channel!
As they say, there is no limit to perfection. If I did not write something, then I could simply forget or not know. Good luck printing.
If you have not got a 3D printer yet and are thinking about which model to choose, I can recommend the following models:
Anycubic i3 Mega 3D Printer
Anycubic Mega-S (Anycubic S) 3D Printer
Anycubic 4MAX Pro 3D Printer
These are links to trusted vendors that sell original printers.