3D printer tolerance test
▷ 3d printer tolerance test 【 STLFinder 】
3d printer tolerance test
thingiverse
3d printer tolerance test.
3D Printer Tolerance Test
thingiverse
Tolerance tests for a high res 3d printer, designed with features beyond machine resolution (~1500dpi) to demonstrate how your printer/material fails. Must be printed on a machine that uses some kind of support material. Includes thin walls and...
3D Printer Tolerance - Gap Test
myminifactory
. ..
I would print this test at a high quality setting if you want to know your printer's limitations, or if you want to know the tolerances for a given design, print the test at the same resolution and settings that you plan on printing your design.
3D Printer Tolerance - Gap Test
cults3d
... I would print this test at a high quality setting if you want to know your printer's limitations, or if you want to know the tolerances for a given design, print the test at the same resolution and settings that you plan on printing your design.
3D Printer Tolerance - Gap Test
thingiverse
. .. I would print this test at a high quality setting if you want to know your printer's limitations, or if you want to know the tolerances for a given design, print the test at the same resolution and settings that you plan on printing your design.
3D Printer Tolerance Test: Arial font
thingiverse
Customized version of http://www.thingiverse.com/thing:2318105 Created with Customizer! ...http://www.thingiverse.com/apps/customizer/run?thing_id=2318105
Tolerance Gauge Meter 3D Printer Accuracy Test
thingiverse
This is my version of the tolerance gauge meter for your 3D printer. Tolerances are between (0.2 up to 0.7 in the middle)
Tested on Anycubic I3 Mega and Mega S.
The design was inspired from Maker's Muse although i made it from scratch.
...
Tolerances are between (0.2 up to 0.7 in the middle)
Tested on Anycubic I3 Mega and Mega S.
The design was inspired from Maker's Muse although i made it from scratch.
...
Printer Tolerance Test 01
pinshape
This is a fast and easy model that I designed in order to test 3D model dimensions versus actual print dimensions on all 3 axes of my printer (daVinci 1.0 Pro). The overall print size is 6.0" x 6.0" x 0.75", but I've included several features to...
Printer Tolerance Test
thingiverse
6/10/19 Update: I went to print a test for my new printer and I was surprised by how much filament this used. The new model, "Small Test.stl" uses less filament and prints quicker. I got rid of the various chamfers and the text is now raised so it's...
Printer Tolerance Test
cults3d
6/10/19 Update: I went to print a test for my new printer and I was surprised by how much filament this used. The new model, "Small Test.stl" uses less filament and prints quicker. I got rid of the various chamfers and the text is now raised so it's...
Printer Tolerance Test
prusaprinters
I didn't label the chamfer on the bottom, but that one is 1.5mm.*6/10/19 Update: I went to print a test for my new printer and I was surprised by how much filament this used. The new model, "Small Test.stl" uses less filament and prints quicker. I...
Testing 3D printer tolerance
thingiverse
Do you know your 3D printer's tolerances? Did you know they vary depending on the materials and resolutions you use? Print these male/female models at various resolutions and with various materials to check your tolerances and make designing and...
SLA printer accuracy/tolerance test
thingiverse
A 0.500" post with a set of slightly larger holes (0.510", 0.505", 0.502") to test your resin printer's accuracy.
The square and hexagon pieces are all 1. 000" across. ... The vertical heights of the pieces are all big round numbers: 0.500" (the...
Complete 3D Printer test all in one (stress test, bed level test, retraction test, calibration test, tolerance test, support test)
prusaprinters
The original file that I remixed is this, I have added new features to test.I added new things to test like stringing test and the write on the bottom. ...You can also test a lot of other things:bridgingbed levelstringingcalibration testoverhang...
3D Printer Tolerance Block
cults3d
A 3D Printer Tolerance block to test out the precision and accuracy of your 3D Printer. Using arches and sharp lines this tolerance block tests the limits of your 3D printer letting you see exactly what your 3D Printer can do. You can also scale it...
3D Printer Tolerance Gauges
thingiverse
3.) Determine the closest fitting gauge 4.) Print the file with the closest matching gauge size: 3D Printer Tolerance Gauges Fine 20.## mm Advanced : If you have Fusion 360 you can edit the parameters for the "test pin" size and when you determine...
3D Printer Tolerance Testing Model
grabcad
This model is meant to help determine tolerances of mating and embedded 3D printed parts. There are 6 embedded parts (green) with tolerances from 0.15 - 0.40 mm at 0.05 mm steps. ...Similarly, there is are 6 slots for mating parts (blue) of the same...
Customizable 3D Tolerance Test
thingiverse
Notes: * The model doesn't test tolerance of first layer which is typically more problematic due to 'squashing' it against the bed and always has ample clearance on the first layer. * The model has inside each cylinder an overhang of 45%. This is...
Customizable 3D Tolerance Test
cults3d
Notes: * The model doesn't test tolerance of first layer which is typically more problematic due to 'squashing' it against the bed and always has ample clearance on the first layer. * The model has inside each cylinder an overhang of 45%. This is...
Tolerance Test 3D Print
cults3d
... with fusion 360, and print at the same time. ...With this test, you can find out what tolerance to put in your designs when you draw them. ... As always thanks for being here to look at my drawing, I hope it comes in handy, if you like leave a like.
3d-Printer Joint Tolerance Testpiece
cults3d
This allows you to test the fitting tolernaces of a given printer and material and see how well different tolerances it together and how movable they are. ...The whole articel can be scaled up or down to test finer sets of tolerances in different size. ..
..
3D printer test
cults3d
3D printer test
3D printer test
thingiverse
This is very simple 3D-printer test
3D Printer Test
thingiverse
3D Printer Test for Object Size. ...
dice 3D printer test
thingiverse
a simple 3d printer test nothing special
Small Test 3D Printer
thingiverse
Rapid Test 3D Printer Retraction, Ghost, Flow. .. ...
test you 3D printer
thingiverse
測試印表機準度 Test your 3D printer accuracy
3D Printer Test
thingiverse
A 3d printer test to do
3d printer test thingi
thingiverse
Just a thing drawn for testing the 3d printer.
3d printer height test
thingiverse
Just an easy test for 3d printer height
Guide to 3D Printing Tolerances, Accuracy, and Precision
Just because a 3D printer has "high resolution” in the printer specifications doesn’t mean your 3D printed parts will be accurate or precise.
Understanding the meaning of accuracy, precision, and tolerance is imperative for achieving meaningful 3D print performance for any application. In this post, we’ll parse through what these terms mean and how to think about them in the context of 3D printing. Then, we'll compare the tolerance ranges you can expect from different 3D printing processes and provide a detailed overview for tolerancing 3D printed assemblies.
Download our free white paper for a breakdown of how to measure and apply tolerances for each type of fit, with specific recommendations for Formlabs Engineering Resins.
White Paper
Tolerance and fit are essential concepts that engineers use to optimize the functionality of mechanical assemblies and the cost of production. Use this white paper as a resource when designing functional 3D printed assemblies, or as a starting point when designing the fit between parts printed.
Download the White Paper
Let’s start with definitions: What’s the difference between accuracy, precision, and tolerance? For each term, we’ll use a target—a common example for unpacking these concepts—to help visualize meaning.
Accuracy is how close a measurement is to true value. In the case of a target, true value is the bullseye. The closer you are to hitting the bullseye, the more accurate your shot. In the world of 3D printing, true value equals the dimensions you design in CAD. How closely does the 3D print line up to the digital design?
Precision measures the repeatability of a measurement—how consistent are your shots at the target? Precision measures this consistency only; your shots could be hitting near the same spot every time, but that spot doesn’t have to be the bullseye. In 3D printing, this ultimately translates to reliability; can you rely on your machine to produce your expected results for every print?
Exactly how precise do you need to be? That’s defined by tolerance, and tolerance is defined by you. How much wiggle room do you have in your application? What’s an acceptable variance in the closeness to the measurement that precision is hitting? That will depend on your project, for example, a component with a dynamic mechanical assembly will require tighter tolerances than something like a simple plastic enclosure.
If you’re defining a tolerance, you’ll likely want accuracy too, so let’s assume we’re measuring precision of shooting at the bullseye. Earlier, we defined the shots on the target pictured on the right as not precise.
However, if your tolerance range is fairly wide, it may be okay. The shots aren’t as close to each other as in the target on the left, but if the acceptable range of precision is the distance of ±2.5 rings, then you’re within spec.
Generally, achieving and holding tighter tolerances means higher manufacturing costs and quality assurance.
Webinar
Watch our webinar for a walk through the SLA 3D printing workflow, material options, and expert tips to optimize the part-to-print workflow to get the most value out of 3D printing.
Watch the Webinar Now
There are a variety of factors to consider when thinking about accuracy and precision in 3D printing. Knowing that the printer will consistently work as promised and produce the quality expected from it, within the tolerances the user is used to, could be crucial to a successful experience.
Here are four big factors at play in determining the accuracy and precision of 3D printing:
3D printing is an additive process, so parts are built layer by layer. Each layer introduces an opportunity for inaccuracy, and the process by which layers are formed affects the level of precision, or repeatability, of the accuracy of each layer. Let's look at the typical 3D printer tolerances for the most common plastic 3D printing processes:
- Stereolithography (SLA) and digital light processing (DLP): ± 0.2% (lower limit: ± 0.1 mm)
In resin 3D printing, liquid resin material is selectively exposed to a light source—SLA a laser, DLP a projector—to form very thin solid layers of plastic that stack up to create a solid object. Thanks to the highly-precise light sources, these processes can achieve fine details and can consistently produce high quality results. Depending on the model geometry, resin 3D printed parts require support structures, which can be essential to achieve dimensional accuracy, especially with complex geometries or large and thin walls.
 - Selective laser sintering (SLS) and multi jet fusion (MJF): ± 0.3% (lower limit: ± 0.3 mm)
Powder bed fusion 3D printers also rely on the precision of a light source—SLS a laser, MJF a fusing lamp—to fuse powder materials into solid parts. As the unfused powder supports the part during printing, there’s no need for dedicated support structures. This makes SLS ideal for complex geometries, including interior features, undercuts, thin walls, and negative features. - Fused deposition modeling (FDM): ± 0.5% (lower limit: ± 0.5 mm)
- In FDM 3D printing, layers of thermoplastic filaments are extruded by a nozzle, which lacks the control and ability to achieve intricate details that other 3D printing processes can offer.
 FDM parts are also prone to warping or shrinkage, as the printed part cools at different rates and the internal stress cause the print to deform. Higher-end professional systems mitigate these issues, but they also come at a higher cost.
Because layers are extruded, FDM parts might show inaccuracies around complex features. (FDM part on the left, SLA part on the right).
3D printer specs alone do not represent final dimensional accuracy. One common misrepresentation of accuracy for various 3D printing technologies is the descriptions of XY resolution or Z resolution (layer thickness) as dimensional accuracy.
However, this data has no implications for how accurate a printed part will be. There are many sources of error that still have an impact on accuracy, which we'll cover next.
Ultimately, the best way to evaluate a 3D printer is to inspect real parts.
Sample part
See and feel Formlabs quality firsthand.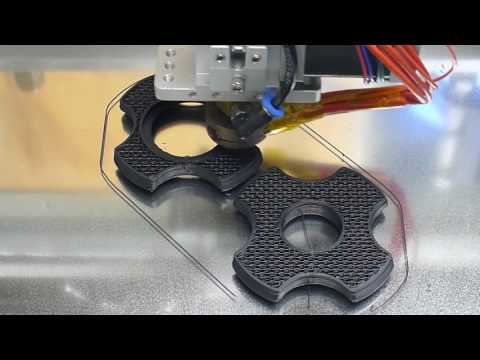 We’ll ship a free sample part to your office.
Request a Free Sample Part
White Paper
Download this report for an internal test that Formlabs created to determine the dimensional accuracy of the Form 3 and Form 3B.
Download the White Paper
Accuracy may also vary depending on which materials you use to print, and the mechanical properties of those materials, which can also affect how likely a print is to warp.
Formlabs Rigid 10K Resin for SLA 3D printing has high green modulus, or stiffness, which enables successful printing of thin, intricate features.
Due to the lack of support structures and great mechnical properties, Nylon Powders used in SLS 3D printing are also ideal for printing complex parts with demanding tolerance requirements.
With resin 3D printers, when a material has a high green modulus (modulus before post-curing), that means it’s possible to print very thin parts with precision and a lower chance of failure.
For FDM 3D printers, materials extruded at higher tempetatures are generally more prone to warping than others. For example, ABS is known to be more susceptible to warping than PLA as the printed parts shrink more during cooldown.
Most 3D printed parts require some form of post-processing after printing:
- SLA and DLP: Washing, post-curing (optional), removal of support structures (if needed), sanding (optional)
- SLS and MJF: Removal of excess powder, media blasting or media tumbling
- FDM: Removal of support structures (if needed), sanding (optional)
Some of these post-processing steps have an influence on the dimensions and the surface of the parts, which in turn influence accuracy and tolerances. Some of these are easy to account for during design and print preparation, but others can vary print to print.
For example, in resin 3D printing, parts often need to be post-cured after 3D printing, and post-curing causes shrinkage. This is normal for any parts produced with resin-based SLA or DLP 3D printing processes, and may need to be considered in designs depending on the printer.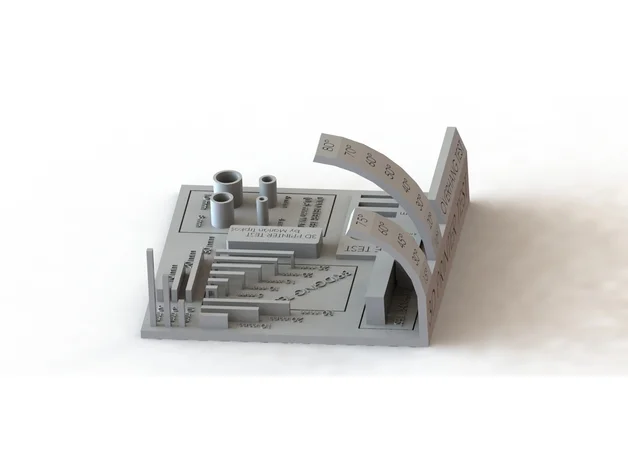 PreForm, Formlabs’ free print file preparation software, automatically compensates for this shrinkage to ensure post-cured prints are dimensionally accurate to the original CAD designs.
On the other hand, FDM printed parts often require sanding to improve the surface quality by removing support marks and layer lines, but this process changes the dimensions of the parts slightly, increasing the variation between the original design and the finished part.
Producing accurate and precise 3D prints requires attention to more than the printer itself, and consideration for the entire process.
The print preparation software, printing technology, quality and calibration of the printer and its components, quality of 3D printing materials, and post-processing tools and methods can all contribute to final results.
Overall, integrated systems that are designed to work together generally produce more reliable results. For example, each new SLA and SLS 3D printing material from Formlabs goes through a series of validation tests on each compatible printer model before release to ensure reliability, consistency, and accuracy. That's not to say that generic printers and off the shelf materials can't produce good results—they might just have a steeper learning curve and require more experimentation and calibration from the users.
An air-powered, functional scale model of a flat two-cylinder internal combustion engine printed in Tough and Durable Resins and lubricated with mineral oil.
In traditional machining, tighter tolerances are exponentially related to increased cost. Tighter tolerances require additional and slower machining steps than wider tolerances, so machined parts are designed with the widest tolerances allowable for a given application.
Unlike machining, 3D printing has a single automated production step. Tighter 3D printing tolerances may require more effort in the design stage, but can yield significant savings in time and costs in prototyping and production.
Also, while complex surfacing adds costs to a process like CNC milling, complexity in 3D printing is essentially free, though the tolerances of a 3D printed part can't be automatically refined beyond what the printer can produce without resorting to subtractive methods.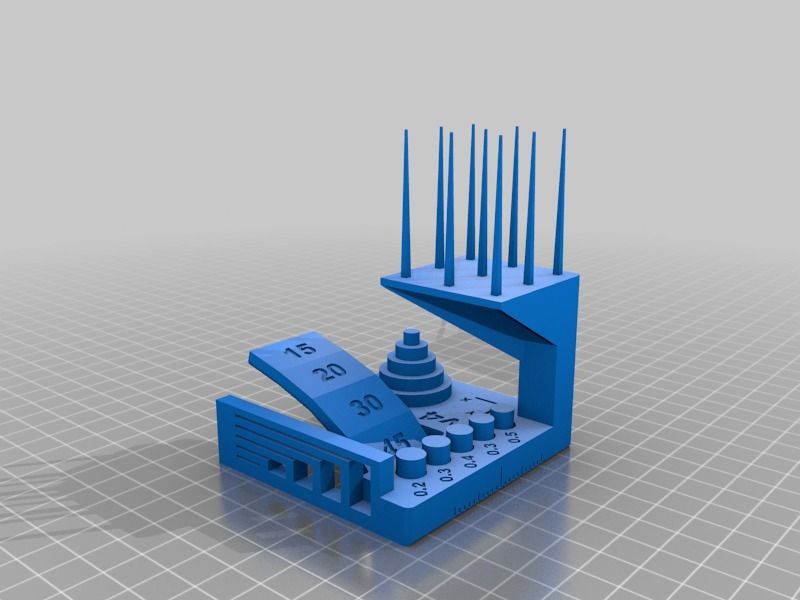 3D printing is great option if you have gross complexity like undercuts and complex surfaces, and don't necessarily need higher surface precision than ±0.005 in (standard machining). Tolerances beyond standard machining have to be reached subtractively, either through hand finishing or machining, in both 3D printed parts and CNC parts.
Overall, resin 3D printing (SLA and DLP) and powder bed fusion 3D printing (SLS and MJF) have the highest tolerance of commercially available plastic 3D printing technologies. Compared to machined accuracy, resin and powder 3D printing tolerance is somewhere between standard machining and fine machining.
Tolerance is the predicted range of possible dimensions for parts at the time of manufacture.
Tolerance and fit are essential concepts for any engineer designing mechanical assemblies. Accounting for tolerances ultimately optimizes both the prototyping and production processes, reducing the material cost of iteration, lowering post-processing time, and mitigating the risk of accidentally broken parts. The static cost-per-part for 3D printing makes it a cost-effective method for prototyping and low volume manufacturing, especially for custom parts that would otherwise require significant investment in molds.
Generally, more compliant 3D printing materials will have a wider tolerance zone than more rigid materials. When printing parts for assemblies specifically, designing for proper tolerance and fit lowers post-processing time and ease of assembly, and reduces the material cost of iteration.
Post-processing steps for 3D printed parts assemblies commonly include cleaning, sanding supports, and lubrication. Sanding an active surface is a reasonable method for achieving the correct fit if the part is a one-off, because less tolerancing work is required in the design phase. With larger assemblies, or when producing multiples of something, proper dimensional tolerancing quickly becomes worthwhile.
In this section we’ll walk through the different engineering fits to describe the basics of clearance, transition, and interference fits and when it makes sense to choose each for an assembly design.
In order to understand and design the optimal 3D printing tolerances, it’s important to determine which type of fit works best for your assembly.
The functional needs of your assembly define how parts should fit together.
Engineering fit can be divided into three types: clearance, transition, and interference. Each of the these types of fit can then be broken down into two major subcategories.
There will always be some variation in tolerances for different manufacturing methods and depending on the 3D printing process, which means that fit is a continuum rather than completely separate stages. For example, larger clearance fits trade precision for freedom of movement. Tighter transition fits are stronger, but cause more wear on the connection. An interference fit that requires more force to join will be more challenging to disassemble.
Free movement of a component requires clearance, or space between the active surfaces. Achieve clearance by ensuring that the tolerance zones of the active surfaces do not overlap.
An active surface is a model region where two surfaces touch and either move against each other or have a static fit.
Subcategories:
- A sliding fit has some lateral play, while a running fit has almost no play.
- A running fit has slightly more friction, but more accurate motion.
Play is the amount of space for movement in an unintended direction within a mechanism.
If no motion between parts is needed, a transition fit allows for easy assembly and disassembly. A transition fit has partially overlapping tolerance zones.
Subcategories:
- With a keying fit, a component accurately inserts into or around another part, with only a light force needed to install and remove it.
- A push fit requires more force to join and remove the parts, but they can be connected by hand.
An interference fit provides a rigid, strong connection, but requires much more force applied in assembly. Tolerance zones fully intersect in interference fits.
Subcategories:
- A force fit requires substantial force to install, likely with additional hand tools like a hammer, and is intended to be permanently joined.
- A press fit needs much more force to install, applied by an arbor press or similar tool.
Fit ranges for common geometries can be broadly applied to many designs. Once you know the best fit, you'll need to select materials and design tolerances for your application. Our white paper, “Engineering Fit: Optimizing Design for Functional 3D Printed Assemblies,” was written to help guide these decisions.
Download the white paper for a breakdown of how to measure and apply tolerances for each type of fit, with specific recommendations for Formlabs Tough Resin and Durable Resin. The resource also includes links to downloadable test models and suggestions for lubricants, bonded components, and machining.
Download the White Paper
There are tons of other attributes to consider when evaluating 3D printers–do your parts need to be isotropic? What mechanical properties do your parts (and therefore, materials) require? One of the best ways to get started is to see real printed parts. Choose a free sample from Formlabs in a variety of materials to see SLA quality for yourself.
Request a Free Sample 3D Print
Free STL file Torture resistance test・3D printer model for download・Cults
Exposure Tester v2
Free
Thicker validation matrix
Free
Print Angle Model
Free
Bottom Exposure Calibration
Free
Oval Tube
Free
Building board leveling tester
Free
Amder smoothing test
Free
Drive compression test
Free
Best 3D Printer Files in the Miscellaneous Category nine0037
(Complete) 3D print drones’ propellers easily & experiment
Free
Retired Superman
10 €
2020
Free
Kitsune - flexible articulated fox with nine tails (printed in place, without supports)
3 €
nine0003 Jug0,50 €
Videl - Dragon Ball
10. 22 €
22 €
Watering spike for 2L bottle
Free
Huge Heavy Tank Alternative Turret (Kitbash/Remix)
Free
Bestsellers in Miscellaneous category
nine0003 Wednesday Addams, The Thing, The Thing5 €
Gremlin rail 640 mm FPV
0.92 €
4th planet Fighting pre-Olympic god
12 €
Chop Fernet World Cup
9.98 €
Addams Thing
1.99 €
nine0003 Gengar - pokemon with flexible articulation (seal in place, without supports)2,50 €
Articulated Gyarados
1. 99 €
99 €
Articulated Raykuaza Flexible Dragon Pokémon
1 €
Charizard - pokemon with flexible articulation (seal in place, without supports)
3 €
nine0003 Wednesday Addams - Merlina Addams - Funko Pop2.49 €
flexible volute
2 €
SlingHAMMER - repeating crossbow pistol for 6mm 8mm 10mm or 12mm steel balls
12.50€
Elongated four-barrel laser cannon armored sponson
7,86 €
nine0003 Key holder for middle finger1 €
TRX4M shock mounts
1.84 €
Brackets for shock absorbers and trx4m escalators
1. 84 €
84 €
Do you want to support Cults?
Do you like Cults and want to help us continue our journey on our own ? Please note that we are is a small team of 3 people, so supporting us in maintaining activities and creating future developments is very easy. Here are 4 solutions available to everyone:
-
AD: Disable your AdBlock banner blocker and click on our banner ads.
-
AFFILIATION: Shop online with our affiliate links here Amazon.
-
DONATIONS: If you want, you can donate via PayPal here.
-
* INVITE FRIENDS: * Invite your friends, discover the platform and great 3D files shared by the community!
ERYONE Plastic Test for 3D Printer
Good afternoon!
Today I tested two coils of Ultra silk (high quality silk).
This plastic has a purely decorative function, so you should not expect any strength loads from it. The rod in the coil meets the tolerance standards and does not get stuck in the PTFE tube. When broken, the plastic begins to shine, so care is required in post-processing, as any accidental scratch will be visible under direct light. nine0181 During extrusion, it has good adhesion both to the table (just glass wiped with ordinary alcohol) and interlayer. The plastic has a silky texture and is shiny, very nice to look at. Of the difficulties, I can note the exactingness to the wall thickness, does not like fast printing.
As an example, I printed two dinosaurs, small and large. A small one in order to check work with small surfaces (it’s good to select the temperature on the fly) for the formation of plastic sagging and drips and a large one with a minimum filling of 5% in order to see how the bridges and, as a result, the finished surface of the model stretches. nine0006
I also printed a fox with a lot of overhangs and also 5% infill. The plastic passed all tests calmly, the ideal temperature on the CR-8 hotend with a PTFE insert turned out to be 210 degrees on the first layer and 195 degrees on the print (190 degrees on the small model). In terms of speed, it is better not to exceed 40 mm / sec, as it can be a little stringy in the sharp corners of the model.
They also invited me to a birthday party and my wife urgently asked me to open a gift box. So, in a hurry, I opened the box in one day. The box is iridescent silk plastic, the lid is silk gold plastic, and the bow is red ultra silk. On the bow, I decided to try printing with a layer of 0.6 mm and it is clear that the lid of the bow did not slam along the edges, although the surface itself is of high quality. In general, the bow turned out well, and the birthday man gratefully accepted the gift. nine0181 As a result, I can recommend this plastic for printing gifts, vases and other non-responsible printing.