3D printer stringing issues
Stringing or Oozing
Stringing or Oozing
Stringing (otherwise known as oozing, whiskers, or “hairy” prints) occurs when small strings of plastic are left behind on a 3D printed model. This is typically due to plastic oozing out of the nozzle while the extruder is moving to a new location. Thankfully, there are several settings within Simplify3D that can help with this issue. The most common setting that is used to combat excessive stringing is something that is known as retraction. If retraction is enabled, when the extruder is done printing one section of your model, the filament will be pulled backwards into the nozzle to act as a countermeasure against oozing. When it is time to begin printing again, the filament will be pushed back into the nozzle so that plastic once again begins extruding from the tip. To ensure retraction is enabled, click “Edit Process Settings” and click on the Extruder tab. Ensure that the retraction option is enabled for each of your extruders. In the sections below, we will discuss the important retraction settings as well as several other settings that can be used to combat stringing, such as the extruder temperature settings.
Common Solutions
Retraction distance
The most important retraction setting is the retraction distance. This determines how much plastic is pulled out of the nozzle. In general, the more plastic that is retracted from the nozzle, the less likely the nozzle is to ooze while moving. Most direct-drive extruders only require a retraction distance of 0.5-2.0mm, while some Bowden extruders may require a retraction distance as high as 15mm due to the longer distance between the extruder drive gear and the heated nozzle. If you encounter stringing with your prints, try increasing the retraction distance by 1mm and test again to see if the performance improves.
Retraction speed
The next retraction setting that you should check is the retraction speed. This determines how fast the filament is retracted from the nozzle. If you retract too slowly, the plastic will slowly ooze down through the nozzle and may start leaking before the extruder is done moving to its new destination. If you retract too quickly, the filament may separate from the hot plastic inside the nozzle, or the quick movement of the drive gear may even grind away pieces of your filament. There is usually a sweet spot somewhere between 1200-6000 mm/min (20-100 mm/s) where retraction performs best. Thankfully, Simplify3D has already provided many pre-configured profiles that can give you a starting point for what retraction speed works best, but the ideal value can vary depending on the material that you are using, so you may want to experiment to see if different speeds decrease the amount of stringing that you see.
Temperature is too high
Once you have checked your retraction settings, the next most common cause for excessive stringing is the extruder temperature. If the temperature is too high, the plastic inside the nozzle will become less viscous and will leak out of the nozzle much more easily. However, if the temperature is too low, the plastic will still be somewhat solid and will have difficulty extruding from the nozzle. If you feel you have the correct retraction settings, but you are still encountering these issues, try decreasing your extruder temperature by 5-10 degrees. This can have a significant impact on the final print quality. You can adjust these settings by clicking “Edit Process Settings” and selecting the Temperature tab. Select your extruder from the list on the left, and then double-click on the temperature setpoint you wish to edit.
Long movements over open spaces
As we discussed above, stringing occurs when the extruder is moving between two different locations, and during that move, plastic starts to ooze out of the nozzle. The length of this movement can have a large impact on how much oozing takes place. Short moves may be quick enough that the plastic does not have time to ooze out of the nozzle. However, long movements are much more likely to create strings. Thankfully, Simplify3D includes an extremely useful feature that can help minimize the length of these movements. The software is smart enough that it can automatically adjust the travel path to make sure that nozzle has a very short distance to travel over an open space. In fact, in many cases, the software may be able to find a travel path that avoids crossing an open space all together! This means that there is no possibility to create a string, because the nozzle will always be on top of the solid plastic and will never travel outside the part. To use this feature, click on the Advanced tab and enable the “Avoid crossing outline for travel movement” option.
Movement Speed
Finally, you may also find that increasing the movement speed of your machine can also reduce the amount of time that the extruder can ooze when moving between parts. You can verify what movement speeds your machine is using by clicking on the Speeds tab of your process settings. The X/Y Axis Movement Speed represents the side-to-side travel speed, and is frequently directly related to the amount of time your extruder spends moving over open air. If your machine can handle moving at higher speeds, you may find that increasing this settings can also reduce stringing between parts.
Related Topics
5 Ways How to Fix Stringing & Oozing in Your 3D Prints – 3D Printerly
If you’re in the field of 3D printing, you might have come across an issue of strings of melted plastic or plastic oozing from your 3D prints. This is called stringing and oozing, which fits perfectly.
Fixing stringing and oozing is best done by having good retraction settings, where a good retraction length is 3mm and a good retraction speed is 50mm/s. You can also decrease your printing temperature to help filament be less runny, which reduces the instance of stringing and oozing.
It’s a fairly common problem that people experience which leads to poor quality prints, so you definitely want to get this fixed.
There are more details to know about so keep on reading the article to find out why this happens in the first place, and how to fix it once and for all.
What Causes 3D Prints to Have Stringing & Oozing?
Sometimes users try to print an object in which the nozzle has to move through an open area to reach the next point.
Stringing and oozing is the problem in which the nozzle extrudes the melted plastic while moving from an open space.
The melted plastic sticks between two points and look like attached strings or threads. To prevent or solve the problem, the first step is to find out the actual cause of the issue.
Some of the major causes behind the stringing and oozing problem include:
- Retraction settings not being used
- Retraction speed or distance too low
- Printing with a temperature too high
- Using filament which has absorbed too much moisture
- Using a clogged or jammed nozzle without cleaning
Knowing the causes is a good way to start before getting into the solutions. The section below will take you through a number of ways how to fix stringing & oozing in your 3D prints.
Once you’ve gone through the list and tried them out, your problem should hopefully be solved.
How to Fix Stringing and Oozing in 3D Prints
Just like there are various reasons that cause stringing and oozing problems, there are also plenty of solutions that can help you fix and avoid it.
Most of the time this type of problem can be fixed just by changing some settings in the 3D printer such as extruder speed, temperature, distance, etc. It’s not ideal when your 3D prints are stringy so you want to get this sorted out quickly.
Below are some of the simplest and easiest solutions that can be implemented without requiring any major tools or techniques.
The methods that will help you to get rid of the problem for once and for all includes:
1. Print at a Lower Temperature
The chances of stringing and oozing increase if you are printing at a high temperature. The very first thing that you should do is to reduce the temperature and check for the results.
Reducing the temperature will help you because it will extrude less liquid material reducing the chances of stinging and oozing.
Those higher temperature materials are more prone to stringing because of the effects of higher heat on the viscosity or liquidity of filament.
Although PLA is a relatively low temperature material, it doesn’t mean it’s safe from stringing and oozing.
- Reduce the temperature step by step and check if there are any improvements.
- Make sure that the temperature is within the range required for the type of filament being used (should be on the filament packaging)
- Try to use a filament that melts at lower temperatures efficiently like PLA
- While reducing the printing temperature, you may have to lower down the extrusion speed because the filament material will take time to melt at low temperatures.

- Do test prints of little objects to get an idea about the perfect temperature because different materials print well on different temperatures.
- Some people will print their first layer 10°C hotter for good adhesion, then lower the printing temperature for the rest of the print.
2. Activate or Increase Retraction Settings
3D printers include a mechanism that works as a pullback gear called retraction, as explained in the video above. Enable retraction settings to pull back the semi-solid filament that is pushing the liquid to extrude from the nozzle.
According to experts, activating the retraction settings usually work to fix the stringing problems. What it does is relieve the pressure of the melted filament so it will not drip while moving from one point to another.
- Retraction settings are activated by default but check for the settings if you are experiencing stringing or oozing.
- Enable the retraction settings so that the filament can be pulled back every time the nozzle reaches an open space where printing is not designed or required.
- A good retraction setting start-point is a retraction speed of 50mm/s (adjust in 5-10mm/s adjustments until good) and retraction distance of 3mm (1mm adjustments until good).
- You can also implement a setting called ‘Combing Mode’ so it only travels where you have already printed, rather than in the middle of your 3D print.
I’d advise you to download and use this Retraction Test on Thingiverse, created by deltapenguin. It’s a great way to quickly test out how well in-tune your retraction settings are dialed in.
It really is hit or miss, high retraction settings of 70mm/s retraction speed and 7mm retraction distance works well, while others get good results with much lower.
3. Adjust Print Speed
Adjusting the print speed is a common factor to fix stringing, especially if you have reduced the printing temperature.
Reducing speed is necessary because with the reduced temperature the nozzle can start under extruding. After all, the filament will take more time to melt and become ready to extrude since it’s less runny.
If the nozzle is moving at a high speed, with a high temperature, and no retraction settings, you can bet you’ll experience stringing and oozing at the end of your 3D print.
- Reduce the printing speed because this will mitigate the chances of leaking filament and causing stringing.
- A good starting speed ranges from 40-60mm/s
- A good travel speed setting is anywhere from 150-200mm/s
- As different filaments take different time periods to melt, you should test the material by reducing the speed before starting your printing process.
- Make sure that the printing speed is optimal because both too fast and too slow speed can cause problems.

4. Prevent your Filament from Moisture
Most 3D printer users knows that moisture affects the filament badly. Filaments absorb moisture in the open air and this moisture turns into bubbles when heated.
The bubbles usually keep on bursting and this process forces the dripping of the filament from the nozzle causing stringing and oozing problems.
The moisture can also become steam and will increase the chances of the stringing problems when mixed with the plastic material.
Some filaments are worse than others such as Nylon and HIPS.
- Keep your filament stored and protected in a box or something that is totally airtight, with desiccant and has the ability to stop moisture from reaching the filament.
- If suitable, try to use a filament which absorbs less moisture like PLA
I’d recommend going for something like the SUNLU Upgraded Filament Dryer from Amazon. You can even dry filament while you’re 3D printing since it has a hole that can feed through. It has an adjustable temperature range of 35-55°C and a timer that goes up to 24 hours.
5. Clean the Printing Nozzle
Whenever you print an object some particles of the plastic are left behind in the nozzle and with time get stuck in it.
This happens more so when you print with a high temperature material, then switch to a lower temperature material like from ABS to PLA.
You don’t want any kind of blockage in the way of your nozzle, since this is a very significant area for creating successful prints without imperfections.
- Clean your nozzle thoroughly before printing to make it free from the residues and dirt particles.
- Use a brush with metal wires to clean the nozzle, sometimes the common brush can also work well.
- It will be better if you clean the nozzle every time you complete a print because it becomes easier to remove the heated liquid residues.
- Clean your nozzle using acetone if you are printing after a long time.

- Keep in mind that cleaning the nozzle is considered essential whenever you switch from one material to another.
After going through the above solutions, you should be in the clear for getting rid of that stringing and oozing problem that you have been experiencing.
It may be a quick fix, or it can require some trial and testing, but at the end of it, you know you’ll come out with some print quality you can be proud of.
Happy printing!
Problems, defects, 3D printing errors and solutions
Often during the operation of a 3D printer, problems may arise due to which defects appear on the finished model. Or instead of a neat product, plastic noodles suddenly appear on the table.
In fact, the causes of defects can be conditionally divided into 2 types - these are physical and software.
Physical ones are those that arise due to problems with the mechanics or any other causes that can be eliminated physically. These include problems with printer mechanisms (belt tension, backlash), clogged or deformed nozzle, incorrect table geometry, etc.
Software - these are defects that occur due to incorrect slicer settings or, less often, errors in the printer firmware. For example, incorrectly selected print speed, retract settings, incorrectly selected temperature for plastic, etc.
Very rarely, the problem may lie in the wrong or “flying” printer firmware (although usually the printer simply will not start then), overheating of some boards during printing, etc. These are rather special cases, so we will not consider them.
Model peels off or does not stick to the build plate
This is the most common 3D printing problem. Every 3D printer has had a case when the first layer treacherously rolls, clinging to the extruder, or the most offensive - when it tears off a partially printed model from the table. The first layer must stick tightly otherwise nothing will be printed.
Gap between table and nozzle 9 too large0023
This is the most common reason. You just need to set the correct gap between the table and the nozzle.
Modern printers often use an auto-calibration (auto-leveling) table system or an auxiliary table leveling program. To calibrate such printers, use the instructions. If there is no manual, it can be downloaded from the manufacturer's website.
If you have a simple printer without auto-calibration, a self-assembly or KIT kit, use a probe or a piece of paper folded in half to calibrate. The probe should be slightly pressed against the table by the nozzle. Before calibration, the table and extruder must be heated. Align the table surface over each adjustment screw (there may be 3 or 4) in turn, and only then check the center point.
If you're having trouble getting your table surface perfectly level, try raft printing. Raft is a thick substrate in several layers that is printed under the model. It will help smooth out the slight curvature of the table.
A small cheat sheet to determine the correct gap on the first layer
Plastic with poor adhesion
Some types of plastic, due to various reasons, such as large shrinkage, do not adhere well to the surface of the printing platform. In this case, try using stickers or special 3D adhesives to improve adhesion between the table and the first layer of plastic.
In the early days of 3D printing, there were experiments with different homemade 3D adhesive recipes. ABS diluted in acetone, BF glue, sugar syrup and even beer. Some experiments have been successful. Until now, some enthusiasts use some types of hairspray or glue sticks as 3D glue. But still they are inferior in their properties to industrial 3D adhesives.
Some types of high temperature plastics with a high percentage of shrinkage (ABS, Nylon, etc.) may peel off the table during printing. This is due to uneven cooling and “compression” of the model (the lower layers have already cooled down, but the upper ones have not yet). For such plastics, it is imperative to use a 3D printer with a heated table and a closed case.
Plastic temperature too low
The hotter the plastic is when it exits the nozzle, the better it will adhere to the print bed. It is better to print the first 5-10 layers at a higher temperature (+ 5-10 degrees) and turn off the blower fan.
Wrong first layer settings (speed and thickness)
A thicker layer sticks easier, so the standard first layer is 0.3mm thick. With an increase in print speed, the heating block may simply not have time to heat the plastic to the desired temperature and it will stick to the table worse. Before printing, check the speed and thickness settings of the first layer in the slicer.
A lot depends on how the 3D printer prints the first layer. Try to control the printing of the first layer and only then leave the printer to work alone.
Plastic does not choke from nozzle
The printer has already begun to print, but the print table remains empty. Or part of the model did not print.
Clogged nozzle
In 3D printing, a nozzle is a consumable. The nozzles are clogged or worn out (frequency depends on the type of plastic). The simplest thing is to replace the nozzle. But if there was no spare at hand, you can try to clean the old one. To do this, there is a whole set of thin needles. Or you can heat a clogged nozzle above the melting point of the plastic and “burn out” the blockage. But later it is still better to replace the nozzle.
Low temperature nozzle
You need to increase the temperature of the extruder in the slicer settings or check the thermistor and heating block. Sometimes the thermistor may not read the temperature correctly due to a malfunction or incorrect 3D printer firmware settings.
If the problem occurs after replacing the thermistor - contact the manufacturer or read articles about PID tuning.
Empty extruder
As the extruder heats up, plastic begins to ooze out of the nozzle. Because of this, the extruder may start printing half empty. Because of this, part of the first layer is not printed. You can push the plastic manually by simply pushing the bar into the nozzle. Or solve this problem programmatically - in the slicer, add a contour print around the model (one line).
Some manufacturers and 3D enthusiasts add a line print on the edge of the table at the beginning of each GCode. This is done so that there is plastic in the nozzle by the time the model is printed.
Feed mechanism does not push through plastic
The plastic pushes the feed mechanism to the extruder - a motor with a special pulley put on the shaft. If for some reason the plastic is not pushed through (nozzle clogged, extruder temperature low, etc.), then the pulley “gnaws” through the bar. You need to push the plastic bar with your hands or cut off the damaged piece.
Elephant foot
The first layers of the model are wider and protrude beyond the boundaries of the model. This is due to the fact that the upper layers put pressure on the first ones that have not yet cooled down and flatten them.
High table temperature
Due to the too high temperature of the table, the lower layers remain soft for a long time. Try lowering the table temperature. It is better to reduce gradually (in increments of 5 degrees). You can try to turn on the blower when printing the first layers.
Small gap between nozzle and platen
If, when printing the first layer, the nozzle is too close to the table, then excess plastic will be forced out. After a few coats, this will not be as noticeable, but can lead to the effect of an “elephant's foot”.
Plastic re-extrusion
When too much material is squeezed out of the nozzle, the walls of the model are not smooth, but bumpy, with sagging.
The solution is software - in the settings of the slicer, you need to set the material feed rate (fluidity) to a lower value. The average value is 95-98%.
It is worth checking the diameter of the rod. If its size is greater than 1.75, then the plastic will be squeezed out more than necessary.
Plastic underextrusion
The plastic is squeezed out too little, because of this, gaps may appear between the layer. The finished model will be fragile and fragile.
Wrong thread diameter
Check the filament diameter in the slicer settings. Sometimes, instead of the popular 1.75, the default is 2.85.
Incorrect feed rate settings
Check the fluidity settings in the slicer. The average should be 95-98%.
Clogged nozzle
Something could get into the nozzle and partially block the exit of the plastic. Visually, the plastic will choke from the nozzle, but in a smaller amount than necessary for printing.
Hairiness or cobwebs on finished model
Thin threads of plastic protrude from the outer wall of the model (most often on one side).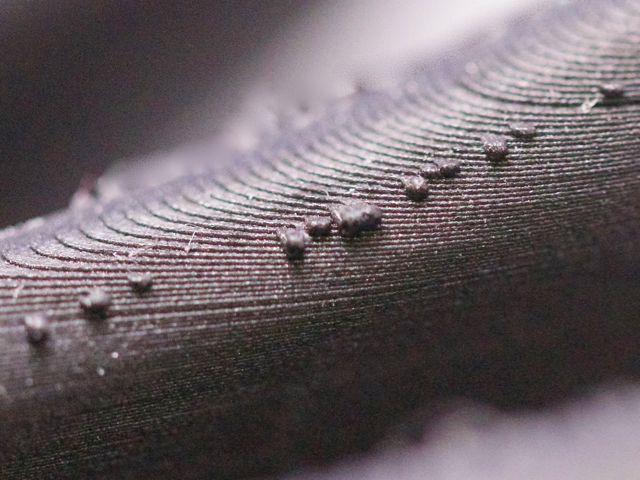 The defect appears due to the flow of plastic from the nozzle during idle movement.
Insufficient retract
A retract is a slight pull of a plastic filament from an extruder. Due to the retract when the extruder is idle (from layer to layer or from model to model), heated plastic does not drip from the nozzle. For some flowable plastics (eg PETG) the speed and amount of retraction must be increased.
"Hairiness" can be easily removed by grinding or cutting off the threads with a sharp scalpel.
High temperature extruder
The higher the extruder temperature, the more liquid the plastic becomes. It is important to find a balance so that the plastic is not too liquid and sticks well in layers.
In the selection of the optimal extruder temperature, a test model - a tower - helps a lot. It clearly shows how plastic behaves when printed at different temperatures.
.
Temperature test
Top "perforated" or uneven
The top of the model is bumpy or with holes. The problem may arise if the top of the model is flat. For example, like a cube.
Insufficient airflow
When printing the top plane (cover), the plastic does not have time to cool down and remains too liquid. Because of this, the threads are torn and holes are formed. Increase the fan speed on the last layers.
Few top layers
The top of the print may be too thin and deform as a result. Check slicer settings. The number of upper layers is not recommended to be set less than 6.
Low percentage of filling
If the infill percentage is too low, then the top layer will simply have nothing to rely on. Increase the fill percentage in the slicer settings.
Model deformation
Some parts of the model seem to have melted in some places or on one side. The problem most often occurs when printing with PLA plastic. The defect appears due to the fact that the plastic does not have time to cool and deforms.
Insufficient airflow model
Turn the fans on to maximum. If their power is not enough (in some printers, the fan is located only on one side), you can put a regular desktop fan and direct it to the 3D printer table.
Small model
Small models are difficult to blow well. Try to print small items alongside larger ones, or place several identical models in different corners of the table. So the plastic will have more time to cool.
Layer offset
Layers shift along the x or y axis during printing.
Print head jam
Turn off the printer and try to move the extruder along the x and y axes with your hands. The extruder must move freely. If there are jams, check the mechanics of the printer. Bearing wear or the curvature of the shafts may be to blame.
Electronics overheating
Sometimes electronics problems can be to blame for misaligned layers. The most common cause is overheating of the drivers or too low current exposed to them.
Table top is loose
This is most often seen in 3D printers with glass. During printing, the nozzle may hit the model and move the glass slightly. Before printing, check if the glass or other printing surface is well fixed on the heating table.
Skip layers
Small holes are visible on the print, or the shell of the model is not continuous.
Teflon tube deformed
There are 2 types of thermal barriers - all-metal and with a Teflon tube. If overheated, the Teflon tube may deform. Plastic will pass through it, but in a smaller amount.
Low extruder temperature or high print speed
If the extruder is not heated enough, then the plastic will not be liquid enough and simply will not have time to be forced through the nozzle. The higher the print speed, the higher the extruder temperature should be.
Sometimes the outer walls print well, but the infill is “torn”. In this case, slow down the infill print speed in the slicer.
Model bundle
Cracks form on the surface of the printout during or after printing. Cracks can be large or very small. Most often, this problem occurs with plastics with a high percentage of shrinkage - ABS or Nylon.
Sudden temperature difference (if model delaminates during printing)
With a sharp temperature difference (for example, a draft), part of the model cools down faster. This leads to uneven shrinkage and incorrect distribution of internal stress. For plastics with low shrinkage, this is not critical. But if the shrinkage percentage is more than a few percent, the model may burst in layers.
For printing with such plastics, it is recommended to use a printer with a closed housing. If this is not possible, try to avoid drafts and sudden temperature changes in the room where the 3D printer prints as much as possible.
Print temperature
Due to too low printing temperatures, the layers may not “stick” well to each other. Raise the print temperature in the slicer settings.
Hardening (if the model cracks after printing)
Sometimes cracks appear on the model a few days after printing. This is due to uneven distribution of internal stress after cooling. You can try to “harden” the finished product.
For hardening, the model is placed, for example, in an oven, and heated to the softening temperature of the plastic. After that, the heating is turned off and the oven is left to cool slowly with the model inside. Due to this, the stress inside the print is distributed more evenly. But accuracy is very important in this method - if you make a little mistake with the temperature, the finished product can “float”.
Ringing
In places where the extruder changed direction, ripples are visible. Most often it looks like a shadow around the “sharp” protruding elements of the model.
Mechanical problems
Sometimes the problem occurs due to extruder play. Check if the extruder mount to the rails is loose. Be sure to check the tension of all belts.
High print speed or high accelerations
Moving the extruder too fast can cause vibrations that cause ripples on the wall of the model. The lighter the weight of the extruder, the less noticeable the ripples will be. To get rid of ringing, simply reduce the print speed in the slicer settings.
Slits for thin-walled models (not solid shell)
The thin wall of the model is not solid, but consists of two thin walls with a narrow gap between them. This problem is often faced by fans of printing "cutting" for baking.
Left model with wall defect, right without
Wall thickness and nozzle diameter mismatch
If the wall thickness is 1 mm, and the nozzle diameter is 0.4, it turns out that for a solid wall, 2 nozzle passes are few, and 3 are already many. The result will depend on the slicer algorithm, but most often you will get 2 walls with a thin slot in the middle (the slicer cannot change the wall thickness). The solution to the problem may be a slight refinement of the 3D model or the use of a different slicer.
Algorithms for calculating 3D models are constantly being improved and refined, and now this problem is less common.
When modeling, take into account not only the thickness of the nozzle, but also the percentage of “overlapping” of lines on each other. If you have a nozzle with a diameter of 0.4 - make the wall in your model not 0.8, but 0.7 - 0.75.
Wrong model geometry
When instead of a circle you get an oval, and instead of a square you get a semblance of a rhombus.
The main reason is malfunctions in the mechanics of the printer. Be sure to check:
Belts
Check belt tension in x and y. Belts stretch over time and may need to be tightened or replaced. Each 3D printer has its own way of tightening the belt. If the belts are slightly stretched, you can tighten them with the help of a "spring".
Loose pulleys, etc.
Check if all bolts and nuts are tight. Are there backlashes. Pay special attention to tightening the pulleys located on the motors along the x and y axes.
Sagging of some parts of the model
Some parts are not printed, broken, or instead of a neat surface, a swollen plastic snot is obtained.
No support for overhangs
A 3D printer cannot print in the air, so if there are overhanging elements in the model, you need to set supports - supports. The slicer can set the necessary support itself, you need to check the appropriate box in the settings.
When printing with soluble support, you can set the gap between the model and support - 0. This will make the surface smoother. If the support material and the model are the same, you need to add a small gap. Otherwise, it will be difficult to separate the support from the model.
Split model
Sometimes the supports can take more plastic than the model. In this case, to save material and time, it will be more convenient to cut the model. If you have more than one 3D printer, then the model will print several times faster.
When cutting the model, you can leave grooves or mortgages so that the pieces of the model are connected without displacement.
Totals
In this article, we talked about the most popular 3D printing defects and how to solve them. Don't be intimidated by such a long list. Some problems are rare and you are unlikely to encounter them.
There is a list of problems that arise due to the design features of a 3D printer, so try to choose a printer that suits your needs. To do this, you need to understand what products and what material you need.
Problems associated with printing algorithms are quickly eliminated by software developers.
Do not be afraid of possible difficulties and each seal will be successful.
Typical problems in 3D printing and ways to solve them -1
Hairiness or gossamer on the finished model
Thin threads of plastic stick out from the outer wall of the model (most often on one side). The defect appears due to the flow of plastic from the nozzle during idle movement.
Insufficient retract
Retract is a slight pull of the plastic filament from the extruder. Due to the retract when the extruder is idle (from layer to layer or from model to model), heated plastic does not drip from the nozzle. For some flowable plastics (eg PETG) the speed and amount of retraction must be increased.
“Hairiness” can be easily removed by grinding or cutting off the threads with a sharp scalpel.
High temperature extruder
The higher the temperature of the extruder, the more liquid the plastic becomes
It is important to find a balance so that the plastic is not too liquid and “sticks together” well in layers.
The test model – the tower – helps a lot in choosing the optimal extruder temperature. It clearly shows how plastic behaves when printed at different temperatures.
.
Temperature test
Problem during task execution
A common situation among novice performers. They face a problem and try to solve it on their own, without resorting to experienced colleagues. They are interested in reaching a decision on their own or afraid to seem incompetent. Meanwhile, the deadline is approaching. Even if the contractor managed to cope with the problem, the remaining time may not be enough to complete the project.
For example, a novice developer is faced with the task of implementing a new component for the system. He handles it on his own. But when experienced developers look at the result, it turns out that it could have been achieved faster and more efficiently.
The problem could be solved by contacting someone who would help and suggest the right direction.
Layer Offset
Layers are shifted along the x or y axis during printing.
Print head jam
Turn off the printer and try to move the extruder along the x and y axes by hand. The extruder must move freely. If there are jams, check the mechanics of the printer. Bearing wear or the curvature of the shafts may be to blame.
Overheated electronics
Sometimes problems with the electronics can be the culprit in misaligned layers. The most common cause is overheating of the drivers or too low current exposed to them.
The table top is loose
This is most commonly seen on 3D printers with glass. During printing, the nozzle may hit the model and move the glass slightly. Before printing, check if the glass or other printing surface is well fixed on the heating bed..
Sources of problems
Problems are obstacles and difficulties that must be overcome in order to achieve a goal. As a rule, they arise for various reasons and are often the result of our own mistakes and failures. There are several factors that usually lead to problems. To identify them as early as possible, we advise you to regularly ask yourself the following questions.
- Am I really doing the right thing and getting results?
There is no point in deceiving yourself by evaluating your work in an unreasonably positive way. Do you see a real measurable result of the work you have undertaken? Very often we do not reach our goal and face problems because we are not fully immersed in the work. But if you allow yourself to be lazy and indulge your weaknesses, you are unlikely to seriously advance on the path to your dream, and problems cannot be avoided either. - Do I understand what resources will be needed to take the next step?
Starting to work on our dream, we do not have a complete idea of what exactly we will need along the way. Therefore, you should constantly ask yourself what resources will be required for the next stage
Most often, we miss some details at the very beginning - and it is important that everything you need is at hand at the right time, and not sometime later.
Do the people who help me and work with me understand what needs to be done, what we have already achieved and how the situation has changed?
Communication between the participants is almost always the weakest link in a project. For some reason, we think that those around us fully understand, although often we do not even give them complete information about what we expect from them. In our opinion, they know the same thing as we do, therefore, in general, everything is known and understandable. We believe that colleagues and partners know how the situation is changing and what needs to be done in the new conditions
It is very, very important to check and double check that everyone knows and understands everything, especially if you feel that communication between the participants is not well established. This way you can avoid at least some problems.
The fewer assumptions you make, the better you will communicate what is truly important and relevant.
Am I getting paranoid? Some
people think too much about what might happen. Sometimes we want to avoid failure or mistakes so badly that thinking about it completely paralyzes us. And in general, if you think a lot about potential troubles, you can provoke problems that would not have arisen with a more relaxed attitude to what is happening. Fear of failure often prevents you from giving all your strength to your dream. So do not allow yourself to worry too much and think about possible difficulties, it is better to work harder!
Some parts of the model are sagging
Some parts are not printed, are broken, or have swollen plastic snot instead of a neat surface.
No support for overhanging elements
The 3D printer cannot print in the air, so if the model has overhanging elements, you need to set supports - supports. The slicer can set the necessary support itself, you need to check the appropriate box in the settings.
When printing with soluble support, you can set the gap between the model and the support to 0. This will make the surface smoother. If the support material and the model are the same, you need to add a small gap. Otherwise, it will be difficult to separate the support from the model.
Divide model
Sometimes the supports can take more plastic than the model. In this case, to save material and time, it will be more convenient to cut the model. If you have more than one 3D printer, then the model will print several times faster.
When cutting the model, you can leave grooves or embeds so that the pieces of the model are connected without displacement.
Plastic is not squeezing out of the nozzle
The printer seems to be starting to print, but the platen remains empty. Or part of the model did not print.
Clogged nozzle
Nozzle is a consumable in 3D printing. The nozzles are clogged or worn out (frequency depends on the type of plastic). The simplest thing is to replace the nozzle. But if there was no spare at hand, you can try to clean the old one. To do this, there is a whole set of thin needles. Or you can heat a clogged nozzle above the melting point of the plastic and “burn out” the blockage. But later it is still better to replace the nozzle.
Low temperature nozzle
You need to increase the temperature of the extruder in the slicer settings or check the thermistor and heating block. Sometimes the thermistor may not read the temperature correctly due to a malfunction or incorrect 3D printer firmware settings.
If the problem occurs after replacing the thermistor, contact the manufacturer or read articles about PID tuning.
Empty extruder
As the extruder heats up, plastic begins to ooze from the nozzle. Because of this, the extruder may start printing half empty. Because of this, part of the first layer is not printed. You can push the plastic manually by simply pushing the bar into the nozzle. Or solve this problem programmatically - in the slicer, add a contour print around the model (one line).
Some manufacturers and 3D enthusiasts add a line print on the edge of the table at the beginning of each GCode. This is done so that there is plastic in the nozzle by the time the model is printed.
The feed mechanism does not push plastic
The plastic pushes the feed mechanism to the extruder - a motor with a special pulley put on the shaft. If for some reason the plastic is not pushed through (nozzle clogged, extruder temperature low, etc.), then the pulley “gnaws” through the bar. You need to push the plastic bar with your hands or cut off the damaged piece.
Deformation of the model
Some parts of the model seem to have melted in some places or on one side. The problem most often occurs when printing with PLA plastic. The defect appears due to the fact that the plastic does not have time to cool and deforms.
Insufficient airflow model
Turn on the blower fans to maximum. If their power is not enough (in some printers, the fan is located only on one side), you can put a regular desktop fan and direct it to the 3D printer table.
Small models are difficult to blow well. Try to print small items alongside larger ones, or place several identical models in different corners of the table. So the plastic will have more time to cool.
The top of the model is “perforated” or uneven
The top of the model is bumpy or with holes. The problem may arise if the top of the model is flat. For example, like a cube.
Insufficient airflow
When printing the top plane (cover), the plastic does not have time to cool down and remains too liquid. Because of this, the threads are torn and holes are formed. Increase the fan speed on the last layers.
Not enough top layers
The top of the print may be too thin and warp. Check slicer settings. The number of upper layers is not recommended to be set less than 6.
Low infill percentage
If the infill percentage is too low, then the top layer will simply have nothing to rely on. Increase the fill percentage in the slicer settings.
Delamination model
Cracks appear on the print surface during or after printing. Cracks can be large or very small. Most often, this problem occurs with plastics with a high percentage of shrinkage - ABS or Nylon.
Sudden temperature change (if the model is stratified during printing)
When there is a sudden temperature change (eg draft), part of the model cools down faster. This leads to uneven shrinkage and incorrect distribution of internal stress. For plastics with low shrinkage, this is not critical. But if the shrinkage percentage is more than a few percent, the model may burst in layers.
For printing with these plastics, it is recommended to use a printer with a closed housing. If this is not possible, try to avoid drafts and sudden temperature changes in the room where the 3D printer prints as much as possible.
Print temperature
If the print temperature is too low, the layers may not stick together well. Raise the print temperature in the slicer settings.
Hardening (if the model cracks after printing)
Sometimes cracks appear on the model a few days after printing. This is due to uneven distribution of internal stress after cooling. You can try to “harden” the finished product.
For hardening, the model is placed in an oven, for example, and heated to the softening temperature of the plastic. After that, the heating is turned off and the oven is left to cool slowly with the model inside. Due to this, the stress inside the print is distributed more evenly. But accuracy is very important in this method - if you make a little mistake with the temperature, the finished product can “float”.
Ripples are visible where the extruder has changed direction. Most often it looks like a shadow around the “sharp” protruding elements of the model.
Mechanical problems
Sometimes the problem is caused by extruder play. Check if the extruder mount to the rails is loose. Be sure to check the tension of all belts.
High print speeds or high accelerations
Moving the extruder too fast can cause vibrations that cause ripples on the wall of the model. The lighter the weight of the extruder, the less noticeable the ripples will be. To get rid of ringing, simply reduce the print speed in the slicer settings.
Cause 1: 3D printing is expensive and slow
3D printing has come under the spotlight during the COVID-19 pandemic and related economic turmoil. Companies ranging from industry leaders to small businesses working from home have been actively using additive manufacturing to quickly produce pandemic-fighting products such as face masks, ventilators and sampling tubes.
Additive manufacturing is being praised by many for its help in the fight against the pandemic, and some see it as a watershed in the development of the 3D printing industry. However, there are those who adhere to the age-old stereotype that this technology makes production slower and more expensive.
To say this about 3D printing in general is unfair and incorrect, but there is still some truth in it.
There are several methods for metal 3D printing. Leading manufacturers use those based on sintering, melting or spraying metal powder. According to this technology, parts are created from metal grains fused together. However, the use of metal powder is expensive. When handling it, production teams need additional security measures. In addition, a lot of time and money is spent on post-processing processes: removal of powder residues, thermal and mechanical processing.
Misunderstanding of the task
We develop software products for business processes. We often encounter a situation where the client has a poor idea of what he needs and how it should work. A dangerous situation is created when the team has to do this - I don’t know what. At the same time, developers are often sure that they have correctly understood the problem being solved and are moving in the right direction.
The deadline arrives, the project manager looks at the result and realizes that the task has not been solved because it was misunderstood.
To prevent such situations from happening, you need to work on a solution not only together with the team, but also with the client.
This is how all participants in the process will understand the problem they are working on. The first step to turning in a task on time is to understand what it is.
In addition to working together, an iterative approach helps. Moving towards a solution in small steps, each of which ends with an analysis, we adjust the direction of work with the least losses.
Model is peeling off or not sticking to the print bed
This is the most common 3D printing problem. Every 3D printer has had a case when the first layer treacherously rolls, clinging to the extruder, or, most offensively, when it tears off a partially printed model from the table. The first layer must stick tightly otherwise nothing will be printed.
Gap between table and nozzle too large
This is the most common cause. You just need to set the correct gap between the table and the nozzle.
Modern printers often use an auto-calibration (auto-levelling) table system or an auxiliary table leveling program. To calibrate such printers, use the instructions. If there is no manual, it can be downloaded from the manufacturer's website.
If you have a simple printer without auto-calibration, self-assembly or KIT, use a probe or a piece of paper folded in half to calibrate. The probe should be slightly pressed against the table by the nozzle. Before calibration, the table and extruder must be heated. Align the table surface over each adjustment screw (there may be 3 or 4) in turn, and only then check the center point.
A small cheat sheet for determining the correct gap on the first layer
Plastic with poor adhesion
Some types of plastic, due to various reasons, such as large shrinkage, do not adhere well to the surface of the printing platform. In this case, try using stickers or special 3D adhesives to improve adhesion between the table and the first layer of plastic.
In the early days of 3D printing, there were experiments with various homemade 3D adhesive recipes. ABS diluted in acetone, BF glue, sugar syrup and even beer. Some experiments have been successful. Until now, some enthusiasts use some types of hairspray or glue sticks as 3D glue. But still they are inferior in their properties to industrial 3D adhesives.
Some types of high temperature shrinkable plastics (ABS, Nylon, etc.) may peel off the table during printing. This is due to uneven cooling and “compression” of the model (the lower layers have already cooled down, but the upper ones have not yet). For such plastics, it is imperative to use a 3D printer with a heated table and a closed case.
Plastic temperature too low
The hotter the plastic is when exiting the nozzle, the better it will adhere to the print bed. It is better to print the first 5-10 layers at a higher temperature (+ 5-10 degrees) and turn off the blower fan.
Incorrect first layer settings (speed and thickness)
Thicker layer sticks easier, so the standard first layer is 0.3mm thick. With an increase in print speed, the heating block may simply not have time to heat the plastic to the desired temperature and it will stick to the table worse. Before printing, check the speed and thickness settings of the first layer in the slicer.
The presence of more important tasks
It happens that you wait for months until an employee finds time for a task that is not very important, but necessary. If there is no deadline, it is not scary that it will be done later. But be on the lookout if you want it to be done.
Our developer was waiting for the project manager to register the project with Microsoft BizSpark. The manager had many higher priority and urgent tasks. The developer patiently reminded about the task and after a few weeks received the long-awaited access. If he had not done this, the task would have been forgotten.
Feel free to remind about the task.
In the worst case, a colleague will be so tired of it that it will be easier for him to do it. At the same time, learn to understand the mood and state of colleagues, as well as take into account what they are currently working on. To do this, it is useful to make the tasks of each employee open to others. This will help you choose the right time to once again remind you of the task.
Support materials
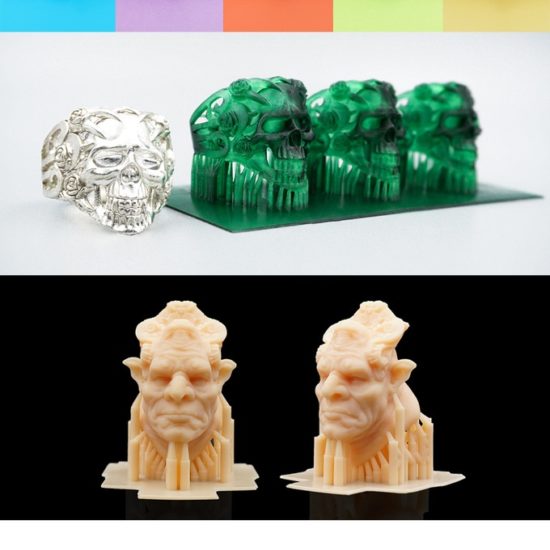
As you know, the 3D printer starts printing from the bottom up. This means that if your model design has large ridges on the top that don't have any sort of stop, then you might run into some trouble. The plastic thread also obeys the laws of gravity and cannot be squeezed out into the void. In such cases, a special supporting structure can be used to support the protruding parts of the model. Such structures can be water-soluble or removed mechanically. In any case, before starting post-processing, such supports must be removed.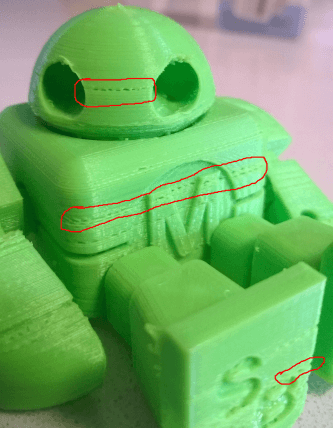
Helmet printed upside down with minimal support. If your support structure is not water soluble, then you will need to break it off or saw it off. For example, in this case it will be convenient to use an Exacto household knife, making cuts in the same plane as the printed surface. After removing the supports, use 200 or 400 grit sandpaper to gently smooth out the marks. In the image above, you can see that the model was printed upside down in order not to create a lot of supporting supports and thus reduce the time to remove them. In addition, PLA plastic is easier to sand on large, flat areas, such as the top of a helmet. If your support structure is dissolvable, then most likely you are dealing with PVA or HIPS. In this case, place the model in the appropriate solvent - water for PVA, limonene for HIPS. Water should completely dissolve the structure in a few hours. Limonene will take longer to dissolve the HIPS, usually around 24 hours. In both cases, remember to shake the solvent containers and your model from time to time to speed up the dissolution process.
Proper rinsing of the product
Thorough rinsing of the product is an important part of the post-processing process
This is especially important for dental products, because. it is unacceptable for liquid polymer to enter the patient's oral cavity
We recommend washing the model in alcohol, dividing this operation into 2 stages:
• Washing in dirty alcohol
• Washing in pure alcohol in an ultrasonic bath
Dividing this operation into two stages allows you to save alcohol and better wash parts
Warming up the model for a specified time in the oven at the required temperature
Warming up the printed model allows you to remove internal stresses that inevitably arise during the printing process. In addition, heating contributes to the evaporation of alcohol from the model after washing, which also has a positive effect on the mechanical characteristics of the resulting part. It is also not worth overheating or overexposing the part in the oven, this leads to cracks.
A lot of revisions
In my practice, most often I have to redo interface layouts several times. This is due to the fact that when working on them, new information is revealed.
To minimize the number of such situations, it is necessary to conduct a detailed analysis of the user's problem and work out interaction scenarios. As mentioned above, the designer should be involved from the very beginning.
With interaction scenarios in hand, you can move on.
I experienced it myself when I worked as a UX designer. From the very beginning, I tried to make high-quality prototypes for the entire interaction scenario. It took a lot of time, and after demonstrating the result, the team found that a lot of things needed to be redone. This led to the failure of deadlines and greatly demotivated.
Build your workflow so that you get feedback from the team, customer or users faster and make changes based on it.
Elephant leg
The first layers of the model are wider and protrude beyond the boundaries of the model. This is due to the fact that the upper layers put pressure on the first ones that have not yet cooled down and flatten them.
High table temperature
Too high table temperature causes the bottom layers to remain soft for a long time. Try lowering the table temperature. It is better to reduce gradually (in increments of 5 degrees). You can try to turn on the blower when printing the first layers.
Small gap between nozzle and platen
If the nozzle is too close to the platen when printing the first layer, excess plastic will be forced out. After a few coats, this will not be as noticeable, but can lead to the effect of an “elephant's foot”.
Part up and down speed
Stage up speed is very important to get a good side surface. A smooth tear-off will keep the supports intact and prevent the destruction of the model during the printing process. This is most relevant for soft materials such as HARZ Labs Dental Cast, Dental Pink Soft and Industrial Flex where the nature of the materials requires them to be sufficiently soft.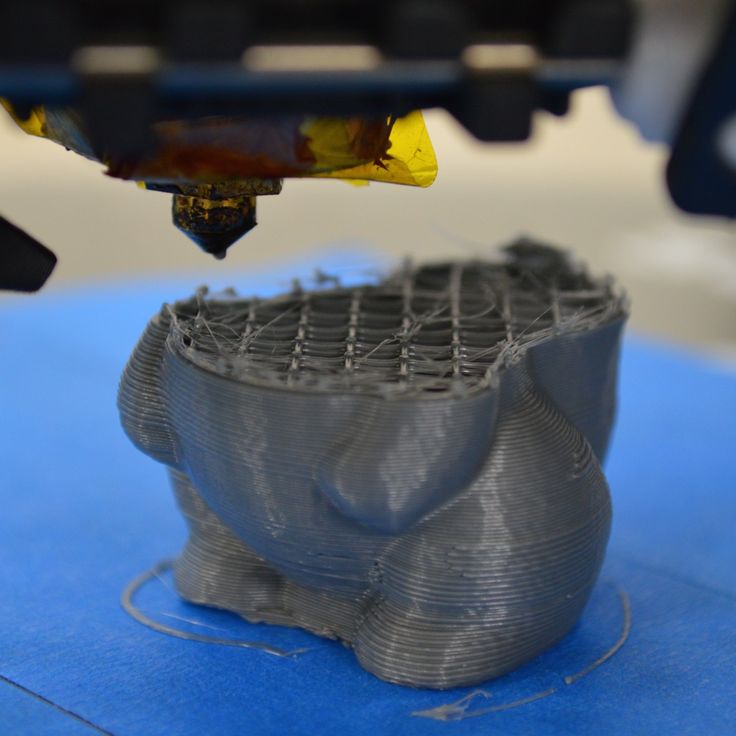
Stage lift height
During the printing process, the part sticks not only to the stage, but also to the cuvette film. When the table begins to rise, the film follows the model and, arching, breaks away from the part. If you choose too low a lift height, then the part simply will not come off and will continue to move with the film until, after several layers, it reaches the desired height and breaks away from the film. Naturally, such a seal can be safely sent to marriage.
Delay time before printing
Many users neglect this setting, underestimating its effect on the print result. To assess its impact on print quality, you need to understand a little about the mechanics of the process. When the stage is lowered, some polymer pressure is created on the cuvette, although it is not great, it is enough to bend the printer screen and increase the gap between the stage and the cuvette film. Accordingly, if you start printing at this moment, you can get a rough side surface of the product.