3D printer retraction
What is retraction in 3D printing? Definition and adjustments
This article tries to clarify the concept of retraction in 3D printing as it's a very important parameter to achieve quality prints, without material depositions on the exterior face of the model, or threads between pieces that are printed at the same time.
Retraction is the recoil movement of the filament necessary to prevent dripping of material during movements and displacements that the vacuum extruder performs during 3D printing.
The parameters that configure the retraction are:
- Retraction distance: Length of material that recedes in the retraction process. It varies depending on the type of material, the type of extrusion system (Direct or Bowden) and the type of HotEnd. For flexible materials, especially for the TPE type (Filaflex), retraction must be deactivated to prevent the filament from coiling on the extruder pinion.
- Retraction speed: Speed at which the extruder motor drives back the filament. With this parameter it's necessary to be very careful if high speeds are used (greater than 70mm/s) because it can mark the filament in such a way that it's unusable to continue the 3D printing.
- Minimum displacement: Minimum length from which you want the retraction to take place.
- Enable combining: By activating this parameter, which is in the section of advanced options of retraction of the program of lamination that is used (Cura, Simplify3D, Slicer, etc), apart from performing the retraction, the HotEnd is prevented from moving over holes. With this material remains are avoided in the faces seen from internal parts of the pieces.
- Z-axis elevation when retracted (Lift z): At the same time that the retraction occurs, the HotEnd moves on the z axis the indicated distance.
 This elevation is only necessary in the case of making pieces with many details and with small areas of great detail to avoid leaving traces of material right in that area. If you need to use this parameter, we recommend using the same distance as the layer height.
With the appropriate adjustment of the above parameters you get the ideal retraction for your 3D printer.
Unfortunately there is no formula to find the exact value, but each 3D printer and each extruder needs a particular value. The following table contains recommended values of length and retraction speed for the 3D printer depending on the type of extruder used, which are a good starting point to adjust them to your particular case:
Image 1: Retraction parameters
The values of the table are entered in the retraction section of the lamination software that is used, in our case, Cura 3D, is within the category of material.
Image 2: Retraction configuration in Cura 3
Care must be taken when varying the length parameter, because if it is increased too much (20 mm in a direct extruder), it will cause a discontinuous flow and thus gaps in the piece being printed.
Once all the parameters that configure the retraction are understood and based on the values that we have provided, each user will obtain their ideal configuration by simply making small adjustments.
Subscribe to our monthly newsletter and you will receive every month in your email the latest news and tips on 3D printing.
* By registering you accept our privacy policy.
How to Get the Best Retraction Length & Speed Settings – 3D Printerly
There are many settings that we can adjust and improve on our 3D printers, one of them being retraction settings. It took me a while to figure out how important they were, and once I did, my 3D printing experience changed for the better.
Many people don’t realize how important retraction can be until they are troubleshooting poor print quality in certain models.
Retraction settings are related to the speed and length at which your filament is pulled back within your extrusion path, so the melted filament at the nozzle doesn’t leak out while moving. Retraction can improve overall print quality and stop print imperfections such as blobs and zits.
What is Retraction in 3D Printing?
When you hear that rotating noise backwards and see filament actually getting pulled back, that is retraction occurring. It is a setting which you’ll find in your slicer software, but it isn’t always enabled.
After you have understood the basics of printing speed, temperature settings, layer heights and widths, then you start to get into the more nuance settings like retraction.
We can be specific on telling our 3D printer how exactly to retract, whether that be the length of retraction, or the speed at which the filament is retracted.
Accurate retraction length and distance can reduce the chances of different problems mainly the stringing and oozing.
Now that you have a basic understanding of retraction in 3D printing, let’s explain the basic retraction terms, retraction length and retraction distance.
1. Retraction Length
Retraction distance or retraction length specifies the length of the filament that will be extruded from the nozzle. The retraction distance should be adjusted accurately because both too low and too high retraction distance can cause printing problems.
The distance will tell the nozzle to pull back the amount of filament according to the specified length.
According to the experts, the retraction distance should be between the 2mm to 7mm distance for Bowden extruders and should not be more than the length of the printing nozzle. The default retraction distance on Cura is 5mm.
For Direct Drive extruders, retraction distance is on the lower end, of around 1mm to 3mm.
While adjusting the retraction distance, increase or decrease it in small increments to get the best suitable length because it varies depending on the type of filament you are using.
2. Retraction Speed
Retraction speed is the rate at which the filament will retract from the nozzle while printing. Just like the retraction distance, setting the most suitable retraction speed is necessary to get better results.
Retraction speed should not be too low because the filament will begin to ooze from the nozzle before it reaches the exact point.
It should not be too fast because the extruder motor will reach the next location quickly and the filament will extrude from the nozzle after a short delay. A distance too long can cause a decline in print quality because of that delay.
It can also result in the filament getting ground and chewed up when the speed generates too much biting pressure and rotation.
Most of the time the retraction speed works perfectly at its default range but you may need to adjust it while switching from one filament material to another.
How to Get the Best Retraction Length & Speed Settings?
To get the best retraction settings you can adopt one of the different ways. Implementing these processes will surely help you to get the best retraction settings and print the object just as you expected.
Notice that the retraction settings will be different depending on the fact that whether you have a Bowden setup or a Direct Drive setup.
Trial and Error
Trial and error is one of the best techniques to get the best retraction settings. You can print a basic retraction test from Thingiverse which doesn’t take very long.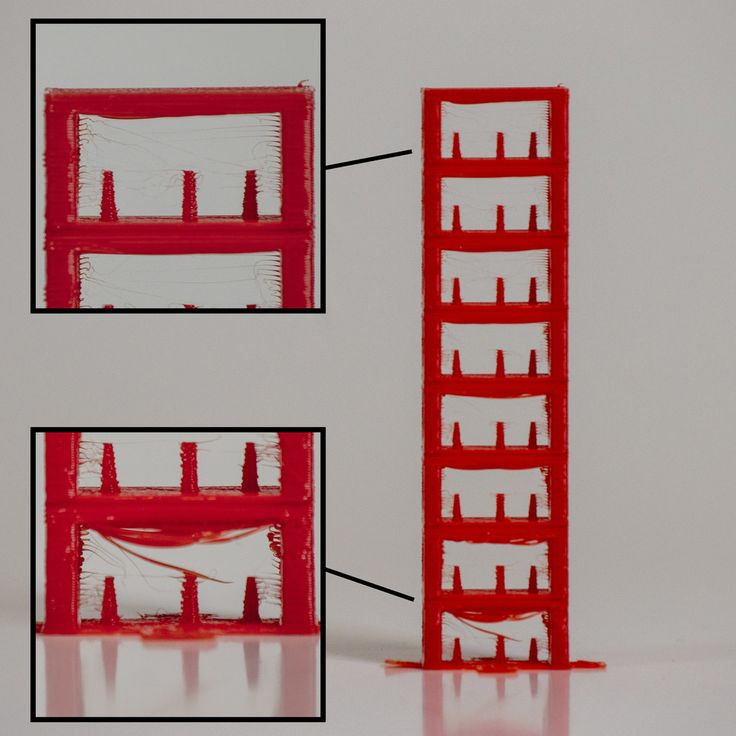
Based on the results, you can then start to adjust your retraction speed and retraction distance little by little to see if you get improvements.
Changes Between Materials
The retraction settings are usually different for every filament material being used. You have to calibrate the retraction settings accordingly every time you use a new filament material such as PLA, ABS, etc.
Cura has actually released a new method to dial in your retraction settings directly within the software.
The video below by CHEP explains it really well so check it out. There are specific objects that you can put on your build plate within Cura, along with a custom script that automatically changes retraction settings during the print so you can compare within the same model.
Cura Retraction Settings on Ender 3
The Cura retraction settings on Ender 3 printers usually include different settings and the ideal and expert choice for these settings will be as follows:
- Retraction Enabling: First, go to the ‘Travel’ settings and check the ‘Enable Retraction’ box to enable it
- Retraction Speed: It is recommended to test a print at the default 45mm/s and if you notice any issues in the filament, try decreasing the speed by 10mm and stop when you notice improvements.

- Retraction Distance: On Ender 3, the retraction distance should be within 2mm to 7mm. Begin at 5mm and then adjust it until the nozzle stops oozing.
The best thing you can do on your Ender 3 is implement a retraction tower to calibrate the best retraction settings. How this works is you can set your Ender 3 to use increments of each setting per ‘tower’ or block to see which gives the best quality.
So, you would do a retraction tower to start with a retraction distance of 2mm, to move up in 1mm increments to 3mm, 4mm, 5mm, up to 6mm and see which retraction setting gives the best results.
What 3D Printing Problems Do Retraction Settings Fix?
As mentioned above, stringing or oozing is the major and most common problem that occurs just because of wrong retraction settings.
It is essential that the retraction settings should be calibrated accurately to get a well-crafted, high-quality print.
Stringing is referred to as a problem in which the print has some strands or threads of filament between two printing points. These strands occur in an open space and can mess up the beauty and charm of your 3D prints.
When the retraction speed or retraction distance isn’t calibrated, the filament can drop or ooze from the nozzle, and this oozing results in stringing.
Most of the 3D printer experts and manufacturers suggest adjusting the retraction settings to avoid the oozing and stringing problems effectively. Calibrate retraction settings according to the filament you are using and the object you are printing.
How to Avoid Stringing in Flexible Filament (TPU, TPE)
Flexible filaments such as TPU or TPE are used for 3D printing because of their amazing non-slip and impact resistance properties. Keep this fact in mind that flexible filaments are more prone to oozing and stringing but the problem can be stopped by taking care of printing settings.
- The first and most important thing is to enable retraction settings every time you are using flexible filament.

- Set up a perfect temperature because high temperatures can cause the problem as the filament will melt quickly and may start dropping.
- Flexible filaments are soft, do a test print by adjusting retraction speed and retraction distance because a bit of difference can cause stringing.
- Adjust the cooling fan according to the printing speed.
- Focus on the flow rate of the filament from the nozzle, usually flexible filaments work well at 100% flow rate.
How to Fix Too Much Retraction in 3D Prints
It’s definitely possible to have retraction settings that are too high, leading to printing issues. One issue would be a high retraction distance, which would cause filament to retract too far back, leading to filament being closer to the hotend.
Another issue would be a high retraction speed which might reduce the grip and not actually retract properly.
To fix retractions that are too high, turn your retraction distance and speed down to a lower value to see if it fixes retraction issues. You can find some standard retraction settings for your extruder and 3D printer in places like user forums.
What is retract in 3D printing. Calibration and Adjustment
Retract is the process of pulling the filament back into the nozzle of the 3D printer before moving the extruder between the printed surfaces. This reduces the pressure in the nozzle and prevents the extrusion of molten plastic at the moment of "idle" movement from one point to another.
You can enable retraction in the slicer. This parameter tells the extruder to draw the filament the specified length back into the nozzle at the specified speed. When the material is slowly drawn into the nozzle, the chance of seepage is greatly reduced. If you make ideal retract settings in a 3D printer, then you will never see any stripes, spots or smudges on the grown model. Favorit 3D service center engineers and specialists have accumulated vast experience in setting up and customizing various FDM 3D printers. If you have any questions or need help setting up print settings, please email [email protected] or call +7(473)295-93-49 and we will be happy to help you.
In the image you can see what the printed model looks like without retraction.
Why Retract is needed in 3D printing
This option in the 3D printer greatly helps with melted filament leakage and poor surface quality. To all of the above, we can add one more positive aspect of the retract. As the extruder moves from one surface to another, the retraction raises the nozzle slightly in the Z-axis (most often by 0.2 mm) and thereby reduces the risk of the nozzle tip hitting the already printed elements.
We tried to make this guide as clear as possible and take as many photos as possible to make it clear how much the retract setting affects the 3D printing result.
The photo below shows the difference between printing without retraction (left photo) and printing with calibrated retraction (right).
How to turn on the retraction
In the last article, we dwelled on the Cura slicer in detail.
If you are using a different slicer, such as PrusaSlicer or Simplify3D, then the retraction setting will be slightly different, but the setting principle will remain the same.
We'll use Cura as an example. Open the slicer, go to the settings section and open the retraction options menu. If you have not yet enabled this mode, press the button "Enable retraction" .
Please note in advance that in this article we describe the instruction for retraction calibration for beginners, i.e. we will only check the correctness of the printing temperature and change the length of the filament retraction. Other parameters, such as speed, will not be considered here. We recommend starting with a speed of 50 mm / s no more. Any cheap extruders, as well as high-quality ones, can cope with this speed. This speed is the benchmark for filament retraction.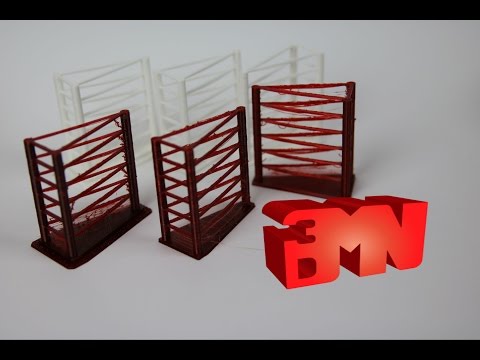
Be sure to check the print temperature, it must correspond to the temperature recommended by the manufacturer (as a rule, it can be found on the packaging with plastic).
Before calibrating, I recommend that you determine the optimum print temperature for your printer using the "Temperature Tower". The temperatures shown here are typical for most PLA manufacturers. If you use a different type of filament, then you need to change the operating temperature, for example, for PETG it will be 235°C, etc.
Before calibration, you need to find out if you have a direct type extruder ("direct drive"), then it is recommended to start the retraction length from 0.2 mm .
If the printer is equipped with a Bowden extruder (filament fed through a PTFE tube), it is recommended to start with approximately 2 mm .
How to calibrate the retraction
1. Download and print the test model
Download the special calibration model from the link below.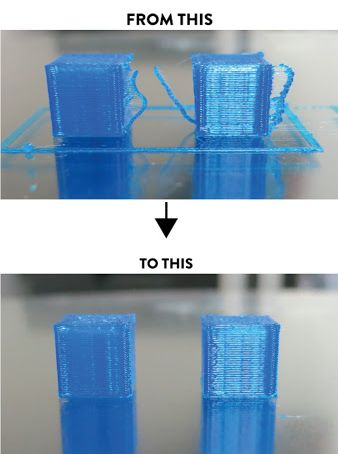 This is a fairly popular version, so keep it for yourself.
| |
| Download retract calibration model (Thingiverse.com) |
When the download is complete, find the downloaded file (by default it is the "Downloads" folder)
Unpack (unzip) the file.
open the folder and find the file four_square_cons.stl . Run this file in your slicer (Cura in our case).
Now check your slicer to see if you have active retraction. Then click on "Cut" and slice the model.
Click "Save to file" and copy to SD card or flash drive. Then send the model to the 3D printer.
2. Evaluate the printed model
It is very important to first evaluate the current retraction settings on the printed model.
The photo below shows that the quality of the model turned out to be very deplorable.
The model is printed from PLA plastic, which usually has no problems with threading. The photo shows that in addition to the threads, thicker tails are observed, this indicates that the plastic outlet is not configured correctly.
A typical error is insufficient thread rollback length or too low retraction speed. All these settings need to be adjusted.
Therefore, it is very important to print a test model and make a correct assessment for further adjustment of the retract settings.
3. Adjust the length with the current temperature.
The photos below compare several models printed with different retract lengths.
Only parameter "Bend length" was changed in the settings - from 2 to 6 mm. The rest of the parameters were not changed.
If the thread remains at any length of the retraction, then it is necessary to adjust the printing temperature .
3.1 Branch length - 2 mm.
3.2 Lifting length - 3 mm
3.3. Dishasis length - 4 mm
3.4 Lifting length - 5 mm
9000
3.5 Blunger 6 mm
3.6 Test evaluation of the model with initial temperature
As you can see in the images above, the problem threads still appear. Changing only the retraction length did not help.
Therefore, other parameters must be changed, such as temperature or retract speed.
4. Test at lower temperature. Decrease by 10°C.
Since I am printing at a fairly high speed (160-200mm/s), the temperature I use is much higher than with standard printing at around 4-40mm/s.
In any case, if the test with retract adjustment at normal temperature is not successful, I recommend lowering the temperature by 5-10°C.
The photo below shows models printed with 2 and 3 mm retraction / at 205°C. As we can see the quality has improved a lot, but the threads are still visible.
4.1 Branch length - 2 mm.
4.2 Branch length - 3 mm.
4.3. Test print score
Compared to the first test where the standard temperature is set, we see a significant improvement in print quality.
However, the thread is still present on the model, so we will reduce the temperature even more.
5. Test at a lower temperature. Lower it another 10°C.
If threading still persists, reduce temperature by 5 -10°C . Here I went from 205°C to 195°C.
We see that the resulting models have finally reached their level of quality (in terms of retraction).
Unfortunately I can't avoid fine filaments on this 3D printer due to the use of the Volcano hot end, higher print speeds and long Bowden tube (Distance between nozzle and extruder about a meter).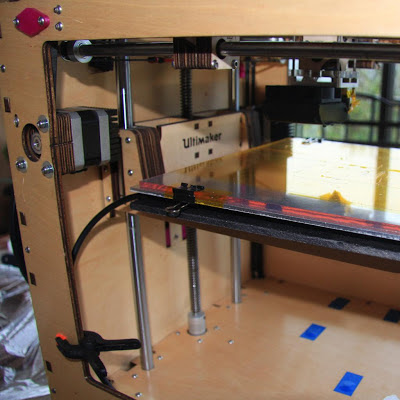
5.1. Branch length - 2 mm. 5.2.
Branch length - 3 mm. 5.3.
Branch length - 4 mm.
5.4. Test score.
Lowering the temperature by another 10°C produced the desired result. "Tails" and threads have disappeared almost completely.
If all the turrets on the model are clean, without any threads, cobwebs, etc. then we can consider the retraction calibration successful and use the parameter values for this filament.
6. Conclusion.
In this article, we learned in detail how to calibrate the retraction on a 3D printer by changing the temperature parameters.
More settings such as retract speed and acceleration will be gradually added to this article.
3D printer retraction speed. What's this?
3DPrintStory 3D printing process 3D printer retraction speed. What's this?
When a 3D printer's extruder moves between two points, the filament is known to leak out of the nozzle. This leads to the appearance of plastic residues between the individual parts of the model, which must be removed at the stage of final processing of the 3D model, can lead to breakage of individual parts of the 3D model or are simply annoying.
One way to solve this problem is to enable retraction in the slicer. This parameter tells the extruder to pull material of the specified length back into the nozzle at the specified speed. When material is temporarily removed from the nozzle, seepage is much less likely. The ideal retract setting for your printer will ensure 3D printing without these filaments and plastic residue.
The 3D Printer Retract Speed is one of the three main settings for retracting material. It determines the speed at which the extruder draws in the filament. However, before discussing this further, it is worth first estimating the material retraction distance.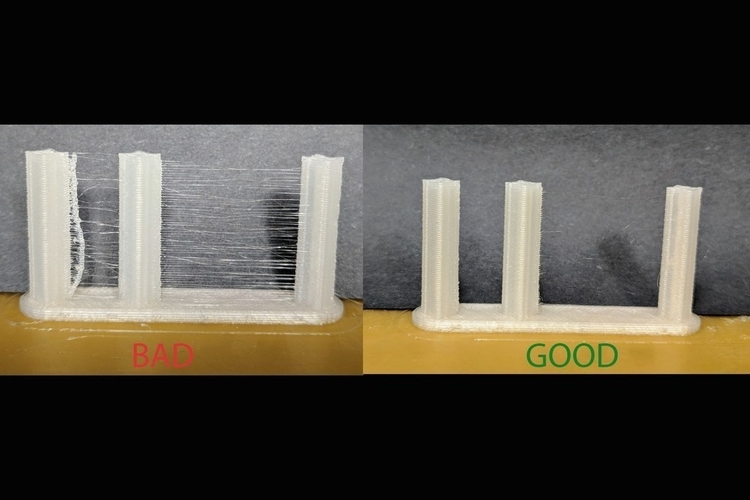 In addition, in this note, we will also talk about the minimum travel distance.
Retraction Distance
The retract distance determines the length of material that is retracted by the extruder motor. The greater this distance, the farther from the nozzle the 3D printing filament is drawn. If this distance is set too low, material will still ooze out of the nozzle. If the value is set too high, the material will be pulled too far and this may result in not enough material to be extruded and also clog the 3D printer's nozzle.
The basic rule for setting the retract distance is not to select a retraction distance larger than the nozzle length. Most 3D printers use a lead distance of 2 to 7mm. While adjusting the retract, change this setting in 1 mm increments until you find the optimal distance.
Retraction speed
The retraction speed is the speed at which the extruder draws in material. If it is too slow, the filament will have time to flow out of the nozzle, forming hairs and sagging on the model.