3D printer nozzle size difference
Everything about nozzles with a different diameter
The default nozzle diameter for most of today’s printers is 0.4 mm, and the nozzles used in Original Prusa i3 MK3S+ and the MINI printers are no exception. Changing the nozzle takes just a few minutes and it can bring a number of benefits. According to our survey, only approximately 20 % of users tried replacing their printer’s nozzle at some point, which is quite a low number. Let’s look at how changing the nozzle can improve your experience.
A smaller nozzle is great for detailed (but slower) prints, while larger nozzles print faster, but the quality suffers – or does it? In reality, it’s a bit more complicated. In our article, we will demonstrate the benefits of smaller and larger nozzles in real situations. But first, we need to clarify something users often get wrong – the correlation between layer height and nozzle diameter.
Layer height vs nozzle diameter
Layer height should not exceed 80 % of the nozzle diameter. If you are using the standard 0.4mm nozzle, the maximal layer height is about 0.32 mm. However, with a 0.6mm nozzle, it’s possible to achieve up to a 0.48 mm layer height.
Apart from these limitations, the two parameters are independent of each other. Tweaking their settings separately will bring completely different results. The nozzle diameter affects the overall level of detail almost exclusively in the horizontal plane (parallel to the print surface). What does this mean? With a smaller nozzle, you will be able to print a more detailed text – assuming it’s placed on the top side of the printed object. Contrary to that, the layer height affects the level of detail on vertical and slanted sides of an object. You have a much greater chance of seeing individual layers on organic-looking objects. The lower you set the layer height, the better the overall result. On the other hand, it makes little sense to print rectangular-shaped objects with very low layer height. There will be little to no difference in the end result, plus the printing time will be unnecessarily long.
Print up to 4 times faster!
3D printing is not exactly a fast process. Even a print that is just a few inches tall can take several hours to complete. So it’s quite puzzling how overlooked large-diameter nozzle printing is, despite the fact that it can lead to a dramatic improvement of the printing speed.
STL download link – Chibi Grim by Tanya Wiesner
A larger-diameter nozzle lays down wider perimeters, which means that it uses fewer perimeters than a smaller-diameter nozzle to print a wall of the same thickness. A nozzle with a larger diameter also allows for printing with increased layer height. Combining these two effects leads to a noticeably shorter print time. There’s a catch, though: if you keep the same layer height to print something with just one perimeter, like a vase, you won’t notice any improvement in speed. Because the nozzle has to go through exactly the same sequence of moves, independent of diameter. Yes, the vase will have a slightly thicker wall, but the print time will be almost the same.
Effect on mechanical properties
Another advantage of using larger nozzles is the increased toughness of printed objects. An impact resistance test revealed that the objects printed with the 0.6mm nozzle absorbed up to 25.6 % energy more than those printed with a 0.4mm nozzle. And objects printed with a 0.25mm version absorbed 3.6 % less energy than those printed with a 0.4mm nozzle. This test was performed on ten different samples. We then removed the minimum and maximum values, which is why you can see values of 8 samples. To learn more about the Charpy impact strength test, please visit this link.
Supports
Supports are usually printed as a one perimeter wide polyline. If you go to slicer settings, you may often notice that the supports are deliberately underextruded, so they are easier to remove. And, of course, using a different printer nozzle directly affects the width of support walls. You can turn this into an advantage. By simply using a smaller nozzle supports will be thinner and easier to remove. Using larger nozzles has an opposite effect leading to wider and sturdier supports, which can be a bit difficult to remove.
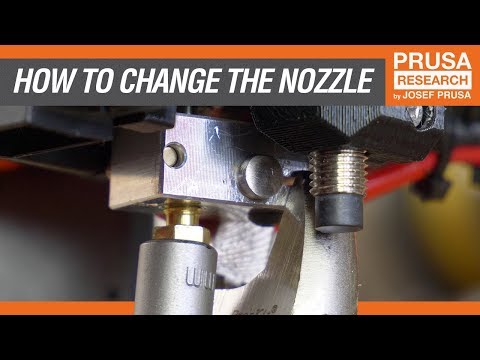
How to replace the extruder nozzle?
Ready-made settings for 0.
 25mm, 0.6mm, and 0.8mm nozzles
If you want to try 0.25mm, 0.6mm, or 0.8mm nozzle and own an Original Prusa printer, you don’t need to create brand new slicer profiles. We’ve done that for you! Open the Configuration Wizard in PrusaSlicer and tick the nozzle diameter checkbox under your printer corresponding to your nozzle size. Then simply select it as the active printer profile.
0.25mm nozzle
Pros
Better looking printed texts
Better resolution in XY axes – perfect for jewelry, logos…
Extremely easy-to-remove supports
Cons
Significantly longer print times
Higher risk of nozzle getting clogged
Not compatible with some filaments (filaments containing larger particles)
Examples of practical use (0.25 mm)
Printing texts
As already mentioned, the nozzle diameter has a noticeable effect on the printing resolution of the plane parallel to the print surface. This means that a 0.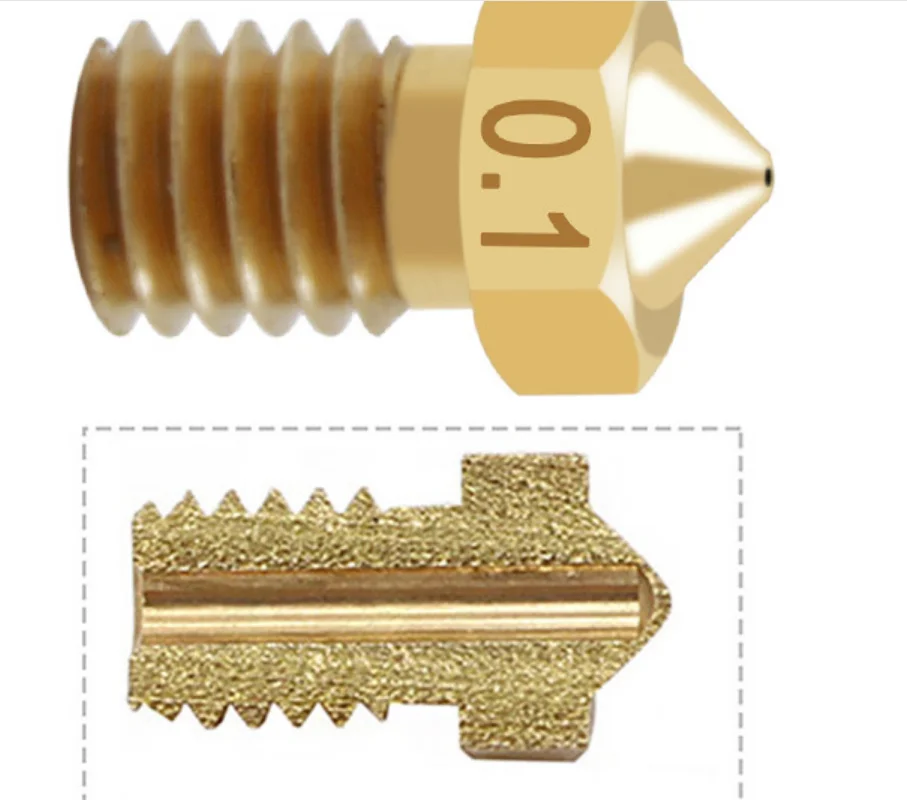 25mm nozzle is suitable for printing detailed text. Let’s compare it to the default 0.4mm nozzle. Despite the fact that ‘Detect thin walls’ is enabled, parts of the letters can be lost during slicing. This won’t happen with a 0.25mm nozzle, so you can use it to print an unusual business card to woo the crowds 🙂 It’s worth mentioning that changing the layer height won’t affect the text legibility.
Slic3r preview shows that the object’s details are too small for the selected nozzle
Left: Business card printed with a 0.4mm nozzle. Right: Same model, printed with a 0.25mm nozzle.
Printing jewelry
This is another great use of a smaller nozzle. The difference between a 0.4mm and a 0.25mm nozzle is not so dramatic, because even a 0.4mm nozzle can print small objects reasonably well. Improvements will be visible especially when printing thin lines.
Printing miniatures
Surprisingly, printing miniatures using a small-diameter nozzle leads to a fairly minor improvement in print quality. You’ll notice the biggest improvement while printing supports for these objects. Supports printed with a 0.25mm nozzle are easy to remove and they leave nearly invisible marks on the object.
STL download link
On the other hand, if you don’t need supports, the difference between a 0.4mm and a 0.25mm nozzle is close to zero. Honestly, if we had switched the labels above those two chests, could you tell?
STL download link
0.60mm nozzleA 0.60mm nozzle is suitable for any print that doesn’t rely on tiny details. Headphone stands, various holders, racks or flower pots… can all be printed in half the usual time. We have been mostly using a 0.4mm nozzle during the past few months, so frankly it was a pleasant re-discovery of how nifty the 0.6mm nozzle is.
Pros
Print times up to twice as fast
Almost the same print quality as a 0.4mm nozzle
More durable prints
Low risk of a clogged nozzle
Cons
Worse resolution of tiny details and texts
Supports are more difficult to remove
Examples of practical use (0.
 6 mm)
6 mm)Flower pots and vases
Flower pots usually don’t feature any intricate details, so the difference between a 0.4mm and a 0.6mm print is nearly impossible to tell. In the example below, we’re using the same layer height. With an increased layer height, the 0.6mm would finish the print even faster. And thanks to the shape of the flower pot, the difference wouldn’t be too noticeable.
STL download link
Buddy the Dog
Buddy is quite a detailed model. However, the 0.6mm nozzle has no trouble with that whatsoever at this scale.
Voroni lamp
Thanks to the shape of this lamp (large flat surfaces), almost no quality has been sacrificed. A 0.6mm nozzle requires one perimeter less to achieve the same thickness of the wall as a 0.4mm nozzle (3 perimeters with 0.4 mm vs 2 perimeters with 0.6 mm). This saved a huge amount of time with the reduction of the print time by nearly 9 hours!
STL download link
1mm nozzleOne millimeter?! 0. 04 inches? Yep, correct. Forget everything you think you know about 3D printing. Even prints that take dozens of hours to finish can be done in only a few hours using a 1mm nozzle. You can achieve up to 5 times faster printing speeds compared to a 0.4mm nozzle. Of course, there is a price to pay. With a 1mm nozzle, you will usually print at a layer height of 0.5 mm, but it’s possible to go even higher. Sure, the printed object’s layers will be highly visible, but sometimes that doesn’t hurt. In some cases, it can even give the model an interesting aesthetic, which could be quite challenging to achieve using other methods. We will, of course, demonstrate that on several examples below.
Pros
Extremely fast printing
Very sturdy prints
Unusual look with highly visible layers
Nearly zero risk of a clogged nozzle
Cons
Lack of detail
Visible layers
Supports very difficult to remove
Filament seems to disappear from the spool
Examples of practical use (1 mm)
Dinosaur – a toy for children
A surprising advantage of using a 1mm nozzle is its ability to print rounded edges naturally – without any extra settings.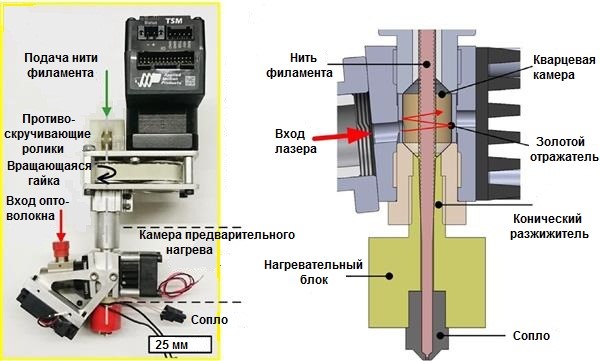 This is great for printing toys for children because the risk of cutting one’s finger on a sharp edge is minimized. Plus, the toy was printed five times faster compared to the default 0.4mm nozzle.
STL download link
Pencil holder
STL download link
Transparent prints without infill
Models printed using a transparent filament (e.g. PETG) without an infill and with a very high layer height have the ability to refract light in an interesting way. Especially, if you can print them with only one or two perimeters. Achieving a similar look would be otherwise quite challenging.
Conclusion
If we could recommend buying only one nozzle as an alternative to the 0.4mm nozzle, our vote goes to the 0.6mm option. It offers noticeably shorter printing times, but it’s still possible to print reasonably detailed models. If you usually print tiny models with texts, jewelry or logos, you should also consider the 0. 25mm nozzle. The 1mm version has a limited use, but it’s still pretty fun to use. Even the original E3D nozzles, which can be purchased through our e-shop or directly from E3D, are just around 7 EUR per unit. This small investment can have a surprisingly large impact on how you print.
What 3D Printer Nozzle Size Should I Use? - The Pros and Cons
When browsing for your last printer, 3D printer nozzle size may well have been the last thing on your mind. It’s an often overlooked detail.
Depending on what you need to print; the wrong setup could be holding you back.
In this article we’ll take a look at the options, and why you might need to explore different 3D printer nozzles, different materials, the relationship between nozzle size vs layer height and if in doubt, how to measure your actual nozzle diameter.
How does the 3D printer nozzle size affect prints?
The nozzle diameter directly affects the 3D printer extrusion width of each line in your print. This has an effect on a few elements of your print.
If you 3D print for business (or doing large quantities of very similar prints) you’ll want to make sure your extruder is laying down the right amount.
Not too much (as you could be using more filament than necessary) and not too little (as your print times could be longer than they need to be).
Or perhaps you print various models, some very detailed and intricate, and some more practical prints (like a replacement doorknob for example) that just need to be printed quickly, and for maximum strength.
Either way, you’re going to need the right setup for you so you’re not wasting your time, wasting filament or just coming out with an undesirable print quality. You can treat this guide as a sort of 3d printer nozzle size comparison.
There’s no simple answer to what’s the best 3D printer nozzle size, you need to weigh up what you’re trying to achieve and what elements matter most to you.
Depending on your 3D printer, various nozzles can be interchanged reasonably easily (most are screw fit) and multipacks (with different sizes in) can be picked up quite cheaply.!–split3–!
Let’s look at the various nozzle size 3D printer options commonly available:
The most common standard nozzle sizes are the 0.4mm (or 0.35mm) nozzle used by most current 3D printer manufacturers currently available. The reason for this, quite simply is that it’s a great all-rounder nozzle size.
This means you can print exceptional detail, and it won’t take forever.
That’s because you can print down to layer heights of just 0.1mm, or up to 0.3mm using a 0.4mm 3D print nozzle. The thinner the layer height, the better the detail (on the Z axis), and the thicker the layer height the fast your print will be, but with less detail.
This is more often than not, for most print jobs the best nozzle size for your 3D printer.
Well, maybe some prints take forever – but at least it’s an acceptable amount of time.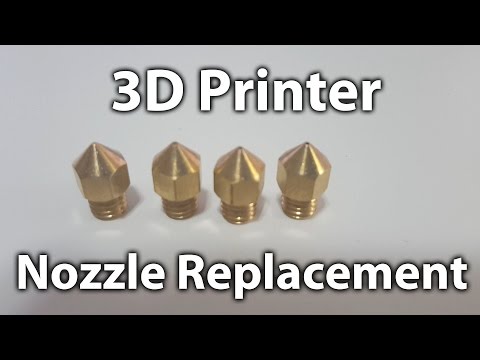 A common misconception is that if someone isn’t getting good enough print quality from their printer running a 0.4mm nozzle, they immediately think they need a smaller 3D printing nozzle size.
Another common smaller size is 0.25mm. Some printers are now offering 0.2mm, 0.15mm and Mass Portal are even experimenting with 0.1mm 3D printer extruder nozzles.
These create some incredible results for FDM machines, they managed to print the inner workings of a watch in excellent detail.
3D Printer Resolution Explained:
Now in theory, smaller 3D printer nozzle sizes do allow you to achieve better precision. But for a lot of printers, especially lower-priced or older models – a smaller-sized extruder nozzle isn’t necessarily going to make a difference unless your printer supports the higher resolution necessary.
Like putting low profile, performance tires on an old classic car – it won’t make it go any faster or necessarily handle the corners better.
It’s similar to how 3D printer specifications on paper (such as advertised resolution) won’t always translate to better print quality on the finished article.
Similar to how Ultimaker and Zortrax have very similar resolutions on paper, but in our unbiased opinion our Zortrax creates better quality prints than our Ultimaker 2 does – for example.
Check out the fine detail below for a 3D printing resolution comparison on very small nozzle sizes. 3D printing fine detail: Close-up shot of an FDM print with a 0.1mm nozzle – Mass Portal. If you were wondering how small can a 3d printer print, then this will give you a good idea.
If you bought your 3D printer recently though, it’s likely you’re going to be able to benefit from a smaller nozzle size as the resolution across the board is getting really good.
Let’s take a look at the pros and cons to printing with smaller nozzle sizes. Some are less obvious than others. Then we’ll take a look at the underrated larger nozzles available.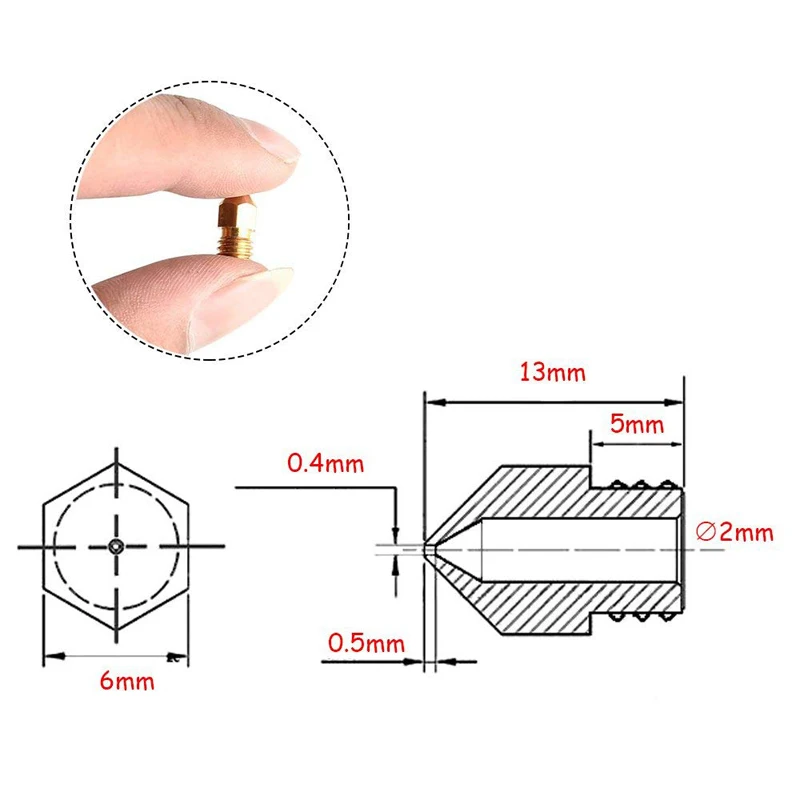
Hopefully once you’ve finished this article you’ll be able to answer that “What nozzle size should I print with?” that you’ve likely been losing so much sleep over.
You’ve likely guessed already that the smaller the nozzle in your extruder, in theory the higher detail you can print.
This is great for those intricate prints, or if you need to print very thin walls for aircraft skin, or high transparency prints and similar reasons for example.
This photo of a ‘printed model plane skin was done in one layer thick on a regular 0.4mm nozzle. If we’d done it on a 0.2mm nozzle the weight (and strength) of the skin would be halved.
It’s worth noting though that a 0.2mm nozzle 3d printer does not extrude half the amount of filament that a 0.4mm nozzle does.
Oh no, thanks to Area that means that halving the diameter actually means you’re looking at extruding just 25% of filament in an 0.2mm nozzle compared with a standard 0.4mm.
That could, if all other things being equal increase printing time by a large margin. In real terms though, it’s likely to increase by about two times longer, as you’ll usually use less filament as you print thinner wall thicknesses and thinner infill supports.
So bear that in mind if you need really strong parts; high detail and strength can only both be achieved if you’re willing to wait a long time…
Basically the smaller the nozzle size, the higher you increase your chances of 3D printer problems. Especially if you’re using cheap filament – it might work fine with lower detail, thick nozzles, but if you want specialist prints with small nozzles, it’s key to using pure, high-quality filaments.
Other factors when printing with thin diameter nozzles are less obvious – like it’s harder to print with overhangs. This is because each layer has less width for the next layer to purchase on as your traverse an overhang for example. Bridging is also more challenging.
Psst: here’s how to print really good overhangs and bridges.
But there’s good news! Where overhangs are a little more tricky with a thinner nozzle, the supports are actually much easier to remove.
Because of the additional precision, your slicer can use the minimum filament necessary between your model and the supports, so they’ll break away more easily – and have less broken contact area that needs sanding.
One last point, that really is the elephant in the room is the ease with which very thin nozzles are clogged. If you get down to 0.2mm or even 0.1mm sizes, you only need a small particle to clog the hotend.
We’re not trying to plug our own product here (well, maybe a little) but it’s increasingly important to print with excellent quality filament the thinner you go.
No contaminants in your filament, and clean out the nozzle sufficiently and regularly and you’ll turn an otherwise problematic printing experiment into a reliable endeavor.
So it’s worth mentioning you’d benefit from using a filament dust catcher when printing with those extra fine nozzles.
Before we consider a wider selection of 3D printer nozzle diameter, it’s worth taking a moment to understand the relationship between nozzle size and layer thickness.
In short, the former dictates horizontal details (along the x and y axis), and the latter controls the resolution on the vertical, or z axis.
How do I measure the nozzle size?
While the manufactured diameter of your nozzle should be engraved on the side of it, it’s not always possible to read this if it’s already mounted in your extruder, or if you’ve been printing with it for a while, you may not be confident it’s the same size as it was before.
Some materials can be more abrasive than others, wearing your nozzle to a larger diameter.
To work out what size your nozzle is really extruding, extrude some material into the air very slowly (fast can alter the shape or size) at the coolest setting you can extrude that material at, around 1mm/s.
Once cool, use a micrometer if you have one, they tend to be more accurate than digital calipers. You should find this is reasonably accurate.
Bear in mind it’s likely the filament will have expanded after extruding, but doing it this way should minimize this. Poor quality filament, or printing way too hot (especially if you’re extruding 1mm/s) will cause the material to expand more, giving an inaccurate reading.
Having said all this, it’s often useful to know the swollen die size that your filament is expanding to after extrusion if you’re working to get a really nice, precise finish on your prints. So feel free to experiment with a faster speed that’s a little more similar to your actual printing.
Ultimately the most important metric is volume of filament delivered. This is simply related to your actual filament diameter (not just the advertised diameter) and the speed you’re extruding.
That’s one of the reasons it’s so important your filament diameter is consistent to get nice-looking prints. So it pays to get good quality filament.
What is layer height in 3D printing?
Simply put, it’s the thickness of each line of extruded material that makes up each layer of your print.
The thinner the layer height (or layer thickness) the finer the detail of the print on the Z axis (the vertical dimension of your print), but the more layers it will need. Leading to a longer print time.
They are related but not completely independent from each other. For example, it is possible to print a thinner nozzle with a thicker layer height if vertical resolution is less important to you, and a thicker nozzle with very thin layer heights for vice versa priorities – but if you take this route to the extremes it will cause problems.
To maintain adequate pressure your layer height wants to be at the very least 20% smaller than the width of your nozzle – in most instances though we recommend it to be 50% for the best results.
How do I gauge the correct distance from the nozzle to the bed?
Getting this right can mean the difference between your print not even starting, and your print finishing with a perfectly smooth, glass-like surface under it.
People assume a feeler gauge 3D printer setup is required – but even this can be too thick. We recommend using very thin paper, like receipt paper to gauge the correct distance of your nozzle from the bed.
Please the receipt paper under the nozzle, and move the nozzle down step by step until the receipt paper has just a little resistance to it when you try to move it out. Printing at this height will give the bottom of your prints a professional glass-like finish.
Here’s our explanation for the best 3d printer layer height combo.
What’s The Max 3D Printing Layer Height vs Nozzle Size?
You don’t necessarily need a 3D printer layer height calculator, but a general rule of thumb is your max layer height is 50% the width of your nozzle. In some instances you can go higher (maybe 75%) but you may sacrifice reliability.
It’s best to experiment with the parameters of your print, as long as you understand the relationship between 3D printer nozzle size vs layer height you’ll be on track.
So for a 0.4mm nozzle, you’ll be looking to print at 0.2mm layer height, or up to 0.3mm. Your minimum would want to be around 0.1mm, any lower than this and you’re just increasing your waiting time for not much benefit (on the same 0.4mm size nozzle).
Just don’t forget to adjust filament flow rate or extrusion pressure to compensate for any layer height vs nozzle size changes. Though most updated slicers should handle standard extrusion width vs nozzle diameter for you automatically.
Here’s our mini guide on 3D printer nozzle height; explaining the close relationship between nozzle size, layer height and pressure.For most cases we recommend printing thinner layers with thinner nozzle diameters, and thicker layers with thicker nozzles, generally.
Just note that if you do print with a thicker nozzle diameter and a very thin layer height, you’ll need to bring your extrusion settings in the slicer way down to prevent over-extrusion.
It’s also worth noting, regardless of size, you’ll always want to make sure you have a clean 3d printer nozzle at all times. One of the easiest ways to do this is with high quality cleaning filament. You only need to use a few grams of it each time you clean, but it’ll prevent carbon build up over time.
If you’ve got a partially clogged nozzle, it’s effective enough to help with full nozzle cleaning too – flushing out all the impurities without being abrasive.
Another point to note, if you’re printing thicker layer heights (in proportion to nozzle diameter) your overhangs will look a bit messier.
In contrast to thinner layer heights, or better 3D printer layer resolution, will improve the detail on Z axis. Here’s a diagram to better illustrate layer height 3d printing.
So why would I use a 0.8mm or thicker nozzle?
These were more common on older machines, but they’re making a comeback. It’s all about using what you need, and no more. For a lot of prints, the stock 0.4mm that likely came with your printer could be overkill as far as detail is concerned.
If you want strength and speed and detail is less important, printing for a nozzle size comparison with a 0. 8mm or even a 1.0mm nozzle could be your answer.
This is especially important if you’re printing for business.
Need to get more prints in a shorter time frame from your machine and increase profits? Switch up the nozzle size – remember a 0.8mm could reduce print times down to ¼ of a print done with a 0.4mm.
The savings could be massive.
And don’t forget, prints done with 0.8mm can still be impressively detailed depending on your printer.
The only slight downside could be that you use slightly more filament, but with the thicker part walls you can likely get away with lower infill to compensate.
There’s no single best printing nozzle size diameter for all prints, you just need to consider what’s appropriate for what you’re wanting to print.
Which leads us onto…
What Nozzle Size Should I Use For Composite Materials?
It’s worth noting that composite filaments (any particle based filaments like Woodfill, Copperfill, Carbon Fibre Nylon or Glass Reinforced Nylon) will have trouble extruding through a thinner 3D print head.
That’s because these filaments have particles that, although still nano-sized, can have issues flowing through nozzles under 0.4mm diameter. We recommend that the best printing nozzle diameter is 0.5mm for composite materials, and for any metal, glass or Carbon Fiber materials you’ll need a hardened nozzle.
The brass one that came with your printer likely won’t last, and will bore out to a larger size after a few hours of printing.
A 0.5mm stainless nozzle or tungsten nozzle will last much longer for composite filaments and cost £5-£20. Or you might want to really splash out on one of these.
So if you’re still wondering “What extruder size to choose?” let’s recap with the pros and cons of smaller nozzles so you can work out the best nozzle size for your 3D printer:
- Much finer details, providing your printer supports the additional resolution.
- Can take significantly longer to print, but thicker nozzles can cut the time down dramatically. Spending 5 mins changing the size on longer prints could be worth the time investment!
- Overhangs are a little more challenging to print, but supports break away more cleanly.

- You need seriously good filament, or your nozzle could block easily. Is it worth the risk?
Hopefully this article has shed some light on the options available to you. If it has, or you have further questions related to this, please do comment below so we can help – we love to hear your thoughts or even see photos of experiences you’ve had with different nozzle sizes.
When experimenting with various types of nozzle and rate of using filament, it may be useful to know the length of the remaining filament on the spool. We’ve put down a chart for various spool sizes and filament diameters for the different materials, you can find our filament length guide here.
- For any more nozzle information, read our full guide to 3D printer nozzles.
- We also have a guide to 3D printer hot ends
- How to unclog a clogged nozzle
- How to print overhangs and bridges over 45 degrees
- The best FDM 3D printers
How to choose the nozzle size for a 3D printer? Pros and cons
3DPrintStory 3D printing process How to choose nozzle size for 3D printer? Pros and cons
When choosing your 3D printer, the nozzle size of your 3D printer may have been the last thing on your mind.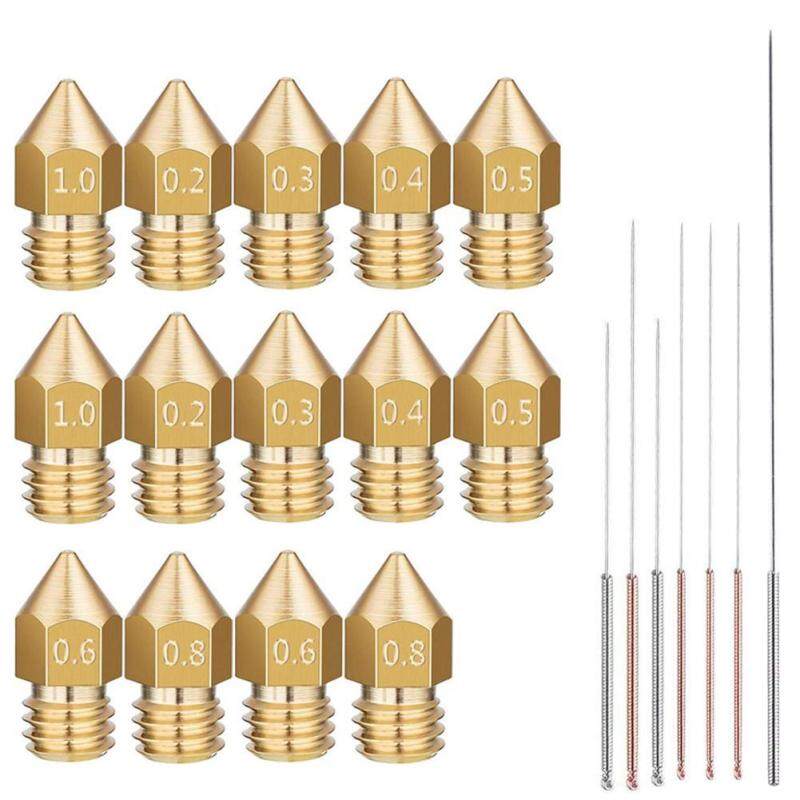 This is a detail that is often overlooked. But depending on what you need to print, the wrong nozzle diameter can get in the way.
In this article, we'll take a look at the different 3D printer nozzle sizes and why you should consider this assembly, what materials it's made from, understand the relationship between nozzle size and layer height, and how to measure the actual nozzle diameter.
How does nozzle size affect 3D printing?
Nozzle diameter affects the extrusion width of the 3D printer line. This affects some elements of your model. If you are 3D printing for business (make a lot of orders), you need to make sure your extruder is feeding the right amount of material. If too much material is fed, then more filament is used than is actually required for successful 3D printing. Well, a smaller number can simply lead to marriage.
Or maybe you're printing different designs, some of them very detailed and intricate, and some more practical (like a replacement doorknob) that just needs to be printed quickly and with maximum durability.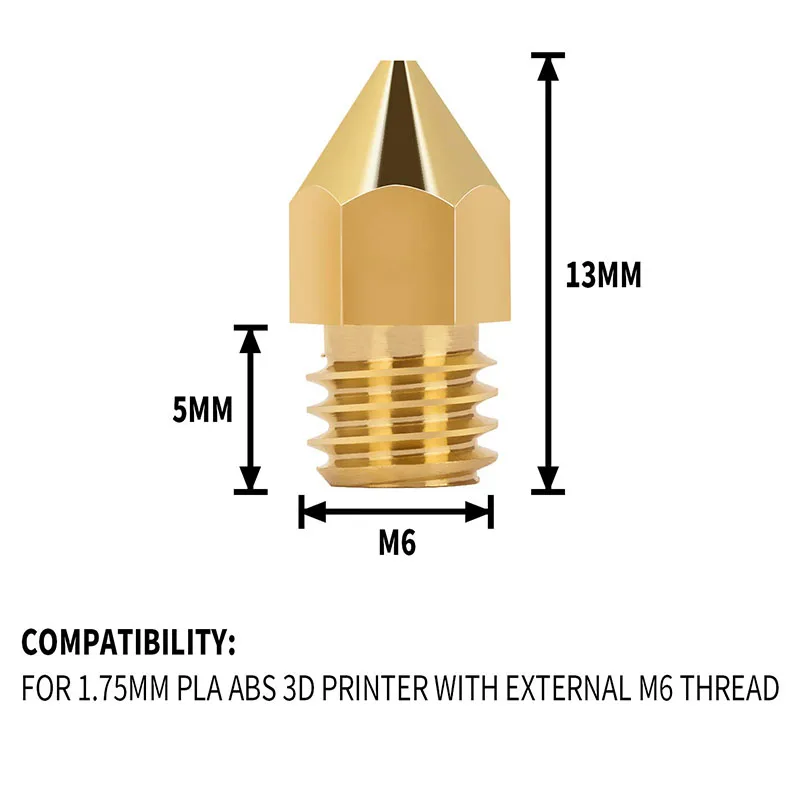
In any case, you will need the correct setting to save time, material and ensure the normal quality of the 3D model.
There is no easy answer to what is the best nozzle size for a 3D printer. You need to weigh what you want to achieve and what elements of the 3D model are most important to you.
Depending on your 3D printer, the nozzle can be quite easily replaced (most of them are mounted on screws), and buying a package with different sizes will cost you a lot.
Most common 3D printer nozzle options
The most common standard nozzle size is the 0.4mm (or 0.35mm) nozzle used by most modern 3D printer manufacturers. The reason for this is that it is a rather large and yet versatile nozzle size. This means that you can print with exceptional detail in no time.
With the 0.4 mm 3D printing nozzle you can print up to a layer thickness of only 0.1 mm or up to 0.3 mm. The lower the layer height, the better the detail (on the Z axis) and the larger the layer height, the faster your 3D print will be, but with worse detail quality.
A common misconception is that if someone doesn't get good enough 3D print quality on their printer with a 0.4mm nozzle, they immediately think they need a smaller 3D print nozzle.
Another common smaller size is 0.25 mm. Some 3D printers offer 0.2mm, 0.15mm, and Mass Portal is even experimenting with 0.1mm 3D printer nozzles. And the experiments are really interesting. Thanks to this miniature nozzle, they were able to print the clock mechanism with excellent detail.
How is nozzle diameter related to 3D printer resolution?
Theoretically, smaller 3D printer nozzles allow for greater precision. But for many 3D printers, especially cheaper or older models, a smaller extruder nozzle won't necessarily make a difference if your printer doesn't support the higher resolution you need. It's like putting low-profile, high-performance tires on an old classic car - it doesn't make it go faster, and it doesn't necessarily make it better cornering.
This is also similar to how the specifications of a 3D printer on paper (eg advertised resolution) do not always result in the best print quality of the finished product. Just like Ultimaker and Zortrax have very similar resolutions on paper, but in many actual tests, Zortrax produces better models than Ultimaker 2.
smaller nozzles as resolution across the board is getting better every day.
Let's look at the pros and cons of 3D printing with smaller nozzles. Some are less obvious than others. Next, we'll look at the larger, underpriced nozzles available. I hope after reading this article you will be able to answer the question: "What nozzle size should I print?".
You probably already guessed that the smaller the nozzle size in the extruder, the more detailed model you can get as a result of 3D printing. The thin nozzle is great for complex figures, or if you need to print very thin walls for aircraft skins, or high transparency models, etc.
The photo below shows the printed skin of a model aircraft, which was made with a standard 0.4 mm diameter nozzle. If the same skin is printed with a nozzle with a diameter of 0.2 mm, then the weight (and strength) would be halved.
It is worth noting that a 3D printer with a 0.2 mm nozzle feeds half as much material as a 0.4 mm nozzle. And this actually leads to an increase in print time by the same two times. It should be noted that strength and detail are reciprocals of time. So to get high-quality 3D models using a thin nozzle and high resolution, you will have to be patient (2 times more than when printing with a standard 0.4 extruder :)). In some cases this is justified, in others it is a waste of time...
As a general rule, the smaller the nozzle size, the higher the chance of problems with the 3D printer. Especially if you are using cheap materials - they can work well with low models and thicker nozzles, but if you need detailed models that are printed using a thin nozzle, then you should also be puzzled by buying quality filaments for 3D printing.
Other factors are less obvious when 3D printing with a thin diameter nozzle - for example, protrusions can be problematic. This is because each layer has a smaller width for the next layer.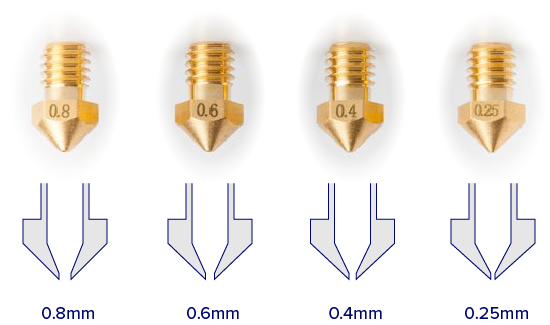 Crossing bridges can also be difficult.
But there is good news too! Where overhangs form, the caliper material will be much easier to remove if printed with a thin nozzle. Due to the increased accuracy, your slicer can use a minimum amount of material between your model and supports, so they will break off more easily and have fewer damaged pads that need to be sanded.
And finally, the most annoying thing about a thin nozzle is the ease with which it clogs. If you downsize to 0.2mm or even 0.1mm, you'll need a small particle to clog the hotend. You need to be very careful about the cleanliness of your 3D printing material and regularly clean the nozzle of your 3D printer. Otherwise, you will not end up with additional unnecessary problems.
It is also worth taking the time to understand the relationship between nozzle size and layer thickness. In short, the first parameter determines the horizontal detail (along the x and y axes), and the second adjusts the resolution along the vertical or z axis.
How to measure the nozzle size of a 3D printer?
Although the actual nozzle diameter should be engraved on the side of the nozzle, it is not always possible to read this value if it is already installed in the extruder or if you have been printing with it for some time. After all, there is the concept of wear and you may not be sure that the nozzle is the same size as before.
To determine what size your nozzle really is, very slowly extrude some material into the air (high speed may change shape or size) at the lowest setting you can feed material at (approximately 1 mm/s). Once cool, use a micrometer if you have one. They are generally more accurate than digital calipers. Keep in mind that the filament will probably expand after being extruded. Poor quality material or an extruder that is too hot (especially if you extrude at 1mm/s) will cause the material to expand more, resulting in inaccurate readings.
It can also be useful to know the size to which your material expands after extrusion if you are working on getting a really nice and accurate model. So feel free to experiment with higher speeds that are a bit more like your actual 3D printing.
What is the relationship between 3D print layer height and nozzle diameter?
In simple terms, this is the thickness of each line of extruded material that makes up each layer of your model. The thinner the layer height (or layer thickness), the finer the print detail in the Z-axis (the vertical dimension of your model), but the more layers will be required. Increases print time.
These characteristics are related, but not completely. For example, you can print using a thinner, thicker nozzle if vertical resolution is less important to you. Or you can use a thicker nozzle with a very small layer height. Although in this case, do not get too carried away. To maintain adequate pressure, your layer height should be at least 20% less than your nozzle width - and in most cases, for best 3D printing results, it should be around 50%.
How to determine the correct distance from the nozzle to the desktop of a 3D printer?
With the correct setting of the distance between the table and the nozzle, the base of the finished model should have an almost perfectly smooth, glassy surface. Many people assume that you need to use a stylus to properly set the distance between the nozzle and the 3D printer bed, but in fact, even that can be too thick. So it's worth thinking in the direction of the already proven table calibration with a piece of paper. You should use thin paper. For example, check paper is a great choice. Place the receipt paper under the nozzle and gradually lower the nozzle down until the receipt paper resists a little when you try to push it out. 3D printing at this height will give the bottom of the model a great look, and in the case of tall models, the print will definitely not go astray.
What is the maximum 3D print layer height compared to the nozzle size?
You don't necessarily need a layer height calculator on your 3D printer, but typically the maximum layer height is 50% of the nozzle width. In some cases, you can go higher (perhaps 75%), but in this case, you must be aware that you can sacrifice reliability.
It's best to experiment with the parameters of your model if you understand the relationship between the 3D printer's nozzle size and the layer height you'll be using to print. So for a 0.4mm nozzle, you will need to print with a layer height of 0.2mm, or up to 0.3mm. Your minimum should be around 0.1mm. If less, then in fact you just increase the waiting time without much benefit (on the same 0.4 mm nozzle).
In most cases, it is worth printing thinner layers with smaller nozzle diameters and generally thicker layers with thicker nozzles. Just note that if you are printing with a thicker nozzle diameter and very thin layer height, you will need to lower the extrusion settings in your slicer to prevent overfeeding.
It's also worth noting that no matter the size, you should always make sure you always have a clean nozzle. One of the easiest ways to do this is to use a high quality cleaning floss. You only need to use a few grams of it each time you brush, but this will prevent carbon buildup over time.
So why should I use a 0.8mm nozzle or thicker?
Similar nozzle sizes were more common on older 3D printers but are making a comeback. It's all about using what you need and nothing more. For a large number of models, the 0.4mm headroom that your 3D printer probably comes with may be overkill in terms of detail.
If you need strength and speed, but detail is less important, then you should use a 0.8 mm or even 1.0 mm nozzle. And don't forget that models printed with a 0.8mm nozzle can be very detailed, as a lot depends on your 3D printer as well.
The only slight disadvantage may be that you use more material, but with thicker part walls you can probably compensate with less infill.
There is no single optimal nozzle size for all models, you just need to take all factors into account and decide which nozzle size is best for you.
What nozzle size should I use for composite materials?
It is worth noting that composite materials (any particulate filament such as wood filler, copper filler, carbon fiber nylon or glass reinforced nylon) will cause extrusion problems when using a thinner nozzle.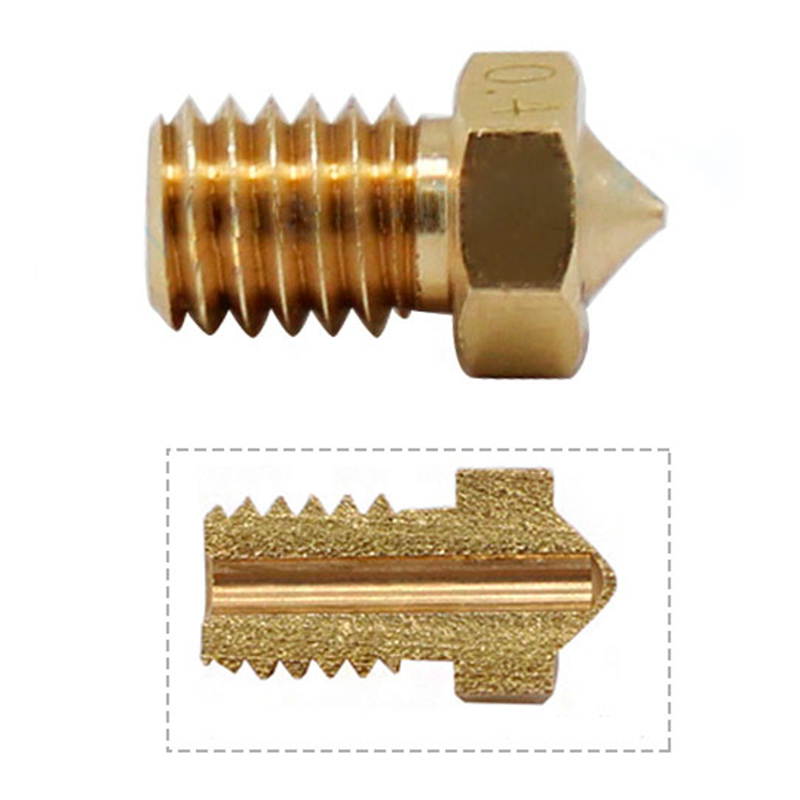
This is because these filaments contain particles which, although nanosized, can cause problems when passing through nozzles smaller than 0.4 mm. For composite materials, it is better to use nozzles of at least 0.5 mm, and for any metal, glass or carbon fiber materials, you will need a hardened nozzle. The brass nozzle that comes with your 3D printer will most likely not last long and will increase in diameter after a few hours of printing.
A 0.5 mm stainless steel or tungsten nozzle will last much longer for composite materials, but will, of course, be more expensive.
So, if you're still wondering "What size extruder nozzle to choose?", here are the results for a nozzle with a diameter smaller than the standard 0.4 mm:
- worth using for small detailed models if your 3D printer supports high resolution;
- 3D printing can take significantly longer, thicker nozzles can significantly reduce print time;
- overhangs are more difficult to print, but supports break off more easily;
- you need material from a quality proven manufacturer, otherwise the nozzle can easily become clogged.
Nozzles for 3D printers - types, differences. Nozzle type
Nozzle is an integral part of any 3D printer, and there are many varieties of this part. Brass products are considered standard nozzles. This type is suitable for printing with conventional types of plastics, but for those that include an abrasive, such as NylonX, is not suitable. Printing with these materials requires higher performance nozzles made from stronger materials. There are also copper nozzles, Clean Tip nozzles - such nozzles are distinguished by the fact that the thread does not stick to them, and they remain clean.
3D printing allows you to replace nozzles. This allows you to achieve different results and use different materials for printing.
3D printer nozzle: what is it?
The 3D printer nozzle is a special nozzle located in the extruder heater block. It is screwed into place by means of a thread. There is a small chamber inside the nozzle where molten plastic accumulates and is squeezed out through the hole. Moreover, the key parameters of the nozzle will be: the material from which the nozzle is made and the diameter of the hole.
Nozzle material
A standard desktop 3D printer is equipped with a 0.4mm brass nozzle. This is the best option for printing with ABS and PLA plastics. However, such nozzles are not at all suitable for printing with luminescent PLA, carbon fiber and metal enriched filaments. The fact is that plastics, which include solid particles, destroy the nozzle. The internal dimensions of the nozzle are distorted, and this affects the uniformity of the extruded material, which will inevitably affect the quality of 3D printing. For this reason, there are nozzles that are made from harder materials. Consider further the types of nozzles that can be found on the market.
Brass 3D Printer Nozzle
Brass Nozzle is the most popular option used in most desktop 3D printers. Of all the materials used to make nozzles, this one is the softest.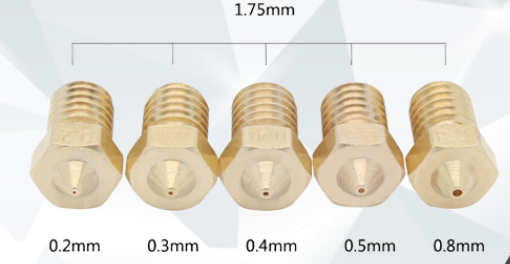 But brass nozzles are easy to process, cheap and affordable. Therefore, they are easy and simple to replace.
Main characteristics of brass nozzles:
- corrosion resistance;
- high thermal conductivity;
- relative softness;
- abrasion.
Application: Ideal for printing with "soft" plastics - standard ABS, PLA, PETG, and other plastic filaments that do not contain carbon fiber and metal additives.
Stainless steel or hardened steel nozzle
Steel nozzles are also used for 3D printing. They provide long-term printing with materials that contain solid particles, such as metal, carbon fiber. At the same time, such nozzles are not prone to abrasion and destruction, like softer brass nozzles. That is, you can print for a long time without reducing productivity.
But steel nozzles are not without drawbacks: lower thermal conductivity compared to brass nozzles. This can change the flow, especially when using large nozzles.
Main characteristics of steel nozzles:
- corrosion resistance;
- low thermal conductivity;
- relatively large weight;
- abrasion resistance.
Application: 3D printing with additives (carbon fiber, metal, glass, etc.)
Ruby nozzle
Anders Olsson developed the Olders Ruby nozzle. This is a brass nozzle equipped with a tip made of aluminum oxide, that is, an artificial ruby. This nozzle was originally created for 3D printing by the third heaviest material in the world. The nozzle was the result of an experiment conducted at Uppsala University in Sweden.
Initially standard nozzles made of steel and brass after printing 1kg of plastic wear out and are no longer usable. However, the nozzles have a number of disadvantages. Olson Ruby nozzles combine the high thermal conductivity of brass with the abrasion resistance of ruby. Of course, there are experts who say that the ruby tip has a low thermal conductivity, which negatively affects the printing result, but there is no evidence for this. At least for now.
The main characteristics of Olsson Ruby nozzles are:
- corrosion resistance;
- low thermal conductivity;
- abrasion resistance.
Application: Can be used for highly abrasive threads.
Tungsten Carbide Nozzles
Dyze Design Tungsten Carbide Nozzles are something of a newcomer to the market as they only started production at the end of 2018. Tungsten carbide is hard and wear resistant. It is used for drilling, cutting ceramics and metals. Such nozzles also have disadvantages, but it is too early to talk about them.
Main characteristics of tungsten carbide nozzles:
- abrasion resistance, very high;
- hardness;
- high thermal conductivity;
- corrosion resistance.
Application: This is a universal nozzle that can be added to your nozzle set, and the nozzle is also suitable for printing with highly abrasive filaments.
Nozzle sizes for 3D printer
Nozzles are characterized by the diameter of the hole. This characteristic will affect the degree of print detail. In this case, the influence will be exerted not only on the width of the lines, but also on the height of the layer.
Beginners are advised to use a nozzle with a diameter of 0.15mm. Compared to a standard 0.4mm nozzle, this nozzle allows you to get a higher resolution in the OX and OY axes. Thanks to thin lines, sharper corners can be obtained, but this will only be possible in that case. If your 3D printer is well set up and serviced regularly.
The choice of nozzle diameter should be determined by the layer height you require. It is necessary to choose a nozzle so that the size of the layer during printing is 25-50% of the nozzle size.
If the device is calibrated correctly, optimum adhesion between layers can be achieved. For example, a standard 0.4mm nozzle allows you to print layers of 0.