3D printer minimum layer thickness
Layer Thickness : Precision of 3D Printing
Layer thickness is an important aspect while you are 3D printing. We are going to explain to you everything about layer thickness, its importance, its differences with 3D printing resolution, and how it can affect the details on your part.
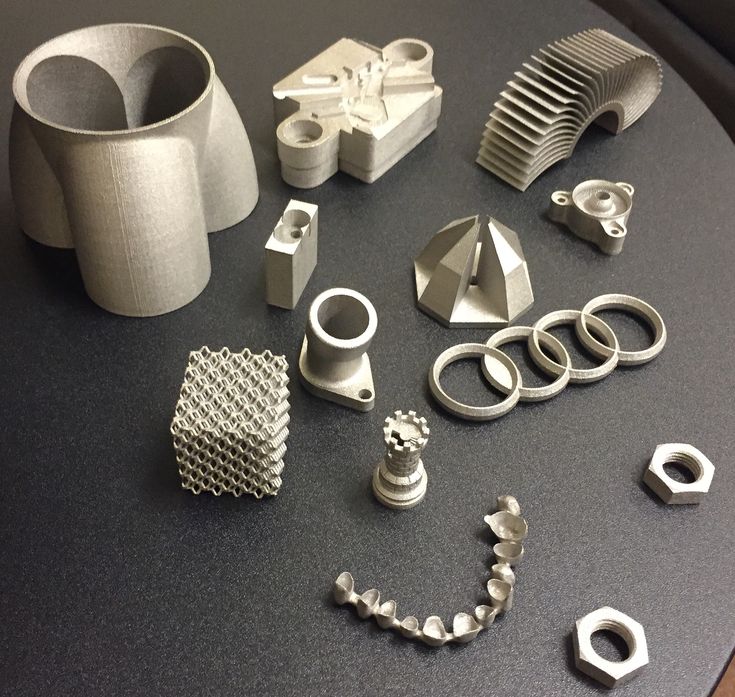
Close up of a 3D print displaying layer thicknesses from Selective Laser Sintering (SLS) printing technologyWhat is layer thickness?
3D printing is an additive manufacturing technique, meaning that your part will be printed layer by layer. These layers have a thickness. Layer thickness in 3D printing is a measure of the layer height of each successive addition of material in the additive manufacturing or 3D printing process in which layers are stacked. It is one of the essential technical characteristics of every 3D printer; the layer height is essentially the vertical resolution of the z-axis. When manufacturing a project using additive manufacturing you deal with three different dimensions: X, Y and Z axis.
To understand what is a layer thickness it would be helpful to fully understand what it does for your 3D prints. Selective Laser Sintering is an Additive Manufacturing method that uses a powder bed fusion process to build 3D parts.
Powdered polymer build material, typically nylon, is transferred from containers (called the ‘powder delivery system’ in the picture) holding fresh powder onto the build stage in the process chamber with a recoating tool.
A laser then selectively scans the thin layer of powder, sintering together powder particles in the shape of the cross-section of the first layer of the 3D part. The build platform then descends one layer and the recoater transfers more fresh powder from the hopper to the surface of the first layer. Just like the first layer, the second cross-section of the 3D model is scanned and sintered. The laser scanning process simultaneously generates the current layer and adheres it to the previous layer, making a solid part.
Printer / Technology
Layer Thickness
Professional fused deposition modelling for production (Stratasys, etc. )
)
0.17 mm to 0.33 mm (0.007″ to 0.013″)
Office or fablab fused deposition modelling (Makerbot, Ultimaker, etc.)
0.10 mm to 0.33 mm (0.004″ to 0.013″)
Selective laser sintering (SLS) – (EOS, 3D System)
0.060mm to 0.150 mm
Resin deposit (Stratasys Polyjet)
0.016mm to 0.028 mm
Material binding (3D Systems ZPrinter)
0.1 mm
Stereolithography, DLP, resin hardening by light or
0.05 mm to 0.15 mm
Wax deposition by piezoelectric head (Solidscape)
0.005 mm to 0.10 mm
Layer thickness examples
In general, not all 3D printers are technically equal, as there are technical differences that generate different layer thicknesses, some 3D printers generate lower layer height than others. Generally, 3D printers’ minimum layer thicknesses is 16 µm layer height and the maximum is 150 µm layer height. You are able to change this setting on all 3D printers before beginning the 3D printing process of your 3D file.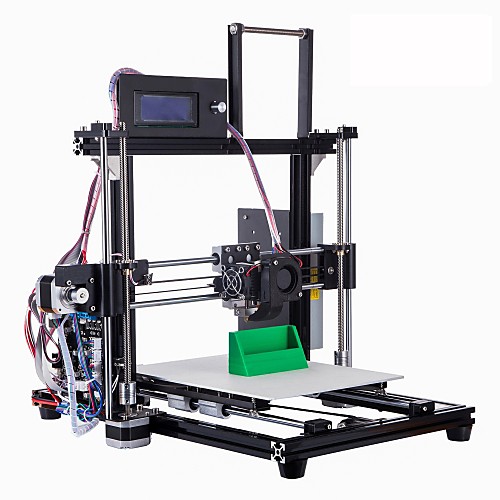 The printing time required and the results of a smoother surface are also greatly determined by layer height. Here is a summary table of the max and min layer thicknesses for the various 3D printers (like FDM printer, SLA 3D printer etc.) and technologies:
Differences between layer thickness, printing resolution and size of the details
The layer thickness in 3D printing should not be confused with printing resolution or with the size of the smallest detail possible.
The print resolution is the size of the printed voxel. In laser sintering technology, it is related to the size of the laser beam, which is typically around 120µm to 150µm.
As for the size of the smallest detail possible, it is based on the strength of the 3D printing materials. Therefore, even though in theory the print resolution (vertical resolution) may allow construction of a 125µm detail on a surface, in reality it isn’t strong enough to withstand the cleaning and finishing stage if it has a diameter of 0. 5mm to 0.8mm, according to its size.
Relation between layer thickness and 3D printing direction
The impact of a 3D printer’s layer height on the print result also depends on the orientation chosen for printing objects.
In particular, flat surfaces with a weak rising angle relative to the z-axis will be greatly impacted. A staircase effect will appear to the surface finishes no matter what technology is chosen. The printing finishes are impacted either in SLA 3D printing, in FDM printing, even in binder jetting.
We have tools available on our online 3D printing service in order to help you manage the orientation of your parts in the 3D printer. The Batch Control tools, available for orders of more than 20 copies, let you specify the orientation and thus optimize the choices of quality vs. cost of 3D printing.
Layer thickness, 3D printing speed and cost of objects
The number of layers required to create an object determines the printing speed and thus the printing time required. The lower the layer thickness, the longer it takes to make a 3D printed object of a given height.
Therefore, an object 1cm high requires 100 layers at 100µm (like on our material, for example White Plastic ) or 167 layers at 60µm. This explains the higher cost of 3D printing using the same technology with thinner layers.
Related glossary pages
Which Layer Height is Best for 3D Printing? – 3D Printerly
The layer height of your 3D printed objects are important for quality, speed and even strength. It’s a good idea figuring out which layer height is the best for your situation.
I’ve wondered what the best layer height is for certain 3D printing situations, so I did some research about it and will share that in this post.
The best layer height in 3D printing for a standard 0.4mm nozzle is between 0.2mm and 0.3mm. This layer height provides a balance of speed, resolution and printing success. Your layer height should be between 25% and 75% of your nozzle diameter or you might run into printing issues.
You have the basic answer but wait, that’s not all! There are more details to look into when working out the best layer height for yourself, so stick around and keep reading to find out.
If you are interested in seeing some of the best tools and accessories for your 3D printers, you can find them easily by clicking here (Amazon).
What is Layer Height, Layer Thickness or Resolution?
Before we get into choosing what layer height is the best, let’s all get on the same page about what layer height is.
So basically, the layer height is the measurement, usually in mm that your nozzle extrudes for each layer of a 3D print. It’s also known as layer thickness and resolution in 3D printing due to being what makes a 3D print better quality.
If you think about a detailed object, having a large layer height means that the detail can only go so far. It’s similar to trying to build a detailed object using Lego pieces, the blocks are just far too big for the details to really come out.
So, the smaller the layer height, or ‘building blocks’ the better your quality but it also results in more layers needing to be extruded to complete the same print.
If you are wondering “does layer height affects print quality?” it does directly, as well as dimensional accuracy. The lower your layer height, or higher your resolution, the more your 3D printed parts will be dimensionally accurate, and have better print quality.
Layer height is basically the same as resolution.
Now that we have this basic understanding of the layer height, let’s answer the main question of choosing the best layer height for 3D printing.
Which Layer Height is the Best For 3D Printing?
This isn’t the most straightforward question to answer because it really depends on your preference.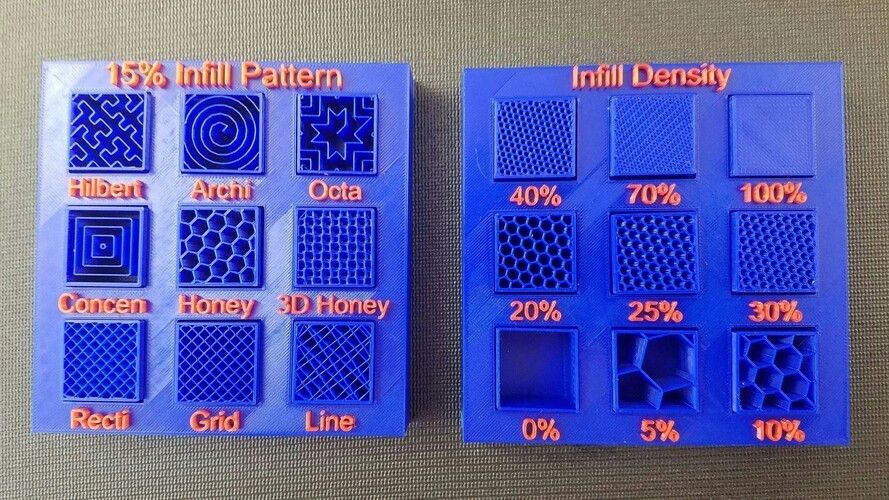
Do you need a fast as lightning print so you can get them out ASAP? Then pick a bigger layer height.
Do you want an artistic piece with highly detailed parts and unmatched precision? Then pick a smaller layer height.
Once you determine your balance between speed and quality, then you can pick which layer height would be good for your 3D printing situation.
A good layer height that works in most situations is 0.2mm. That is what the typical layer thickness is for 3D printing since the default nozzle is 0.4mm and a good rule is to use around 50% of the nozzle diameter as the layer height.
For a situation like 3D printing PPE face masks and face shields, your main goal is getting them printed as fast as possible. Not only would you opt in for a larger nozzle, but you’d also use a large layer height, up to the point where it’s fully functional.
When you have a model of a detailed, artistic statue that you would like to display in your home, the goal is to have the best quality.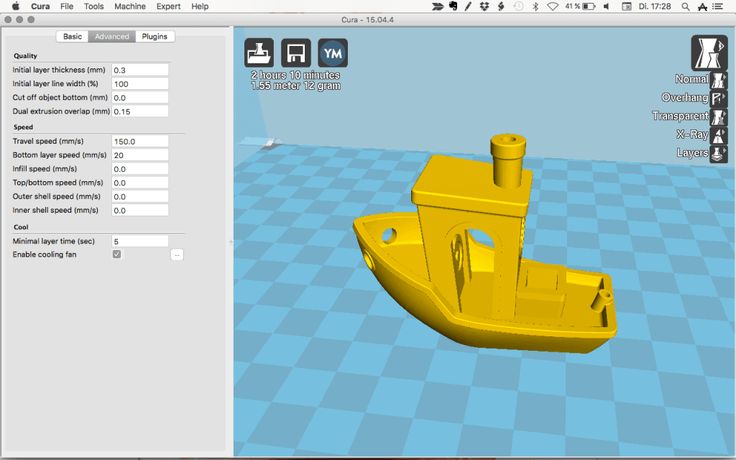 You would opt in for a smaller nozzle diameter, while using a small layer height to get an extremely high level of detail.
To properly determine which is the best, you should 3D print objects like a calibration cube, or a 3D Benchy at different layer heights and inspect the quality.
Keep these as reference models so you know just how well the quality will be when using those nozzle diameters and layer height settings.
You should keep in mind though, there are limits to how small or large your layer height can be, depending on your nozzle diameter.
A layer height too low for your nozzle diameter would cause plastic to be pushed back into the nozzle and it will have issues pushing out filament at all.
A layer height too high for your nozzle diameter would make it hard for layers to stick to each other due to the nozzle not being able to extrude with good accuracy and precision.
There is a well-known guideline set in the 3D printing community about just how high you should set your layer height, as a percentage of your nozzle diameter.
Cura even starts to give warnings when you put in a layer height that is above 80% of your nozzle diameter. So if you have a nozzle diameter of 0.4mm which is the standard nozzle size, you’ll get a warning with a layer height anywhere from 0.32mm and above.
As previously mentioned, your layer height should be between 25% & 75% of your nozzle diameter.
For the standard 0.4mm nozzle, this gives you a layer height range of 0.1mm up to 0.3mm.
For a larger 1mm nozzle, it’s a little easier to calculate, with your range being between 0.25mm & 0.75mm.
The middle or the 50% mark is usually a good starting point to be at, then whether you want better quality or a faster printing time, you can adjust accordingly.
A good layer height for PLA or PETG is 0.2mm for a 0.4mm nozzle.
How Does Layer Height Affect Speed & Printing Time?
As previously mentioned, we’ve determined that layer height affects the speed and overall printing time of your object, but to what extent.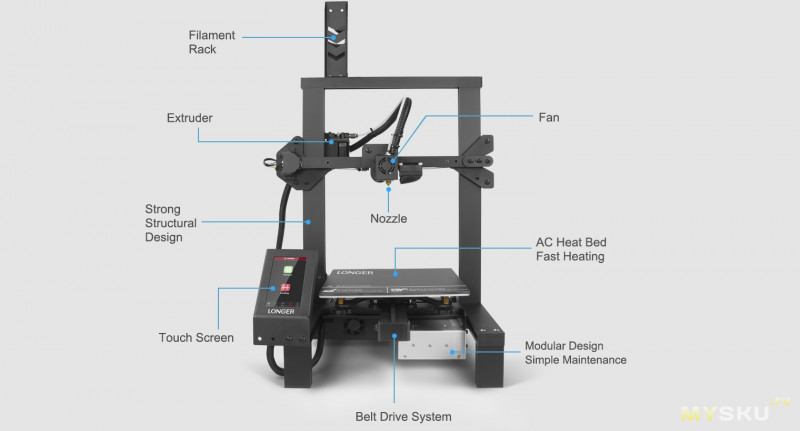 This one, luckily is pretty basic to figure out.
Layer height affects printing time because your print head has to print each layer one by one. A smaller layer height means your object has more layers in total.
If you have a layer height of 0.1mm (100 microns), then you adjust that layer height to 0.2mm (200 microns) you will have effectively halved the total amount of layers.
As an example, if you had an object that was 100mm high, it would have 1,000 layers at a 0.1mm layer height, and 500 layers for a 0.2mm layer height.
All things being equal, this means halving your layer height, doubles your total printing time.
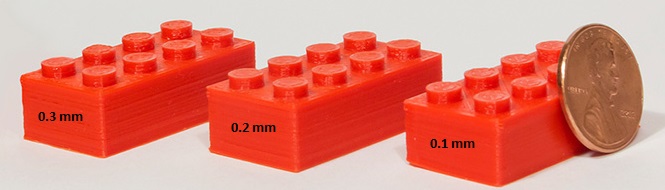
Let’s use a real example of the one and only, 3D Benchy (a staple 3D printing object to test printer abilities) of three different layer heights, 0.3mm, 0.2mm & 0.1mm.
The 0.3mm Benchy takes 1 hour and 7 minutes, with 160 layers in total.
The 0.2mm Benchy takes 1 hour and 35 minutes, with 240 layers in total.
The 0. 1mm Benchy takes 2 hours and 56 minutes to print, with 480 individual layers to complete.
The difference between the printing time of the:
- 0.3mm height and 0.2mm height is 41% or 28 minutes
- 0.2mm height and 0.1mm height is 85% or 81 minutes (1 hour 21 minutes).
- 0.3mm height and 0.1mm height is 162% or 109 minutes (1 hour 49 minutes).
Although the changes are very significant, they become even more significant when we are looking at large objects. 3D models that cover a large portion of your print bed, wide and high have bigger differences in print times.
To illustrate this, I sliced a 3D Benchy at 300% scale which almost fills up the build plate. The differences between printing times for each layer height was huge!
Starting with the largest layer height at 0.3mm, so the faster print, we have a printing time of 13 hours and 40 minutes.
Next up we have the 0.2mm 300% Benchy and this came in at 20 hours and 17 minutes.
Lastly, the highest quality Benchy with a 0.1mm layer height which took 1 day, 16 hours and 8 minutes!
The difference between the printing time of the:
- 0.3mm height and 0.2mm height is 48% or 397 minutes (6 hours and 37 minutes).
- 0.2mm height and 0.1mm height is 97% or 1,191 minutes (19 hours and 51 minutes).
- 0.3mm height and 0.1mm height is 194% or 1,588 minutes (26 hours and 28 minutes).
When we compare the normal Benchy to the 300% Benchy we see the differences in relative printing time differences.
| Layer Height | Benchy | 300% Scale Benchy |
|---|---|---|
| 0.3mm to 0.2mm | 41% Increase | 48% Increase |
| 0.2mm to 0.1mm | 85% Increase | 97% Increase |
| 0.3mm to 0.1mm | 162% Increase | 194% Increase |
This goes to show that if you are printing large objects, your layer height is going to count more towards the printing time, even though the quality remains the same.
The trade off for layer height and print time makes it slightly more beneficial to opt-in for a bigger layer height for larger objects.
‘Yes, of course’ you’re thinking, more layers means a longer printing time, but how about the quality?
How Does Layer Height Affect Quality?
Depending on how you personally see things, you might not really be able to tell the difference between a print with 0.2mm layer height and 0.3mm layer height, even though that is a 50% increase.
In the grand scheme of things, these layers are extremely small. When you are looking at an object from a distance, you really wouldn’t notice a difference. It’s only up-close with good lighting around the object when you realize these quality differences.
Just as a test and a helpful visual example of this, I 3D printed some Benchys out myself in a few different layer heights. I picked 0.1mm, 0.2mm and 0.3mm which is a range that the majority of 3D print users replicate in their prints.
Let’s see if you can tell the difference, take a look and see if you can figure out which is 0.1mm, 0.2mm and 0.3mm layer height.
Answer:
Left – 0.2mm. Middle – 0.1mm. Right – 0.3mm
Great job if you got it correct! When you inspect the Benchys closely, the main giveaway is the front. You can see the ‘stairs’ in the layers more prominent with the bigger layer heights.
You can definitely see the smoothness of the 0.1mm layer height Benchy all across the print. From a far distance, it might not make such a difference, but depending on your model, some parts might not print successfully with large layer heights.
Smaller layer heights can deal with issues such as overhangs a lot better because it has more overlap and support from the previous layer.
If you were looking at these from far, would you really notice the difference in quality?
To determine the best layer height for your 3D printer, just ask yourself whether you prefer the increases in quality over time and quantity, if you are printing many parts.
Your nozzle size will have an effect on the layer height in terms of the limitations for how high or low it can be, following the 25-75% rule.
Does Layer Height Affect Strength? Is a Higher Layer Height Stronger?
CNC Kitchen has created a staple video on which layer height is the best for strength, whether it’s a low-detailed large layer height, or a very precise small layer height. It’s a great video with visuals and well-explained concepts to give you the answer.
I’ll summarize the video for you if you want the quick answer!
You might think either the largest layer height or the smallest layer height would come out on top, but the answer is actually pretty surprising.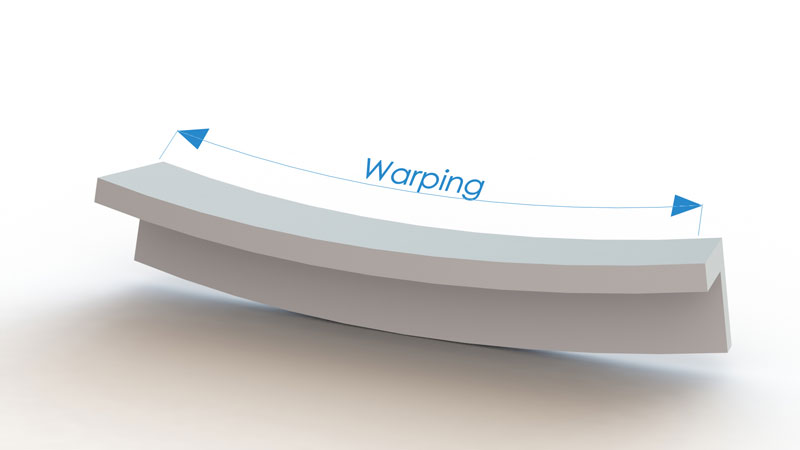 It was actually neither of the extreme values, but something in between.
After testing a number of hooks at layer heights of between 0.05mm and 0.4mm, he found that the best layer height for strength was between 0.1mm & 0.15mm.
It does depend on what nozzle size you have for which layer height works best.
Ender 3 Magic Number Layer Height
You might have heard the term ‘Magic Number’ when referring to the layer height of a specific 3D printer. This comes about because of the Z axis stepper motors travel in ‘steps’ of 0.04mm, pushing the hotend that distance.
It works for the Ender 3, CR-10, Geeetech A10 and many more 3D printers with the same lead screw. You have M8 lead screws, TR8x1.5 trapezoidal lead screw, SFU1204 BallScrew and so on.
It is possible to move in between values with microstepping, but those angles aren’t equal. Using the natural rotation of the stepper motor is done by moving the hot end in increments of 0.04mm.
This means, if you want the best quality prints, for the Ender 3 and a range of other 3D printers, instead of using a 0. 1mm layer height, you’d want to print with a layer height of 0.08mm or 0.12mm and so on.
Using these magic numbers has an effect, of averaging out variations in layer heights from unequal microstep angles, for a consistent layer height throughout.
This is well described by Chuck at CHEP on YouTube which you can watch below.
Simply put, a stepper doesn’t give you feedback so your printer has to follow the command and be in a position as good as it can be. Steppers usually move in full steps or half steps, but when moving in between that, there are several variables which determine the step distances for these microsteps.
Magic numbers avoid that hopeful game for precise movements and use half and full steps for the best accuracy. The level of error between the commanded steps and actual steps get balanced out every step.
Other than 0.04mm, there is another value of 0.0025mm which is the 1/16th microstep value. If you are using adaptive layers, you should use values divisible by 0.0025 or limit them to a half-step resolution of 0.02mm.
Optimal Layer Height Calculator
Josef Prusa created a sweet calculator for determining optimal layer height for your 3D printer. You simply enter some parameters and it spits out information about your ideal layer height.
Many people have recommended and used this calculator over time, so it’s worth checking out for yourself.
What is the Best Layer Height for an Ender 3?
The best layer height for an Ender 3 is between 0.12mm and 0.28mm depending on what quality you desire. For high quality prints where you want the most detail, I’d recommend a layer height of 0.12mm. For lower quality, quicker 3D prints, a layer height of 0.28mm is a great layer height that balances out well.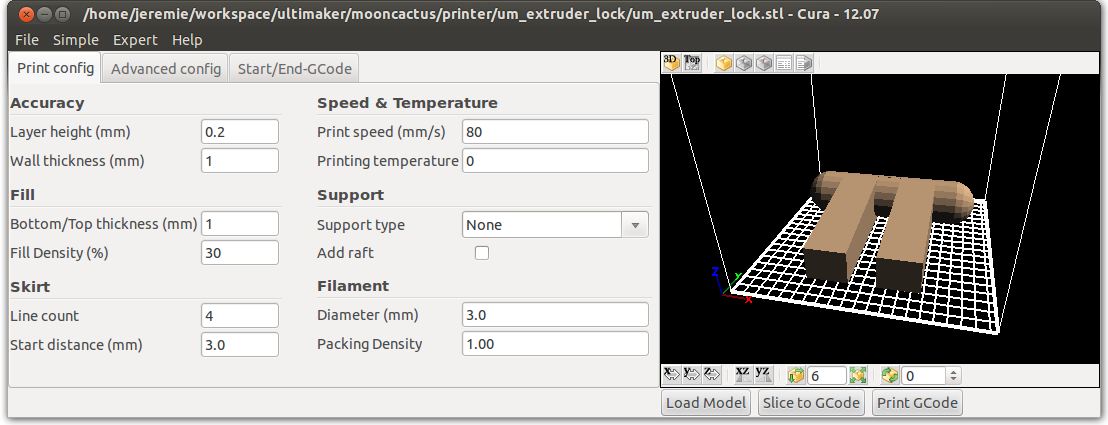
What Are the Downsides of Using a Small Layer Height?
Since your printing time would increase with a smaller layer height, it also means there is more time for something to go wrong with your print.
Thinner layers don’t always result in better prints and can actually hinder your prints in the long-run. An interesting thing to know when it comes to smaller layer objects is that you usually experience more artifacts (imperfections) in your prints.
It’s not a good idea chasing a tiny layer height for some extremely high quality objects because you might just end up spending significantly more time for a print that doesn’t even look great.
Finding the right balance between these factors is a good goal to pick the best layer height for yourself.
Some people wonder whether a lower layer height is better, and the answer is that it depends on what your aims are as mentioned above. If you want high quality models, then a lower layer height is better.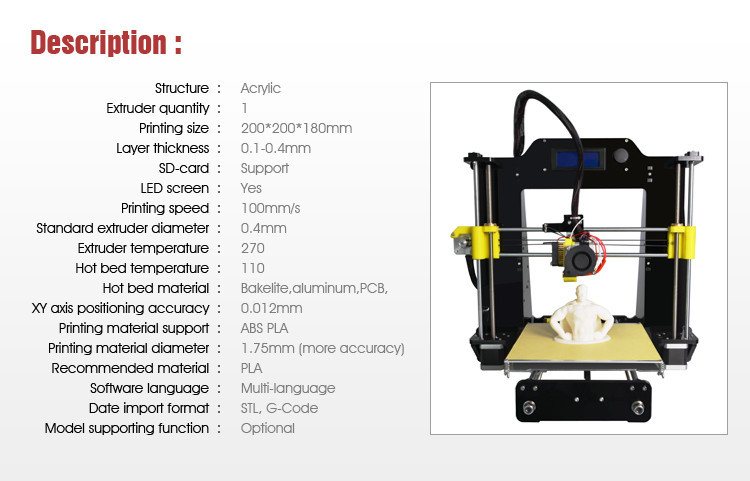
When looking at nozzle sizes and layer heights, you might question how small a 0.4mm nozzle can print. Using the 25-75% guideline, a 0.4mm nozzle could print at a 0.1mm layer height.
Does Layer Height Affect Flow Rate?
Layer height has an effect on the flow rate since it determines the amount of material that will be extruded from the nozzle, but it doesn’t change the actual flow rate set in your slicer. Flow rate is a separate setting that you can adjust, usually default at 100%. A higher layer height will extrude more material.
3D Printing Layer Height Vs Nozzle Size
In terms of layer height vs nozzle size, you want to generally use a layer height that is 50% of the nozzle size or diameter. The max. layer height should be around 75-80% of your nozzle diameter. To determine the layer height of a 3D printed object, print your own small test 3D prints at different sizes and pick the one you desire.
If you love great quality 3D prints, you’ll love the AMX3d Pro Grade 3D Printer Tool Kit from Amazon. It is a staple set of 3D printing tools that gives you everything you need to remove, clean & finish your 3D prints.
It gives you the ability to:
- Easily clean your 3D prints – 25-piece kit with 13 knife blades and 3 handles, long tweezers, needle nose pliers, and glue stick.
- Simply remove 3D prints – stop damaging your 3D prints by using one of the 3 specialized removal tools.
- Perfectly finish your 3D prints – the 3-piece, 6-tool precision scraper/pick/knife blade combo can get into small crevices to get a great finish.
- Become a 3D printing pro!
3D print layer height: how important is it?
3DPrintStory 3D printing process 3D print layer height: how important is it?
Layer height is actually the height of each layer of plastic, extruded, vulcanized or sintered on a 3D printer. This setting is configurable with your slicer and has a much larger impact on the final 3D printed model than it might seem at first glance. When used correctly, this setting will increase the speed, resolution, and quality of 3D printing in general. nine0005
The height of a 3D printed layer is usually measured in microns. One micron is equivalent to 0.001 mm.
Things to watch out for when playing with layer height on FDM printers: a thinner vertical layer results in a thicker horizontal line, and a thicker vertical layer results in a thinner horizontal line. This can reduce horizontal accuracy, especially in small moving parts.
Different printers have different maximum layer height resolution. The standard minimum height is typically 50 to 100 microns (0.05 to 0.1 mm). Cheaper 3D printers usually do not have such high accuracy. In printers such as the Anet A8, the minimum layer height is 100 microns (0.1 mm). Therefore, when buying a 3D printer, you should consider the minimum layer height. nine0005
SLA and laser 3D printers typically have a much lower minimum compared to FDM printers, which explains the insanely detailed models they can print.
Optimizing 3D print speed
One of the most common reasons for changing 3D printer layer height settings is to increase 3D print speed. The higher layer height means the printer doesn't have to print multiple layers to achieve the same overall height, resulting in much faster 3D printing. nine0005
In general, increasing the layer height reduces the resolution and print quality. Thus, this "trick" is best suited for large 3D models, where close-up details will either be ignored or corrected during any post-processing.
The layer height can be optimized for each model separately to achieve maximum print speed while maintaining a specific resolution. However, this is something that should be judged individually for each 3D printer, as effective 3D printing will require some play around with the settings. nine0005
Increasing resolution
A little-known fact in the 3D printing community is that most 3D printers have higher vertical resolution than horizontal resolution. Why? The lead screws provide your 3D printer with a much more precise vertical position than the drive belts used for other axes. Thus, the printer can create sharper patterns in the vertical plane than in the horizontal plane.
This is one of the reasons why aaskedall's "Fillenium Malcon" model is so popular (among Star Wars enthusiasts). It is because of the presence of such amazing details that can be implemented on a huge number of 3D printers. nine0005
A lower layer height on your 3D printer will, of course, slow down printing, but the printer will apply more layers for a given height, resulting in much higher detail.
Smoothing out a surface
Another use for the extreme detail available at lower layer heights is to smooth 3D models. With a lower layer height, they become less noticeable, and the details become smoother. As the layer height increases, the surface of the model becomes rough, and the layers are clearly visible. nine0005
With this knowledge, you can ensure that parts that require a very smooth finish (such as axles or shafts) are as smooth as possible by reducing the 3D print layer height. As you might have guessed, this increases detail but reduces 3D printing speed, so keep this in mind when printing large 3D models.
Slicer developers have noticed this point and the PrusaSlicer software has even added a setting to increase the smoothness of the print by changing the layer height. For more information on how to anti-alias models, you can check out this PLA anti-aliasing tutorial. nine0005
Plastic 3D printing, basic parameters
Plastics such as ABS and PLA have long been and will continue to be the most popular materials for 3D printing for a long time. The main reason is their affordability in conjunction with relatively high strength characteristics compared to other materials.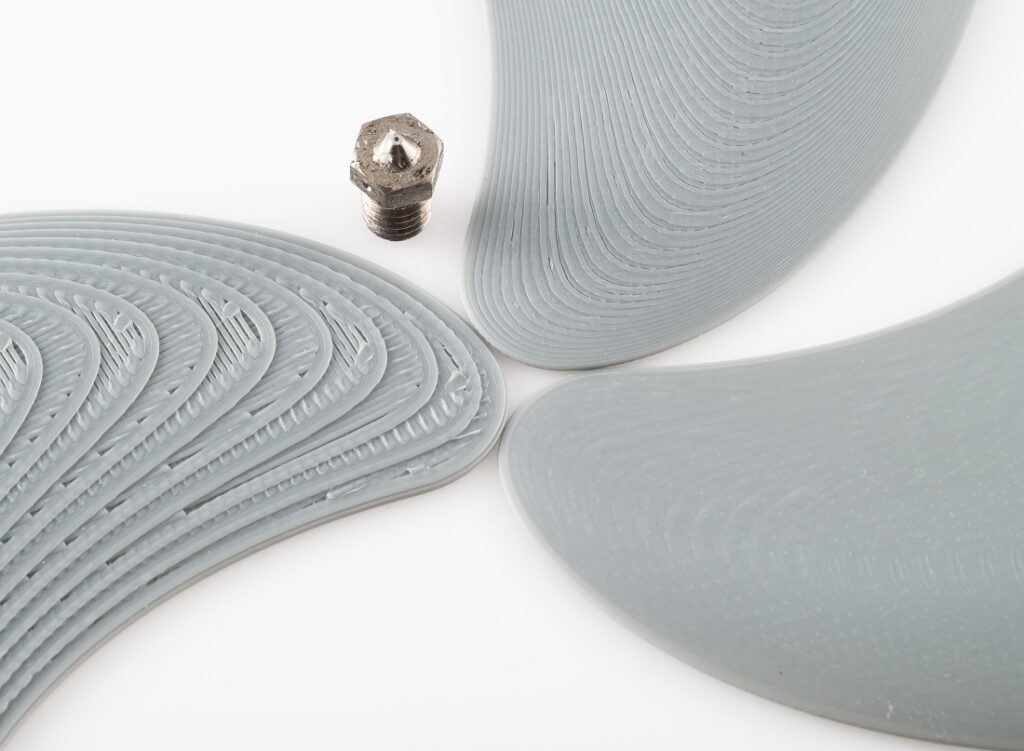 In this article, we will not delve into the reasons for the popularity of the plastics described above, fully describe their characteristics, or delve into the features of 3D printing technology. Here we want to highlight the effect of print settings/parameters and the position of the part on the printing platform, when printing with FDM (FFF) technology, on the final strength of the product. nine0005
You can learn about how a 3D printer works here, about 3D printing technologies (including FFF, FDM) and how they differ here.
The strength characteristics of a 3D model can be affected by 3 main factors: layer thickness, filling and orientation of the model relative to the printing platform.
Layer Thickness
Layer Thickness is an adjustable parameter that determines how much vertically (Z-axis) the furnace head moves when moving to the next 3d print layer. There are 4 standard sizes: 0.1, 0.15, 0.2 and 0.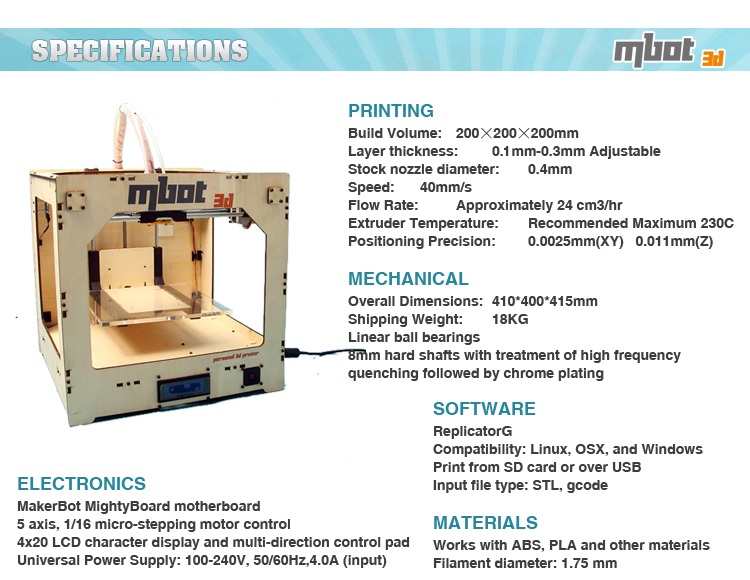 3 mm. There are smaller values, but, frankly, with a standard 0.4 mm nozzle, they make no sense (there will be no noticeable difference in quality). There are larger sizes, but they require a larger diameter nozzle. The typical value for this parameter with a typical 0.4 mm nozzle is 0.2 mm (200 microns). nine0005
First of all, it is worth mentioning that the layer thickness directly affects the surface quality (this is especially noticeable on surfaces slightly deviated from the horizontal or vertical), the lower the layer height, the higher the surface quality. This of course will depend on the type of printer, speed settings, etc., but we will not go into this. The higher the layer thickness, the correspondingly lower surface quality, while a simple transition from 0.2 to 0.3 mm will be noticeable. nine0005
Further, it is worth mentioning that the higher the layer height, the faster the printing takes place and, accordingly, it costs less. So 0.1 from 0.2 differs in speed by 2 times and in cost by 1. 5-1.7 times.
And finally - strength. Without going into technical justifications, let's just say that the greater the thickness of the layer, the greater the overall strength of the product.
Infill
Infill in 3D printing with plastic is a configurable parameter that controls the amount of material and voids inside the outline of the model. nine0079 The outline of the model (default 1.2 mm) is the wall separating the outer space from the interior of the model. Since the printable models have a closed volume, when the print is finished, the interior space is completely hidden.
By default, the parameter is set to 12.5% (12.5% - material, 87.5% - void), which creates the required minimum strength. The higher the infill, the greater the weight and printing time of the model, and, accordingly, the cost.
For printing on plastics, you can choose any infill from 10 to 100%. It is better not to choose more than 90% to keep the minimum headroom for depreciation.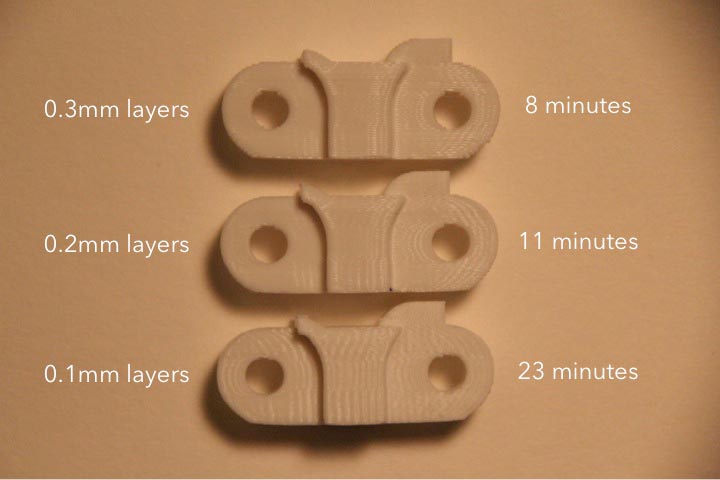 Many tests have proven that 90% filling is stronger than 100%. The presence of free space inside adds additional strength under dynamic loads and object operation in changing conditions (for example, cooling-heating), due to the ability of the material to absorb into empty space. Moreover, 100% filling has a negative effect on the quality of the surface: small excesses appear on it plastic.
The relationship between filling and strength is simple: the higher the filling, the higher the strength. It is also worth remembering: the higher the filling, the greater the cost. nine0005
Location of the part on the printing platform
The location of the part on the working platform is regulated by the 3D printer operator and can significantly affect both the strength and the quality of the surface of certain areas. In some cases, this parameter is unregulated, since the very shape of the model dictates the only correct location. For example, a thin plane with a small relief on one side (a plate with letters) should not lie on a plane (and not stand on an edge) so that the letters are directed upwards.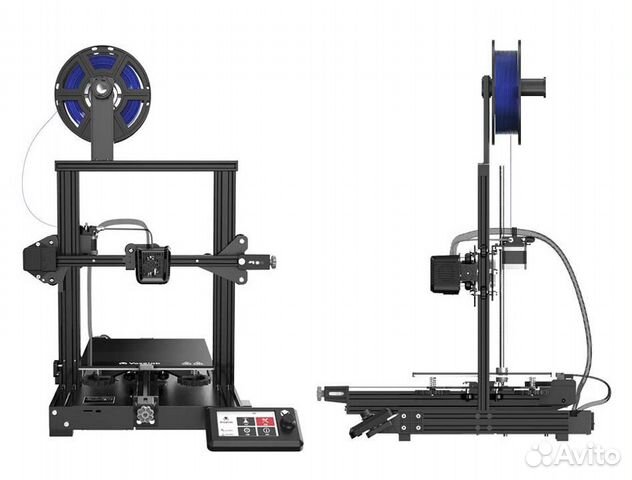 nine0005
We can probably write a separate article about the location of the part, since the quality of the surface from different sides will largely depend on the shape of the model and the presence / absence of support. To do this, you need to understand the principle of operation of the FDM (FFF) technology, you can find it here.
Effect of location on strength. For example, let's take a 10/10/1 cm parallelepiped. When printing "lying down" (the 10/10 cm plane is placed on the platform), the layers are located along the main plane. When printing "on edge" (plane 10/1 cm), the layers are arranged across the main plane. The strength of the model across the main plane will differ up to 6 times. (layers along the plane, the model is stronger). nine0005
Accordingly, when 3D printing, it is necessary to take into account which parts of the product should have greater strength and place the model accordingly. It must also be remembered that when printing one model with the same settings, the time and weight of the print may differ (due to supporting structures), and sometimes, all significantly.