3D printer library programs
Starting A Teen 3D Printing Club at Your Library
Originally appears in the February 2017 print edition of VOYA Magazine as “Teens and Technology: Teen 3D Printing Club”.
3D printing is an exciting technology that can engage your teen patrons like few things can! The question for many libraries that are considering purchasing a 3D printer (or for some that already have made a purchase) is what to do with them! By creating a teen 3D printing club at your library, you can guarantee a full year of activities. So how do you get started?
Creating a budget:The most obvious (and costly) expenditure is, of course, your 3D printer. Hubs maintains an extremely comprehensive buying guide that should inform your purchase! In general, a standard size, entry level 3D printer from one of the more established companies will run you between $2,200 and $3,000. These include the current generation Makerbot, Ultimaker and Lulzbot. You could potentially save money by ordering a miniaturized version of these printers. Buying a mini printer will save you money, but sacrifice build volume, meaning significantly smaller prints! Considering the amount of printing that can be generated in a club, it’s inadvisable to purchase a budget brand. You should set aside $100 for some fine sandpaper and miniature needle nose pliers for cleaning up prints.
Aside from your printer and tools, consumables are the ongoing cost you must manage. Consumables are all the materials your printer uses up as it operates. These can include:
- Filament: the plastic or other material used to print an object. As an example, a 1kg spool of ABS filament costs $48, which is enough material to print 392 chess pieces! For the most part, you will be printing in a single color. This gives you the option to either purchase a quantity of one neutral color filament (which can be painted) or multiple differently colored filaments.
 I’ll address the rate of printing later, but as a general rule, a half dozen spools of filament is a good starting point. This will run roughly $300.
 - Build plate covers: the surface where printing occurs often needs to be covered with materials ranging from Elmer’s glue, to painters tape or other proprietary materials. Roughly $50 annually should cover you.
- Replacement extruders: the extruder is the print head where heated material comes out to form layers which in turn form your object. While they tend to last many, many hours, they can become jammed and require repair or replacement. Having an extra on hand can cut down time and is highly recommended! Depending on the model, this can be unnecessary (the manufacturer would need to replace it themselves) or an approximately $200 purchase.
- Maintenance kits: Most printers require regular maintenance. These tend to be inexpensive purchases in the form of replacement parts, or a lubricant that needs to be applied to gears and other points of friction.
All told, a printer and a year’s consumables will likely run somewhere in the realm of $3,000 – $4,000. Keep in mind, your first year of 3D printing will be the most expensive. A well-maintained printer will last several years, meaning the long-term costs can be quite manageable. The cost of a 3D printer can be shared by several library departments who could all benefit from its use. Being able to insource your 3D printing programs is a significant cost saver as well. Consider the cost of paying a programmer to hold a dozen or more classes!
Looking at your consumables, companies such as Gizmo Dorks sell generic versions of filaments at a discount. When using generics, always ensure that doing so will not void your printer’s warranty. If your printer uses a cover for its build plate, this can also be a source of savings. If you’re willing to buy in bulk and cut your tape to fit, you’ll find it far less expensive than purchasing from your printer’s manufacturer. With our budget established, we can move on to running the club itself!
In a 3D printing club, there needs to be a focus on design. Happily, there are many free or inexpensive options when it comes to design software. In my experience, TinkerCAD is the best option for several reasons. For starters, it is free! It’s browser based, so there’s no need to install software. It employs a cloud save feature, so you can manage the account from any computer, plus you don’t need to worry about your public computers wiping saved data if you use restore software. It offers a series of sample lessons perfect for teaching students or staff who might be running a class. Finally, it uses a highly visual, geometric editor that is a great precursor to more advanced CAD software. For these reasons, TinkerCAD can and should form the core software you use. As a club progresses, you can of course introduce additional software to keep things fresh.
Ideally, each member of the club should have access to a computer or laptop with internet access. In the case of browser-based design software (such as TinkerCAD), Chromebooks are also an inexpensive option, as they can run in the $200 range. Mice are a necessity–it can be extremely difficult to design using a touchpad! Depending on the size of the club, it can be helpful to have an instructor’s computer hooked up to a projector or large two-way monitor to facilitate demonstrations. Initially, I create a single TinkerCAD account which I log each student into–don’t give out the password! This allows the instructor to easily track progress from a single login, which is especially useful when it’s time to print.
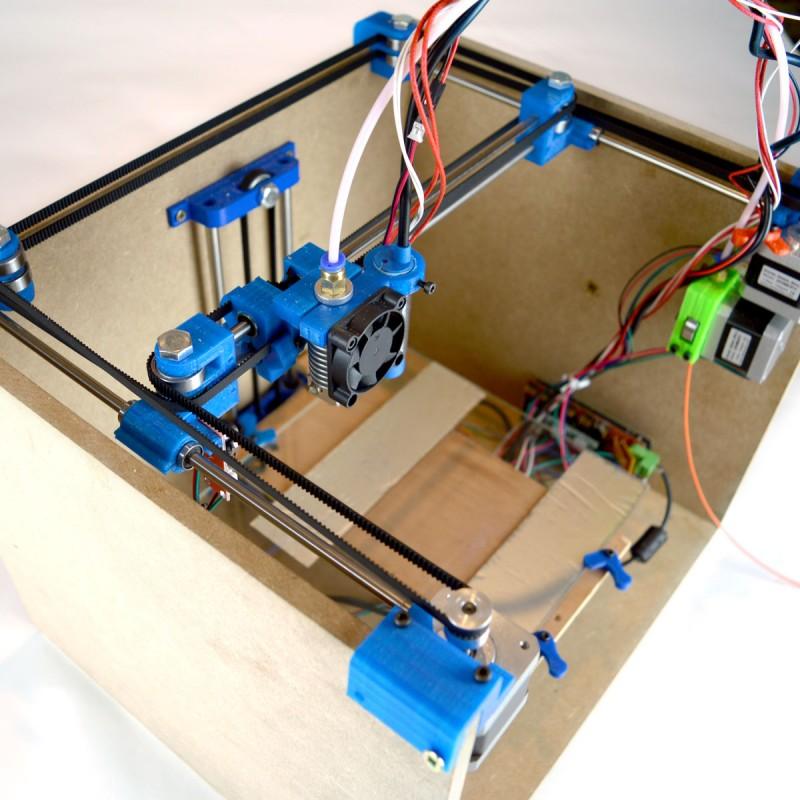
Your Inaugural Meeting:For your first club meeting(s), you should focus on both 3D printing and 3D design. Have your 3D printer on hand so you can go over its anatomy before giving a printing demonstration. Explain the basics of the technology. Let participants handle spools of filament and some sample printed items. Aside from the hardware, you should next tackle the software! In the case of TinkerCAD, you can have your teens work on one of the curated lessons or choose to teach the software basics yourself. If you’re vastly outnumbered, pre-made lessons will allow you the flexibility to assist anyone who is struggling, while still keeping the group moving. It is also important that you establish some ground rules early on. These include:
How often are you printing? Printing can be a time consuming process! Even a small chess-sized print could take 45 minutes to an hour. Multiply that by the number of club members and you can see a potential logjam! Your club may meet weekly, monthly, etc. It is important that you come up with a schedule that can accommodate your teens’ creativity and the workload of your staff and printer.
What are the specifications of your prints? Often, when it comes time to print, your teens will want to “make it as big as possible”. In terms of time and material, this is impractical at best. Communicate a set size for your prints, using either time or material. Aside from managing workflow, this will also allow you to accurately budget for your filament. A secondary consideration is whether your teens are choosing their print colors. Even if you are allowing that flexibility, you should clue them in that a print comes in a single color–this can inform their design decisions!
What is appropriate to print? Having a 3D print policy in place will allow you to be transparent and consistent. Can someone print a weapon? An offensive slogan? Will you respect copyright? Better to have a set of clear rules to point to rather than making it up as you go!
Regular activities:Generally, your club can be run as a sort of “freestyle”. In a freestyle, participants simply design what they want to. The instructor of the class is present to offer advice and otherwise troubleshoot as the teens create their designs. You can run the entirety of your club in this format, or use it as a break from more formalized sessions. When a participant has finished a design, the instructor gives it a look-over, ensuring it is a printable object that observes your club’s guidelines. If it checks out, the design is downloaded as an .STL file, which can be formatted for printing in whatever design software your printer runs on (Cura, Makerbot Desktop, etc). Most often, this printing will take place outside of the club, given time constraints.
Even after a design is printed, there’s often more to do. Designs commonly have excess material that serves as a support structure while they are printed. Beyond that, prints can have rough edges or “fuzz” that requires cleaning. Depending on the size and intricacy, excess material can be removed by hand, sanded away or clipped with simple tools such as scissors and needle nosed pliers. Cleanups may be time consuming, but they can also be fun!
These post-print sessions are also an opportunity to see what went wrong, or at least, what can be improved. An ideal design is one that takes into account the limitations of a 3D printer. As your teens examine their printed works, they may discover design flaws that lead to poor prints–too much overhang, weak connections, not enough contact points with the build plate, etc. Many times, a design session is actually spent reworking a prior design to make it more printable. This is exactly the benefit of the club–it represents an ongoing learning process!
Beyond your club itself is a greater community of 3D printing enthusiasts. Sites like Thingiverse allow designs to be uploaded and shared with others, who can then print them, or even incorporate them into new designs. Creating a Thingiverse site for your library is a great way to collect and showcase these works online. Your teens can also create their own sites which can follow or be followed by the library. Set aside some time for your club members to upload their proven (successfully printed) models if they wish. These designs can be added to a collection within Thingiverse, allowing you to organize by club, project, or any other criteria you wish to use. The Mastics-Moriches-Shirley Community Library’s Thingiverse site can be viewed here.
If your club ever feels like it’s getting stale, it may be time to mix things up! Try one of the following to keep things fresh:
Challenges: In a challenge session, you simply give confront the group with a task. “Design a new utensil,” or “create a new species!” These are ways of getting the creative juices flowing. As they view each other’s designs, they tend to play off one another.
Collaborations: This type of format is one where the whole is greater than the sum of its parts. You might have the class design a chess board. Each teen would work on the different parts, from the game board to the pawns, rooks and other pieces. This format works well when you have an established club whose members know each other.
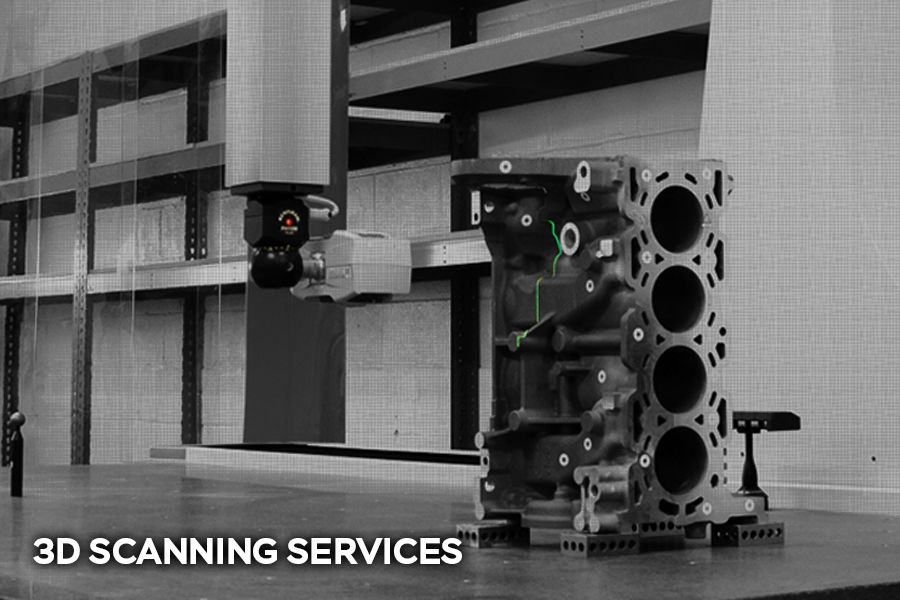
Demonstration: A demonstration is an opportunity to check out a new piece of equipment, or introduce a speaker or concept. Perhaps you have someone in the industry that is willing to talk to the group. Maybe there is an opportunity to have a new printer on loan, or a complimentary piece of equipment, such as a 3D scanner! You can also introduce a new piece of design software. At the end of this article is a resource list which includes some additional free options.
Remix: A remix session is one where you rework an existing design. Your teens can download a model from an open source site (always check the licensing permissions) open it in TinkerCAD, then add on, combine, or otherwise rework it to create something new. They can even use each other’s files!
3D-printed “Raptor Reloaded” prosthetic hand. Photo credit: Sara RoyeVolunteer Opportunities: Non-profit organizations such as Enabling the Future pair people in need with free 3D printed, open-source prosthetics. Having a class print and assemble replacement hands or arms is an activity that is both educational and deeply rewarding. Aside from prosthetics, you can also use your club to help to provide helpers in a 3D print class for children.This younger audience needs extra attention–your teen volunteers can give it to them!
While a club can run indefinitely, your teens will eventually age out of the department. For this reason, it is nice to have a culminating event, namely a 3D print art show! An art show is a chance to showcase the good work your teens have been doing during the club.
Ethan F. in front the model B-17 Bomber he designed.As your teens create their designs, they begin to accrue quite a portfolio! Have them each select their favorite design, one that has already been printed in miniature and perfected. This print will be rendered in a size fit for display–likely a 6-8 hour print! In addition to your display piece, you can also print their designs in the traditional sense. This means saving the image itself (in TinkerCAD, or your design/printer software) then printing it on paper and mounting it to foam board, cardboard, or another material. This will allow participants to feature multiple works, including some designs that could have proved difficult to print. You can then add each teen’s name to the exhibit by adding a label, name plate, or simply having them sign their work. A 3D art show can be scaled to taste. It can be done as an annual or semi-annual event. It can operate as a stand alone event, or exist as an exhibit within a general art show. It also acts as a great recruitment event for new members, so you can fill your ranks and plan for another year of printing!
123D Design: Intermediate CAD (computer aided design) software. Free and available for PC.
Autodesk ReMake: Using this software, you take multiple photos of the same object from different angles. This then generates a 3D model which can be downloaded & printed! A free version is available for PC.
Blokify: Blokify uses blocks which can be dropped on a grid to form three dimensional objects. This is a great app for designing quickly, or for those who may struggle with TinkerCAD. As it creates blocky designs, it is also perfect for someone who is looking to make pixel or Minecraft inspired designs! Available from the App Store for $3.99.
Cubify Draw: Despite its name, Cubify allows you to design in curves. You can either upload a photo and trace its outline or draw freehand. In either case, you use a single connected line. This two dimensional drawing is then given depth and thickness, creating a 3D object! Free from the App Store.
Blender: Blender is powerful design software which does come with a steep learning curve. Available for Windows, Mac OSX & Linux.
Like this:
Like Loading...
3D Printing | www.mybpl.org
3D Printing Policy | Getting Started With 3D Printing | Using the 3D Printers | 3D Print Specs | Submit Your 3D Print Request
3D Printing Policy
Library staff reviews each file before it is printed. In accordance with the Library Board Approved Rules of Behavior Policy, the 3D printer may not be used to create weapons, firearms, or destructive materials. Library staff reserves the right to refuse any 3D print request. Before submitting files, please check our 3D print specs for max print time, max print size, etc.
Getting Started With 3D Printing
3D printing is the process of taking a digital design file and turning it into a physical 3D object. You can download premade designs online or create your own designs. Bloomingdale Public Library owns two 3D printers, and we use plastic PLA filament to print. PLA filament is an environmentally safe, biodegradable plastic.
3D Printing Guides
Learn more about the technology and what to expect from your 3D prints.
3D Printing Overview for Beginners 3D Printing: Managing Expectations 3D Printing Reality
3D Design Files
Ready to try out a 3D print? Check out the following sites for premade digital design files.
Thingiverse - Thingiverse has user created .stl and .obj files ready for download and printing. If you'd like to make changes to a file, download a design and then upload it to your Tinkercad account for further editing.
Digital design websites - List of additional websites with 3D design files.
Selva3D - Selva3D takes 2D .jpeg or .png files and turns them into 3D images. This works best with images that are pure black and white.
Create Your Own 3D Designs
Move beyond premade designs and create your own custom design.
- Tinkercad - Beginner level website for creating 3D designs for printing
- Tinkercad Tutorials - Guides on learning Tinkercad
- LinkedIn Learning - Learning Tinkercad course - (Bloomingdale Public Library card required) Take a course on the basics of 3D modeling in Tinkercad, from adding and grouping 3D shapes to creating and duplicating patterns.
- LinkedIn Learning - 3D Printing courses - (Bloomingdale Public Library card required) LinkedIn Learning offers numerous other videos and courses on 3D design software and printing, including Fusion 360, OnShape, Blender, and more.
Post-Process Your 3D Designs
Make your print finish smoother and more professional looking.
- Definitive Guide to 3D Printing Post-Processing
- How To: Smooth and Finish Your PLA Prints
- Post-processing for FDM printed parts
Using the 3D Printers
The 3D printers are open to all library patrons. Read the 3D print specs below, then submit your 3D print request. A staff member will contact you within one week to confirm your file submission, your estimated print cost, and estimated print time.
3D Print Specs
- Printers available: Lulzbot Taz 6 (equipped with an IT-Works E3D Titan Aero toolhead, 0.4mm diameter nozzle size) and Dremel Idea Builder 3D40
- Maximum print size: 280mm x 280mm x 250mm (11 in x 11 in x 9.8in)
- Maximum print time: 8 hours (for all files submitted). If your project/files are over 8 hours total, you must break your project into smaller time increments.
 We only accept one 8 hour project per patron, per two week period.
 - File types accepted: .stl or .obj
- Print colors: Filament color choices are available on the 3D print request form
- Filament type: PLA only
- File names: Before uploading, name your print file as your first name and the color of filament. Example: Jaime Cool Grey.stl If you're submitting multiple files, please number your files. Example: 01 Jaime Cool Grey, 02 Jaime Cool Grey, etc.
- Cost: 10¢ per gram, cash only. Pick up and pay for your item at the Adult Reference Desk.
- You will not be charged for failed prints.
- Prints are processed in the order they're received.
- Staff will contact you within one week to confirm your file submission, your estimated print cost, and estimated print time.
- Please allow up to 2-3 weeks for prints to be completed.
- The 3D printer may not be used to create weapons, firearms, or destructive materials.
 Library staff reserves the right to refuse any 3D print request.
Questions?
Questions about 3D Printing? Contact us at [email protected].
REC Wiki » Best 3D Printing Software in 2022
3D printing is a multi-step process, because you first need to design a 3D model, check it for errors, convert it to machine code, and only then the 3D printer goes into business . In this article, we will share examples of programs that can help at every stage of preparatory work and directly during 3D printing.
Contents:
1. 3D modeling software:
- Tinkercad
- ZBrushCoreMini
- 3D Builder
- SketchUp Free
- Fusion 360
- FreeCAD
- Blender
2. Editing and repairing STL files:
- Meshmixer
- MeshLab
3. Slicers:
- Cura
- PrusaSlicer
- ideaMaker
- ChiTuBox Basic
- Lychee Slicer
- Kiri:Moto
- IceSL
4. Control programs:
- OctoPrint
- MatterControl 2.0
- AstroPrint
5. G-code Visualizers
- UVTools
- WebPrinter
- Gcode Analyzer
- Design Software
1. 3D modeling software
If you are ready to create from scratch, you will have to learn special 3D modeling software. Many of them, especially professional computer-aided design systems, can be expensive investments, but on the other hand, there are plenty of quite capable and at the same time free offers on the market.
Tinkercad
Tinkercad is a browser-based application from Autodesk that is great for no-experience users, even kids, because of its simplicity. In this program, 3D models are built on the basis of basic blocks - simple geometric shapes that are joined together and then "filed" to the finished look. You can also convert 2D vector images into 3D models. Of course, you have to pay for simplicity - in the case of Tinkercad, rather primitive functionality that makes it difficult to create truly complex models. But such a task is not worth it: having gained basic skills on Tinkercad, you can always move on to more complex and more capable programs on our list. nine0003
Official website
ZBrushCoreMini
ZBrushCoreMini is primarily a 3D sculpting tool, especially popular among those who create human and animal figures, computer game characters, comics, and the like. This software is mainly aimed at beginners and users with moderate experience, but at the same time, it is full of impressive features that make the work easier. For example, dynamic tessellation algorithms constantly analyze the surface of the working model and automatically add polygons so that detail is not violated. nine0003
ZbrushCoreMini is offered free of charge and is positioned as an entry-level program for learning and gradually moving to more capable and complex options - ZBrush and ZbrushCore.
Official website
3D Builder
This program was developed by Microsoft and was included with Windows 10 for some time, although now it needs to be downloaded and installed separately. 3D Builder allows you to edit models in STL, OBJ, and 3MF formats, as well as create models from scratch. In this regard, the program is quite primitive, but it is simple and understandable even for novice modelers. nine0003
One of the interesting features of 3D Builder is the ability to simplify meshes by reducing the number of polygons, file weight and processing time in the slicer - useful in cases where the original designer obviously went too far with polygons. Additionally, you can import models from the library and even use Kinect sensors to 3D scan and import models of physical objects.
Official website
SketchUp
SketchUp is a web application with a great combination of simplicity and functionality. The user-friendly interface is intuitive and greatly facilitates learning, and the set of tools is quite diverse even for advanced users - hence the wide popularity of this program. nine0003
The free version was formerly called SketchUp Make, but is now simply called SketchUp Free. It includes everything you need for 3D modeling for 3D printing, just don't forget to download the module for exporting STL files - it's also free. The kit comes with 10 GB of storage for projects in the cloud and access to the 3D Warehouse, a repository with open source user-generated content.
Official site
Fusion 360
Professional CAD developed by Autodesk and famous for its ease of use and advanced functionality. This includes parametric modeling and mesh analysis and load distribution tools, including through generative design with topological optimization. The program is great for those who are engaged in 3D printing of functional products, for example, for industrial applications. nine0003
Some versions of Fusion 360, such as hobby and student versions, are even available free of charge. FreeCAD FreeCAD The program relies on a parametric approach: at any point in history, you can scroll back and make changes to the parameters. The program even includes finite element analysis and a robotic system simulator. nine0003
Official site
Blender
One of the most popular 3D modeling programs, but quite difficult to master. Not the best choice for a novice designer, but a great tool for those who have already gotten their hands on simpler editors. Fortunately, the popularity of Blender has led to a huge number of guides, tutorials, and visual examples published by experienced users for beginner colleagues.
Developers are trying to make the program more convenient without sacrificing functionality: the interface has recently been updated, rendering has been improved, and 3D design and animation capabilities have been expanded. And yes, it's open source and freeware, so you don't risk anything. nine0003
Official site
2. Editing and repairing STL files
If you find an interesting 3D model on the Internet, this does not mean that it can be immediately sent to a 3D printer. Many models are created for completely different needs, such as animations or video games, and in principle are not intended for 3D printing. But there is a solution: before processing such models into G-code, they must first be repaired so that the slicer can do its job well. The following programs on our list will help you cope with the repair. nine0003
Meshmixer
Meshmixer is an advanced and free program from Autodesk that allows you to view and check 3D models for errors in polygonal meshes that can ruin 3D printing. If such problems are detected, the program can automatically repair meshes. One example of an application is finishing 3D scans to a state suitable for 3D printing.
Additional functionality includes mesh blending, 3D sculpting, surface writing, cavity creation, support branching, mesh smoothing, and more. nine0003
Official website
MeshLab
MeshLab is another open source program for editing polygonal meshes. MeshLab has the necessary tools for editing, checking, cleaning and converting meshes with the ability to combine meshes into one model and patch holes that can lead to incorrect processing of models into G-code.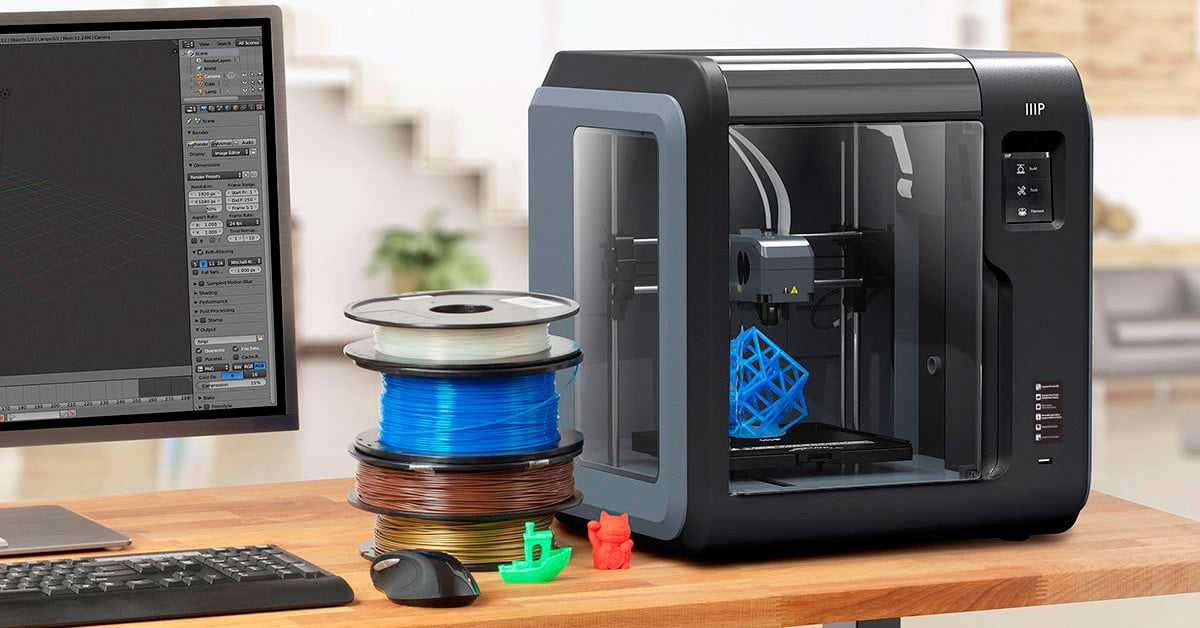
Official website
3. Slicers
After receiving a 3D model, it must be converted into machine code - a series of commands understandable to CNC machines, including 3D printers. Slicers are responsible for this task - programs that accept digital models (usually in the form of files with STL, OBJ or 3MF extensions), analyze their structure, and then compile lists of actions for 3D printers, called G-code (Gcode). Such lists contain all the information necessary for the equipment: to what temperature to warm up the extruders and tables, whether to use airflow, along what trajectory and at what pace to lay the plastic. nine0003
Cura
Cura is a slicer from the Dutch company Ultimaker, designed primarily for proprietary 3D printers, but open source and compatible with most other FDM/FFF systems. The program is easily customizable with various plugins. Since this is a very popular program, the chances are that it already has a profile with optimal settings for your 3D printer. If not, then nothing prevents you from creating a profile manually or using profiles prepared by other users. nine0003
The program has several levels of difficulty depending on the level of training - basic, advanced, expert and complete. The higher the level, the more access to customizable options. At a basic level, the program takes the bulk of the work on itself, helping inexperienced users.
Cura is constantly being developed and improved through regular updates and is also offered free of charge, although a paid version of Cura Enterprise is available to professional users with licensed plug-ins from the Ultimaker Marketplace, technical support and additional security measures. nine0003
In addition to converting 3D models to G-code, Cura can also take on the role of a control program, but this will require a constant connection between the 3D printer and the computer throughout the 3D printing. Professionals appreciate another feature of Cura - seamless integration with professional computer-aided design systems such as SolidWorks and Siemens NX.
In general, Сura is suitable even for novice users, especially since a huge number of training videos and step-by-step guides are available for this program, both from developers and enthusiasts. nine0003
Official website
PrusaSlicer
3D printer manufacturer Prusa Research, under the leadership of the legendary Czech engineer Josef Prusa, whose designs are copied and refined around the world, has developed its own open source software based on the Slic3r slicer. PrusaSlicer quickly gained popularity as it not only retains the original program's extensive customizations, but also adds a number of useful features not found in Slic3r. nine0003
A redesigned interface, support for Original Prusa branded 3D printers, and profiles with settings to work with many common polymers are just some of the improvements. Additionally, algorithms for generating support structures have been improved, support for multimaterial 3D printing and the ability to dynamically adjust the layer thickness have been added.
PrusaSlicer can process models not only for FDM 3D printers, but also for stereolithographic systems printing with photopolymers. As with Cura, the user can select a difficulty level with appropriate access to fine-tuning. nine0003
Official website
ideaMaker
Raise3D's slicer is optimized for branded additive hardware in the same way that PrusaSlicer is optimized for Original Prusa 3D printers, and Cura is optimized for Ultimaker 3D printers, but this does not mean that it cannot be use with third party systems. The organization of workflows and the interface is somewhat more complicated than in Cura and PrusaSlicer, but on the other hand, ideaMaker allows you to set up individual layers and apply textures for product customization. nine0003
ideaMaker users can connect to the cloud platform and access hundreds of 3D printer profiles and materials created by other operators, or create their own library of settings.
Add the ability to customize support structures, split models for more efficient 3D printing of large parts, integrated mesh repair tools, and OctoPrint compatibility, and you have a flexible, versatile program to suit the needs of most 3D printers.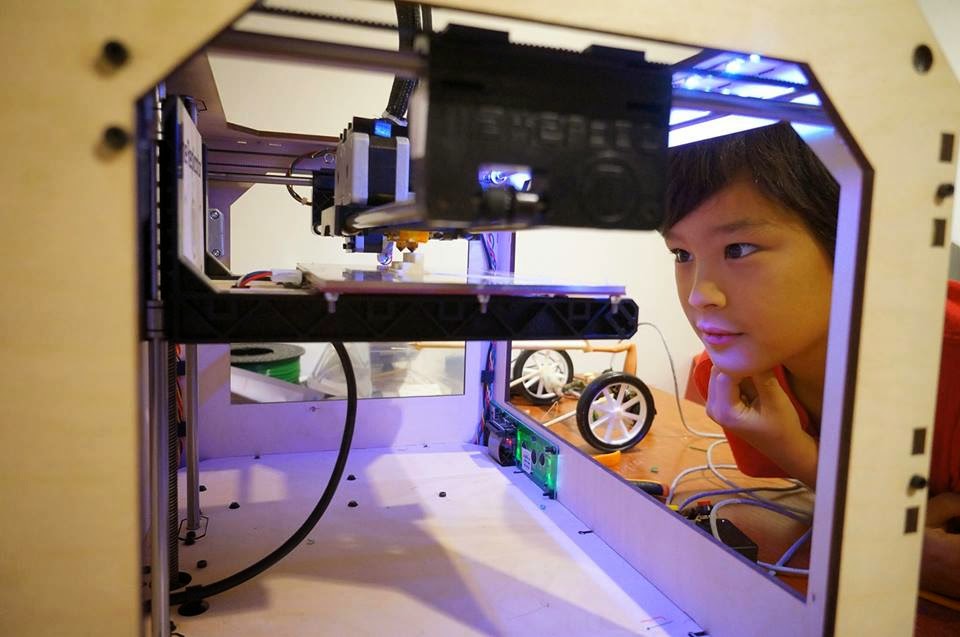 nine0003
Official website
ChiTuBox Basic
This is a specialized slicer for those who use stereolithographic 3D printers that print with photopolymer resins. Most budget LCD masked stereolithography (MSLA) 3D printers rely on motherboards and firmware from ChiTu Systems, which also developed this software.
Users gain control over technology-specific parameters such as layer exposure time, as well as access to predefined profiles with settings for many popular 3D printers. The slicer takes into account such moments as the orientation of the model and the automatic construction of support structures with the possibility of manual optimization. nine0003
Official website
Lychee Slicer
A program from the independent Franco-Belgian team Mango 3D, not associated with 3D printer manufacturers, but with support for many popular stereolithographic 3D printers, including those from Elegoo, Anycubic, Phrozen and Creality.
One of the features of this program is the high level of automation. If you wish, you can simply click on the "magic" button (it's called Magic), and the slicer will do everything by itself: it will orient the model on the platform, generate supports, and so on. Although, here you are lucky: the results are not always optimal, but usually adequate for relatively simple models. Otherwise, everything can be configured manually. nine0003
The program is offered in free and paid versions. The functionality of the free version is slightly reduced, but it has everything you need.
Official site
Kiri:Moto
Browser solution for those who lack computing power. Kiri:Moto can prepare 3D models for both 3D printing and laser engraving or milling. The settings are somewhat more primitive than in locally installed slicers, but are sufficient for most users. nine0003
Official website
IceSL
IceSL is a combination software that combines slicing with 3D modeling. In the left window, you can edit 3D models using scripts in the Lua language, which makes it possible to perform parametric modeling. On the right side, the 3D printing settings are displayed. For beginners, pre-configured settings are available, while experienced users can take advantage of features such as specific adjustment of parameters for individual layers with automatic gradation of intermediate areas. For example, this allows you to gradually reduce or, conversely, increase the filling density of the product as it is built, or gradually change the thickness of the layers. nine0003
Official website
4. Control programs
Control programs are designed for exactly this - managing workflows during 3D printing. Although you can insert a G-code drive into almost any 3D printer and press the start button, this is not always convenient, especially when you have to work with several 3D printers at the same time, and even more so when you do it remotely. This is where control programs come to the rescue. In addition, some of them offer additional functionality, including slicing and even editing 3D models. nine0003
OctoPrint
A web-based appliance that requires connection to a 3D printer via a microcomputer such as a Raspberry Pi equipped with a Wi-Fi module. This system allows you to control 3D printers remotely. OctoPrint accepts G-code from almost any slicer and provides the ability to visualize - view files before and during 3D printing. Alternatively, STL files can be loaded and processed directly in OctoPrint.
OctoPrint not only provides all the necessary tools for remote management, but also allows you to track the work in progress using notifications via various instant messengers. nine0003
This is a completely free, open source program with many plug-ins created by enthusiasts and available on the official website.
Official website
MatterControl
MatterHackers offers its own control program, slicer and 3D editor in one package. MatterControl allows you to directly control and observe 3D printing, slice, export G-code to SD cards for offline printing, and even create 3D models from scratch. The 3D printer will need a Wi-Fi or USB connection to run MatterControl. nine0003
The interface is well structured: on the left side there is a file browser and a library of simple geometric shapes. Interestingly, these shapes can be dragged into the 3D model and used as support structures.
Basic functionality is available in the free basic version, advanced users can pay to upgrade to MatterControl Pro.
Official website
AstroPrint
AstroPrint is a cloud-based management platform that allows you to remotely monitor and control multiple 3D printers simultaneously, store files, convert 3D models to G-code, and track workflow statistics. The functionality ranges from basic in the free version to advanced with different levels of paid subscriptions. nine0003
The 3D printer will require a Wi-Fi module to fully work with AstroPrint. In conjunction with the Raspberry Pi, the system is similar in functionality to OctoPrint: you can process models and send the finished code to a 3D printer via a web interface without the need for additional software. Another plus is integration with popular repositories of 3D models Thingiverse and MyMiniFactory, as well as 3D editors 3D Slash and Leopoly.
Official website
5. Programs for visualizing G-code
What if you find an old file with a G-code, but you have no idea what it is and why - maybe garbage, or maybe an excellent, but long-forgotten model without a clear marking in the file name? The programs in this section will help you visualize the contents of such files.
UVTools
This program combines file browsing with layer editing and even model repair for stereolithographic 3D printing. The program can also be used as a plug-in for PrusaSlicer, adding support for third-party photopolymer 3D printers - although PrusaSlicer is open source, support for stereolithographic systems is still limited to branded equipment. At the same time, UVTools allows you to print calibration samples to check the exposure time and other parameters, which can be useful, for example, when working with new photopolymers that have not yet been tested. nine0003
Official website
WebPrinter
A simple browser tool for quick G-code preview, developed by the same team that created the IceSL slicer and 3D editor. The application works very simply: follow the link, upload the file with the G-code and see how the 3D printer will grow the model according to the commands provided. Unfortunately, the functionality is limited: for example, the application does not provide information about temperature settings. On the other hand, you can quickly figure out what kind of model is hidden in a file with an incomprehensible name. nine0003
Official website
Gcode Analyzer
An old but still very capable and popular G-code analysis web application. The 3D simulation doesn't work very well, but the 2D and G-code previews work great. In 2D mode, you can conveniently view individual layers, moving from layer to layer and following the construction path step by step using two sliders. G-code viewer displays a complete list of commands, allowing you to see what a particular line of code is doing. nine0003
Official website
Adapted translation of The Best Free 3D Printing Software of 2022 article.
Top 20 Free 3D Printing and 3D Printing Software
Looking for 3D printing software? We've rounded up the top 20 software tools for beginners and professionals alike. Most slicers are free.
What is a slicer? This is a program for preparing a digital model for printing. Models for 3D printing are usually distributed in STL files. To turn an STL file into G-code (a language that a 3D printer understands), a slicer program is required. It is called a slicer because it cuts (to slice - English) a 3D model into many flat two-dimensional layers, from which a 3D printer will add a physical object. nine0003
Which slicer should I choose? In this article, we will tell you which slicer is the best choice for 3D printing for each stage of your work. Which one is better for preparing a 3D model for printing? But what if you need to create a 3D model from scratch? And if you are only taking the first steps in 3D?
Don't be afraid: we've answered all of these questions, including the required skill level for each program and where you can download it. The great thing is that most of these programs are completely free and open source. nine0003
- Cura
- CraftWare
- 123D Catch
- 3D Slash
- TinkerCAD
- 3DTin
- Sculptris
- ViewSTL
- Netfabb Basic
- Repetier
- FreeCAD
- SketchUp
- 3D Tool
- Meshfix
- Simplify3D
- Slic3r
- Blender
- MeshLab
- Meshmixer
- OctoPrint
#1: Cura
For beginners who need a slicer to prepare STL files for 3D printing
Cura is the default slicer software for all Ultimaker 3D printers, but can be used with most others , including RepRap, Makerbot, Printrbot, Lulzbot and Witbox. The program is completely open source, its capabilities can be extended using plugins.
This program is very easy to use and allows you to manage the most important 3D printing settings through a clear interface. Start in Basic mode to quickly get up to speed and change print quality settings. If finer control is required, switch to Expert mode. nine0003
Cura can also be used to directly control the printer, but then the printer and computer must be connected to each other.
Download: Cura
Price: Free
Systems: PC, Mac, Linux
#2: CraftWare
3D printers by the Hungarian startup CraftUnique to support their CraftBot crowdfunding machine. However, the program works with other printers. nine0003
Like Cura, CraftWare allows you to switch from "Easy" to "Expert" mode, depending on how confident you feel. It's a colorful app that features a visual G-code visualization with each function represented by a different color. But the most outstanding feature is the individual support service. As far as we know, only the paid program Simplify3D has this.
Please note, however, that this program is still in beta, so bugs may occur. nine0003
Download: CraftWare
Price: Free
Systems: PC, Mac
#3: 123D Catch
-systems, smartphones and tablets, which allows you to convert images of objects into a 3D model. Pictures can be taken with a smartphone/tablet or digital camera.
You need many photos of the object from different angles - the more the better - after which they will be compiled into a 3D model. nine0003
123D Catch is more of a fun app than a professional 3D printing tool, but after some tambourine dancing, you can get good results, especially when paired with an STL editor like MeshLab or Meshmixer.
Price: Free
Systems: PC, Android, iOS, Windows Phone
#4: 3D Slash
and surprisingly simple, and refreshingly new. With 3D Slash, you can design 3D models using your dice skills. nine0003
You can start with a large block and, like a virtual sculptor, remove small cups from it with tools such as a hammer or drill, or start from empty space and build a model from cubes and other shapes. You can paint with flowers or use template pictures.
Other features worth mentioning are tools for creating logos and 3D text. The Logo Wizard imports an image and creates a 3D model, while the Text Wizard allows you to enter and format text, and then turn it into 3D. nine0003
Recommended!
Download: 3dslash.net
Price: Free
Systems: PC, Mac, Linux, Browser
#5: TinkerCAD
- A computer-aided design (CAD) system for 3D printing, which is a good starting point for beginners. Since its capabilities are limited compared to Blender, FreeCAD and SketchUp, many users switch to more powerful tools after some time. nine0003
As in 3D Slash, here you can build models from basic shapes. At the same time, unlike 3D Slash, TinkerCAD allows you to create vector shapes in 2D and convert them into three-dimensional models.
Come in: Autodesk TinkerCAD
Price: Free
Systems: Browser
#6: 3DTin
For beginners who want to create 3D models for printing
online is another easy and intuitive tool choice for beginners in 3D modeling. All you need is a Chrome or Firefox browser with WebGL enabled. nine0003
Choose from a huge library of 3D shapes and add them to your sketch. All sketches are stored in the cloud, access to them is free if you honor the Creative Commons license. Everything can be exported to STL or OBJ formats.
Enter: 3DTin
Price: Free
Systems: Browser
#7: Sculptris
For beginners who want to create 3D printable models
clay. This is a fantastic 3D modeling program if figurines are your main task. For example, you can make a bust of your favorite video game or comic book character. Sculptris is completely free and bills itself as a stepping stone to the more complex (and expensive) ZBrush tool. nine0003
Download: Pixologic Sculptris
Price: Free
Systems: PC, Mac
#8: ViewSTL
For beginners who want to view STL files
ViewSTL is the easiest way to view STL files . Simply open a web page and drag the STL onto the dotted box.
The STL online viewer allows you to display the model in one of three views: flat shading (for a quick view), smooth shading (for a high-quality image), and wireframe. nine0003
Enter: ViewSTL
Price: Free
Systems: Browser
#9: Netfabb Basic
some nice features that allow you to analyze, "repair" and edit STL files before moving on to the model cutting stage.
A good choice if you need more than just a slicer and want to be able to quickly fix STL files without having to learn programs like MeshLab or Meshmixer. nine0003
Don't let the 'Basic' in the name fool you, Netfabb Basic is actually a very powerful 3D printing tool. It's "basic" only in the sense that it doesn't cost €1,500 like Netfabb Professional!
Download: netfabb. de
de
Price: Free
Systems: PC, Mac, Linux
No. 10: Repetier
For advanced to prepare STL files for 3D printing
9002 the next level of 3D printer slicer software, but if you want to stay open source, you should look into Repetier. It is the great grandfather of 3D printing software and a favorite of the RepRap community. nine0003Today the program is moving by leaps and bounds from the level for beginners to advanced users. Packaged in an all-in-one configuration, it supports up to 16 extruders, multi-slicing via plug-ins, and virtually every fusing 3D printer on the market. Get ready to tinker!
What's more, Repetier Host works remotely via Repetier Server, so that the 3D printer can be controlled via a browser, tablet or smartphone. nine0003
Download: Repetier
Price: Free
Systems: PC, Mac, Linux
#11: FreeCAD
The program is a great option for developing your design skills. More technically, this parametric 3D modeling program allows you to easily change the project by rolling back through the history of the model and editing the parameters. nine0003
Download: freecadweb.org
Price: Free
Systems: PC, Mac, Linux
#12: SketchUp
For beginners who want to create 3D printable models
SketchUp functionality, with a user-friendly interface and a relatively flat learning curve (i.e., as experience grows with the time spent), the ideal program for developing three-dimensional models.
The Make SketchUp version is free and will have everything you need for 3D modeling if you also download and install the free STL exporter. There is also a professional edition for architects, interior designers and engineers. nine0003
Download: sketchup.com
Price: Free (SketchUp Make), $695 (SketchUp Pro)
Systems: PC, Mac, Linux
#13: 3D-Tool Free Viewer
view and check STL files
3D-Tool Free Viewer is a sophisticated tool that, among other things, allows you to check the structural integrity and printability of your file. With the Cross-Section function, for example, you can look at the model from the inside and check the wall thickness. Very useful if you want to check your STL file for killer errors before printing. nine0003
Download: 3D-Tool
Price: Free
Systems: PC
#14: Meshfix
your model for errors.
Price: Free
Systems: Browser
#15: Simplify3D
For professionals to prepare STL files for 3D printing print. A flexible algorithm checks the model for problems, fixes them, shows a preview of the printing process (ideal for identifying potential problems), and then slices it. nine0003
This slicer offers the best infill pattern options in the competition. For models that require supports, Simplify3D will create the appropriate structures on its own and give you full control over their placement. For printers with a dual extruder, when printing with different materials, the Dual Extrusion wizard will help, as a result of which, for example, it will be easier to remove the dissolving filament.
Simplify3D supports 90% of today's commercially available desktop 3D printers and is compatible with Marlin, Sprinter, Repetier, XYZprinting, FlashForge, Sailfish and MakerBot firmware. Simplify3D can also be used to directly control the printer, but then the printer and computer must be connected to each other. nine0003
Download: simplify3d.com
Price: $149
Systems: PC, Mac, Linux
#16: Slic3r
source code, which has a reputation as a carrier of super new functionality, which you will not find anywhere else. The current version of the program is able to show the model from multiple angles, so that the user gets a better preview experience.
There's also an incredible 3D honeycomb infill, the first of its kind that can extend over multiple layers rather than repeating itself like a stamp. This significantly increases the strength of the internal filling of the model and the final printout.
Another option is direct integration with Octoprint. Once the files on the user's desktop are sliced, they can be directly uploaded to Octoprint with one click.
Download: Slic3r
Price: Free
Systems: PC, Mac, Linux
#17: Blender
For professionals who want to create 3D printable models
Blender is a popular computer-aided design (CAD) system with a steep learning curve. Not at all the best choice for beginners, but what you need if you are quite experienced and need something more complex for modeling and printing.
In short, Blender is one of the most powerful tools in existence. Its community is always ready to help, there are a lot of educational materials. It's also open source, so enthusiasts often write extensions to make it even better and more powerful. nine0003
Download: blender.org
Price: Free
Systems: PC, Mac, Linux
#18: MeshLab
For professionals to prepare STL files for 3D printing
MeshLab - advanced editor. It allows you to remove parts of a 3D model, merge two models into one, patch holes. If you need a program to modify models for 3D printing or some kind of "repair" work, MeshLab is the right choice.
Price: Free
Systems: PC, Mac, Linux
#19: Meshmixer
For professionals to prepare STL files for 3D printing files. It's especially good for identifying potential problems and fixing them automatically.


_Angle_View.jpg)