3D printer from inkjet parts
Make a DIY 3D Printer From Old Inkjet Printer Parts
3D printing is all the rage these days, and it has gone so far that you almost anyone can buy his own 3D printer. If you’re in the market for one, Tom’s Guide has a handy reference on the best 3D printers in the market, with prices ranging from $349 to $2,899. Then there is the Peachy Printer, which was a successful Kickstarter campaign, aiming to sell the first $100 3D printer. Yup, it is easy as pie to get a 3D printer without breaking the bank.
But what’s a geek/nerd for if he can’t build one for himself, right?
If that’s a measure for you, then Michael Ball may very well be crowned the 3D printer king, for he is working on a DIY 3D printer using old inkjet printer parts! How awesome is that???
While there is no doubt many of us still use laser printers and inkjet printers, asking questions like, “Why HP Toner Cartridge?” and “Should I use inkjet refills?”, I am pretty sure that you have one or two old inkjet printers that you can use to emulate Michael Ball. And, even if you don’t have one sitting around, it’s still easy enough to get your hands on the devices that Michael Ball suggests for the project – even easier and more affordable than buying a ready-made 3D printer.
He shares his story in his blog, where his journey starts with the question:
Why are there not many hobbyists re-using old All-In-One or Multifunction printers to scavenge parts from?
For sure, there must be a good reason why this is not happening, but that did not deter Michael, and he went on to purchase a printer and a printer/scanner and took the parts he needed to put a DIY 3D printer together.
But that was the easy part. He shares that his project couldn’t be totally made out of salvaged parts, and that he still needed to buy certain things such as some 80/20 T-Slot aluminum extrusion.
In short, he’s made some progress, but he’s still got some ways to go. In a more recent post detailing his work on the DIY 3D printer, he talks about DC motors – so you know this is going to get even more complicated. But you have got to admire this guy!
While it is so easy to shell out several hundred dollars for a 3D printer (assuming you have the money, of course), it takes something else to commit to a project that will not only take time and money, but also a lot of creativity, research, hands on work, and patience.
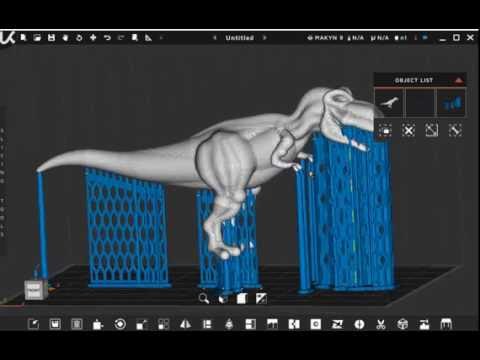
Take a look at what he has got so far, and be motivated and impressed!
Sure, a DIY 3D printer may not be the easiest and most cost affordable option, but imagine the immense sense of self-achievement that you will have at the end of it all. Not to mention geek cred. Sky high geek cred.
What say you? Challenge accepted?
Postscript: In case you’re wondering who the heck is Michael Ball:
He has survived various roles in the IT field for the past 25+ years from Hardware developer with the National Research Council, through Network Administrator, and teaching Computer Science, to Network Architect and CISO of a prominent Insurance company. Most recently, he is currently in the Position of Information Security Architect for a Canadian Financial Institution.
So check out his blog, Arduino-Pi Ramblings. Who knows, you might make a new friend!
Here’s a little more on 3D printing to whet your appetite:
3D Printing Just Keeps Getting Cooler and Cooler [LEGO Alert!]
Crania Anatomica Filigre Is How 3D Printing Should Be Done
Have something to tell us about this article?
Let us know
or Comment Below
Gaming Trailers
More Like This
Predator | 2022 Helios 300 Spatial Labs Edition 3D Gaming Laptop |
Latest Trailers
Asphalt 8 | Independence Day Celebration Official Trailer
How to Make a 3D Printer Out of Old Printers?
This site contains affiliate links to products. We may receive a commission for purchases made through these links.
0 shares
- Share
- Tweet
Buying a 3D printer, even with the prices falling in recent years, is an expensive endeavor. Therefore, you might be tempted by the thought of building your 3D printer, but is this possible?
Troubleshoot A 12 Volt Relay Quickly
Please enable JavaScript
Troubleshoot A 12 Volt Relay Quickly
Well, luckily, this is something you can do using old printers, thereby saving your hard-earned money for other purchases.
Table of Contents:
- Steps To Turn A Printer Into A 3D Printer.
- How to Get Started
- Delta-based Printers
- Cartesian-Based Printers
- Benefits of The DIY 3D Printer
- Conclusion
However, the process to follow when making a 3D printer is something that many people find complicated. For this reason, in this article, we’ve sought to explain the steps you need to follow when making a 3D printer using old printers.
Steps To Turn A Printer Into A 3D Printer.
Using an inkjet printer, you can embark on the process of making a 3D printer. This is an excellent option instead of discarding it once it can’t print several pages of your novel or flight boarding passes. Furthermore, most people buy another one once a newer model is launched.
This is what an 18-year old Italian student Michele Lizzit did instead of throwing away the parts of the now destroyed inkjet printer. He also got an old scanner, Amazon cardboard boxes, and several hand-soldered electronics in addition to the printer. Whereas the outcome wasn’t attractive to the eye, it did work well as a 3D printer, and all this is at a mere price of €10.
Other items that Lizzit used are some electronics, a hotend extruder, a motor driver, an ATmega328 processing brain, a high-current transistor, and three driver boards.
Once everything that’s needed has been assembled, other things required for the 3D printing include working to repurpose old parts and 3D printing an extruder housing. All that’s required are two cardboard boxes to be used as the printer frame, which should later be attached to an axis on them. It would be best to use an inkjet printer paper loading mechanism instead of buying a new hobbed bolt.
Consequently, place the plastic plate from the scanner on top of Amazon’s cardboard packaging as this provides excellent adhesion for prints. At the moment, cardboard biscuit boxes offer the structure with support but using a robust metal frame is ideal.
The reason for this is that the cardboard frame affects the accuracy of the cardboard frame negatively. After doing this, create a system firmware that’s open-source just as Lizzit did.
Although the print resolution on both axes is 33 microns, this DIY 3D printer doesn’t boast an appealing look. The integrated upcoming software enables the system to clean a blocked nozzle, compensate for filament shipping, and choose the correct temperature for the filament independently.
This project aims to make a 3D printer using an old printer to show that you can still achieve relatively accurate prints using home-build linear encoders found in inkjet printers.
It shows the ingenuity to make good use of old hardware, plus it is very cheap.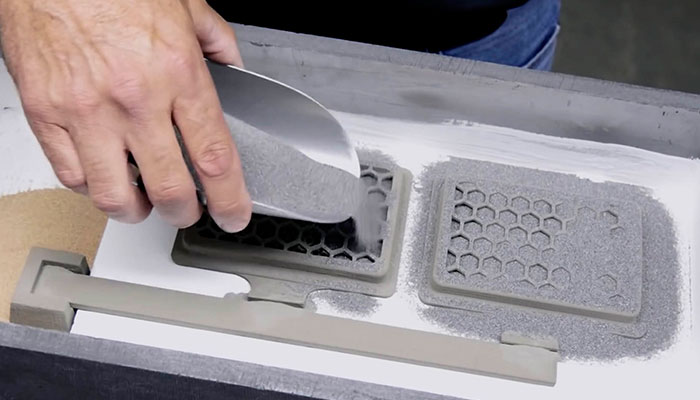 Moreover, these 3D printers use up less power than models bought in shops as it features DC motors instead of stepper motors.
All these instructions are also made available on Lizzit’s website.
How to Get Started
After deciding to build a 3D printer, the first thing to do is determine what type of printer you’re hoping to construct. In this guide, you’ll be taken through the steps to follow when making a plastic deposition or FDM printer with three-axis. With that in mind, there are still lots of configurations and frames you have to pick from.
The two different coordinate systems incorporated in 3D printers are Delta and Cartesian.
Delta-based Printers
These printers consist of three parallel axes linked to the extruder, which prints onto the stationary, circular print areas. It’s a less popular choice compared to the Cartesian option, and some of its features include:
- It has a cylindrical build volume.
- It’s a lot harder to program and construct.
- Best suited for bigger parts.
- Its resolution varies across the parts, with lower resolutions towards the center, whereas higher resolutions are further out.
- Needs at least three motors.
Cartesian-Based Printers
These printers are a more popular choice than the Delta-based counterparts. It comprises three perpendicular axes which print on the rectangular print regions. Typical setups have a bed controlled by the third axis while the other two axes control the extruder. Nevertheless, there exist some minor variations across different models.
The features of Cartesian-based printers include:
- Incorporate the most common coordinate system.
- Simplest to program and build.
- Needs a minimum of three motors.
- It can be scaled up or down with ease.
- A popular coordinate system.
If you want a desktop printer, the Cartesian is an ideal choice since they have a bigger build volume than the deltas of the same size and are more compact.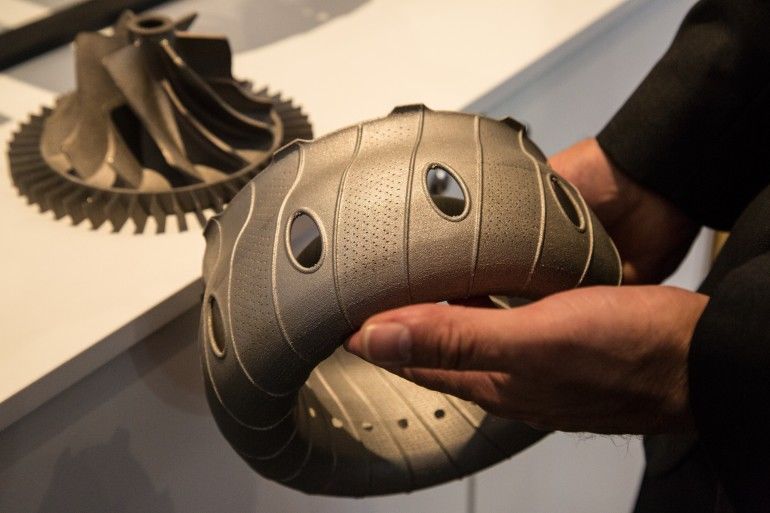 However, the delta printers are preferred as they’re cheaper to use as it gets bigger.
In addition to this, bigger-sized printers are, in most cases, delta printers as they need less framework in comparison to the construction of building-sized Cartesian.
Benefits of The DIY 3D Printer
Educate Your Children
If you want to educate your children by teaching them how to carry out certain tasks practically, then this DIY 3D printer will be a handy appliance. Using this machine, your kids get to stimulate their creative sides, and this is very important in sharpening their education skills. Furthermore, it helps them develop problem-solving skills, which further boosts the creativity of your kids.
Save Time And Money
The price of 3D printers bought online or in shops is quite steep even if the prices have recently started to fall. Therefore, why suffer this stiff investment if you could instead set aside only a small percentage of this money and spend it on making your DIY 3D printer.![]()
You also get to save time you would have otherwise spent waiting for your 3D printer to become available after placing an order for one.
Conclusion
The hype around 3D printers won’t die down any time soon. However, if you’re on a tight budget, using an old printer to make a 3D printer is a viable solution. By doing this, you can be sure to start using this equipment to carry out your 3D printing tasks.
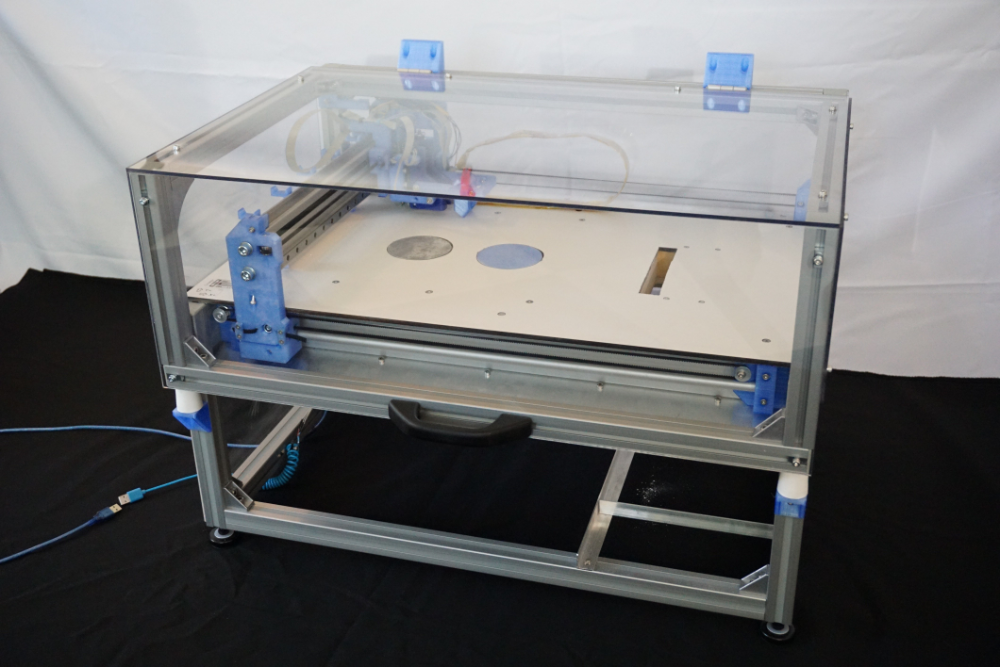
DIY 3D printer from inkjet printer
How to assemble a 3D printer from parts from an inkjet printer?
3D printer is a high-tech and expensive device. If you buy a cheap device, you may encounter poor-quality assembly, fragile components and a short uptime. Having in stock unnecessary, decommissioned, failed inkjet printers and scanners, you can assemble a printing device from their parts to create three-dimensional models.
Do-it-yourself 3D printer from an inkjet printer
If the cost of the device is the leading factor in choosing a device for printing 3D objects, it is worth assembling a 3D printer yourself.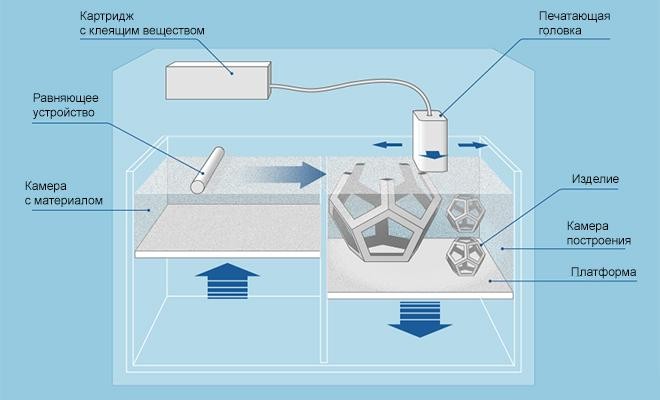 According to user reviews, cheap models of 3D printed devices made in China have the main drawback - the low quality of components. In particular, guides are the weak point of Chinese devices. These elements are subjected to significant stress, and if they are of poor quality, they can be deformed under the action of tension belts.
Important! In older document printers, the rails are made of hardened steel. They do not bend even with considerable effort. Such details will be an ideal alternative to regular Chinese ones.
By dismantling unnecessary office devices, you can get a set of spare parts necessary for assembling a 3D printer and save a lot on the purchase of components. These are:
- printer head slide assembly;
- timing belts;
- mechanical or optical limit switches;
- power supply;
- stepper motors and drivers with controllers and other parts.
Attention! Inexpensive inkjet printers were mostly equipped not with stepper motors, but with DC motors with an encoder.
Theoretically, they can be used in the assembly of a 3D apparatus by redesigning the latter. Stepper motors are usually extracted from scanners.
But the advantage of DC-motors should be noted: they consume electricity only during movement, while stepper motors are constantly supplied with power.
Accessories such as hot end, extruder and control board will have to be purchased. The frame is assembled from improvised materials - plywood, steel corners or parts of the cases of disassembled copiers.
A self-assembled printer will be much cheaper than factory counterparts, but at the same time, it will be of higher quality than budget models presented on the market by Chinese manufacturers.
How to make a 3D printer from an inkjet printer: step-by-step instructions
To work on assembling a printer from donor components, you will need a set of tools and materials:
- hacksaw, drill - to make the case;
- soldering iron and solder - for mounting electrical cables;
- screwdrivers and hex set - for assembling components;
- pliers;
- multimeter tester - for checking the electrical circuit;
- screws and nuts;
- cable ties;
- electrical tape.
Attention! Knowledge of electronics and engineering is a plus.
Accessories:
- steel rails;
- timing belts;
- micro stepper motors;
- stepper motor drivers;
- extruder and hotend;
- optical sensors - limit switches-microswitches;
- power supply;
- connection cables;
- electronic control board and microcontroller based on Arduino;
- LCD display;
- desktop glass;
- parts for the frame.
Next, you will need to stock up on a fair amount of patience and pedantry - assembly requires careful observance of all instructions.
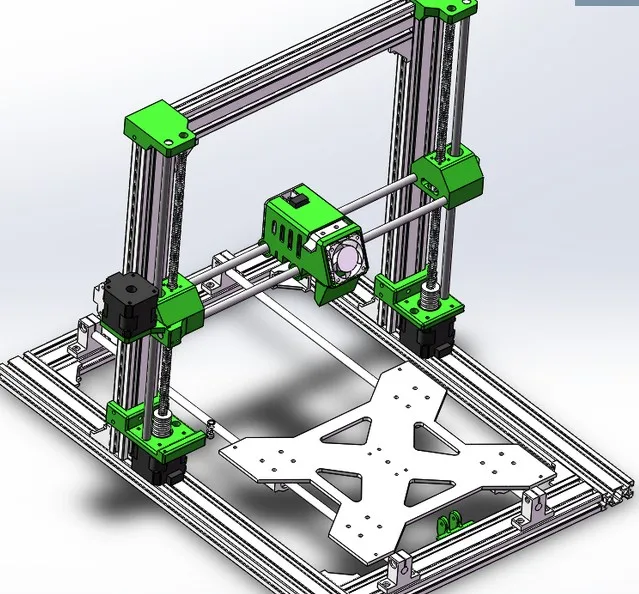
Assembly process
- Fabrication and painting of the frame.
- Mounting the X and Y frame axes and fixing stepper motors to them. The extruder will move along the X axis, the Y axis is needed to move the platform.
- Installing the Z axis support rod.
- Attaching the extruder.
- Connection of heating elements, cables, power supply.
- Assembly of electronic elements: boards, microcontroller, LCD display.
After assembling and testing the electrical circuits, install the software. At the last stage, the working table, the X, Y, Z axes, the temperature of the heating elements and the filament pulling speed are calibrated.
Important! After starting the printer, print a test model. It will show all the flaws in the assembly and settings.
Mistakes and how to avoid them
Printer performance depends on the quality of the installation. But it is not always possible to eliminate errors when assembling the device.
- One of the serious mistakes that is often made when assembling the printer with your own hands is the incorrect installation of the frame elements. Even a slight misalignment of the corners will cause jamming when the carriages move.
 The geometry of the mating parts must be maintained as accurately as possible.
If the body is made of plywood, it is recommended to cut its elements on a CNC laser machine. When assembling a frame from metal corners, it is necessary to control the mating angles of the parts at each stage. - The second common problem is the backlash of the frame elements. In this situation, print quality cannot be achieved. There should be no gaps between the parts. They occur either when the fasteners are loosely tightened, or if the frame elements are poorly prepared, that is, the dimensions are incorrectly maintained.
- If the electrical wiring connectors are not of good quality, there will be constant power outages. And the installation of short wires will cause them to break. The length of the wiring must match the dimensions of the frame, taking into account moving parts. It is necessary to check the tightness of the connection of the connectors, thereby minimizing the risk of disconnecting individual components and mechanisms from the power supply.
Quality control of the assembly at each stage, checking all connections and geometry of structural elements will help to avoid problems.
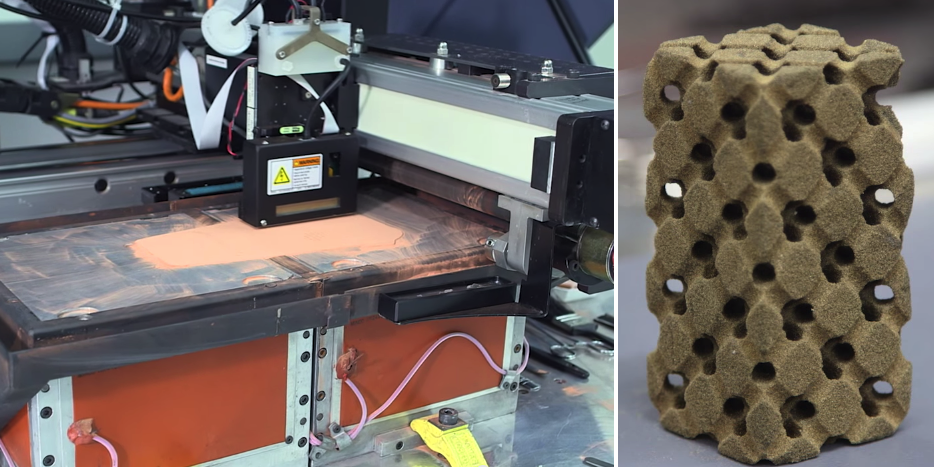
That's interesting! The article discussed how to assemble an FDM printer from improvised materials and parts left after dismantling office equipment. And an engineer from the Netherlands assembled a powder-type 3D printer based on an inkjet printer. As a filament, he used gypsum, sand, metal powder, and filled the cartridge with a binder. Otherwise, the technology is similar to laser layer-by-layer sintering.
Assembling a 3D printer with your own hands is not at all as simple an action as it seems at first glance. But lower financial costs and higher quality components compared to budget models from China make it expedient to manufacture a printing apparatus on your own. And given that a significant part of the parts will be recovered from the old inkjet printer and copier, this will further reduce the cost of producing a homemade 3D printer.
- May 17, 2021
- 3045
Get expert advice
3D Inkjet Printing (3DP) – 3dprofy
Turch October 21st, 2014
3DP stands for Three-Dimensional Printing , and translates as three-dimensional printing. This technology is one of the varieties of systems for the additive construction of a product according to its CAD model and differs from numerous similar schemes in that the process is carried out according to the principle of a conventional printer - through print head nozzles. Thus, 3D inkjet printing is a natural continuation of the development of conventional 2D printing technologies. To date, it has achieved fairly good results, such as color printing.
Products printed on the Z Corp's Spectrum Z510 color 3D printer
The history of the emergence and development of 3DP
The idea of implementing equipment using this printing scheme was first proposed by two students at the Massachusetts Institute of Technology Tim Anderson and Jim Bredt in 1993. It is thanks to them that the term 3D printing has spread around the world. And this is quite fair, because the first model of the device was a modification of a conventional 2D printer. Instead of ink, he used a special adhesive composition, which applied layer by layer to the surface of the bonded substance, the boundaries of the future three-dimensional product.
In 1995, Tim and Jim formed the Z Corporation, which brought this technology to market, improving it to such an extent that in 2012 3D systems Corporation wished to acquire it along with the company. Under her brand, former Z Corporation models are now sold worldwide.
One of the directions of ExOne (USA) is the release of 3D printers that use the same technology. This firm was founded in 2005 as a subsidiary of the Extrude Hone Corporation. Using the patents obtained by Anderson and Bedt, they launched a line of printers that even print metal products today.
3D inkjet printing technology
Today there are more than thirty 3D printing technologies, which in one way or another duplicate each other, although each has its own characteristics.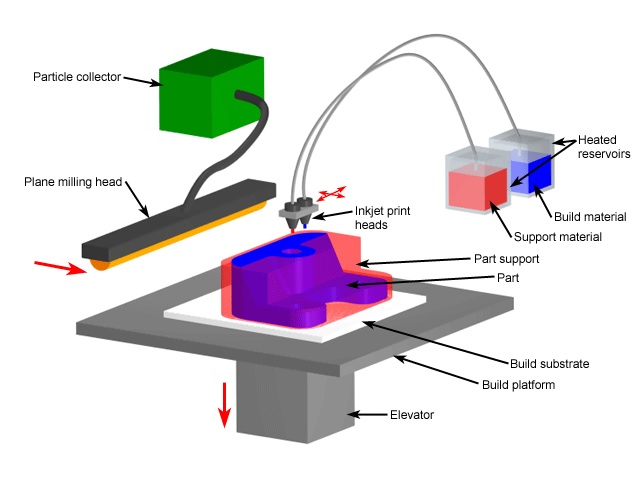 The American Society for Testing and Materials (ASTM International) has divided 3D inkjet printing technologies into two categories:
- Material jetting - material splattering.
- Binder jetting Binder jetting.
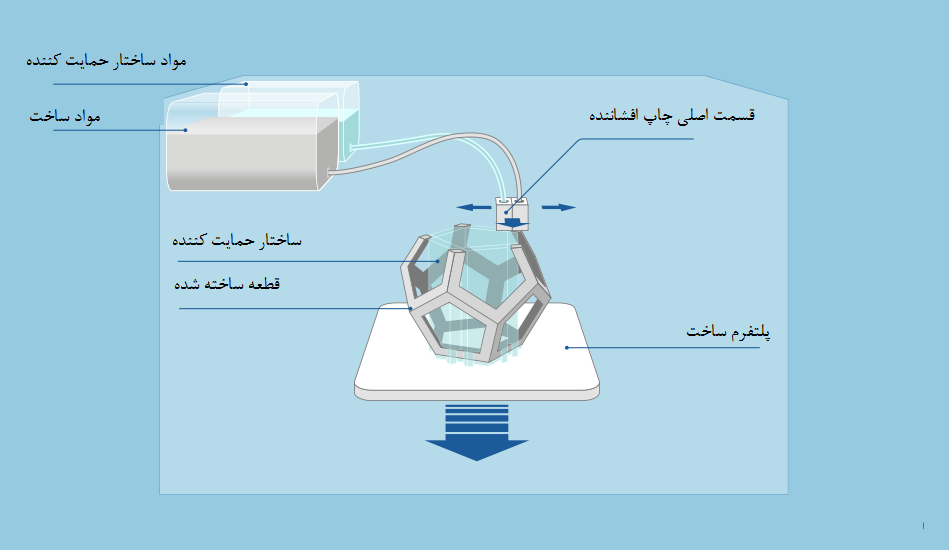
In the first case, the building material itself is fed directly through the nozzles, which hardens after application. In the second, an adhesive is sprayed onto a thin layer of gypsum, polymer or metal powder. 3DP technology in its original form represented exactly the second method.
If we consider it in more detail, then printing takes place in the following way:
The 3D printer construction chamber consists of two parts: the first contains the material from which the model will be “grown”, the second contains the process itself, namely:
- First, a CAD model is loaded into a computer connected via an Ethernet cable to the printer, which is “cut” into layers, about 0.1 mm thick.
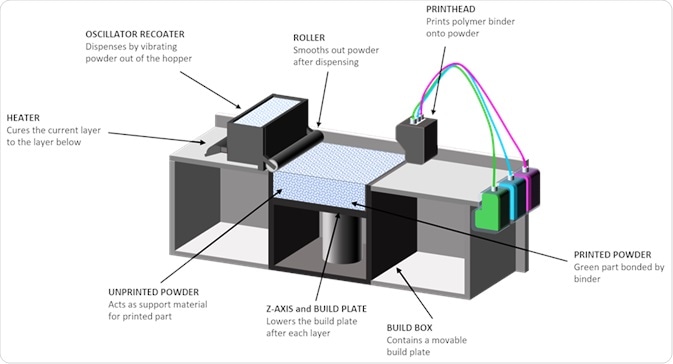
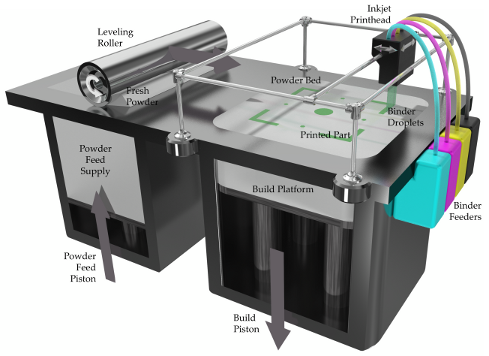
- Next, a thin layer of powdered material (gypsum, polymers, sand, metal) is applied with a roller on a special platform.
- Using the print head, a binder (glue, water, special mixture) is sprayed along the coordinates of the boundaries of the first layer received from the computer.
- After that, the platform with the model is lowered by the thickness of the layer down, and the chamber with the building material is lowered by the same distance.
- Next, the roller unrolls the next layer and the process repeats.
- After the end of 3D printing, the product is removed from the powder layer and thoroughly cleaned of its residues.
When making models from metal powder, a firing process in a special oven is added. Let's take a closer look at this process.
The picture above shows 4 stages of his stage:
- First, according to the above scheme, the so-called "green model" is formed from the matrix powder and binder (1,2).

- Next, the article is placed in an oven filled with a protective gas, usually nitrogen.
- When the temperature rises to 1000-1100 degrees, the binder is removed, and the free space around the powder particles is impregnated with bronze (or other metal) previously placed next to the "green" model. This process is called infiltration.
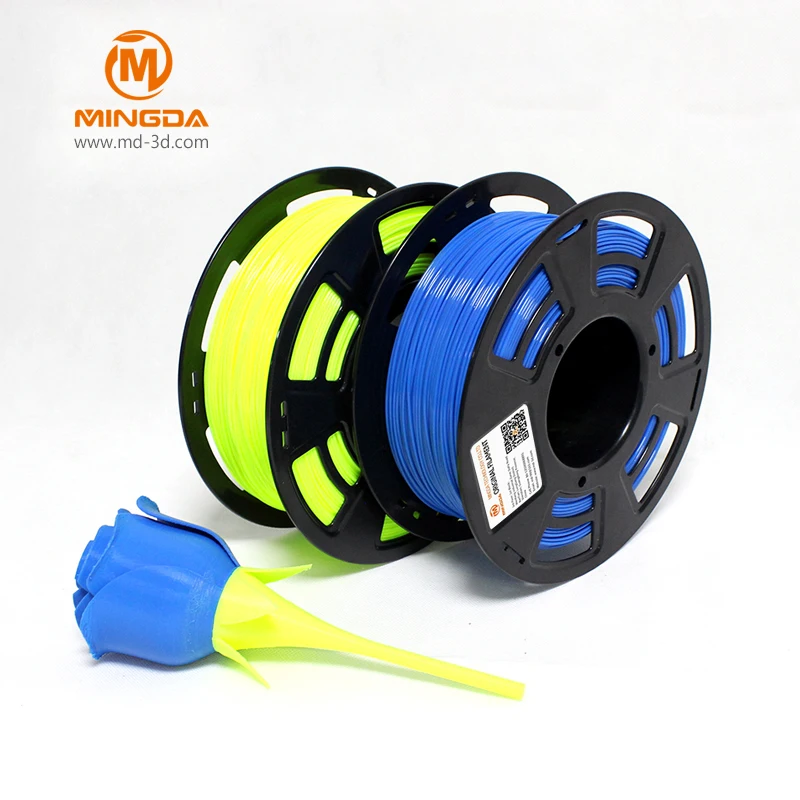
Materials used for 3DP printing and their cost
Gypsum has traditionally been used in 3D printing, and water played the role of a binder in this case. However, technology has stepped forward and, as is clear from the previous section, metals (bronze, copper), sand and polymer mixtures are now also used. Dyes are mixed into the binder, which makes it possible to carry out color printing on such a 3D printer.
The cost of the simplest powders is on average 600-700 euros for a 10 kg bucket (8200 cm3), the price of the binder is about 660 euros for 3.8 liters.
Characteristics of finished products and their application
Models made of gypsum and polymers are not too strong to be used in the production cycle as a mold, however, they are quite suitable for rapid visualization of prototypes of various parts and products . It can also be used in various architectural and design works or in the manufacture of souvenirs.
Products using metals have the best properties, however, their strength is still at an average level: tensile strength 610 MPa, hardness HRC = 10-20.
Such characteristics are quite suitable for the manufacture of molds for plastic injection, which can withstand from 200 to 500 thousand production cycles. They are also used to make parts that work under friction conditions - shafts, bushings, gears, etc.
Disadvantages
- Gypsum-based products are quite fragile and can only be used in a narrow field of activity. As a mold, it can only be used once, after which it is destroyed.
- When working with gypsum powders, a lot of dust is generated, so a good extraction is necessary.
Benefits
- High speed of building parts - about 6 mm in height per hour, with a working area of 780 x 400 mm it will be 1780 cm3, which is an order of magnitude superior to laser rapid prototyping technologies.
Learn more