3D printer bed coating
Truck Bed Liners Improve 3D Prints
- by: Al Williams
There are at least two kinds of 3D printer operators: those who work hard to make their prints look better after they come off the bed and those who settle for whatever comes off the printer. If you are in the latter camp, you probably envy people who have smooth prints with no visible layer lines. But the sanding and priming and multiple coats of paint can put you off.
[Teaching Tech] has a few tricks that might change your mind. He shares his technique for using different coatings for 3D prints that provide good quality with a lot less effort. The coatings in question are polyurethane used for coating pickup truck beds and bitumen rubber used for waterproofing. In the United States, bitumen is known as asphalt, and both materials are relatively cheap, available, and safe to use.
According to the video you can see below, there’s no need to sand or prime the print. In addition to covering imperfections and sealing gaps, it produces watertight prints that have UV resistance and some measure of protection against heating.
The waterproofing example was fun. Using vase mode, [Teaching Tech] printed a few boats. Having single-layer shells, the boats had a few imperfections. Untreated, the boats actually floated, because they didn’t weigh enough to break the surface tension. However, placing a payload — in this case, a stepper motor — into the boats caused them to sink. With the coatings, though, the boats would float with their motor cargo.
The outward appearance is good, although it isn’t as smooth as paint. You’ve probably seen truck beds and that’s what it looks like. Still, for many parts that’s not a bad look; it almost appears powder-coated. Painting the material on didn’t look very difficult, although the rubber sealant looked thin. On the other hand, it was cut with water, so it might work to use less water in the mixture.
We are anxious to try this out. We aren’t sure if the popular Flex Seal is asphalt rubber, but it might be a good thing to try and is easily available in the states.
We’ve looked at some coatings before. Paint doesn’t have to be hard, but we get why some people don’t want to bother.
3D Printing Essentials: How to Succeed with Every Bed Surface Solution
Matching 3D printing filaments with the proper bed surface material is an important part of the 3D printing process. Read more to find out the best path to success.
Posted on December 2, 2020
by
Alec Richter
Having your 3D prints come out perfectly comes down to more than just a calibrated first layer and a properly leveled bed, you need to make sure that your bed surface is compatible with the material you are printing. There are almost as many bed surface options as there are materials to print, and each surface has their unique combination of strengths and weaknesses. Maximum printing temperature, compatible materials, bottom layer surface finish, and the ease of finished part removal are all things to consider when choosing your bed surface.
Glass
Glass build plates are generally made from what is called “float glass”. Float glass is made by pouring molten glass onto molten metal (usually tin) to achieve a uniform thickness and flatness. Having a flat, uniform surface is critical in the success of the first layer, and glass is one of the most uniform and flat build surfaces available. Installing a sheet of glass, especially borosilicate glass which has low thermal expansion, is one of the easiest ways to correct a 3D printer with a warped build plate. To use a glass bed at its fullest potential, you will want to use some form of adhesive applied directly to the surface which are both easy to apply and can be regularly cleaned off to maintain a nice, reusable surface.
Use a Glass Bed Printing Surface for:
- PLA (Heated)
- Nylon (Heated with PVA Gluestick)
- ABS (Heated with StickStick, Magigoo, Dimafix, 3D Gloop, hairspray, or ABS juice)
- BASF Ultrafuse 316L (Heated with Dimafix)
How to succeed with Glass Bed Printing Surface
- Glass plates should be sized for your 3D printer’s bed size
- Clamp to build plate with binder clips or swiss clips, or use high temperature adhesive sheets to semi-permanently adhere it to the build plate
- Alternatively, stick the glass plate to a flexible spring steel build surface so you can easily swap between build surfaces.
A glass bed being clamped onto the Ultimaker 2+ Connect heated bed.
Adhesive - Chemical/physical solutions
Additional adhesives are highly recommended for most bed surfaces to ensure you lock down your 3D prints. Some are simple but originally designed for general purposes like PVA glue sticks, and others are specifically designed for 3D printing like Magigoo or 3D Gloop. Glass or garolite won’t react to solvents that may be used to clean the adhesives off, like acetone or isopropyl alcohol, and Magigoo or PVA glue stick can be easily wiped off with some warm soapy water and a credit card or the rough side of a sponge. For other bed surfaces, adhesives can double as a release agent, ensuring that the 3D print doesn’t permanently bond to the surface below while still providing something for the 3D print to stick to. You can learn more about when adhesives should be used as release agents in some of the other bed surface sections.
Use adhesives for:
- PLA (Heated glass with PVA glue stick, Magigoo, or 3D Gloop)
- Nylon (Heated garolite with PVA Gluestick)
- ABS (Heated glass with 3D Gloop, Magigoo, or Nano Polymer Adhesive)
How to Succeed with Adhesives
- Apply adhesive in a thin, even layer across the entire bed.
- Refresh with additional adhesive periodically.
- Wipe the bed clean and reapply adhesive after significant buildup and use.
From left to right, PVA glue stick, MatterHackers Stick Stick, and Magigoo Adhesive Solution ready to be applied to a glass printing surface.
LayerLock Garolite
A unique build surface made using phenolic resin and fiberglass cloth pressed into a sheet, garolite has found its place in 3D printing as the build surface of choice for nylon based filaments. Other surfaces - despite being textured, made for 3D printing, or successful with seemingly all filaments - usually struggle to keep nylon locked to the surface for the duration of the print. Garolite doesn’t have that problem and is able to successfully hold onto nylon and nylon composites with ease. To increase adhesion for prints with smaller footprints, like the teeth of a gear, use a thin layer of PVA glue stick. Though it’s the ideal surface for nylon filaments, Garolite is a highly durable bed surface and is also compatible with PLA, PETG, TPU, TPE, ASA, and ABS.
Use a Garolite Bed Printing Surface for:
- Nylon (Heated with PVA Gluestick)
- NylonX (Heated with PVA Gluestick)
- NylonG (Heated with PVA Gluestick)
- NylonK (Heated with PVA Gluestick)
- PET and PETG (Heated with PVA Gluestick)
- RYNO (Heated with PVA Gluestick)
- PLA (Heated with PVA Gluestick)
How to Succeed with Garolite Bed Printing Surface
- Garolite sheet should be sized to your 3D printer’s bed size
- Attach with a Flexplate System or directly to heated bed plate using adhesive backing
- For additional adhesion, after cleaning garolite, use 220 grit sandpaper to rough up the surface.
LayerLock Garolite on a Pulse XE, one of the many bed surfaces offered in the Pulse's lineup.
PEI (Smooth)
Smooth Polyetherimide (PEI) is a popular build surface that is compatible with a wide range of materials. For most materials that it works with, PEI adheres strongly to the print when warm/hot, and releases the part when cooled. This ease of part removal is one of the best features of a PEI build surface. From 65°C for PLA to the 120°C for ABS, PEI works at a wide range of temperatures for an equally wide range of materials. Generally you can find PEI in two different forms: sheet and film. PEI sheets are significantly thicker than films and are usually applied to glass beds using an adhesive sheet like 3M 468MP. In general, PEI sheets aren’t intended to be flexed and instead rely on the releasing nature of cooled PEI. PEI films are what you’ll find on printers that have flexible build plates. PEI film is a durable surface, but a little too much aggression with a spatula (if it isn’t on a flexible bed) or other scraper tools increases the risk of a tear. Important note: TPU/TPE and PET based filaments have a tendency to bond to PEI permanently if your first layer is too close to the bed. Applying some PVA-based glue stick can help prevent this by acting as a release agent, rather than as a traditional adhesive.
Use a PEI Bed Printing Surface for:
- PLA
- PETG (with PVA glue stick as a release agent)
- TPU & TPE(with PVA glue stick as a release agent)
- ABS
- ASA
- HIPS
How to Succeed with PEI Bed Printing Surface
- Clean off periodically with isopropyl alcohol to remove oils left from your fingers.
- Scrub with fine steel wool (#0000 grade) when cleaning with isopropyl alcohol doesn’t increase adhesion.
Smooth PEI is a fantastic all-purpose bed surface that has the unique property of releasing 3D prints as it cools.
LayerLock Powder-coated PEI
Powder-coated PEI is a durable and versatile build surface made by coating flexible spring steel with a baked-on layer of PEI. The powder-coating process leaves a unique texture on the bottom of your 3D prints that hides any sign that your part was 3D printed. (Insert picture showing bottom surface of smooth PEI vs powder coated) Designed to be used on magnetic build surfaces, part removal is a breeze. Simply lift the build plate off the 3D printer’s bed, flex it, and the print should pop right off. The powder-coated surface is less susceptible to permanently bonding to PETG or TPU/TPE , but care should still be taken when printing those materials to avoid damage to the build surface.
Use a LayerLock Powder-Coated PEI Bed Printing Surface for:
- PLA
- PETG (with PVA glue stick as a release agent)
- TPU & TPE (with PVA glue stick as a release agent)
- ABS
- ASA
- HIPS
How to Succeed with PEI Bed Printing Surface
- Clean off periodically with isopropyl alcohol to remove oils left from your fingers.
- Adjust the first layer Z-offset for more or less texture on the bottom surface.
When you want to hide the fact that something was 3D printed, LayerLock Powder Coated PEI is a quick solution for excellent adhesive properties with a unique surface texture.
LayerLock Build Surface for Polypropylene
Polypropylene has some wildly useful properties - high chemical resistance, extreme resistance to fatigue, durable - but 3D printing with it can be very difficult. The main difficulty is due to it not adhering to any material other than itself. LayerLock Build Surface for Polypropylene is specifically designed to work with polypropylene and polypropylene-like filaments like OBC. Unlike most other build surfaces, this is a material-specific build surface. So, if you aren’t printing with Polypropylene or Polyethylene, you’ll want to look at other build surface options.
First layer height is critical when printing polypropylene. Too close and your part will be permanently bonded to the surface. Too far and it won’t stick well enough to successfully finish. Magigoo PP or SmartMaterials Smart Stick work well as release agents to help prevent your part from permanently bonding to your build surface.
Use a Polypropylene Bed Printing Surface for:
- Polypropylene (Heated with Magigoo PP, or SmartMaterials Smart Stick)
- OBC (Heated with Magigoo PP, SmartMaterials Smart Stick)
- Polyethylene (Heated with Magigoo PP, SmartMaterials Smart Stick)
- X-Strand PPGF (Heated with Magigoo PP, SmartMaterials Smart Stick)
How to Succeed with PEI Bed Printing Surface
- Clean off periodically with isopropyl alcohol to remove oils left from your fingers.

- Start with the first layer Z-offset further away from the build plate and lower it to the ideal height to prevent permanent bonding with the build plate.
A Polypropylene 3D print adhering to the LayerLock Polypropylene Build Surface.
Flexible and Magnetic
Some build surfaces are able to be flexed like painter’s tape, Buildtak, or PEI, which means if you apply it to a flexible spring steel sheet, you can bend it, tweak it, and flex it without worrying about creasing or breaking the applied surface. These spring steel sheets are also magnetic, which means you can remove the entire build plate from the printer, get a better angle at it, and remove the print without needing any sharp instruments to pry off your delicate 3D print. Being able to remove your build surface without modification means you can have several spring steel sheets on hand to swap to depending on the material at hand, ensuring you always have the perfect build surface for your materials. Some examples of these are the Buildtak FlexPlate System or the LayerLock MagBase.
Use a Flexible and Magnetic Bed Printing Surface for:
- Any build surface that can be adhered to a flexible spring-steel sheet.
How to Succeed with Flexible and Magnetic Bed Printing Surface
- Have multiple spring-steel sheets with different materials to easily swap filaments and change to a compatible build surface.
Spring steel is highly magnetic and bounces back into shape which makes it a versatile 3D print bed platform.
Buildtak
One of the most common 3D printing-specific build surfaces you can find is Buildtak. It has a slight texture to it to provide grip, and can be used at room temperature or at 110°C without issue, which makes it a great choice for printers with unheated beds or for the high temperatures needed for ABS printing. Make sure when you’re using Buildtak that you optimize your first layer distance, as some materials like ABS or PETG can weld to the Buildtak if you are printing too closely to it, resulting in small chunks being ripped out of the sheet, or even creating a tear that requires a replacement of the entire sheet. Buildtak is one of the more versatile bed surfaces in that you can use it with almost any material except for nylon, nylon based composites, and polypropylene, with the caveats mentioned previously.
Use a Buildtak Bed Surface for:
- PLA
- PETG (with a calibrated first layer Z-offset)
- ABS (with a calibrated first layer Z-offset)
- Flexibles
- ASA
How to Succeed with Buildtak Printing Surface
- Clean off periodically with isopropyl alcohol to remove oils left from your fingers.
- Adjust the first layer Z-offset based on the adhesive properties of the filament
- Replace Buildtak when more bed heat, cleaning, or adjustments do not improve adhesion.
Buildtak comes in many different sizes and can easily be cut down to size for your 3D printer's bed.
Kapton Tape
While it was one of the more common bed adhesive materials in the beginnings of desktop 3D printing, Kapton tape has become significantly less common than it used to be. The most common place you might find Kapton tape now is as part of a wrap for a heater block on some of the cheaper printers you can find. Kapton tape is basically a nylon based tape with an adhesive backing that helps evenly spread out the temperature of the build plate while serving as a replaceable build surface in the event of damage from a nozzle that was closer than it should have been. Application of kapton tape usually requires squeegeeing it on using some soapy water in order to limit bubbles, as this thin material is prone to bubbles if it’s applied dry and without care. Some printers you might find with Kapton tape are MakerGear and CraftUnique printers.
Use a Kapton Bed Surface for:
- PLA
- PETG (with Magigoo)
- ABS (with Magigoo)
How to Succeed with Kapton Printing Surface
- Place on build plate without overlapping (edge to edge).
- Push out any air bubbles during application.
- Clean off periodically with isopropyl alcohol to remove oils left from your fingers.

- Adjust the first layer Z-offset for more or less texture on the bottom surface.
- Let cool if parts are sticking too strongly after the 3D print has finished.
It's an older solution, but it checks out as a viable bed surface; most filaments will stick to this heat-conductive bed surface.
Painter’s Tape
The simplest of the bunch, using painter’s tape as a bed surface is as old as desktop 3D printing. While some of the less expensive printers you can find today may come with small rolls of cheap, tan masking tape, blue painter’s tape is more commonly used when that roll of masking tape runs out. Some users, and even our MatterHackers Pros, swear by blue painter’s tape and use it exclusively on their 3D printers. If you are looking to use painter’s tape, make sure you grab a roll of the cheapest blue stuff; the tan rolls don’t hold up nearly as well and the more expensive tapes are too gentle to grab onto prints well enough. Blue painter’s tape is best suited for PLA, PETG, or TPU and can be used with or without a heated bed. This tape is paper-based, so it will wear down and need replacing as spatulas, removed 3D prints, and nozzle gauges remove bits of it over time.
Use a Painter’s Tape Bed Surface for:
- PLA (unheated or heated)
- PETG (unheated or heated)
- Flexibles (heated)
How to Succeed with Painter’s Tape Printing Surface
- Place on build plate without overlapping (edge to edge).
- Replace frequently when torn or loses adhesive properties.
Painter's Tape is a reliable and time-honored bed surface that doesn't break the bank and is easy to replace.
Perforated
The perforated build plate is a thick mesh-like plate that filament is forced into for strong adhesion. By nature of extruding filament into the holes it does take considerably more force than other bed surfaces to remove the finished 3D print, but that proves that it holds strong while you’re printing as well - even with ABS . A caveat of using perforated build plates is that you have to use rafts in order for the print to be removable without damaging it in the process.
Use a Perforated Bed Surface for:
- ABS
- ASA
- Materials prone to warping
How to Succeed with a Perforated Printing Surface
- Scrape and remove 3D prints aiming tools away from your body and hands.
- Fine tune the Z Distance between the top of the raft and the bottom of the 3D print for better surface finish.
Perforated bed surfaces exhibit excellent adhesion at the cost of requiring rafts to be 3D printable.
There is an incredible variety in the different build surface materials that can be used for 3D printing. Some are tailor-made for specific materials and others are a good all-purpose build surface for your everyday 3D printing, but each of them is unique in their own way. Hopefully, with this walkthrough you have a better understanding of which build surface is the one you need for your 3D printer or your upcoming 3D printed project. Best of luck on whatever prints come your way; for all your 3D printing needs, bed surfaces included, check out MatterHackers. com.
com.
Happy printing!
Article Tags
- 3D Printing
- Firmware
- 3D Design
- MatterControl
- Press Releases
- Small Business
- Automotive
- E3D
- Jewelry Making
- Engineering
- Entertainment Industry
- MatterControl Touch
- ESD Materials
- NylonX
- BCN3D
- Open Source
- Crafty Pen
- Digital Fabrication Anatomy
- How To
- Hardware and Upgrades
- Tips and Tricks
- Weekend Builds
- Top Ten
- Education
- Tech Breakdown
- Women in 3D Printing
- Project Ideas
- Advanced Materials
- Reference
- Pulse Dual Extrusion
- Product Spotlight
- Aerospace
- Jobs
- Military & Government
- Multi-Tool Machines
- Getting Started
- Healthcare
- How To Succeed With Any 3D Printing Material
- Creality3D
- Architecture
- 3D Printer Reviews
- Hacker of the Month
Related Products
View all related productsIndustrial 3D printers for printing resin-coated sand for injection molds and polystyrene
SLS technology (Selective Laser Sintering - Selective Laser Sintering)
SLS 3D Printer Scheme for Polymer Coated Sand and Polystyrene
Technical parameters of industrial 3D printers SLS-PS
| Model nine0019 | SLS-500PS | SLS-1000PS | SLS-1200PS | SLS-1400PS |
| CO2 laser, Power W | 55 | 100 | 100 | 100*2 100*4 |
| Scanning system Dynamic focus nine0019 | 8 m/s | 8 m/s | 8 m/s | 8 m/s*2 8 m/s*4 |
| Print Layer Thickness | 0. 08-0.3 mm 08-0.3 mm | |||
| Print Accuracy | ±0.2mm (L≤200mm), ±0.1% (L>200mm) | |||
| Print chamber size mm nine0019 | X500 Y500 Z400 | X1000 Y1000 X600 | X1200 Y1200 Z600 | X1400 Y1400 Z500 |
| Powder supply | Two pistons on both sides | |||
| Print material | Color coated sand, polystyrene | |||
| Operating system | Windows XP | |||
| Software | HUST 3DP (independent research and development) | |||
| File Format | stl, online cuts in the process of formation, changing the layer thickness, scanning. 3D visualization | |||
| 3D printer dimensions mm nine0019 | X2070 Y1280 Z2080 | X2150 Y2170 Z3100 | X2350 Y2390 Z3400 | X2520 Y1790 Z2780 |
| Power supply | 3 phases, 4 lines with earth, 380V±10%, 50Hz | |||
| Working temperature | 18-25°С | |||
| Operating Humidity | Not more than 60% | |||
| Power consumption kW | 3 | 4 | five | 9/16 |
Catalog
Download >>> View >>>
Video
Related products
3D printer SLA-600
Industrial stereolithographic 3D printer SLA on photopolymer resin
Industrial 3D printers for metal printing using EBM technology
Equipment for the production of metal powders for 3D printers using induction vacuum melting and gas atomization
Industrial 3D printers for metal printing SLM nine0003
Industrial 3D Metal Printers LMD
Industrial 3D printers for printing with nylon (polyamide) and polypropylene powder
Industrial 3D printers for printing ceramics
Auxiliary equipment for additive 3D manufacturing and prototyping
Electroplating of 3D printed plastic models
Overview
In electroplating, a thin layer of metal is applied to the surface of a part grown on a Fortus industrial 3D printing machine.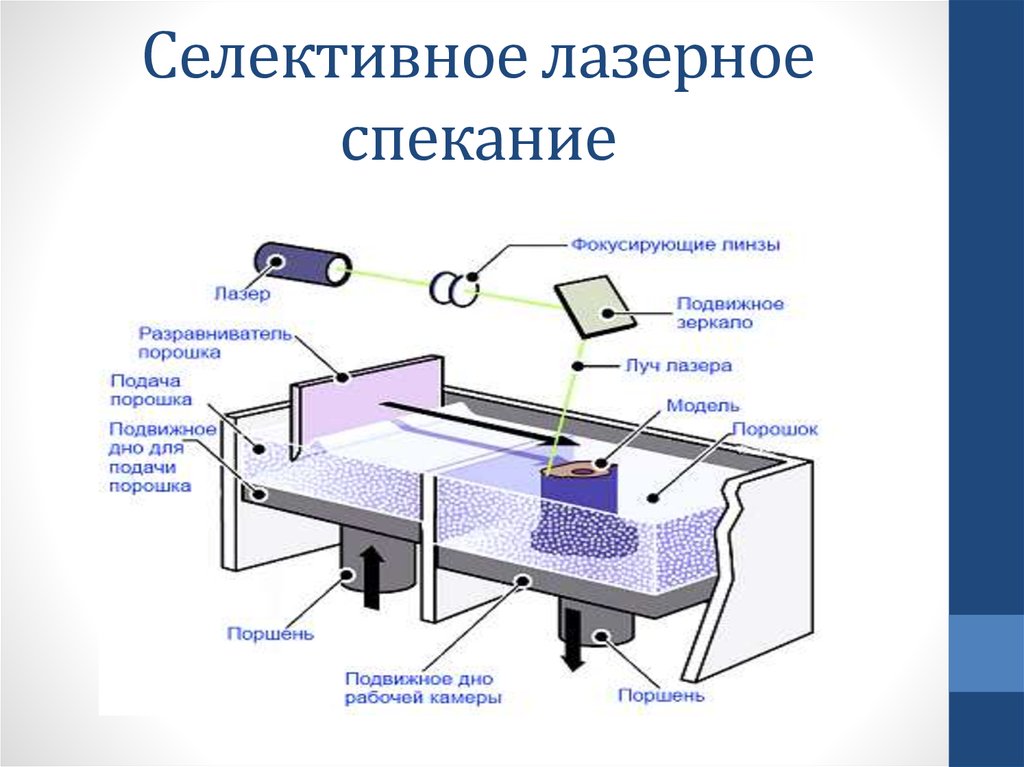 This metal coating can be both decorative and functional. The coating gives the part the appearance of a metal or plated product and provides a hard, water-resistant surface with reflective properties. Coated parts also have improved mechanical properties.
After a simple FDM finish, models are ready for metal plating such as chrome, nickel, copper, silver and gold. Combining the properties of the Fortus model materials with the properties of the metal coating results in a product with high strength, reliability and thermal resistance, which is ideal for functional applications. nine0003
Electroplating for increased durability
Electroplating not only improves the appearance of the part, but also provides a hard, durable surface and greatly increases the strength of the FDM part.
Test samples were made on a Fortus 3D printer with a print layer thickness of 0.127 and 0.254 mm. The thickness of the metal coating usually varies from 0.0025 to 0.508 mm. The test pieces were plated with a combination of nickel and copper, although typical plating metals also include chromium, palladium, silver and gold. nine0003
Testing by Aspen Research Corporation showed impressive increases in both tensile and flexural strength of FDM test specimens. Depending on the coating thickness and orientation, the tensile strength increased by 10-12 times compared to the original sample. The results for bending strength were even more significant. They showed an increase in this parameter by 21-24 times compared with the original sample.
To achieve optimum strength of plated specimens, the parts must be densified in the manner described in step 4. The coating process also requires that the prototypes be able to withstand temperatures of 37.7 degrees, which is well suited to the operating temperature range of FDM thermoplastics. nine0003
Process
Consult manufacturer for process specifics, expected coating thickness, temperature to be maintained and other variables. Select the correct material and adjust the part according to the supplier's specification.
1. Adjustment of the CAD file:
Offset the surfaces in the CAD model according to the thickness of the coating material. If there are any critical dimensions, such as holes or bosses, this must be taken into account when setting the parameters of the galvanizing process. nine0003
2. 3D printing FDM parts
The following materials have been tested - ABS-M30, ABS, ABSplus. All other materials have not been tested as they do not conflict with the requirements of the electroplating process.
3. Sanding the surface
After removing the support, sand the parts to remove build layers and stepped areas. At this stage, coarse sanding is sufficient. The smooth surfaces required for electroplating will be obtained in the following steps. nine0003
4. Surface sealing
The part must be sealed to prevent any substances from the galvanized solutions from being absorbed into it. There are three options for compacting an FDM part: surface smoothing with a Finishing Touch smoothing station, solvent dipping, and painting.
- Option 1: Finishing Touch
The first technology for smoothing the surface of a part is based on the use of the Finishing Touch station, which smoothes the surface by holding the part in an evaporating solvent for 15-30 seconds.
Smoothing in this way has been tested on ABS, ABSplus, ABS-M30 and ABSi materials. nine0003
- Option 2: Solvent immersion
The second technology, solvent immersion, smoothes the surface by immersing the part in a chemical bath for 15 seconds. The recommended solvent is methylene chloride solution from IPS Corporation. If this solvent is not available, then methyl ethyl ketone (MEK) will do.
- Option 3: Painting
The third technology, painting, smoothes the part by filling in the lines of the roughness of the layers. Spray on the part with sanding primer and let it dry. Then grind the part to the desired quality. Repeat if necessary. Remember, before applying a primer, you need to consult a specialist in electroplating. The primer can adversely affect and contaminate containers with galvanic solutions. Also, if the part is painted, it will be necessary to apply a conductive spray coating instead of using a traditional electroless nickel bath.
Placing a painted part in a bath can destroy the bath. If using option 3, you can go to step 7.
5. Part drying
Solvent remains on the part after the smoothing process. If electroplating is started before the solvent has completely evaporated, then the coating material will bubble and flake off the part. If the part is allowed to dry for at least 18 hours, the solvent will disappear. However, drying may take longer as the drying time depends on the geometry of the part. To speed up the process, the part can be left overnight in the oven at a temperature of no more than 43 degrees. nine0003
6. Re-sand the surface
Sand off any remaining streaks from the layers with wet sandpaper (500-1200 grit) and repeat steps 4 and 5. Repeat the smoothing and sanding steps until all defects are eliminated.
7. Electroplating
Send the part to the electroplating facility.