3D printer bath
Bath best 3D printing files・Cults
BURN BOOK BATH BOMB MOLD
€2.85
BURN BOOK SOLID SHAMPOO AND MOLD FOR SOAP PUMP
€2.85
LOVE (CHIHUAHUA) BATH BOMB MOLD
€2.85
LOVE (CHIHUAHUA) SOLID SHAMPOO AND MOLD FOR SOAP PUMP
€2.85
MOM BATH BOMB MOLD
€2.85
MOM SOLID SHAMPOO AND MOLD FOR SOAP PUMP
€2.85
LOVE BATH BOMB MOLD
€2.85
LOVE SOLID SHAMPOO AND MOLD FOR SOAP PUMP
€2.85
REX LOVE BATH BOMB MOLD
€2.85
REX LOVE SOLID SHAMPOO AND MOLD FOR SOAP PUMP
€2. 85
CALCIFER BATH BOMB MOLD
€2.85
CALCIFER SOLID SHAMPOO AND MOLD FOR SOAP PUMP
€2.85
3pc 3D Egg Bath Bomb Mold
€6
Gnome with hearts Bath Bomb Mold
€13.31 -30% €9.31
Deonico_deodorant_applicator
€2.40
Duck Nintendo Switch Stand
€3.99
3pc Easter Bunny Bath Bomb Mold
€6
1pc Easter Bunny Silhouette Bath Bomb Mold
€6
3pc Easter Egg Bath Bomb Mold
€6
1pc Easter Egg Bath Bomb Mold
€6
3pc Chick Bath Bomb Mold
€6
1pc Chick Bath Bomb Mold
€6
1pc Hatching Chick Bath Bomb Mold
€6
3pc Easter Bunny Bath Bomb Mold
€6
1pc Easter Bunny Bath Bomb Mold
€6
3pc Easter Bunny Bath Bomb Mold
€6
1pc Easter Bunny Bath Bomb Mold
€6
Wounded heart
€3. 80
80
BITCH SPRAY SOLID SHAMPOO AND MOLD FOR SOAP PUMP
€2.85
SQUIRTLE BATH BOMB MOLD
€2.85
SQUIRTLE SOLID SHAMPOO AND MOLD FOR SOAP PUMP
€2.85
XOXO BATH BOMB MOLD
€2.85
XOXO SOLID SHAMPOO AND MOLD FOR SOAP PUMP
€2.85
CHARMANDER BATH BOMB MOLD
€2.85
CHARMANDER SOLID SHAMPOO AND MOLD FOR SOAP PUMP
€2.85
SNOWMAN SOLID SOAP BATH BOMB MOLD PRESS
€1.43
TOASTER BATH BOMB MOLD
€2.85
3D TOASTER SOLID SHAMPOO
€2.85
STUPID CUPID HEART BATH BOMB MOLD
€2. 85
85
STUPID CUPID HEART SOLID SHAMPOO AND MOLD FOR SOAP PUMP
€2.85
STUFF HEART BATH BOMB MOLD
€2.85
STUFF HEART SOLID SHAMPOO AND MOLD FOR SOAP PUMP
€2.85
LICK IT HEART BATH BOMB MOLD
€2.85
LICK IT HEART SOLID SHAMPOO AND MOLD FOR SOAP PUMP
€2.85
I LOVE YOU HEART BATH BOMB MOLD
€2.85
I LOVE YOU HEART SOLID SHAMPOO AND MOLD FOR SOAP PUMP
€2.85
HUGS HEART BATH BOMB MOLD
€2.85
HUGS HEART SOLID SHAMPOO AND MOLD FOR SOAP PUMP
€2.85
Full Bathroom Remodeling (with the Help of a 3D Printer)
This is about one of my ‘long running projects’: I happily can report that the missing last piece has been installed after 16 months from the start of the project: the ‘3D-Printed-Supported-Driftwood-Bath-Tub-Shower-Gel-Holder’ 🙂 :
This is the ‘official finish’ of a complete bathroom renovation and remodeling. It has been a joint project with the help of friends, contractors, my family and my brother in law (who is an outstanding carpenter and cabinetmaker), plus the Ultimaker2 3D printer which contributed many ‘background and hidden’ features.
I invite you to a virtual time travel. I hope you enjoy it and get inspired….
I was not sure if I should share the details of this ‘build’. I asked James in the UK and he responded:
“and is it worth blogging? – certainly!!”
So here we go: Maybe you get some ideas if you are planning a similar project. Or if you are looking for a justification why you should buy and use a 3D printer (or laser cutter) if you don’t already have one?
The Plan
The idea was to build something which could be best described as ‘Scandinavian-Swiss-Alpine’ style. The plan to remodel the 20+ year old bathroom and make it more ‘modern’ started at the end of 2019, and the original plan was to complete it by the end of 2020. That was the plan. Reality was different. Doing things yourself does not necessarily accelerate things but is probably more rewarding. And the COVID-19 pandemic delayed contractor work for extra months too. Over the last months the project made steady progress and I consider it finished mid of May 2021.
I have done lots of construction work in the past, and for this one I needed and received help. I’m lucky to have an excellent carpenter and cabinetmaker in my family plus I had an excellent team helping with plaster, plumber and paver work (thanks again!). A 3D printer (Ultimaker 2) helped with around 1 kg of PLA and ABS material too.
The old installation and materials have been recycled and reused if possible. As much as possible local and natural materials have been used: For example, local wood (oak and pine tree), stones and clay plaster. Driftwood from the lakes nearby, oak wood from a local forest is used for the furniture and door. The ceramic tiles and slabs are from Italy (sorry, Switzerland seems not a good source for this). I have found high quality fittings from a manufacturer in Denmark. That freestanding bathtub is from a manufacture located in the next village just a few kilometers away. For the wall we used 250 Mio year old quartzite from the Swiss Alps. Not to forget that Menhir we found a few kilometers away from our home.
The old room concept and arrangement has been kept with some modifications. Best seen with ‘before and after’ pictures:
I used open and free tools for construction drawings (Inkscape) and software development (MCUXpresso IDE and SDK).
Inkscape drawings and plansDemolition
Wife: “Will it be noisy, or will you create any dust or dirt during that project?”.
Me: “No, honey, don’t worry, it will be all fine and well contained!”
Well, I was wrong. I hoped for the best, but the physics and the universe were unfortunately against me: it is very, very hard (well: impossible) to contain that fine dust. My daughter decided to move out of the house during the demolition days because it was that noisy. And I should mention the unintentional breakthroughs (pun intended!) and these “oh: why is this pipe here where I’m drilling?”. I guess these “ups!” are all part of the process and fun :-).
Below a few pictures from the demolition process:
Old bathtubBelow all the existing furniture has been taken out.
Old dual sinkold shower locationUps! just one of the unintended ‘break-through’ momentsPlumbing and Electricity
In the next phase electricity and water gets re-installed.
Ceiling
The wooden ceiling has been replaced with one using clay plaster. Clay plaster is excellent to absorb and slowly release moisture, perfect for a bathroom.
Below the electrical installation pipes for the ceiling lamps:
Then 20 mm sheets of clay mixed with straw get attached to the ceiling using wood screws:
Clay-Straw sheets attached to ceilingThen layers of clay plaster get put over them :
The last layer is a very fine white clay plaster applied and modeled with a brush.
Both the ceiling and the walls get covered with clay, except in the areas for the tiles and stone materials.
The clay plaster turns whiteish after drying, no paint needed. And the clay plaster is easy to fix or remodel afterwards: just add some wet clay plaster with a brush.
Ceiling Lights
The room uses RGBW LED (GU10) lamps and RGBW LED stripes, controlled with a wireless ZigBee and BLE network. A challenge has been drilling holes for the lamps into the clay-straw sheets: This is how my drill looked after a single hole, compared to what it looked before:
After drilling a single holeThat was the moment to buy a more expensive and tougher drilling equipment. That worked :-).
Because the clay-straw mixture is not very hard, inserting the lamps was messy and would damage the clay. Therefore, a 3D printed adapter and ceiling protector has been created:
Lamp hole insert (3D Printed)With the 3D printed holder everything fits nicely without touching the clay directly:
There are a total of 12 LED spots, each individually addressable with R, G, B, cold and warm white LEDs.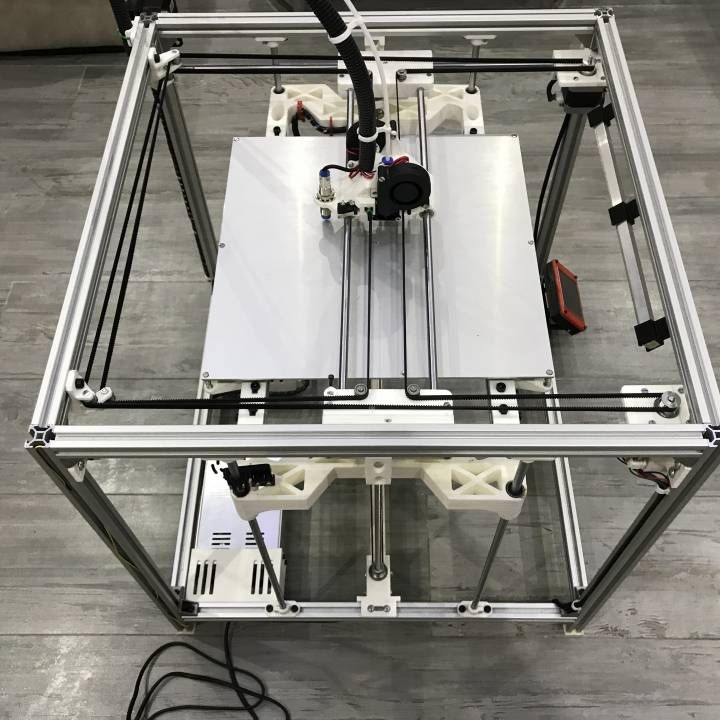 Each spot is dimmable, consumes a maximum of 6.5W, provides up to 250 lumen and covers the 2000-6500 K range.
Slabs and Tiles
For the floor and the shower, we used slabs and tiles from Italy. They are ‘artificial stone’ tiles and slabs, looking like slate, but much harder and easy to clean.
Floor tilesShower SlabYou might notice that hole in the picture above: this is for the laundry (more about this later).
The tiles look really awesome. And we all love that little ‘witch’ hiding in there:
The ‘Witch’ TileLight Switch
I installed ZigBee and BLE controlled LED lights. As light switch I am using an energy harvesting switch: with pressing the button it creates enough energy to send the wireless Zigbee telegram, so I don’t have to worry about batteries. Unfortunately the switch did not came with a mounting bracket, so I had to print one.
3D Printed Feller Mounting BridgeFinished wireless energy harvesting wall switchDoor
The door is made of the same oak tree as the other furniture in the room.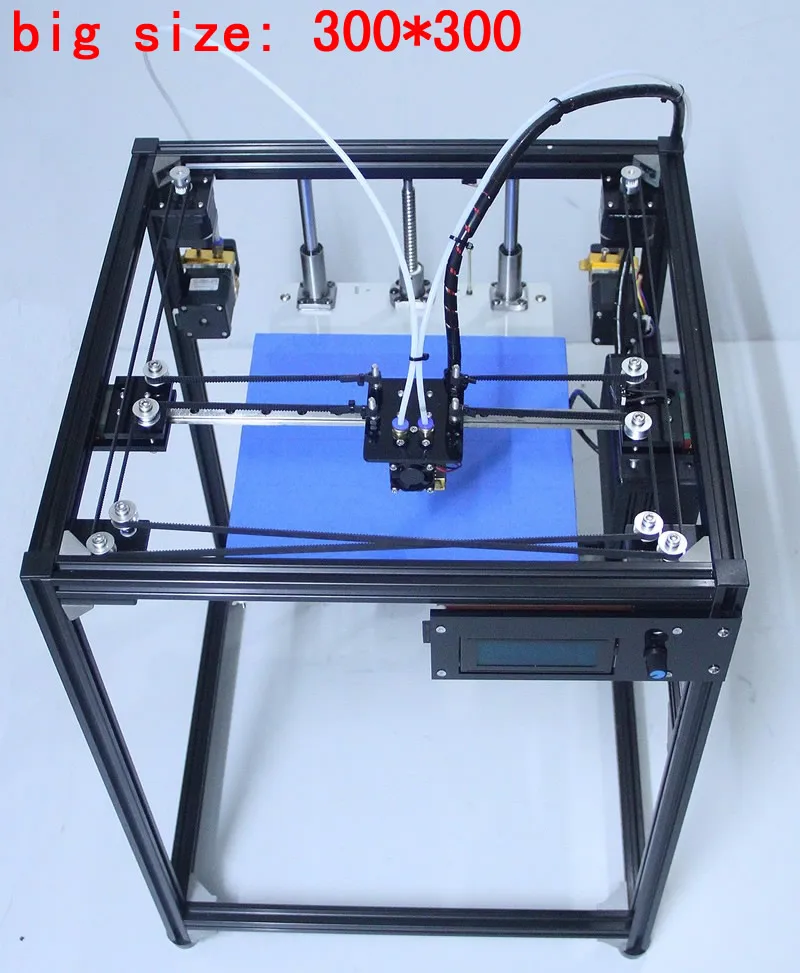
The old door was in place until the final stage of the remodeling. Finally, it was time to replace the old one:
Removed old doorThe room is monitored by a PIR sensor mounted on a 3D printed holder, attached above the door:
3D Printed PIR Sensor HolderPIR SensorWith the PIR sensor the light automatically turns on and off if there is no movement for some time. The installed rules for the sensor only turn on a dimmed (night) light during night hours.
Toilet
One idea was to cover the flushing water tank, and the same time having two small cabinets left and right of the toilet seat:
Both side doors feature an automatic ‘push-to-open’:
The cabinets are used to store the toilet paper, toilet brush and trash can. Or whatever fits.
Toilet Paper Holder
The paper and the paper holder are inside the oak wood cabinet. Because the cabinets with 16 cm are not wide enough to turn move out the paper holder, it has been placed inside. With this the holder had to be detachable. This was realized with a combination of metal plate, magnets and 3D printed parts:
The back side of the holder includes multiple strong magnets:
Magnets inside frameThe magnets get attached on the back of the toilet paper holder.
Another frame with a metal plate inside gets attached inside the cabinet:
Metal Plate FrameWith this, the holder with the magnets attaches to the metal plate and can be removed if needed.
With magnets attached holderPneumatic Flushing
Flushing the toilet water is with a small external plate outside the wooden cabinet:
Pneumatic Flushing PlateIt works pneumatically: pressing the plate creates a pneumatic pressure triggering the flushing. For this the ‘pump’ is connected by two pipes with the flushing system:
Pneumatic Flushing SystemTo mount the pump to the cabinet a 3D printed mounting bracket has been created:
Holding piece with brass nuts3D printed mounting case 3D printed enclosure and mounting case (laser cut)Assembled and connected pneumatic flushing pumpIt is the perfect hiding place for a Raspberry Pi server and gateway using the NXP K22FN512 (tinyK22) on top of it to read the sensors.
Brush Holder
The holder for the brush is 3D printed and attached to the inside of the door. Opening the door moves the brush out of the cabinet.
3D Printed HolderTrash can
It has been difficult to find a matching trash can for the size of the cabinet. At the end I transformed another brush holder into a trash can.
A special insert has been designed and 3D printed to hold the plastic bag:
The result:
As for the brush on the other side: opening the door moves it outside:
Side Cabinet
The side cabinet is made of the same massive oak wood as the other furniture.
Side Cabinet back sideThe natural wood oil and wax makes a huge difference:
Below it has been mounted on the wall:
On the back it has a power outlet (left). The one on the right is a blind cover.
Mirror Cabinet
A lot of thoughts went into the design of the mirror cabinet. I wanted to have good (RGBW) lights and the same time all the electronics hidden. The decision was to go with oak wood and special cut-outs for the LED lights. The light shall be indirect and no individual LEDs visible.
On the top there is the cut-out for the top LEDs. They provide up to 4800 Lumen (2200-6500K) with R, G, B, cold- and warm-white LEDs:
The holder and enclosure for the 6 LED stripes is 3D printed using white ABS, printed in multiple parts:
3D Models for printing top side LED stripesOn the back frame there is a small hole for the LED wire connector back to the wall:
On the bottom side three RGBW light stripes hide inside a slot to create a 3D printed high-density LED stripe. The bottom side is is able to provide 2400 Lumen.
End ConnectionDiffuserThe back is made with the same wood, with no screws visible:
There was no reasonable space available in the cabinets for the other electrical or electronic installation: so everything had to go into the back wall:
The holes needed a cover but due the limited space it only had to be 1 mm thick. Commercial covers are at least 5 mm, so I had to 3D print them. They are using a ‘snap-in’ mechanism, so no screws required.
As I did run out of white PLA, I used green PLA and painted it white afterwards. I did not worry much about the color as in the end everything will be covered by the furniture anyway.
The electrical connections and cables are all hidden.
With attaching the cabinet to the wall the cable is pushed inside the prepared space:
Each side of the mirror cabinet has a 3-plug electrical outlet installed:
Power OutletThe top LED light is covered with a glass for easy cleaning:
The bottom LEDs are well hidden too and create different light colors:
Chest of Drawers
The chest of drawers is made of the same oak tree, except for of the internal side panels:
We wanted to have it ‘all flying’ above the ground, but because we have to access the floor heating valves, we had to add one more drawer and a base to the floor:
Drawers Frame InstalledWith a cut-out there is access to the floor heating valves.
Unfortunately, it was difficult to open that door. So, two 3D printed door handles have been added:
That way it is easy to open and close the cover:
For double sink two holes get drilled into the top plate:
Double Sink HolesTo use a maximum of space, the drawers are as deep as possible. But this requires small cut-outs for the siphon:
These get closed with 3D printed covers:
The drawers and everything else are using hinges from Blum, including the drawer and box system. And yes: I considered adding servo support to doors and drawers: that would have been *really* cool! But my wife made it clear that she does not like that level of automation. So, I had to learn that there are certain limits for adding electronic gadgets to a bathroom. Oh, well….
I think it is still cool without the extra motors. I was successful with adding an LED stripe on the bottom of the chest of drawers. Yes, not necessary, but it looks sooooooo much better.
Shower
To make cleaning easy as our water is very hard, we used large ceramic panels with minimal joints. Basically three plus a smaller slab. With a linear shower drain at the front wall.
A challenge for the shower head was the lower ceiling:
The usual ‘rainforest shower heads don’t work here. The solution was to use this special shower head:
Shower HeadIt not only looks very cool, but it also works perfect as a shower head:
Below details of the shower fittings:
To make cleaning simple, there are no doors and the shower is 140 cm long. With this a single piece of glass is is used: 10 mm thick and a weight of 65 kg:
It is glued to the wall and bottom tiles. No screws, brackets, or other kind of support. To be honest, I was skeptical if this really works, but see for yourself:
PendelschlagtestQuartzite Wall and ‘The Rock’
For a long time, we wanted to use old/recycled wood for the wall behind the bathtub. After lots of back and forth we decided for a wall made of 250 Mio year old Valser Quartzite quarried in the Swiss alps.
It is a predominantly grey stone with shades of blues, greens, white and black. It totally looks different based on the light: from grayish to silverish up to golden and metallic. I think it is really hard to capture that with a picture, so you have to believe me that it looks very special and beautiful.
We used pieces of Valser Quartzite pieces with a height of 5, 10 and 15 cm.
The pieces are cut on the backside and split on the front side, creating unique shapes:
The other thing is that we wanted to have a freestanding bathtub. The question is what to use as bathtub spout? The ‘usual’ ones you can find really did not fit the design we had in mind. With the materials used (wood, stone, steel) we evaluated many ideas, and finally we had an idea: why not having some kind of mountain spring or fountain? To make a spout out of stone is not easy, but finally we had the idea to use a big rock or menhir for it. Everyone thought that we are crazy, and it is not feasible. I wanted to prove that it is possible.
The first problem was finding a suitable piece of rock. Together with my wife we visited many places, and we were about to give up. And then we have found the perfect rock in the neighbourhood! :-).
A stonemason had it in his exhibition, intended as a garden decoration. It has nice natural patina probably built up in hundreds or thousands of years. It had the perfect size and shape we were looking for. The stone kind is an ‘Alpen Diabas’, around 440 Mio years old, very hard with a grey-blue-greenish color and white veins. It has been there through the whole history of the Alps which are ‘only’ about 100 Mio years old. We thought that would be a perfect fit.
We asked to drill a hole for the water pipe and to deliver it to our home. The rock weight is around 400 kg, definitely a bit too heavy as carry-on item. We wanted to care about everything else.
Finding that stone was one thing, but how to get that 400 kg rock up the third floor where the bathroom is located? Solution: Asking somebody for help who has the right toys for the job 🙂
Part of the problem solved 🙂
The next step was to move it into the bathroom (yet another different story, but we made it):
To fit close to the wall, we had to remove part of the wall material:
Then moving the back of it to the wall. A critical moment was to check if all the calculations were correct, and if it would fit with the water pipe back from the wall:
It was pretty much a perfect fit, maybe off by one millimeter (uff!). 3D printed wedges fixed the pipe during the dry-out period of the glue fixing the pipe.
That whole thing took one full day: the remaining part was easy :-).
Behind the stone tiles there are two electrical dispatching boxes. To hide them they are installed behind a stone piece. A 3D printed cover with a magnet is used to keep everything in place:
3D printed protection cover with magnetic stone holderA metal sheet is glued to the back of the stone to keep it in place:
Making that junction box perfectly hidden:
Hidden Junction BoxBelow a picture of the finished wall with the rock:
Such a wall with broken stone faces is problematic for the water fittings, because there is rarely a flat surface. It was going well with the two fittings on the left below, but for one there was too much of a gap:
The quick solution was to 3D print a matching piece compensating for the differences:
With this the non-flat area was compensated and hidden behind the fitting:
Bathtub
The tub is one from Schmidlin, a Swiss factory specialized in steel bathtubs.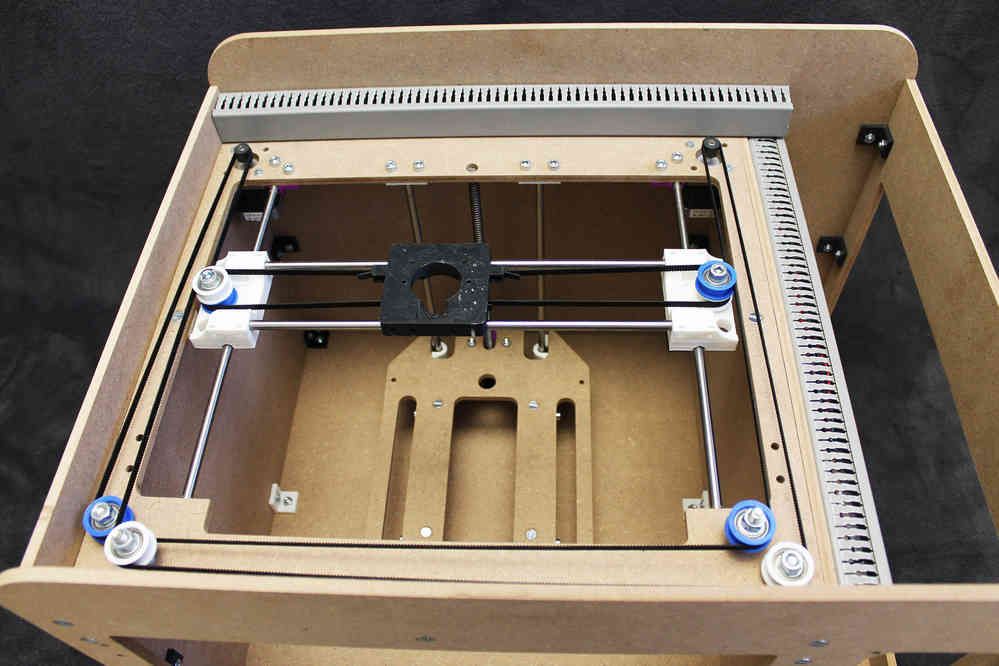 Getting the bathtub to the 3rd floor would be yet another story, but I skip that one. What counts is that we were successful ;-). Installation is rather easy: it gets placed on the floor tiles (with the drain connected). A narrow ‘noise isolation’ is between the steel of the tub and the floor tiles, then sealed with silicone.
Then filled the first time with water to check if everything is tight. After applying the silicone the bathtub stays filled for about 24 hours.
Everything worked out perfectly 🙂
Towel Warmer
The old towel warmer was attached to the floor heating pipes. As a consequence, it was only getting warm during wintertime. So we replaced it with an electrical one. It has four different heating levels plus an automatic-off timer.
The bars can be mounted on either side, and we decided for the following arrangement to have more space available for he towels:
Window Glass Tattoo
Another part of the project was to replace the old (dual-glass, plastic) window with a modern (triple-glass, oak-wood/aluminum) one.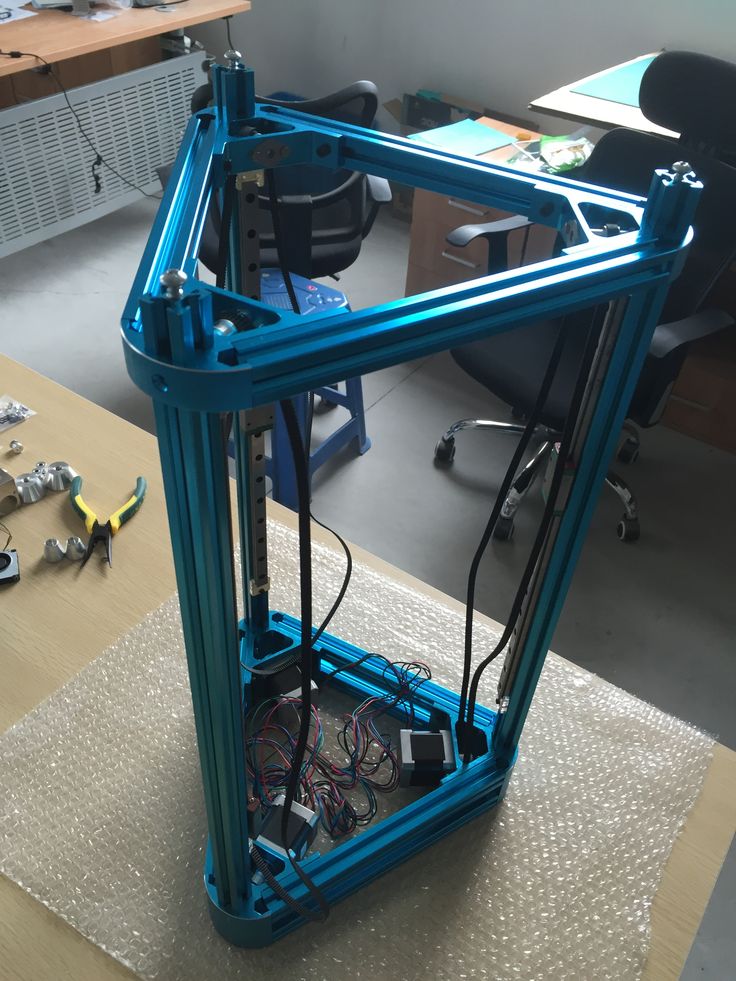 The old one was already pretty good in terms of energy efficiency, but the new one is much better.
The old window had full ‘frozen’ surface for privacy. For the new one we decided against this to have more daylight in the room. For privacy reasons we had the idea to add a ‘window glass tattoo’. We ordered online a custom printed glass tattoo with the picture of the Mythen mountain we see from our house:
It comes on a carrier paper and has a glue on the back. Application is with soap water.
The tattoo is semitransparent and is really looking cool (but very hard to get a good picture of it).
The material usually is used for shower glasses or large outside glass fronts. It works perfectly on a window and could be removed later.
Laundry Chute
Remember seeing that hole in the floor? It is for a laundry chute to throw down dirty clothes and linens to the laundry area in the lower floor. I covered the inside with a sheet of aluminum:
Then the top of is covered with a 3D printed ring (printed in three pieces):
To ‘hide’ the hole, we decided to go with massive pieces of oak log cuts:
They get placed above the hole and glued together:
The top cover is attached to the lower parts with a steel rod (see the hole below):
With this the top piece is turnable:
And no: it is not motorized, but I thought about it ;-).
Bathtub Caddy
And now about the last and final small piece: A difficult thing was to create something near the bathtub to hold shampoo and the like. The idea was to use a piece of driftwood, but to mount and fix it was difficult as I do not want to use screws and it shall be detachable. The solution was to use a 0.5mm steel sheet with two wood screws, in addition to the two 3D printed holders on the side:
Driftwood bottom sideThe wall on the side has narrow gaps between the stone pieces:
Bathtub side areaThe sheet perfectly fits into such a narrow gap:
Driftwood Bathtub CaddyDone 🙂
Summary
It has been a long journey and project, with surprises and many challenges.
I would like to thank everyone involved and helping with that long project and ‘make’. A big thanks goes to Marc Reichlin (demolition and clay work), Rolf Gasser (plumbing and water system), Bruno Schuler (stonework), Othmar Schuler (tiling and quartzite wall) and all their workers.![]() A special big ‘thank you’ to my brother in law Mugi Imhof and his workers for the outstanding wood work. They all provided their expertise to help us implement our crazy ideas, even the ‘impossible’ ones :-). And of course thanks to my wife for allowing me to implement a few gadgets and features :-)).
A special big ‘thank you’ to my brother in law Mugi Imhof and his workers for the outstanding wood work. They all provided their expertise to help us implement our crazy ideas, even the ‘impossible’ ones :-). And of course thanks to my wife for allowing me to implement a few gadgets and features :-)).
I hope you enjoyed the virtual tour! If you think you could use of any of the 3D models: post a comment or contact me directly. But maybe not right now: I’m going to take a long bath :-).
Happy bathing 🙂
Links
- Imhof Schreinerei: https://schreinerei-imhof.ch
- Reichlin Bau: http://www.reichlinbau.ch
- Gasser Heizung-Sanitär: http://www.gasser-haustechnik.ch
- Gasser Plattenbeläge: https://www.gasser-plattenbelaege.ch
- Schnüriger Naturstein: https://schnueriger-naturstein.ch/
- Schmidlin: https://www.schmidlin.ch/
- Valser quarzit: https://valsernaturstein.ch/
- Clay plaster: https://www.haganatur.ch
- Wandtatoo: https://www.
 wandtattoo.ch/
 - Ergon Ceramica: https://www.emilgroup.com/ergon/
- Vola: https://en.vola.com/
- Geberit: https://www.geberit.com
Like this:
Like Loading...
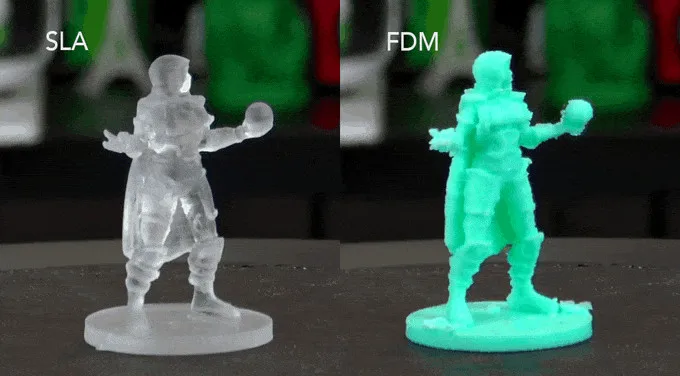
Overview of the 3D printer RK-1 / Sudo Null IT News
Hello everyone!
My name is Sergey.
Recently I got my hands on a 3D printer RK-1. It will be discussed in this article (+ assembly steps).
I cheated a little, of course. It didn't just fall into my hands, I made it myself. So if you have not lost interest, you can familiarize yourself with the material presented.
Let's start
Before doing anything, I, like many others, first create a 3D model of the device being developed. So it was with the 3D printer. nine0004
The housing consists of two parts. They are cut on a laser machine, bent on a bending machine and painted with powder paint.
Pre-assembled elements are installed in the housing (in the picture on the left):
- Y-axis
- Z axis
- power supply (eats: 220V 50Hz or 110V 60Hz).
 The printer consumes no more than 20 watts during operation.
 - wires (limit switches. 2 sets)
As a result, after assembly, everything looks like this:
The wiring sticks out in place of the panel:
The control board, with the exception of some elements, looks like this:
We finish with the mechanics. After assembling and hanging everything and everything, the printer takes on a finished look.
A standard computer cable is used for electrical connection.
Many of you know how important it is in a photopolymer printer, especially if the light comes through the bottom, to cover the bottom of the tray, and the tray itself too. nine0004
In the RK-1 printer, the tray is collapsible and consists of 4 main parts.
From left to right: side of the tub, plexiglass bottom, tub frame.
I would like to dwell on the anti-adhesion coating in more detail. Everyone knows that there is sylgard 184, I myself printed on it for the first time, there are Teflon (they are also fluoroplastic) films.
Moreover, siliconized films are also available. These are materials based on PET film, about 50 microns thick, with a silicone layer applied. They can be used too. You can take it here. By the way, A4 samples are sent free of charge. nine0004
In addition, there is also an anti-graffiti film (it is called orafol 5095). You can take it here. This is an adhesive film. Accordingly, the layer opposite to the adhesive has anti-adhesive properties.
Well, my favorite PTFE is transparent. His brand is F4MB. Produced in St. Petersburg. Googling easily.
Any other material? Write in the comments if you know.
All of the above anti-adhesion coatings have their advantages and disadvantages. If you are interested in what - write, I will answer. nine0004
The assembly order is as follows:
- take the bath frame
- put the plexiglass bottom into the recess
- on the bottom we install anti-adhesion film
- on the film we put the edge of the tray
- screw in and tighten the screws (tighten the frame of the bath and the edge)
- Advantages of this approach: you don't have to change the entire bath.
 Coverage only and/or if you damaged the plexiglass. You can use your materials. nine0025
Let's move smoothly from the bath to the platform. To do this, look under the lid. It rises with a simple movement. In the open position, it does not fall on the head.
The platform is fixed with a gimbal (so that the tub can be aligned parallel to the bottom of the tub).
Close up, the installed gimbal looks like this. The white bracket is the handle. To remove, it is necessary to wring out the wing screw and pull the suspension towards you.
At the bottom of the platform there are special grooves for removing the photopolymer when the platform is lowered to the bottom of the bath.
Control panel:
Printer operation
It is most convenient to get acquainted with the work on the printer using the video.
Software description. RK-sliser
About how to prepare a UE (control program) for a printer, what settings are important and what are needed, the video will tell you better than anything.
Start printing from start to finish...
Last video in this article. About how to prepare a model for printing, how to prepare a printer for printing, start printing. You can find out more about this below.
Printed examples
Well, you have reached the most interesting part. To the mini-gallery of printed products.
Ring
Screw
Ring
Left - layer thickness 0.08 mm, right - 0.04 mm. nine0011 Head
Propellers
Lock If you have any questions - write in the comments, I will be happy to answer.
Consumables and spare parts for 3D printers
| Product | Art. No. | Designation | Cost | ||||||||
| HARZ Labs NEW | |||||||||||
| Photopolymer | HARZ Labs Model Resin, gray (500 gr) | $4,200 | |||||||||
| Photopolymer | HARZ Labs Model Resin, black (500 gr) | $4,200 | |||||||||
| Photopolymer | HARZ Labs Model Resin, white (500 gr) | $4,200 | |||||||||
| Photopolymer | HARZ Labs Model Resin, cherry (500g) | $4,200 | nine0257 | ||||||||
| Photopolymer | HARZ Labs Model Resin, clear (500g) | $4,200 | |||||||||
| Photopolymer | HARZ Labs Model Resin, white (1000 g) | 7,000 rub. | |||||||||
| Photopolymer | HARZ Labs Model Resin, cherry (1000g) | 7,000 rub. | |||||||||
| Photopolymer | HARZ Labs Model Resin, transparent (1000 g) | 7,000 rub. | |||||||||
| Photopolymer | HARZ Labs Model Resin, gray (1000 g) | 7,000 rub. | |||||||||
| Photopolymer | HARZ Labs Model Resin, black (1000 gr) | 7,000 rub.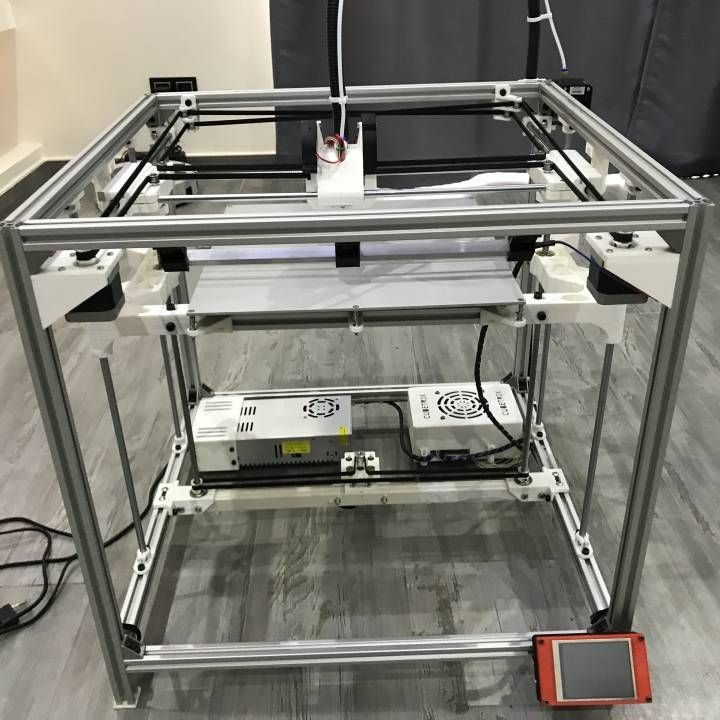 | |||||||||
| Photopolymer | Photopolymer HARZ Labs Dental Sand (A3), beige (500 gr) | $7,380 | |||||||||
| Photopolymer | Photopolymer HARZ Labs Dental Sand (A1-A2), beige (500 gr) | $7,380 | nine0269 | ||||||||
| Photopolymer | Photopolymer HARZ Labs Dental Sand (A1-A2), beige (1000 gr) | $12,300 | |||||||||
| Photopolymer | HARZ Labs Dental Yellow Clear Photopolymer (1000 g) | $10,700 | |||||||||
| Photopolymer | Photopolymer HARZ Labs Dental Pink, pink (1000 gr) | $8,400 | |||||||||
| Photopolymer | HARZ Labs Dental Peach Resin, peach (1000g) | $8,400 | |||||||||
| Photopolymer | Photopolymer HARZ Labs Dental Clear, transparent (1000 g) | $12,300 | |||||||||
| Photopolymer | HARZ Labs Dental Cast Cherry, Cherry (500g) | $4,800 | |||||||||
| Photopolymer | Photopolymer HARZ Labs Dental Cast Cherry, cherry (1000 g) | 8,000 rub. | |||||||||
| Photopolymer | Photopolymer HARZ Labs Basic, red (1000 gr) | $5,500 | |||||||||
| Photopolymer | Photopolymer HARZ Labs Basic, red (500 gr) | $3,300 | |||||||||
| Phrozen | nine0257 | ||||||||||
| Spare parts | Film for Phrozen A4 printers | 1,500 rub.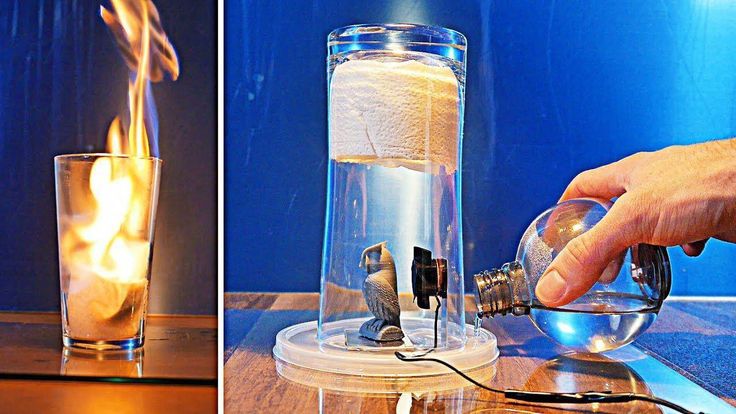 | |||||||||
| Spare parts | Film for printers Phrozen Transform | $1,900 | nine0257 | ||||||||
| Spare parts | Tray for Phrozen Shuffle XL/XL 2019 printer | $7,500 | |||||||||
| Spare parts | Phrozen Shuffle 2019 Tray/Shuffle 4K/Sonic/Sonic Mini, pcs | $5,100 | |||||||||
| Spare parts | Tray for printer Phrozen Transform Standard | $18,500 | nine0257 | ||||||||
| Spare parts | Plastic tray for Phrozen Shuffle 2019/Shuffle 4K/Sonic/Sonic Mini printer | $1,900 | |||||||||
| Spare parts | LCD Display 5. |