3D printer backlash
What Is 3D Printer Backlash? How Can You Fix It? – 3D Printerly
Factors that affect backlash are very important to take care of and I’ll explore the reasons why in this article.
The best way to fix 3D printer backlash is to tighten up any loose belts and make sure they are in good condition. If your printer has the relevant software, adjust backlash speed to 1500mm/s then trial and error from there. X & Y backlash settings should be between 0.2-0.6mm & 0.4-1.3mm respectively.
There is more to the backlash setting, from understanding what it actually is, to learning how to properly fix it. This article will aim to explain both of these to you so you can solve any backlash issues.
What Is 3D Printer Backlash?
Backlash is not a very well-known term in the 3D printing world or very well understood, so I’ll give you a simplified definition of it.
Backlash is the necessary correction for the looseness or slack in the moving system of your X and Y axis. It can also be referred to as the amount of play between the lead screw and the nut that runs through it to the Z-axis.
As you know, when your 3D printer is extruding material, the print head is vigorously moving on the X and Y axis in different directions, as per the software’s command, following the digital file you have put in.
Your G-Code is in control of these movements which are extremely precise, which is why 3D printers can display such high quality.
Now that drive is well controlled by different rods and belts, which provides flexibility to the head of the print.
The problem of backlash comes about when the movement in the system has slack from moving parts such as rods, belts and bearings. The parts that are flexible are the worst because they very slowly change in their flexibility over time.
After some time, that extra flexibility will have an effect on the precision of your 3D printer.
A good clue into identifying backlash is when infill diagonal lines don’t meet up with the perimeter lines.
The video below goes into more detail about backlash, as well as explains how to use the backlash tower to calibrate backlash.
Backlash Tower
Backlash Explained in Real Life
Let me give you a practical example of how backlash applies.
Imagine you are standing still and I tell you that you have to step backward and then come back to your original spot.
The chances of you stepping back and coming forward to the exact spot that you were on are very thin. Similarly, your 3D printer can have a hard time going back to the same spot.
The print head moves backward and then tries to come back to the original spot, however, it may miss just by a very small difference depending on the flexibility level of the belts on the 3D printer.
This is where the backlash comes in, adjusting the flexibility of the belts to correct the flexibility and make sure the head of the print comes back exactly where it was before, to ensure high quality prints.
Bad cases of backlash can easily result in print imperfections like gaps between walls, especially in circular objects.
Fixing the Backlash of Your 3D Printer
It’s important to know, many 3D printers don’t usually experience backlash. The M3D printer is one that is known for having backlash and its software even allows you to adjust for backlash compensation.
There isn’t always a backlash setting that your 3D printer can adjust, so how do I stop backlash from happening?
Your belts are usually the main culprit for backlash effects, so a good tightening of your belts should help a lot. If your belts are worn out, a replacement might be in order to get your high quality prints back.
Speed is one of the main factors where backlash will show itself.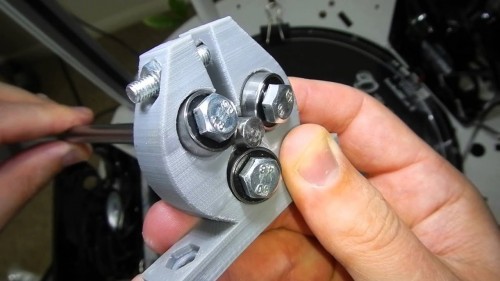 Your jerk & acceleration settings also contribute, so keeping these at a low level should help reduce backlash.
Ideal jerk & acceleration settings are. I wrote a whole article just on getting jerk & acceleration settings perfect which you can feel free to check out.
If the stuff you are about to print is a circle in nature, it becomes a must for you to set your 3D printer for the backlash setting so that there are no visible gaps in your circle and the shape of your circle stays perfect.
Muele designed a Quick Test Cylinder on Thingiverse to quick check your 3D printer backlash. There is an added version which has a flat spot, making it easier to identify the orientation after you remove it from the print bed.
Update: Added a version with a flat spot to make it easy to identify the orientation after removing it from the build-plate.
Changing Steps Per mm
You may have to adjust the motor speeds for your 3D printer to compensate for backlash issues.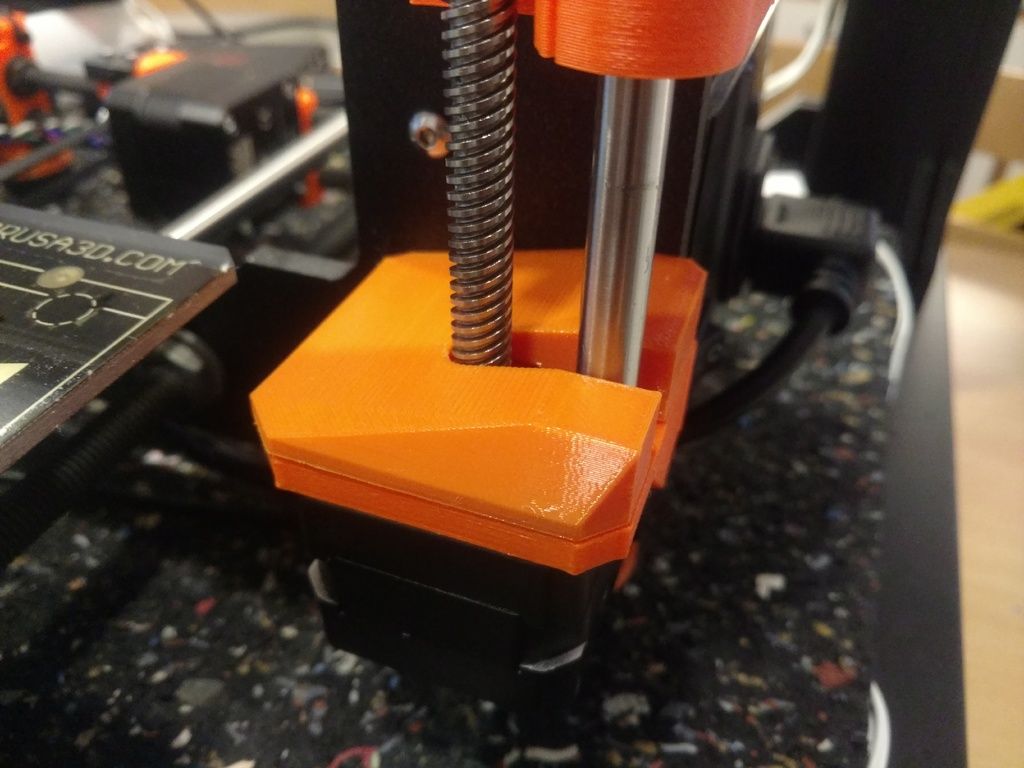 This is done by changing the steps per mm for X & Y in the firmware.
Follow these steps:
- Send an M92 command in your GCode header or – M92 X78.74 Y78.74 or,
Set it permanently in firmware by issuing:
- M500 stores current settings
- M501 retrieves the data from EEPROM
- M502 reverts to the ‘factory defaults’
From RepG/Printrun etc, send M501 to view what they are currently
- Print something which is 100mm x 100mm
If your Y setting is currently 75, while your print comes out as 85mm in Y direction, you need to calculate a new Y.
It would be 75 * 100 / 85 = 88.235
Now you would send:
M92 Y88.235
M500
Doing the same for X should leave you in a good position for your backlash.
How to Install an Anti-Backlash Nut on a 3D Printer
You can install an anti-backlash nut on your 3D printer by using something like the Z-Axis T8 Anti Backlash Spring Loaded Nut from Amazon.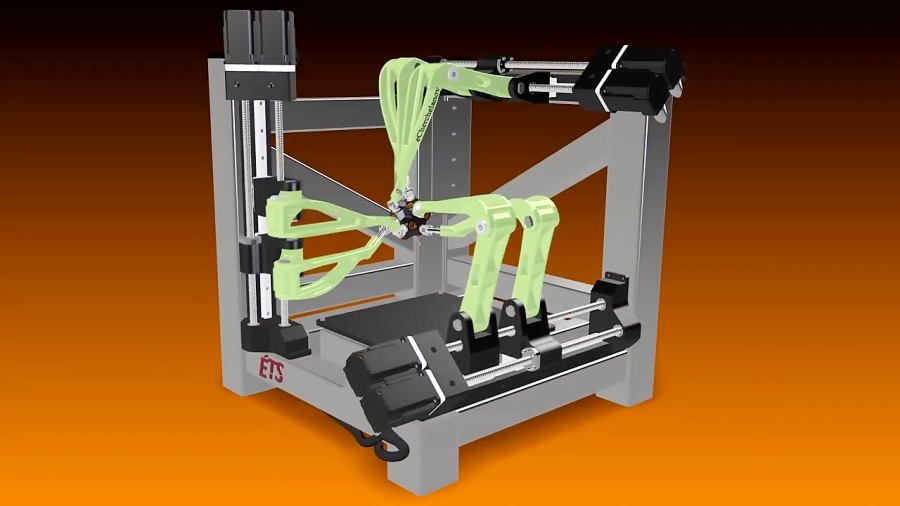 Users have mixed reviews on the product though, with some saying it worked perfectly and others mentioning that it is difficult to thread properly.
One user said that it really helped with the backlash on the Z-axis, also improving layer adhesion.
Check out the video below on this product by BV3D on YouTube.
Backlash Settings in 3D Printer
Frankly, you can control the backlash setting of your 3D printer manually through changing its speed or simply controlling the backlash along the y and x-axis.
However, the Y axis can prove to be difficult to adjust as it is controlled by belts instead of rods which are rigid and allows for only as much fluctuation as given instructions on.
Once you have adjusted the speed, you can ensure that there are no skipping occurs that causes gaps. Remember, the higher the speed of the backlash, the more chances are that gaps would form.
You may also have to play around for a while with the settings to get the exact outcome you desire, as every printer differs from others.
The speed of the backlash that is recommended to avoid any gaps and deformation of the circle shape is 1500mm only.
Now that we know what’s going on, let us see how can we make the settings right on our 3D printer;
So, are you wondering what exactly you have to do to make sure your 3D printer is well-equipped in the field of backlash? Well then, remember that you need to have the following backlash settings done.
Your X-axis backlash should be 0.7mm.
Your Y axis backlash should be 1.03mm. And the speed of your backlash, as mentioned earlier, should no more than be 1500 mm.
Please note that these settings are only for one printer. Your printer’s setting may not be the same, and you may not get the same results. Therefore, you need to check with your printer by following my simple steps.
Step by Step for Backlash Setting
To attain the settings mentioned above, follow my step-by-step guide so that we are on the same page, and you don’t get lost in the middle of the process.
Now, in the advanced calibration setting, you would have the option to set your x and y-axis measurements.
Depending on what 3D printer you have, these backlash settings can vary. Some printers may need more of a correction to solve a backlash issue to trial and error would be needed. The level of flexibility of your machine will vary from printer to printer.
Remember that the aim of setting your backlash setting is to have a perfect circle, with no gaps whatsoever. So, therefore, with a very composed mind, you have to keep changing the adjustments until you have a perfect circle shape.
I would suggest you to remember those measurements for later use also as if you plan to use the same 3D printer even in the future, it is very likely that you will have to make the backlash measurements again.
However, with time, your 3D printer’s belt and rod may lose its flexibility and become loose, so make sure you keep your printer well maintained to get the best result out of it.
T8 Anti Backlash Spring Loaded Nut
ShenZhen Creativity Technology Co.,Ltd Description:
Creativity is an innovative high-tech enterprise specializing in 3D printer design, R&D, production, sales, spare parts and 3D printer related derivatives. The company is committed to the development and innovation of the 3D printer market for individuals, families, education, The company provides an efficient and affordable 3D printing solution to meet each customer's requirements for efficiency, quality and rapid prototyping.
Extended keyword:Creativity
3D printer,I3 3D printer,Core XY 3D printer,3D printer motor,Stepper motor,17HS4401,17HS4401S,NEMA 17 Motor,NEMA 23 Motor,Stepper motor dirver,3D printer accessories,3d printer parts,Bearing,Coupling,Extruder kit,Titan extruder,CR10 extruder,MK8 extruder,nozzle,MK8 nozzle,E3DV6 nozzle,MK10 nozzle,Throat,PLATO 170,3D TOUCH,BL TOUCH,LERDGE,Automatic leveling,PTFE tube,Heating aluminum block,100K Line,E3DV6 Kit,GT2 Kit,Motherboard controller,motor driven,Heat resistant tape,Linear Bearing,LCD2004,A4988 stepper motor driver,Drv8825 stepper motor driver,T8 lead screw,E3D J-head,Pulley&Timing belt,Drag Chain,The Radiator,Linear guide,3D printer supplies,PLA filament,ABS filament,PLA,ABS,3D printer hot bed,3D printer fan,3D printer nozzle,3D printer power supply,3D printer motherboard.
Description:Creativity is one of the most professional 3D printers and accessories from China. The exclusive development of two-color 3D printers and Core XY3D printers are well received by users around the world; we are committed to being your most trusted supplier,Our's will use the best deals price is for you and one-stop service.
1.About us:
ShenZhen Creativity Technology Co.,Ltd is a one-stop service provider for 3D print production, R&D, sales, accessories and 3D print-related derivatives from China.
Creativity All of Our's 3D printers and accessories products provide global (custom, design, proofing)
2.Contact:
E-mail: sales#Creativity3Dprinter.com,Please use # after replacing it with @.
3.PAYMENTS:
We accept the following payment methods:
Escrow,T / T in advance, Paypal, Western Union.
If you have any other terms, pls contact us.
4.Long Time Warranty:
We offer 90-365days warranty on all items. Parts can be returned for replacement or refund during the warranty.
Items will be tested before shipment.They will be in good condition.If there are some problems with the items, feel free to contact us.
Please kindly contact us before returning any products. All returns must be made within 90 days from this shipment date. Return must be in new condition(the SAME CONDITION as it was sent to you).
5.Fast SHIPPING:
Parts would be shipped out within 1-7 working days.
If you don't have an account with any courier, we can help you to prepare the transport on our side and prepay the shipping cost here. We can ship our parts by DHL, UPS, FedEx, TNT and etc. to most places of the world. If you prefer any other shipping ways, please tell us and we'll check if it is available. We will ensure the lowest shipment cost.
6.CUSTOMS DUTY & HANDING FEE:
Please kindly note that our price is EXW price, not including shipping fee or handling fee.
When parts arrived at your local custom, if the parts were charged customs duty, we do not responsible for any custom duty or import tax.
7.CONTACT US:
Our office hours are 9:00am-12:00am ; 1:00pm-6:00pm China HK working time.Monday-Friday, except holiday.
All E-mails would be answered within 24hours, Trademanager would be answered within 5minutes.
Please don't be discouraged if your email is not answered during non-business hours.
We are closed weekends, so if you email us on Friday, we may not get back to you until next Monday.
If you have any issues, please CONTACT us before leaving negative feedback, we reply email in 24 hours.
8.Domestic Cooperation:
We can be your native partner in China with our one-stop supply capacity. If you're in China, you're welcome to give us an investigation.
Creativity will make sure give you 100% satisfactory answer. Choosing Creativity is you right choice.
Thank you for visit.Should you have any queries, feel free to call or e-mail Our's.
Eliminate table backlash.
Technical
Subscribe to the author
Subscribe
Don't want
30
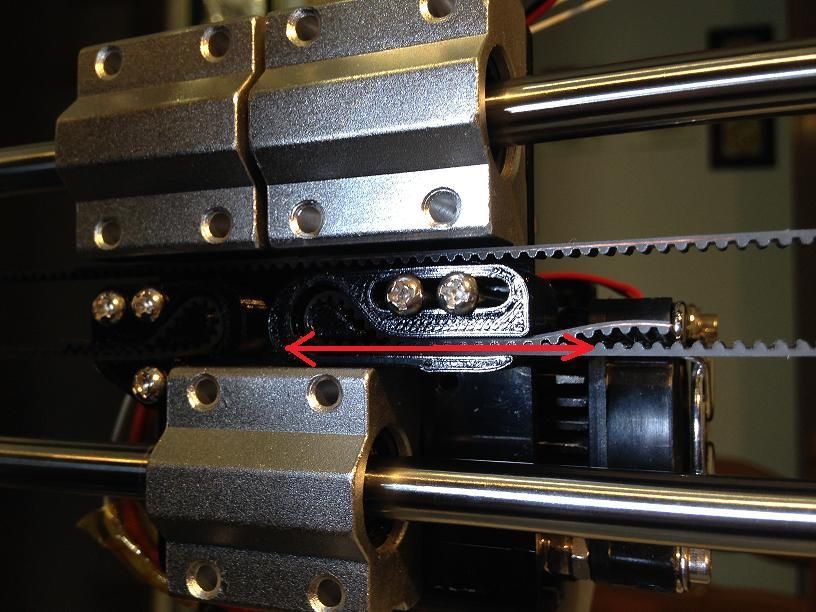
Budget printers are almost always based on shafts with linear bearings, like on my Anet A8.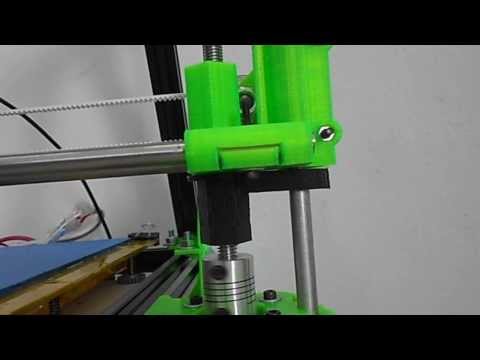
Often on the net I come across reports that this or that linear bearing is sticking / crunching. Of course, you can also use rails, upgrade the entire printer on them, so to speak. That's just it will already be Prusa 4 and the prices and quality of the guides will still have to be chased. But you and I are here not going to throw money on aliexpress, but collective farming in black =)
After running about 600m of plastic and running time for about a week, I began to be confused by the crunchy sound from the far end of the table. Having localized the source of the sound, I came across this comrade:
The clip loosened and the bearing itself bit when heated after 40 minutes, from the operation of the printer.
Without thinking twice, I got into the net to look at the solution to the problem and replace all the table bearings with others. What other options are there? - right - Linear rolling bearings.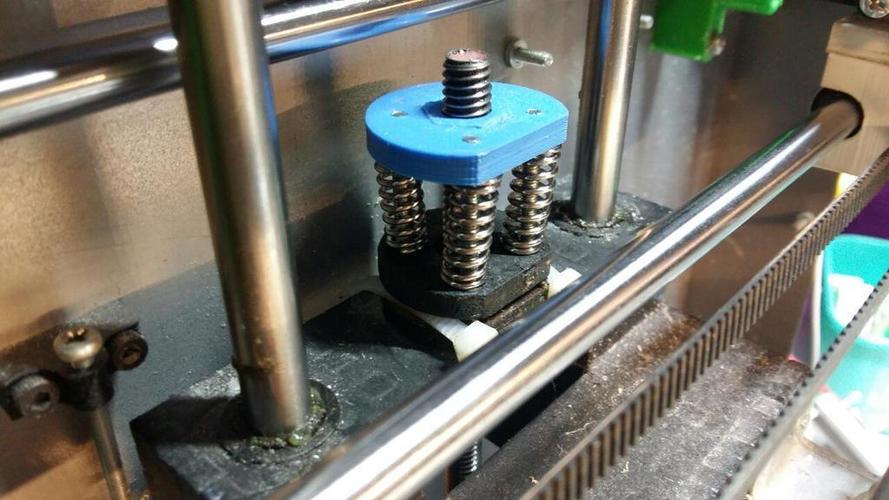
On singverse I found several options that did not suit me much:
For adjustment, there is an oval hole in the seat of one of the bearings. However, over time, I realized that the bearing can become loose and the clamp loosen.
Here the author has already taken into account the possibility of clamping with two screws from above. However, the model was under the size of bearings 623zz and I only had 624zz available. Well, it's not the time to get upset, I decided to use a CAD system to throw a model like this:
In pursuit of dimensions, I had to reduce the height of the bearing as much as possible and make a clamping mechanism on a ratchet. Printed and inserted bearings:
And everything would be fine, but the ratchet was constantly in tension and strove to jump into a more relaxed state, violating the whole concept. I did not want to do a vertical clamp because of the small space to the frame [but then I had to file one horseradish]. As a result, after a bit of sitting and thinking, I threw on the second model with a side clamp of the upper bearing:
Here I could already insert the screws through two walls and pull them off, thereby tilting the upper bearing as needed. But I didn't use them. it is sufficient to retract the thin side and preload the bearing. [and no, it doesn't relax when warmed up].
As a result, I converted the table to them:
- why glossy
- but because gladiolus acetone
The frame had to be filed anyway, size 624zz required 5mm of space.
As a result: the table now rides on such bearings. There is no backlash from the word at all.
When I set the table according to the level, I already forgot [no, Z of the table does not go away when the bearings warm up, no, it does not play, but how? yes, like this, I don't know, ask ABS why it doesn't expand =) ]
I'm posting models, in case they come in handy. And in general, anetovody, immediately print and put yourself such bearings. must-have.
Final version of yf 624zz: http://mixedspam.ru/content/3d_models/sc8uu/sc8uu_v1.STL + http://mixedspam.ru/content/3d_models/sc8uu/sc8uu_v2_2.STL Triple sprocket under 623zz https://www.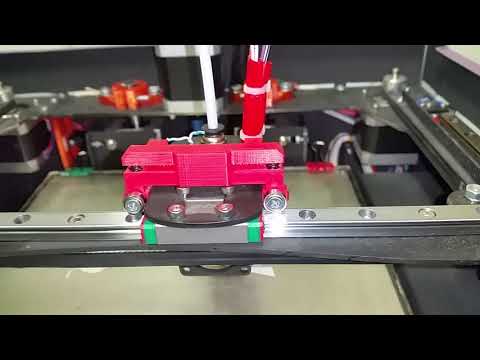 thingiverse.com/thing:1424346 With vertical clamp, at 623zz: https://www.thingiverse.com/ thing:2043585ps. but in general it would be correct to use two such bearings on one side of the table, and on the second side one, in which the shaft is pressed only by bearings from above and below, in order to avoid thermal expansion of the table by
 fat wide
Subscribe author
Subscribe
Don't want
30
3d printer maintenance
3DPrintStory 3D printing process 3d printer maintenance
3d printer, like any other piece of equipment, needs maintenance. And if you haven’t done it until today, it’s better to start right after reading this short article.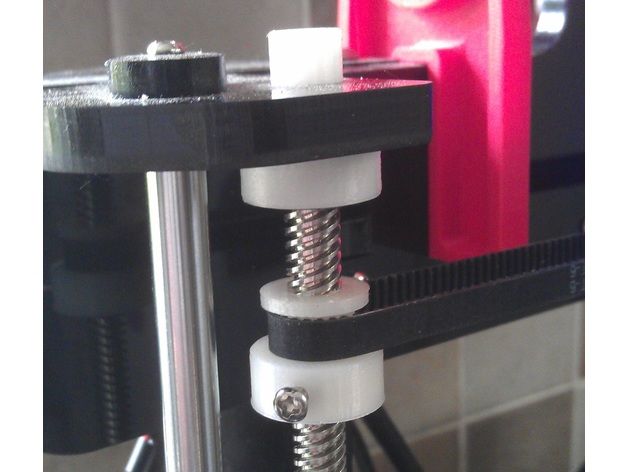
I won't categorize maintenance into daily, weekly, or monthly because each of you types at a different rate. For someone, a 3d printer can stand turned off all week, while for someone it works 24 hours a day. Therefore, to a greater extent, you yourself have to determine how often you will carry out maintenance on your 3d printer.
Have you ever heard of preventive maintenance? This is one of the pillars of the concept of general equipment care, the essence of which is that after the equipment has been used for a certain period of time, preventive inspections, various types of scheduled repairs and revisions are made, excluding the possibility of equipment operation in conditions of progressive wear. So you and I, as owners of one piece of equipment or a whole fleet of 3d printers, must track down the precursors of major malfunctions - whether it is extraneous noise during printer operation or an unscrewed screw.
Technical inspection of the 3d printer
Therefore, the first thing we will talk about today is the control and inspection of the 3d printer components to identify deviations that lead to breakdowns, which in turn can lead to equipment downtime.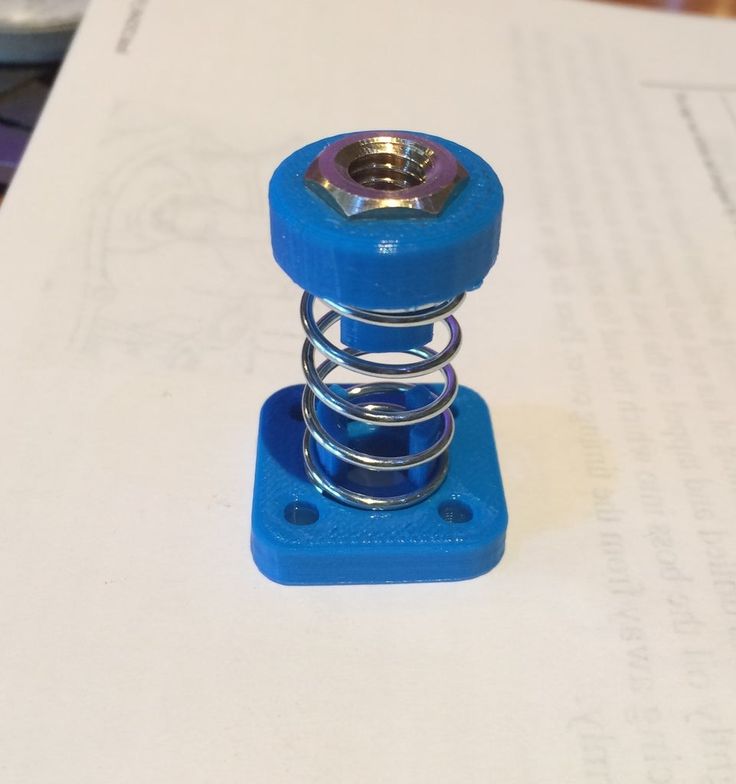 What should you pay attention to first of all?
Extruder. It is worth checking it for leakage of the plastic melt and the nozzle-cylinder interface, so the accumulation of polymeric material can form either from above or below the heating block. In case of detection, at least pull the nozzle, or rather, disassemble and clean all elements from polymer material. By noticing the leaking nozzle in time, we can prevent the failure of the thermistor heaters.
From the extruder, move on to inspecting the kinematics. First to the shafts. Be sure to control the appearance of wear on the shafts, as it often happens that the user does not notice that the linear bearing is wedged, and corresponding marks, scuffs appear on the shafts. Up to a certain point, or rather, depth, they can be removed by grinding, and then not. Therefore, the sooner such wear is diagnosed, and the linear bearing is replaced, the less likely it is to get an expensive shaft replacement.
Just like shafts, belts are subject to wear. This can be either wear on the working surface of the belt or damage to the cord. In any case, during the inspection, check the condition and tension of the belt. Why tension? Because once you pull the belt, you can break the integrity of its cord. Naturally, such a belt will need to be changed. If you notice the wear of the belt in time, you will have time to order it and the 3d printer will not stand idle, waiting for the spare part to arrive.
Since we are talking about belts, it is worth checking stepper motor pulleys along with them. Namely, whether there is no idle rotation. If necessary, tighten the lock screws. Always check the kinematics of the 3d printer for any play. For the most part, play will affect the quality of the surface of the printed product, but this check should not be neglected. Take the carriage and move your hands to a break, try to pull it. If you do not notice characteristic knocks, then everything is in order. If you notice, then check the tension of the screws. Axes misalignment during 3D printing can also lead to both linear bearing failure and high shaft wear.
| |
You should also check if the fan for blowing the 3d printer board and the extruder heatsink is working. I understand that in some models of 3d printers, the manufacturer did not worry about ease of maintenance, but this should not be neglected, as overheating can lead to failure of the stepper motor drivers.
If you have something to add to the inspection list, write about it in the comments, and we will go directly to maintenance.
3d printer maintenance
What actually needs to be serviced?
Let's start with cleaning. More specifically, from cleaning the filament feed mechanism. There are several ways to get it contaminated. You can get rid of one of them very easily by installing a so-called filament filter. It is a box with a sponge placed inside, which is designed to clean the bar from accumulated dust and other contaminants. A very simple thing. Link to the 3d model on Thingiverse. If you have a bowden extruder, you can clean the filament feed tube from dust by simply blowing it.
Your 3d printer table also needs to be kept clean. I periodically wipe it with a cloth dipped in acetone. It is better to do this procedure with a glove in order to avoid skin contact with acetone.
The table lift screw also needs to be cleaned of dust and dirt before being lubricated. As for the lubricant itself, I read a lot of opinions on this matter and came to the conclusion that the best choice is ordinary Litol-24. I use it both for lubricating screws and for lubricating linear bearings. We lower the table down, apply lubricant to the screw above the nut, then raise the table to the upper end position and apply lubricant from below the nut and drive the table again. Then, if excess grease has formed, remove them.
Also take the time to extruder. Clean the model fan and radiator from dust and dirt. The best way to do this is with a vacuum cleaner. In my 3d printer, the manufacturer did not bother about the ease of removing the extruder, so this procedure is quite time consuming.
Pay attention to the shafts. If your linear bearing seals are working well, then you should see a buildup of dust mixed with grease in the end positions of the axles. It is worth deleting it as it accumulates. The easiest way to do this is with a paper towel.
Moving on to the lubrication of linear bearings. In theory, they should be stuffed with the right amount of grease at the factory. Moreover, this basic packing is calculated for the entire life of the bearing, but whether the Chinese do it or not is unknown. When I bought linear bearings, I found that they are only covered with a liquid lubricant to prevent corrosion, so it’s better to remove and stuff the same lithol inside, because it doesn’t make sense to smear it on the guides, since the seals will simply remove it and nothing will get inside.