3D printed embossing plate
3D Printed Embossing Plates - Creative Fabrica
While this is part one, it is a complete project and a great place to start.
- What You Need
- There’s a Bumpy Road Ahead
- Why Use a 3D Printer
- Start Out Simple
- What’s Size Got to Do with It
- The Innies and the Outies in Embossing
- Set Some Boundaries
- A Hole from My Cheating Heart
- A Good Act Has a Lead In
- Printing Must be Precise
- And the Results Are
- There is More to Come
To follow the steps in this article, you will need three things and two pieces of software:
- A computer (Windows, Mac, Linux, all good, just not a smartphone) to run the free software
- A 3D Printer
- A Die Cut/Embossing Machine
The software is free, and is found at:
- https://www.tinkercad.com – Web based, all you need to do is set up a free account
- https://ultimaker.com/software/ultimaker-cura – Select the free version.
Runs on your computer, just select the type of computer you have (Windows, Mac, Linux)
There are a lot of art forms that use embossing. Cardmaking and Scrapbooking are obvious ones, but it is also used in mixed media and in a fashion when collecting rubbings of old plaques and gravestones. My introduction to embossing was through the metal foil kits used with plastic embossing plates. If have never done one, you tape a piece of thin mental foil (thicker than aluminum foil but not as think as what we would think of as sheet metal). Then you rub really hard with a wooden stick until you have embossed the image from the hard plastic plate into the metal. This is the kind of art project they give kids at summer camps and for school arts projects because it puts all the work on the kids and lets the adults rest. I tried to find an image of what I am describing, but Google or my memory of events failed me. So, nod you head and say you remember these too even if you don’t.
Today there are many things referred to as embossing. One of the better known is using an embossing folder and a roller press of some sort. The term “envelope” is used, but it is more accurately a folded piece of plastic that you put a piece of paper (typically a heavier paper like 80lb/316GSM) into. With the “envelope” open on three sides you can use it with different sizes of paper. The inside bottom is raised, and the inside top is recessed (or the bottom is convex and the top is concave if you like).
The result is a raised pattern in the paper (or possibly foil) that can be seen and felt without any printing. Some embossings are used to added texture while others are used to impart specific patterns. We will do the later in this article.
You understand embossing and you have seen all the embossing sets sold in the craft store. There are so many, so what does using a 3D printer bring to the table? The answer is in the question. There are so many embossing offerings because there are so many different needs and design. Just look at the offerings on Creative Fabrica for as common an object as a heart (over 50,000 when I checked). The reason for using a 3D printer is the ability to create something unique to your vision.
Go to TinkerCAD at htt://www.tinkercad.com. If you have not already created an account (perhaps while reading one of my other articles) you can do it now. It is free and can be used from any browser.
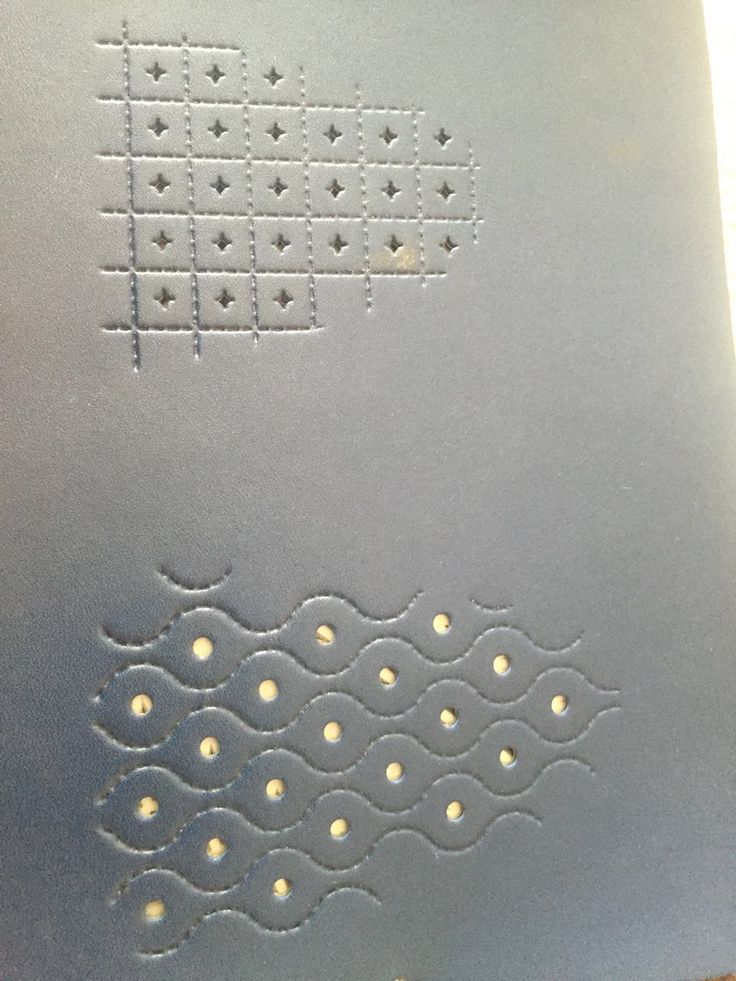
The old adage is that you should walk before your run. To start with embossing we are going to make a basic heart embossing set. Just to be clear, our 3D printing envelope will start out as two pieces we later join. This is because the type of 3D materials suited for embossing do not fold (they would snap). The project is to create a heart embossing envelope. TinkerCAD includes a premade heart shaped object, so we do not have to create or download one. You may need to scroll down the list of basic shapes on the right hand side to find it.
Drag the heart on to the workspace (the graph paper like grid) and size it up to approximately 50 millimeters across. The heart does not need to be exactly proportional, but if you want to keep the proportions of the original heart, hold down the shift key as you drag one of the corners (pointed out by the blue arrow) to size it.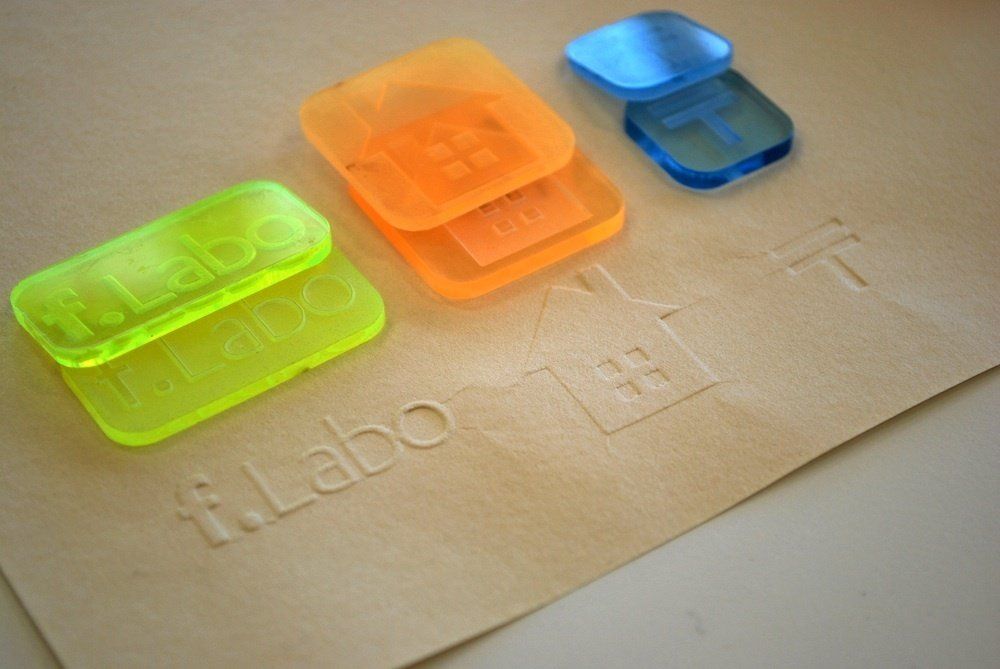
Why stop at 50 millimeters? That depends on what embossing/die cutting machine you have. I have a little Sizzik Sidekick that has an opening of around 60 mm or 2 ½ inches. There are much bigger machines, but there is a lot you can do with a machine of this size. Everything in this article applies to bigger machines as well. The thickness of the plates we create will also be influences by the machine. In these examples we will be creating plates that have a total thickness of 2 millimeters. This is what works with the combination of one embossing pad and one cutting pad for my machine. You can adjust the thickness of the embossing plates you 3D print to work with your machine.
To get the best results, we want one side of the embossing envelope to be raised (outie, raised, convex, your choice of what you call it) and the other sunken (innie, sunken, concave, again your choice). The sunken portion needs to be slightly larger than the raised portion, so that the raised portion will fit into the sunken portion and have some room for the paper to be formed. We are talking very small amounts. The first heart is going to be our raised heart. The raised embossing plate will be 1mm thick with the raised portion being .5 mm higher than that. A half of a millimeter is so small that you would have trouble measuring it, but it is enough that you can see it and feel it easily.
Change the height of the heart (the control marked in green above) to 1.5 mm. The easy way to change the height to a fractional number is click on the control and type the number you want in the box.
The heart by itself would be hard to place consistently, so we attach it to a base. Using a box from the right side of TinkerCAD, create a box around the heart that will become the base. For the heart shown above, a good size is 60 mm wide and 60 mm deep, with a height of 1 mm. Center the heart on the base (top to bottom and left to right) using the align tool.
Selecting both the heart and the base, click on the duplicate icon (blue arrow points to it above). This creates an exact copy in the exact same place. Without clicking anywhere, use the right arrow on your keyboard to slide the copy to the right side of the screen to end up with two stacks like shown above.
The stack on the left will be our raised embossing plate, and we are done with it for now. The heart on the right needs to be a bit bigger (as mentioned above) so that the raised portion can fit inside it. Size it proportionally just like we did originally, making it only slightly larger. In this case I went with a width about (but not exactly) 52 mm wide and 48 mm deep. Center the larger heart on its base again, to make sure the two parts will align correctly later.
If we just turn the heart on the right into a hole, that will work by cutting all the way through the base. Instead we will make a solid base with a lowered portion. I want to be honest with you and say I cheated a little here. Normally you need to flip the embossed object 180 degrees (left to right) before using it to make a sunken part. But since a heart is symmetric along the vertical access (the left side is the same as the right) we don’t need to do this. In short, a heart looks the same from the front of the back. Many shapes you may want to emboss (circles, squares, diamonds, smiley faces) are like that. In a future article we will explore more complex shapes.
To create the lowered section, raise the heart up .5mm using the vertical (Z-Axis) movement arrow (marked in blue). By default, TinkerCAD snaps to millimeter increments, but you can type in a value after you start raising up the object. Change the heart to a hole (the grey lined option pointed to by the green arrow). Before grouping the parts together to complete the sunken area, one more change is needed.
One thing I have found as a practical matter is that it is easier to get an embossing stack (the plates you make and the pressure plates for your machine) into my machine if I have a bit of free space before the start of the embossing. Your experience may differ, but it also allows you some more freedom in your paper placement.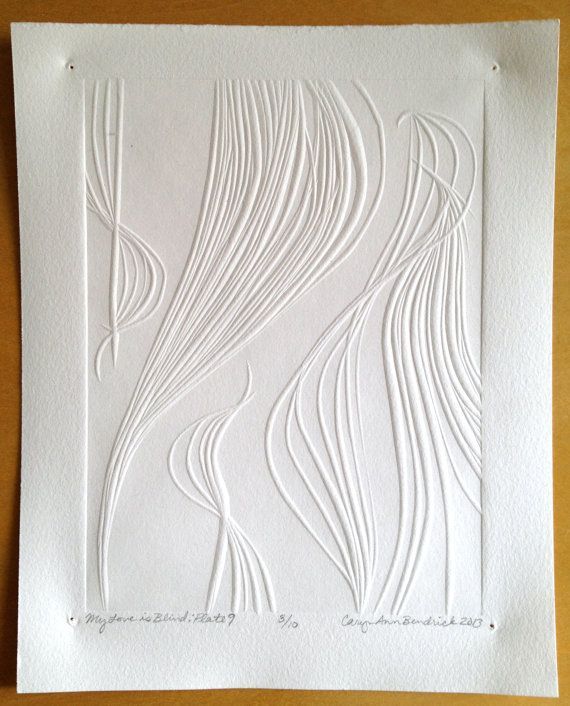
3D printing the plates that you create is the same as in other projects user TinkerCAD and Cura, or other slicing software for the 3D printer. If this is new to you, I suggest reading the article The Simple (and Free) Way to Make 2D Art Into 3D Prints. Otherwise, I will believe that you understand how to get from TinkerCAD to Cura or a similar slicer.
Normally in Cura I set my printing to be done in .2mm slices to make things go faster. In this case though, we are dealing with layers that are very thin so I print embossing plates with .1mm layers. The rest of my settings remain the same. I continue to use PLA (Polylactic Acid) filament as I do for almost all my projects. And be sure that when you print the plates, or have them printed, that the machine is “dialed in”. I sadly had a catastrophic failure of my 3D printer (unrelated to this project) that required me to replace some parts. My first prints after the repairs were disappointing. This project requires such tight tolerances that things that would not make a difference in printing a cookie cutter (see Free 3D Printable Cookie Cutter) will make an embossing plate too thick or too thin to work correctly.
Very subtle changes in depth are hard to perceive in pictures like this. The gray filament helps a bit, but in case it is confusing, the plates are like they were in TinkerCAD. The plate on the left is raised and the plate on the right is sunken. This photo is so close and the plates so small, that you can see individual lines in the center of the right-hand heart.
I used the plates to emboss a piece of foil covered card stock. The heart is raised, although it also looks sunken. Start at the bottom of the heart where it is most obviously raised and then follow the edge with your eye. In this case, the line details around the heart are visible but the raised heart itself is smooth. There are ways to address this and further improve the results, but it is not as noticeable with paper or plain card stock.
Everything you need to get started is covered in this article. Simple symmetrical objects like the heart are the best place to start. In a future article we will dive into non-symmetrical things like texts, monograms and logos. I am very interested in hearing what you would like to see turned into an embossing envelope. Santa and reindeer to emboss paper ribbon for the holidays? Monograms on writing paper? Mandalas on greeting cards? The options are wide open.
3D Printed Plate for Embossing in the Sizzix Big Shot
Ursula's Digital Mixed-Media
3D Printed Plate for Embossing in the Sizzix Big ShotHi everyone! Today’s post is possible because of a new friend I made this year! Tim and I have become email pen pals and it has been fun sharing our art and ideas and even collaborating on projects! One of them was a plate he printed for me with his 3D printer, from one of my new designs. I love this plate- it embosses so nice in the Sizzix Big Shot machine! So a very special thanks go out to my artful and talented (and generous!) buddy Tim and I hope you have someone like him in your life!!
I filmed a video to show you the set up so you know what plates to use etc. The Big Shot Machine comes with a multi-purpose platform that has a series of tabs that give you guidance on how many to tabs to use based on what you are using them with. Since they do not have a setup for 3D printed plates, I had to figure out the best combination.
You will need a piece of embossing rubber like the one that Sizzix sells here. Spellbinders also sells one and I list one from Amazon down below. The embossing platform I mentioned in a previous post will not work in this case since the 3D printed plate is too thick. I believe it was 3 mm.
In this project, I used cardstock painted with Micaceous Iron Oxide paint from Golden. I love this paint- it has texture and a tiny bit of shimmer!
The stack will look something like this (you may need to play around with it a bit):
- the Sizzix multi purpose platform that comes with the machine with all but one tab
- a cutting plate
- the rubber
- the cardstock (in this case I put it face down but you can play around with that)
- the 3D printed plate
- a cutting plate
- possibly some pieces of paper or thin plastic to use as shims
You can spray the cardstock with water if you like. Sometimes I do, sometimes I don’t. It can help with the paper not tearing as much if the sandwich is a bit too tight or the embossing plate is too deep. Also, you may need to test which direction you want the cardstock to go depending on the design of the plate.
Run the whole stack through the BigShot machine. It should have a small amount of resistance as you roll, but not too much where it feels like your machine will break! It should feel about the same as when you follow the Sizzix guidelines with an embossing folder or one of their dies.
And Yay! you have the impression of your design from the 3D printed plate! I use Tim Holtz Distress Oxide inks to bring out the impression and make it show up even more! The inks are much more vibrant used on top of paint than they typically are on plain cardstock. I LOVE it!
3D printed Embossing Plate Distress Oxide 23D printed Embossing Plate Distress Oxide 3Here is the process if you’d like to follow along….
Enjoy!
I now have a Zazzle Store!
I now have a Zazzle store! Check it out here.
Bright Teal Ferns Tank Top
by US_Designs
Product categories
Select a categoryDigital Goods (38) Digital Card Fronts (18) Digital Page Backgrounds (9) Digital Stamps (11)Jewelry (59) Ceramic (48) Fused Glass (4) Silver (7)Rubber Stamps (27)Blog Search
Search for:Social
Blog Categories
Blog CategoriesSelect CategoryBlast from The Past (3)Digital Related Posts (44)General (2)Jewelry (13)Mixed Media Posts (251)Photoshop Posts (24)Reviews (2)Silhouette Studio (12)Technical Tips (13)Video Posts (89)Blog Tags
Accucut Artist Trading Cards Big Shot Blend Modes Cards Carving Charcoal Composite Cool Paper Die Cuts Digital Cutting Distress Spray Stain Embossing Gelli Arts Gel Medium Gesso Holiday Jewelry Kraft Glassine Leather metal Paint Paint Mediums Photos Photoshop Potter Press Printing Printing Plate resin Resists Rubber Stamping Samples Shrink Plastic Silhouette Curio Silhouette Studio Silicone Molds Sizzix Sketches Stencils Tags Take 5 Thoughts Tim Holtz Distress Oxide Tooling Yupo
Recent Posts
- StazOn Opaque White Ink on Transparencies
- Leather Embossing with Potter Press Embossed Copper Strips
- Leather Embossing using Polymer Clay
- Altered Homemade Embossing Plate from a Tim Holtz Bold Text Die Cut
- Leather Embossing Experiment with Potter Press Impression Dies and Accucut Grande Mark
Archives
- October 2022
- September 2022
- August 2022
- July 2022
- June 2022
- May 2022
- April 2022
- March 2022
- February 2022
- January 2022
- December 2021
- October 2021
- August 2021
- July 2021
- May 2021
- April 2021
- March 2021
- February 2021
- January 2021
- December 2020
- November 2020
- October 2020
- September 2020
- August 2020
- July 2020
- June 2020
- May 2020
- April 2020
- February 2020
- July 2019
- March 2019
- December 2018
- November 2018
- July 2017
- February 2017
- November 2016
- October 2016
- July 2016
- April 2016
- January 2016
- November 2015
- October 2015
- September 2015
- April 2015
- March 2015
- February 2015
- January 2015
- December 2014
- November 2014
- October 2014
- September 2014
- August 2014
- July 2014
- May 2014
- April 2014
- March 2014
- January 2014
- November 2013
- October 2013
- September 2013
- August 2013
- June 2013
- May 2013
- April 2013
- March 2013
- February 2013
- January 2013
- December 2012
- November 2012
- October 2012
- September 2012
- August 2012
- July 2012
- June 2012
- May 2012
- April 2012
- March 2012
- February 2012
- January 2012
- December 2011
- November 2011
- October 2011
- September 2011
- August 2011
- July 2011
- June 2011
- May 2011
- April 2011
- March 2011
- February 2011
- January 2011
3D printed jewelry collection
Application
3D printer.

Collection idea
Ksenia Zagainova approached the firm with an interesting and extraordinary project to create a jewelry collection called Memento. Translated from Latin - the word Memento means "remember", and in English there is a synonym for this word souvenir (souvenir).
Ksenia Zagainova is completing her studies at the British Higher School of Design in the summer of 2019 with a degree in Jewelry Design. As part of the course project, Ksenia was researching the topic of travel and collecting. Her task was to create a unique traveler's jewelry album. The designer collected a collection of souvenirs from different countries.
The objects in her collection are the intricate ornaments of the balcony railings of city buildings. To date, the "piggy bank" of the album has already included 5 different, but similar in style, ornaments from Istanbul, Shanghai, Jaipur, Paris and Barcelona. Here are some of them:
Our company enthusiastically met the designer's offer to perform 3D printing on her order.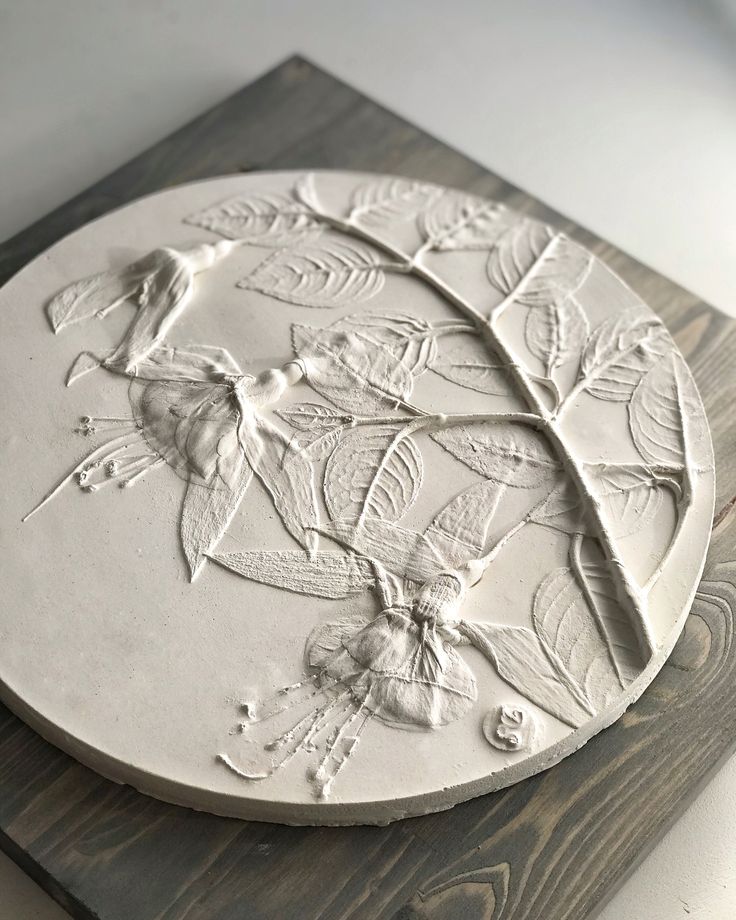 The result is extraordinary products that attract with their interesting, unusual design. Jewelry, despite the unusual shape, is not striking and perfectly merges with the right image.
Ornaments are made in the form of removable plates, which, if desired, can be changed and rearranged to your liking. It is also permissible to replenish the collection with other ornaments.
The jewelry frames were produced on high-tech equipment - a Concept Laser M2 3D printer developed by a German manufacturer. The device works on LaserCUSING technology.
Concept Laser M2 Equipment
This printer is designed for industrial use. The device works on the technology of additive laser melting of powder metal. Metals are used as consumables - alloys of bronze, nickel, steel, aluminum and titanium, which was used in the manufacture of the collection. The use of titanium to create the Memento collection made it possible to endow products with lightness, strength and durability.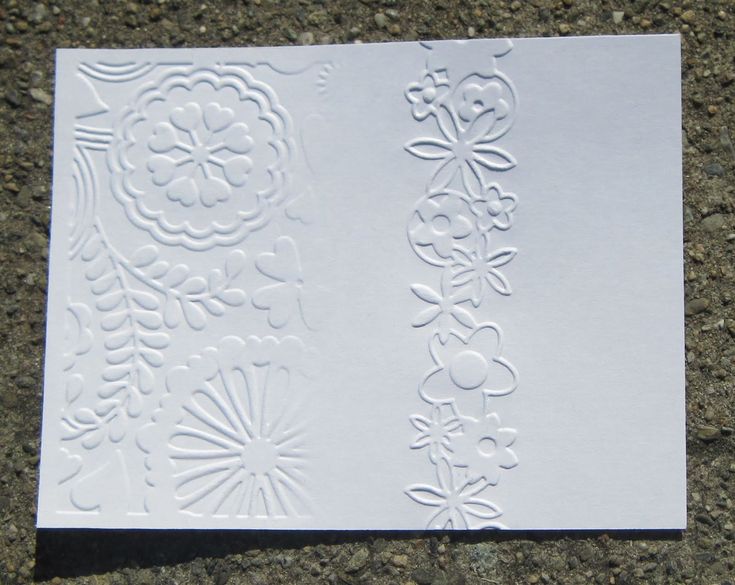
The 3D printer is designed for small-scale production of various metal parts with complex geometry. When working with the device, the maximum parameters of the accuracy of reproduction of a given model are achieved, so high print quality is created even in the manufacture of miniature products.
The principle of LaserCUSING technology is the repeated deposition of layers of metal powder according to the specified parameters. The powder is subjected to selective laser melting. Melting occurs in accordance with the geometric parameters of the section of the produced layer of the model.
Collection photo
.
Follow author
Follow
Don't want
5
More interesting articles
16
Subscribe to the author
Subscribe
Don't want
Yes, and this happens, but not quite like in a recent video from Pryusha.
Good idea...
Read more
Hangu
Loading
01.10.2022
861
7
Subscribe to the author
Subscribe
Don't want
I welcome everyone!
Finally got around to writing a blog). Some time ago,...
Read more
154
Follow author
Follow
Don't want
Good day, dear colleagues!
In this post I would like to tell you about such...
Read more
13 notes about 3D printing after 3 years of owning a 3D printer / Sudo Null IT News
This article will be, first of all, of interest both to those who have directly dealt with 3D printing, that is, who owns a 3D printer, but also to those who are just about to join the ranks of 3D printers and are thinking about buying their own printer.
In the framework of this article, I would like to present my observations as a direct owner of a 3D printer for more than 3 years.
Despite the fact that 3D printers have been known for a long time and, in my memory, have become widely used, judging by the information on various resources, starting around 2010 (I may be wrong, these are my subjective observations), for a long time I ignored this area, it’s hard to say why…
Probably, he considered it some kind of “childish pampering”, another hype topic for which there is simply not enough time…
The break happened when one of the wheels on my travel suitcase wore out. You know, a big plastic suitcase, with four spinning wheels on the bottom. Unfortunately, it is a “rather disposable thing”, due to the lack of bearings on the wheels, which is why the wear of the friction point of the axle and wheel allows the suitcase to last no more than one or two seasons.
And it’s like “lightning flashed in the middle of the day: 3D printer!” It is with his help that I can fix this problem! Looking ahead, I’ll say that I didn’t succeed in fixing the suitcase in this way, so I had to use a different approach . ..
..
As a result, I "upped" him - by installing wheels from unnecessary roller skates. Thanks to this “up”, the suitcase has become a real all-terrain vehicle and, even being very loaded, it rides easily - pushed forward even with “one finger”. And even in the snow, 5-6 cm thick. A tank, not a suitcase turned out! By the way - I took spinning wheeled "units" in Leroy. Then he took off and threw out his native plastic wheels, inserting from roller skates:
But this thought itself became a kind of trigger that allowed me to finally join the world of printers and buy my first 3D printer.
Like many, before buying it, I studied various forums and sites for a long time, delving into all the subtleties. And for some reason, I immediately liked the type of printer called the delta printer. Probably because during operation it looks like some kind of "alien device".
If at your leisure you like to sit “looking into the carpet”, then with the advent of such a printer you will have a much more interesting activity, even, one might say, hypnotizing :-))
And this, in fact, is my delta (if anyone interesting), which went, let's say, "ultimate up": all the electronics were placed upstairs, on a self-made welded frame, covered with polyethylene and a magnetic door was made. The coil with a bar is installed at the top, on the frame. The axis on which the coil is put on is machined on a lathe from aluminum and a bearing from the VAZ timing is inserted into it. As a result, the coil - "rotates even from the passage of a fly nearby":
Well, yes, I won’t argue for a long time, let’s start reviewing the main facts that I have accumulated as a result of owning this car ... The facts are purely subjective and may differ from your vision. In any case, I will be glad to comments, clarifications, etc.
▍ NOTE 1. Delta is good, but...
Here I should give a number of my observations regarding the delta printer:
- It contains a completely finished frame of the future box, which makes it easy to form a heat chamber. I understand that many printers are made in the form factor of a “certain box” (but this point cannot be ignored), which greatly facilitates the process of wrapping this box with heat-insulating material.
 In my case, as such a material, I used a plastic film.
 - Already thanks to its design, delta allows you to work at much higher speeds than XY printers. By the way, it is on the delta principle that many modern high-speed industrial robots are built to sort various parts directly on the conveyor belt:
However, this plus does not allow to fully realize the occurrence of parasitic vibrations, even despite their suppressors:
Thus, accurate printing is possible, only at speeds (at least that was the case for me), no more than 60 mm per second. A complex procedure for aligning the movement of the head parallel to the table, which is why, for many, the so-called "lens" appears. People struggle with it with varying degrees of success, but I have not encountered this on my printer and for me, therefore, the “lens” has never been a problem. At the same point, it is worth noting the calibration of the table, which was initially absent on the first deltas, and I had to use an external third-party solution from one American do-it-yourselfer called EZBED. This solution was a hardware-software complex that allows you to quickly and easily calibrate the printing table, that is, to let the printer understand its geometry. Modern printers do not have this issue as they come with a built-in calibration solution. It is worth noting that I solved this problem by attaching a limit switch to the print head, and using the Marlin-1.1.9 firmware.
▍ NOTE 2. "Size doesn't matter..." :-)
When I got the printer, I was impressed by the possibility of huge printouts, a la the handguards of some futuristic rifles, huge body parts, etc.
However, if you try to analyze the results of your many years of practice, it turns out that in most cases, rather small objects were printed that easily fit in the palm of your hand, a maximum of two palms. Despite such a seemingly small size, the printing of these details took a significant amount of time. Of course, this very much depends on which nozzle you print with. But, despite this, it is difficult to disagree with the fact that most of the printed parts will be quite utilitarian and small in size.
Therefore, to be honest, the need for a printer that allows you to print "Venus de Milo in life size" is not obvious.
Of course, you can object to me that “I’m going to buy a printer, I’ll get used to it a bit and I’ll get started!!!”
Here you need to take into account one simple point: there are no universal things. And in order to understand how much 3D printing in general and your printer, in particular, you will need to solve your problems, and how much it will be able to solve such problems, you just need to first try the 3D printing method personally and then a lot will become clear to you .
Therefore, for a beginner, I recommend taking a small printer that allows you to print extremely small items that fit in the palm of two. With such a device, you will definitely never lose, as it will always be needed. In addition, with its help you will be able to get used to the printing process and, if necessary, purchase a larger device, already clearly understanding its capabilities and ability to solve your set of tasks.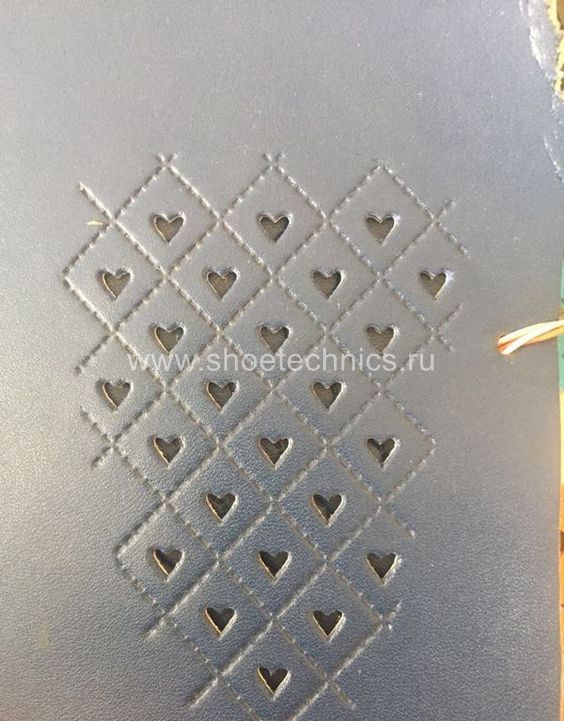
▍ NOTE 3. What type of printer to get.
Based on the foregoing, I do not recommend taking a delta printer and this can be said right away.
Not because it is bad, in fact, it prints quite accurately, its main problem (in my opinion) is the inability to print rectangular flat, fairly large case components, as well as the inability to fully realize high-speed work, since the quality drops critically. Here it turns out to be a rather offensive situation - the printer can work quickly, but this cannot be done, since the quality will be “nothing”.
And then what kind to take? Depending on the budget and capabilities, I recommend taking any cube printer, for example, the same Core XY (the head moves, and the table goes down as the model “grows”, from top to bottom):
Image source: thingiverse.com
Such a printer allows you to easily print fairly large flat parts of cases, has good speed and accuracy. In addition, the presence of a rigid box-shaped frame allows it to be easily covered with polyethylene to create a sealed heat chamber. In addition, the very fact that the table does not move while working reduces the number of problems with model peeling.
However, the advantages of this printer will not be fully revealed if it has a direct extruder. On the one hand, it will allow printing with rubber-like materials, on the other -
large inertia and head weight. And these are parasitic vibrations, wear of the fur. parts, etc. (like everything in life, “we treat one thing and cripple another” :-))
At the initial stages, this may not be necessary, but in the future it may be necessary to print, for example, tires for your homemade car. And with this, the Bowden extruder has obvious problems. Although, in fairness, printing with such a rubber-like material is far from a daily need. However, whoever seeks will always find: over time, I found a way to “upgrade” my printer with a Bowden extruder to print with flexible materials. "Crutches" of course. But even so.
By the way, there are printers of a cheaper type, the so-called "drygostol", printing by moving the table and head:
They are inexpensive, moderately accurate, but they require a sufficiently high-quality gluing of the printed model to the table, because the table moves, and the model can come off when the table is jerked sharply. When printing large models, this can be a problem.
▍ NOTE 4. What to print with?
It's only a matter of taste and purpose. That is, if your printout will only stand on a shelf and should differ in some kind of aesthetic appearance, these are some requirements, if the printout is an engineering part that will be operated under conditions of increased mechanical load, these are different requirements. That is, in the first case, you can use any PLA, SBS plastics, and others with similar properties.
For engineering parts, for example, I only use ABS. It combines high hardness, strength and low price. Although I understand that now this last statement will cause a storm of comments in the style of “no! - there is even stronger, even better, the same PETG, etc. ":-)
I just wanted to say here that thanks to the low price and the practical experiments that I conducted with ABS plastic, I realized that it is completely meets all my requirements.
However, the fact that ABS plastic releases carcinogenic substances when heated is quite annoying and forces you to take measures to prevent poisoning. For this, my printer prints completely closed and on an open balcony. After printing, the printer chamber opens, and it remains open in this form until it is completely ventilated and cools down.
▍ NOTE 5. "ABS is difficult to type on, it separates, peels off the table, and in general..."
With a properly configured printer (in my case, at a print temperature of 205 degrees, a thermal chamber and a desktop temperature of 100 degrees), the use of auxiliary techniques, for example, among which, one can name the so-called ABS juice (which is ABS- plastic dissolved in acetone), you can create wear-resistant and durable things, without any hypothetical problems.
For example, my printer has been printing for many hours at temperatures well below freezing. And this happened more than once, not twice, not three! And the print quality was excellent:
12-hour ABS printing at -4 C
▍ NOTE 6. Acetone for post-processing and ABS juicing
At one time, I wrote a fairly detailed article on this topic and I will try to give the main excerpts from it. The essence of the issue here is as follows: due to the fact that different GOSTs are used for the production of acetone, acetone differs in quality. Despite the fact that it would seem that “acetone is also acetone in Africa,” nevertheless, one type of acetone can differ significantly from each other. For example, ordinary acetone, which can be bought at any hardware store, such as "1000 little things", "store near the house" and the like, is very low quality acetone, smells disgusting (although someone like it, maybe someone likes its pleasant building aroma and "aftertaste" :-))).
In contrast, there is a much higher quality acetone, which, however, is not found at all in any household stores, even large chain stores, such as Auchan or Leroy Merlin.
This type of acetone is found exclusively in shops that sell varnishes and paints for automotive work - that is, these are highly specialized shops for car workshops:
Acetone, which can be purchased there, is of excellent quality, smells almost like alcohol, quickly disappears,
:-) - this is a joke, of course, don't even try it.
However, its main advantage, compared to household type acetone, is that it perfectly dissolves ABS plastic and does not allow it to precipitate. For me personally, it was a very surprising observation when the same ABS plastic was perfectly dissolved with acetone from an auto shop, and completely precipitated when I tried to use household acetone (I just ran out of good acetone, and I had to use "what is ").
Therefore, if you want your result to be always excellent, then here is the right acetone. It should be labeled "for professional use":
▍ NOTE 7. What about ABS juice?
"ABS juice" is what printers call a mixture of acetone and pieces of ABS plastic dissolved in it. This mixture is smeared on the surface of the desktop before printing and allowed to dry. Thanks to this spread, the model easily sticks to the desktop and does not peel off during the printing process. After printing is completed and the platen has cooled down, the model can be easily separated.
All that needs to be said here is that, after trying different approaches over time, I settled on using flexible metal spatulas, also called “Japanese-style spatulas”:
According to the results of many tests, this method of spreading turned out to be one of the most convenient options, such spatulas can be cleaned very quickly and easily after work. In other words, highly recommended!
▍ NOTE 8. "Yes, nothing sensible can be done on it, I indulged a little and decided to sell it - you can't use it for anything good anyway"
I absolutely disagree with the statement above, which is periodically heard from newcomers to 3D printing. You can even say more: at the moment I can’t even imagine how I used to live without a 3D printer! Since it is he who makes it possible for any do-it-yourselfer to significantly expand their capabilities and make piece products, almost of factory quality! Of course, for this, the appropriate hands must be applied to the 3D printer, but that’s another question… and take on things that I would never have thought to take on before!
For example, among my homemade products, the following can be listed:
- Heated sole for boots, which is a hose integrated into the insole (and filled with household silicone from a household store), through which water flows, heated with a catalytic type hand warmer.
 Water is pumped using a small peristaltic pump. The engine with a metal gearbox, which is used in the creation of this pump, allows you to develop a force of 3 kg, which is even redundant for this homemade product. The engine is powered by Peltier elements mounted next to the catalytic heater. The project is currently in progress.
- Centrifugal water pump, mounted on the shaft of an internal combustion engine, which drives a portable high-pressure air compressor with a pressure of 500 bar. The pump pumps coolant through the casing of the high pressure pump, or rather its second stage. Despite the fact that the pump is 3D printed and runs at over 6000 rpm, nothing “fell apart, fell apart, didn’t break.” As you can see in the photo, the pump is installed instead of the “starter”, that is, the armstarter. The compressor scheme as a whole is as follows: 2 engines. Connected by clutch. One is heavy duty. The second is modified and turned into a high pressure compressor:
Yes, before assembling this, I also did not believe that this was possible. Moreover, even when I collected it, I did not believe my eyes :-))). However, it is a fact…
- I printed a number of Rank-Hilsch test tubes, the essence of which I have described in detail in this article.
- Printed mass of parts, more than 100 pieces, to create 10 web-controlled robots. There was also a detailed article about this here.
Well, and a bunch of all sorts of useful and not very crafts. As you can see from my crafts above, I have a special passion for creating some useful things, a utilitarian direction. That is, so that the printout is useful, and does not belong to the type “yyy breathe, Mikola, what am I doing here” :-), and then put it on the shelf and that's it. Although, engineers are also not alien to beauties, and this will be my next fact below.
▍ NOTE 9 Proper placement of the model when printing is half the battle
It would seem an obvious fact, but many underestimate it. Here I mean the following: by experience, I accidentally discovered that when printing various statues (in which I, completely unexpectedly for myself, discovered another passion of mine), it is advisable to place the statues at an angle to the printing table.
This allows the layers in the printout to run at an angle of approximately 45-50 degrees to the model. The result of this is that the printed model is almost completely invisible layers and the model looks like it has been post-processed, but at the same time retains a deep matte color, which, to my personal taste, is more like a marble than a glossy result of processing in an acetone bath :
An additional advantage of this method is that the layers going at an angle of 45-50 ° to the model give it additional strength. This is especially true for printing statues, which contain many thin elements that are easily chipped when the statue is accidentally dropped from a table or shelf (learned from bitter experience, this happened to me many times, and ruined some fairly decent prints).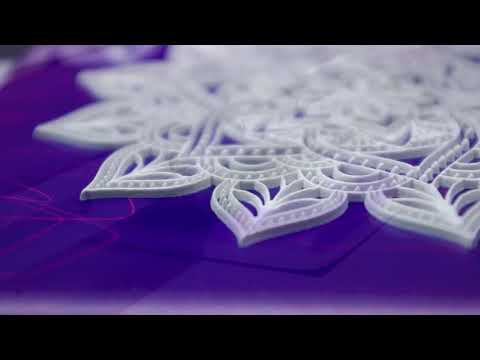
That is, layers running across the model, if the model has a large extension in height, does not allow it to maintain sufficient strength. For better understanding, I tried to illustrate this point in the figures below:
▍ NOTE 10. "Blurring" must be taken into account when printing, especially if the model is made up of separate parts and must be assembled by joining these parts to each other, entering into each other, etc.
I tried to illustrate this point in the figures below. The implication here is that if you're printing a composite model, you need to correct for the amount of bleed on the plastic (I'm not sure what it's called, but at least I tried to convey what I mean). If this is not taken into account, then the model will not fit.
For example, in my case this correction is 0.2 mm per diameter - if I want the model to fit more tightly; if I need a free joint, without excessive density, then 0.3 mm per diameter:
That is, suppose that the blue part has a size of 10x10mm. So it must be modeled in a CAD program as 9.8x9.8 mm (if we want it to sit tight) or 9.7x9.7 mm (to sit freely). Well, or expand the hole in the green part, and leave the blue one as it is.
This is often a problem when you download a prefabricated model from the Internet - but it is not going to, even if you crack! But because no amendments have been made…
For your particular case, the amendments may be different.
▍ NOTE 11. What if...
In fact, this note complements note number 8. Using a 3D printer allows you to create metal parts using a printed 3D model. For this, the casting method is used according to the lost wax or burnt model. In our case, we will deal mainly with metal casting on a burnt model.
Briefly, it looks like this: printing a 3D model (using PLA plastic) → pouring it with plaster → burning the PLA plastic, simultaneously with burning the mold, in a conventional stove oven → pouring the resulting shape with molten metal (melted in a conventional microwave) .
Image source: 3dtopo.com
I told about a simple method of melting metals in a home microwave oven here.
There was even a good article about casting on Habré.
▍ NOTE 12. Durability?
Despite the fact that ABS plastic is called exposed to ultraviolet radiation and, accordingly, burns out, losing its strength in the sun, in my practice, even printouts that are constantly exposed to the sun have not lost their strength and color at all, continuing to be successfully used and Currently.
It should also be added here that printouts are constantly exposed not only to the rays of the sun, but also work continuously in damp conditions!
As such printouts, I can give an example of winglets for technical cranes, which I printed out, but, unfortunately, did not photograph this process; as well as fasteners on shoes that I use “both in the snow, and in the heat and in the pouring rain, and in general are always with me”:
▍ NOTE 13.