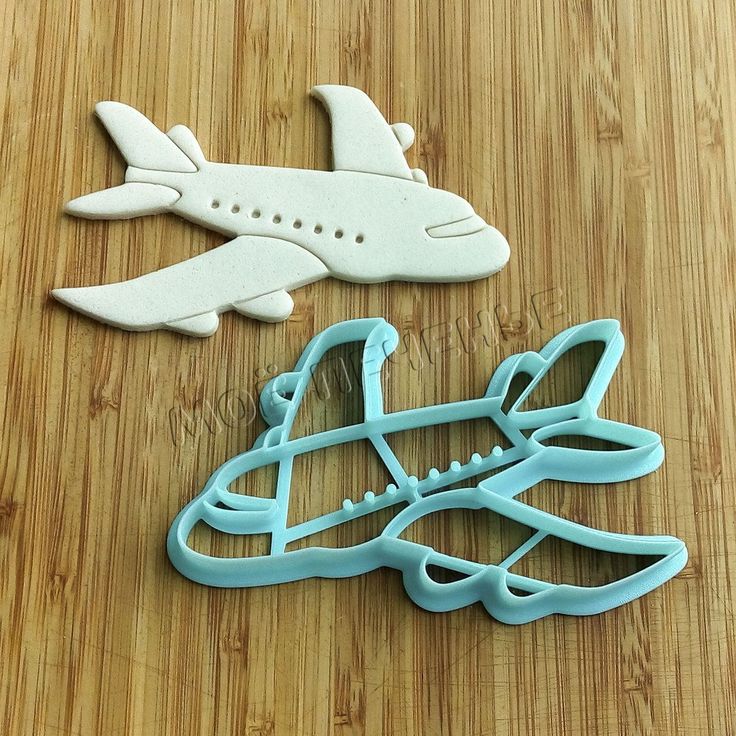
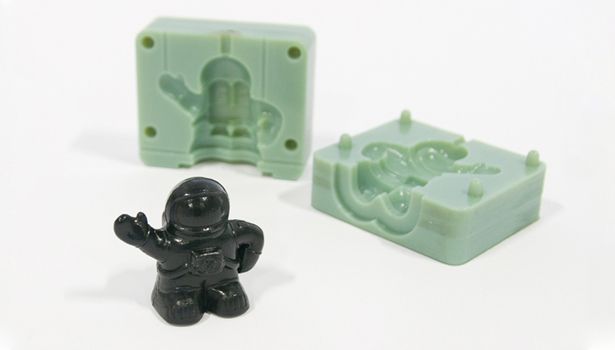
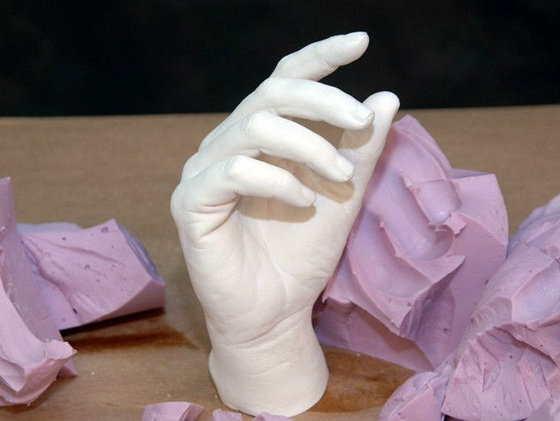
3D print rubber mold
Ultimate Guide to Silicone Molding for 3D Printing (Part 1)
Download the full Guide
as a PDF!
The simple post-processing techniques presented in this guide are an excellent way for professionals to create low-cost silicone molds, threaded inserts for enclosures, vacuum formed parts, and more.
Silicone molding is a powerful production method that, when combined with 3D printing, can allow you to make several copies of one product. You can also create a product in a material that is not supported by your 3D printer.
In this How To, we will show you some of the best practices associated with creating silicone molds around 3D printed parts.
Working time will vary depending on a number of factors. Creating a mold around our 3D printed part took us about 1.5 hours. Casting into our mold took about 15 minutes.
Supplies
3D printed mold box, hardware, vents & keys (read on for more info).
Master (the print you are molding)
Silicone
Resin and dye
Mixing cups
Mixing sticks
Mold release spray
Hot glue or cyanoacrylate glue
Funnel
Ex acto knife
Rubber bands, tape, or straps
Gloves
Respiratory mask
Eye protection
Need some of these products? We've curated an Amazon wish list for you.
Step 1: Choose a file to cast a mold around
Obtain a file that you would like to either make several of, or create in a material not supported by your printer.
We chose the cap to a perfume bottle to understand what the process would look like for a product development team attempting to produce several concept models of a prototype.
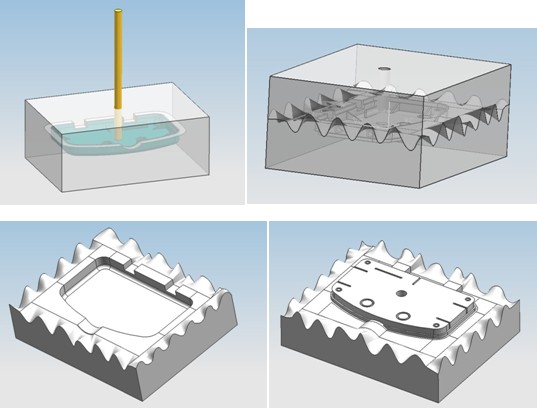
The next step is to create your mold box. This is the structure that will hold the silicone in place around your part when pouring. Your master will need to be suspended in this structure.
You can create mold boxes from:
Foam core board
Legos
3D printing
We chose to design and print ours as this method has a few benefits. Designing and 3D printing mold boxes allows you to:
Print in pour holes and vents
Easily calculate the volume of our mold
Create boxes that perfectly fit the parts you plan to create a mold of
Re-use mold boxes to create multiple molds
While 3D printing your mold box isn’t necessary, it provides you with a reusable customizable mold box that the other methods cannot produce.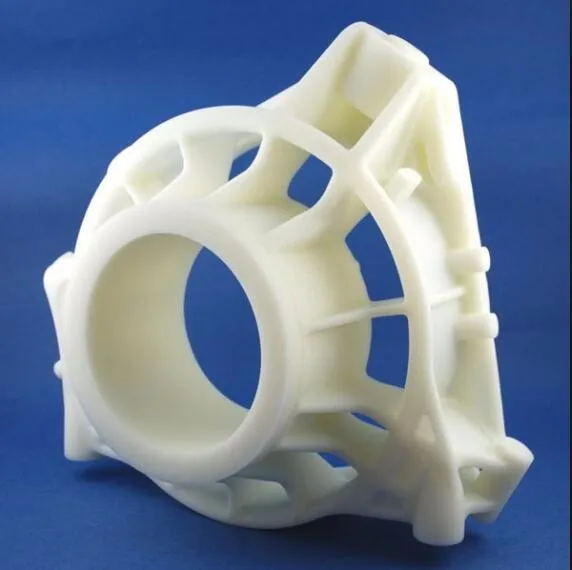
Step 3: Prepare and Print
Because the silicone molding process is not very demanding on the 3D printed mold box or master, you can select standard print settings.
The 2021 Guide to 3D Printing Materials
Learn about polymers, composites, and metals all available for 3D Printing!
Supplies Used:
3D printed mold box, 3D printed master, Cyanoacrylate glue, Mold release spray, Vents & Keys
A: Spray your mold box, master, vents, and keys with mold release.
B: Choose points across model to glue vents
C: With our 3D printed mold box we were able to glue our master directly onto the pour hole during preparation.
D: Spray again with mold release for good measure
You can suspend your master using popsicle sticks, skewers, or 3D printed rods glued to the surface of the master in an inconspicuous place. The holes left in their place after your mold has cured will aid in resin flow through the mold.
Step 5: Open Bottles of Silicone (Parts A and B) and Stir Thoroughly
Supplies Used: Silicone (Part A & B), Mixing Sticks
As silicone comes in two parts, it needs to be mixed both individually and once combined with its hardener.
Mix slowly using separate mixing sticks.
Supplies Used: Measuring cups
A: Determine the volume of silicone needed to fill your mold
B: Measure desired amount of silicone and hardener separately in two measuring cups.
We calculated our mold volume by filling our 3D printed mold box with water and pouring the water into a measuring cup to find exact volume.
For two part molds like the one shown, you only need to mix enough silicone to fill half of the volume of your mold.
Once you have measured each part, combine the two parts into one mixing cup and stir slowly with a mixing tool.
Be cautious not to stir in air bubbles. Be sure to scrape the sides of the cup to mix in all material.
Once your parts are thoroughly mixed the curing process will begin.
TIP
Read instructions on your silicone for “pot-life”. This is how long you have to work with the silicone before it cures.
Supplies Used: Mixed silicone, prepared mold box and master
Pour silicone into the first half of your mold box.
When pouring, pour slowly into one corner of the mold box and allow the silicone to run to other parts of the mold box as it fills.
Stop when the silicone reaches the top of the first half of your mold box.
Once you have poured your silicone place small keys into the silicone. These will create negative spaces and allow the mold halves to fit together once poured. We will remove them before pouring the second half of our mold.
Depending on what type of silicone you are using it can take anywhere from 75 minutes to overnight to cure.
Temperature and humidity will affect curing times, so we recommend this process be done in a room temperature environment.
Step 10: Attach and Prepare Mold Part Two
Supplies Used: Mold box part two, hardware (nuts & bolts)
Once our mold has set, we will prepare to pour the second half of our mold.
A: Remove the keys you inserted in step 9.
B: Attach and secure second half of mold box.
C: Spray with mold release
Next, repeat steps 5-9 and create the second half of your mold using the methods mentioned above.
Step 12: Let Cure
Supplies Used: Pliers or Ex-Acto knife
Once both halves of your mold have cured you are ready to remove them from the mold box and begin using them to recreate parts.
A. Remove the hardware
B: Remove the mold from the mold box and open.
C: Remove the master and vents.
Supplies Used: Cured mold, mold release spray, rubber bands
Next, you will need to reassemble your mold.
A: Ensure that all parts of your mold are correctly aligned, and plug any holes created by vents.
B: Secure mold pieces using rubber bands, straps, or tape.
Tip
Another great application for 3D printing would be to design and print a box to hold the mold together when pouring resin, or modify the mold box we used to serve the same purpose.
TIP:
If your vents leave holes in areas where resin can spill out during the pour, they will need to be plugged.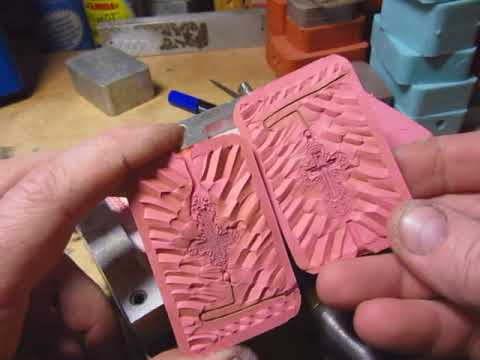
Supplies Used: Resin (Part A & B), measuring cups, measuring sticks, dye.
Just as with silicone you will need to measure each part of the mixture taking into account the volume needed to create a part.
If you have made several molds, you can mix a larger quantity of resin and pour several molds at once.
Add dye to the part of the resin mixture specified in the instructions.
Step 16: Mix Resin
Combine both parts of the resin mixture and mix thoroughly being sure not to stir in air bubbles.
TIP:
Resins typically have a shorter “pot-life” than silicone meaning they will cure faster.
Step 17: Pour Resin
Supplies: Funnel
Once mixed, pour immediately into the opening of your mold using a funnel.
Pour slowly as not to overfill and spill resin.
Any resin that remains in the mixing cup will harden, but can typically be removed afterwards.
Step 18: Let Cure
Once poured, allow the resin to cure for the appropriate amount of time.
Supplies Used: Pliers
Once your resin has cured, you can open the mold and remove your cast part.
Any resin that escaped through seams or voids and cured is called “flash”. Flash will need to be removed from the part through post processing.
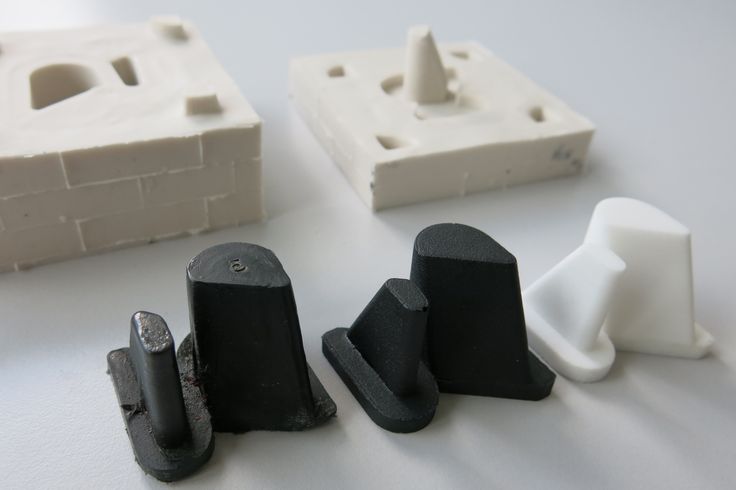
Below, you can see that we were able to recreate our perfume bottle cap in several different colors and opacities using silicone molding.
Visit one of our other applications pages for tips on how to take your print even further.
We recommend that you visit our pages on:
Silicone Molding Part II
Vacuum Forming
Sanding
Last but not least, remember to share your work with us on Thingiverse and social media @MakerBot.
We can’t wait to see what you make!
Powered by MakerBot Learning.
Can You 3D Print Silicone? Best Silicone 3D Printers and Alternatives
Silicone is a synthetic rubber that boasts several appealing characteristics for manufacturing. Its chemical structure is amazingly versatile, making it possible to adapt its chemical formula to fit diverse industrial applications from seals to joints, wearables, medical devices, robotic grippers, cooking utensils, thermal and electrical insulation, and more.
Most silicone products today are produced with injection molding, compression molding, or casting. With advancements in 3D printing, many people ask the question, “can you 3D print silicone parts?”
The answer is yes, with some important caveats. Silicone has a very high viscosity, making it difficult to 3D print with it precisely. It cannot be heated and extruded or cured with UV light like photopolymer materials. This means that 3D printing silicone requires highly specialized 3D printers, of which there are only a few inaccessible options available on the market today. However, there are many 3D printing processes that offer 3D printing materials with silicone-like properties, and 3D printing can also be used to create molds for molding silicone parts, bringing many of the benefits of 3D printing to traditional silicone manufacturing methods.
In this comprehensive guide, learn about the different options for silicone 3D printing, its alternatives, and how additive manufacturing supports traditional silicone manufacturing processes.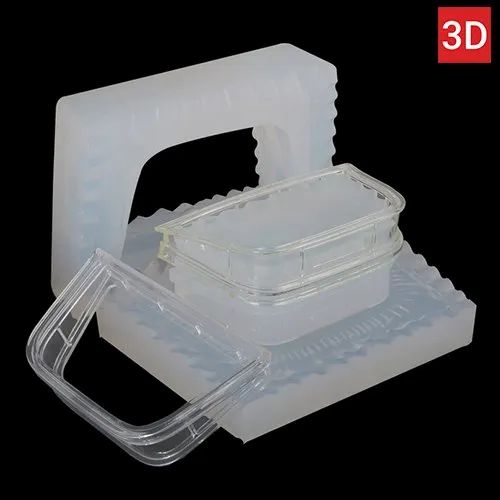
Silicone 3D printers and their alternative solutions can be divided into three categories:
-
Direct silicone 3D printing: There are silicone 3D printers on the market, but they are still far from being commercially viable or available to the average business.
-
3D printing using materials with silicone-like properties: Common polymer 3D printing processes offer various materials with silicone-like material properties that can serve as alternatives for certain applications.
-
Casting or molding silicone using 3D printed molds: Rapid tooling with 3D printing can bridge the gap between prototyping and mass-producing silicone parts with traditional manufacturing methods.
Webinar
In this webinar, you get to learn from a detailed example of a gravity-filled injection overmold printed with Formlabs Clear Resin. We also discuss how to select a mold type for your application, as well as silicone-resin compatibility and other silicone casting best practices.
Watch the Webinar Now
While most 3D printing technologies have been around for many years or even decades, silicone 3D printers are still a relatively new and experimental field due to the complexity of printing with silicone. Over the last few years, some companies have brought silicone 3D printers to the market, but these solutions all have certain limitations alongside excessively high costs, which means that they’re not suitable for most businesses and applications.
One of the first solutions for direct silicone 3D printing was a drop-on-demand deposition process developed by the German company ACEO. The drop-on-demand process involved the deposition of small amounts of silicone onto the build platform and the use of UV light to cure them into a finished part. However, this solution failed to find its niche in the market and was discontinued in 2021.
Liquid additive manufacturing (LAM) is another form of silicone 3D printing developed by InnovatiQ (formerly known as German RepRap) that involves dispensing liquefied silicon onto the build platform using an extrusion process that is similar to fused deposition modeling (FDM) 3D printing, and then curing the material with the combination of UV light and heat to form the finished product. However, with this solution, the design options and the quality of the parts are limited, and the printer costs $120,000.
The silicone additive manufacturing technique developed by Spectroplast works similarly to resin 3D printers and turns silicone materials curable by light. (© Spectroplast)
The latest example of silicone 3D printers is the silicone additive manufacturing (SAM) technique developed by Spectroplast. The SAM process is similar to the vat photopolymerization technique known from stereolithography (SLA) and digital light processing (DLP) 3D printers. Normally, silicone materials cannot be light-cured, but the company uses a proprietary process to turn them light-sensitive. This emerging technology promises to provide the same high degree of design freedom as other resin 3D printing technologies, for a price of around $100,000.
Some of the primary reasons why manufacturers choose silicones are the elasticity and flexibility of these materials that empower a wide range of applications.
Silicones generally fall between 10A and 80A Shore durometer hardness. Common polymer 3D printing processes like FDM, SLA, and SLS offer various materials in this hardness range, with various degrees of likeness in other important material properties of silicone such as durability, thermal stability, UV resistance, food safety, biocompatibility, as well as color and translucency options.
For fused deposition modeling, elastomers such as thermoplastic polyurethane (TPU) and thermoplastic elastomer (TPE) are the most flexible materials that can offer an alternative to silicone. These materials are commercially available at Shore 45A to Shore 90A hardness, which covers part of the silicone hardness range, except for the softest materials.
The pros associated with these alternatives are the general affordability of FDM 3D printers and materials. Conversely, the cons include lower precision and dimensional accuracy, low resolution, quality, and part strength, and limited design freedom that all restrict real-world usability. Silicone-like FDM materials are generally less durable than standard silicone, not food-safe, have lower temperature resistance, and offer limited color and no real translucency options, but they can be biocompatible and skin-safe.
Stereolithography 3D printing is popular among professionals for its high precision and wide range of material options. SLA 3D printing offers multiple alternatives to silicone that empower manufacturers to prototype silicone-like parts or even manufacture end-use parts with the flexibility, elasticity, and durability of silicone. SLA parts offer the smoothest surface finish and a higher degree of design freedom than FDM.
Silicone-like flexible 3D printing resins are generally also less durable than standard silicone, not food-safe, not biocompatible (but can be skin-safe), and have lower temperature resistance. Silicone-like SLA materials can be translucent and can also be dyed to different colors.
SLA 3D printing offers multiple alternatives to silicone that can be used to prototype silicone-like parts or even manufacture end-use parts.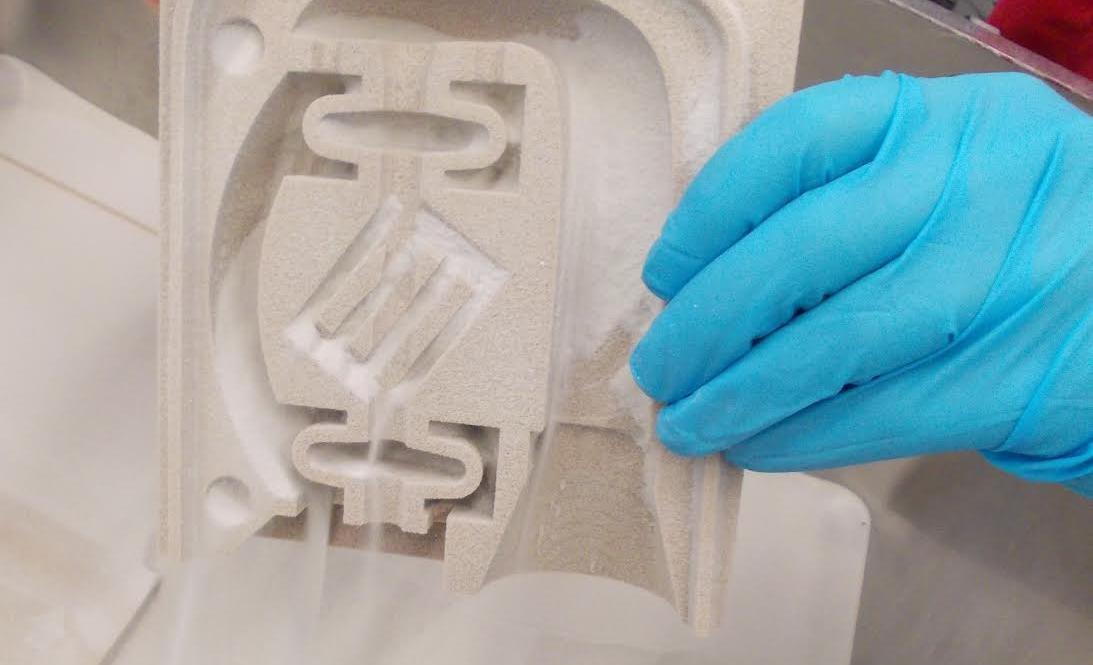
The specific material availability is dependent on the printer model, but generally falls within the 30A and 90A Shore durometer hardness range. Alternative materials to silicone among Formlabs’ SLA 3D printing materials include:
-
Elastic 50A Resin is a soft material that’s suitable for prototyping parts normally produced with silicone. This 50A Shore material is ideal for parts that will bend, stretch, compress, and hold up to repeated cycles without tearing, and spring back quickly to their original shape. Choose Elastic 50A Resin for applications like wearables (straps), stretchable enclosures and casings, compressible buttons, or soft tissue anatomy in healthcare.
-
Flexible 80A Resin is a stiff soft-touch material with an 80A Shore durometer to simulate the flexibility of hard silicones, as well as rubber or TPU. Balancing softness with strength, Flexible 80A Resin can withstand bending, flexing, and compression, even through repeated cycles.
 It is ideal for prototyping applications like handles, grips, overmolds, cushioning, damping, shock absorptions, seals, gaskets, and masks, or cartilage, tendon, and ligament anatomy in healthcare.
 - While slightly beyond the hardness range of silicone materials, Rebound Resin is an 86A Shore elastic 3D printing material that offers unique properties for end-use applications. With five times the tear strength, three times the tensile strength, and two times the elongation of other production-grade elastomeric materials on the market, Rebound Resin is perfect for 3D printing springy, resilient parts. Rebound Resin’s high elongation makes it perfect for tactile, stretchy parts such as handles and grips. It is strong enough to handle constant compression or tension, which is ideal for manufacturing complex gaskets and seals that last.
New Balance shoes incorporating Rebound Resin are already on the market and worn around the world. Rebound Resin withstands the elements, enduring daily use in all weather conditions to outperform and outlast traditional materials.
Sample part
See and feel Formlabs quality firsthand with a Elastic 50A Resin or Flexible 80A Resin silicone-like 3D print. We’ll ship a free sample part to your office.
Request a Free Sample Part
Selective laser sintering (SLS) 3D printing is the most common additive manufacturing technology for industrial applications. It offers high accuracy, high throughput, and almost limitless design freedom as the unfused powder supports the part during printing and eliminates the need for dedicated support structures.
SLS materials with silicone-like properties include TPU, TPE, and TPA, offering hardness ranges between 45A and 90A Shore. The exact availability is dependent on the printer model.
Parts produced with silicone-like SLS materials are accurate, durable, abrasion and wear-resistant, and have the highest temperature resistance of the three plastic 3D printing processes. They can be biocompatible, skin-safe, and also food-safe after post-processing. On the downside, SLS printing offers limited color and no translucency options, and designs with thin walls may warp while cooling down.
For those looking to produce real silicone parts, 3D printing can also help bridge the gap between prototyping and mass-producing silicone parts with traditional manufacturing methods.
Injection molding, thermoforming, compression molding, and silicone casting all make use of molds to create the finished silicone product. However, tooling comes with high upfront costs and weeks or months-long lead times from service providers, slowing down product development and extending the time it takes to get a product to market.
Incorporating in-house rapid tooling into the product development process empowers businesses to validate the design and material choice before transitioning to mass production and provides an affordable means to produce custom or limited series of end-use parts.
White Paper
In this white paper, learn how to combine rapid tooling with traditional manufacturing processes like injection molding, thermoforming, or casting.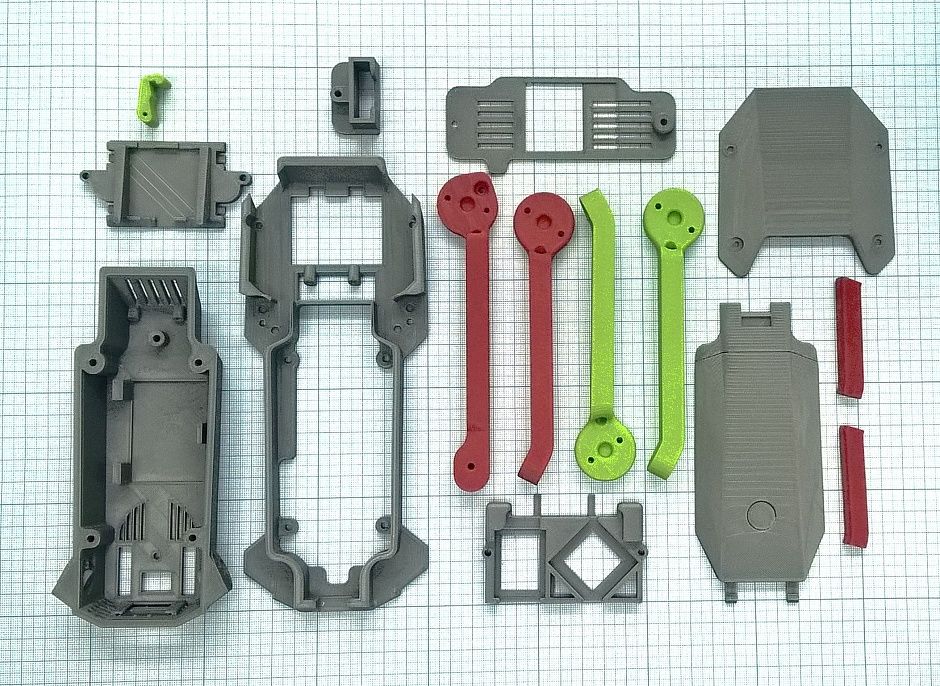
Read the White Paper
Google’s ATAP team used 3D printed stand-ins or surrogate parts instead of overmolded electronic sub-assemblies for the initial tool tuning at the factory.
Designers at the Google Advanced Technology and Projects (ATAP) lab were able to cut costs by more than $100,000 and shorten their testing cycle from three weeks to just three days using a combination of 3D printing and insert molding. Google ATAP’s team found that by 3D printing test parts, they could save time and money over using expensive electronic parts that had to be shipped in from a supplier.
Dame Products, a Brooklyn-based startup, designs products for the health and wellness industry. They employ silicone insert molding to encapsulate internal hardware for customer beta prototypes. The Dame Products product line incorporates complex ergonomic geometries fully encapsulated in a layer of skin-safe silicone in vibrant colors.
Dame Products employs silicone insert molding to encapsulate internal hardware for customer beta prototypes.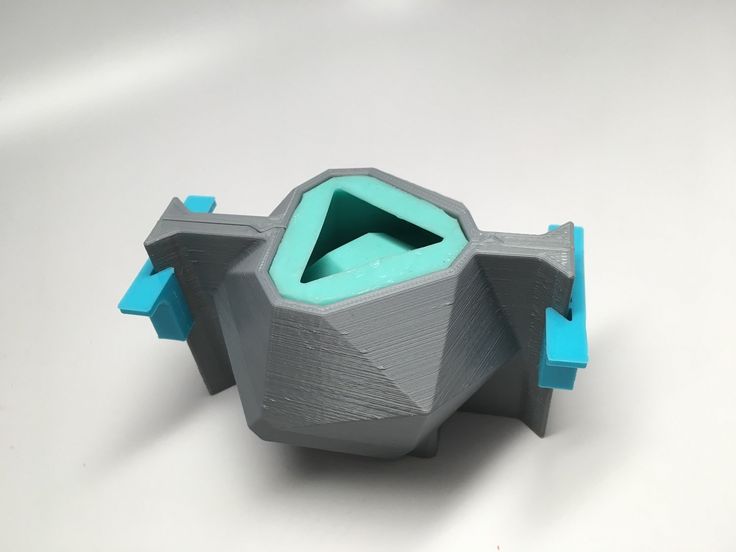
Silicone insert molding is also ideal for manufacturing low volumes of end-use parts. Advanced prosthetics manufacturer Psyonic uses the process to create fingers for prosthetic hands that have a hard 3D printed core overmolded with silicone, while Robotics manufacturer RightHand Robotics uses the same process to create grippers for robots.
Psyonic uses silicone insert molding to create fingers for prosthetic hands.
3D printed rapid tooling for compression molding can be leveraged for the production of thermoplastic, silicone, rubber, and composite parts. Product developers at kitchen appliance manufacturer OXO use 3D printing for prototyping rubbery components such as gaskets by compression molding two-part silicone using 3D printed molds.
3D printing is a fast and cheap method for creating molds for compression molding.
White Paper
Download this report for a step by step guide on 3D printed tooling for silicone part production, with mold design best practices and customer case studies.
Download the White Paper
Casting is also a popular method for producing silicone and plastic parts for medical devices, audiology, food-safe applications, and more.
Medical device company Cosm manufactures patient-specific pessaries for patients with pelvic floor disorders. They 3D print molds on an SLA 3D printer and inject biocompatible, medical-grade silicone into it to create the part. Rapid tooling with 3D printing allows them to create custom parts without the high costs of traditional tooling.
Patient-specific pessaries, produced by silicone casting.
Manufacturing custom ear molds with 3D printing has also revolutionized the audiology space, for applications like hearing aids, noise protection, and custom-fit earphones. Digital manufacturing provides greater control and accuracy compared to traditional mold production, significantly reducing the number of errors and remakes.
The step-by-step process of making custom-fit ear tips using silicone ear molds.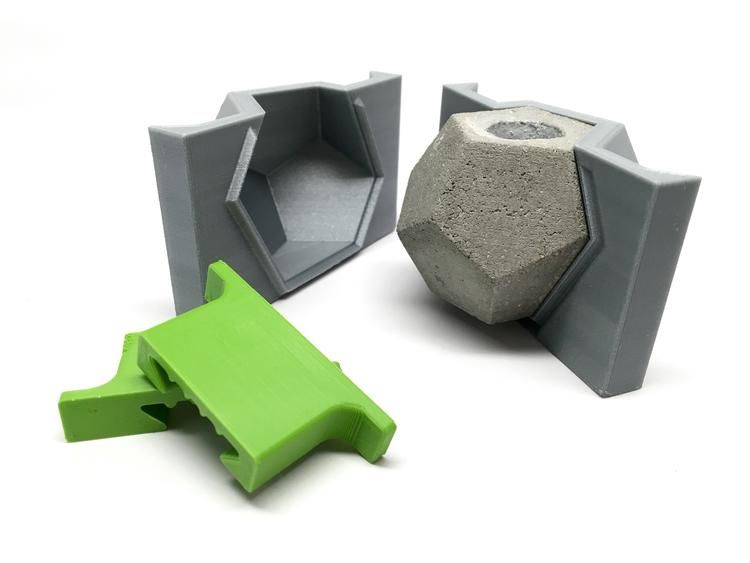
White Paper
Walk through a step-by-step guide of the process for affordably producing custom silicone ear molds using a Formlabs 3D printer and Formlabs’ Standard Clear Resin.
Download the White Paper
Silicone casting is also used in the entertainment industry. Jaco Snyman, founder of the award-winning practical prosthetic make-up effects and prop-making company Dreamsmith Studio, used a variety of these techniques for the sci-fi series “Raised by Wolves”. Leveraging the large build volume of the Form 3L SLA 3D printer, Snyman created a hyper-realistic silicone replica of an actress’s body, silicone masks for actors, human-size dummies, and more.
Making a hyper-realistic silicone replica of an actress’s face, with molds digitally designed and 3D printed on the Form 3L.
Conversely, silicone materials can also be used to create molds for molding various materials. Read our guide to learn how to make silicone molds.
| Direct Silicone 3D Printing | FDM 3D Printing | SLA 3D Printing | SLS 3D Printing | Casting or Molding Silicone Using 3D Printed Molds | |
|---|---|---|---|---|---|
| Accuracy | ★★★☆☆ | ★★★☆☆ | ★★★★★ | ★★★★★ | ★★★★★ |
| Surface Finish | ★★★☆☆ | ★★★☆☆ | ★★★★★ | ★★★★☆ | ★★★★★ |
| Design Freedom | ★★★☆☆ | ★★★☆☆ | ★★★★☆ | ★★★★★ | ★★★☆☆ |
| Ease of Use | ★★★☆☆ | ★★★☆☆ | ★★★★★ | ★★★★☆ | ★★★★★ |
| Materials | Silicones | TPU, TPE | Proprietary resins | TPU, TPE, TPA | Silicones |
| Hardness | 20A to 60A Shore | 45A to 90A Shore | 30A to 90A Shore | 45A to 90A Shore | 10A to 80A Shore |
| Price | Starting around $100,000 - $120,000, depending on the solution.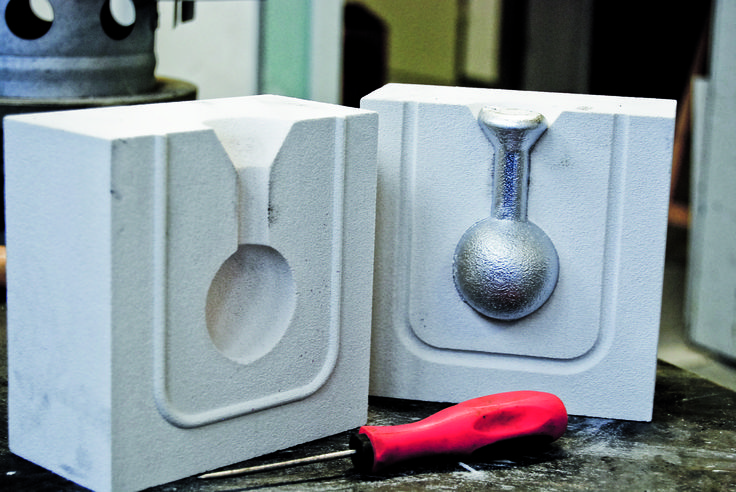 | Budget printers and 3D printer kits start at a few hundred dollars. Higher quality mid-range desktop printers start around $2,000, and industrial systems are available from $15,000. | Professional desktop printers start at $3,750, and large-format benchtop printers at $11,000. | Benchtop industrial systems start at $18,500, and traditional industrial printers are available from $100,000. | Same as SLA 3D printing for the printer. Other costs depend on the manufacturing process. |
| Pros | Uses real silicones | Affordable Can be biocompatible | Great value High accuracy Smooth surface finish Easy to use Can be durable and wear-resistant Can be translucent and colored | Durable and wear-resistant Design freedom No need for support structures Can be biocompatible and food safe | Uses real silicones Affordable |
| Cons | Expensive machinery Low accuracy Low details Limited material options | Low accuracy and resolution Limited design freedom Limited material options | Limited material options | Limited material options Rough surface finish | Labor-intenseve workflow |
| Ideal for | Niche applications | Prototyping simple parts | Functional prototyping Moldmaking End use parts | Functional prototyping End use parts | Functional prototyping End use parts |
While direct silicone 3D printers are not yet easily accessible, there are many ways to leverage the benefits of 3D printing to produce silicone or silicone-like parts.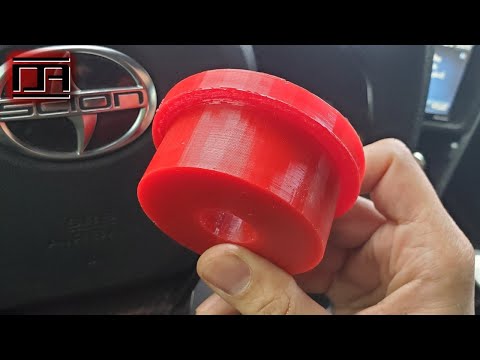
SLA 3D printing is ideal for prototyping parts with silicone-like properties and creating molds for molding real silicone parts.
Request a free sample of our flexible and elastic SLA materials or speak with a 3D printing expert today to find the right solution for your application.
Request a Free Sample Part
3d printer for silicone molds and products
With a 3D printer, you can create many complex and unusual products from various materials. In recent years, silicone 3D printing has become increasingly popular, which allows you to create implants, organ prototypes, and other useful products. Let's take a closer look at silicone printing, products that can be created with its help, the necessary equipment and the prospects for the development of new technology.
What is 3D printing silicone?
Silicone is a polymer that consists of chains of alternating silicon and oxygen atoms. This material is resistant to various temperature ranges and various chemicals.
In 2016, Wacker Chemie found the most efficient way to 3D print silicone products. Based on this technology, Fripp Design, Envisiontec, Carbon 3D developed and produced equipment and materials that made it possible to work with silicone on a 3D printer.
Silicone is most often used in the medical industry to create objects that are resistant to changing environmental conditions. Until 2016, it was possible to create medical objects from silicone only with the help of injection molding of thermoplastics (injection molding). However, the new technology of additive 3D printing allows you to create smaller parts at an acceptable cost compared to injection molded products.
3D silicone printing technology
3D printer, which can print silicone products, has the same principle of operation as an inkjet printer. Liquid molten silicone is fed through the extruder in small droplets that are superimposed on each other, forming layers. The printer software is responsible for the correct formation of lines and shapes as a whole.
The curing process is required for the silicone to cure. It is performed using ultraviolet radiation, which forms cross-links between sections of the polymer chain. Due to this, the silicone is strengthened and becomes heat resistant.
3D printed silicone inside a microgel
Silicone 3D printed inside a microgel was developed at the University of Florida. This technology makes it possible to create more durable, but at the same time flexible and comfortable implants. At the same time, the cost of their production will be significantly lower, as well as the final cost for buyers. In the future, silicone printing inside the microgel will allow the creation of various therapeutic devices and very complex structures, such as human organs and tissues.
This 3D printing method allows you to create individual products of various shapes. The printing nozzle moves along a predetermined path and extrudes liquid silicone drop by drop onto the microorganic gel substrate.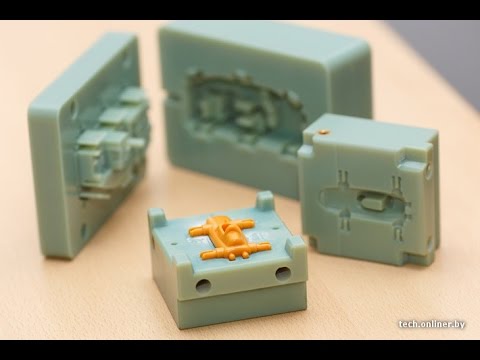 Depending on the complexity of the finished product, the printing process can take from several hours to several days.
Application of silicone mold printer
3D silicone mold printer is applicable to the following industries:
- Medicine. Silicone is biologically compatible with the human body, does not have a toxic effect on it and is resistant to the influence of an aggressive environment. Thanks to this, the material is used for the production of:
- individual implants;
- respiratory masks;
- hearing aids;
- ear prostheses;
- training preoperative organ models;
- spectacle nose pads;
- contact lenses.
- Automotive industry. Due to the resistance of silicone to extreme temperatures and solar radiation, it is used for the production of automotive plugs, hose. The presence of waterproofing properties also allow the use of silicone for the manufacture of seals in hydraulic systems and materials for sealing automotive joints.
- Manufacture of everyday or sports articles. The elasticity of silicone and the safety of its use makes it possible to produce insoles for running shoes, ear plugs for headphones, and wristbands.
- Manufacture of souvenirs and jewelry.
Which 3D printer is suitable for silicone products?
What to look for when choosing?
When choosing a 3D printer for printing silicone products, you should pay attention to three main parameters of the device:
- Extruder. It must be inkjet, as liquid silicone is used for printing.
- Integrated heater and pump. To prevent liquid silicone from cooling down during printing and not clumping, the printer must have a heater that will constantly maintain the same temperature. It is also important to have a pump. It will help to evenly supply liquid filament to the work surface from the extruder.
- Closed print area. It is necessary for the vulcanization of the printed blank.
 An ultraviolet emitter is located in the printed area, and the area itself is closed with a darkened glass dome.
German RepRap LAM PRE-SERIES 3D printer
Ideal for printing silicone products. It adopts FDM technology, in which two-component liquid silicone rubber (LSR) is mixed by a pneumatic piston and extruded by an extruder. Then each layer of material is thermally cured under the action of an infrared rod.
The FDM technology used by the printer has increased print speed, reduced waste during production, completely eliminated post-processing of the product and accelerated its time to market.
The operation of the device is controlled using the touch screen. The printer uses Simplify3D software to process 3D models.
3D printer German RepRap LAM PRE-SERIES
- Base platform heated
- Weight 80
- Material LC-3335
- Seal FDM
- Working chamber area 390 x 400 x 330 mm
- Speed 6000 mm/m or 100 mm/s
- Number of print heads 1
- Layer thickness from 100 µm
- Nozzle diameter, mm 0.
 4
4
Go to product
Top 9 Silicone 3D Printers0021
The following professional silicone 3D printers have proven themselves in the market:
- EnvisionTEC - printing medical and dental parts (Perfactory Micro, Vida HD CROWN & BRIDGE and Xede 3SP Ortho lines).
- Structo - creation of dental products (OrthoForm, DentaForm series).
- Total Z - printing of advertising, souvenir, layout and educational products (Anyform line).
- Stratasys - creation of parts for the automotive, aerospace, defense industries (Connex Objet series), printing of dental products (J720 Dental line).
- 3D Systems - printing of souvenirs, models, promotional items and educational products (sPro series).
- Sinterit Lisa Set is a system for creating advertising, souvenir, mock-up and educational products.
- Intamsys FUNMAT PRO 610 HT is an industrial printer for printing large items and testing functional parts under critical conditions.
3D printer Intamsys FUNMAT PRO 610 HT
- Software IntamSuit, Simplify 3D, Cura
- Control connection interfaces WiFi, Internet, USB
- Material PEEK, PEKK, PEI, PPSU, PC, Nylon, ABS, PLA, PVA, TPU, Carbonfiber Reinforcement
- Seal FDM
- Supported file formats STL, OBJ
- Z-axis resolution 0.0016 mm
- Resolution X and Y 0.016 mm
- Platen temperature 300°C
- Extruder temperature 500°C
- Working chamber area 610 x 508 x 508 mm
- Number of print heads 2
- Layer thickness from 50 µm
- Thread diameter 1.
 75
75 - Nozzle diameter, mm 0.4 (0.25, 0.5, 0.6, 0.8, 1.2 mm)
- Display 7" color touch screen
Go to product
Sinterit Lisa Set
- Control connection interfaces WiFi
- Laser IR 5W
- Maximum Layer Height 0.15 mm
- Maximum consumer power 24 W
- Maximum build chamber temperature 105 °C
- Maximum platform temperature for printing 190 °C
- Max extruder temperature 275 °C
- Material PA12 smooth, flexa Black
- Minimum Layer Height 0.
 06 mm
06 mm - Seal SLS
- Nutrition 110/120 V or 220/230 V
- Supported software Sinterit Studio 2016
- Dimensions (mm) Sinterit Lisa - 650x550x450; Sinterit Sieve - 600x340x330; Sinterit Sandblaster - 480x370x360
- Accuracy along X, Y axes, mm 0.1
- Speed 15 mm / hour
- Layer thickness from 75 µm
- Weight, kg Sinterit Lisa - 35;Sinterit Sieve - 22.
 5;Sinterit Sandblaster-15
- Data output format STL, OBJ, 3DS, FBX, DAE, 3MF
- Max workpiece size PA12: 90x110x130 mm, flexa Black: 110x130x150 mm
- Print area Sinterit Lisa - 150x200x150 mm; Sinterit Sandblaster - 410x310x200 mm
- operating system Microsoft Windows
Go to product
The future of silicone 3D printing
Silicone printing was originally developed for medical applications. Therefore, the most promising goal is the development and creation of silicone tissues and human organs that imitate real ones with great accuracy.
Help.
The first attempts to create a human organ from a silicone filament were made at the Federal Institute of Technology Zurich. The artificial heart in design and movement completely imitated the real one. However, the silicone model takes only 3,000 strokes to wear out, which is equivalent to a lifespan of less than one hour.
In 2021, only training and demonstration organs are printed from silicone, which help to study human physiology during training in medical specialties. The first experimental implants and prostheses also began to be developed.
Silicone 3D printing with silicone is a new, emerging technology. It is considered very promising due to the ease of use of the material, its high elasticity, wear resistance, resistance to radiation and aggressive chemical environments.
- March 14, 2021
- 8732
Get expert advice
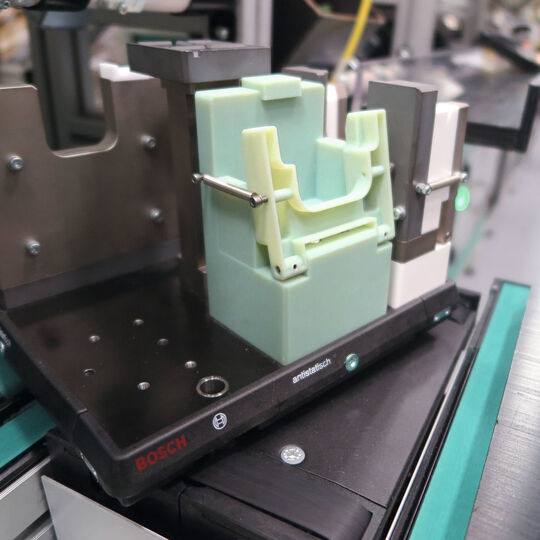
3D printing mold making
Desktop 3D printing molding allows engineers and designers to get more functionality out of a 3D printer beyond prototyping.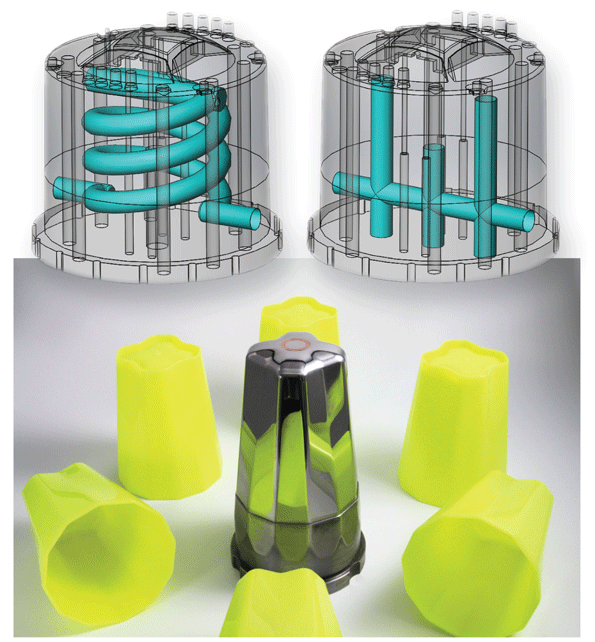 Molding opens up a world of production materials and provides the opportunity to produce small batches and sample test molds before using expensive
tools.
This booklet covers the following three mold making strategies: injection molding, high temperature molding and injection molded elastomers. Typically, molds are made from Formlabs clear resin, which is preferred for its transparency, although any standard resin can be used, and high temperature resin is ideal for processes with high temperature requirements. It should be noted that these processes are best suited for stereolithographic 3D printing (SLA) because the printed parts are isotropic and waterproof.
Prototyping and small-scale production with 3D printing tools
| Process | Equipment | Run time | Material cost (for example: 300 ml / cm3) |
| Do-it-yourself mold making and parts making | Mold 2 and injection molding machine | 5 to 24 hours (form print time) | Approximately $50 for High Temperature Resin |
| Third Party SLA Form | injection molding machine | 3-5 days | Approximately $700 for back office printing on industrial SLAs |
| Third party metal mold | injection molding machine | 1-2 weeks | Approximately $6,400 for office desk, aluminum finish |
| Outsourced mold Creation and production | no - full outsourcing | 1-3 weeks | $4,000 to $15,000 depending on volume and materials |
Silicone molding and some desktop molds are available using Formlabs Standard Resins High Temp, which has the highest HDT at 0. 45 MPa for any 3D printed media currently on the market and allows print parts that can be used for high temperature forming such as thermoforming and injection molding of materials with higher melt temperatures
Injection molding
High-resolution SLA 3D printing on the Form 2 can be used for rapid prototyping of inexpensive injection molds that can be used to make real parts from a wide variety of
thermoplastic materials. Injection molds can be used to test mold designs before manufacturing metal tooling or to produce low-volume parts
3D Printed Injection Molding covers injection molding using Formlabs clear resin printed molds. Following the release of Formlabs High Temperature Resin, designed to achieve higher heat resistance and stiffness, the booklet has been updated to describe the benefits of High Temperature Resin plates that are less likely to break due to thermal shock or temperature-related deformation
USB Device Enclosure Mold, 3D Printed on Form 2 High Temperature Resin
This mold contains a core, a cavity and two "gates" leading to the two halves of the enclosure. High temperature resin molds can be used to mold a wide range of thermoplastics without thermal stress or temperature-related deformation
Formlabs High Temperature Resin can be used to injection mold a wide range of plastics.
3D printed mold tools reproduce the exact quality of the SLA print finish on the Form 2. Forms can be printed at 100 microns for faster prototyping or the recommended 50 microns for fine detail and smoothness
electronics molded in HDPE with a High Temp tool.
This shape of the USB case has been adjusted over three iterations to remove pits, entrapped air, and partial shrinkage. Total cost of materials for prototyping this high temperature resin mold tool: $25
Thermoforms
Form 2 3D printed thermoformed dies are a fast and efficient way to create high quality vacuum formed parts for low volume production. Printed thermoformed dies can be used to make packaging prototypes, clean orthodontic retainers, and food-safe molds for chocolate confectionery.
Thermoforming dies experience less pressure than injection molds, but still reach high surface temperatures.
High temperature polymer resists deformation and surface degradation from the combined heat and pressure of thermoforming for most plastics. Standard resins may also be suitable for thermoforming with some low temperature plastics such as vinyl.
APPLICATION EXAMPLE
Formech thermoformed prototype packaging.
Thermoforming a thin sheet of polycarbonate over a high temperature polymer matrix produces a transparent piece by matching the geometry and detail of the matrix. Thermoformed packaging can be easily prototyped and incorporated into the design process along with 3D printed product prototypes, and all this is achievable on the Form 2. The printed matrix was used without additional processing and the need for UV curing. Texture is recommended in thermoforming design to prevent air trapping under the sheet - layer lines on the printed thermoforming die can be helpful in this regard.
TEMPERATURE CONTROL
High Temperature Polymer Cycle Thermoforming
The surface temperature of the die reaches 130°C. The high temperature resin is highly resistant to deflection, whereas with standard resins you must allow the print matrix to cool between cycles, otherwise warping and degradation may occur.
If temperature rise becomes a limiting factor in molding efficiency, cooling channels are an effective way to remove heat from the print. When used in conjunction with an automated thermoforming machine, the water-cooled die can produce more parts with shorter cycle times.
Conformal water channels visible in the high temperature thermoforming die.
Thermoforming die surface temperature
Conformal cooling channels are easy to implement when designing for SLA 3D printing and print successfully without any internal supports to interfere with flow. After printing, the channels are flushed with uncured resin using isopropyl alcohol. The mold is connected to a pump and a source of cold water.
Integrated water cooling as a strategy can also be applied to standard and rigid polymer parts to reduce heat dissipation when used in higher temperature environments.
Elastomer casting
Precision molds for most flexible elastomers such as silicone and urethane rubbers can be printed on the Form 2 using standard resin. The transparency of Clear Resin allows the material to be observed during the pouring or injection process. Flexible materials can be easily removed from rigid SLA printing plates, and applications from model production to functional molding can be obtained. Silicone molding can also be used to quickly replicate master prints, greatly reducing production time when multiple rigid parts and objects are needed.
APPLICATION EXAMPLE
Forms printed on Form 2 are used to create composite parts with advanced built-in features. Assembly subcomponents such as electronic, metal and SLA printed elements can be embedded and sealed in soft surface molds.
RightHand Robotics used the Form 2 to create the production blocks of their robotic gripper using urethane molding. The forms were printed in clear resin, with black resin inserts forming the internal structure.
The Form 2 printer allowed RightHand Robotics to move from prototypes to small-scale production without the need for expensive tooling. The rapid transition from original printed prototypes to production materials that have longer flex cycle life was done with 3D printed plates on the same Form 2 hardware they used for initial prototyping.
The first layer applied from RightHand Robotics' multi-stage process includes urethane compounds that can withstand multiple flex cycles while still providing the high elasticity needed to securely return the gripper to its open state.
The outer layer provides improved tactile grip and control, as well as sealing the sensor electronics with softer, lower durometer rubber.
SLA 3D printed parts can also be encapsulated inside molds to provide a rigid structure for flexible materials.