3D print layers separating
8 Ways How to Fix Layer Separation & Splitting in 3D Prints – 3D Printerly
In the 3D printing process, there is a phenomenon called layer separation, layer splitting, or even delamination of your 3D prints. It is where some layers of your 3D print don’t adhere to the previous layer properly, which ruins the final look of the print.
There are a few ways to fix layer separation, which are usually pretty quick solutions.
Hotter plastic has better adhesion than cooler plastic, so make sure your printing temperatures are high enough for your material. Also, decrease layer height, check filament quality, and clean your extrusion pathway. Using an enclosure can help out with fixing layer separation and splitting.
Many other methods work to fix layer splitting, so keep on reading to get the full answer.
Why Am I Getting Layer Separation & Splitting in My 3D Prints?
We all know how 3D prints by building a model in layers, and each successive layer is printer on top of the other one. To make sure that the product is strong, all layers must be bonded together.
Bonding in the layers is necessary to avoid any cracks in the final print or any separation in the layers.
If the layers are not bonded together properly, they can cause the model to split, and it might start to bring from different points.
Now, I am going to tell you why the layers of your 3D prints are separating or splitting. The following is the list of issues that are causing the Layer Separation and Splitting in your 3D prints.
- Print Temperature too low
- Flow Rate too Slow
- Not Proper Print Cooling
- Incorrect Nozzle Size for Layer Height
- High Printing Speed
- Extruder Pathway not Clean
- Filament Misplaced
- Use an Enclosure
How to Fix Layer Separation & Splitting in My 3D Prints?
It’s fairly easy to spot layer separation and splitting in your 3D prints, since it gives serious imperfections. It can get pretty bad depending on a number of factors as shown above.
Now that we know the causes of layer delamination, we can look at the methods on how other 3D print users fix this issue.
The video below goes into some of the solutions, so I would check this out.
1. Increase Your Printing Temperature
If the extruder temperature is lower than the required value, the filament coming out will not be able to stick to the previous layer. You will be facing the problem of layer separation here then, as the adhesion of layers will be minimum.
The layers adhere to each other through fusion at high temperatures. Now, what you need to do is increase the temperature but gradually.
- Check the average temperature of the extruder
- Start increasing the temperature at the intervals of 5°C
- Keep on increasing until you start seeing better adhesion results
- Generally, the warmer the filament gets, the better the bond between layers
2.
 Increase Your Flow/Extrusion Rate
If the flow rate means the filament coming out of the nozzle is too slow, it can create gaps between the layers. This will make it difficult for the layers to adhere to each other.
You can avoid layer separation by increasing the flow rate so that more melted filament is being extruded, and the layers get a better chance to adhere.
- Start increasing the flow rate/extrusion multiplier
- Increase the flow rate by an interval of 2.5%
- If you start to experience over-extrusion or blobs, then you should dial it back.
3. Improve Your Print Cooling
If the cooling process is not proper, it means your fan isn’t working properly. The layers would cool down quickly as the fan is working at its top speed. It would just simply keep cooling the layers instead of giving them the chance to adhere to each other.
- Start increasing the speed of the fan.
- You can also use a fan duct to attach to your extruder, which directs cool air straight to your 3D prints.
Some materials don’t work too well with cooling fans, so this isn’t always a fix that you can implement.
4. Layer Height too Big/Incorrect Nozzle Size for Layer Height
If you are using the incorrect nozzle as compared to the nozzle height, you can have trouble in printing, especially in the form of layer separation.
Mostly the nozzle diameter is between 0.2 and 0.6mm from which the filament comes out, and printing is done.
To get secure bonding of layers without any gaps or cracks, implement the following:
- ensure that the layer height has to be 20 percent smaller than the nozzle diameter
- For example, if you have a 0.5mm nozzle, you don’t want a layer height larger than 0.4mm
- Go for a bigger nozzle, which improves the chance of a firmer adhesion
5.
 Decrease Printing Speed
You need to adjust the printing speed because if the printer is printing too fast, the layers will not get the chance to adhere, and their bond will be weak.
- Decrease your printing speed in your slicer setting
- Adjust it in intervals of 10mm/s
6. Clean Extruder Pathway
If the extruder pathway is not clean and if it is clogged, the filament can have difficulty in coming out, thus affecting the printing process.
You can check if the extruder is clogged or not by opening it and pushing the filament with hands directly.
If the filament is getting stuck, you have a problem there then. It would help if you cleaned the nozzle and extruder by:
- Use a brush with brass wires which help you in cleaning off the debris
- Break the particles in the nozzle with acupuncture for better results
- You can use a nylon filament for cold pulling to clean the nozzle
Sometimes just taking apart your extrusion system and giving it a good clean from bottom, up is a good solution. Dust can easily build up on your 3D printer if you aren’t using an enclosure.
7. Check the Filament Quality
You need to check the filament first, whether it is stored at the right place or not. Some filament doesn’t require strict storage conditions, but after enough time, they can definitely weaken and drop in quality through moisture absorption.
- Buy a good quality filament for a good quality print
- Store your filament in an airtight container with desiccants before and after use (especially Nylon).
- Try drying your filament in the oven on a low setting for a few hours and see if it works better.
Oven settings vary depending on type of filament so here are the general temps according to All3DP:
- PLA: ~40-45°C
- ABS: ~80°C
- Nylon: ~80°C
I would leave them in the oven for 4-6 hours to get fully dry.
8. Use an Enclosure
Using an enclosure is the last option. You can use it if nothing else is working properly or if you are working in a cold environment.
- You can use the enclosure to keep the operating temperature constant
- Layers will get enough time to adhere
- You can then keep the fan speed slow
Overall, the separation of layers is the result of many possible reasons which have been mentioned above. You should identify your cause and try out the corresponding solution.
How to Fix Layer Separation and Avoid It?
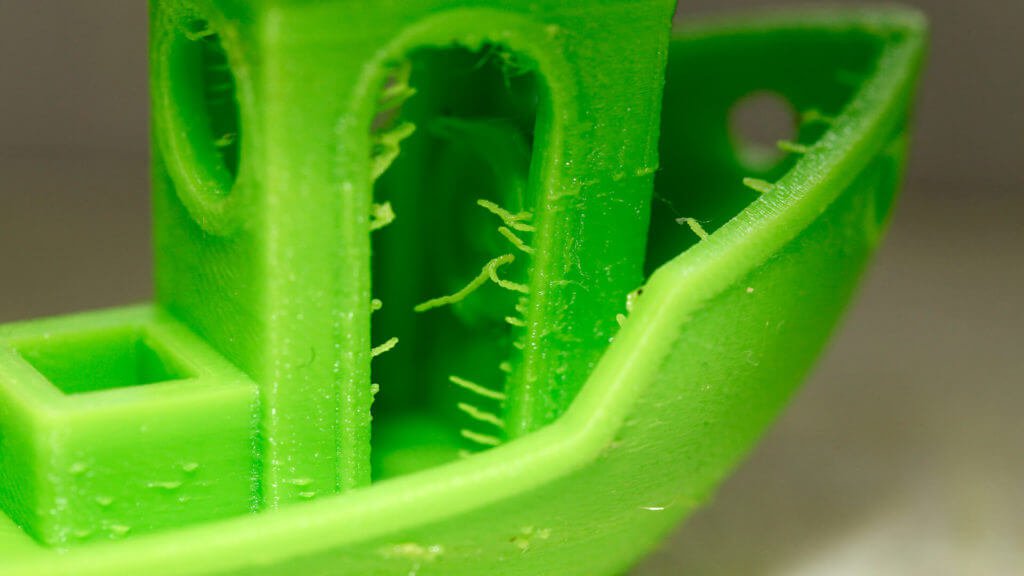
Among in 3d printing troubleshoot, layer separation could be one of the most disastrous. Not only does a print with separated layers look terrible, but it also has virtually no mechanical strength.
It’s also irreversible – by the time you see layers splitting in your project, you will likely have to start over.
Contents(show)
What Is Print Layer Separation?
Layer separation also called layer splitting or layer delamination is caused by the filament material layer’s inability to bond between layers.
Without anything to latch on to, the material expands as it cools, creating the characteristic appearance of the layer warping upward.
Reasons for 3D Printing Layer Separation
About print separate, there are so many factors that could lead to this problem. such as software setting(cure), types of filament, and printing preparation.
It is not the problem with 3d printer, you don’t need to upgrade special hardware for your printer.
Filament Type
The melting flow rate is different among 3d printer filaments. When coming back to 3d printing, some has better adhesion of layers. ABS and Nylon are two outstanding examples.
If you’re having delamination between layers with ABS or other material which needs high print temperature, switching over to something like PLA or PETG might be the easiest solution.
Nozzle is not Clean
Any residual filament, dust, or dirt in the nozzle can cause extrusion problems because of clogging.
Inconsistent extrusion can lead to poor layer adhesion and eventually, layer separation.
Improper Setting
3D printers can be quite unforgiving when dialing in the proper settings for any given filament.
Improper printer settings can lead to delamination layers. It includes cooling fan speed, layer thickness, printing temperature, and so on.
Want to Fix Layer Separation? Try These Solutions
To develop a comprehensive solution to the layer separation problem, we must look at each possible reason and try to address it.
Reduce Layer Height
When printing with an FDM printer, the rule of thumb sets the layer height at about 80% of the nozzle diameter. Any higher setting and you run the risk of layer separation.
Reducing layer height creates a “squishing” effect when the material is extruding. This action can mechanically aid layer adhesion by pushing the layers together. Adjusting the layer height settings can be one of the most straightforward fixes to layer separation.
Improve Nozzle Temperature
Plastic at a higher temperature will always bond better. You can take advantage of this behavior by increasing your nozzle temperature. If you’re having layer separation problems, try increasing the hot end temperature by 5 °C increments.
You can continue doing this as long as you’re still within the acceptable temperature range of your filament. Also, watch out for stringing or blobs – that’s a sign that your temperature is already too high. Dial down the temperature a bit and look at other possible solutions.
Slow Printing Speed
As with most 3D printing problems, taking it slow and steady is a safe approach to eliminating layer separation. In this case, you may want to reduce the speed of movement of the print head.
Try to reduce your print head movement speed by increments of 10 mm/sec until you can see a marked improvement. Ensures that enough filament extrudes out as the print head moves. It also gives the filament enough time to create strong bonds with the previous layer as it cools down.
Print In Enclosure
One of the most reliable ways to avoid layer separation is to slow down the filament’s cooling.
Allows the material to maintain high temperatures longer, thus bonding better with the preceding layer. It also redistributes thermal stress in the material to avoid the usual warping issues.
A great way to slow down cooling is to print in an enclosure. It can maintain an elevated temperature in the printing chamber and prevents heat loss to the surroundings of the 3D printer. This way is advantageous if you’re printing in a room with an open window and periodic gusts of wind.
If your 3D print does not come with a built-in enclosure, you can buy a third-party product. You can even DIY a 3D printer enclosure using inexpensive materials. Just make sure not to use materials that can melt or catch fire easily.
Check Clogged Nozzle
The clogged nozzle will almost certainly lead to under-extrusion. The layer will have holes or gaps in them and compromising layer adhesion.
Any residual filament, dust, or grime can get burnt inside the nozzle and cause a clog. To avoid this, you can use a brush with brass or steel bristle to clean the inside of the nozzle periodically.
You can also do the “cold pull” method. Insert a piece of Nylon filament inside the nozzle, heat it, cool it down, and pull it out.
If this still doesn’t work, then you can disassemble the nozzle and soak it in acetone. While you’re at it, take the time to clean your entire extruder assembly.
Improve Print Cooling
The cooling fan in your 3D printer is there for a reason. However, that does not mean that you need to use it all the time.
If you’re having problems with layer separation, the best course of action would be to turn your cooling fan off.
Other Tips You Need to Know
The solutions we have listed above all have to do with the actual 3D printing process. Just as crucial as dialing in the correct settings is making sure that you are working with a suitable filament.
Here are a few things to check on the raw material side of 3D printing.
Filament Quality
When you work with cheap and poor-quality filament, you cannot expect it to perform just as well as those coming from reputable brands.
A common characteristic of cheap filament is that they have poor diameter consistency. It will lead to extrusion problems and inconsistent layers.
If you cannot get your layers to print perfectly, you will almost certainly have layer separation problems.
Store 3D Filament Properly
It has been repeated time and time – humidity is the mortal enemy of 3D printing filaments. Filament materials are naturally hygroscopic, which means that they absorb moisture readily from the environment.
The filament that is absorbed with moisture will lead to heavy extrusion problems. Water will expand and evaporate in the hot end, resulting in layers with holes or gaps. These are weak points in layer adhesion and will eventually cause the layers to start splitting.
To make sure your filament stays in good condition, keep it in an airtight container with some desiccant.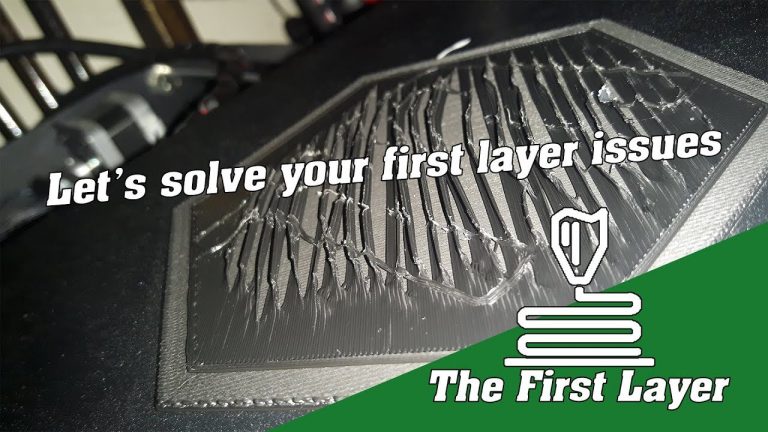 Silica gel is an inexpensive and easily accessible desiccant option. You can also consider drying your filament in an oven for 4 to 6 hours before 3D printing.
Summary
3d printer layers separate are frustrating because there’s no way to salvage. For this reason, it’s worth the time to double-check your 3D printer and slicer settings to make sure that no layer separation takes place.
It’s also essential to use high-quality filament and kept away from moisture. This may sound like a lot of work, but it is still better than letting all the filament waste.
Need Any Services? Contact Us Now!
An overview of the stages of the SLA printing process
Rapid prototyping
Experts recommend
Author: Semyon Popadyuk
Author: Semyon Popadyuk
1. Importing and editing a 3D model
2. Orienting a part and creating supports
3. Slicing (separating into layers)
4. Preparing a 3D printer
5. 3D printing a product
6. Removing a product from a 3D printer
7. Cleaning the product and removing supports
8. First sanding step
9. UV curing
10. Painting
11. Second sanding
12. Top coat
The 3D printing and prototyping industry has grown at a tremendous pace over the past few years. ProtoFab, a manufacturer of stereolithographic 3D printers and consumables, believes it's time to move beyond just 3D printing services and additive manufacturing.
ProtoFab offers a look behind the scenes of industrial 3D printing to give everyone a deeper and clearer understanding of this process.
The article and video cover all stages of the SLA printing process, from file processing to obtaining the finished product - the steering wheel of a sports car.
1. Import and edit 3D model
The first thing we need to do is import the STL file into an additive manufacturing software like Materialize Magics. This file is usually provided by the client. Specialists of the rapid prototyping center carefully analyze the model and, if necessary, perform its optimization. These changes are usually minor, but they improve the efficiency of the printing process.
Two holes need to be added to the steering wheel to be printed. This is necessary in order to make the interior space hollow and to make the product light and spectacular in appearance. If you print the steering wheel in one piece, it will be too heavy and will cost a lot more. If we don't make these holes, then at the end of the 3D printing, the uncured photopolymer will remain inside the hollow areas.
However, these holes are not needed in the finished product. Therefore, two holes should be cut out, and these round parts should be printed separately as plugs and installed after 3D printing.
2. Part orientation and support creation
It is very important that the part stays absolutely still throughout the printing process, so we need support structures. Most parts are printed at an angle because they are easier to support.
Orienting the part in a steeper or flatter position would require much more support material, which is time consuming and wastes material, and makes post-processing difficult.
You may be wondering why we form a support structure at the front and not at the back of the handlebars. The main reason is that this orientation makes post-processing easier and cleaner.
As a rule, supports are placed on a less visible side, but in this case the back of the handlebar has small indentations, the shape of which will be disturbed by supports. It will take extra time to correct these errors in post-processing, so it's easier to put supports up front. Modern software is very good at calculating exactly where these support structures should be and how many of them will be needed.
However, some manual adjustment is still required and can only be done with a lot of experience. If there is a possibility that certain parts of the product do not have enough support created by the program, the technicians will do it manually in the software. They can also identify areas where the program has "overdone" and overused material.
3. Slicing (layering)
The part is now cut into layers depending on the selected layer thickness. While ProtoFab 3D printers are capable of printing 0.05mm thick, 0.1mm is typically used unless the client's requirements are different. The reason is that 0.1 mm is already a very thin layer. Printing a 0.05 mm thick layer will take twice as long, while the cost of work will also increase significantly. In this case, the entire part with supports and a platform consists of 3385 layers.
4. Preparing the 3D printer
Now that the 3D model is ready, it's time to prepare the 3D printer. Regardless of the size of the part, the resin reservoir must always be at least 95% full or the software will not allow printing. ProtoFab uses in-house developed photopolymers specifically designed to work best with the equipment. The range of materials is quite large, and the choice of a specific photopolymer is an important part of the printing process. In this case, we use an ABS-like Formula L1 material.
The surface of the photopolymer must be absolutely flat, therefore, the formation of bubbles or foam is excluded. Bubbles are removed from the surface manually using a special tool. This process is performed immediately after filling the tank.
After that, the photopolymer is leveled by the passage of the recoater blade. The tank is equipped with sensors that detect any movement or unevenness on the surface of the material, since printing can only be done with absolutely even and stationary photopolymer.
While the tank and resin are being prepared, the operator analyzes the 3D model again. The engineer checks if the part will be stationary at every moment of construction. Of course, it is very important that the finished part is completely immobile in the tank, but it is also necessary to provide it with a sufficient number of supports, even when it is only a few layers high.
If the part deforms even by a fraction of a millimeter at the initial stage of printing, this tiny deviation will increase more and more as the printing progresses, and at the end of the process it will become simply huge.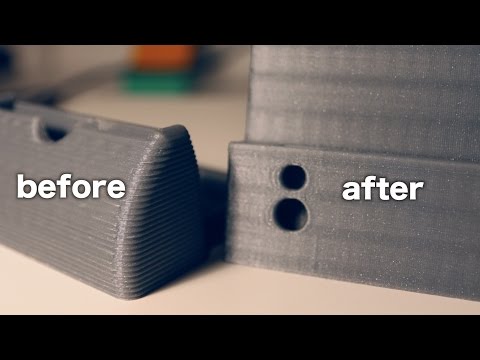 Therefore, it is very important to correctly position the supporting structures. Typically, designers will provide an excellent 3D model, and at this stage, 3D printers simply get a clear idea of what they are printing.
Now that the 3D file is fully validated, it's time to transfer it to the printer using a USB stick. It is at this stage that the final orientation of the part is determined. This step is often overlooked, but it can have a significant impact on print times.
5. 3D printed item
Now we can finally start the 3D printing process.
Each layer is laser cured, then the build platform is lowered to one layer height and the recoater blade makes one pass over the surface. After building all the layers, the platform rises to its original position, and the finished part emerges from the liquid photopolymer. This is perhaps the most exciting part of the whole process, which is so exciting to watch!
6. Removing the product from the 3D printer
Next, we need to remove the part from the surface of the platform with a scraper. Only the support material is in contact with the platform, so no extra care is required in this case. It's not scary if the base gets a little scratched or damaged.
7. Cleaning the product and removing supports
At the end of this step, we remove the part from the printer and take it to the wash. Flushing is carried out in a strictly controlled environment, using all appropriate personal protective equipment.
There are three alcohol baths in total and parts must be cleaned in each of them.
In the first bath, the part is simply soaked in alcohol, which removes most of the excess uncured photopolymer from the surface. It is necessary to ensure that all parts of the part are well soaked.
We can then move on to the second bath, where the part is cleaned with alcohol, which helps remove even more photopolymer residue from the surface. At this stage, the bulk of the support material is torn off by hand. Supports are specially designed to be easy to remove, so they come off quite easily, and the alcohol aids this process. However, it is generally not possible to completely remove all support material by hand, and more thorough cleaning and sanding of the part will be required later.
Now moving on to the third bath, where an additional brushing takes place to get rid of the remaining support material that was not removed in the second bath. A pneumatic blower can be used to process hard-to-reach places, which displaces the remaining unnecessary material and helps to evaporate the alcohol. The whole part is completely blown in this way. Less pliable support material must be removed by hand. This is done with a chisel and other tools, and sometimes quite a lot of effort is required.
8. First sanding step
This is followed by pre-sanding to smooth out the roughest areas.
There will be a few more sanding steps to follow, but right now the resin is still too soft and needs to be handled carefully so as not to press too hard and damage the part.
This is just a preliminary sanding to prepare the part for post-curing, during which the remaining tiny support particles are removed.
9. Curing in UV oven
SLA prints generally need to be post-cured in a UV oven. This is due to the fact that at this stage the polymerization has not yet been completed, and the alcohol baths, which facilitated the removal of supports, also softened the part itself in the process.
10. Painting
Now it's time to move into the room where the additional sanding and first paint application is done. At this point, the small hole plugs that were printed with the steering wheel are inserted into the corresponding holes. After applying the paint, the seams will not be visible.
Painting is carried out in a laboratory where all necessary personal protective equipment must be used at all times. This is necessary to maintain the health of personnel, as well as to maintain the sterility of the environment so as not to contaminate the painted surface with hair, dust and other foreign objects.
First, the handlebars and plugs are sprayed with a dark primer to prepare the part for sanding. At this stage, the color does not matter.
11. Second sanding step
After applying the primer, additional sanding is carried out. The part is sanded with such care that the first layer is almost completely removed. In our case, the steering wheel was polished for 4 hours.
This process ensures an absolutely smooth surface and prepares it for the second stage of painting. Now you can apply the next layer, but it's still not the outer coat. It serves as the basis for applying subsequent required colors. The paint used is sprayed very thinly, and care must be taken to ensure that no bubbles or bumps appear on the surface. This coating is also applied to the end caps to prepare them for the next painting step.
12. Top coat application
Then comes the stage of final painting. Three different colors are used for this steering wheel: black, silver and brown. When applying silver and brown paint, the remaining areas of the wheel must be covered with adhesive tape. This is not an easy task that requires a lot of patience and precision. A millimeter or two to the side - and the paint will fall into those areas where it should not be, and thereby spoil the appearance of the finish.
Silver paint is applied to the completely closed part. The exposed areas around the edges will also be covered with brown paint to give volume thanks to the three colors.
After all stages of painting are completed, the plugs are installed - and the steering wheel is ready!
The whole process takes 2-3 days, which is much faster than traditional methods.
Material provided by ProtoFab
Want to order a free test print or run a project on ProtoFab equipment? Contact iQB Technologies!
Article published on 06/27/2019, updated on 04/26/2021
10 rules for preparing a model for 3D printing / Habr
Download the model, print it, use it - what could be easier!? But, if we talk about FDM 3D printers, then not every model can be printed, and almost every model (not prepared for 3D printing) has to be prepared, and for this it is necessary to imagine how this 3D printing goes.
First, a couple of definitions:
Slicer is a program for converting a 3D model into a control code for a 3D printer. (There are plenty to choose from: Kisslacer, Slic3r, Skineforge, etc.). It is necessary, because the printer will not be able to immediately eat the 3D model (at least not the printer in question).
Slicing (slicing) is the process of translating a 3D model into a control code.
The model is cut (sliced) in layers. Each layer consists of a perimeter and/or fill. The model may have a different percentage of filling with a fill, and there may not be a fill (hollow model).
On each layer, movements occur along the XY axes with the application of a plastic melt. After printing one layer, it moves along the Z axis to the layer above, the next layer is printed, and so on.
1. Mesh
Intersecting faces and edges can lead to funny slicing artifacts. Therefore, if the model consists of several objects, then they must be reduced to one.
But it must be said that not all slicers are mesh-sensitive (for example, Slic3er).
And even if the grid is crooked, and it’s too lazy to fix it manually, then there is an excellent free cloud service cloud.nettfab.com that will help in most cases.
2. Flat base
Desirable, but not mandatory. A flat base will help the model stay on the printer table better. If the model peels off (this process is called delamination), then the geometry of the base of the model will be broken, and this can lead to a shift in the XY coordinates, which is even worse.
If the model does not have a flat base or the base area is small, then it is printed on a raft - a printed substrate. The raft damages the surface of the model it comes into contact with. Therefore, if possible, it is better to do without it.
3. Wall thickness
The walls must be equal to or thicker than the nozzle diameter.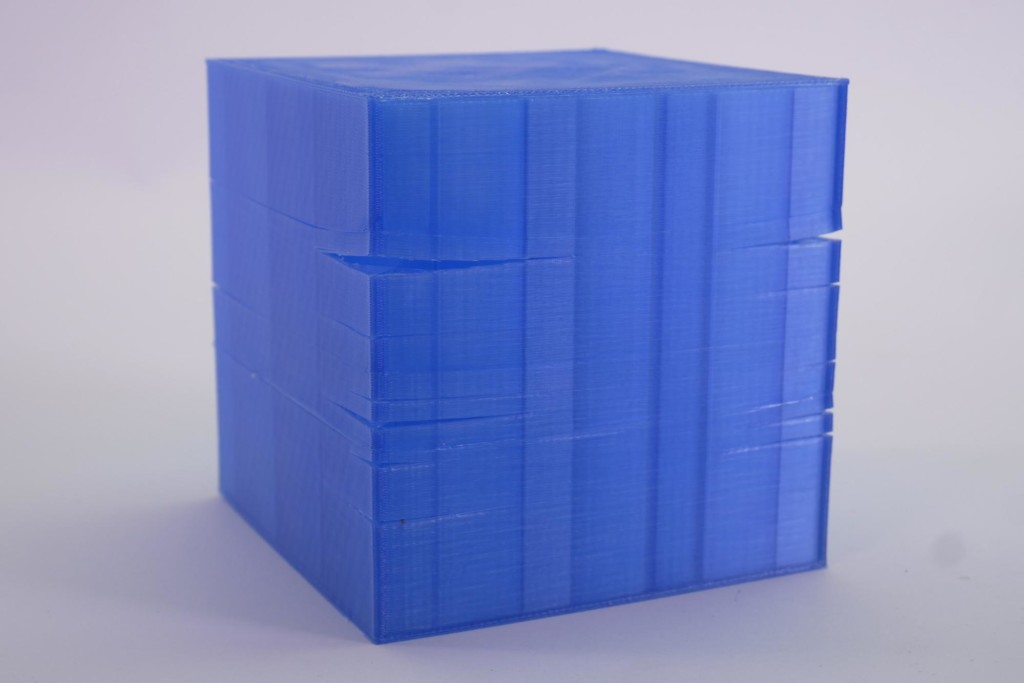 Otherwise, the printer simply will not be able to print them. The wall thickness depends on how many perimeters will be printed. So with 3 perimeters and a nozzle of 0.5mm, the wall thickness should be from 0.5, 1, 1.5, 2, 2.5, 3mm, and above it can be any. That is, the wall thickness should be a multiple of the nozzle diameter if it is less than N * d, where N is the number of perimeters, d is the nozzle diameter.
4. Minimum overhangs
Each overhanging element requires a supporting structure - support. The fewer overhanging elements, the less supports you need, the less material and printing time you need to spend on them, and the cheaper the print will be.
In addition, the support spoils the surface in contact with it.
It is allowed to print without wall supports, which have an inclination angle of not more than 70 degrees.
5. Precision
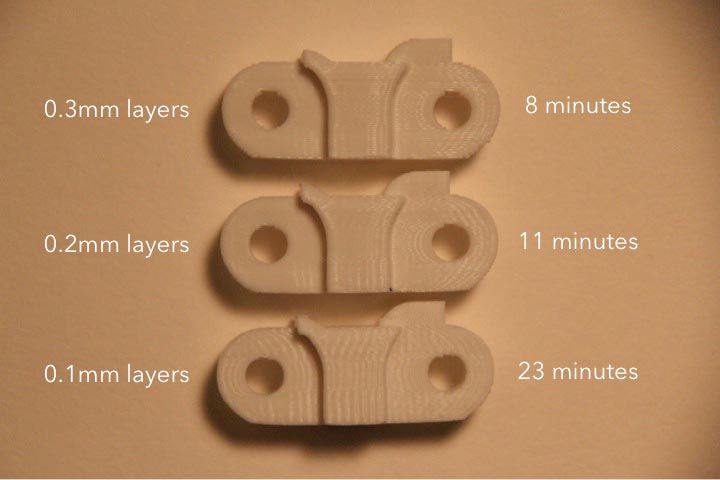
Accuracy along the XY axes depends on backlash, structural rigidity, belts, in general, on the mechanics of the printer. And it is about 0.3 mm for hobby printers.
The Z-axis accuracy is determined by the layer height ( 0.1-0.4 mm). Hence, the height of the model will be a multiple of the height of the layer.
It should also be taken into account that after cooling, the material shrinks, and at the same time the geometry of the object changes.
There is also a software side of the problem - not every slicer correctly processes internal dimensions, so it is better to increase the diameter of the holes by 0.1-0.2 mm.
6. Small parts
Small details are quite difficult to reproduce on an FDM printer. They cannot be reproduced at all if they are smaller than the nozzle diameter. In addition, when processing the surface, small details will become less noticeable or disappear altogether.
7. Bottlenecks
Bottlenecks are very difficult to handle. If possible, it is necessary to avoid such places that require processing, which cannot be approached with a sandpaper or a microdrill.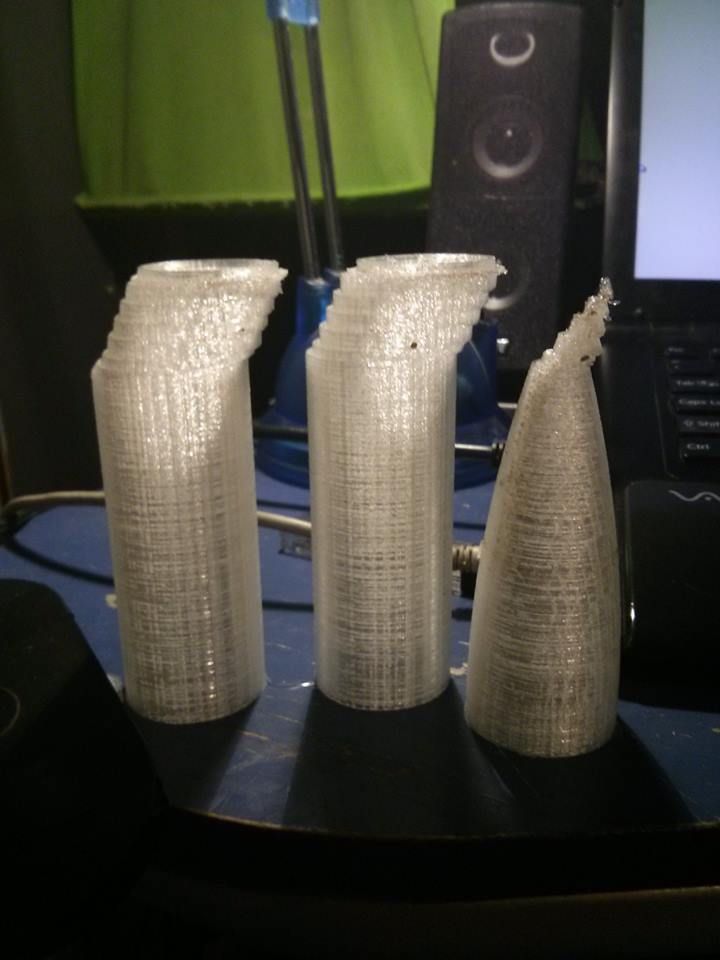 Of course, you can treat the surface in a solvent bath, but then small elements will melt.
8. Large models
When modeling, it is necessary to take into account the maximum possible dimensions of the print. If the model is larger than these dimensions, then it must be cut in order to print in parts. And since these parts will stick together, it would be nice to immediately provide connections, for example, a dovetail.
9. Desktop location
How to place the model on the desktop depends on its strength.
The load should be distributed across the print layers, not lengthwise. Otherwise, the layers may disperse, because. adhesion between layers is not 100%.
To make it clear, let's look at two L-shaped models. The lines show the print layers.
The strength of the printed part depends on how the force is applied relative to the layers. In this case, a small force will be enough for the right "G" to break it.