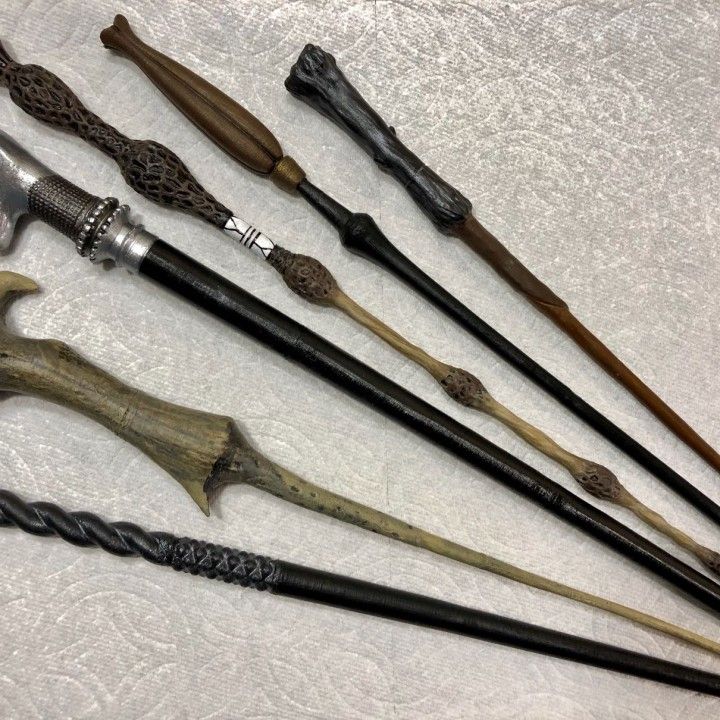
Wand 3d print
3d Printed Wand - Etsy.de
Etsy is no longer supporting older versions of your web browser in order to ensure that user data remains secure. Please update to the latest version.
Take full advantage of our site features by enabling JavaScript.
Find something memorable, join a community doing good.
(269 relevant results)
3D Printed Illuminated Wand Prop
Introduction
In this tutorial, we will learn about how to create a theatrical prop for a performance by 3D printing a wand and adding an LED.
Required Materials
To follow along with this project tutorial, you will need the following materials. You may not need everything though depending on what you have. Add it to your cart, read through the guide, and adjust the cart as necessary.
Resistor Kit - 1/4W (500 total)
In stock COM-10969
180
Favorited Favorite 185
Wish List
Coin Cell Battery - 20mm (CR2032)
In stock PRT-00338
Favorited Favorite 33
Wish List
Coin Cell Battery Holder - 20mm (Sewable)
In stock DEV-08822
4
Favorited Favorite 13
Wish List
Heat Shrink Kit
30 available PRT-09353
7
Favorited Favorite 39
Wish List
LilyPad Slide Switch
In stock DEV-09350
2
Favorited Favorite 25
Wish List
Hook-up Wire - Black (22 AWG)
In stock PRT-08022
1
Favorited Favorite 19
Wish List
LED - Super Bright White (25 pack)
In stock COM-09850
2
Favorited Favorite 16
Wish List
Tools
You will need a soldering tools, a 3D printer, and ABS filament. A heat gun or hot air rework station is optional for applying heat to heat shrink or if you want to smooth out the edges of hot glue.
Heaterizer XL-3000 Heat Gun
In stock TOL-10326
$14.95
19
Favorited Favorite 49
Wish List
Soldering Iron - 60W (Adjustable Temperature)
In stock TOL-14456
$16.50
16
Favorited Favorite 43
Wish List
Solder Lead Free - 15-gram Tube
18 available TOL-09163
4
Favorited Favorite 14
Wish List
ABS Filament 3mm - 1kg (Black)
Retired TOL-12954
1 Retired
Favorited Favorite 3
Wish List
TAZ 6 3D Printer
Retired TOL-13880
2 Retired
Favorited Favorite 11
Wish List
Wire Strippers - 20-30AWG
Retired TOL-14763
3 Retired
Favorited Favorite 0
Wish List
You will also need:
- Scissors
- Hot Glue Gun and Glue Sticks
- Sand Paper or Filer
Suggested Reading
If you aren't familiar with the following concepts, we recommend checking out these tutorials before continuing.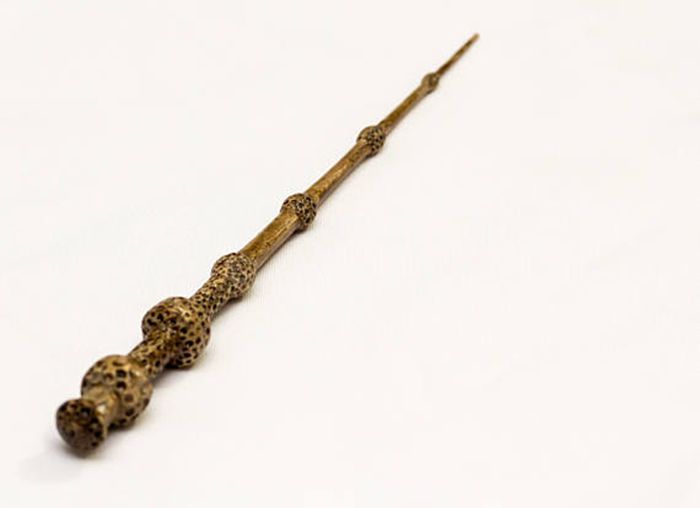 The flashlight kit is a good beginning kit to start with if you have not soldered before!
How to Power a Project
A tutorial to help figure out the power requirements of your project.
Favorited Favorite 66
LilyPad Buttons and Switches
Learn about the button and switch offerings in the LilyPad line and how to use them.
Favorited Favorite 2
Flashlight Kit
This is an assembly guide for the SparkFun Flashlight Kit, a basic learn to solder kit.
Favorited Favorite 3
3D Print it
After browsing Thingiverse, the model that I found appealing was “jakereeves” elder wand. Head over to the thing and download the files to print the model of your size. Since the print area is small, you will need to print the part in two pieces.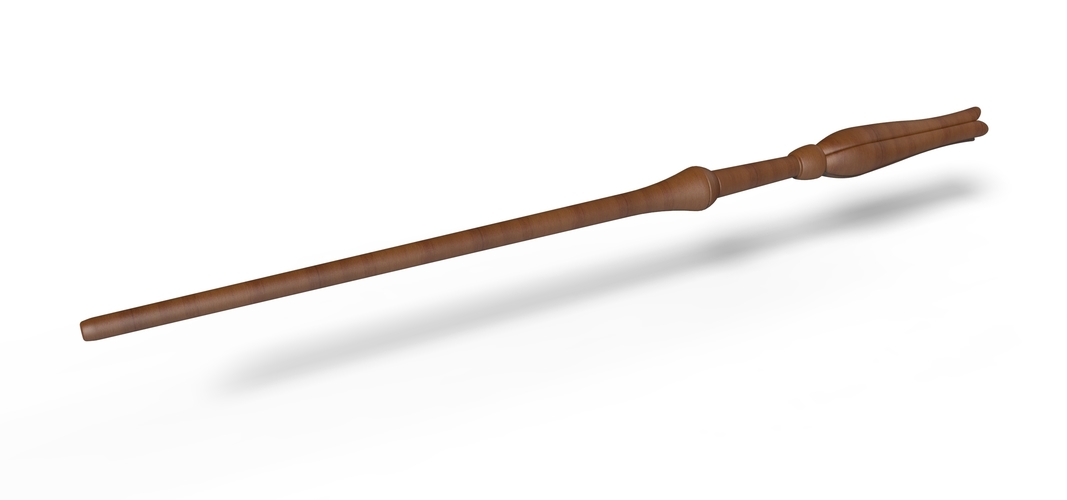
Thingiverse: The Elder Wand
Understanding Your Circuit
The circuit is simple and consists of an LED, 10Ω resistor, LilyPad switch, and a battery holder. I chose to add a current limiting resistor between the anode (longer leg) of the LED and "+" terminal of the battery holder. The resistor was probably not necessary since a coin cell is not able to source enough current to damage the LED. Nonetheless, a resistor was still added as good practice. The LilyPad switch was added between the cathode (shorter leg) of the LED and the "--" terminal of the battery holder.
While the orientation of the switch did not affect the overall functionality of the circuit, I did decided to have the ON side of the LilyPad switch facing toward the LED for the user. Also, the LilyPad coin cell holder was a bit big compared to the size of the wand so a smaller holder was chosen for the project. There will be markings on the holder to indicate the "+" and "--" terminals with the alternative holder.
| Dimension of LilyPad Coin Cell Holder [PRT-10730] | Dimension of Coin Cell Holder [DEV-08822] |
Hardware Hookup
Note: I used a Lulzbot Taz 5 for the print. The Lulzbot Taz 6 should have a sufficient enough area to print the wand pieces.
After printing the wand on your 3D printer and removing it from the print area, you will need to remove the raft support under the wand. Carefully remove support using pliers. With my settings, there was also some support printed in the handle that needed to be removed before gluing the two pieces together. When ready, add some hot glue in the dimple of the handle and join the two pieces together.
Once assembled, your wand should look similar to the image below.
Let's start on the electronics side of the wand. The super bright white LED was bright but hard to see from all angles. To diffuse the LED and increase the viewing angle of the LED, you will need to sand the epoxy lens. Using sand paper or file, sand the outside of the LED. Make sure to hold the legs close to the LED to avoid damaging pins coming out of the epoxy lens.
Wrap a current limiting resistor around one terminal of the LED. In this case, I added a 10Ω resistor to the longer leg of the LED (i.e. +, anode side). Then solder and trim down the remaining terminal with a flush cutter. Make sure to be careful when handling the resistor terminals since they are thin compared to the terminals of the LED.
Cut two solid core wires so that they are able to run along the length of the wand. You will want a little extra room to work with the wire. Strip the wire ends and solder one wire to the shorter leg of the LED (i.e. --, cathode side). Then solder the second wire to the other end of the resistor.
Note: While you can use stranded core wire, solid core wire will hold its shape better compared to stranded wires.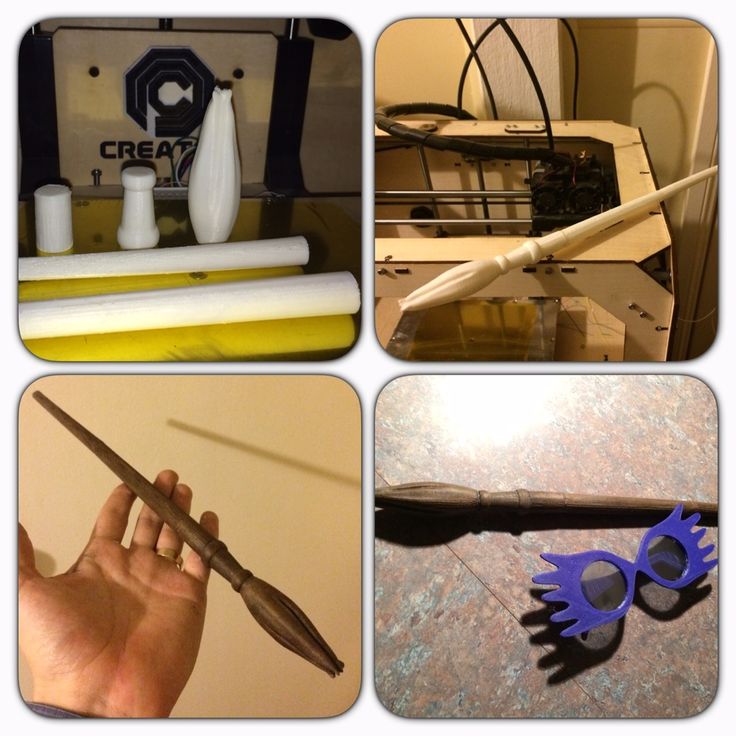
Cut some heat shrink to cover the exposed terminals of the LED and resistor. Slide the heat shrink down the wires and over the terminals. Wrap the wires around the wand. You will need to use one hand to hold the wires down as you twist the wires around the wand. Make sure the the wires are secure to the wand. If you are satisfied with the length of wires provided for the switch and coin cell holder's "+" terminal, apply heat to the heat shrink.
Before soldering wires to the switch and the coin cell battery holder, take note of the location of where the components will be added. The switch will go on the top of the wand between grooves shown in the image below. The battery holder will go underneath the wand (where the raft support was removed) between the grooves as shown in the image.
You should have enough wire to add a switch and battery holder. Solder the wire that was from the LED's cathode side (i.e. "-", longer leg) to the terminal adjacent to the ON position. If you are unsure of the polarity, test it out with a coin cell battery or multimeter.
Tip: The plated through hole on the LilyPad switch was designed to provide enough area for contact when using conductive thread and hold the component against fabric. However, you can still solder to the pad. If necessary, you could hook and clamp the wire down against the hole using pliers. You may need to use a 3rd hand or tape to hold the wire and switch down when soldering the joint.
Carefully bend the terminals of the coin cell holder using the end of a wire stripper so that it can fit nicely between the grooves of the wand.
Strip the other end of the wire that is connected to the resistor and slide the exposed ends of the wire through the top of the "+" terminal's through hole. If you are satisfied with the length, solder the wire to the terminal. Then cut and strip another piece of wire to add between the switch's OFF position and the holder's "--" terminal.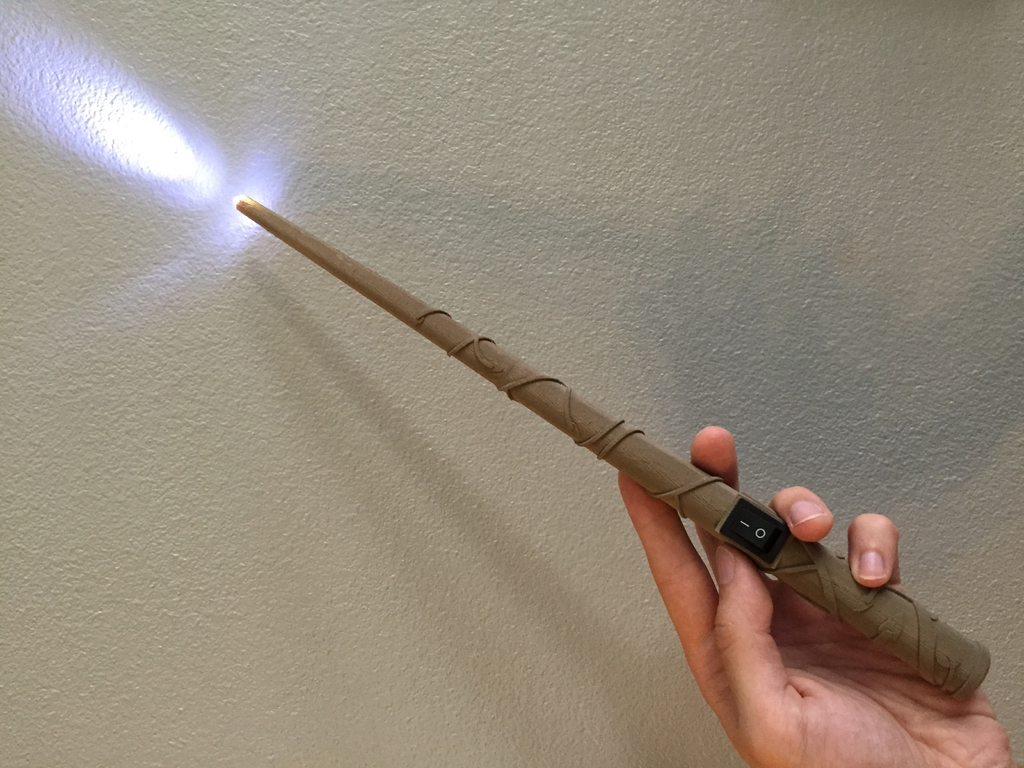
At this point, test out the connections with a coin cell battery or multimeter. Make sure the switch is flipped to the ON position. If you are using a coin cell battery, the battery does not need to be fully inserted in the coin cell holder to light up.
Cut some clear heat shrink and slide it over the LED and wand's tip. Apply heat to the heat shrink.
If you are satisfied with the connections, hot glue the bottom of the switch and coin cell battery holder to the wand. Avoid adding too much hot glue on the coin cell battery holder. If the holder's contacts to the battery are covered, it can interfere with the circuit causing the LED to not light up. Once the hot glue has cooled down, fully insert the coin cell battery into the holder.
The wand's handle should look similar to the image below.
Your fully assembled 3D printed illuminated wand should look similar to the image below!
If you have not already, flip the switch to power the LED. Even in a bright room, the diffused LED was still visible!
| Illuminated Wand in Bright Room | Illuminated Wand in Low Light |
Repeat the steps above to make more wands as necessary for all of your wizards!
Stress Testing in the Field
Rehearsals
How did it go when I handed the illuminated wands over to my students? Well, they did not mind the circuit being wrapped around on the outside of the wand. The kids started saying magical incantations, ran around flicking imaginary balls of energy, and tried making things levitate. As a result, NO ONE WAS FOCUSED. Luckily, I handed them their illuminated wands during their last rehearsal before the fall show. At least they were really in character?
Show Time!
When it came time for the show, everything went as planned. The illuminated wands lasted throughout tech, during the performance, and after the show. Here’s a picture of the team after they went on!
Making it Better
There’s always room for improvement. After the project was completed, I had a few ideas of making the prop more functional. Below are a list of possible upgrades and improvements that could be implemented for future builds.
- Microcontroller and Sensors -- If I had more time, I would have wanted to add a microcontroller and sensors (i.e. an accelerometer and gyro) to each of the wands so that the LED would only turn on based on the gestures.

- Custom 3D Model -- I would have also wanted to design a wand from scratch to include the electronics on the inside similar to the other models found on Thingiverse.
Resources and Going Further
For more information related to the project, check out the resources below:
- Thingiverse: The Elder Wand
Need some inspiration for your next project? Check out some of these related tutorials:
Prototype Wearable LED Dance Harness
A project tutorial to add an extra effect for dancers performing a choreographed piece. The harness can be added quickly under a costume.
Favorited Favorite 4
TeensyView Hookup Guide
A guide to using the TeensyView OLED board to display text and graphics.
Favorited Favorite 5
Interactive 3D Printed LED Diamond Prop
In this tutorial, we will learn about how to create an interactive theatrical prop for a performance by 3D printing a translucent diamond prop using a non-addressable RGB LED strip and AT42QT1011 capacitive touch sensing.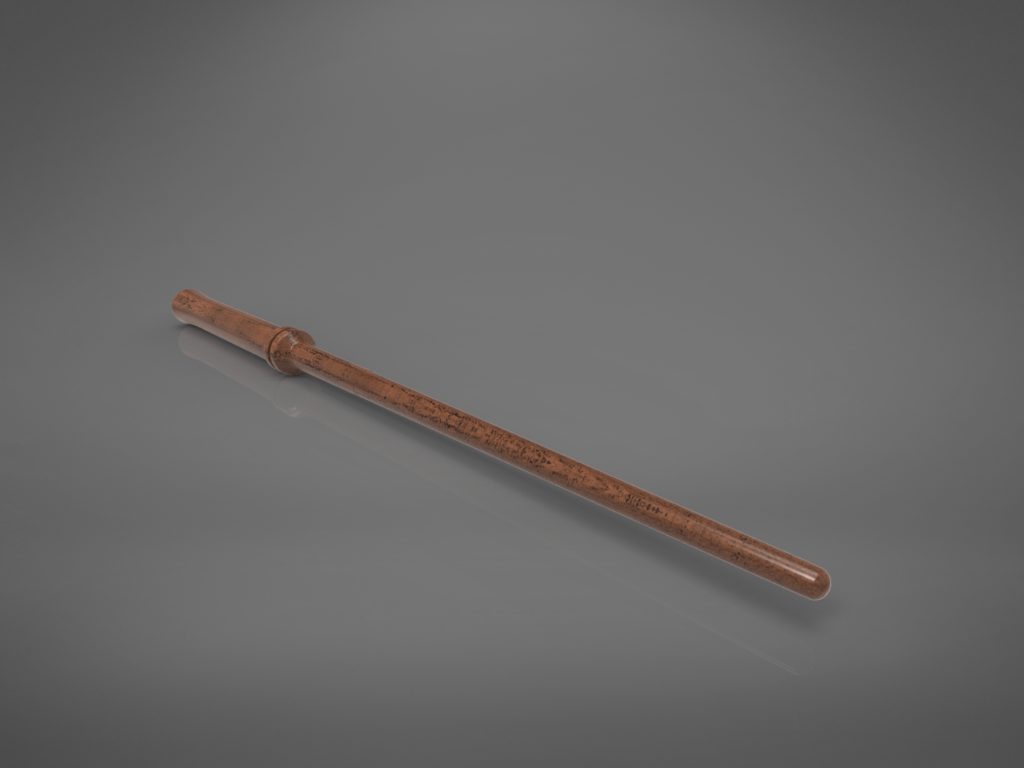
Favorited Favorite 5
Or check out some of these blog posts for ideas:
Electronic Campfire
March 4, 2015
Favorited Favorite 2
Hardware Hump Day: One-Day Lightsaber Build
May 3, 2017
Favorited Favorite 0
Shades of Gray in the 3D Printing Marketplace
February 21, 2018
Favorited Favorite 2
Making Magic with EasyVR
December 20, 2018
Favorited Favorite 1
E. coli turned into a 3D printing ink factory
19:26 11/23/21 5.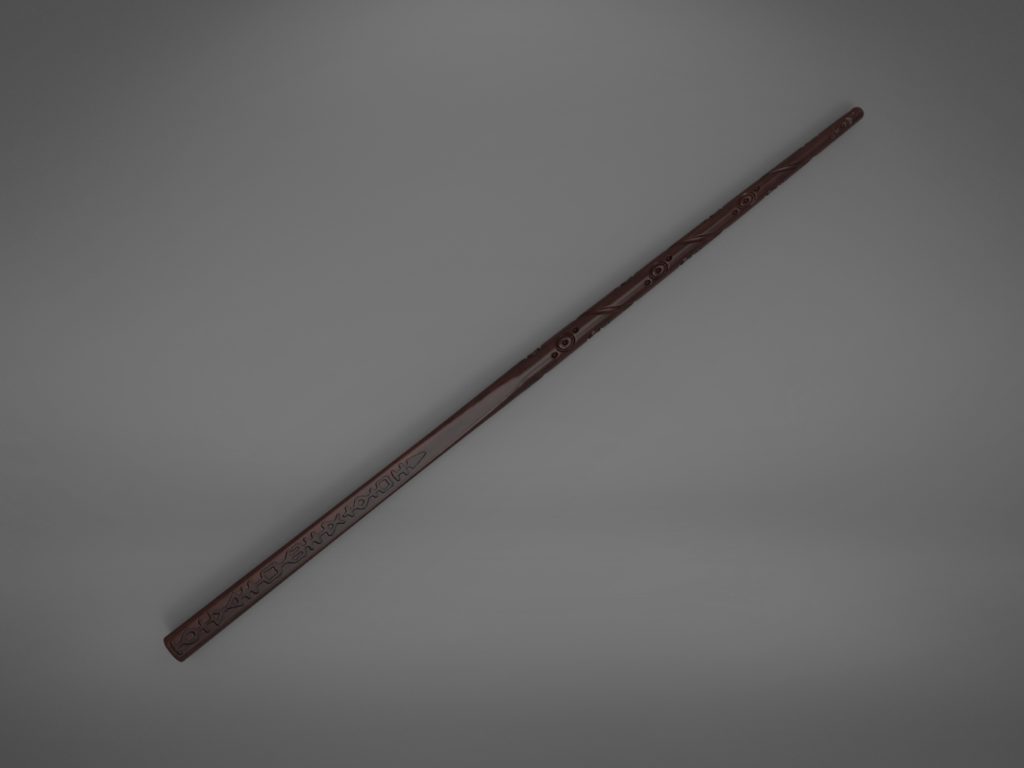 5 3D printing Biology
Anastasia Kuznetsova-Fantoni
American technologists created a biological ink for 3D printing, all components for which are synthesized by E. coli. the same The bacterium in various modifications is also used to fill the hydrogel. Scientists experienced E . coli in three experiments - inside of the printed design, bacteria synthesized an anti-cancer drug, endoribonuclease, as well as a protein that binds toxic bisphenol. Work published in Nature Communications .
Before printing individual organs on a 3D printer scientists have not yet reached, but they can already create single cellular structures. AT hydrogel is often used as ink, which contains, for example, tissue spheroids are conglomerates of cells. This approach was used in 3D Bioprinting Solutions, you can read more about their printer in our Space Organautics article. The device of this company even flew to the ISS, and then he printed bone tissue in space. In addition to tissue spheroids, for printing used stem cells of the small intestine and epithelial cells of the stomach.
Miscellaneous additives in hydrogels (collagen or the extracellular matrix of the omentum) can help in printing by creating an additional scaffold for cells and mimicking their natural environment. It enhances cell survival and increases strength designs.
Neel S. Joshi of Harvard The university and its colleagues approached the creation of 3D ink from a different angle. Biologists did not add matrix components into a ready-made hydrogel, and the hydrogel was synthesized on basis of the extracellular matrix. To do this, the researchers taught E. coli ( Escherichia coli ) produce CsgA-alpha and CsgA-gamma proteins. They are monomers, to which scientists have attached fibrin domains. The latter allow proteins spontaneously assemble into chains, just like fibrin monomers when formation of a blood clot.
Of these nanofibers and a hydrogel was obtained, to which, at the second stage, scientists added all the same E. Coli genetically modified in three different ways. In the first case, bacteria were isolated in extracellular matrix drug for cancer - azurin. The synthesis of the substance was activated after the addition isopropyl-beta-D-1-thiogalactopyranoside.
In the second case coli, secreted into the extracellular matrix proteins that bind toxic bisphenol. In the third experiment E. Coli was taught to synthesize endoribonuclease MazF, which inhibited cell growth. It was also activated after the addition of isopropyl-beta-D-1-thiogalactopyranoside.
All three models coped with the tasks, so scientists believe that they technology has great potential, including for printing 3D structures in space, where resources are limited. Its advantage is that it does not use any additional polymers to create a hydrogel, but relies entirely on components synthesized by Escherichia coli.
3D printing of structures with living cells is now booming. We recently talked about the fact that Chinese scientists, together with colleagues from Belgium and the United States have developed a 3D bioprinter that can print polymer forms with living cells through various tissues.
Anastasia Kuznetsova-Fantoni
Found a typo? Select the fragment and press Ctrl+Enter.
18:30 27.10.20 2.4 materials 3D printing
The irregularity of 3D printing made it possible to create a plastic analogue of fabric
Grigory Kopiyev
American engineers have learned how to print mesh structures on a 3D printer, which are similar in structure and properties to fabric. They are obtained when the material exits the printer extruder unevenly.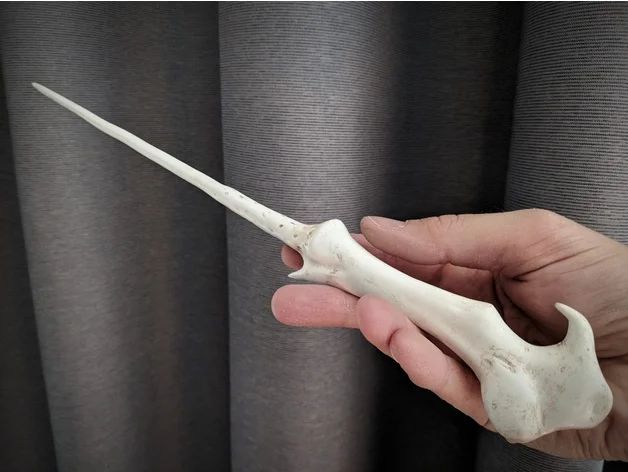 The method allows you to create a "fabric" structured at different scales, designed for different applications, say the authors of the article presented at the UIST 2020 conference.
Read more
Antibacterial plastics
References :
1. Ziegler-Graham, K.; MacKenzie, E.J.; Ephraim, P. L.; Travison, T. G.; Brookmeyer, R. Estimating the prevalence of limb loss in the United States: 2005 to 2050. Arch. Phys. Med. Rehabil. 2008, 89, 422-429. [CrossRef] [PubMed]
2. VA Office of Inspector General. Helathcare Inspection Prosthetic Limb Care in VA Facilities; VA Office of Inspector General: Washington, DC, USA, 2011.
3. Kuret, Z.; Burger, H.; Vidmar, G.; Maver, T. Adjustment to finger amputation and silicone finger prosthesis use. Disabil. Rehabil. 2018.1-6. [CrossRef] [PubMed]
4. Biddiss, E.A.; Chau, T.T. Upper limb prosthesis use and abandonment: A survey of the last 25 years.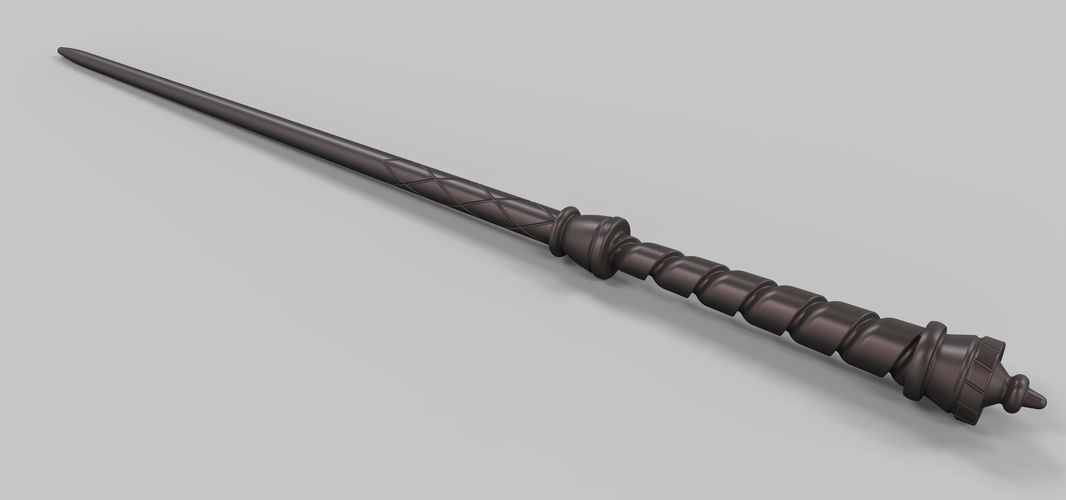 Prosthet. Orthot. Int. 2007, 31, 236-257. [CrossRef] [PubMed]
5. Butkus, J.; Dennison, C; Orr, A.; Laurent, M.S. Occupational Therapy with the Military Upper Extremity Amputee: Advances and Research Implications. Curr. Phys. Med. Rehabil. Rep. 2014.2.255-262. [CrossRef]
6. Routhier, E; Vincent, C; Morissette, M.J.; Desaulniers, L. Clinical results of an investigation of pediatric upper limb myoelectric prosthesis fitting at the Quebec Rehabilitation Institute. Prosthet. Orthot. Int. 2001, 25,119-131. [CrossRef] [PubMed]
7. Bosnians, J.; Geertzen, J.; Dijkstra, P.U. Consumer satisfaction with the services of prosthetics and orthotics facilities. Prosthet. Orthot. Int. 2009, 33, 69-77. [CrossRef] [PubMed]
8. Shim, J.-H.; Lee, Y.-H.; Lee, J.-M.; Park, J.M.; Moon, J.-H. Wrist-driven prehension prosthesis for amputee patients with disarticulation of the thumb and index finger. Arch. Phys. Med. Rehabil.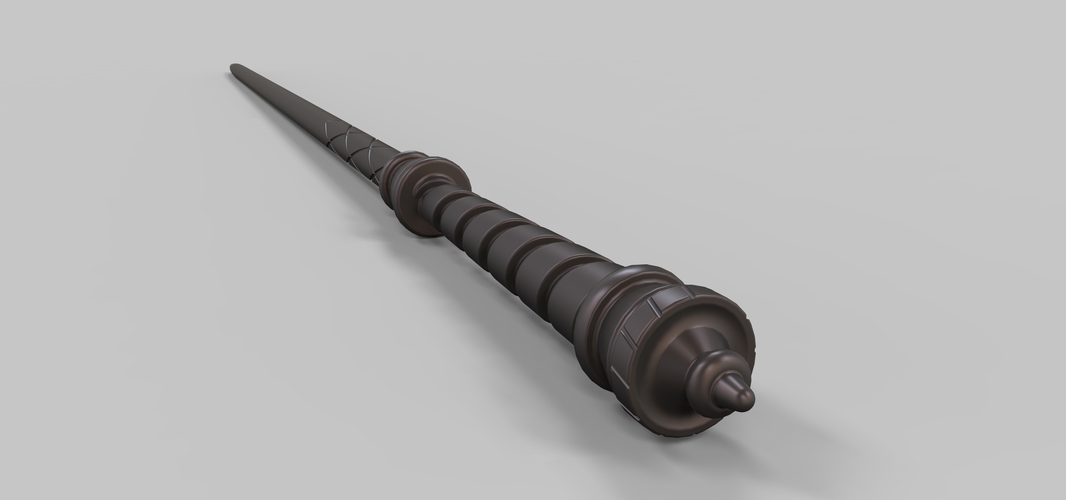 1998, 79, 877-878. [CrossRef]
9. Nallegowda, M.; Singh, U.; Khanna, M.; Babbar, A. Temporary Upper Limb ALIMS Prostheses—A New Design. Indian J. Phys. Med. Rehabil. 2010, 21, 1-4.
10. Bowker, J.H.; Michael, J. W.; Surgeons, A.A.O.O. Atlas of Limb Prosthetics: Surgical, Prosthetic, and Rehabilitation Principles; Mosby Year Book: Maryland Heights, MO, USA, 1992.
11. Godymchuk, A.; Frolov, G.; Gusev, A.; Zakharova, O.; Yunda, E.; Kuznetsov, D.; Kolesnikov, E. Antibacterial Properties of Copper Nanoparticle Dispersions: Influence of Synthesis Conditions and Physicochemical Characteristics. IOP Conf. Ser. mater. Sc. Eng. 2015, 98, 012033. [CrossRef]
12. Palza, H. Antimicrobial polymers with metal nanoparticles. Int. J. Mol. sci. 2015, 16, 2099-2116. [CrossRef] [PubMed]
13. Muwaffak, Z.; Goyanes, A.; Clark, V.; Basit, A. W.; Hilton, S.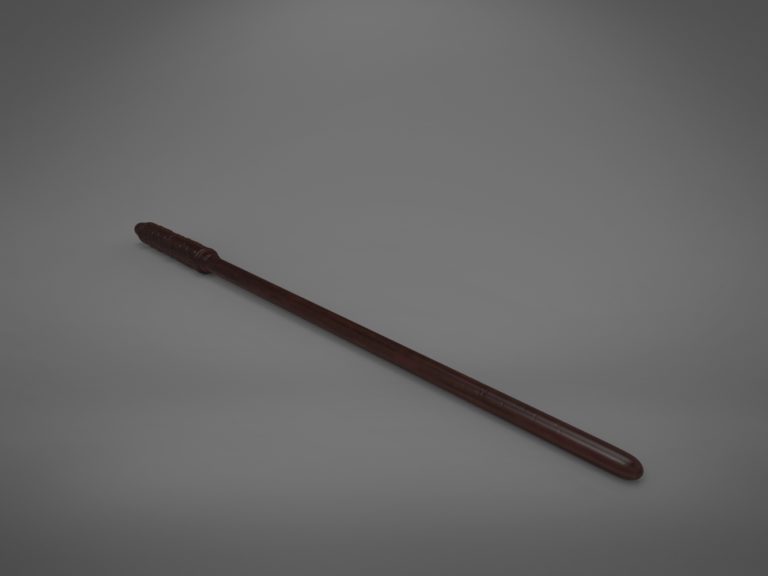 T.; Gaisford, S. Patient-specific 3D scanned and 3D printed antimicrobial polycaprolactone wound dressings. Int. J Pharm. 2017,527,161-170. [CrossRef] [PubMed]
14. Gadi, B.; Jeffrey, G. Copper as a Biocidal Tool. Curr. Med. Chem. 2005, 12, 2163-2175. [CrossRef]
15. Liu, Y.; He, L.; Mustapha, A.; Li, H.; Hu, Z.Q.; Lin, M. Antibacterial activities of zinc oxide nanoparticles against Escherichia coli 0157:H7. J.Appl. microbiol. 2009, 107, 1193-1201. [CrossRef] [PubMed]
16. Zuniga, J.M.; Katsavelis, D.; Peck, J.; Stollberg, J.; Petrykowski, M.; Carson, A.; Fernandez, C. Cyborg beast: A low-cost 3d-printed prosthetic hand for children with upper-limb differences. BMC Res. Notes 2015, 8 , 10. [CrossRef] [PubMed]
17. Zuniga, J.M.; Carson, A. M.; Peck, J. M.; Kalina, T; Srivastava, R.M.; Peck, K. The development of a low-cost three-dimensional printed shoulder, arm, and hand prostheses for children. Prosthet. Orthot. Int. 2016, 41, 205-209. [CrossRef] [PubMed]
18. Zuniga, J.M.; Peck, J.; Srivastava, R.; Katsavelis, D.; Carson, A. An Open Source 3D-Printed Transitional Hand Prosthesis for Children. }. Prosthet. Orthot. 2016, 28, 103-108. [CrossRef]
19. Zuniga, J.M.; Peck, J. L.; Srivastava, R.; Pierce, J.E.; Dudley, D.R.; Than, N.A.; Stergiou, N. Functional changes through the usage of 3D-printed transitional prostheses in children. Disabil. Rehabil. assist. Technol. 2017.1-7. [CrossRef] [PubMed]
20. Mathiowetz, V.; Volland, G.; Kashman, N.; Weber, K. Adult norms for the Box and Block Test of manual dexterity. Am. J. Occup. Ther. off. Publ. Am. Occup. Ther. Assoc. 1985, 39, 386-391. [CrossRef]
21. Mathiowetz, V; Wiemer, D.M.; Federman, S.M. Grip and pinch strength: Norms for 6- to 19-year-olds. Am. J. Occup. Ther. off. Publ. Am. Occup. Ther. Assoc.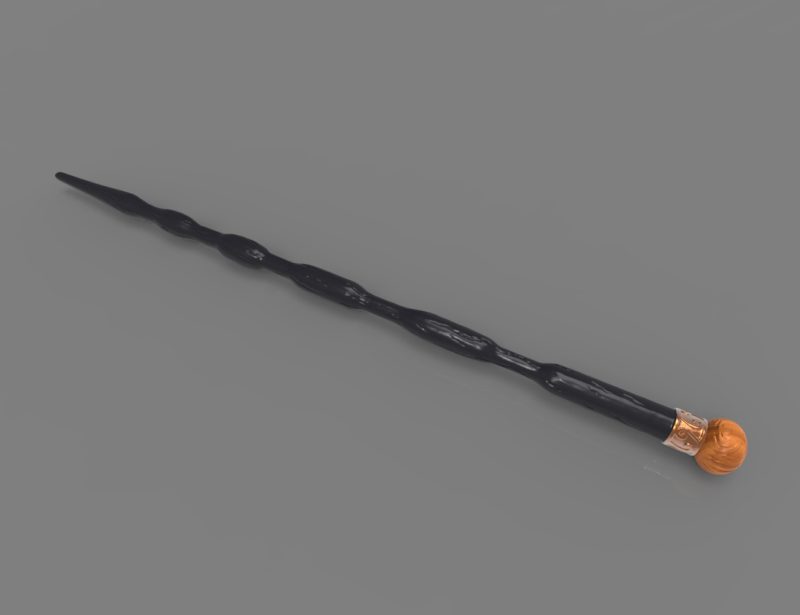 1986, 40, 705-711. [CrossRef]
22. Dromerick, A.W.; Schabowsky, C.N.; Holley, R.J.; Monroe, B.; Markotic, A.; Lum, P.S. Effect of training on upper-extremity prosthetic performance and motor learning: A single-case study. Arch. Phys. Med. Rehabil. 2008, 89, 1199-1204. [CrossRef] [PubMed]
23. Demers, L.; Weiss-Lambrou, R.; Ska, B. Item analysis of the Quebec User Evaluation of Satisfaction with Assistive Technology (QUEST). Assist. Technol. off. }. RESNA 2000, 12, 96-105. [CrossRef] [PubMed]
24. Patemo, L.; Ibrahimi, M.; Gruppioni, E.; Menciassi, A.; Ricotti, L. Sockets for Limb Prostheses: A Review of Existing Technologies and Open Challenges. IEEE Trans. Biomed. Eng. 2018, 65, 1996-2010. [CrossRef] [PubMed]
25. Yamada, R.; Nozaki, K.; Horiuchi, N.; Yamashita, K.; Nemoto, R.; Miura, H.; Nagai, A. Ag nanoparticle-coated zirconia for antibacterial prosthesis. Mater. sci. Eng. cmater. Boil. Appl. 2017, 78, 1054-1060. [CrossRef] [PubMed]
26. Brenner, C.D.; Brenner, J.K. The Use of Preparatory/Evaluation/Training Prostheses in Developing Evidenced-Based Practice in Upper Limb Prosthetics. }. Prosthet. Orthot. 2008, 20, 70-82. [CrossRef]
27. Bryant, M.H.; Donahue, J.R.; Sweigart, J. F.; Hunter, J.M. A prosthesis to restore opposition in children with congenital absence of the hand. Assoc. child. Prosthet.-Orthot. Clin. 1979, 17.5-10.
28. Rankin, T.M.; Giovinco, N.A.; Cucher, D.J.; Watts, G.; Hurwitz, B.; Armstrong, D.G. Three-dimensional printing surgical instruments: Are we there yet? J. Surg. Res. 2014, 189, 193-197. [CrossRef] [PubMed]
29. Cohen, J.L. Understanding, Avoiding, and Managing Dermal Filler Complications. Dermatol. Surg. 2008, 34, S92-S99.