Toy box 3d printer review
Toybox 3D Printer Review: A Fun Way to Create Toys
Skip to main contentWhen you purchase through links on our site, we may earn an affiliate commission. Here’s how it works.
While not the most sophisticated 3D Printer, the Toybox does a good job of printing basic toys quickly and without much hassle.
Editor's Choice
Tom's Guide Verdict
Young makers will get a big kick out of watching this neat, cheap 3D printer produce toys for them.
Pros
- +
Prints simple toys quickly and efficiently
- +
Easy setup and interface
- +
Wide selection of simple toys available to print
Cons
- -
Hot and moving parts make it unsuitable for younger users without supervision
- -
Unheated print bed means prints don't always stick.
Why you can trust Tom's Guide Our expert reviewers spend hours testing and comparing products and services so you can choose the best for you. Find out more about how we test.
Today's best Toybox 3D Printer deals
$299
View
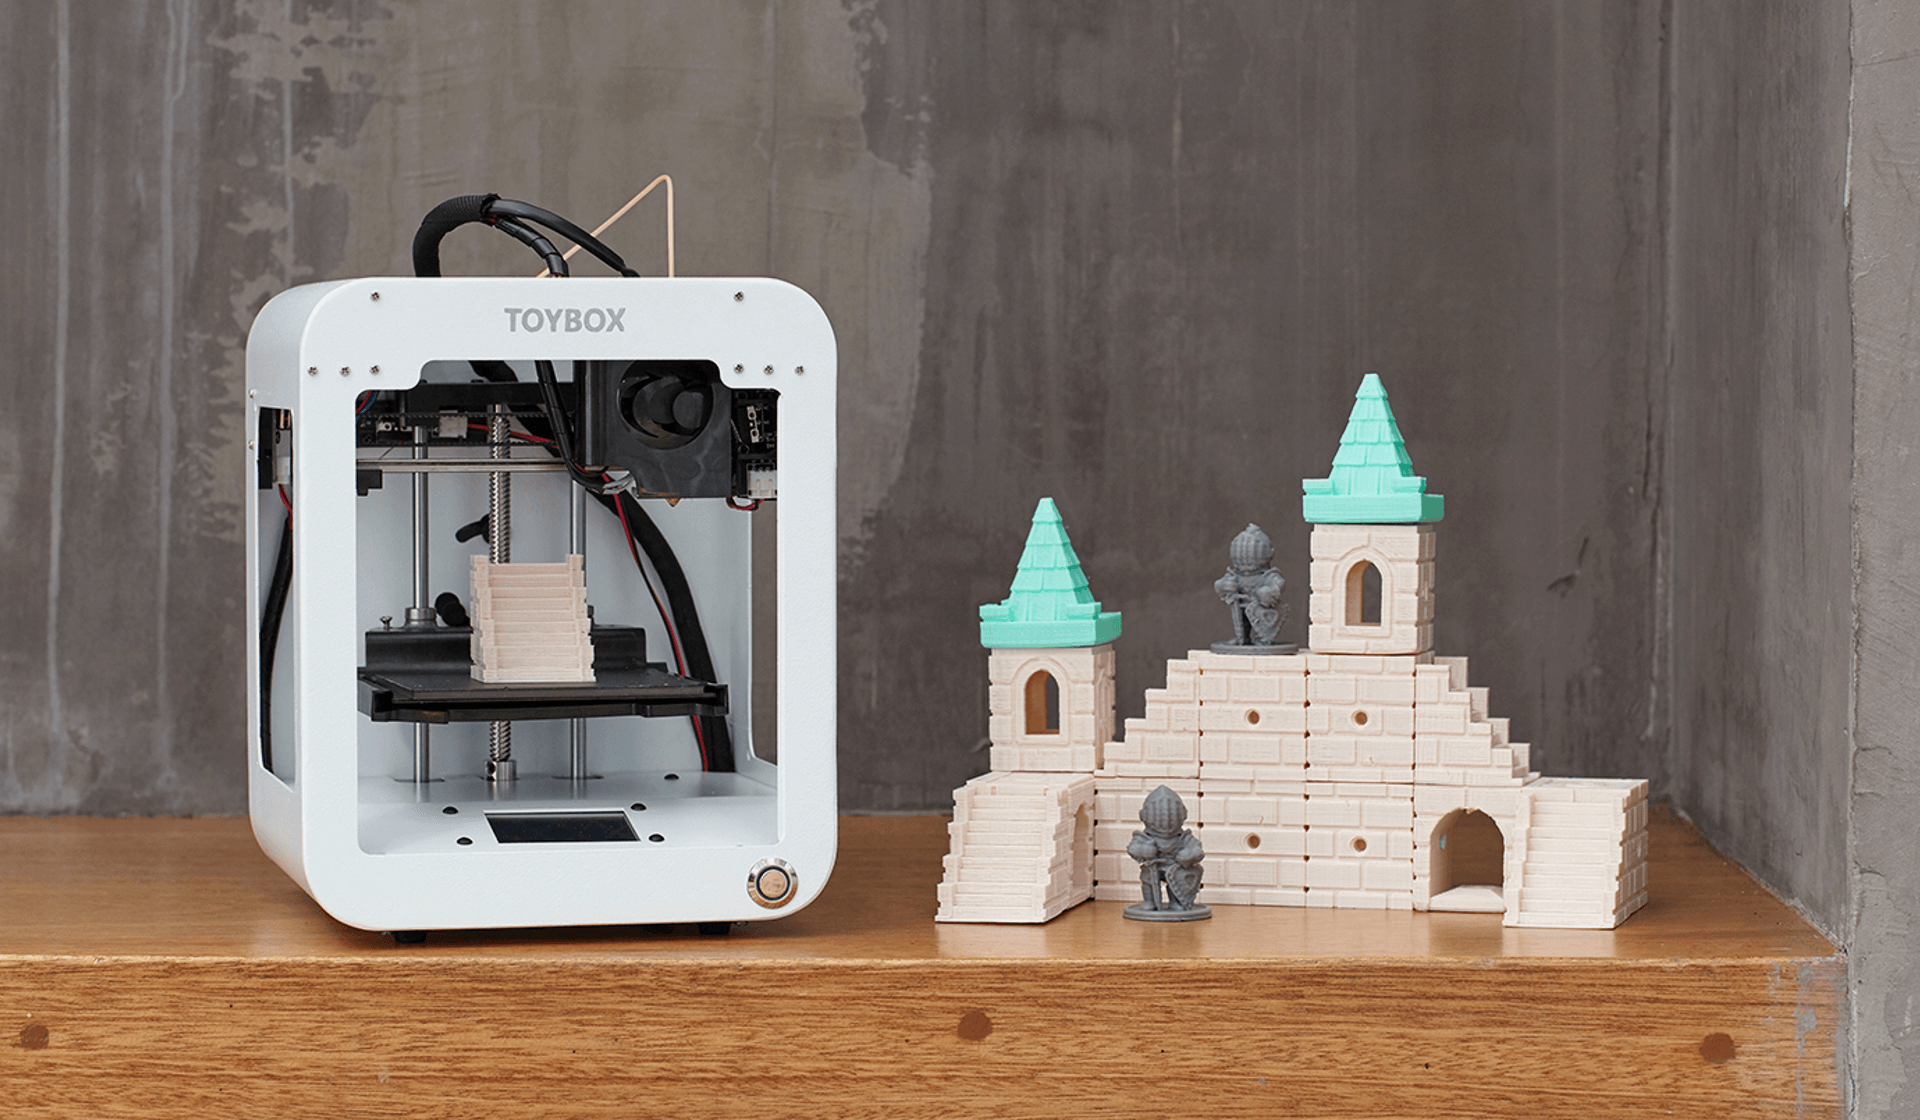
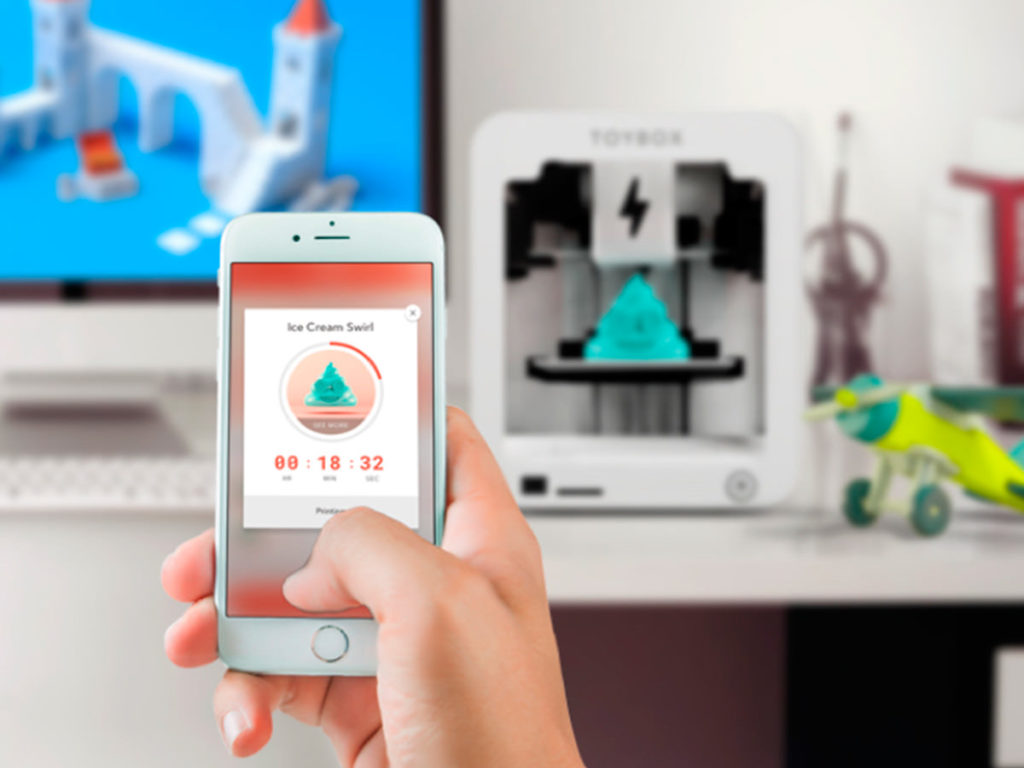
Part of 3D printing's promise is that you'll be able to print useful things at home. And that's precisely what the Toybox from Make.Toys does: it simply and quickly prints toys. You just pick the toy you want from a selection on the company's website, hit the print button and wait. Your completed toy then pops out, ready for play.
The process works, mostly: We were able to print some of the best toys like trains, track, castle parts and walls and small action figures from the simple-to-use web interface, and they were faithfully printed in sturdy, nontoxic PLA in a range of colors. But, like growing up, there are a few teething issues you need to get through first with the Toybox, such as the odd failed print and an interface with a few rough edges.
Still, if you look at 3D printing as a hobby for you and your kids can enjoy together, Toybox is one of the best 3D printers you can buy.
- Toybox 3D Printer (White) at Amazon for $299
Toybox 3D printer review: Price and availability
The Toybox 3D printer debuted a few years ago for $399. These days, the starter bundle costs $299, and you buy it directly from Make.Toys .
Not to put too fine a point on it, but the Toybox is cute. It's a small printer, less than 8 inches wide and a little more than 9 inches high. The frame is metal, with open areas revealing the printhead and removable print bed. The print bed is a magnetic sheet that holds tightly onto the base, but which slides off easily when the print is done. Because this base is flexible, you can remove prints by bending it until they lift off.
Spare print beds are cheap: three will cost you $14. The filament comes in 0.5lb (about 220g) reels that cost $10 each and fit onto the back of the printer. Although these reels are smaller than most and carry only 0.5lb of filament, you can use any 1.75mm PLA filament if you can work out a way to feed it to the printer.
The Toybox can't produce large prints: they are limited to just over 3 inches on each side. Considering the size of the printer, that is no big surprise, and the toys on offer are either small, or print in small parts. The train track, for instance, can be printed in 2-inch lengths that fit together to produce a larger model. The layer height (the thickness of the layers used to create the print) is also fixed at 0.2mm, which is pretty standard for small printers.
Make.Toys plays up the cute angle with the naming of the parts: the power supply is an "electron feeder" and the filament is "printer food." The food metaphor stretches to the colors as well: green filament is called apple, purple is grape, white is coconut and so on. It's a cute idea, but it also has to be accompanied by the warning that the filaments are not edible.
MORE: 10 Things You Never Knew Your 3D Printer Could Produce
Although the Toybox is designed to print toys, there are a few things about the printer that aren't kid-friendly. The hot printhead can be touched fairly easily, and fingers could be crushed by the moving printhead. (Update, 12/17: Make.Toys tells us that the Toybox uses low torque motors, so the motors should stop rather than crush anything.) There is also another curious omission: There is no way to stop the print midway on the device itself. The only way to stop it is to pull the power plug out, or hit the stop button in the web print interface. The latter method takes a couple of seconds to take effect.
Toybox 3D printer review: Controls
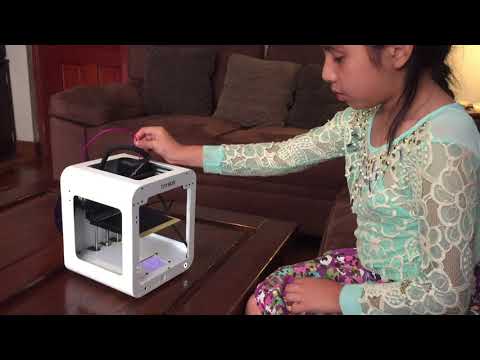
The Toybox keeps the controls on the printer itself simple. There's a single small LCD touch screen that shows the status of the printer and offers a simple interface to load filament, set up the printer and configure a few other basic settings.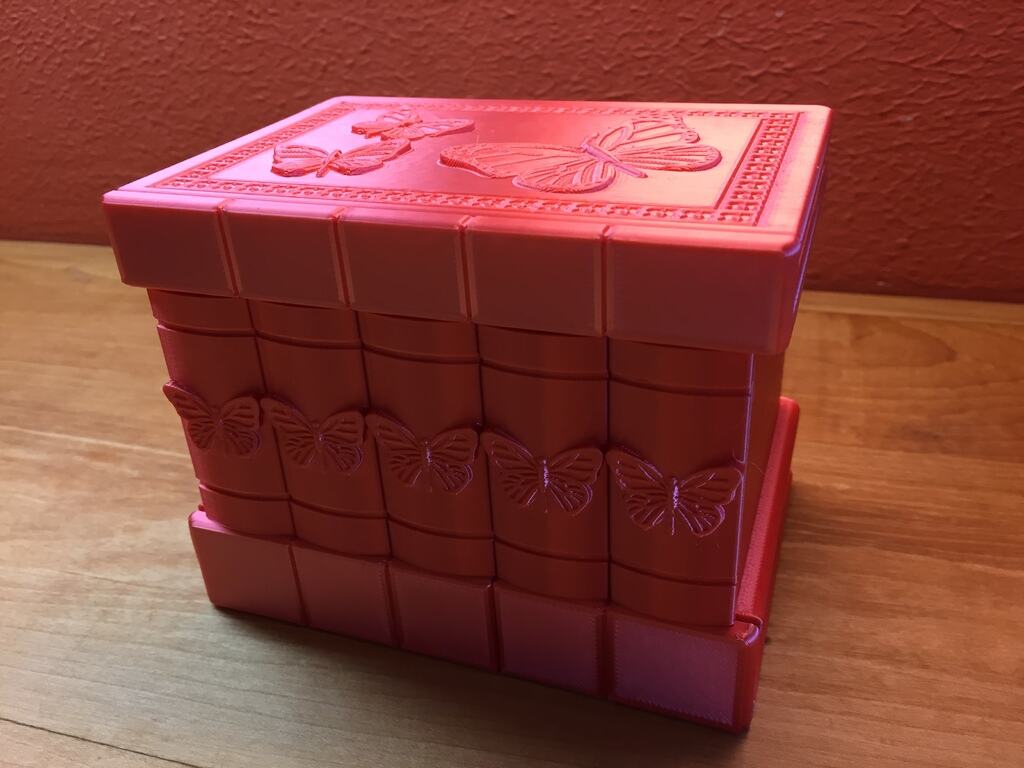 The printer connects to the Make.Toys online service over 2.4GHz Wi-Fi, so you'll need to set up an online account to control your printer.
There's are a great selection of free toys available at Make.Toys, from trains and tracks to castles, miniature figures, seasonal toys like a cute pumpkin and oddities like an owl cookie cutter. The Make.Toys web interface also allows you to create your own toys, either by modifying one of the available models or uploading your own.
To print one of the existing models, you just select the model and hit print. The service does the rest; there is no need to copy files, connect cables or process files. An online editor lets you create personalized figures or tweak an existing model by stretching and scaling it. The service's 3D editor is pretty basic, but I could build a few simple models without problems.
You can load existing 3D models in .stl or .obj formats, but the editing tools are still pretty basic. If there is a problem with the model (such as a hole in the 3d mesh), the system will warn you, but can’t fix it. We also found that more complex models, such as the geometric sculpture and set of planetary gears we typically use in testing, were a bit much for this system to cope with. That's not surprising, as both are complex models designed to confuse a printer, and are not really what the Toybox was intended to work with.
Toybox 3D printer review: Print process
Once you've chosen or created your toy, you hit print in the web interface, and your object starts printing. All of the hard work of configuring the print, creating the print file and sending it to the printer is done by Make.Toys' online service.
We found printing to be mostly successful, but we did have a few failures. The PLA print material does not always stick to the Toybox's unheated print bed, so we had some prints fail at the beginning as parts came loose and stuck to the extruder rather than the printhead. On more than one occasion, I had to pry a goopy lump of melted PLA off the extruder when it became stuck.
Other prints failed partway through the process, ruining the print. A print of the train track bridge, for instance, failed when one of the towers of the bridge came loose and stuck to another part of the print.
But these cases were more the exception than the rule. Most of our test prints on the Toybox worked flawlessly, creating prints that stuck to the print bed and which were easily removed from the print bed afterward.
Toybox 3D printer review: Print speed
Because of the small size of the print area of the Toybox, we were not able to do our full comparative tests that feature a 4-inch-high print. Toybox prints max out at a little more than 3 inches tall. However, we did find that the Toybox is a fairly fast printer — a 3-inch high version of our Thinker print took just 1 hour and 45 minutes to print.
Toybox 3D printer review: Print quality
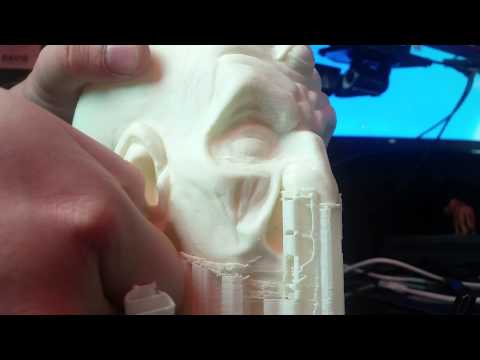
We were generally impressed with the quality of the prints produced by the Toybox, which were clean and well printed. The thick layers of the print are somewhat obvious (look at the close-up photo of the Thinker statue, for instance), but don't usually detract from the look and playability of the prints.
The Toybox did struggle with some fine details,though: The clips that hold the wheels on the train were not very well formed, so the wheels had a tendency to stick as they went around, or to sometimes fall off.
Toybox 3D printer review: Verdict
The Toybox is a lot of fun, allowing you to print simple, colorful and fun toys on demand that might give a young maker insight into how things are made. And the process is wonderfully simple: no messing with installing apps and configuring slicers. It is just press print, wait and play. But the Toybox is not perfect: We had a certain number of failed prints and other quirks that make it not quite the hassle-free process you might hope for.
So, is this 3D printer going to replace a big box of Legos? No. The prints the Toybox produces are not as high quality as mass-produced plastic blocks, and some users will find the print times frustrating.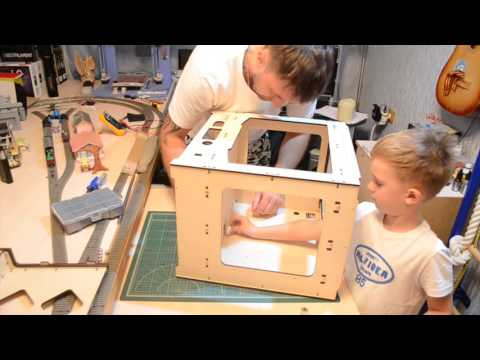 But for older children who know where not to stick their fingers, and who want to add a creative angle to their play, the Toybox is a great and not overly expensive printer.
Today's best Toybox 3D Printer deals
$299
View
Richard Baguley has been working as a technology writer and journalist since 1993. As well as contributing to Tom's Guide, he writes for Cnet, T3, Wired and many other publications.
Tom's Guide is part of Future US Inc, an international media group and leading digital publisher. Visit our corporate site .
© Future US, Inc. Full 7th Floor, 130 West 42nd Street, New York, NY 10036.
Toybox 3D Printer Review: Reasons Not To Buy
This 4D Filtration resource is user-supported by donations, affiliate links, and/or ads.
The Toybox is a $300 FDM 3D printer that is marketed towards younger kids. The printer is operated over Wi-fi on an app that kids can use to print drawings or choose from a file catalog. It is simple to operate but has very low functionality given its price point.
We typically recommend printers like the Anycubic Kobra or Artillery Genius that have increased functionality and more quality of life features. When 3D printer shopping for kids, choosing a printer like the two mentioned will allow them to grow into an advanced user and provide the entire family the opportunity to take advantage of its capabilities.
Photo credits: (c) Toybox - toybox.com
The Toybox printer has a small build volume
The Toybox's build volume is 70 x 80 x 90 mm or 504 cubic centimeters. The majority of FDM printers on the market today are at least 220 x 220 x 250 mm or 12,100 cubic centimeters. This makes the Toybox's build volume at least 24 times smaller than most printers.
The Toybox printer does not have a heated bed
While PLA is one of the filaments that does not necessarily require a heated bed, using one can increase the chance of success for a print. The Toybox printer does not have a heated bed, which explains why one of the more common issues is prints detaching from the bed.
The Toybox printing relies on the app and Wi-Fi
The only method of printing for the Toybox printer is over Wi-Fi, while most printers allow for SD cards and USB drives. This makes the functionality of the printer reliable on the stability of the Toybox servers, your internet, and your local Wi-Fi connection.
The Toybox printer is still not safe for young kids
The Toybox printer uses a metal nozzle that is heated to ~200°C (392°F) which is pretty toasty. All FDM 3D printers use elevated temperatures to melt the plastic, and curious kids can be burned if they are intent on touching the nozzle.
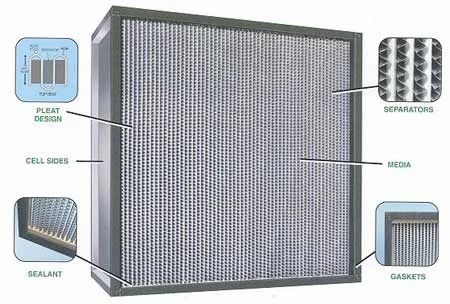
PLA is one of the safest filaments you can use with a printer but it is still not without some small risks. Printing with PLA can release nanoplastic particulates and trace amounts of tetrachloroethylene, formaldehyde, and methyl methacrylate gasses.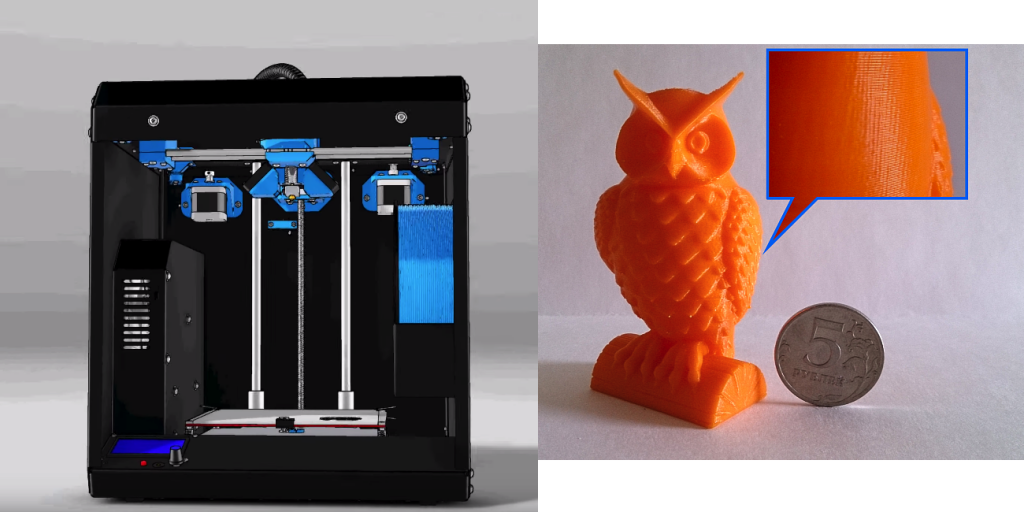 This can be mitigated by having a small air filter next to the printer - the air filter should have a MERV or HEPA particulate filter and activated carbon, ideally granules.
The Toybox printer food is expensive
The Toybox printer food is 0.5 lb spools of PLA that sell for $10-14 each, which is $42-62 per kg. In comparison, Prusament is one of the better PLA filaments on the market and it is only $30 per kg. There are plenty of other quality brands that sell PLA in 1 kg spools for $20.
What are the benefits of the Toybox printer?
- Printing is pretty straightforward for simple prints, when it works.
- There is a flexible magnetic bed for easy print removal.
- There is a vast catalogue to select prints from, but some of the files are paid.
- The Toybox app allows kids to draw an object and print it right away.
What are the alternatives to Toybox?
There are a few $200 FDM printers that are decent and you can find those on our printer table page. You will likely run into Creality printers such as the Ender 3 being suggested to you, and we can not recommend any of those printers at all since they are generally poorly designed and the company has poor quality control. Instead, printers like the Anycubic Kobra and Artillery Genius below have the additional quality of life features, and the companies are known for producing reliable printers.
Toybox
$300
Assembly: Fully
Extruder: Bowden
Auto-Leveling: No
Max Nozzle Temp: ~200°C
Max Bed Temp: N/A
Print Volume: 70mm (L) 80mm (W) 90mm (H)
Amazon
Anycubic Kobra
$300
($10 Off)
Assembly: Partial
Extruder: Direct Drive
Auto-Leveling: Yes
Max Nozzle Temp: 230°C (260°C)
Max Bed Temp: 110°C
Print Volume: 220mm (L) 220mm (W) 250mm (H)
Kobra vs Vyper
AnycubicAmazonAliExpress
Artillery Genius Pro
$350
Assembly: Partial
Extruder: Direct Drive
Auto-Leveling: Yes
Max Nozzle Temp: 230°C (240°C)
Max Bed Temp: 130°C
Print Volume: 220mm (L) 220mm (W) 250mm (H)
Genius vs Prusa Mini
AliExpressBanggood
To compare resin printers, browse resin, and get equipment inspiration visit our Ultimate Resin Guide.
To compare FDM printers via an interactive table, side-by-sides, and in-depth articles.
Application & Safety FAQ answers common questions about resin.
Ventilation Simulations has animations for common DIY venting setups, and Heating Resin Printers during winter provides data for specific heat sources.
Our Resin Print Settings Table has associated images, mixes, and does a resin giveaway.
To browse resin properties and find your ideal strong, durable, flexible, or high-temp resin visit our Resin Properties Table. To find properties of filaments, visit our FDM Properties Table.
Disclaimer: You assume all responsibility and risk for the use of, but not limited to, the resources, advice, and opinions of 4D Filtration or its employees. 4D Filtration or its employees do not assume any liability or create any warranty for the use of any information. 4D Filtration may receive commissions for referral links. Prices are approximated for simplicity and they may fluctuate due to sales or markdowns. Amazon .com should refer you to your local amazon site if you are not in the United States; there is a chance Amazon's link redirect system will take you to a different product.
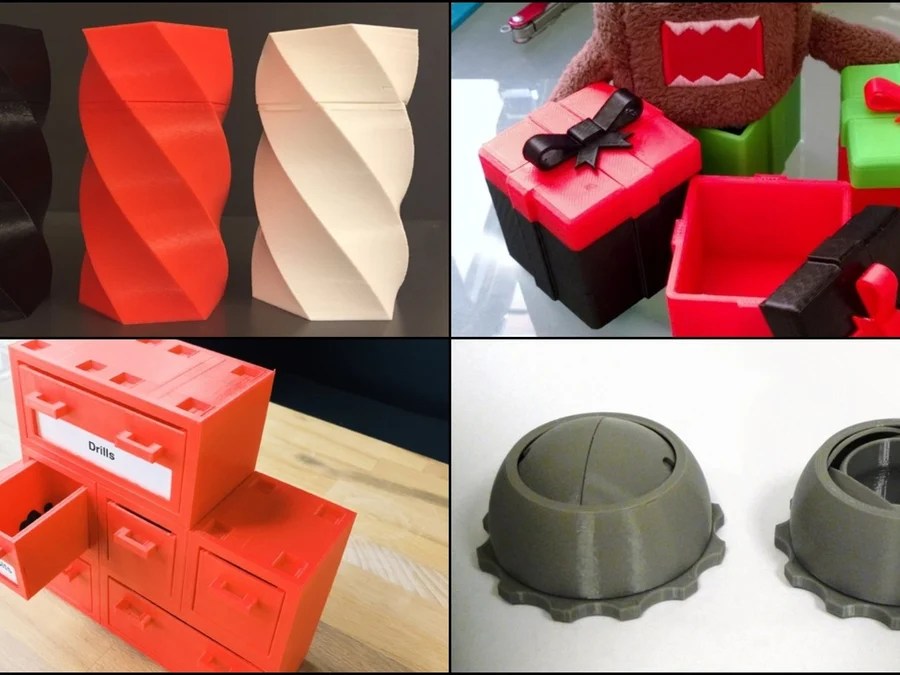
Top 20 3D printed toys
Why 3D print toys? What toys can be 3D printed? 1. Mini monster truck 2. Surprise eggs 3. Gliders with elastic band 4. Folding sword 5. Micro catapult 6. Spinning top 7. Moving animals 8. Spirograph 9. Transformers 10. Toy tool set 11. Castle 12. Lego bricks 13 14. Edible toys 15. Anti-stress keychain 16. Chunky Trucks set 17. Sword rattles 18. Vikings Squigglepeeps 19. Math Spinner 20. Jumping Turtles Results
Today, 3D printing is developing and spreading very rapidly, gaining more and more popularity. And no wonder, because 3D printing is an invaluable tool for prototyping designs, creating mockups, fabricating parts, and more. At the same time, it is no longer difficult to buy a 3D printer at an affordable price even for home use. However, a 3D printer is not only a tool, it is also a kind of toy. A toy capable of creating other toys! Using a 3D printer to make toys gives you control over the material, color, size and other components, so the models you create with 3D printing will be unique! nine0003
But what if you don't have your own 3D printer and you need to print a toy or some part of it? It doesn't matter, in this case our 3D printing studio will help you! You only need to place an order by uploading the file of the desired finished model, after which our specialists will contact you to calculate the cost and resolve other possible issues.
Why 3D printed toys?
This is probably the first question that comes to mind, and it is not surprising, because often 3D printing can cost you more than the cost of such a toy in the store. But there are also a number of advantages of 3D printing, as well as cases when it would be more profitable and appropriate to turn to creating models on a 3D printer. nine0003
- As already mentioned, a toy printed on a 3D printer can be absolutely unique due to the ability to give it exactly the shapes, sizes and colors that you and your child want.
- Some toys can be difficult to find in the store, and their cost may exceed the cost of their printed copy.
- Sometimes you only need to replace one or a few broken or missing parts of a toy, such as a building toy. In this case, it will be much more profitable and more expedient to use a 3d printer than to buy a whole set for a high price. nine0016
- An important factor is, of course, the impressions of the 3d printing process itself, which will captivate both a child and an adult. And the positive emotions of your child from the toy you created will be the best reward!
- And for those who are just getting acquainted with their printer and 3d printing in general, the process of creating toys will be an excellent, exciting simulator to improve their skills and gain experience.
Which toys can be 3D printed? nine0011
In the context of constant development and increase in the possibilities of 3D printing technology, you can create almost any toy on a 3D printer, but the result largely depends on the capabilities of your device, your abilities, as well as the time, resources and effort that you are willing to devote to this process. Therefore, more or less simple projects are most often created on a 3D printer. But the relative ease of manufacture does not mean boring finished products! Below we will give you a list of 20 interesting 3D printed toys that are not particularly difficult to create. Among these crafts you will find toys for children of all ages, including the smallest: mechanical products, motion figures, building blocks and even rattles! For each toy from the list, we leave a link to the finished model so that you can try them yourself. So let's get to know them better! nine0003
1. Mini monster truck
Two monster trucks. Source: Thingiverse
Not everyone can afford a monster truck, but if you have a 3D printer, you can print yourself a mini copy of it... which is almost as cool. Thanks to the all-printed suspension and removable discs that attach easily and without the aid of glue to the body, this truck is perfect straight from the printed surface.
You can even choose from a variety of body styles and wheels. And for a two-tone tire, stop printing the wheel at 19.8 mm and replace the filament.
Model files for download can be found here.
2. Surprise eggs
Surprise! Source: Twitter
Bigger is not always better. And often the most interesting thing is just a small size, and these 3D printed eggs with a surprise are an example of this.
These tiny cars with moving wheels and other accessories are amazing! Plus, you have plenty to choose from, as you can print surprise eggs with just about anything inside, be it a fire truck or even a fighter plane! nine0003
No support required for these models. We advise you to use at least 40% infill to make sure that small elements are both beautiful and durable. Given the number of such tiny parts these machines have, be prepared that printing them can be a real challenge for you, but with good calibration and fine tuning of your machine, everything will work out in the best way!
3. Elastic Gliders
Get ready to take off! Source: Thingiverse
With 3D printed gliders you will be able to “pull out” even more fun from ordinary rubber band ! Just 3 simple steps, and your glider will take off: hook it with an elastic band, pull it towards you and release it.
With this model on Thingiverse, you and your friends can take to the skies a whole fleet of these rubber gliders!
100% infill and a layer height of 0.1 mm are recommended for greater aircraft strength and longer life for thin wings. nine0003
4. Folding sword
Telescopic pirate sword. Source: Thingiverse
This toy may not be best given to a child when there are breakable items nearby. But in the right environment, telescopic swords will bring tons of fun and enjoyment to kids! From the designer of this folding pirate sword, you can also find models of telescopic katana, daggers and even lightsabers!
This Telescopic Pirate Sword is designed for printing at low speed using a 0.4mm nozzle. Also, successful printing requires a printer with a good retract and precise settings for Coast (turning off extrusion at the end of the layer print) and Wipe (“wiping” the nozzle at the end of the layer). nine0003
5. Micro Catapult
Hit all your enemies (or at least your deskmates). Source: Thingiverse
This little catapult is a great toy for kids and bored office workers alike. She can throw small crumpled pieces of paper and any other small things that will fit in her. Selected ammunition can fly about 2 meters, which is enough to hit unsuspecting victims at another table! nine0003
This model is an all-printed prefabricated assembly that does not require any supports or special adjustments. A minimum filling and layer height of 0.25 mm is sufficient.
Despite the fact that many catapults are made from PLA plastic, the author of the design still insists that this model is not for PLA, but for ABS plastic. We can also recommend PETG filament for this printing, which has the best qualities of PLA and ABS.
6. Top
The oldest toy for the whole family. Source: Thingiverse
As far as we know, the spinning top is one of the oldest toys in the world. In ancient times, tops were made from almost any material: from stone and wood to fruits and nuts. And now additive technologies allow you to make your own spinning top using a 3D printer! All you have to do is print this model, glue the pieces together and have fun with this simple yet fun toy!
Offered 0.2 mm layer height and 20% infill.
7. Moveable animals
Cute articulated octopus. Source: Thingiverse
Making flexible prints with a 3D printer has become completely affordable and common practice thanks to special filaments such as TPU. But what if we said that you don't have to use flexible plastics to create flex parts?
Using excellent hinges that are printed in one piece with the entire model, you can create movable flexing toys even from plastics such as PLA, ABS and PETG, without any additional settings and adjustments. nine0003
The standard specifies a layer height of 0.2 mm and an infill of at least 15%.
Most popular models:
- Octopus
- T-Rex
- Lizard
8. Spirograph
Convenient case for creativity at any time. Source: Thingiverse
Everyone knows the children's toy spirograph, which allows you to easily draw masterpieces with repeating geometric patterns. But this model has gone a little further and is a whole case containing a platform for drawing and a compartment for storing gears and paper. It fits easily into your pocket, backpack and bag, so you can take it with you and paint whenever you want! nine0003
The case has several levels. The lower level holds slips of paper for notes, drawing gears and, if desired, a small pencil or pen, if, of course, you can find one. The next level provides a secure, flat drawing surface so you can make art while walking! The top level has fixed gear teeth and holds the piece of paper in place.
A layer height of 0.2 mm and an infill of 20% or more is recommended. As a loop, a regular straightened 1.75 mm filament thread is used. nine0003
9. Transformers
Toys from the planet Cybertron. Source: Thingiverse
Transformers are a hugely popular children's toy to this day, so these Optimus Prime and Megatron are sure to please your kids.
This printed Optimus Prime transforms from a classic Optimus truck into a fully functional standing robot. And it's amazing, considering that you immediately get a ready-to-use all-printed model right from the printing platform, which does not even require supports! nine0003
But, of course, every Optimus needs an opponent to fight. Therefore, you can also print Megatron, but it should be noted that his model is more difficult to print and consists of two parts.
10. Set of toy tools
The first tools for little craftsmen. Source: Thingiverse
The Toy Tool Set is a great way to introduce kids to basic tools, their appearance, purpose, and how they work. Print your child's first hammer, screwdriver and pliers and he'll feel like a real craftsman! nine0003
The hammer is modeled to fit two pieces together with a screw, but some users simply glue them together, which is just as pretty. You can also use a hammer to assemble pliers: just lay the two pieces on a flat surface with the screw down and tap lightly a couple of times.
Model can be found here.
11. Castle
Build your own medieval world! Source: Thingiverse
This medieval castle playset is meticulously designed for 3D printing. Walls and towers are easily attached to each other with a simple connection. You can make as many details as you want to create a large or small original castle layout of your own! The set contains walls, towers, houses, characters, animals and a variety of props to add to the fun of this medieval set. nine0003
All parts are small enough to be printed comfortably even on 3D printers with a small printable area: 140x140x140mm. For such purposes, the Flashforge Creator Pro 2 3D printer is perfect, equipped with two independent extruders and has excellent printing accuracy. This printer will cope with the study of small details, and two extruders will help you print several parts at once or one part in two colors!
12. Lego bricks
Your favorite constructor is now more accessible! Source: Pinterest
LEGO is one of the most popular toys for children. At the same time, the cubes of this designer are made of ordinary ABS plastic. So, having your own 3D printer, you can print the missing/lost Lego bricks yourself or even some of your author's design of the details of this amazing designer! At the same time, you can use not only ABS, but also other 3D plastics: PLA and PETG are also great.
Thingiverse has a lot of Lego models, and we'll take a look at one of them. It's customizable model of several different LEGO and LEGO DUPLO pieces. These bricks are not completely identical to real Lego, but they are compatible in every way.
13. Ballista
Fire! Source: Thingiverse
Introducing a fully printed ballista model, ready to use right out of the box. One has only to set the string and load the projectile, and this ballista will impress you with its simplicity and good range of the arrow. As a bowstring, you can use several layers of thread or ordinary stationery gum. nine0003
Recommended to print in PLA or PETG with 90% coverage and 0. 2mm layer height.
14. Edible toys
The Open Toys project turns ordinary vegetables into toys. Source: Thingiverse
The project was originally envisioned as a way to turn commonly discarded residual materials such as wood and cork into toys: helicopters, planes, cars and so on. But soon, wood and cork were replaced by more accessible and easily pierced materials: fruits and vegetables. With this project, you can turn ordinary food items into fun personalized toys. nine0003
15. Anti-stress keychain
Entertaining keychain. Source: Thingiverse
Add some flair to your keychain with this cool little toy. She will entertain you wherever you are!
This model is not the easiest, but try it and you will definitely succeed! Important print quality settings are "Outer Walls Before Inner Walls" and being extra careful with temperature. It is printed with supports and requires a certain, sometimes lengthy, post-processing. Remove not only supports, but also make sure that the surface of the part is smooth, otherwise it will cling and stutter. A scalpel or a 1 mm drill will do. Periodically rotate the gears to see where it still sticks, which is especially true when using PLA. nine0003
16. Chunky Trucks set
Two models from the fun and cute Chunky Trucks set. Source: Thingiverse
The adorable Chunky Trucks collection includes various unique models of small trucks, fun builders and even a movable barrier. The cars are specially designed so that even the smallest children can play with them. Unlike builders, who are not recommended to be printed for toddlers so that they do not try to put them in their mouths, but which will greatly amuse older children. nine0003
All models can be printed without supports. And for long truck life, at least 25% infill and three-wall use are recommended.
17. Rattleswords
Arm your warrior! Source: Thingiverse
Rattles are an integral part of all babies. But what if we move away from banal and boring designs and build a rattle in the form of a sword for your little warrior? This fun design will not only amuse your baby, but also you, as this rattle will be a lot of fun to print! nine0003
All corners of the model are rounded for safety. There are also two versions of the tip. Initially, a gem was attached to the tip, but after some concern that the stone could slip off the tip and be swallowed by a child, a second version was created that did not include a gem.
Print two sets of peas first. Then, while printing the sword, throw them inside the blade. This will ensure that the peas stay inside the rattle forever. After printing all the elements, simply fasten them with superglue. nine0003
As with any printed toy, parental guidance is required. Be sure to throw away the toy if it breaks.
18. Viking Squigglepeeps
Three Viking Squigglepeeps set sail. Source: Thingiverse
Squigglepeeps is another kid-safe toy, this time with absolutely no glue required. These fun chubby Vikings and their boat are too big to choke on, making them suitable for kids of all ages. They look funny even in one color, but they will be even more beautiful if you paint them with child-safe paints! The model also absolutely does not require supports. nine0003
19. Math Spinner
A great way to have fun learning math! Source: 3Dtoday
This math spinner is the perfect companion for learning math. Moreover, it is suitable for all ages, because it is never too late to brush up on your arithmetic knowledge! You can print this finished model or modify it for yourself by removing or adding rings. This advanced design contains all the signs of addition, subtraction, multiplication, division, equality and inequality, as well as a pointer to the string to be solved! On the central insert there are special grooves for fixing. For this version, you will need to print 2 caps and 8 rings of numbers, the rest of the details are printed in a single copy. nine0003
Recommended coverage 25% and layer height 0.2 mm.
20. Jumping turtles
The variety of these turtles is amazing! Source: Thingiverse
Last but not least, jumping turtles! Agree, even the name sounds fun! And a variety of shell designs will give each turtle its own uniqueness. This model uses the same flex concept as the Mini Monster Truck above, making the Turtles bounce when you tap on the body. Also in this turtle, the head can be drawn into the shell. nine0003
The model is assembled with printed H-clamps and does not require glue. All parts are printed without supports. Also note that using the raft (rafts) and brim (margins) options can have a negative effect on the results if you don't then take the time to sand and clean the edges at the base.
If you have problems with head slip, you can try to print 1 of the 3 narrower shaft head files that the author has specially uploaded for this case. nine0003
Results
We hope you enjoyed this selection of toys for 3D printing, and you will definitely choose some option for yourself, because 3D printing of toys is not only fun and interesting, it is also a new experience and knowledge for both you and and for the child. But we have considered only some entertaining options from the many existing ones.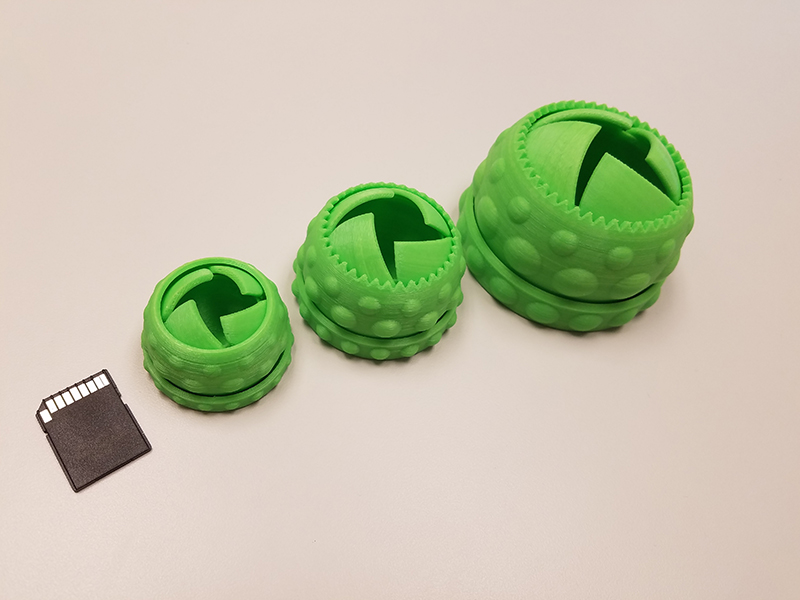 And, of course, you can create your own unique designs and implement them on your 3D printer or contact our 3D printing studio for this. And toys printed by you can serve as a great unique gift, which is also one of the reasons to buy a 3D printer for your home. nine0003
Candidate for Best 3D Printer of 2022 / 3D Printers, Machine Tools & Accessories / iXBT Live
If you want quality printing out of the box as well as a solid build, then Kywoo3D Tycoon Max is the one for you. This printer attracted me with interesting features at a low price. And most importantly, what attracted me is a very reliable design. After all, it is she who affects the quality of the print.
I found the first mentions of this manufacturer and printer on Kickstarter, and then on local sites. Then the model was simply discussed, but there were no real owners. But then the first reviews appeared, and to be honest, the printer was not praised in them. Despite the thoughtful design, the printer had problems with airflow and buggy firmware. Therefore, when I needed a 3D printer, I took myself Anet ET4 Pro. But then there was a need for another printer, so I, again returning to the question of choice, decided to take myself a Tycoon Max. And now, having used the printer for several weeks, I realized that I made the right choice. The printer for its price really gives excellent print quality, and if necessary, also a very fast print speed comparable to deltas. nine0003
Characteristics of Kywoo3D Tycoon Max:
Well, in words, I’ll add something that is not in the table:
- Print area: 300 * 300 * 230mm
- Print type: FDM
- Number of extruders: 1
- print l.
- -0.4mm
- Nozzle: 0.4mm
- Control: USB, MicroSD card, Wi-Fi
- Power: 350W
- Maximum table temperature: 100C
- Maximum extruder temperature: 260C
- Maximum print speed: 0mm/10mm s (personally tested up to 140mm/s and it prints fine)
- Additional information about the design:
- High rigidity aluminum profile frame.
- X-axis rails, Y-axis shafts.
- Z-axis motor belt synchronization
- 16-point auto-leveling
- 3.5" touch screen to control printer and print process
- Convenient filament threading with ring on extruder
-
Now let's talk about the printer itself. It was ordered from a warehouse in the Russian Federation, and the delivery time took 5 days. A huge box weighing 16kg was received in the mail:
Inside the box is a printer disassembled into two parts. Everything lies in layers, which are laid with foam material. So it is unlikely that anything could be damaged along the way. Opening the box, the first layer I saw was the bottom frame of the Y axis with a heating table and ultrabase:
Below the next layer is the main frame of the Z axis, a reel of PLA test plastic, a box with accessories:
I’ll tell you right away about the complete plastic. It has a weight of 500g, wound on a plastic reel, sealed in a vacuum bag.
 I printed part of the coil during the tests, and I liked the plastic. nine0003
 As for complete accessories, everything is relatively standard. Inside the box are a spatula, a set of hexagons in a convenient case, several spare ties, wire cutters, clamps for the ultrabase, four screws for assembling the printer, a Phillips screwdriver, a piece of heat pipe, a spare 0.4mm nozzle, a needle for cleaning the nozzle, a wrench for unscrewing the nozzle, spare limit switch, USB cable, reel mounting stand. Also included is a card reader and a MicroSD 8Gb flash drive manufactured by Netac ( a good manufacturer, I have several flash drives of this company, and they work well )
The printer is powered through a detachable cord with a European-type plug. If necessary, it can be replaced without any problems:
Also included with the printer is an assembly and configuration manual. It is made on high-quality printing, but, in fact, there is no great benefit from it:
Now let's consider ultrabase glass.
 It has dimensions of 305*320mm and a thickness of 4mm. On the edge there is an inscription with the logo of the manufacturer:
 Having already printed enough parts, I can say that the quality of the Ultrabase is excellent. It is strong, there are no problems with plastic sticking, it heats up evenly. And at the end of printing and cooling, the parts come off without problems.
The ultrabase is attached to the heating table with 4 stationery clips (they are included). The heating table itself is made of metal, and is attached to the frame on shafts through plain bearings. By the way, in order to reduce weight and inertia during movement, the manufacturer made the table itself with holes that do not affect rigidity. nine0003
By the way, the table is connected to the control board via the XT60 connector. This is the first time I see such a solution, but logically, this is a fairly reliable connection.
Another thing I would like to note on the table frame and X-axis is the presence of good legs that can be adjusted in height.
 This is useful if the printer is not standing on a completely flat surface, and correct adjustment will avoid unnecessary movement of the frame when printing.
 Now let's move on to inspecting the frame along the YZ axes. It also contains the control board and power supply. It also has an extruder. This is what it looks like:
The first thing I want to pay attention to is the overall rigidity of the frame. It uses a double frame made of aluminum profile, on which there is a metal box on top. This box serves two purposes: hiding the interior of the printer and adding rigidity to the frame. And it has a very good effect on the quality of the print.
The Z-axis of the printer is fixed on the frame through two shafts rigidly fixed to the frame itself and a closed plain bearing, and for moving there are two studs with stepper motors on both sides. Additionally, the manufacturer has added a belt that synchronizes the operation of these stepper motors:
Rails are installed on the printer to move the extruder.
 They are quite high quality, and during the work I personally did not have any problems with them. For better sliding, the rails are immediately lubricated from the factory, and the rails themselves also have holes through which this lubricant enters the rails. Also, through these holes, the rails were fastened along the entire length of the frame.
 As for the extruder, the manufacturer did not reinvent the wheel, and equipped the printer with a proven solution. This is MK10, but with some modifications. First, it adds an iron frame that looks good while protecting the user from contact with hot extruder elements. I would like to think that this frame also serves as an additional radiator, but if you look at how it is fixed, it immediately becomes clear that there is not much heat coming to it. And the second addition is a special lamb for scrolling plastic when refueling. And this is a really handy feature. When refueling, you do not need to press anything, as in other printers.
 We simply pull the plastic through the plastic sensor, point it into the hole of the extruder and turn the lamb. Plastic itself immediately clings and is pressed through. A simple and elegant solution that is sorely lacking in other printer models. nine0003
 Also immediately above the extruder is a low filament sensor. This is also a pretty good solution, since the distance between the sensor and the extruder is minimized here. And this means that you don’t have to throw out 20-30cm filament bars that simply cannot be pushed into the printer. The amount of waste here is minimal.
As for blowing, a fan with an impeller is used here, which is mounted near the nozzle. Fan model pb04010ms4. The airflow itself is realized through a wide slot. I personally did not notice any problems with blowing during printing, there is enough blowing, and it blows directly on the model. The blowing speed can naturally be adjusted both during the cutting of the model, and already directly during printing, the fan has speed control.
 nine0003
 I also once had to disassemble the extruder to replace the nozzle during printing. What was in the kit, I managed to score on my own stupidity, alternating types of plastics without changing the temperature. Therefore, I will show the extruder in disassembled form:
I also want to draw attention to the fact that the printer has a table auto-calibration function. For this, a BL Touch sensor is installed here. More precisely, there is not the original 3D Touch with a plastic plug.
But by the way, I have no complaints about his work. The table calibrates perfectly, and even if there is a misalignment of fractions of millimeters, everything is taken into account and there are no problems with printing. The table itself is calibrated using 36 points (6*6) and looks like this:
Also, in addition, I can also note the presence of a silicone pad on the hotend, so that the temperature is more stable:
Well, after we have examined both halves of the frame, we can proceed to assembling the printer.
 She's very simple. The existing 4 screws are screwed through the grooves, and we stretch harder.
 Additionally, you need to connect the connector to the table and connect the motor along the X axis. By the way, in the printer, all the wires are laid right away, and where they can be fixed with ties. Therefore, nothing dangles here, does not hang down and is as neat as possible:
That's it, the assembly is finished. This is what the assembled printer looks like, well, with the exception of the ultrabase and the bracket for installing the filament spool.
The bracket itself, by the way, is standard, like most printers in this price range. Metal profile and plastic tube. The bracket is installed at any point of the aluminum profile, through two spacer nuts:
Well, once the printer is assembled, you can consider the rest of the design elements. If you look at the back of the printer, you can see the power button and the port for connecting the power cord:
On the other hand, there is a sticker on the frame with information about the printer:
Separately, I would like to note one more convenient feature of this particular printer, which I have not seen anywhere else.
 These are convenient carrying handles:
 They are metal and rigidly fixed to the frame, you can safely lift the entire structure with them and not worry that something will break. For me, this is very important, since my printer can be transferred to different points around the room, and even between rooms. Depending on how long the print is placed. nine0003
If you look at the printer from the right end, then you can see a slot for a MicroSD card through which a model for printing is thrown onto the printer. There is also a MicroUSB port for connecting to a computer (does anyone use this method of printing?) And another slot for SD cards, the purpose of this slot remains a mystery to me:
Well, now the most interesting. It is, of course, a touch screen. When you turn on the printer, we first see a splash screen with the manufacturer's logo, and then the main desktop, from which you can get to different settings:0003
All items on the desktop are interactive. Management is implemented by clicking on the desired element.
 For example, by clicking on the ruler of XYZ axes, we get to the axis calibration menu:
 And if you click on the flash drive icon, the files for printing located on the flash drive are opened:
The printer sees folders and subfolders without problems, but there are Russian file names Problems. In the current firmware, the Cyrillic alphabet looks like unreadable krakozyabry.
If you click on the gear icon, then naturally we get into the settings menu. Here you can select the temperature of the preheating of the table and extruder, change the filament during printing or in idle time. Find out information about the firmware, set up Wi-fi and select the interface language ( there is no Russian language in the photo, but it has already been added in the latest firmware )
By the way, the printer has a built-in Wi-fi module, and it can be run in access point mode or connected to a home wi-fi network.
In the first case, you can connect to the printer and use an additional plug-in in Cura to send files for printing over the air, as well as monitor the status of the printer:
True, the wi-fi module has one minus.
 It stands inside a metal case, and it dampens the signal very noticeably. If the printer is in the next room, then I can no longer connect to it because the signal level is too weak. In fact, the range of the access point is about 5-6 meters maximum. nine0003
 But back to the screen. Despite the modern 32-bit processor, another disadvantage that I want to point out is the lack of model previews. This option is already firmly in use, and I would like to hope that it will also appear in future firmware. But so far the interface looks pretty simple. By the way, this is also visible at print time, when progress is displayed simply as a blue bar with a percentage of completion.
But in general, the management here is really convenient. You can change the Z-axis gap on the fly, change the speed of the blower fan and the temperatures of the table and extruder. nine0003
Well, I also want to show the inside of the printer without disassembling it. How could I get the camera. The printer is powered by the built-in Mean Well LRS-350-24 power supply.
 Already by the name it is clear that this power supply produces 24v / 350w.
 In the future, I plan to crawl up to this PSU and add a backlight tape to the printer frame so that you can see the printing process.
The brains of the printer are located in the upper part of the case, it is already much more difficult to crawl up there with the camera:
But since the board is sold separately, I'll just add a photo from the manufacturer here:
True, in this photo it is not clear which processor is used in the board. But let's hope it's good enough.
In general, if we talk about the assembly, then it did not raise any questions for me. The frame here is well thought out and very rigid. All axles run smoothly and there is no backlash. The printer is large, solid and heavy. And gravity, as we know from the words of Boris Razor, is good and reliable.
Now it's time to talk about the printing process and the models I have printed
The first thing I decided to do was check the speed characteristics of the printer.
 The specifications indicate that its maximum speed reaches 150mm / s. Therefore, I printed a test cube at this speed:
 I shot with a macro lens so that the flaws in the layers were immediately visible. And they are here, since my plastic is not the best, besides, it’s also old, taken from the remnants.
Then I printed the same cube, but at a speed of 180mm/s, and put it next to the first cube:
Try to guess from the photo which of these two cubes was printed at what speed.
I'll give you a hint. On faster printing, at 180 mm/s, the plastic from the nozzle no longer has time to come out and lay down evenly, so the layers appear thinner, and there are gaps between the layers.
And yes, on the left it's a cube printed at 180mm/s and on the right it was 150mm/s.
And by the way, this speed is quite suitable for printing rough parts, when you need to determine the degree of fit and size, without regard to quality. This saves a lot of printing time.
 nine0003
 Well, at a speed of 150mm / s, you can already print full-fledged models. Here, for example, I printed a model at this speed:
And this is not a draft part, but a full-fledged one, for a commercial order. Here is what I printed, the size of this medal is 22 centimeters:
If you look at macro photography, you can evaluate both the detail and the level of stacking layers at this print speed:
By the way, as you can see, the medal was printed in two colors of PLA plastic. This type of printing is not difficult, just at a certain moment of printing, you can pause the printer and replace the filament. But I want to add that Cura has a handy plugin that allows you to precisely set the pause on the desired layer. To do this, go to the plugins, and select the “Filament Change” function in the post-processing plugins, in which we simply set the layer on which the pause will occur. The printer will stop printing at the right moment, move its head to the extreme left side in front and squeak loudly, calling for a replacement of the filament:
Through this plug-in, you can set the replacement of the filament at least on each of the layers, which is very convenient and allows you to achieve interesting effects when printing art objects.
 I hope my advice will be useful to those who are fond of 3D printing.
 I also printed an axolotl toy for children, which consists of closed links:
Printing was done at a speed of 120mm / s, and could have been more successful if I had not forgotten to remove the automatic supports in Cura. But since there were supports, I had to spend time post-processing and separating the supports, as well as cleaning up excess plastic in the links. This is what this axolotl looks like on a macro shot:
Layer height 0.25mm, travel speed 120mm/s, table temperature 60 degrees, extruder temperature 220 degrees.
The next model was among the models on the flash drive provided with the printer, this is a ghost keychain.
By the way, I want to add a macro photo of the substrate that remained after printing, so that you can evaluate the uniformity of laying layers and tracks:
a piece of ordinary sponge to clean the plastic from dust, which is very visible on white parts.
 Some print different boxes and cases, but I just took a piece of dish sponge and pierced it with a filament, which I then moved on. After that, the parts became noticeably cleaner. nine0003
 Another custom-printed detail. Steering shaft bushings for Nissan Qashkai. Designed to eliminate the runout between the shaft and the tube in the steering reach adjustment mechanism:
Another model. Decepticon logo overlay for standard Mazda car logo:
Spinner gear. A toy that I printed to test the possibility of printing gears:
Stand legs for Sony PlayStation 4 Slim:
Well, there were many other models that were printed to order, but I did not have time to take high-quality photos. I mainly use PLA and Petg plastics when printing. Well, a little ABS, which I really dislike because of its capriciousness to ambient temperature and drafts. And as you can see from the photo, there are no problems with printing. The only problem I had was changing different types of plastic during printing and clogging the nozzle as a result.
 But it's my own fault, I shouldn't have experimented. nine0003
 Conclusion:
As you can see from the review, I really liked the Kywoo3D Tycoon Max 3D printer. It is definitely worth the money, here it is clear that the manufacturer did not save on everything and everyone, as is the case with other manufacturers. I will try to indicate the advantages that the buyer receives:
Reliable design and rigid frame . A double profile and a metal frame are assembled into a single design that is reliable and does not give any backlash. This has a positive effect on detail and print quality, as well as on the maximum print speeds. Also, all cables and wires are correctly laid in the printer immediately from the factory. And the heating table is attached through the XT60 connector, which has long proven its reliability. nine0003
Shafts along the axes Z and X. The presence of shafts and plain bearings also has a positive effect on the accuracy of printing and the reliability of the design as a whole.
 Since they are less subject to wear and play, unlike wheels that drive along a profile.
 Axis rail Y . The advantage of rails over conventional wheels, I think, is not even worth discussing. This is a more accurate movement of the extruder, and the absence of backlash, and durability. Of course, it would be better to have rails on all axes, but this will significantly increase the price of the printer, and it will no longer be so interesting. nine0003
Convenient filament threading with scroll knob . Here I will attribute this not only to pluses, but directly to huge pluses. Such a trifle like, but very much affects the work with the printer, especially if you print a lot and often change the filament.
Short feed extruder MK10 . Allows you to safely print any type of filament, including flex. In addition, unlike Bowden, plastic is saved here. The retract works more adequately. In general, I personally prefer Direct extruders, although I have a printer with a bowden system.
 nine0003
 Availability of Wi- fi module. Let him be weak, and not everyone needs him. But for some it will be very useful and necessary.
Axis motor synchronization Z . Another little thing that many manufacturers neglect. Meanwhile, this little thing affects the accuracy of printing. And many people customize their printers by adding a Z-axis belt.
Auto level. The printer builds a table map using 36 points and then takes into account any irregularities during printing. Which is very good for the adhesion of the base layer. Well, of course, there are no dances around the printer with a leaflet for an exact fit. To be honest, this process is what I dislike the most during printing. nine0003
Print area 300*300*230mm. With this size of the printed area, you can print a much larger number of details than with the usual 220 * 220mm in most models.
 True, as a minus, the dimensions of the printer themselves are already acting here. Under it, you need to prepare a surface with dimensions of 62 * 62 centimeters, and not every table is suitable here.
 But to be honest, I did not find any minuses for the printer. Well, except perhaps the dimensions and the weak signal of the Wi-fi module. But I already wrote about this above. Well, perhaps the relatively simple firmware can be attributed to the minuses, although it does not affect the print quality, it's just an interface. nine0003
Kywoo3D Tycoon Max is currently my main 3D printer, on which I print most models. For yourself and to order. Print field 300 * 300 * 230mm allows you to print large enough parts or batches of parts, which suits me completely. I also liked the robust, well-thought-out and monolithic design of the printer, as well as the speed of its operation. As for working on wi-fi, this did not take root for me. At first I dabbled in sending and monitoring, and then, out of habit, I returned to the flash drive and card reader again.
Learn more