Threaded inserts for 3d printed parts
Ultimate Guide to Threaded Inserts and 3D Prints
Download the full Guide
as a PDF!
The simple post-processing techniques presented in this guide are an excellent way for professionals to create low-cost silicone molds, threaded inserts for enclosures, vacuum formed parts, and more.
Threaded brass inserts can be a great way to add longevity to 3D printed enclosures that need to accept screws.
In this “how to” we will show you some of the best practices associated with installing threaded brass inserts into your 3D printed enclosures.
Working time will vary depending on your model and how many inserts you plan to install. The process shown took us about 10 minutes from start to finish.
SUPPLIES
Soldering Iron
Threaded brass inserts with matching machine screws
Washers
Pliers
Vise
Heat resistant gloves
Eye protection
Respiratory mask
Need some of these products? We've curated an Amazon wish list for you.
STEP 1: OBTAIN YOUR MODEL
If you are designing your model to meet a specific need, remember to design the holes in your model slightly smaller than the inserts you plan to install. This will account for any plastic that melts when installing inserts. If you are adding inserts to a downloaded model, purchase your inserts with the hole diameter in mind.
For our model, we chose this “Light Switch Box” designed by Thingiverse user qbasan.
Manufacturers of threaded brass inserts specify the hole size needed for the insert.
Step 2: Prepare & Print
When installing inserts, changing a few print settings in MakerBot Print can be a big help.
Increase the number of shells in your print. This will leave more plastic around inserts.
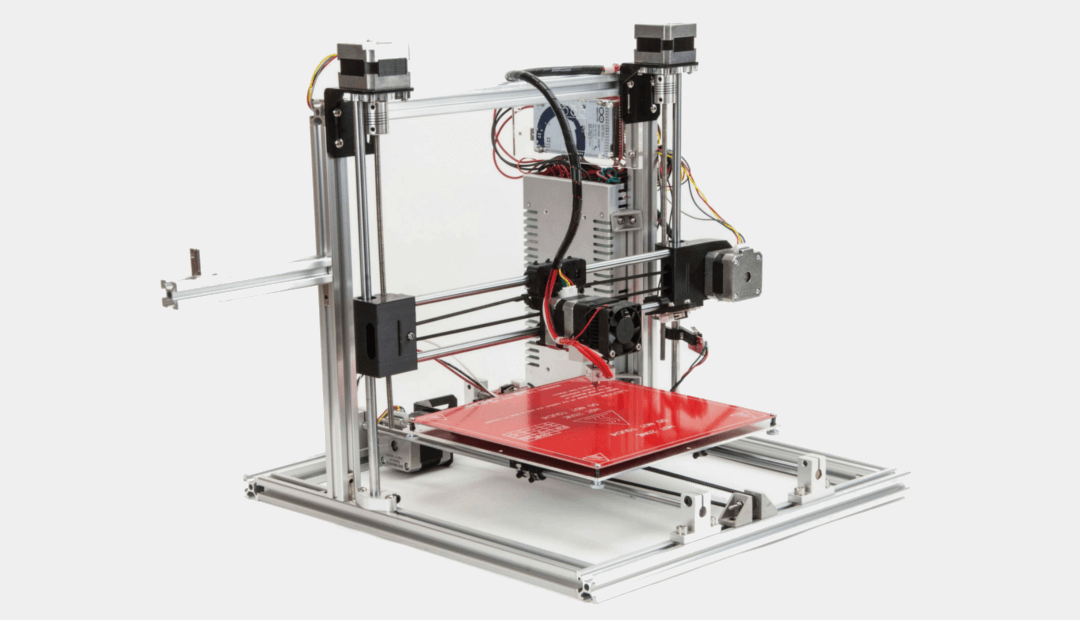
Once you have selected your settings you can print your object. We chose to print our model on the MakerBot Replicator+.
STEP 3: ROUGHING
Supplies Used: Needlenose pliers
Once your model has been printed and removed from the build plate, remove any rafts or support material.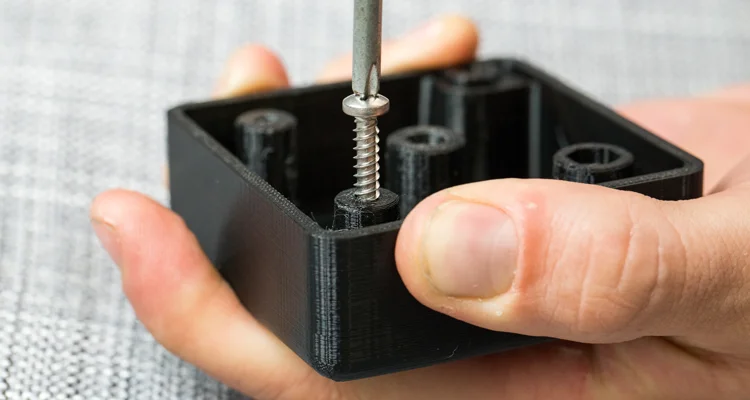
Supplies Used: Soldering Iron
Allow your soldering iron to heat for 3-5 minutes before installing inserts. This will ensure that you have to use the least amount of force to install inserts.
The 2021 Guide to 3D Printing Materials
Learn about polymers, composites, and metals all available for 3D Printing!
Supplies Used: Soldering Iron
Before installing your inserts, it’s also important that your model be secure. If your model moves during installation of an insert, you could damage the void or even the model itself.
We used a multi-axis vice that allowed us to work on the model from a few different angles.
Secure the model
Adjust the angle of the model
Supplies Used: (continued use through Step 9) Multi-axis vice, soldering iron, threaded brass inserts, and pliers
Because PLA has a relatively low heat deflection temperature and can deform at moderate temperatures, it is important to install inserts gradually.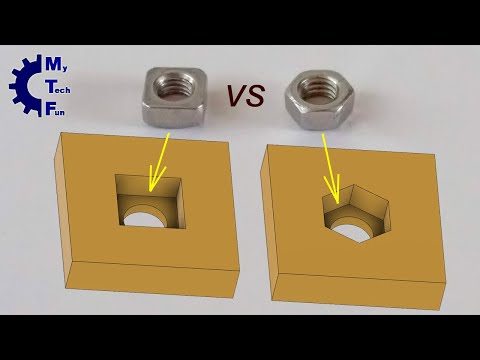
A: Grasp your insert with pliers
B: Position insert over hole
C: Press the insert half way into your print holding the soldering iron vertically
D: Move on to the next insert
Push lightly, your soldering iron should do most of the work for you
As brass transfers temperature relatively quickly, your inserts should be cool within a minute or so.
STEP 8: COMPLETELY INSTALL INSERTS
Once you’ve allowed your model to cool for a minute or so, install the inserts until they are flush with the top of your model.
When completing the installation of inserts be sure to avoid:
Installing too quickly
Pushing down on your inserts with too much force
Caution:
Never attempt to hold inserts in place with your hand when installing. Always use pliers.
Supplies Used:
Screws & washers
Screwdriver
Multi-axis vice
Thread in your screws using a screwdriver or drill.
Insert washers and screws
Insert additional hardware
Caution: Be sure not to over tighten.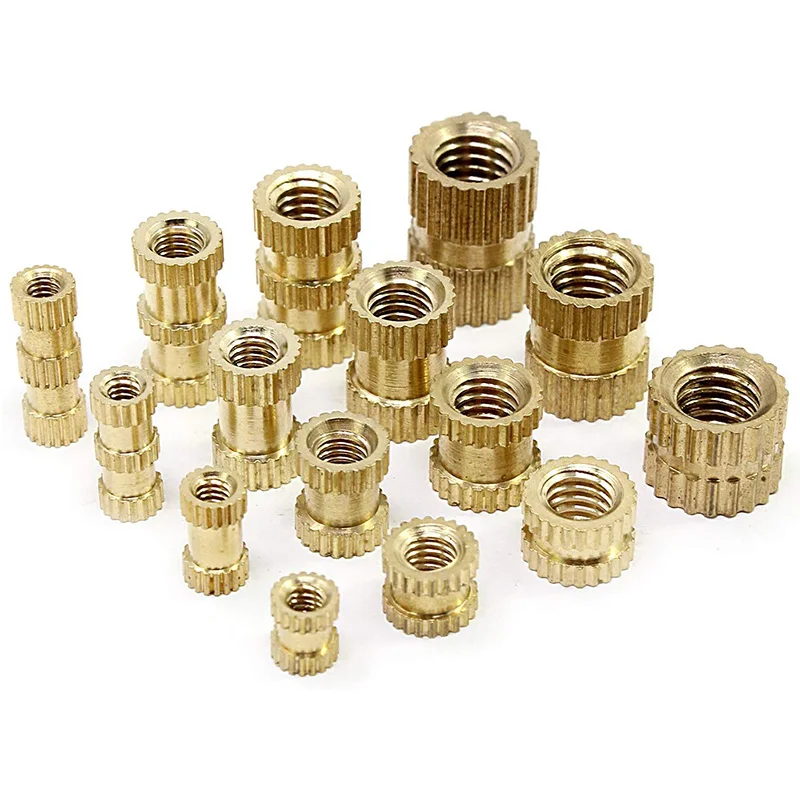 This can force the insert free from the surrounding plastic.
If you over tighten your screws, you may need to melt out your inserts and reinstall.
Here is our final part. After installing inserts, screws, and washers, we added the final switches to this electrical enclosure.
Visit one of our other applications pages for tips on how to take your print even further.
We recommend that you visit our pages on:
Vacuum Forming
Silicone Molding
Painting
Last but not least, remember to share your work with us on Thingiverse and social media @MakerBot.
We can’t wait to see what you make!
Light Switch Box
Qbasan
11/12/2014
https://www.thingiverse/thing:541876
Powered by MakerBot Learning.
3D Printing Threads and Adding Threaded Inserts to 3D Printed Parts (With Video)
There are many ways to attach screws to 3D printed parts, including inserts, tapping, and even 3D printed screw threads.
Screws are among the most popular fasteners in any material.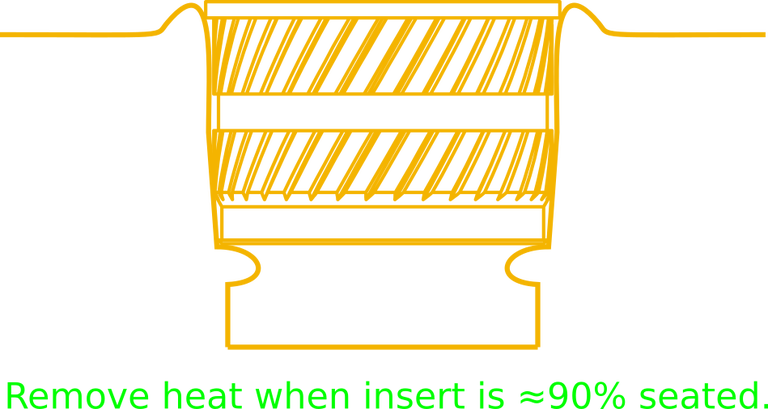 Can you use off-the-shelf screws with your 3D printed parts? The answer is a clear yes, for both stereolithography (SLA) and selective laser sintering (SLS) parts.
In this article, we explore different methods of using metal screws with 3D printed parts, and provide some tips for incorporating screw threads directly into your 3D design.
Watch our application video about 3D printing threads and threaded inserts for 3D printed plastics.
Video Guide
Having trouble finding the best 3D printing technology for your needs? In this video guide, we compare FDM, SLA, and SLS technologies across popular buying considerations.
Watch the Videos
Let’s take a look at the various design options for 3D printed threads, which we’ve collected over the years within Formlabs and based on feedback from our customers. Our test part is designed to showcase all these methods at once:
We’ve grouped these options based on the type of fastening, with pros and cons of each option listed for different use cases.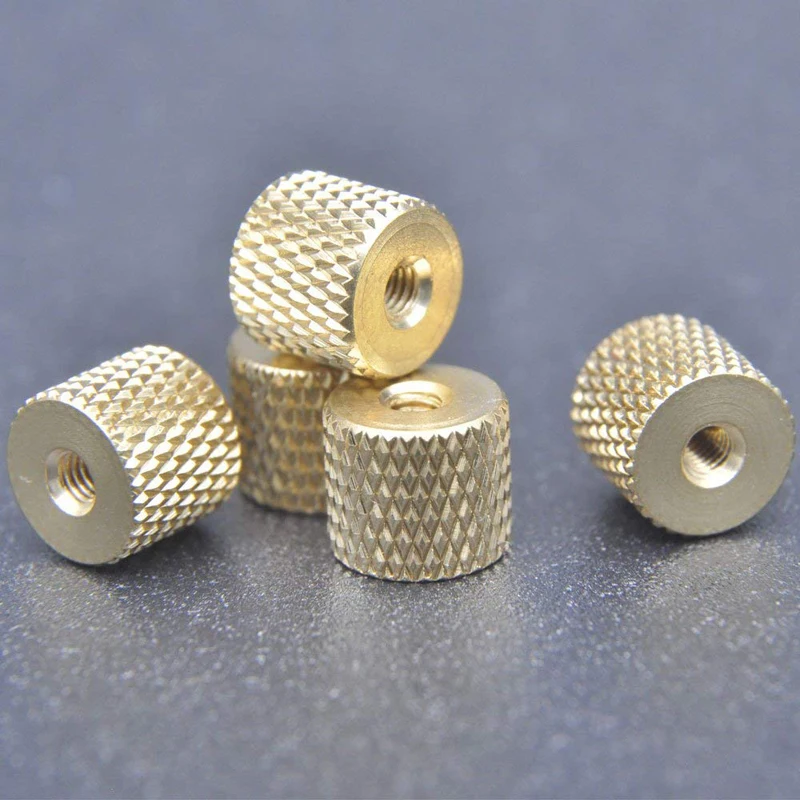
Sample part
See and feel Formlabs quality firsthand. We’ll ship a free sample part printed on an SLA or SLS 3D printer to your office.
Request a Free Sample Part
In this section, we look at three ways to incorporate inserts and nuts into your completed 3D prints for strong, long-lasting fastening that stands up to multiple cycles of assembly and disassembly.
Pros
-
Very good hold into 3D printed parts
-
Metal threads are strong and wear-resistant
-
Installs with a simple press fit
Screw-to-expand inserts are cylindrical, with a slight taper and knurling on the exterior surfaces. During the design stage, incorporate a boss with a depth and diameter based on the insert’s specs into your part. Print and post-process the part as normal, following the usual steps for SLA or SLS post-processing, taking care to make sure no extra material remains inside the cavity, and install the insert with a simple press fit. Adding a screw will press the knurled surface into the surrounding printed material, creating a strong friction fit.
Tip for using screw-to-expand inserts with 3D printed parts made with SLA 3D printing: Wash the part as normal, insert the screw-to-expand insert, install a screw, and post-cure the part with the screw in place. Saving this step for last reduces the chance that the insert will crack the surrounding material when expanded.
Heat-set threaded inserts are designed to be installed into thermoplastics using a soldering iron with an installation tip. They can also be used as glue-in inserts in thermoset materials, such as SLA parts.
To install in a thermoplastic part, like one printed with SLS Powders, follow the installation instructions for your particular hardware. The typical process is to use a soldering iron, with or without a special attachment, to heat the insert, which conducts heat into the surrounding plastic. The surrounding material softens and, by pressing down with the soldering iron, you can gently press the insert into the printed part. Be sure to allow enough time for the material to cool down and regain strength before installing a screw.
To install in a thermoset part, like one printed with SLA Resins, glue can be used to hold a heat-set insert in place. Unlike with traditional installation, make sure to design your boss to match the widest diameter of the insert, and use a bead of cyanoacrylate (CA) glue or epoxy to hold it in place when installed. Be sure to allow enough time for your glue to fully cure before installing a screw.
Note: In the SLS 3D printed part photographed for this article, the boss is sized for a press-fit, as we recommend here for thermoset plastics. This also works, with a drop of glue or epoxy, for thermoplastic parts, but won’t have as strong a hold as a true heat-set installation.
Although an additional step of soldering or gluing is required, heat-set threaded inserts for both SLS and SLA parts offer improved security and strength compared to screw-to-expand inserts With either method, these are a great option to gain a little extra security and strength compared to screw-to-expand inserts, although the additional step and equipment may be inconvenient.
Cons
-
Pocket or boss needs to be designed into the part, and accessible after printing
-
Depending on geometry, may require glue and curing time
Designing a pocket or boss that securely holds a nut into the part itself is another method to get metal-on-metal contact. Hexagonal or square nuts can be used, and even locking nuts are possible to accommodate. There are many design variations for this method—just make sure your pocket or boss is easily accessible (i.e. not on an interior surface) so that the nut can be installed. For extra security, a drop of cyanoacrylate (CA) glue will hold the nut in place.
White Paper
Stereolithography (SLA) 3D printers such as the Formlabs Form 3+ have high accuracy and precision, and offer a wide range of engineering materials. Download our white paper for specific recommended design tolerances.
Download the White Paper
For speed and simplicity, it might be preferable to forego inserts and nuts in favor of screwing directly into a 3D printed part. Whether tapping threads or using a self-tapping screw, off-the-shelf hardware designed for use with plastics work well with 3D printed materials like resins and thermoplastic powders.
Using a thread tap designed for plastic is a quick, economical way to add screw threads to 3D printed parts. It doesn’t require any extra design steps, and most shops that work with plastics will already have the equipment required.
Self-tapping screws, also called thread-forming screws, can be inserted into a negative feature with no preparation work done to the part. Follow the manufacturer’s guidelines for boss dimensions.
It’s suggested to use these with materials that are ductile, or have high elongation. Formlabs Nylon 11 Powder or Nylon 12 Powder are both suitable for this, as are the Tough and Durable Resins in the Formlabs SLA material family. Brittle materials, or those with low elongation (such as the Rigid Resins in the Formlabs SLA material family), may crack when used with self-tapping screws, so take caution and wear eye protection when using these materials.
Including threaded geometries in your printed part can be effective if you follow certain guidelines. Stick to larger thread sizes, at least ¼”–20 (imperial) or M6 (metric) or larger; reduce stress concentrations with fillets; and use thread profiles that are designed for plastics. For smaller screws, the threads should be customized to create a better fastener. For example, printing a semi-circular thread profile (on screw and nut) and using a 0.1 mm offset gives better thread engagement with improved wear characteristics.
SLA and SLS 3D printing are generally preferable for this method over FDM, because they are more precise and can create parts with a smoother surface finish. Any material with particularly low surface friction, such as Durable Resin, is less likely to show wear over multiple cycles of assembly and disassembly.
When preparing your part for printing, it's important to minimize support structures on any threaded surfaces to ensure your parts will come together smoothly without additional post-processing.
There are many options for combining multiple 3D printed components using screws and threaded fasteners. From directly 3D printing threads to using off the shelf inserts, you can choose any of the methods outlined above, based on the chosen material, the number of cycles of assembly and disassembly you anticipate, the strength required, and the amount of extra steps your workflow can accommodate.
Curious to see what 3D printing material might be right for your application? Use our interactive wizard to choose the best 3D printing material or request a free 3D printed sample part to see the quality firsthand.
Explore 3D Printing MaterialsRequest a Free Sample Part
Bronze in and out...
ski
Loading
08.12.2019
9919
Technician
RepRap
X191208: Stefan tested different types of bronze fusion nuts for 3d printing on diy rack
Epigraph:
GIF on the topic:
Fragment on the topic:
https://youtu. be/b_tdqGM4_sE
.
Greetings!
.
Translate for Stefan:
I tested different types of threaded inserts for strength and ease of use and application to see if it was worth spending more money on special inserts marked "3D Print Only". Since the last video (of my channel, about bronze inserts) really worked well in your opinion, I made another video on the same topic to answer some questions and comments. This test takes the most popular M3 inserts and tests them by fusing them into PLA and ASA.
.
Regards,
Ski.
.
Threaded Inserts for 3D Prints - Cheap VS Expensive
7 Dec. 2019
CNC Kitchen https://youtu.be/G-UF4tv3Hvc
.
[]
nuts bushings Bronze fasteners inserts
Follow author
Follow
Don't want
21
Article comments
More interesting articles
33
Subscribe to the author
Subscribe
Don't want
Friends, hello everyone! We are already here like family. So, the problem with Picaso feed control is...
Read more
14
Subscribe to the author
Subscribe
Don't want
Good time. After 4 years of using the Ender 3 Pro 3D printer, I decided to upgrade it....
Read more
xedos
Loading
04/25/2016
345728
210
Subscribe to the author
Subscribe
Don't want to
Good afternoon Dear readers!
GCODE: Buns from PavlushkaAfter writing the previous...
Read more
Read blogs
3D printer threads and thread inserts for plastic
At Formlabs we design various functional parts for printing on our stereolithography (SLA) 3D printers such as the Form 3. These parts include prototypes used for our own R&D, clips and fixtures to be used on our production lines, models for design verification prior to casting the final product in an appropriate material such as nylon.
Regardless of the application, we often need to connect 3D printed components with screws and threaded fasteners. As the catalog of versatile and reliable engineering polymers grows, the differences between "imitation" prototypes and functional prototypes diminish.
This article is a guide to threading and threading 3D parts with a 3D printer. There are many ways to connect multiple 3D printed parts together, but if you need the ability to repeatedly connect and disconnect components and secure mechanical fastening, there is no real substitute for metal screws.
Do you like to see everything with your own eyes? Watch a video about 3D printing threaded connections and threaded inserts for 3D plastic parts.
White Paper
Download our white paper on stereolithography to learn how SLA printing works, why thousands of professionals use it today, and how this 3D printing technology can be useful in your work.
Download white paper
Let's take a look at some of the threading options for 3D parts we've put together based on years of Formlabs experience and your input. We've ranked these options, starting with the one we think is the best, with the pros and cons of each option for different use cases.
Experience Formlabs print quality first hand. We will send a free 3D printing sample directly to your office.
Request a free sample
Benefits: Strongly connects 3D printed parts without the use of glue. The metal threads are durable and reusable.
Disadvantages: Inserts may loosen with increasing temperature.
3D print a sleeve blank with a depth and diameter that matches the insert specifications. Rinse with isopropyl alcohol (IPA) and allow to dry without final polymerization. Insert the insert into the sleeve with a screwdriver and use the screw to secure it completely into the plastic. Then finish curing the part to reduce the creep effect and fix the insert in the plastic even better. Performing this step last reduces the chance that the insert will break the sleeve when screwed in.
Benefits: Connects 3D printed parts very securely. The metal threads are durable and reusable.
Disadvantages: Adhesive required (don't try to use a soldering iron!).
Threaded inserts with heat setting are designed for installation in thermoplastics using a soldering iron with a soldering tip. They can be used in acrylic models and FDM parts, but cannot be used with in SLA photopolymer parts, which bend but do not melt when heated.
Check out our detailed guide comparing FDM vs. SLA 3D printers to see how they differ in terms of print quality, materials, application, workflow, speed, cost, and more.
However, the notches and ridges on the heat set inserts make them a very effective thread fastener if you bond them with a two part epoxy or cyanoacrylate adhesive.
Determine the bushing size by the largest diameter of the insert and apply some adhesive before installation. For best results, the part must be completely dry and cured.
Benefits: Nuts are easy to match to any required screw size.
Drawbacks: Side nut slots can eliminate the need for glue, but can make maintaining the model during printing more difficult.
Adding a hexagon socket to the nut press-fit end creates a reusable strong metal-to-metal connection. To increase the twisting force, you can choose a square nut. This nut can also be plastic or have blocking elements. If necessary, a drop of cyanoacrylate glue will help hold the nut in place, but if the design includes a side socket, there is no need for glue. Use a 0.1 mm offset around the press-in nut and clearance around the screw itself.
Benefits: Prototyping uses the same metal parts as mass-produced injection molded parts.
Sleeve blanks made from Tough (and Durable) polymer are unlikely to crack if you follow the screw manufacturer's sleeve design guidelines.
Disadvantages: The screws will hold tight, but the threads will not be as resistant to repeated use as metal threads. Standard resins can be used, but the bushing is more likely to crack.
Follow manufacturer's recommendations for core sizes and print with high impact engineering resins (such as our Tough Resin and Durable Resin). Before using the screws, complete the final curing. If you are prototyping an injection molded part that will use tapping or tapping screws in its final assembly, this is a good option for testing.
Benefits: No need to buy special plastic screws.
Disadvantages: The screws will hold tight, but the threads will not be as resistant to repeated use as metal threads.
We have tested the screws in our Tough Resin product and found that their use is identical to that of threading screws designed for plastic. The size of the hole diameter of the threaded bushing must be in the range between the main (threaded) diameter of the screw and the inner diameter. The screw shown is a #8 screw in a 0.16" diameter hole.
Benefits: Can be used for prototyping large and custom threaded designs.
Disadvantages: Not a durable or reusable fastening solution, especially for smaller threads.
3D printed threads from standard resins are better than Tough Resins because they are much harder. 3D printed threads remain relatively brittle, depending on the size of the thread, and are not recommended if the fastening system is to be used continuously and repeatedly.
Thread sizes ¼-20 or larger are generally functional without the need for post-processing. For smaller screws, the threads must be modified to provide better fastening. For example, printing a round thread profile (on a screw and a nut) and using a 0.1mm offset results in a better thread fit and improved wear characteristics.