Test 3d print file
20 Best & Most Popular 3D Printing Calibration Tests – 3D Printerly
When I first started 3D printing, I didn’t know much about calibration tests so I just went straight into 3D printing objects. After some experience in the field, I learned how important 3D printing calibration tests are.
The best 3D printing calibration tests include the 3DBenchy, XYZ Calibration Cube, Smart Compact Temperature Calibration, and the MINI All In One Test for configuring your 3D printer efficiently.
Keep reading through this article to learn what the most popular 3D printing calibration tests are, so you can improve your model quality and success rate.
The 3DBenchy is probably the most 3D printed object and most popular calibration test of all time, giving users a “torture test” that can be used to see how well a 3D printer can perform.
The goal is to 3D print a 3DBenchy that can successfully handle overhangs, bridging, inclines, small details, and dimensional accuracy. You can find the specific measurements of what your Benchy should measure up to on the 3DBenchy Measure page.
TeachingTech made a great video that goes over how to troubleshoot your 3DBenchy if it isn’t coming out perfect.
There is even a 3DBenchy Facebook Group where you can ask for advice and get some feedback about your Benchy.
One interesting tip that one user discovered is that you can check for under or over extrusion by sticking the chimney of one Benchy into the box of another Benchy.
The 3DBenchy was created by CreativeTools.
The XYZ Calibration Cube is a popular calibration test that helps you tune your 3D printer so it becomes more accurate and precise for making high-quality 3D prints.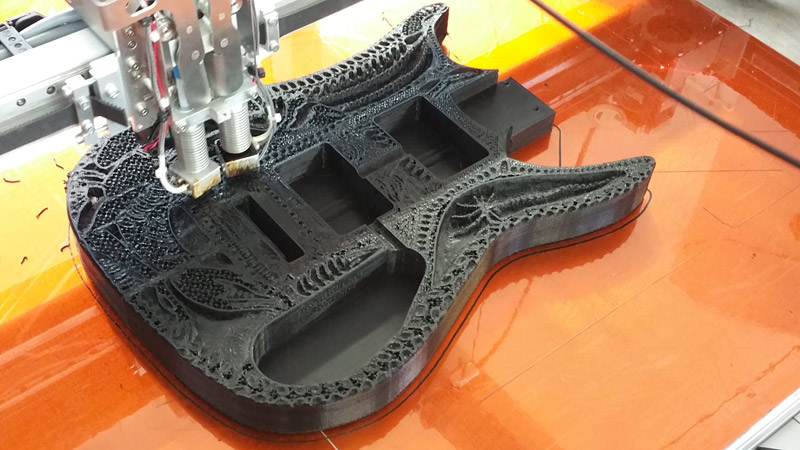
The calibration cube has three axes: X, Y, and Z and the idea is that they should all measure 20mm when you print the cube. This can determine whether your 3D printer is creating dimensionally accurate objects or not.
If you happen to measure 19.50, 20.00, 20.50mm for the X, Y, and Z axes respectfully, then you can adjust your e-steps for the individual axis to get it closer to the 20mm measurement
The following video is a great tutorial on printing the XYZ Calibration Cube and how you should configure your 3D printer accordingly.
One user has pointed out that you should measure the cube at its top layers to get more accurate readings. This is because some inconsistencies can be caused by an uneven bed, so do make sure that your bed is properly leveled, and that you measure the cube at its top, just to be sure.
The XYZ Calibration Cube was created by iDig3Dprinting.
Cali Cat is the perfect alternative to regular calibration cubes and is a simple test that determines if your printer can handle advanced prints.
The Cali Cat model is equipped with the linear dimensioning tests of a calibration cube, making sure that you nail down the basics before moving on to complex prints.
Besides that, it has many complicated features as well, such as a 45° overhang, surface irregularities in the face, and bridging. If you see imperfections in your Cali Cat print and don’t observe high-quality features, then you have to configure your 3D printer.
The following is a great explanation of what the Cali Cat is and what role it plays.
Cali Cat or Calibration Cat takes about 30 minutes to print, so it is a quick and easy way of calibrating your 3D printer to get great quality parts reliably.
It can also serve as a cute desktop decoration for you, as many people have said. It’s definitely more fun to print than regular cubes or the 3DBenchy.
The Cali Cat was created by Dezign.
4. ctrlV – Test Your Printer v3
The ctrlV Printer Test V3 is an advanced calibration test that challenges the capabilities of your printer, to see just how well it can really perform.
It has several tests in one such as:
- Z-Height Check
- Warp Check
- Spike
- Hole in wall
- Raft Test
- Overhang tests (50° – 70°)
- Extrusion width tests (0.48mm & 0.4mm)
To get the best results with the V3 calibration test, you want to configure your slicer’s settings and retraction settings as well as level your bed properly. You’ll get better results with time using trial and error consistently.
One user pointed out that having the print bed heated to 40-60°, depending on your filament, can help get the model to stick properly and print successfully.
The v3 model takes somewhere around two hours to print, so it’s definitely one of the best calibration tests out there if you want to tune your 3D printer relatively quickly, compared to other models that take considerably longer.
The ctrlV Printer Test V3 was created by ctrlV.
The Smart Compact Temperature Calibration Tower is an effective test for determining the best temperature for your 3D printer filament. The “Smart” edition of the Temp Tower adds more features that you can use to configure your printer.
A temperature tower consists of many units, and each unit is printed at a different temperature, usually with increments of 5°C to find out the temperature that works best for your specific filament.
To print a temperature tower successfully, you have to implement a script in your slicer so the temperature changes automatically with each block of the tower.
Doing that can get confusing for beginners, so I highly recommend watching the following video that takes you through the process of how you should print the Smart Compact Calibration Tower.
Many people have said that the Smart Compact Temperature Calibration Tower has worked wonders and they were perfectly able to calibrate their printer, especially by using the video above.
The Smart Compact Temperature Calibration Tower was created by gaaZolee.
The Ender 3 Calibration Files are pre-sliced G-code files for the Creality Ender 3 or any other Marlin-based 3D printer to help you find the ideal slicer settings.
This isn’t a calibration test specifically, although it does include a speed test for calibrating your printing speed. However, the pre-sliced G-code files included in this download can be really helpful for configuring your 3D printer.
The sliced files consist of the following:
- Retraction Test With and Without Automatic Bed Leveling
- Heat Tower With and Without Automatic Bed Leveling
- Speed Test With and Without Automatic Bed Leveling
- Fully Configured Ender 3 Simplify3D Profile
The following video by the creator of the Ender 3 Calibration Files is a good visual guide on how to tune your slicer settings.
The Ender 3 Calibration Files have been created by TeachingTech.
The Part Fitting Calibration test is for tuning your 3D printer’s extruder to make parts more size-accurate.
The goal is to print the S-Plugs of this test in such a way that they fit together perfectly. There’s also another model called Thin Wall Test under the “Thing Files” section for calibrating your Wall Thickness.
One interesting piece of information is that if you’re using Simplify3D, you can enable the “Allow single extrusion walls” setting under the “Thin Wall Behavior” section of the Advanced settings to print the Thin Wall model with the best results.
People who have successfully calibrated their extruder using this test say that objects like bearings, gears, nuts, and bolts now fit better and work as intended.
The Part Fitting Calibration was created by MEh5d.
The Retraction Test is a popular calibration model to check how well your 3D printer’s retraction settings are tuned.
The aim is to print the model and see if there is any stringing in the four pyramids. People say that this is a great calibration model for fixing stringing in your prints before moving on to more advanced objects.
The creator has left working settings for Slic3r software in the model description, such as:
- Retraction Length: 3.4mm
- Retraction Speed: 15mm/s
- Retraction After Layer Change: Enabled
- Wipe on Retraction: Enabled
- Layer Height: 0.2mm
- Print Speed: 20mm/s
- Travel Speed: 250mm/s
One user says that decreasing the temperature by 5°C has helped reduce stringing, since the filament doesn’t get as softened and retains it’s shape better. It’s advised to implement trial and error with your slicer’s settings until you find that sweet spot and make high-quality prints.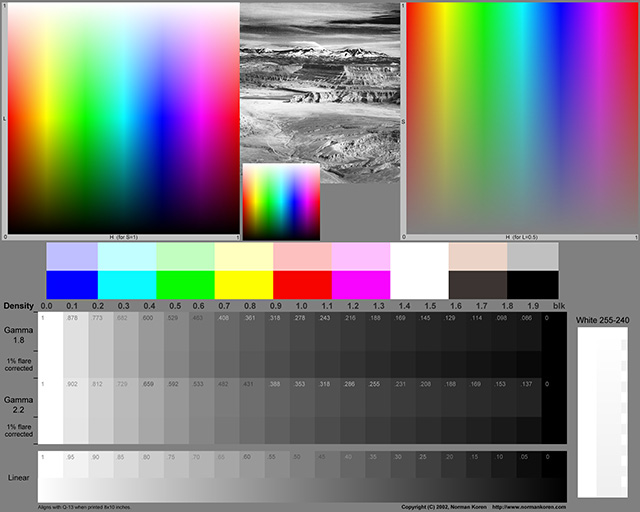
The Retraction Test was created by deltapenguin.
The Essential Calibration Set is a combination of multiple calibration prints that determine how well your 3D printer is configured as a whole.
This calibration test consists of the following models:
- .5mm Thin Wall
- 20mm Box
- 20mm Hollow Box
- 50mm Tower
- Perimeter Width/T Tester
- Precision Block
- Overhang Test
- Oozebane Test
- Bridge Test
The creator has left instructions for printing each calibration print that’s part of this set in the description. It’s worth following these to fully calibrate your 3D printer.
The Essential Calibration Test was created by coasterman.
The Ender 3 Level Test is a calibration method that uses a G-code command to help you level the print bed evenly and prints five 20mm discs for tuning your adhesion.
This calibration test works by instructing your 3D printer’s nozzle to move towards each corner of the print bed with a slight pause in-between. Doing so allows you to manually tighten or loosen the leveling knobs and level your 3D printer.
The G-code will instruct the nozzle to stop at each corner twice, so you can comfortably level the print bed of your Ender 3. After that’s done, a total of five 20mm discs will be printed for you to check adhesion: four in each corner, and one in the center.
Do bear in mind that this test is compatible with 3D printers that have a 220 x 220mm build volume. However, the model has been updated to include the G-code file for the Ender 3 V2 as well, which has a 235 x 235mm build volume.
The Ender 3 Level Test was created by elmerohueso.
The MINI All In One 3D Printer Test aims to target several parameters of a 3D print all at once to check how capable your 3D printer really is. It used to be a larger version but he updated it to be smaller and quicker to print.
This calibration model consists of a variety of different tests, such as:
- Overhang Test
- Bridging Test
- Support Test
- Diameter Test
- Scale Test
- Hole Test
The MINI edition of this object is 35% smaller than the original All In One 3D Printer Test.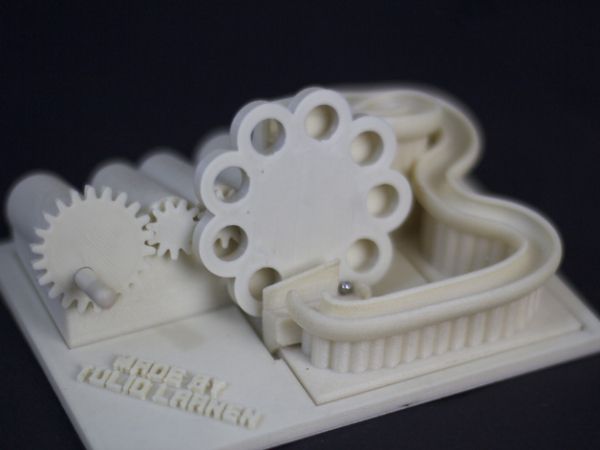 People have been really able to dial in the settings of their 3D printer after printing this model.
The results of this 3D printed test would allow you to check which areas of your 3D printer need work, so you can troubleshoot the shortcomings accordingly.
The following video is a nice illustration of how this calibration test is printed.
People advise printing this model with 100% infill and with no supports for the best results. There’s also a version of this model without the text under the “Thing Files” section that can also be tried out.
The creator made a guide to try and assist users who are experiencing any issues with the test. It goes through fixing over extrusion, PID auto-tuning, temperature settings, belt tension, and bed PID.
The Mini All In One was created by majda107.
The Lattice Cube Torture Test is the ultimate calibration model that tunes your 3D printer’s retraction, overhangs, temperature, and cooling.
This test is based on Maker’s Muse’s lattice cubes, but this one is more of a modification for your printer’s calibration.
You’ll find several different types of lattice cubes under the “Thing Files” section, each with its own features that are worth getting into.
For instance, the Super Lattice Cube STL is a complicated model that comprises two lattice cubes rotated together thereby making it even harder for your printer to get everything right.
The creator says that it’s best to keep your Layer Height to 0.2mm for the best results when printing the lattice cube.
The following video by Maker’s Muse is a great introduction to the lattice cube torture test so do give it a watch to find out more.
The Lattice Cube Torture Test was created by Lazerlord.
The Ultimate Extruder Calibration Test tunes your 3D printer’s ability to print bridges and gap distances by calibrating the temperature and travel speed.
Using this model, you will be able to see how far your bridges can reach without noticeable imperfections. If you find the bridges start sagging, it means that you need to lower the temperature.
In addition, there are large gaps within the model which is great for testing reversal or travel speed settings. It’s also recommended to set extra shells to 0 and use as little infill as possible to save time and print the model quicker.
People who have tried the Ultimate Extruder Calibration Test say that this is a very useful calibration print that has helped people get optimal temperature settings and make perfect bridges.
One user who printed the model said that reducing the gap fill speed in PrusaSlicer specifically leads to better stability during printing.
You can also customize this model using your own variables. For this purpose, the creator has left instructions in the page’s description that you can easily follow.
The Ultimate Extruder Calibration Test was created by Starno.
The Customizable 3D Tolerance Test tunes your printer’s accuracy and determines how much clearance is best for your 3D printer.
Tolerance in 3D printing is how accurate your 3D printed model matches the dimensions of the designed model. We want to minimize the amount of deviation as much as possible for the best results.
This is something that’s necessary to calibrate when you want to make parts that must fit together.
This model consists of 7 cylinders, each having its own specific tolerance. After printing the model, you will carefully examine which cylinders are stuck tight and which ones are loose.
The ones that are loose can be easily taken out with a screwdriver. In this way, you can determine the best tolerance value for your 3D printer.
The following video by Maker’s Muse nicely explains what tolerance is and how you can test it for your 3D printer.
One user advises to print the model with 0% infill or else the whole model may get fused together. You can also use rafts with this print for better adhesion and to prevent warping.
The Customizable 3D Tolerance Test was created by zapta.
The Ultrafast and Economical Stringing Test is a quick and easy fix for stringing in your 3D prints that requires no extra post-processing steps.
This model gives you the advantage of stopping the print as soon as you observe stringing in the two pyramids that are printed. You can then tweak your retraction or temperature settings, and print another one of these models to continue the calibration.
If the issue still persists, I highly recommend checking out another one of my articles that discusses 5 Ways to Fix Stringing and Oozing in Your 3D Prints.
People who have tried calibrating their 3D printer with this model have shown a lot of appreciation for the creator. This model takes somewhere around 4 minutes to print and uses very little filament.
It saves you both time and money, and makes it possible to get rid of stringing in your parts, which is when the nozzle pushes out excess filament and leaves small strings of material on your print.
You can also watch the following video to get a visual idea of how to identify stringing and why retraction settings influence this imperfection among other factors.
It’s worth noting that keeping your filament dry is half the work for getting successful 3D prints. I’ve put together an ultimate guide on How to Dry Filament Like a Pro so do check that out for an in-depth tutorial.
The Ultrafast and Economical Stringing Test was created by s3sebastian.
The Bed Center Calibration Test recenters your print bed and helps you change the bed center that your 3D printer recognizes, to the actual center of the bed.
Printing this model will allow you to clearly see whether your print bed is perfectly centered or not, and this is something that’s necessary to make parts without being offset from the center.
The cross feature in the model should be exactly in the middle of your print bed and the distance from the outer squares to the edge of the heated bed should be equal.
If you find your bed away from the center, you will need to measure the offset in the X and Y direction and change the bed center value in your firmware to calibrate the print bed.
The following video on bed centering goes in-depth in this process, so you should definitely check it out.
The Bed Center Calibration Test was created by 0scar.
The Lithophane Calibration Test model is a simple test for that helps you determine the best print settings for 3D printed Lithophanes. It has a set of wall thickness values that increase by 0.4mm, with the first 0.5mm value being the exception.
Here are the recommended settings that the creator has left for the model:
- Walls Count 10 (or 4.0mm) – or higher
- No Infill
- 0.1mm Layer Height
- Use a Brim
- Print Speed 40mm or less.
This model has a 40x40mm and 80x80mm version, with three types for each size:
- STD which includes a combination of raised and recessed numbers
- RAISED which only contains raised numbers
- BLANK which has no numbers
The creator recommends that using either the RAISED or BLANK model for printing the Lithophane Calibration Test is better for achieving the desired results, so do implement trial and error to calibrate your 3D printer.
The Lithopane Calibration Test was created by stikako.
The LEGO Calibration Cube is similar to a regular calibration cube for testing print tolerances, surface quality, and slicer profiles, but these can be stacked upon each other, making for a more visually pleasing and useful calibration cube.
This model serves the same function as the XYZ Calibration Cube, but can be seen as an upgrade since it can even be used as a cool display or toys.
Ideally, you should be having a 20mm measurement on all three axes of the cube, which you measure with a set of Digital Calipers.
If not, you can calibrate your e-steps for each axis separately to fine-tune your 3D printer and get back to making high-quality prints.
People love the idea of the LEGO Calibration Cube because it not only allows them to configure their printer but also beautifies their desktop as the cubes are stackable.
The Lego Calibration Cube was created by EnginEli.
The Flow Rate Calibration Method is an effective test that helps you calibrate the flow rate using trial and error, so your 3D printer extrudes the correct amount of filament.
This calibration test is a quick and easy way of tuning your flow rate, which is essential for getting high-quality prints. However, make sure that your e-steps are calibrated before you test your flow rate.
That said, here’s how you easily calibrate your flow rate with this model.
Step 1. Download the Flow Rate Calibration STL file that matches your nozzle diameter.
Step 2. Print the model with your Flow Rate set to 100%.
Step 3. Measure the width of each wall of the printed model.
Step 4. Take the average of your measurement using the (A/B)*F formula. The resulting value will be your new Flow Rate.
- A = expected measurement of the model
- B = actual measurement of the model
- F = new flow rate value
Step 5.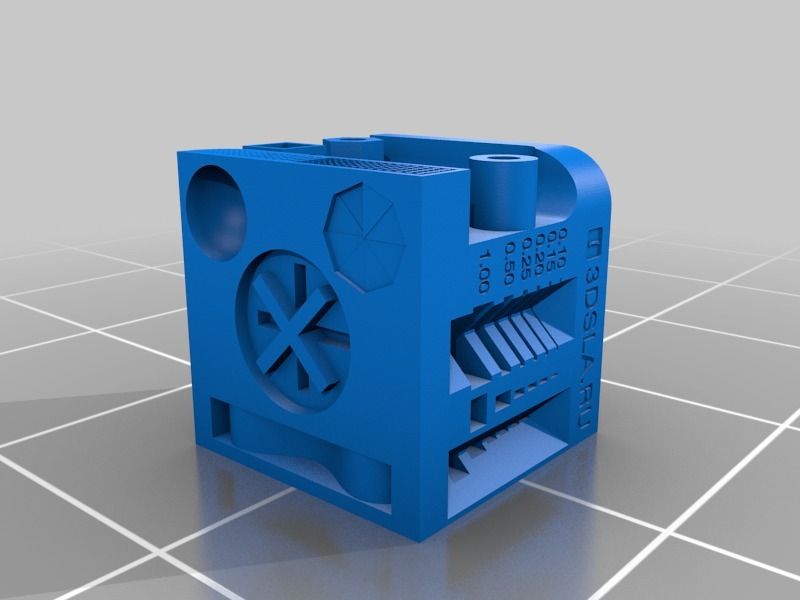 Print the model again with the calibrated Flow Rate value and measure the model afterward. If the actual measurement is equal to the expected one, you’ve successfully calibrated your Flow Rate.
If not, calculate the Flow Rate again with the measured value and repeat the process until the two measurements match each other.
The following video is for those who prefer a visual tutorial.
The Flow Rate Calibration Method was created by petrzmax.
The Surface Finish Calibration Test determines how well your 3D printer prints the surfaces of your models. It’s perfect if you are having problems with 3D printing uneven or curved surfaces, so you can calibrate your printer correctly beforehand before starting the main model.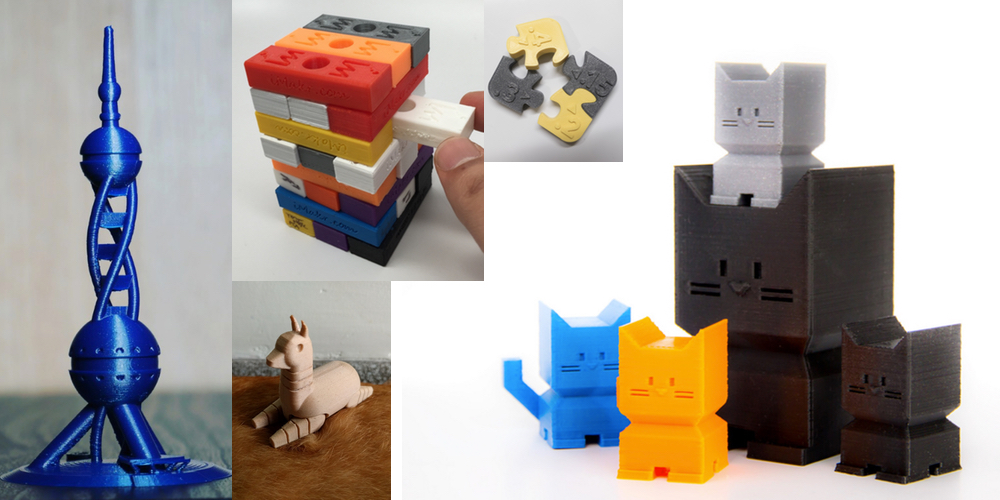
This model is a quick and easy way to print multiple surfaces and check them each. Doing so makes it simpler to tweak your slicer’s settings and calibrate your 3D printer.
You can check out the recommended settings in the page’s description for each resolution of the model.
The creator also mentions that if you live in a humid area, decreasing the nozzle temperature by 5-10°C can help you get better results.
The Surface Finish Calibration Test was created by whpthomas.
Test best 3D printer models・Cults
Test your 3d printer?
Free
3D Print Test
Free
Retract Test
Free
Test Tube Rack Holder Lab Organizer
Free
BullDog Thing :)
Free
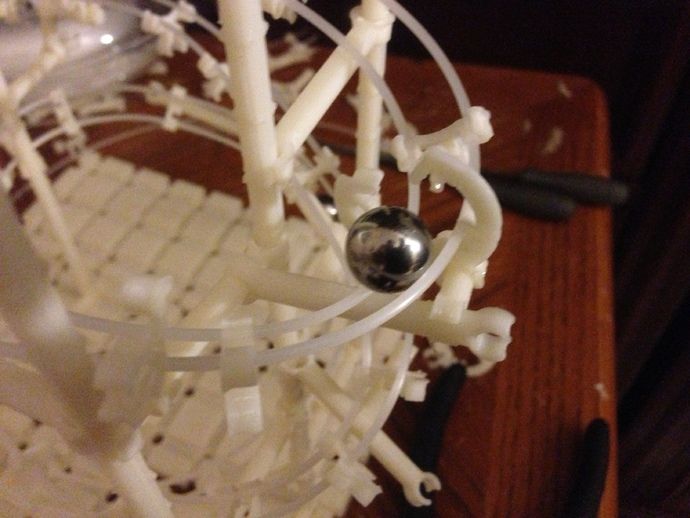
Sphericoil Christmas Ball
€1. 44
44
First Layer/ Bed mesh tester
Free
support test
Free
Clear Filament Test's
Free
Filament Testing Block
Free
calibration cube 20x20x20 xyz
Free
Filiment "test"tube
Free
BenchmARRRk_V1
Free
Yet Another Bed Level STL
Free
TPU Speed Test Tower
Free
Calibration Cube + Dice "Fast food Order"
Free
Classic Ramp
Free
XYZ Horizontal Expansion Test
Free
Cube 2.
 0
0€0.59
TEST RETRACTION
Free
Worm Gear Drive - Print In Place Test
€1.56
Parametric turner's cube
Free
Test tube holder with Eppendorf holes for Anycubic Photon
€1.59
BTS Test Cube
€0.60
Minimus Precision Layer Calibrator
Free
Exposed Print in Place Combination lock
€0.66
Satisfying Klicky Fidget
€1.80
Gyroid Stress ball 60mm- relieve your stress about Corona / Covid-19 virus
Free
Optical Test Stand for 4-8" Telescope Mirrors
Free
Bend test
Free
Thread_Print_Test v2
Free
Duster (MONGER promo miniature)
Free
Calibration Waffle
Free
Adjustable Focus 3D Printed Liquid Filled Lens
Free
Flow test from 1 to 4 walls (0.
 4 to 1.6mm)
Free
Sparkmaker Resin Tower test v4
Free
Flite Test Powerpod firewall
Free
Undercarriage plates for foamboard planes
Free
Minecraft Calibration Cubes
Free
Concentric Ring Fit Test
Free
Bridge and Overhang test
Free
3D Printer Calibration Piece
Free
Interlocking calibration clips - Curves and straights
Free
Accuracy Block
Free
Tight Tolerance Calibration Clips
Free
Wooden furniture
Free
VASE
€0. 50
50
Test Glycémie - Blood glucose
Free
10 models for 3D printer calibration. Set up your printer
Before you start printing on a 3D printer, you need to test it. For this, special models are most often used to diagnose and calibrate the device. Next, we will list the top 10 models for calibration, in our opinion.
3D Benchy
Among all 3D printing tests, the flagship is 3D Benchy. This model is a boat that can test everything from protrusions to extrusion. If you want to test your 3D printer, then the bench will help you determine the optimal settings for the ideal result. On Thingiverse, more than three thousand users posted photos with their samples, and the boat itself was printed by more than a hundred machines and no fewer materials.
Model reference
All-In-One
A very interesting model, which is called “all-in-one”. Everything is presented in the model: canopy, bridge, string, temperature and belt tension test, extrusion. This is an ideal model for testing the device at several levels at once. A manual is included with the model to help you troubleshoot any issues you find. On Thingiverse, more than 75 users have posted test results on different 3D printers and different materials.
Model Reference
XYZ Calibration Cube
Very simple and fast model for testing. This is a cube with a side of 20mm. It helps to gain dimension by adjusting the steps in millimeters. Also, the model allows you to test extrusion, vibration, temperature. This cube was printed simply by countless 3D printers and a variety of materials.
Model Link
Cali Cat
Nice little calibration cat or just Cali Cat is a simple model that allows you to test the accuracy of the device, as well as detailing, lugs, bridges, vibration and extrusion. And all this in just one hour. More than 2.5 hundred users have submitted their test results on the service.
Model Reference
Phil A.
 Ment
Ment The MatterHackers Mascot is a Phil A. Ment test model. It was originally intended for manufacturers. The description mentions the fact that Phil has several functions. And they were originally designed specifically for 3D printers. The model has small inserts, relief details, cylinders of vertical and horizontal orientation, ledges. In addition, the model contains chamfers, bridges and fillets. And this miracle is performed by a domed helmet. The record size on the service is 5,1397mm. A total of 84 models were published.
Model Link
Calibration Temperature Tower
You can use this model to adjust the heat of your 3D printer. You can also test for different materials at what temperature the print comes out better.
NEW model Autodesk
This is a new model, or rather not even a model, but a whole procedure that will allow 3D printer manufacturers to show all the capabilities of devices to Kickstarter supporters.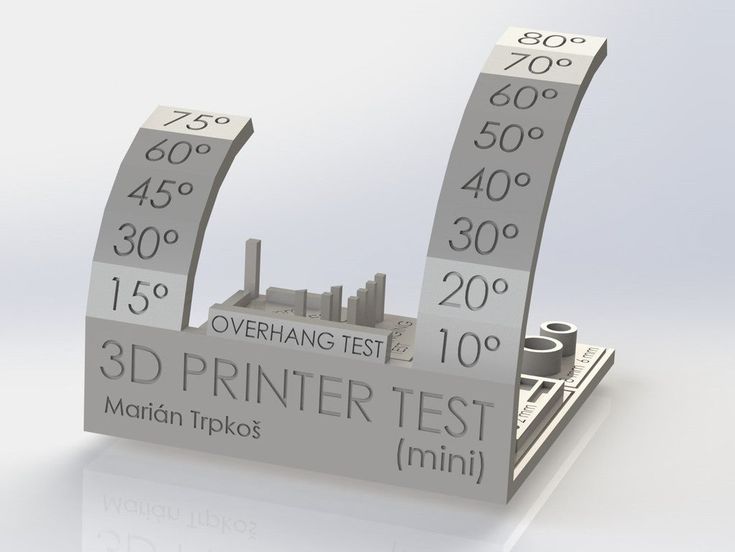 And of course, calibrate. The test was developed by Andreas Bastian and is a consolidated STL file that is able to test the system for the following indicators:
- authorization;
- alignment;
- accuracy;
- bridge, etc.
The model has it all. For example, if the 3D printer is set up well, then the horizontal function will be performed with a minimum of problems.
Model Link
PolyPearl Tower
If you want to test curves, cuts, bridges, cuts, then this model can be a great solution. In the description for this test model, the name "torture tower with a twist" appears. It is worth trying to use it for calibration.
Model Link
Rapid Screening
This model is a very quick test to check temperature, cooling, and retract function. Among the advantages of the model is its cost-effectiveness. The model will weigh only 0.23g. With its help, you can immediately remove the "strings".
Model Reference
Parametric Calibration Object
A particular difficulty in calibrating a 3D printer is lowering the stage level. With this model, you can draw the right conclusions to improve the first layer of printing, and as a result, get better prints.
Model Reference
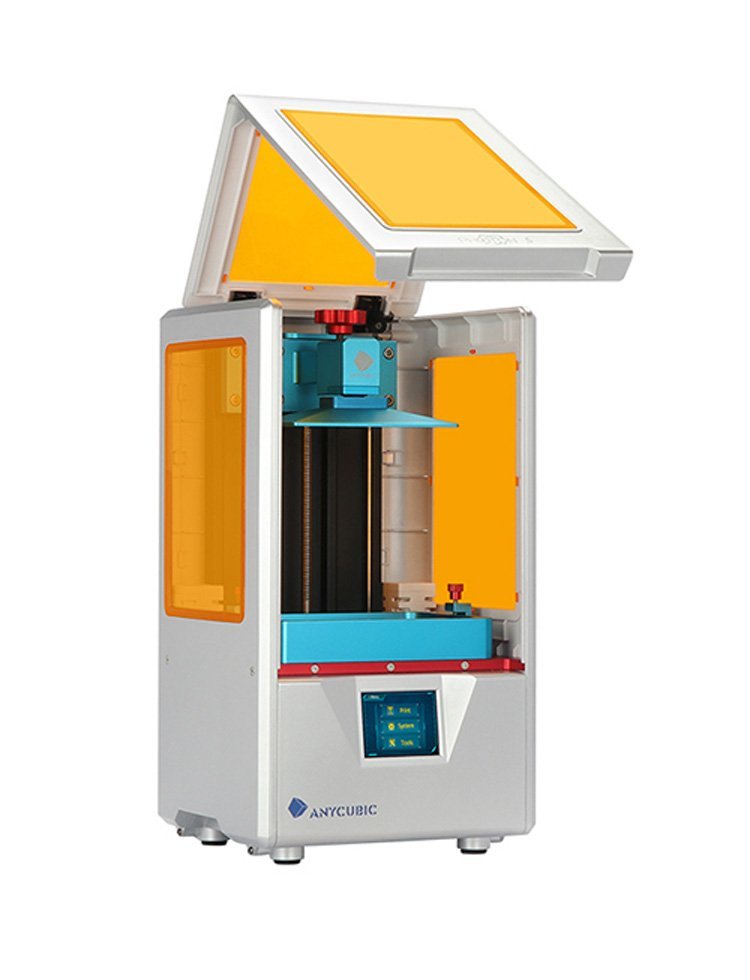
Resin 3D Printing Test File. Calibration
Calibration is required from time to time for all 3D printers and photopolymer devices are no exception in this case. We have collected here the most popular test 3D models, with which you can carry out diagnostics and calibration.
3D printing technology
Among 3D printing technologies, photopolymer stands apart. This is the second most popular printing method after FDM, the essence of which is squeezing molten plastic through a nozzle. A relatively inexpensive plastic thread is used as a material in FDM technology.
Photopolymer printing uses resins that cure with light.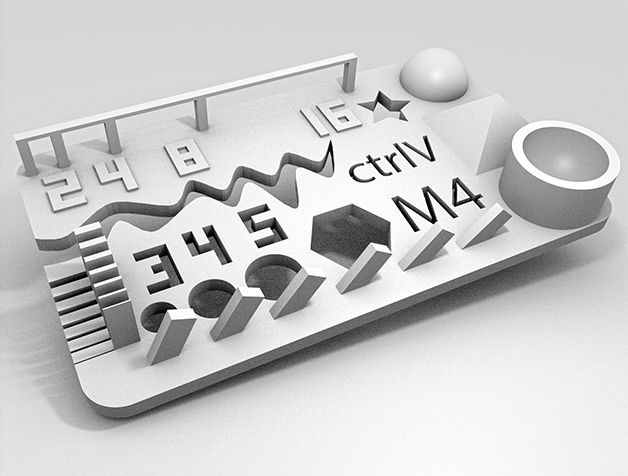 There are several variations of technology: SLA, LCD and DLP . They differ in light source and printing speed. But in any case, this is always the exposure of the photopolymer resin layers. The finished model, due to the peculiarities of the printing technology and the material itself, needs to be washed and additionally cured.
Resin technologies are different, but they all rely on a number of common settings and factors. Among them:
- authorization;
- interlayer adhesion;
- exposure time;
- smoothing index;
- resin specifications.
How do I check the print settings and determine if they need to be adjusted? For this, calibration or test models were created. Such models allow you to test the settings. There are many options, but there are several popular ones that have proven their effectiveness in practice:
- AmeraLabs Town
- HARZ Labs Test
- Siraya Tech
- Validation Matrix
Let's dwell on each in more detail .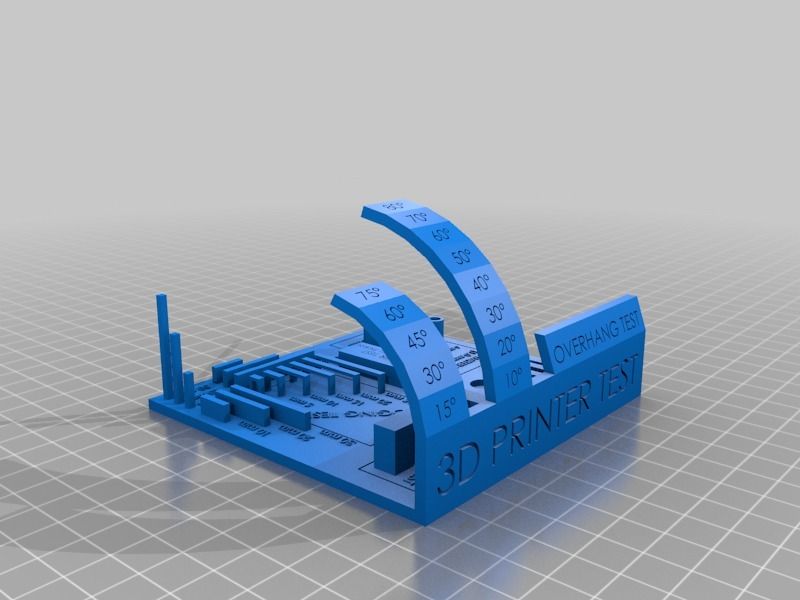 .. /www.thingiverse.com/thing:2810666
Lithuanian photopolymer resin manufacturer AmeraLabs has developed a universal Town calibration model for testing purposes. It is called a universal part because it allows you to check not only the printer settings, but also the quality of the resin. A total of ten tests are included in the model. Each is enclosed in "buildings" of different heights and located at different angles. The model is very effective and therefore can often be seen in tutorials and simple resin printing videos.
There are ten tests in total, as mentioned earlier, we note three to understand the possibilities:
- gaps of different widths (0.1-1mm) - checking the quality of the light source and exposure time;
- holes of different heights - checking exposure time, adhesion of layers;
- cross bridge - checks layer height and resin quality.
Analysis of deformations, inconsistencies allows you to identify problems and make appropriate adjustments.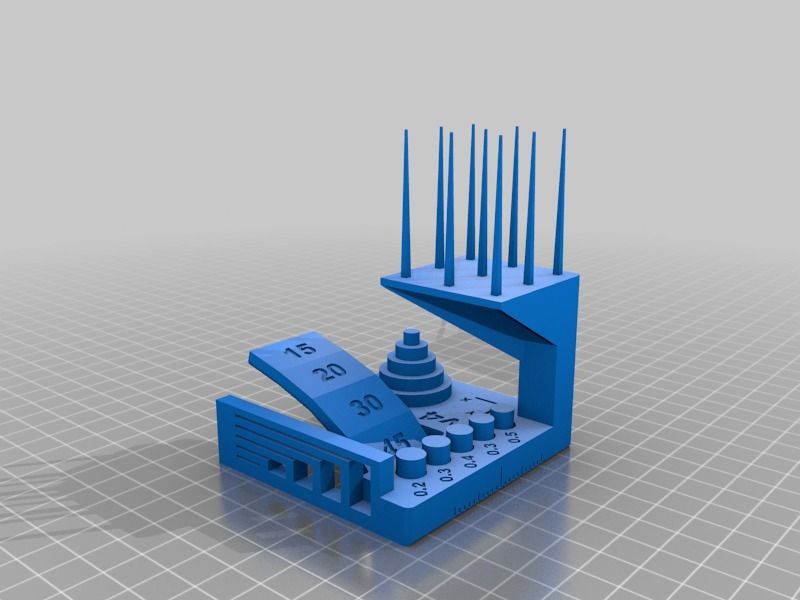
3D model for HARZ Labs Test calibration
Download link (copy the link and paste in the address bar): https://www.thingiverse.com/thing:2776522
HARZ Labs is a leading company in the production of photopolymer resin. But it produces resins for photopolymer printing. For the purpose of testing, a calibration model was developed.
Siraya Tech
calibration 3D model Download link (copy the link and paste it into the address bar): https://www.thingiverse.com/thing:5438127
Test model from a Hong Kong resin manufacturer. There are five testing sections in the model. Three are for checking exposure. The model allows you to quickly find and fix the problem. The fact is that resolution and exposure are checked right during printing, problems will be visible even before the model is printed to the end. With a print height of 3.5 mm, holes, recessed text, objects of a round and triangular shape should be clearly visible.