Ortur obsidian 3d printer review
Ortur Obsidian Review: Feature Packed 3D Printer
I noticed the Ortur Obsidian while browsing Gearbest, and it looked like a featured packed 3D printer available for a fair price. I thought it would be a good printer to test and check if it’s a good competitor for the popular Artillery Genius. Continue reading to learn more about the Ortur Obsidian and find out if it lives up to the expectations.
Ortur Obsidian Shipping and Packaging
The Ortur Obsidian comes in a carboard box with ample protection on all sides. Everything is packet well in plastic bags for extra protection. I don’t think there’s any risk of receiving the printer in good condition even if it gets a bit roughed up during shipping.
Assembly of the Ortur Obsidian
In the Ortur Obsidian description, it’s stated that the assembly takes about 20 minutes, but this is an optimistic estimate. It took me about 1 hour to properly assemble the printer and check everything, mostly because the assembly guide steps are not accurately described in the correct order.
On the included SD card, there are a few helpful videos for assembling the printer but even in these videos, some of the steps are not followed in the correct order.
I recommend you check all the screws to make sure everything is nice and tight because I found some loose screws. Besides that, I also recommend you check the eccentric nuts for all the roller wheels and tighten them just right. They should be tight enough so they can barely be turned with your fingers, but not too tight so they develop flat spots.
Finally, take extra care when assembling the printer to make sure the frame is square. All these steps are required for any printer to ensure good results during printing. It’s always good to take your time during assembly, to avoid issues which can be more time consuming later.
Besides the printer parts, you also get the following accessories:
- Tools for assembling the printer
- Card reader with 8GB MicroSD card
- Leveling blocks
- 200gr white PLA roll
- Power cable
- Plastic handle
- Top mounts for Z screws
- Screws for assembling the printer
- Z-sync belt
- Zip ties
- PTFE tube for reverse bowden
- Rubber feet
- Z endstop
- Pulleys for the Z sync belt
Ortur Obsidian Specs
| Brand | Ortur |
| Model | Obsidian |
| Type | DIY |
| Material (Frames) | Aluminium Extrusion,Sheet-metal structure |
| Platform board | Aluminum Alloy |
| Nozzle diameter | 0. 4mm 4mm |
| Nozzle temperature | 0 to 260 degree |
| Product forming size | 250mm * 250mm * 300mm |
| Layer thickness | 0.05-0.4mm |
| Memory card offline print | SD card |
| LCD Screen | Yes |
| Print speed | 150mm/s (MAX) |
| Platform temperature | 0 to 120 degree |
| Supporting material | ABS,HIPS,Nylon,PETG,PLA,TPU |
| Material diameter | 1.75mm |
| Language | English,French,German,Russian,Spanish |
| File format | G-code,STL |
| Model supporting function | Yes |
| XY-axis positioning accuracy | 0.11 mm |
| Z-axis positioning accuracy | 0.04mm |
| Voltage | 110V/220V |
| Print Surface | Sticker |
| Host computer software | Cura,Repetier-Host,Simplify3D |
| Packing Type | Partially-Assembled packing |
| System support | Windows, Linux, Mac OS |
| Voltage Range | AC110V/220V |
| Current | 24V, 15A |
| Connector Type | SD card,USB |
250x250x300 build volume
The Ortur Obsidian 3D printer sits between the regular and large format 3D printers.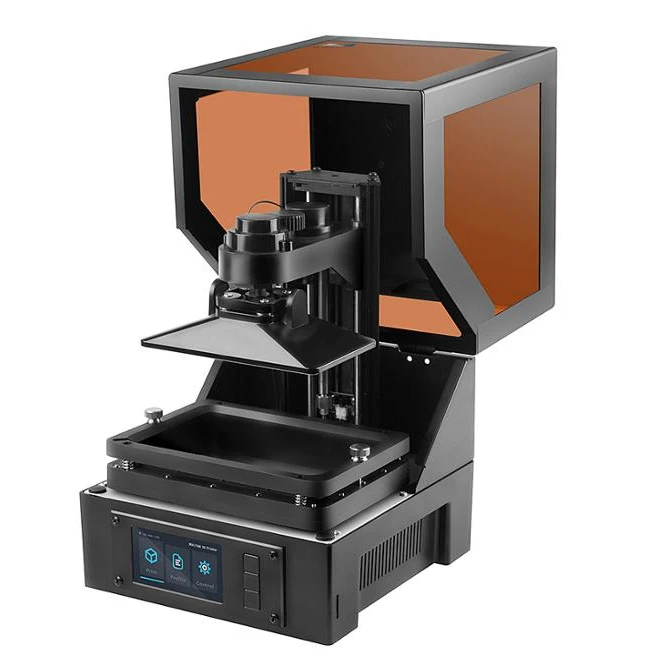 It has a build volume of 250x250x300 in a compact footprint close to the one taken by the Artillery Genius which has a build volume of 220x220x250.
I really like this because it offers the best of both worlds. Larger print volume with smaller footprint, that doesn’t take a lot of space.
Dual-Z axis with Z sync belt
Lately, more and more 3D printers offer Dual-Z axis and the Ortur Obsidian maintains the trend. With a Dual-Z axis setup, the X gantry can be moved easily and more consistently compared to a single axis printer. Both motors are wired to a single stepper driver. This works well, but you won’t be able to use features like the Z Steppers Auto-Alignment available in Marlin.
Considering that the stepper motors are linked with a Z sync belt, this is not that big of an issue and can easily be ignored. Unfortunately, my Z sync belt seems to be a bit longer than it should, and doesn’t sit properly on the pulleys. It could be an isolated issue, but it’s worth mentioning.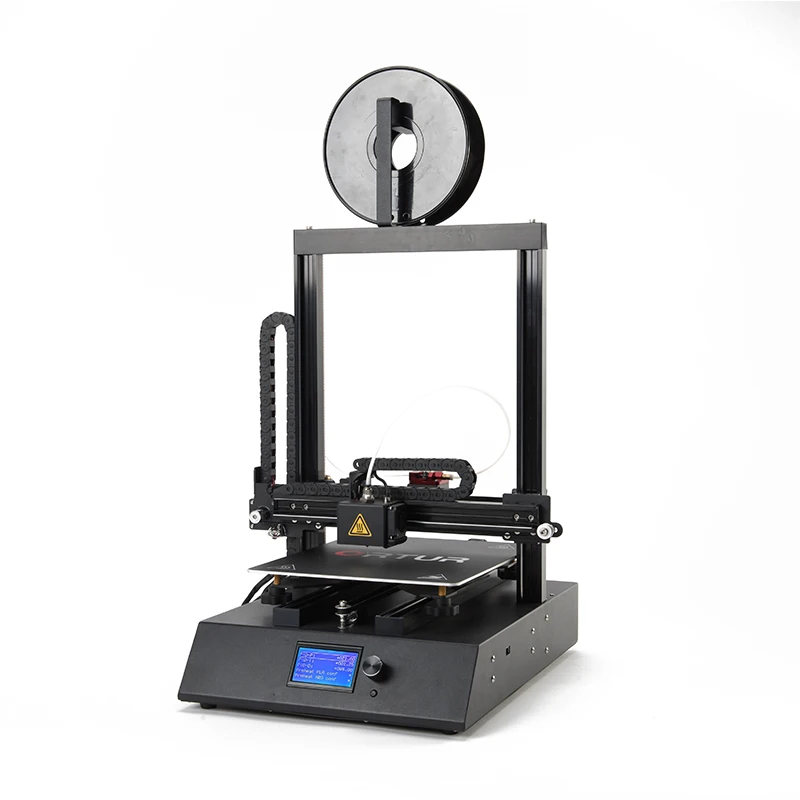
POM anti-backlash couplers
Another excellent feature which works great with the Dual Z axis setup is the inclusion of POM anti-backlash couplers. The Ortur Obsidian doesn’t use the regular Z screw nuts like most of the printers, but instead it has a pair of POM couplers which are used more commonly on CNC machines.
BMG Direct Drive Extruder with reverse bowden
The Ortur Obsidian also includes a BMG Direct Drive extruder clone with a 3:1 gear ratio. It’s not the best quality BMG clone but it works well and gets the job, accurately extruding filament.
Currently, the BMG is my favorite extruder and I’m happy to see this included out of the box with the Ortur Obsidian.
On the right side of the motor, there’s also a handy metal knob which is used when feeding new filament which makes filament replacements a breeze.
To make things even better, the Ortur Obsidian uses a reverse bowden setup to route the filament from the spool located in the back of the printer, to the hotend. That way, there is no weight added to the top of the printer.
It’s the first 3D printer I tested which uses this setup, and I love it. It makes the whole setup look cleaner.
PTFE lined V6 clone hotend
The BMG Direct drive extruder is paired with a V6 hotend clone. The heat break is lined with a PTFE tube which goes right up to the nozzle, thus limiting the temperature you can print reliably. With this setup, the hotend is capable of safely working up to 240C without damaging the PTFE tube and I don’t really recommend going past this temperature for long periods of time.
If needed, you could easily upgrade the heat-break with a Bi-metal heat break from Trianglelab or a Copperhead heat break from Slice Engineering which will offer much better thermal performance and will allow you to reach higher temperatures safely. Even with the stock setup, you can print PLA, PETG, and TPU with no issues.
Next to the hotend there’s also a white LED light which should light up your print, but it’s blocked by the bottom metal cover of the extruder.
Inductive Auto Bed Leveling probe
To make things easier for beginners and advanced users alike, the Ortur Obsidian also includes an inductive auto bed leveling probe. This is similar to the popular BLTouch ABL probe but it only detects metallic surfaces so it will only work with the stock bed or with a PEI Spring Steel Sheet. The heatbed is probed in 25 points and I had no issues with it during my testing. It’s reliable and produces consistent measurements.
When you receive the printer, I recommend you make sure the probe is set at the correct distance from the bed. In my case, the probe was sitting a lot higher and it would not detect the bed.
The probe can detect metallic surfaces from about 4mm, so I recommend you install at ~2-3mm above the bed. The easiest way to do it is to manually lower the nozzle to barely touch the heatbed then lower the probe until the red LED from the probe light up.
32-bit board with TMC2208 silent steper drivers
The Ortur Obsidian comes with a proprietary Ortur 6. 1 32-bit board with TMC2208 silent stepper drivers. As I previously mentioned, it only includes four stepper drivers which are soldered to the board, so there’s no way to upgrade it in the future.
There’s also an ESP-01S slot where you can install a Wi-Fi module if you want, but usually the functionality of these adapters is not that great. The transfer speed is limited, so if you are looking to add Wi-Fi capabilities to your printer, then an Octoprint server would be better.
Unfortunately, the Ortur Obsidian board does not have heatsinks on the stepper drivers. Even tough there’s a fan blowing cool air over the board, I had a layer shift during a 20 hour print. This is caused by the overheating of the stepper drivers and it’s unfortunate. The heatsinks can help the drivers stay cool and avoid issues during printing.
Heatsinks can be purchased for about 3$, and the board cooling can be improved but hopefully Ortur will start adding heatsinks to the board in the future.
Responsive touchscreen
The touchscreen installed on the Ortur Obsidian is nice and responsive. It uses a proprietary interface which is a bit different compared to other 3D printers.
I like that there’s a speed indicator updating in real time during printing, where you can see the movement speeds on various parts of the print.
I don’t really like the small buttons and the way they are laid out on the screen. The XYZ homing buttons are sometimes hard to accurately touch with your fingers and there’s no home button to move all the axis to 0.
Marlin RTOS 2.1.6 firmware
The Ortur Obsidian is running Marlin with the addition of freeRTOS. I’m not sure if this version of Marlin brings any substantial improvements over the regular Marlin Firmware but this is what we get with this printer. There are no sources available right now for me to check.
I will contact Ortur and update the review after I get more information about this.
Ribbon cables
You have probably seen the same kind of ribbon cables with the popular Artillery Genius and Sidewinder X1 printers. I think the Ortur Obsidian uses the ribbon cables a bit better, because there are ribbon cable strain relief brackets included which will make them more reliable.
Hopefully, more printers will use the same ribbon cables in the future because ribbon cables make the printer look much cleaner.
Belt tensioners on X and Y axis
You can tension the X and Y axis belts using the included metal belt tensioners. It’s nice to see these tensioners included out of the box because it makes tightening the belts easy.
What I don’t like is the missing spacers to keep the idlers centered. This is not a big issue and the printer works well but if the belt is not properly aligned, issues can occur during printing.
Auto Power Off with integrated relay
The inclusion of a power relay on the Ortur Obsidian is a nice upgrade over other printers available right now on the market. When the print is complete, the printer waits for the hotend to cool down then it turns off the printer
It’s the first printer I tested with this upgrade and I love it.
You can add the M81 command to your end G-code which will turn off the printer. If the printer is connected via USB to Octoprint, the screen will stay on, but you can fix this with a simple cable mod: Fix Octoprint always on printer display.
Quiet operation
All the fans installed on the printer are relatively quiet. During printing, most of the noise comes from the 5015 part cooling fan blowing at 100%. The PSU and case fans are quiet, but still audible.
Ortur Obsidian drawbacks
No heatbed insulation
I would have liked to see some heatbed insulation material under the bed because it makes heating up a bit faster, and the the power consumption would be a bit lower during operation. They probably did this to make sure the bed cools faster and users don’t damage the surface when removing a print.
Fortunately, It’s a cheap and easy to do upgrade.
No removable print surface
Another feature which would have made this printer a bit better would be the addition of a removable bed surface. I’m not a fan of the included “glass sticker” and I will probably replace it soon with a magnetic PEI Spring Steel Sheet.
While the prints stick really well on this surface, removing them is hard. The prints don’t pop off by themselves like when using a simple glass bed and you need to use a sharp scraper or blade to remove them. Besides that, my print surface already has marks from the few prints I did during my time with the printer even tough the first layer was properly tuned.
Keep in mind that it’s not recommended to print ABS on the stock build surface (probably because the ABS would fuse with the bed and removing it would be impossible).
The PEI sheet upgrade will be a bit harder to do because the 250×250 PEI sheets are not that common, so you would have to get one cut on order. Besides the size issue, removing the old sticker and cleaning up the adhesive could be hard to do, but I will update this article when I perform the upgrade.
Side mounted power connector
I don’t really understand why Ortur installed the power connector on the side of the printer when there’s ample space available in the back. You could mitigate this issue with an angled power cable but I would have still liked to have the power connector on the back.
Bad quality printed parts
The printer also has some printed parts used in the construction of the printer. They don’t look that great but they get the job done. Fortunately, all the files are available on the SD card so you can easily re-print them if you are looking to make the printer look better.
This is not such a big issue, but I thought it’s worth mentioning, just so you know what to expect.
IdeaMaker profiles for Ortur Obsidian
During my time with the printer, I also tuned three IdeaMaker profiles for the Ortur Obsidian. These profiles are tuned for the stock printer and worked well for me. If you are looking to give them a go, then feel free to download them from the links below:
Ortur Obsidian IdeaMaker Profile – PLA – 3DPrintBeginner
Ortur Obsidian IdeaMaker Profile – PETG – 3DPrintBeginner
Ortur Obsidian IdeaMaker Profile – TPU – 3DPrintBeginner
Test prints on Ortur Obsidian
3D Benchy
As usual, we start the tests with a 3D Benchy. The quality is pretty good, considering this is out of the boxwith no tweaks made to the printer profile. A bit of over-extrusion which was easily compensated for with the flow calibration.
- Material: SUNLU Gray PLA
- Layer Height: 0.2 mm
- Nozzle Temperature: 205C
- Bed Temperature: 60C
- Print Speed: 50 mm/s
Calibration Cube
After calibrating the flow rate, the calibration cube looks good and the extrusion is accurate. Unfortunately, the bridging settings were messed up and there are a few issues with the cube. But I was confident enough to start a bigger print.
- Material: SUNLU Gray PLA
- Layer Height: 0.2 mm
- Nozzle Temperature: 205C
- Bed Temperature: 60C
- Print Speed: 50 mm/s
Gizmo
The first bigger model which I printed was Gizmo from Thingiverse. Layers are consistent even though it was printed at a higher speed than my regular settings.
- Material: SUNLU Marble PLA
- Layer Height: 0.15mm
- Nozzle Temperature: 210C
- Bed Temperature: 60C
- Print Speed: 60 mm/s
Doctor Doom
Doctor Doom bust from Eastman was printed in around 24 hours. While the carbon filament can make the prints look better, there’s no denying that the print quality is excellent, and the Ortur Obsidian can deliver on its promises.
- Material: SUNLU Carbon Fiber PLA
- Layer Height: 0.15mm
- Nozzle Temperature: 210C
- Bed Temperature: 60C
- Print Speed: 50 mm/s
Supergirl
The second bust is Supergirl from Eastman. This time, there was a small layer shift on the Y axis which I believe was caused by the lack of heatsinks on the stepper drivers. Anyway, the print quality is just as good.
- Material: FilamentOne PLA Glint Red
- Layer Height: 0.15mm
- Nozzle Temperature: 210C
- Bed Temperature: 60C
- Print Speed: 50 mm/s
TMNT
I also wanted to test the print quality using silk filament, so I printed the TMNT bust from Eastman. With this print, you can see the layer lines a bit more, and there are also some parts where cooling was not doing the best. But the print still looks really well in my opinion.
- Material: SUNLU Silk Copper PLA
- Layer Height: 0.15mm
- Nozzle Temperature: 210C
- Bed Temperature: 60C
- Print Speed: 45 mm/s
Dory
PETG also print well on the Ortur Obsidian. The print quality is good, but if you look closely some small inconsistent layers can be seen.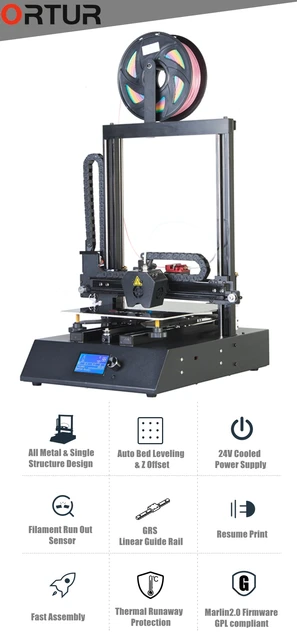 This could be caused by the old filament I used (opened about 12 months ago). I think that with a bit more tuning, you can get better quality from PETG.
I’m also happy to report that adhesion was great and there was no need for glue stick or other adhesion helpers.
- Material: Fiberlogy Easy PETG
- Layer Height: 0.2mm
- Nozzle Temperature: 240C
- Bed Temperature: 70C
- Print Speed: 50 mm/s
TPU 3D Benchy
To also test the TPU performance, I printed another 3D Benchy because it it a pretty challenging print in TPU. The quality is fine, but as you can see, there’s some small stringing which most of the time is hard to get rid of. Maybe with a bit more retraction and coasting this can be improved (or even drying the filament in advance).
- Material: Devil Design Pink TPU
- Layer Height: 0.2mm
- Nozzle Temperature: 215C
- Bed Temperature: 50C
- Print Speed: 40 mm/s
Conclusions: Is the Ortur Obsidian worth it?
The Ortur Obsidian looked like a promising printer, and I’m happy to report that it confirmed my expectations. It manages to produce quality prints consistently and there was no need for me to do any calibration for these results (besides the regular flow rate calibration).
It comes with some of the best hardware specs available right now in a compact package. All of these features are sold for a good price and I have no problem recommending the Ortur Obsidian considering the price range and the build volume offered.
Sure, it has some small drawbacks which can be fixed with upgrades further down the line, but out of the box, the printer is good enough to be worthy of your consideration.
The Ortur Obsidian is an excellent alternative to the popular Artillery Genius, offering more features with up to date hardware and a larger build volume. I would recommend getting it instead of the Genius even tough it’s a bit more expensive.
Where to buy the Ortur Obsidian?
The Ortur Obsidian can be purchased from the following sites:
Gearbest
I recommend checking out the Discount Codes page before purchasing.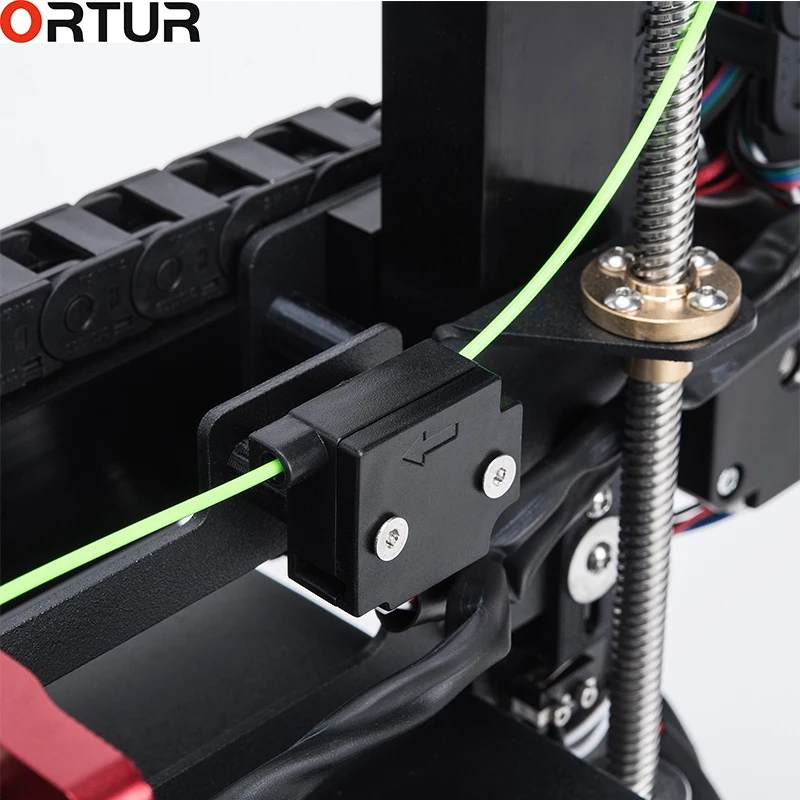 I regularly update the article with discount codes for various online shops, and you might find one for this particular model.
The Ortur Obsidian was provided free of charge by Ortur for the purpose of this review. While the article includes affiliate links, all opinions are my own. Nobody reviewed the article before it was posted, following the Review Guidelines.
Liked it?Consider supporting 3DPrintBeginner if this content helped. You can also join Patreon for exclusive perks! |
Ortur Obsidian 3D Printer: Review The Specs
Table of Contents
The Ortur Obsidian 3D printer is an amazing printer, available on a low price. What else is there to the low price of this amazing printer? let’s find out in this review.
Ortur Obsidian 3D Printer Main Specifications
Ortur Automatic Leveling Feature
Leveling the bed can become one of the most meticulous tasks during a print operation.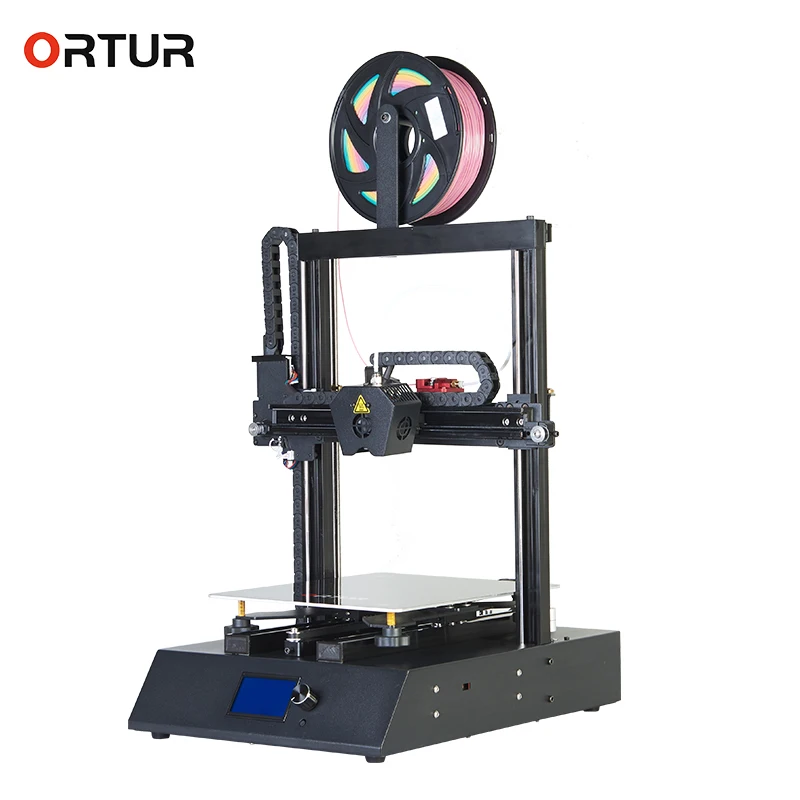 However, the Ortur Obsidian offers pleasant features for leveling the bed. The printer offers automatic leveling which gives brilliant design to the prints and it does not distort them.
Ortur Obsidian Filament Runout Detector
The printer has proximity sensors installed to detect the remaining filament. As soon as the filament runs out, the print function is stopped by the filament run-out detector. This way your prints are not damaged and you get the high quality of prints. Furthermore, you can also resume your print function from where you left it in case of a run-out of filament.
Easy and Quick Assembly
The Ortur Obsidian has a modular design. This means you receive the printer in 4 major modules, namely the Z-axis columns, Chasis, X-axis assembly, and the X-axis beam. Therefore, you need to assemble the printer before you can use it. However, since the fitting is so simple, you can complete the assembly task within twenty minutes. This makes the printer an amazing pick for the new starters.
Stability of FDM Structure
The design of the Ortur Obsidian is also something that has been designed with technical thought. First, the Z-axis has dual rails on the sides to support the printer. Furthermore, the dual lead screw design ensures that the printer has great stability during the printing function. As a result, the vertical movement is smooth and stable. Also, it improves positional accuracy, resulting in high-quality designs.
On the XY-axis, the fastening structure is very effective. It binds the XY axis with a tensioning device and therefore the adjustment of the axes becomes much easier.
Modular Design
The print head of Ortur Obsidian is Modular. This means that you can separate the print head forms the rest of the printer and repair it in case it gets broken down. This saves you from sending the whole printer for repair in case there is a minute fault in the print head.
Independent running and Flexible Operation
The printer is supported by the Open Source Obdisian version of Marli_RTOS firmware.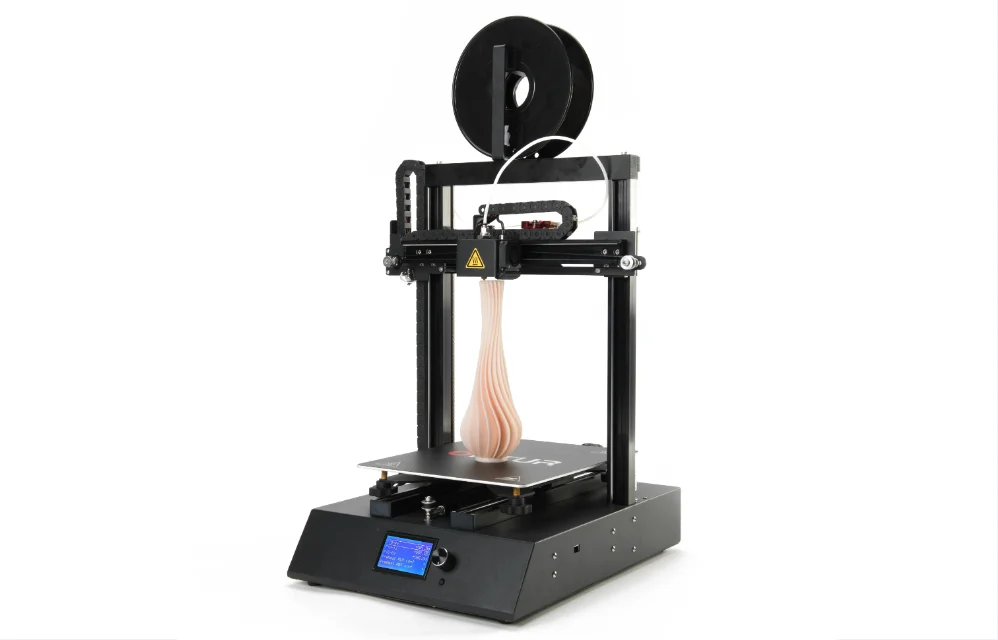 This comes in combination with the Freetos real-time operating system. Because of this, the color screen operation and the movement control of the print work independently. Therefore, there is no mutual interference.
3D Print Speed
The Ortur Obsidian offers a fast printing speed and that too with a higher quality of prints. The STM32 motherboard has the power to provide quick processing of instructions. This increases the speed of the printing and also its accuracy. This way the printer has a maximum speed of 150 mm/s. features
Ortur Obsidian Price
The most important factor is that the 3D printer is being offered at a cheap price of $299.99 at gearbest. The original price for the printer is $474. However, you will get a whopping discount of 37% if you purchase it now.
Who Should Buy the Ortur Obsidian 3D Printer
Given the price tag for which all these features are on offer from the Ortur Obsidian. Therefore, this 3D printer is suitable for all classes of users. However, for the extremely discounted price that it is being offered, we would suggest that the newbies and beginners can also get hands on with this printer.
Related Articles:
2020-09-26
Ortur Obsidian 3D Printer Fast Response Automatic Leveling Filament Run-out Detection Power Outage Resume Quick Assembly Slient Running
Key Features
Main Features:
More Applicable Consumables / Latest Marlin_RTOS Firmware + Freertos OS / Power Control Unit / Ortur6 Motherboard / Integrated FFC Wiring / Sheet Metal Shell + Keel Structure / Quick Assembly / Power Outage Resume /Automatic Leveling / Filament Run-out Detection
More Applicable Consumables Can Be Print Perfectly
The 60W high-power heating rod can smoothly heat the nozzle temperature to 260°C; the 280W hot bed can heat the temperature to 120°C; with short-range extruder. These configurations allow Ortur Obsidian to perfectly melt, extrude, and stick various types of 3D printing consumables such as TPU, ABS, PETG, etc. , providing a hardware foundation for presenting the perfect printing effect of different types of consumables.
Independent Running & Flexible Operation
The latest Obsidian version of Marlin_RTOS firmware, combined with the Freertos real-time operating system, allows the color screen interface and motion control to run independently, preventing mutual interference, making printing more delicate and operating more flexible . nine0003
Faster Printing Speed, Quieter Printing Process, Better Printing Quality
Ortur Obsidian adopts STM32 32-bit motherboard that can quickly and efficiently process various instructions. XYZ are all 256 high subdivision stepping drive chips, which have better mute effect (the Z axis is also 256).
Power Control Unit Enhances The Safety
Ortur Obsidian comes with power control unit, which automatically shuts down to save power after printing. Directly detect the change of input voltage under the state of mains power, timely trigger power outage resume function to save printing information. Ortur Obsidian can also monitor the temperature at all times, the power control unit is directly powered off when abnormality occurs, very safe and reliable to use. nine0003
Achieve a Stronger and Simpler Appearance
Unlike other printers that uses sheet metal to receive force, Ortur Obsidian adds a keel structure to receive force, thereby providing a solid printing platform for the printer. The simple FFC cable layout can also reduce the problem rate caused by messy wires.
Intimate Details Improve User Experience
Dual Z-axis structure: The Z-axis uses a double lead screw design. The lifting motion is quiet and stable, improve positioning accuracy, and the power failure is more reliable. nine0005 XY fastening structure: X and Y axis belts are designed with tensioning device, the adjustment is more convenient.
Removable print head: The print head is modularized, which is easy to disassemble and repair.
LED lights: With LED light, it is convenient to observe the printing process.
Automatic Leveling + Filament Run-out Detection
The Ortur Obsidian 3D printer is equipped with a proximity switch and has an automatic leveling function. It is not afraid of deformation of the hot bed and makes it easier to print. Filament runout detection module, will automatically stop the printing and move the nozzle to the home position when the filament is broken or run out. nine0003
20 Minutes Fast Installation
After each machine is tested and printed, it will be disassembled into 4 main modules (chassis + Z-axis column + X-axis assembly + X-axis beam) and packed in a carton. The non-professionals can complete the installation in 20 minutes, which is convenient and fast.
Specification
Package Size(L x W x H)
55.000*39.000*22.500cm
Package Weights
Package Contents
1 x 3D Printer
More
$$319 with coupon for Ortur Obsidian Fast Respone 3D Printer Auto Leveling Filament Out Detection Power Outage Detection Resume Quick Assembly Slient Running - Black EU Plug from GEARBEST
$319 $399 Buy It Now
OPEN COUPON
0003
3D printer Ortur Obsidian
Ortur Obsidian 3D printer
worldwide shipping
$319 $399
Buy this item
OPEN COUPON
Main Features:
Additional Consumables / Latest Marlin_RTOS Firmware + Freertos OS / Power Control Box / Ortur6 Motherboard / Integrated FFC Wiring / Sheet Metal Case + Keel Design / Quick Assembly / Power Loss Resume / Auto Leveling / Detection thread exit
More suitable consumables can be perfectly printed
60W high power heating rod can smoothly heat the nozzle up to 260°C; 280W hot bed can heat up to 120°C; with short range extruder.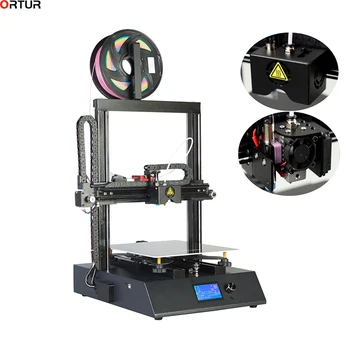 These configurations allow Ortur Obsidian to perfectly melt, extrude and bond various types of 3D printing consumables such as TPU, ABS, PETG, etc., providing the hardware foundation to present the ideal printing effect on various types of consumables. nine0003
Independent launch and flexible operation
The latest Marlin_RTOS Obsidian firmware, combined with the Freertos real-time operating system, allows the color screen interface and motion control to work independently, preventing mutual interference, making printing more delicate and more flexible.
Faster printing speed, quieter printing process, better printing quality
Ortur Obsidian uses STM32 32-bit motherboard, which can process various instructions quickly and efficiently. XYZ is 256 high subdivision stepper chip which has better mute effect (Z axis is also 256). nine0003
Power management box improves security
Ortur Obsidian comes with a power management box that automatically turns off to save power after printing.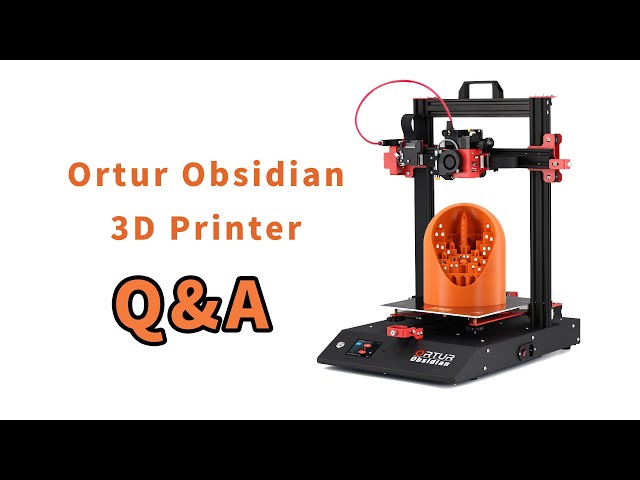 Directly detect the change in input voltage under mains power, start the power outage resume function in time to save printing information. Ortur Obsidian can also continuously monitor the temperature, the power control box will immediately turn off when a malfunction occurs, which is very safe and reliable to use. nine0003
Make appearance stronger and simpler
Unlike other printers that use sheet metal to receive force, Ortur Obsidian adds a force receiving keel structure, thus providing a solid print platform for the printer. Simple routing of the FFC cable can also reduce problems caused by dirty wires.
Intimate details enhance user experience
Z-Axis Dual Design: The Z-axis uses a dual lead screw design. The lifting movement is quiet and stable, improves positioning accuracy, and power off is more reliable. nine0005 XY attachment design: X and Y axis belts have a tension device, the adjustment is more convenient.
Detachable Printhead: The printhead is modular and easy to disassemble and repair.