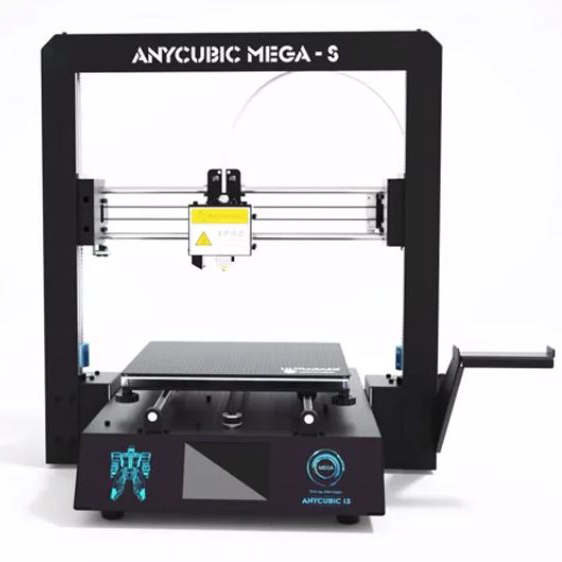
Monoprice maker select pro ultimate 3d printer
Review: Monoprice Maker Ultimate 3D Printer
A few months ago, a very inexpensive 3D printer appeared on Monoprice. My curiosity for this printer was worth more than $200, so I picked one of these machines up. The Monoprice MP Select Mini is an awesome 3D printer. It’s the perfect printer to buy for a 13-year-old who might be going through a ‘3D printing phase’. It’s a great printer to print a better printer on. This printer is a sign the 3D printing industry is not collapsing, despite Makerbot, and foreshadows the coming age of consumer 3D printers.
The MP Select Mini isn’t Monoprice’s only 3D printer; the printer I bought was merely the ‘good’ printer in the good-better-best lineup. Since my review of the MP Select Mini, Monoprice has introduced their top of the line, the Maker Ultimate 3D printer. Monoprice asked if I would like to take a look at this offering, and I’m more than happy to oblige.
After a week of burn-in, I can safely say you’re not wasting your money on this $700 3D printer. It’s not a starter printer — it’s one that will last you a long time. 2016 is the beginning of the age of consumer 3D printers, and the Monoprice Maker Ultimate is more than proof of this.
Yes, It’s A Rebadge
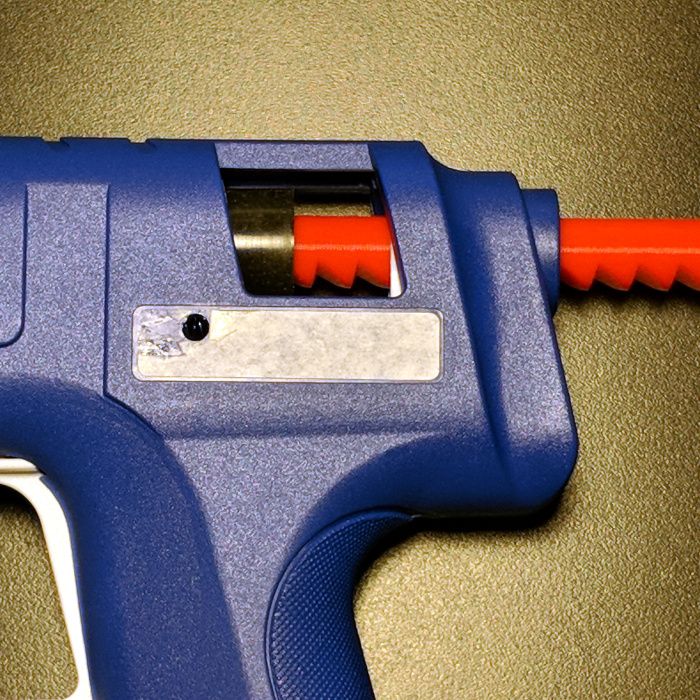
One feature missing from the Monoprice version is the acrylic side panels and top. If you have a laser cutter, these can be easily fabricated. Image source: wanhaousa.com.The Monoprice Maker Ultimate is a rebadge of the Wanhao Duplicator 6, and should be regarded as the same exact printer. The Monoprice sells for $700, whereas the Wanhao sells for $800, but the Monoprice does not come with acrylic panels for the sides and top of the printer. Other than that small difference, you’re looking at the same printer. Whether the addition of acrylic enclosure panels is worth the $100 markup depends on the user. Anyone with access to a laser cutter could easily make a replacement for these panels, and I eagerly look forward to those .DXF files appearing online shortly.
The fact that this is a rebadge of a Wanhao printer is a selling point. Wanhao has a rather large following because of their version of the i3, and with that following comes the availability of spare parts. My review of the low-end Monoprice printer, the MP Select Mini, lamented the fact that no spare parts were sold by Monoprice, and no distributor for the original manufacturer could be found in the US. At the very least, you can get parts for the Monoprice Maker Ultimate from the US distributor of Wanhao printers. This printer is also slightly more standardized than the built-to-a-price MP Select Mini, and replacement nozzles and hotends are available through the usual online retailers.
Specs, Construction, and Impressions
Let’s get one thing out of the way right now. This is an Ultimaker clone. The software menus for the OLED control panel are exactly what you would find on an Ultimaker. The mechanical setup for the X and Y axes are almost Ultimaker, except there are two cross-bars on the carriage instead of one. The Z axis is exactly the same, except the two ‘corner’ bed adjustment points are in the back, not the front.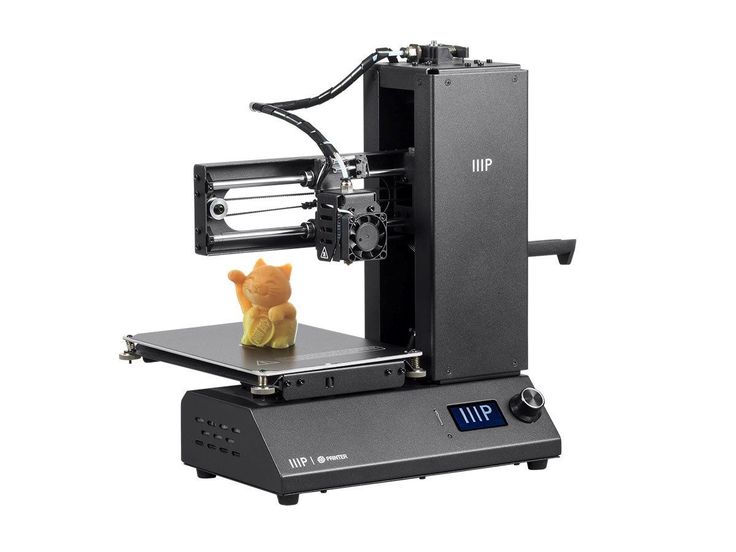 The only significant difference between the Monoprice Maker Ultimate and an Ultimaker is the extruder on the XY carriage. The Ultimaker uses a Bowden setup, whereas the Monoprice stacks a stepper and a direct drive extruder on the carriage. That’s it. That’s the only difference. With the extruder on the carriage, the top speed of this printer is theoretically lower than the Ultimaker, but I haven’t noticed any issues.
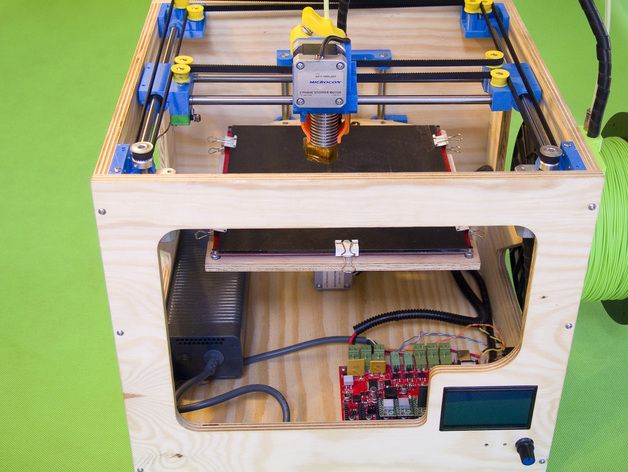
The enclosure for this printer is exceptionally solid. The front, top, and side of the printer are a single sheet of aluminum. The sides are welded on to this sheet, and all the components are attached to this very strong, very robust frame. The powder coat finish will hold up reasonably well. This printer is all about mass, and this design choice continues to the 1/4″ thick aluminum build plate. This aluminum build plate heats up fast compared to my 6″ square Printrbot Metal Simple, and all the electrical connections are solidly crimped and covered with heat shrink.
While I’ve only used this printer for about 130 hours in the week or so I’ve been using it, that is much more time per 3D printer review than I’ve seen at other usual outlets. It’s not accurate to say a week or so or run time is enough to properly assess a printer. For that, I would need months of print time, I’d need the nozzle to clog, and with any luck a few bearings would give out. I pushed this thing hard, though, grinded some ABS in the extruder, and put a few nice, deep marks in the replaceable build surface. I have come away with the impression this is a very robust 3D printer. It can handle daily use in a workshop and daily abuse in a classroom. It’s built to last, and I don’t see this printer going out of commission anytime soon.
The specs — as given in the manual, not the online spec sheet — list the build volume as 200 x 200 x 175mm. The position precision in the X and Y axes are 12.5 micron, in the Z is 5 micron. This is a printer built for 1.75mm filament, and comes equipped with a 0. 4mm nozzle. Print speed is listed as 1- 300 mm/s, travel speed is 1-350mm/s. The printer weighs thirty pounds.
Sample Prints, Print Quality, and Capabilities
During testing, I only used the stock settings on the printer (changeable through the OLED display), and the suggested settings for Cura. These settings are more than sufficient to produce excellent quality prints, although I did have issues with stringing on retraction. That issue is easily cured with a bit of fiddling with the retraction settings in the slicer and by setting the temperature a bit lower.
Sappho’s Head printed at 0.02mm layer height. Click to embiggenFor years now, the highest quality prints have always seemed to come out of an Ultimaker, and since this printer is effectively a clone of the Ultimaker, there’s a certain expectation I had in testing. I was not disappointed.
I believe machines that only move the bed in the Z direction invariably produce higher quality prints. Extremely well-tuned i3-style printers are the exception to this rule, but the Monoprice Maker Ultimate is what I would expect in this regard: very high-quality when printing at very small layer height.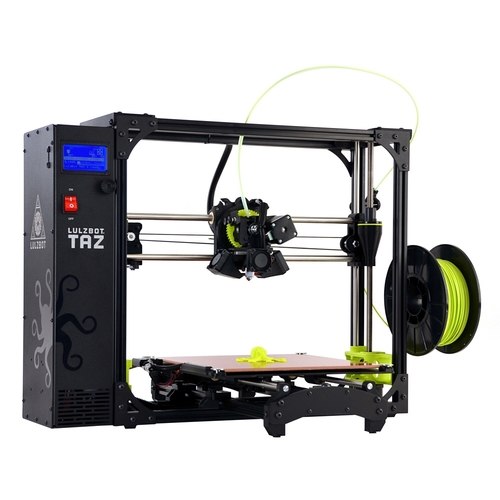
Unlike the $200 Monoprice MP Select Mini, there was no Z-banding to speak of. The trapezoidal Z axis leadscrew was more than capable of moving the bed down to exactly where it needed to be, and the Ultimaker-style cartesian arrangement had very little slop in it.
This does not mean the printer is without its faults, though. One glaring oversight can be found in the fan used to blow air onto the freshly extruded plastic. There’s one problem with this fan: it doesn’t blow air onto freshly extruded plastic. Instead, it blows air a few centimeters to the right of the print.
The part cooling fan blows straight down, and does not actually cool the filament as it is extruded.The best example I can come up with to demonstrate this filament-cooling problem is an overhang, and the Benchy tugboat I printed provides more than enough evidence that overhangs will be a problem with this printer. The duct for the part cooling fan can be taken off easily, and once I tear down this machine a bit more, I’ll start work on designing a better low-profile duct that blows air a little closer to the nozzle.
Aside from a problem with overhangs, this really is a printer with remarkable build quality. All sample prints were dimensionally accurate, the bow of the 3D Benchy was one of the best I’ve ever seen, and even the name on the back of this little tugboat was readable. Apart from an issue with retraction — a function of tuning, and one that is fixable with the right settings — I can easily see the potential for this printer to produce Ultimaker-quality prints.
Yes, you can read the nameplate on this 3D Benchy.
The overhang above the front window is sagging far more than what would be expected of this printer.
As far as the bed is concerned, it’s acceptable, despite the limited information available on the build surface. The bed is aluminum, heated by a 24V PCB. It comes up to temperature quickly. This printer ships with an ‘adhesive sheet’, and the only data on what this build surface actually is comes from the Wanhao product description: it’s a “Wanhao Adhesive Sheet”.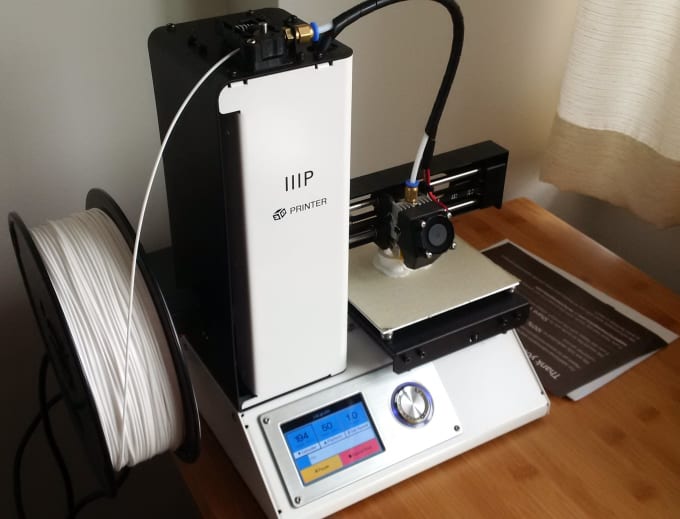 That’s not a lot of information, but it seems to be a perfectly acceptable build surface. ABS, PLA, PETG, and Ninjaflex sticks to the bed and the prints are easy to remove.
I’m a believer in a PEI build surface. It’s the build surface of the future, and the build surface I’ll eventually slap on this printer. That’s not to knock the ‘adhesive sheet’ that ships with this printer — it’s acceptable, even if it is a pain to remove. My advice, though, would be to ignore the spare build sheet included with this printer and spend $16 on a PEI sheet.
A Word On Speed And Acceleration
In the review for the Monoprice MP Select Mini, I called out Monoprice for not knowing what they were selling. In that particular case, it wasn’t a bad thing — the printer was better than what their spec sheet said. It could print at a much lower layer height than the stated 100 microns, and the product copy makes no mention of the ARM controller board. The MP Select Mini was undersold, which can only be the result of two mutually exclusive truths. Either Monoprice wants to undersell their cheapest printer to bump potential buyers up to the next best printer in their lineup, or Monoprice doesn’t have the institutional knowledge needed to properly assess or write copy for 3D printers.
Now, with two data points, it’s a little more clear which truth is more likely.
Push filament out of the nozzle too fast, and you’re going to grind some filament.The online spec sheet for this printer says the printing speed of Monoprice Maker Ultimate printer is 150 mm/sec. This is fast, but comparable to a very well-tuned Ultimaker. The specs for this printer found in the product manual, however, list the top print speed as 300 mm/sec and the top travel speed of 350 mm/sec. This is a bit high.
Just to test things, I tried printing at 300 mm/sec. At this speed, and at a 0.1mm layer height, the nozzle is squirting plastic out at a rate of 12mm³/sec. This volume of plastic per second would be too much for a 12V heater, but the 24V hotend performed admirably — until the extruder started stripping filament, of course.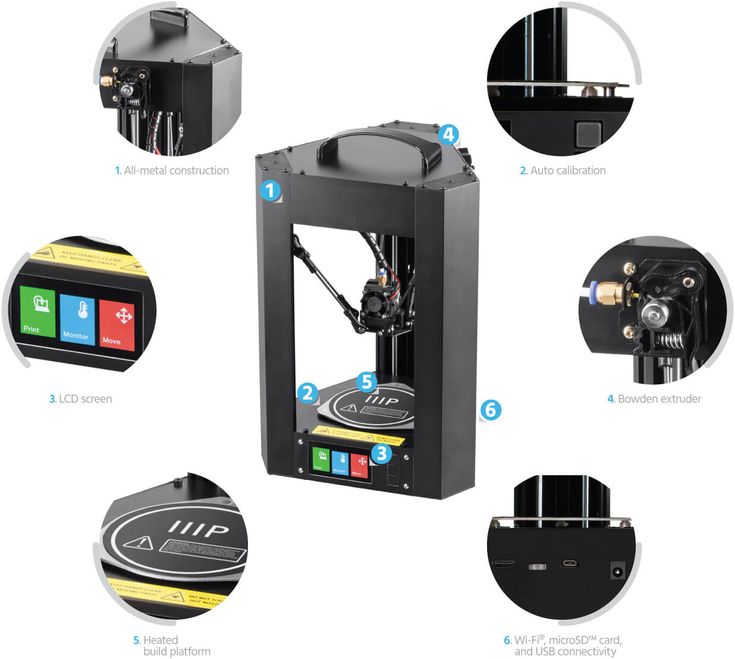 You simply can’t push plastic out of a nozzle that fast, no matter what a spec sheet says. It may have worked at a lower layer height, but that brings us to another problem of high print and travel speeds: acceleration.
With the top speed of the print and travel moves set to 300mm/sec, and the acceleration set to 800mm/sec², the printer might never even reach those speeds. At these travel settings, the print head will only reach a speed of 300mm/sec after about 50mm. Fast travel and print speeds are great if you’re building a printer with a meter long build plate (more on that later), but if you plug a few numbers into [Prusa]’s handy acceleration calculator, you’ll find you need acceleration to hit those travel speeds, anyway.
I don’t know why this machine shipped with a default acceleration of 800mm/sec². The default acceleration for the Marlin Firmware is 3000mm/sec², and every RepRap I’ve seen seems to do alright with that. The default acceleration can be changed through the on-screen menu, though, and after changing it, the printer performed very well.
Fast travel and low acceleration mean the specs are overly ambitious at best, and slightly deceptive at worst. Of course ambition or deception doesn’t matter, as all of this can be fixed with a few changes in the settings. I’d recommend setting the acceleration at 2000-3000mm/sec² (configurable through the OLED menu), and setting the slicer to around 100mm/sec. That’s a good ballpark for this printer.
The Guts
Twenty four Volts. Finally. Since the early days of RepRap, printers have been built with twelve volts in mind. Hotends were designed for 12V. Heated build plates were designed for 12V. Slowly, this has been changing, and I would suggest to anyone who wants to build their own printer to choose 24V. V=IR, and higher voltage means the hotend comes up to temperature quicker. You can push filament through a nozzle faster. Commercial printers have been slow to catch on.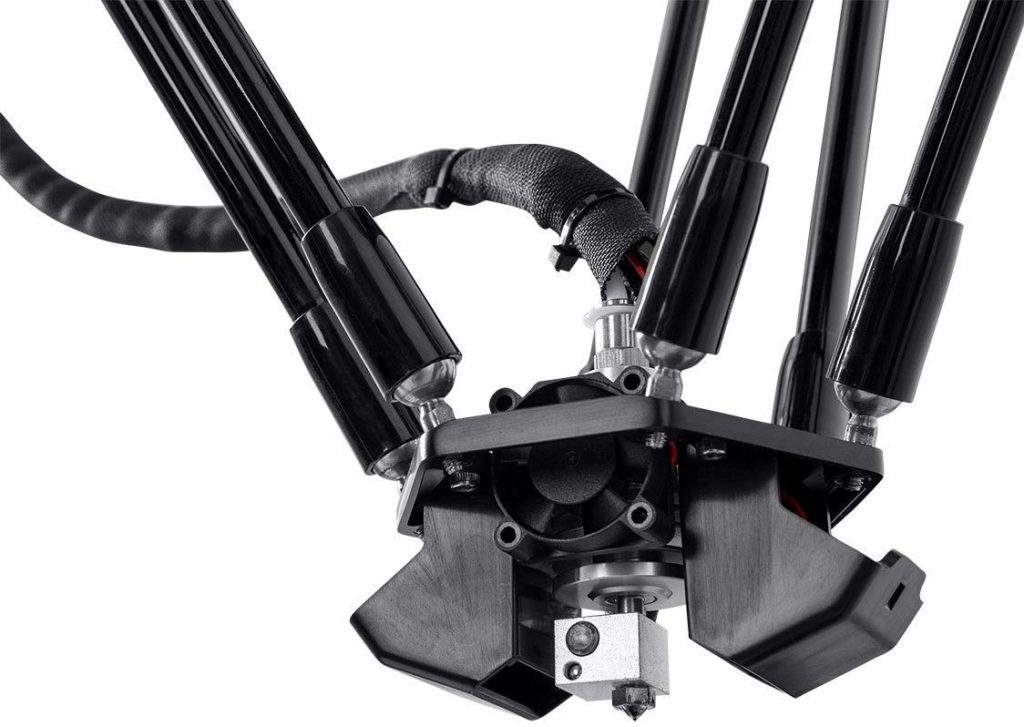 Not this printer, it’s 24V. The heated bed comes up to temperature quickly, and is almost impressive in that it’s heating a quarter-inch aluminum plate.
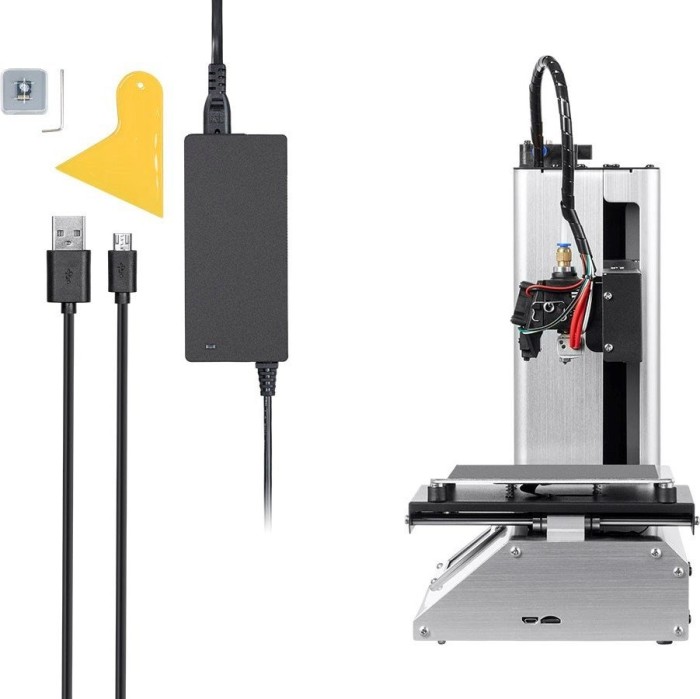
Unscrew four screws on the bottom of the machine, and the guts are revealed. Underneath the printer you’ll find the power supply, the controller board, and the OLED/knob/SD card board.
The controller board is based on the ATmega2560, but is not based on any board I can readily identify. It does use integrated stepper drivers, and there do seem to be a few spare connections available should I ever want to dig into this board to add an enclosure heater. No, it’s not an ARM board with fancy acceleration, but that’s the future and this is a 3D printer from the present.
The OLED display/interface is, as far as I can tell, exactly the same as a Ultimaker. There are options to set the motor current, and the bed leveling wizard is exactly the same. For anyone who has ever used a Ultimaker, the interface for this printer will be very familiar.
Contextualizing
I’ll take my 3D printing cred now, thanks.Deep in my email inbox, dated almost exactly five years ago today, I hold an invoice for Lulzbot order #000032. Take this as proof I have seen this industry grow before my eyes, and I’m a big believer in what Open Hardware can do.
Today, Lulzbot is going gangbusters, the TAZ 6 is still completely open source, and Lulzbot is the perfect example of what you can do with Open Hardware. The RepRap project and Lulzbot in particular have upended an entire industry, forced innovation, greatly expanded the mind share of a technology. 3D printers can print Pokemon. It doesn’t get more revolutionary than that.
The $200 MP Select Mini is the antithesis of Open Hardware. It is not built for modification. You can’t get spare parts. It is a black box, and when it breaks, you’ll just buy another. You don’t own that printer, it owns you. I can accept the low-end Monoprice printer, though. It’s just enough to get someone interested in 3D printing, it can print parts for a better 3D printer.
I don’t know if you can print a better 3D printer with the Monoprice Maker Ultimate. This $700 machine is capable of nearly everything you could ever want from a 3D printer. The quality of the prints coming out of this printer are really, really good. The potential for a (passively) heated enclosure is simply awesome. No, you’re not going to do dual extrusion, and the PTFE tube in the extruder won’t let you print really exotic plastics, but most people aren’t printing with those, anyway.
Compared to any printer you can build yourself, the Monoprice Maker Ultimate wins. It’s everything you need, and with a bit of tuning, know-how, and maybe an adapter to fix the fan issue, there’s nothing you can’t do with this printer. My poor Prusa Mendel weeps. The Open Hardware community should be philosophically opposed to this printer. It’s a true consumer 3D printer. Plug it in, turn it on, and in an hour or so you have some plastic trinkets in your hand. Learn how 3D printing works, and you can produce some really fantastic prints with this printer.
It’s a good printer, and I don’t think you’ll be disappointed.
In Conclusion…
Should you buy this printer? If you’re one of those people who would use GIMP instead of pirating Photoshop, no, this is not the printer for you.
For normal people, at $700, this printer is hard to beat. Software-wise, the stock firmware could use a bit of help, but everything that’s wrong with it can be fixed via the OLED control panel. Whoever is writing up the Monoprice manual and product copy needs to spend a few weeks cruising the RepRap forums.
This is a very good printer, and it’s very likely you won’t outgrow it. If you’re looking for your first 3D printer, you could do much worse and spend much more money in the process. It’s a bit higher quality than the innumerable $500 i3 clones I’ve seen (and at that price you should give Prusa a ring, anyway). The Monoprice Maker Ultimate is a solid printer. Even though Monoprice won’t sell as many of these compared to their $200 MP Select Mini, they’ve done their job.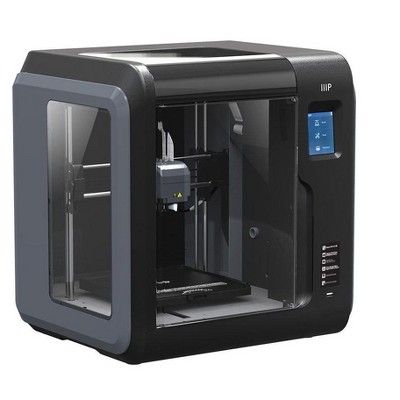 The Monoprice Maker Ultimate is one of the best values in 3D printing I’ve seen, and should be on the short list for anyone planning to buy a printer for under $1000.
Concerning the question over the $700 Monoprice Maker Ultimate and the $800 Wanhao Duplicator 6, that’s an issue that could go either way. Judging from the availability of the MP Select Mini on Monoprice, I expect their Maker Ultimate to be out of stock often. For people whose patience is worth less than $100, this will tip the balance to Wanhao. That $100 impatience fee also gets you acrylic side panels and top. That isn’t a terrible deal, although I do desperately wish the US distributor would put a ‘Duplicator 6’ category in their online store.
Our Review Policy
It’s this. For this review, Monoprice provided me with this printer. Negative disclosure, or stating how this review was not influenced by a vendor or company, is an illegitimate concept and incompatible with civilized discourse.
Monoprice Maker Select Ultimate 3D Printer
Skip to main contentTom's Guide is supported by its audience. When you purchase through links on our site, we may earn an affiliate commission. Here’s why you can trust us.
The Maker Select Ultimate targets the budget-conscious 3D printmaker who wants to experiment with 3D printing without breaking the bank.
Tom's Guide Verdict
The Maker Select Ultimate targets the budget-conscious 3D printmaker who wants to experiment with 3D printing without breaking the bank.
Pros
- +
Well-priced with decent performance
- +
Support for a wide range of printing materials
- +
Large print area
- +
Solid construction
Cons
- -
Slow print speed
- -
No automatic print-bed leveling
- -
Struggled with ABS material in our testing
- -
Software requires some technical knowledge.
Why you can trust Tom's Guide Our expert reviewers spend hours testing and comparing products and services so you can choose the best for you. Find out more about how we test.
: Price Comparison
No price information
For more information visit their website
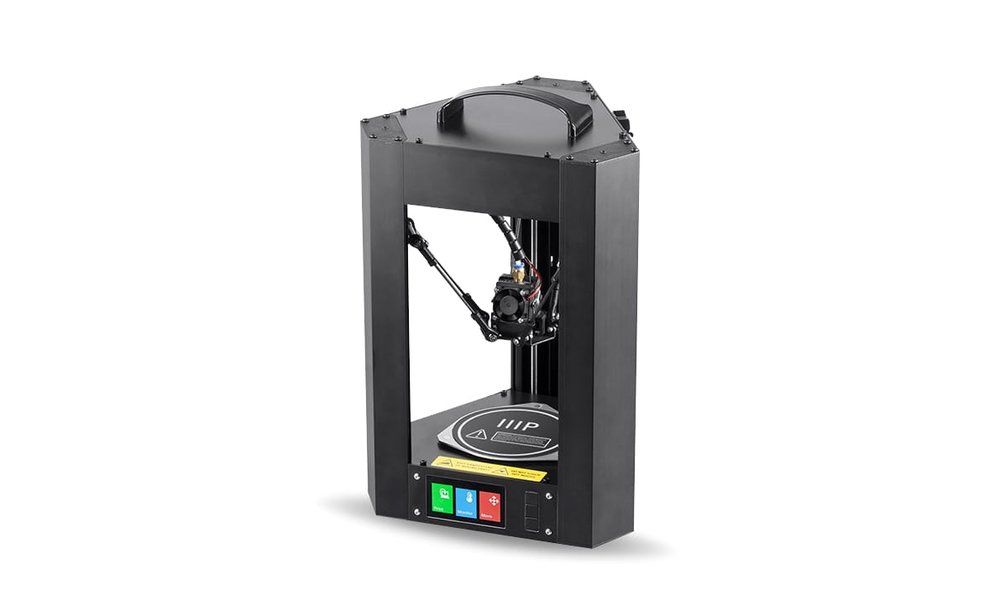
Monoprice has a reputation as a producer of cheap but high-quality accessories for the audio world, but the company is now branching out into 3D printers with the $699 Maker Select Ultimate. The printer does the company's cheap-and-cheerful reputation no harm: It's a well-priced 3D printer that offers strong performance and some surprising features.
In addition to the Maker Select Ultimate, Monoprice offers an even cheaper model, the $199 MP Select Mini. Monoprice claims that the $199 Select Mini takes less than 10 minutes to set up, but can still print in ABS and PLA. We plan to review it to see what features you're giving up in exchange for that lower price tag.
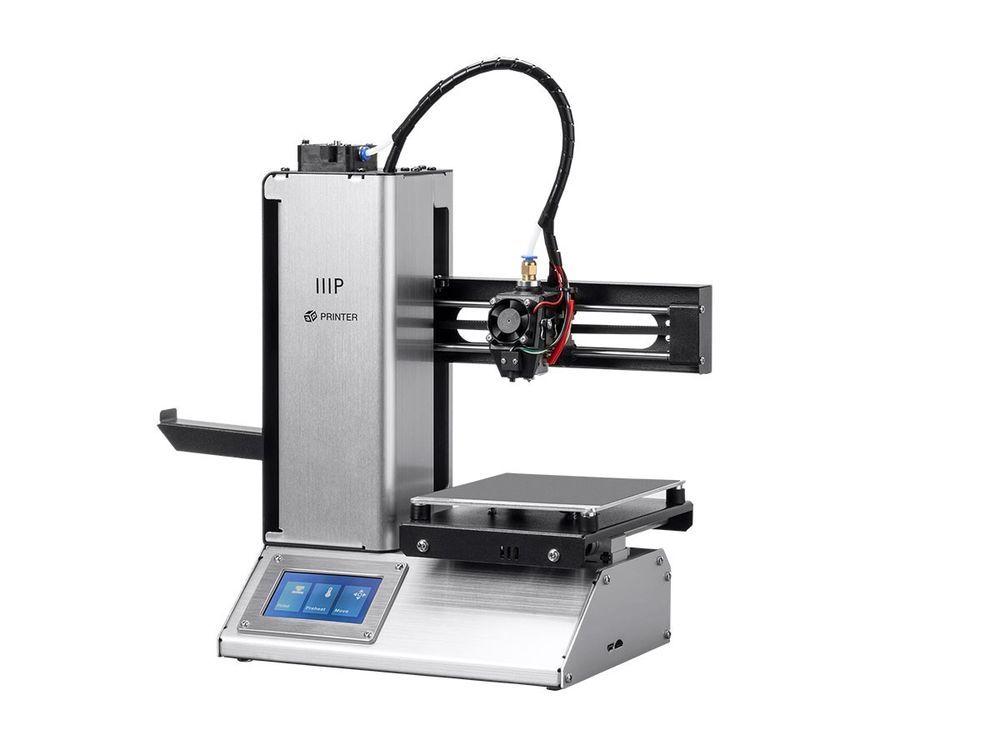
The Maker Select Ultimate is a hefty-looking chunk of a printer.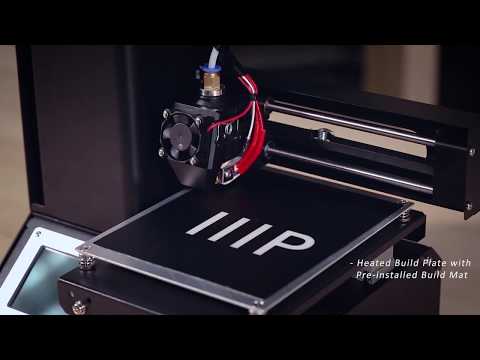 Its frame sports an industrial look made of heavy, black, anodized metal. That won't win any prizes for graceful design, but it is practical: It keeps the moving parts contained and allows you to add covers for the openings if required. The insides of the printer have the same look made of black, anodized metal.
In the middle of the Maker Select Ultimate, you'll find the print bed, a 9 x 9-inch plate covered with a removable plastic coating that you lay print onto. This gives the Maker Select Ultimate a sizeable print volume, measuring 7.8 by 7.8 by 6.8 inches, for a total of about 413 cubic inches. That compares well with the 223 cubic inches offered by the similarly sized LulzBot Mini. This solid construction feels very robust, and doesn't shake or move as the print head swishes back and forth during printing.
The print head above the print bed is another chunk of heavy metal with a brass nozzle that the print material squishes out of. The filament feeds into the top of this print head from a reel of filament that fits onto the back of the printer frame.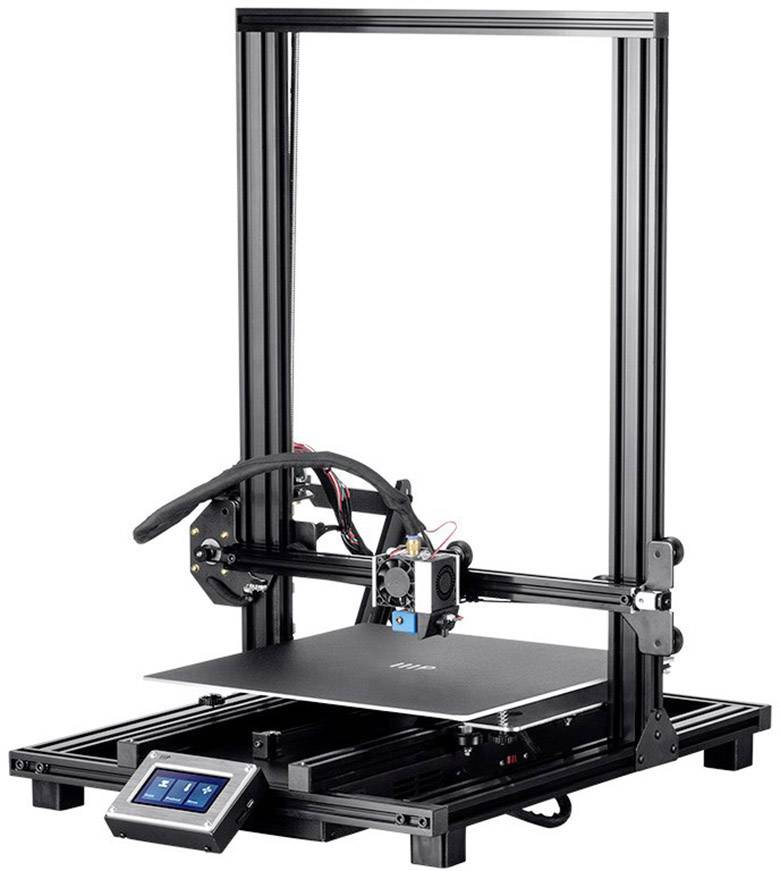 I did find some issues here: The print nozzle on my test model had some sort of obstruction in it that impeded the flow of melted filament. I had to remove the print nozzle and clean this out manually, but fortunately, the removable nozzle design made that process fairly easy.
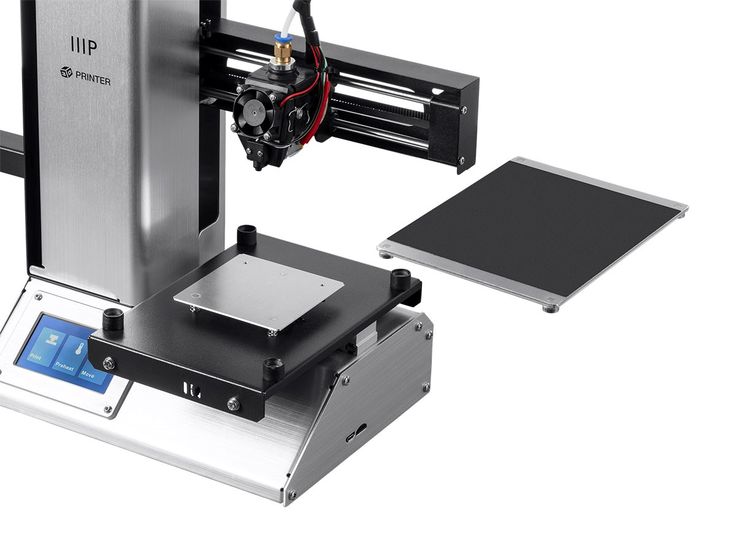
The removable plastic sheet covering the print bed is replaceable, so if the sheet becomes damaged (or you just can't remove a print from the print
bed), you can peel it off. One print got so tightly stuck to the print bed that I ended up damaging the sheet when prying it off. Fortunately, sheets are easy to replace; you get three replacement sheets from Monoprice and can order more from the company, though there's no listed price at the moment.
On the front of the case are the controls: a small LED screen and a combination dial and button. Next to the screen is the SD card slot. The controls are simple to use: Turn the dial to scroll through the on-screen menu, then press it in to select.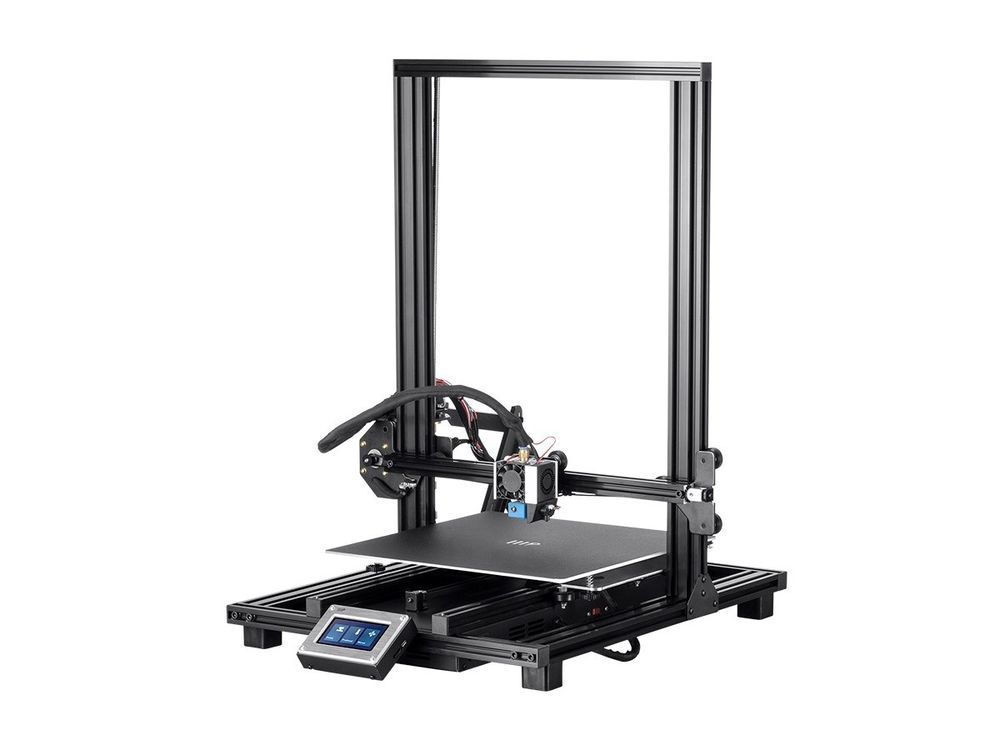
The Maker Select Ultimate's solid construction feels very robust, and doesn't shake or move as the print head swishes back and forth while printing.
If you're wondering why this printer is labeled with the name IIIP, this is a rebadge: Monoprice buys its printers from Wanhao and resells them under its own name.
Setup: Manual labor
The Maker Select Ultimate comes mostly assembled. You remove the packaging, install the dial and plug it in. Once the printer starts up, you have to level the print bed. Many recent printers, such as the LulzBot Mini, come with an automatic print-bed leveling system, in which a probe detects the print bed so the print head can hover just over it, but the Select Maker is strictly manual.
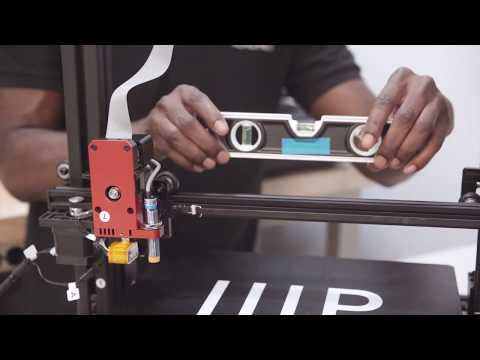
(Image credit: Richard Baguley)To level the print bed here, you have to slide a piece of paper between the bed and the print head and adjust three knobs until the gap is the same thickness as the paper. It's not particularly difficult, but automatic bed leveling is preferable.
Once the print bed is level, you can insert the filament and start printing. This is another simple but manual process, in which you follow a series of on-screen prompts. The reel of print material fits onto a hook behind the printer, then feeds over it and down into the print head. It isn't very obvious where the filament feeds into, but the illustrated manual covers the process well enough.
Print Materials: Flexibility, with some limits
The Maker Select Ultimate doesn't put any restrictions on the materials you can use for prints. The printer will work with any 1.75mm filament material that comes on a reel. The wide range of temperatures that the extruder and print bed can manage (260 degrees Celsius and 100 degrees C, respectively) means it can handle a wide range of materials, including PLA, ABS, HIPS, many nylon filaments and others.
(Image credit: Richard Baguley)We did most of our testing with PLA filament, but we also tested with ABS filament, another material used frequently for 3D printing. The Maker Select Ultimate struggled somewhat with ABS, with several prints failing because the layers didn't stick together properly. This was disappointing: One of the selling points of the Maker Select Ultimate over cheaper models is this flexibility, so we would have hoped for better performance out of the box with ABS.
Print Process: Straightforward with one catch
The Maker Select works with a software package called Cura IIIP Edition that comes included on an SD card that ships with the printer. This is a customized version of the open-source program Cura, although it is a few versions behind the latest release of Cura. It is pretty simple to use, presenting the user with a rotatable 3D view of the loaded model. You can also move and scale the model, but since it's not a full-on 3D modeling program, you can't create models from scratch. You can view the model in several different ways, including the layer view that provides a preview of the 3D print as it is created layer by layer.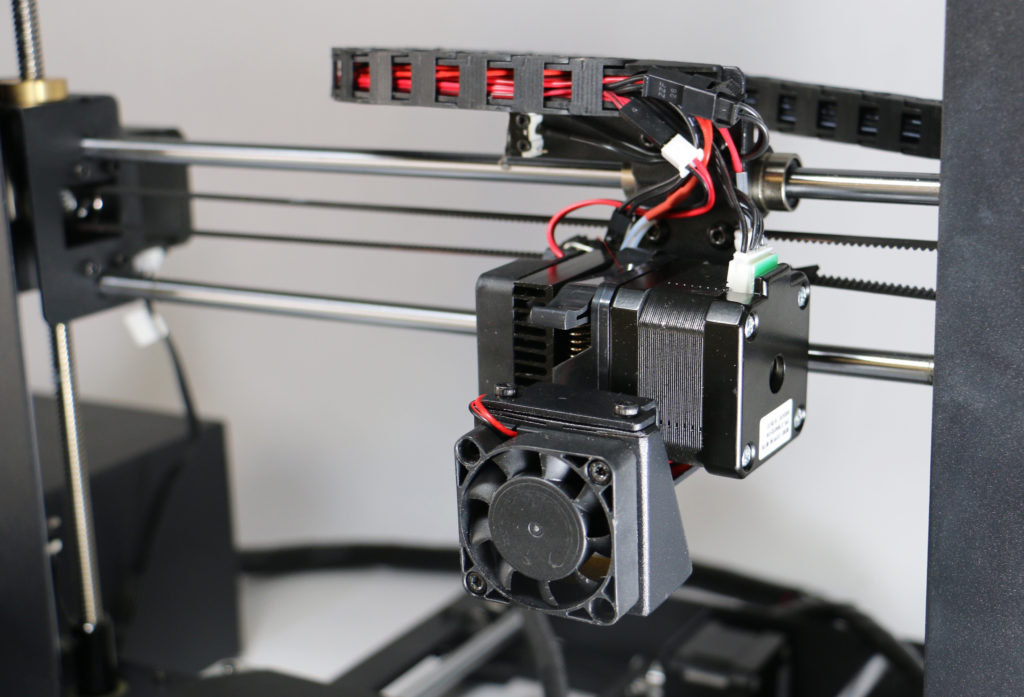
This customized version of Cura also offers the ability to get into the more technical details of 3D printing and tweak them. By setting the software to expert mode, you can get access to a bewildering number of options and settings and create custom profiles for different materials and types of print.
The Maker Select Ultimate struggled somewhat with ABS, with several prints failing because the layers didn't stick together properly.
Once the print is ready to go, you can print it directly over USB, or save the print file to the SD card. If you are doing the latter, you then have to choose Print from the menu on the printer and select the model from the list on the printer LED screen. If you are connected over USB, the software handles most of the process, heating up the print bed and nozzle and starting the print.
Once the printer was configured correctly, the print process turned out to be largely straightforward and trouble-free. I did find that getting the all-important first level of the print right required some tweaking, though. The manual print-bed leveling process described above didn't quite cut it. In my first few prints, the first layer of material didn't stick to the print bed, causing them to fail. To get them to stick, I had to turn the knobs slightly to adjust the print bed, then try a print and adjust again if required.
This is an overly finicky process, and another argument in favor of automatic print-bed leveling. Even after adjusting the print bed, I noticed some prints peeling rather alarmingly. This is when the first layer of material doesn't stick to the bed and peels up as subsequent layers are added. This didn't cause the print to fail, but it's somewhat alarming to see.
Print Speed: Nothing out of the ordinary
In terms of speed, the Maker Select Ultimate is a fairly average 3D printer. Printing with PLA filament at Normal quality with a layer height of 0. 1mm, our 4.5-inch Thinker test sculpture took about 16 hours and 40 minutes to print. A similar print on the XYZprinting da Vinci 3-in1 took about 14 hours and 13 minutes, so Monoprice's printer is a little bit slower. 3D printing is never a speedy process, and the Maker Select Ultimate does nothing to change this.
Print Quality: Decent, not spectacular
The Maker Select Ultimate offers good, though not spectacular print quality. Most of my models printed cleanly, with some visible layering and a small amount of filament whiskers left hanging from the prints when they were complete. On our angular sculpture print, for instance, a lot of whiskers of melted filament came from the edges, caused by the material stretching into whiskers as the head moved to another part of the print. Layers were clearly visible in the shoulders of the test print of Rodin's Thinker sculpture.
(Image credit: Richard Baguley)The Maker Select Ultimate offers three print-quality settings: Fast, Normal and High.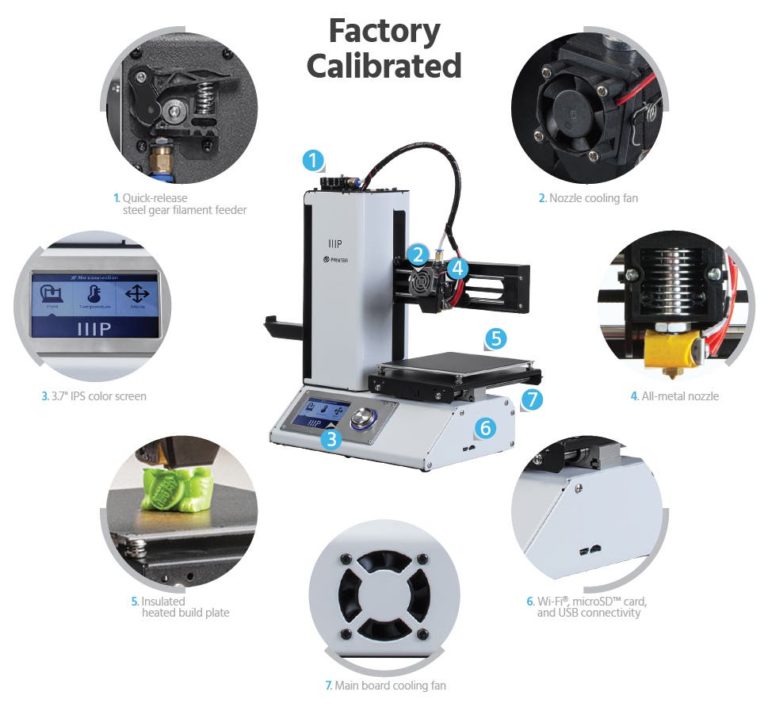 These use a 0.06, 0.1 and 0.2mm layer height, respectively, which is somewhat smaller than most — and thus slower to print. If you want to produce less detailed but quicker prints, the Expert mode allows you to set the layer height manually.
Most of my models printed cleanly on the Maker Select Ultimate, though there was some visible layering and a small amount of filament whiskers left hanging from the prints.
The Maker Select Ultimate offers a lot for not a lot of money. The printer provides acceptable print quality and a decent range of features. Monoprice's printer is rather slow, though, and is missing some of the more sophisticated features that make a 3D printer like the LulzBot Mini. easier to use: There is no nozzle cleaning, for example, or automatic print-bed leveling. These features make a printer more reliable; without them, you have to do more manual tweaking.
For those who don't mind doing this sort of fiddling, the Maker Select Ultimate is a good pick, especially as it is so much cheaper than the LulzBot Mini and offers the same flexibility with printing multiple materials. But for heavy-duty or educational printing, the LulzBot Mini. remains the better pick.
: Price Comparison
No price information
For more information visit their website
Richard Baguley has been working as a technology writer and journalist since 1993. As well as contributing to Tom's Guide, he writes for Cnet, T3, Wired and many other publications.
Samsung TVs just got a great upgrade — what you need to know
Best Buy Black Friday deals LIVE: MacBooks, OLED TVs, headphones and more
Best Black Friday deals LIVE: 4K TVs, laptops, headphones, and more
Tom's Guide is part of Future US Inc, an international media group and leading digital publisher. Visit our corporate site .
© Future US, Inc. Full 7th Floor, 130 West 42nd Street, New York, NY 10036.
Top 20 Inexpensive 3D Printers ($199 to $1000)
3DPrintStory Reviews Top 20 Inexpensive 3D Printers ($199 to $1000)
Just 10 years ago, a 3D printer cost over $100,000. Today, you can easily find a cheap 3D printer for under $200. This is amazing.
Naturally, the lower the price, the more restrictions. Some of the printers on our list will not have a heated bed and the workspace will be small. Naturally, the quality of most of the models presented below cannot compete with more expensive counterparts.
But with a little patience and diligence, it is quite possible to achieve high-quality 3D printing on a printer that costs half the price of a flagship smartphone. And it's really cool!
Important note : All 3D printers in this top are supplied assembled by the manufacturer. If you have free time and want to spend less money, you can buy DIY kits and assemble the 3D printer yourself according to the instructions.
List of the best cheap 3D printers in the price range from $ 200 to $ 1000
| 3D PRICE | Material Material | Working space (mm) | Price | 459 |
|---|---|---|---|
| Flashforge Finder | PLA | 140 x 140 x 140 | 499 |
XYZPRINING DA vinci jr. 1.0 Pro 1.0 Pro | PLA | 150 x 150 x 150 | 499 |
| XYZprinting da Vinci Jr. Mix 2.0 | PLA | 150 x 150 x 150 | 599 |
| Printrbot Simple | |||
| Dremel Idea Builder | PLA | 230 x 150 x 140 | 899 |
| Printrbot Simple Pro | PLA | 200 x 150 x 200 | 999 |
| Prusa i3 MK2 | PLA, ABS, exotic | 250 x 210 x 20022 | |
In the article we are considering unfinished, but high -quality 3D printers from AM etc.
If you want to buy them, even if you live in large cities such as Kyiv, Moscow, St. Petersburg, Minsk, it may turn out that these models will not be in the online stores of your city, or they may be with a decent mark-up relative to the cost that indicated in the article.
Since most of them are European / American, it is possible that they will not be in stores at all.
Therefore, before making a choice, I recommend looking directly at eBay, Amazon, Aliexpress, etc. - many sellers on these planforms deliver to the CIS countries within 1-4 weeks on average.
It is especially worth monitoring these platforms during the discount period - Black Friday or Chinese New Year (Aliexpress or Gearbest) - prices on such days can be 2 or more times lower than usual and it is worth waiting for a few weeks.
Monoprice MP Select Mini ($199)
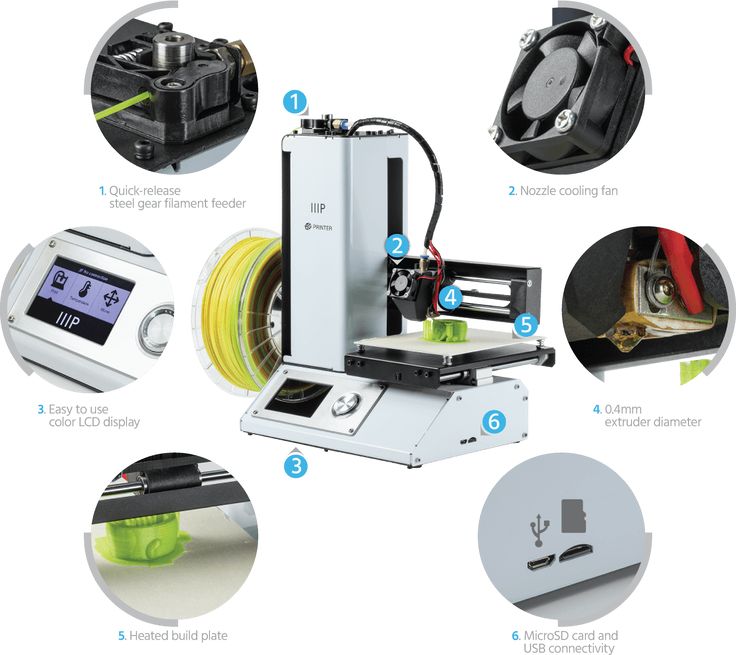
Probably the best 3D printer on our list. Why? Because the Monoprice MP Select Mini is an impressive development with a thoughtful, compact design at a very low price. This model has a quick-change steel material feed wheel, a cooler for cooling the nozzle, a color LCD screen, a heated table, plus the ability to transfer models for 3D printing via microSD or USB.
The heated bed and wide temperature range of the extruder are especially pleasing, because for such a small price you get the opportunity to print in different materials: from ABS B to PLA or exotic materials like conductive PLA plastic, wood, metal-based composites and PVA.
For those who are worried about the lack of a guarantee - for such a price it is possible without it. This model is upgradeable. For example, you can install a new nozzle, change the table and add WiFi connectivity.
Small working space - 120 x 120 x 120 mm. Over time, this will definitely not be enough for you.
Specifications of cheap 3D printer Monoprice MP Select Mini
- Printer type: FDM;
- 3D printing materials: ABS, PLA, exotic;
- Working space: 120 x 120 x 120 mm;
- Minimum layer height: 100 microns;
- Number of extruders: 1;
- 3D printing speed: 55 mm/s;
- Compatible with materials from other manufacturers: yes;
- Heated table: yes;
- Nozzle diameter: 1.75 mm;
- Control panel on 3D printer: yes;
- Connection: SD card, USB.
Back to the list of 3D printers
M3D Micro Retail ($249)
The M3D Micro 3D printer hit the market thanks to Kickstarter.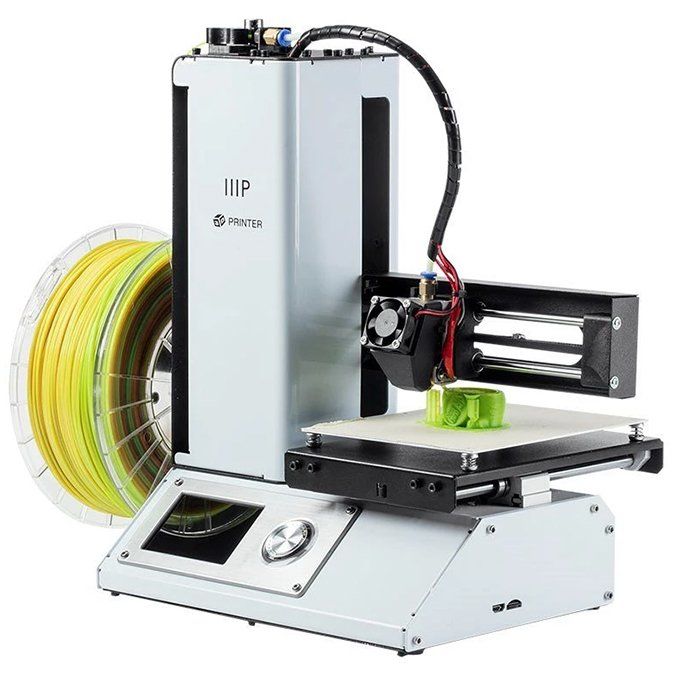 This model was presented with an incredible price of $349.
The working space of the M3D Micro is 109 x 113 x 166 mm. There are several body color options. The company has implemented "Micro Motion Technology" - a set of innovative solutions - thanks to which you get excellent quality 3D printing at a small price.
Today, this inexpensive 3D printer already costs even less than the price announced on Kickstarter. You can buy it for $249 with a 12 month warranty. By the way, it is already possible to pre-order the next "pro" version.
Specifications of cheap 3D printer M3D Micro Retail
- Printer type: FDM;
- 3D printing materials: PLA;
- Working space: 116 x 109 x 113 mm;
- Minimum layer height: 50 microns;
- Maximum layer height: 350 microns;
- Number of extruders: 1;
- XY accuracy: 15 microns;
- Open Source: no;
- 3D printing speed: 55 mm/s;
- Compatible with materials from other manufacturers: yes;
- Heated table: yes;
- Nozzle diameter: 1.
 75 mm;
 - Control panel on 3D printer: no;
- Connection: USB.
Back to 3D printer list
XYZprinting da Vinci Mini ($289)
Da Vinci Mini is a successful attempt to make the 3D printer user-friendly. This model has only one button and 5 multi-colored indicators that reflect the current status of 3D printing. In addition, this affordable 3D printer is WiFi capable so you can control it over a network in your home, office or lab.
Unfortunately, you can only use the manufacturer's own 3D materials. On average, they cost 20% more than usual. However, the company also argues that the materials used (PLA) will be 100% non-toxic.
Specifications of cheap 3D printer XYZprinting da Vinci Mini
- Printer type: FDM;
- 3D printing materials: PLA;
- Working space: 150 x 150 x 150 mm;
- Minimum layer height: 100 microns;
- Number of extruders: 1;
- Open Source: no;
- Compatible with materials from other manufacturers: no;
- Heated table: no;
- Nozzle diameter: 1.
 75 mm;
 - Control panel on 3D printer: yes;
- Connection: USB, WiFi.
Back to 3D printer list
Monoprice Maker Select V2($299)
The next cheap 3D printer with a good reputation is the Monoprice Maker Select V2.
This model is an analogue of the Wanhao Duplicator i3, which, in turn, borrowed the design from the Prusa i3. But this does not affect the quality, as the Monoprice Maker Select V2 is easy to use and gives excellent 3D printing results.
Monoprice Maker Select V2 design feature is that the power supply and control panel are placed outside the 3D printer. The working space of this model is 200 x 200 x 180 mm. And this is really a good indicator for the money.
Specifications of cheap 3D printer Monoprice Maker Select V2
- Printer type: FDM;
- 3D printing materials: ABS, PLA, exotic;
- Working space: 200 x 200 x 180 mm;
- Minimum layer height: 100 microns;
- Number of extruders: 1;
- Open Source: software;
- Compatible with materials from other manufacturers: yes;
- Heated table: yes;
- Nozzle diameter: 1.
 75 mm;
 - Control panel on 3D printer: yes;
- Connection: USB, SD card.
Back to the list of 3D printers
New Matter MOD-t ($299)
New Matter is a young startup that offers a 3D printer MOD-t - An interesting design with a minimalistic design. This cheap 3D printer is WiFi enabled so you can manage print settings and print from your computer, tablet or smartphone. The working space is 150 x 150 x 125 mm. Thanks to the case, the noise during its operation is reduced. But the most interesting and attractive thing about MOD-t is the price. Only $299. In general, this is an interesting, high-quality model.
Specifications of cheap 3D printer New Matter MOD-t
- Printer type: FDM;
- 3D printing materials: PLA;
- Working space: 150 x 100 x 125 mm;
- Minimum layer height: 100 microns;
- Number of extruders: 1;
- Open Source: no;
- Compatible with materials from other manufacturers: yes;
- Heated table: no;
- Nozzle diameter: 1.
 75 mm;
 - Control panel on 3D printer: no;
- Connection: USB, WiFi.
Back to the list of 3D printers
Printrbot Play ($399)
The Printbot Play is a very popular budget 3D printer that is often used in education. This inexpensive, reliable model, which is almost entirely made of metal.
The working space is 100 x 100 x 130 mm. Printbot Play has an extruder manufactured by the company itself - Alu Extruder v2. The body is made of powder coated steel and aluminium. SD slot provided.
You can upgrade the basic design of the Printrbot Play with a heated stand or increase the Y-axis stroke.
Back to 3D Printer List
Wanhao Duplicator i3 Plus ($459)
The Wanhao Duplicator i3 Plus is an upgraded version of the popular Wanhao Duplicator i3 (which in turn is based on the Prusa i3).
The main features of this cheap 3D printer are a large working space of 200 x 200 x 180 mm, a steel frame, electronics integrated into the design itself (previously it was taken out separately), a slot for a full-size SD card and a touchscreen display for control.
Wanhao Duplicator i3 Plus Cheap 3D Printer Specifications
- Printer type: FDM;
- 3D printing materials: ABS, PLA, exotic;
- Working space: 200 x 200 x 180 mm;
- Minimum layer height: 100 microns;
- Number of extruders: 1;
- Open Source: design and software;
- Compatible with materials from other manufacturers: yes;
- Heated table: yes;
- Nozzle diameter: 1.75 mm;
- Control panel on 3D printer: yes;
- Connection: USB, SD card.
Back to the list of 3D printers
Flashforge Finder ($499)
FlashForge Finder is one of the newest 3D printers on our list. This affordable 3D printer offers an average working space of 140 x 140 x 140mm.
This Finder features a transparent sidewall design so you can view the 3D printing process from any angle. A color display is installed, it is possible to transfer data via WiFi network. The printer comes with some supplies and a USB flash drive, so you can start 3D printing almost immediately.
Specifications of cheap 3D printer FlashForge Finder
- Printer type: FDM;
- 3D printing materials: PLA;
- Working space: 140 x 140 x 140 mm;
- Minimum layer height: 100 microns;
- Number of extruders: 1;
- XY accuracy: 11 microns;
- Open Source: no;
- Compatible with materials from other manufacturers: yes;
- Heated table: no;
- Nozzle diameter: 1.
 75 mm;
 - Control panel on 3D printer: yes;
- Connection: USB, WiFi.
Back to 3D printer list
XYZprinting da Vinci Jr. 1.0 Pro ($499)
What's so special about the da Vinci Jr. 1.0 pro? This is a new model from XYZPrinting, which includes many advanced features, such as support for printing materials from other manufacturers and increased speed of 3D printing.
Also features an auto-calibration mechanism, a closed chamber with a unique cooling system, and a 0.3mm nozzle option for high-quality printing of fine model details. All in all, this is a great 3D printer with a lot of useful features and at a low price.
Specifications for cheap 3D printer da Vinci Jr. 1.0 Pro
- Printer type: FDM;
- 3D printing materials: PLA;
- Working space: 150 x 150 x 150 mm;
- Minimum layer height: 100 microns;
- Number of extruders: 1;
- Open Source: no;
- Compatible with materials from other manufacturers: yes;
- Heated table: no;
- Nozzle diameter: 1.
 75 mm;
 - Control panel on 3D printer: yes;
- Connection: USB, SD card.
Back to 3D printer list
XYZprinting da Vinci Jr. Mix 2.0 ($599)
XYZprinting provides a wide range of low cost 3D printers. And paying attention to each model is quite difficult, although many of them are very interesting.
XYZprinting da Vinci Jr. Mix 2.0 stands out because it can print with two different materials and mix them to create multi-colored models. This dual-color 3D printing technology is rare in this price range ($500 to $1,000), so if you're interested in experimenting with multicolor printing, XYZprinting da Vinci Jr. Mix 2.0 is a great choice.
However, there is a drawback. This 3D printer is not compatible with materials from other manufacturers, so you will have to buy special materials from XYZprinting (as we mentioned above, they cost 20% more, but are not toxic).
Specifications of cheap 3D printer XYZprinting da Vinci Jr.
 Mix 2.0
 - Printer type: FDM;
- 3D printing materials: PLA;
- Working space: 150 x 150 x 150 mm;
- Minimum layer height: 200 microns;
- Number of extruders: 1;
- Open Source: no;
- Compatible with materials from other manufacturers: no;
- Heated table: no;
- Nozzle diameter: 1.75 mm;
- Control panel on 3D printer: yes;
- Connection: USB, SD card, WiFi.
Back to 3D printer list
Printrbot Simple ($599)
Printrbot Simple is the flagship of the Printbot empire. This model has a great open design with a solid aluminum frame and a working space of 150 x 150 x 150mm. This inexpensive 3D printer comes fully assembled at a very good price. As you need and want to experiment, you can add a heated table and expand the workspace in the horizontal plane.
Specifications of cheap 3D printer Printrbot Simple
- Printer type: FDM;
- 3D printing materials: PLA;
- Working space: 150 x 150 x 150 mm;
- Minimum layer height: 100 microns;
- Number of extruders: 1;
- 3D printing speed: 80 mm/s;
- Open Source: design and software;
- Compatible with materials from other manufacturers: yes;
- Heated table: optional;
- Nozzle diameter: 1.
 75 mm;
 - Control panel on 3D printer: no;
- Connection: USB.
Back to the list of 3D printers
UP mini 2 ($599)
The UP mini 2 is a low cost 3D printer that packs in impressive design and functionality. For starters, it has a touch screen panel and the ability to connect via WiFi.
But the most interesting is further. Implemented power failure protection system. 3D printing will continue after the emergency stop. Built-in HEPA air filtration system. Automatic detection of the height of the extruder nozzle. A separate, closed container for the material, thanks to which it does not deteriorate under the influence of moisture from the environment.
Great 3D printer for a small price. The only thing that upsets me a little is the small working space - 120 x 120 x 120 mm.
Specifications of cheap UP mini 2 3D printer
- Printer type: FDM;
- 3D printing materials: PLA, ABS;
- Working space: 120 x 120 x 120 mm;
- Minimum layer height: 150 microns;
- Maximum layer height: 350 microns;
- Number of extruders: 1;
- Open source: no;
- Compatible with materials from other manufacturers: yes;
- Heated table: yes;
- Nozzle diameter: 1.
 75 mm;
 - Control panel on 3D printer: yes;
- Connection: USB, WiFi.
Back to 3D Printer List
Monoprice Maker Select Ultimate ($699)
The Monoprice Maker Select Ultimate is an extraordinary beast that combines elements from two leaders in the world of 3D printing - Zortax and Ultimaker. The Monoprice Maker has an aluminum perforated printing table, which was offered in the Zortax M200 (thanks to this table, the grip of the base of the model with the table is much better), and the software part is almost identical to Ultimaker 2 (very user-friendly interface and functionality).
This model uses a "Bowden extruder", i.e. the feed units and nozzle are separated, unlike the direct feed. This improves reliability and reduces the likelihood of 3D printing errors (although, most likely, it was necessary to sacrifice printing speed, as the weight of the printing unit increases). Given the cost, this is a good model, the analogues of which are much more expensive.
Specifications of cheap UP mini 2 3D printer
- Printer type: FDM;
- 3D printing materials: PLA, ABS, exotic;
- Working space: 200 x 200 x 175 mm;
- Minimum layer height: 20 microns;
- Number of extruders: 1;
- Open Source: no;
- Compatible with materials from other manufacturers: yes;
- Heated table: yes;
- Nozzle diameter: 1.75 mm;
- Control panel on 3D printer: yes;
- Connection: USB, SD card.
Back to the list of 3D printers
Robo C2 ($799)
The Robo C2 is a small 3D printer with tons of connectivity options. Using a specialized application, you can monitor the status of 3D printing from your smartphone or tablet. It can be connected to a Chromebook. Thanks to the built-in slicing program, you do not need to install additional printing software.
Probably the most impressive is the integration with Amazon Alexa. Users can stop, cancel and check the status of 3D printing in real time using voice commands.
What does this inexpensive 3D printer offer? Working space 127 x 127 x 150 mm. The 3D printing speed is 300 mm/s and the resolution is 20 microns. There is a built-in 3.5'' color touch screen, a system for monitoring the amount of remaining material for printing, automatic calibration and a removable self-aligning print platform. The only drawback is that the table is not heated, so you have to use PLA plastic.
Specifications of cheap 3D printer Robo C2
- Printer type: FDM;
- 3D printing materials: PLA;
- Working space: 127 x 127 x 150 mm;
- Minimum layer height: 20 microns;
- Number of extruders: 1;
- Open Source: software;
- Compatible with materials from other manufacturers: yes;
- Heated table: no;
- Nozzle diameter: 1.75 mm;
- Control panel on 3D printer: yes;
- Connection: USB, WiFi.
Back to the list of 3D printers
Wanhao Duplicator 4S ($829)
The Duplicator 4S has 2 extruders. It's essentially a copy of the MakerBot Replicator. Behind the steel body is the MK10 material feed mechanism, which is currently the easiest to use and most sought after in the market for 3D printer components.
One of the features of this model is a high-precision material feed wheel, which ensures the same filament feed speed. The Duplicator 4S is equipped with a 0.4mm precision nozzle.
Specifications of cheap 3D printer Duplicator 4S
- Printer type: FDM;
- 3D printing materials: ABS, PLA, exotic;
- Working space: 225 x 145 x 150 mm;
- Minimum layer height: 100 microns;
- Maximum layer height: 500 microns;
- Number of extruders: 2;
- XY accuracy: 11 microns;
- 3D printing speed: 40 mm/s;
- Open Source: software;
- Compatible with materials from other manufacturers: yes;
- Heated table: yes;
- Nozzle diameter: 0.4 mm;
- Control panel on 3D printer: yes;
- Connection: USB, SD card.
Back to the list of 3D printers
Polar 3D Printer ($899)
Polar 3D belongs to a separate category of 3D printers in this top, since this model implements the polar coordinate system. This causes the table to rotate and the print head to move up, down, right, and left.
Thanks to the polar coordinate system, this 3D printer is powered by two stepper motors, so it consumes less power. In addition, it turned out to realize a larger size of the working area: 203 (table diameter) x 152 (Z coordinate) mm.
Nominal price $899, but there are special discounts for educational institutions. The discounted price is only $599.
Specifications of cheap 3D printer Polar 3D
- Printer type: FDM;
- Materials for 3D printing: PLA;
- Working space: 203 (table diameter) x 152 (Z-coordinate) mm;
- Minimum layer height: 50 microns;
- Maximum layer height: 400 microns;
- Number of extruders: 1;
- 3D printing speed: 40 mm/s;
- Open Source: no;
- Compatible with materials from other manufacturers: yes;
- Heated table: no;
- Nozzle diameter: 1.
 75 mm;
 - Control panel on 3D printer: no;
- Connection: USB, WiFi, SD card.
Back to 3D printer list
FlashForge Creator Pro ($899)
You've probably heard of this 3D printer. FlashForge Creator Pro is very similar to Makerbot Replicator 2X. This inexpensive 3D printer has 2 extruders, it has a steel closed case.
Other features include a table sizing system, and a guide screw that makes the guide system more stable and durable. The design is nothing special, but this model has earned positive reviews from the 3D community due to its reliability, versatility and ease of use.
Specifications of cheap 3D printer FlashForge Creator Pro
- Printer type: FDM;
- 3D printing materials: ABS, PLA, exotic;
- Working space: 225 x 145 x 150 mm;
- Minimum layer height: 100 microns;
- Maximum layer height: 500 microns;
- Number of extruders: 2;
- XY accuracy: 11 microns;
- 3D printing speed: 40-100 mm/s;
- Open Source: design and software;
- Compatible with materials from other manufacturers: yes;
- Heated table: yes;
- Nozzle diameter: 1.
 75 mm;
 - Control panel on 3D printer: yes;
- Connection: USB, SD card.
Back to 3D Printer List
Dremel Idea Builder ($899)
The Idea Builder is plug and play. This 3D printer is designed by Dremel. It has a color touch screen display. Sufficiently large working space - 230 x 150 x 140 mm. Unfortunately, the table is not heated. On the other hand, since only PLA plastics can be used, this model is great for classrooms and teaching labs.
Specifications of cheap 3D printer Dremel Idea Builder
- Printer type: FDM;
- 3D printing materials: PLA;
- Working space: 230 x 150 x 140 mm;
- Minimum layer height: 100 microns;
- Number of extruders: 1;
- Open Source: no;
- Compatible with materials from other manufacturers: no;
- Heated table: no;
- Nozzle diameter: 1.75 mm;
- Control panel on 3D printer: yes;
- Connection: USB, SD card.

Back to the list of 3D printers
Printrbot Simple Pro ($999)
Printrbot Simple Pro is a significant upgrade from the original Simple. Same open design, no body. Like its predecessor, the Printrbot Simple Pro is compact and portable. All-metal construction for excellent vibration damping and shock resistance.
The main difference is the built-in color touch screen, the ability to connect via WiFi and free cloud service (optional), which greatly improves the 3D printing process. Simple Pro has a 32-bit processor, which ensures smooth and fast movements. And at the same time, this model is included in our top 20 cheap 3D printers, since its cost is $999.
Specifications of cheap 3D printer Printrbot Simple Pro
- Printer type: FDM;
- 3D printing materials: PLA;
- Working space: 200 x 150 x 200 mm;
- Minimum layer height: 50 microns;
- Number of extruders: 1;
- Open Source: design and software;
- Compatible with materials from other manufacturers: yes;
- Heated table: optional;
- Nozzle diameter: 1.
 75 mm;
 - Control panel on 3D printer: yes;
- Connection: USB, WiFi.
Back to 3D printer list
Prusa i3 Mk2 ($999)
This is one of the best 3D printers you can buy in this price range. All nodes are open-source licensed and part of the Rep-Rap project, so there are many copies around ... but all replicas are worse than the original.
The Prusa i3 Mk2 is equipped with a heated table that has technology to compensate for temperature differences in the center and corners. There is an automatic calibration system. And of course, amazing documentation. This is an extremely versatile 3D printer that you will 100% appreciate when you start printing with unusual materials such as PLA, PET, HIPS, Flex PP or Ninjaflex, etc.
The Prusa i3 Mk2 is a 3D printer that is constantly being developed and supported by the manufacturer. Its developer Josef Prusa regularly adds new features, software and design improvements (for example, the ability to color 3D print). If you look for quality competitors in the 3D printing market, then the cost of their equipment will be in the region of $2000 - $3000.
The only drawback is that if you decide to buy a Prusa i3 Mk2, you will have to wait about 2 months, as the company cannot keep up with the high demand.
Specifications of cheap 3D printer Prusa i3 Mk2
- Printer type: FDM;
- 3D printing materials: ABS, PLA, exotic;
- Working space: 250 x 210 x 200 mm;
- Minimum layer height: 100 microns;
- Number of extruders: 1;
- 3D printing speed: 50 mm/s;
- Open Source: design and software;
- Compatible with materials from other manufacturers: yes;
- Heated table: yes;
- Nozzle diameter: 1.75 mm;
- Control panel on 3D printer: yes;
- Connection: SD card.
Answering questions on wanhao
3D printer manufacturer from China since 2011.
From WANHAO 3D printer page:
Thanks to the great efforts of all the members of the WANHAO 3D printer team, WANHAO started shipping overseas 3D printers from August 8, 2012.
With 6 months experience in China local retail market, WANHAO has accumulated good experience in 3D printing robot production and after-sales service. Based on this valuable experience and the hard work of our team, we believe that WANHAO can provide more professional service and a more modern affordable 3D printer to amazing people around the world.
WANHAO has been manufacturing 3D printers since the beginning of 2011. Several roommates spent all their pocket money and bought one thing - O-Matic from Makerbot. This precious awesome machine brought a lot of enthusiasm for these college students to create 3D projects and helped these buddies make their dream come true. On October 1, WANHAO reproduced Thing-O-Matic and named it DUBLICator NUMBER ONE. This 1st generation 3D printer made in China combined most of the benefits of RepRap and Makerbot and upgraded the extruder to a non-block type.
In June 2012, WANHAO invented his LCD 3D printer, now called the REPLIATOR TWO.
This is a great move that will free up your computer that you don't have to type while your computer is running. Just a simple SD card will do the rest of the work.
- Print is not laminated correctly at a certain height I have a Wanhao i3 duplicator. I've made many great prints with this printer and have found from my own experience that it can produce nearly flawless prints. But..... In…
- OctoPrint won't heat hotend/extruder My OctPrint and Monoprice Maker Select IIIP (Wanhao i3 duplicator Plus clone) worked fine, but all of a sudden today the hotend doesn't heat up anymore. I tried to disable the OctoPrint USB port and reset...
- Wanhao i3 duplicator ceramic ribbon replacement I need a new ceramic ribbon for my 3D printer. Does it matter what I get? Can I just buy the cheapest one? Is there a difference in quality?
- How do I calibrate the temperature of my hot end? I'm using Monoprice Maker Select v2 (a Monoprice branded Wanhao i3 duplicator) and would like to calibrate the temperature readings for my hotend.
 I used a thermal probe on my...
 - Wanhao i3 Mini Temperature Offset I am trying to print with PLA on the new Wanhao Duplicator i3 Mini. Under normal temperature conditions (200-210°C), the printer is underextruded and the extruder motor skips, which…
- Update hotend to reach higher temperatures (e.g. for PETG) I'm struggling to get my printer up to temperature for modified PETG (I have Fillamentum CPE filament and recommend 255-275°C), currently time I can reach…
- Monoprice Maker (Wanhao Duplicator Clone) Intermittent Underextrusion I have had Monoprice Maker (Wanhao Duplicator Clone) for about a year and a half now. I type in a closed chamber and have had a lot of issues with this in the past (all sorts of random issues) that I…
- Consistent blurring and gaps in print towards the right side Question: I have a problem with some clumps and spaces consistently in the same areas. The left edge is always good, the right edge is very bad (especially around the corner), and the front and back.
 ..
.. - Is there a way to remap the pins so that the Z axis is output through the extruder driver? I have a Wanhao i3 duplicator from which I blew a Z-axis stepper motor. I would like to be able to have all three motion axes for another project. I am trying to see if there is an easy way,…
- Wanhao Duplicator i3 Mini - Doesn't reach temperature -> screen freezes I'm having some problems with my Cocoon Create Model Maker/Wanhao Duplicator i3 Mini. The temperature does not rise in the hotend. I'll go to any of the heating functions (start printing,…
- Recommendations for a 3d printer that can print fidget? I'm looking for a cheap 3d printer that can print this: https://www.thingiverse.com/ thing:1307100 and hopefully under US$200 such as Creality Ender 3, Monoprice Select Mini Pro and V2,…
- Assembly plate (PEI on glass) not flat after several months of use? I have a lot of Duplicator 6 branded printers as my ultimate Monoprice about a year and a half ago, 6 months after I got it I decided I hated the buildplate (I had to…
- Z axis adjustment (Monoprice Maker Select) I have a Monoprice Maker Select v2 and recently upgraded to Anycubic Ultrabase glass plate In Cura the model I am printing is in the middle as shown here: but the printer places.
 ..
.. - Monoprice Maker Ultimate extrudes too much filament at start Bought a Monoprice Maker Ultimate 3D printer today. This is a rebranded Wanhao Duplicator 6 for reference. I am using the default settings for Wanhao Duplicator 6 in Simplify3D. Here...
- Compensating device for smaller extruder Let's say someone has a Monoprice Maker Select and switched from the original brass extruder to a D4 Plus which is slightly smaller (10.6 vs 10.9mm outside diameter). This…
- "Missing" lines on 64x128 LCD after flashing Marlin 1.1.9 on Monoprice Maker Select v2 I successfully flashed Marlin 1.1.9 on a Melzi v3.5 board (stock board for Monoprice Maker Select v2 (v2. 1?, Duplicator Wanhao i3 with white label). Initially after the flash succeeded…
- Resin burns to transparent sheet I recently bought a Kelant s400 LCD DLP 3D printer. I'm using Wanhao resin (green) to print using Wanhao's recommended settings.
 I printed a hollowed out cube as a test and it printed...
 - Wanhao i3 stops printing after about 40 minutes I have a Monoprice Maker Select V2.1 (with new Wanhao Di3 load) with a metal hot end and machined arm and extruder plate. It printed very consistently for several...
- Ultimaker Cura infill issues (weird vertical pillars due to insufficient exhaust) I've spent years debugging this issue, but I can't figure out what I'm doing wrong. I have a Wanhao i3 duplicator (a clone of Prusa i3) and until recently I used an adapted…1108
- Is the Prometheus system compatible with the Wanhao i3 Plus duplicator? I'm trying to figure out if the Wanhao i3 Plus duplicator can be easily extended to print with two separate filaments using the Prometheus system with DisTech Automation using one hot end…
- Wanhao i3 duplicator plus the temperature is out of control the new Wanhao i3 plus duplicator, which has been printing successfully for several weeks now.
 This morning a new error appeared in it. When you press the pre...
 - Wanhao Duplicator i3 Mini can't print After unboxing and setting up my brand new Wanhao i3 Mini duplicator, I can't seem to print. When choosing a model for printing, the extruder does not heat up and the whole printer does nothing, ...
- How to make sure that the moving parts do not stick together? I'm new to the world of 3D printing and I would appreciate if someone could give me advice on how to 3D print moving parts without gluing them together. I recently 3D printed predator pliers…
- Wanhao Duplicator i3 Settings for ABS I am looking for others who have successfully printed in ABS using the Wanhao i3 duplicator. I tried and get a lot of warps and delaminations. I tried to put a big box over the printer, which is a little...
- Print quality deteriorates after 1.5 hours Testing my new Wanhao i3+. PLA plastic (Wanhao), basic normal quality settings in Cura (I think layer 0.
 1mm, speed 40mm/s, bed temp 60c, extruder temp 200c). Through…
 - Duplicator Wanhao i3 Plus Stuck Extruder I'm new to 3D printing, just got it for Christmas. The filament is stuck somewhere in the extruder of my Wanhao i3 Plus duplicator. I tried to remove it with the provided hook but without success...
- Extrusion stops during printing I changed the filament (PLA) in my Wanhao I3+ duplicator. I finished my first print attempt when I saw that the "lines" were too thin. I re-sliced with a higher temperature (195°C instead of...
- Regular over-extrusion Can anyone explain to me why I am getting regular over-extrusion patterns on this extrusion calibration cube? Just upgraded extruder from stock to Flexion HT on my Balco…
- Wanhao i3 PLUS restarts on USB plug I just received my Wanhao i3 PLUS duplicator. Everything prints and works fine via the SD card and display, but when connected to my Mac, the printer seems to restart.

Learn more