Make 3d printer buyers guide
Desktop 3D Printer Buying Guide 2022 - 3DPrint.com
Desktop 3D printers have evolved considerably to date—beginning as rickety hobby projects that were more often broken than working and evolving to become quite competent devices. We must point out that 3D printers to date are not as reliable or easy-to-use as your toaster or television. Some skill and determination are still required to operate today’s desktop fabbing machines. However, now for the first time, it can be a rewarding experience with comparatively little effort.
To get the most out of 3D printing, it is still desirable to master CAD and 3D modeling so that you can design and make your own objects. But simpler software and download sites have made printing models that appeal to many people much more accessible. We’ve also seen a lot of development in terms of required slicing software, which makes it easier to achieve good results with packages such as Cura.
About Filament 3D Printing
To date, nearly all desktop machines are material extrusion 3D printers that extrude one of over 80 compounds of polymer filament. These printers range from around $200 to $5,000 in price. With these systems, one can now make objects in a wide range of polymers. Most of the time, your print should come out complete, as long as your printer is level, calibrated, your print bed is clean, and your filament is dry.
Usually described as fused deposition modeling (FDM) or fused filament fabrication (FFF) 3D printers, material extrusion systems are simple and produce tough thermoplastic parts that are fairly strong. Mostly using bioplastic PLA—not actually very sustainable, if we’re being honest—but also increasingly made in materials such as PETG and ASA, desktop printers have become more capable. Filament end detection, fault monitoring, multiple nozzles, more software, and greater reliability have all become more and more standard now.
With $200 printers, you’ll have to do a lot of the calibration yourselves, while printers that cost $2,000 are more reliable, have more features and bigger build volumes, and provide a finer print result. FDM printers closer to $5,000 should be more reliable and repeatable still, with better screens and more sophistication all around.
About Resin 3D Printing
FDM is not the only technology for desktop 3D printers, however. Vat polymerization—including stereolithography (SLA) and its cousin, digital light processing (DLP)—has been making advances in the desktop market. These printers work with photopolymers, materials that can be skin irritants. In their liquid form, resins can have severely negative health effects. Indeed some materials may be carcinogenic.
We would, therefore, never recommend these printers for households with small but eminently curious and mobile children. If you always wear gloves and eye protection, however, then these printers can be operated safely. The key detail here is that skin contact allergies build up over time due to exposure and can lead to diminished quality of life.
If operated safely, SLA printers can make very highly detailed models. These can be used as molds or for casting either in an impression mold or through lost wax casting. They can also be used for very sophisticated end-use parts, but are mostly not fit for use in consumer-facing parts, unless specifically certified for this. The SLA portion of the market is fast developing, but collective knowledge on these printers is limited but improving.
We’ve divided up the market into the following:
- Low-cost desktop 3D printers (priced $150 to $800): Mostly bought by consumers and hobbyists
- Midrange 3D printers (priced $850 to $,2000): Safer and more reliable, bought by consumers and some businesses
- Professional 3D printers ($2,500 to $6,000): Aimed at businesses.
Essentially, if you’re looking to spend the least amount of money possible and willing to put in the time, get a low-cost printer. If you want to have better results with less work, buy a midrange systems. If you need the advanced features, buy a pro printer.
Voxelab Aquila: $199
I have a Voxelab Aquila at home and I really like it. The Voxelab is a pared-down Prusa clone that’s easy to assemble and works well. A friend of mine actually found it easier to assemble than a Prusa Original. The controls work well enough. With some elbow grease, it puts out nice prints. There’s an accompanying software package called VoxelMaker that is easy to use as well. Overall, the glass bed is much better than others in this price category and it is just easier to use across the board. Do expect to be involved in mastering this printer, but if you put in the time, it is very rewarding.
Creality Ender 3 V2: $262
One of the best-selling 3D printers worldwide, the Creality Ender 3 V2 is a quiet and easy to operate model. You can add features such as auto-leveling to it, a nice addition that saves time. On the whole, this printer is a lot of bang for your buck, when tweaked. A lot of people have it as well, which means that you can generally get good community support.
Artillery Sidewinder SWX2: $439
Several friends of mine have various Sidewinder models and the Artillery Sidewinder SWX2 is a workhorse. Quiet and reliable for the price point, it also packs a lot of features. It’s capable and usable. Bed heating on this model is very fast indeed, which saves you a lot of time. This printer can print coherently at much faster rates than most of its brethren.
Original Prusa Mini+: $440
I have an Original Prusa Mini+ and I completely adore it. Build volume is a bit small, so sometimes you’re left disappointed when you’re unable to make certain items. Aside from that, it’s a dream. The prints I get off of this thing are nothing short of amazing. Tight, sharp, and accurate with good detail. Do get the filament sensor option. There is some assembly required, but this tiny machine is my go-to printer at home. Comes with Prusa-flavored software, which is easy to use and has good controls.
Anycubic Photon Mono X: $240
At this price point, the Anycubic Photon Mono X is a surprisingly well-made resin printer. It works. The software is good enough, with an overall strong UX. The screen is easy-to-use, as is the accompanying software. The printer is value-engineered to make the most of its LCD projector and has a good build volume. It’s worth noting that object size will still tend to be limited with resin printers generally. Parts can come out of this printer with great precision and accuracy. For the price, it’s a great little machine.
In this segment, the Creality and Artillery are good workhorse printers that are viable choices. If you want to spend the least amount of money possible and still print relatively large objects, my current favorite is the Voxelab. It’s easier to use and just a bit more well made all around. If small objects suffice and you’re able to spend a bit more, then get the Prusa Original, which packs a lot of quality components and workmanship in a small form factor. The prints off of the Prusa are a dream and it’s easy to use. In this segment, price changes and deals per region are legion. So, the prices will fluctuate often and may make a big difference depending on where you are and when you buy.
Original Prusa i3 MK3S+: $1,000
As for the Original Prusa i3 MK3S+: Prusa offers good support, a fantastic community, and a supremely well made printer. This is my go to recommendation for nearly everyone I meet. It’s just utterly fantastic and so well-made. Tweak this thing, understand it, and you’ll get utterly amazing prints off of it. It can be finicky when manhandled, so, in a shared environment, it may be less helpful than something that has fewer options and tweaks. Other than that, this could comfortably be your first and last 3D printer. You can take this thing from your first print to manufacturing. I kid you not. I love this 3D printer.
CraftBot Plus Pro: $1,400
I’m a big CraftBot fan and the CraftBot Plus Pro is a straight up fire-and-forget printer with a large build volume, a nifty touch screen, and good build volume. It’s not complicated, has remained largely unchanged for a few years now ,but it is dependable and good value. A great option for in the classroom or in a shared environment.
Dremel Digilab 3D45: $1,300 to $1,800
The Dremel Digilab 3D45 is another simple but easy-to-use printer. It is very easy from the get-go and generally works very well. With widely diverging prices on offer right now, something truly weird is going on with the pricing, which could indicate that the model is to be replaced. This is a good printer for a classroom or shared workspace. Prints are never amazing, but it just works. This will be a very limiting printer for those who wish to tweak and experiment at length. You’ll get better results from a Prusa Original, if you want to put in more time.
Formlabs Form 3+: $3,500
The Form 3 3D printer from Formlabs. Image courtesy of Formlabs.
The Formlabs Form 3+ offers great software, industry-leading UX, and as close as you can get to one-click 3D printing. I love using these machines and love having them around the house. They’re reliable and good systems that keep on printing. Consumable costs will become excessive if you start manufacturing with these, but from one printer to a cluster or library-full, these are fantastic machines. More functional materials and design changes that solve problems for users make this a sure-fire pick. If you’re making jewelry, lost-wax casts, or moulds, then this should be your pick.
Ultimaker S5: $6,400
Older now, the Ultimaker S5 has optimized more materials for it over time and more settings available. Quick interchangeable nozzles are a huge win for anyone in a corporate setting. They’ll also save you lots of money. It’s a very reliable printer with a high repeatability that is very easy to use. It gets pricy when you choose the optional air manager, but it’s an unbeatable pick if you’re an enterprise customer looking for an FDM machine.
BCN3D Epsilon W50 $9000
The BCN3D Epsilon W50 is a big machine that’s made to appeal to users in a shared environment. A great choice for corporate labs, offices, and universities. The filament bays inside the machine are lovely and it’s reliable and easy to use. A high-price choice but one that could really pay off for the right client.
If you would ask me for one printer to buy, then I would recommend that you get a Prusa Original MKS3 for $1,000. This is a supremely well-made machine that, with a bit of tweaking, can get you some of the best 3D prints out there. And it will last you a long time.
Subscribe to Our Email Newsletter
Stay up-to-date on all the latest news from the 3D printing industry and receive information and offers from third party vendors.
Tagged with: Anycubic Photon Mono X • Artillery Sidewinder • Buyer Guides • CraftBot Plus Pro • Creality Ender 3 V2 • Dremel DigiLab • formlabs • Formlabs Form 3+ • prusa • Prusa i3 MK3S+ • ultimake s5 • ultimaker • Ultimaker S5 • Voxelab Aquila
Please enable JavaScript to view the comments powered by Disqus.
Best 3D Printer 2022 - The Ultimate Buying Guide [WINNERS]
]3D printers grant you the ability to generate anything you can possibly dream of. However, as they’re fairly complex pieces of kit it’s often hard to decide which one is best for your needs.
That’s where we come in. We’ve researched some of the best 3D printers on the market and broken them down by category. No matter your needs or budget, we’re positive that there’s a 3D printer right here for you!
Table of ContentsShow
Zoom Out: The 15 Best 3D Printers For 2022
In the short buyer’s guide below we’ll explain a few things to look out for. This will help ensure that you find a printer that fits your needs and prevents you from feeling ripped off or otherwise disappointed in your new product. Now, before you spend any money, it’s important to know what the 3D printer’s specifications mean.
We know, we know, it’s a little boring but it CAN save you hundreds of dollars and a whole lot of buyer’s remorse, so taking a little extra time to compare different products is of grand importance.
Build Area
This one is really simple. The build area of a 3D printer refers to the maximum size of an object you can create.
Now, 3D printers come in all shapes and sizes, so some might have a taller or wider build area than others. You can still use most of the templates you’ll find online but you might have to rotate them first.
Generally speaking, bigger is better when it comes to the build area. Unfortunately, larger areas usually mean a higher price tag, so you should try and strike a balance between creating huge items and saving money in the long term.
Materials
Essentially, 3D printing works by heating a filament until it’s malleable and remolding it in the shape you need. However, there are several different filament materials on offer and not every printer can use every type.
The most commonly used filaments are ABS and PLA. These make durable, temperature resistant items, but there are many other types available. If you want to use one, in particular, make sure the printer supports it before buying.
There are even 3D printers that can use other materials, like clay or Sugru. The problem with these printers is that they’re usually less reliable than standard filament-based models. If you’re an artist or want to use a printer for experimental use then have at it, but most people will be better suited towards a standard printer.
Print Speed
Here’s the bad news: 3D printing is still very slow despite its many advancements.
Generally, most low-budget printers go at a rate of around 50mm per second. This means that larger models can take a long time to create. There’s another problem: very fast printers create thicker, more obvious layers in the final product. This proves that usually, slow and steady is the better option.
Some printers allow you to add an additional extruder (essentially a nozzle) to speed up the printing process. These have another upside too – you may even be able to use multiple materials at the same time. If this is something that you think you’d like, consider purchasing a dual-extruder model.
Best Budget 3D Printers
While 3D printers still aren’t particularly cheap, there are several that come with a relatively low price tag. We’ve located and thoroughly researched three of the best budget 3D printers on the market so that you don’t have to.
Take a look!
Monoprice Select Mini
Our first recommendation is the Monoprice Select Mini. At a little over $200, this model is an excellent choice for people looking to dip their toes into the world of 3D printing.
It has a 4.7” build area. This isn’t huge, but it’s still large enough to create models or little things for around the home. With a printing speed of 55mm/s, it’s slightly faster than others in this price range. Need a bracket for that cupboard door? No problem, just wait a few hours.
With its WiFi capability, MicroSD slot, and simple, intuitive interface, this product offers far more than you expect. Also, its price makes it an absolute bargain.
New Matter MOD-t
Next, let’s take a look at the New Matter MOD-t. This is a futuristic looking printer that comes with lifetime tech support and wireless printing functionality.
It uses PLA filament and can print at up 80mm/s, although its speed is adjustable. This allows you to spend a little longer to create a smoother, more professional looking product or just get the job done quickly depending on the situation. Good, right?
It has a slightly larger build area than the Monoprice, and accordingly, costs a little more money. That said, we believe that the versatility of this product more than offsets the increase in price.
XYZprinting da Vinci Jr.
Lastly, in this category, we have the XYZprinting da Vinci Jr. This model has a 5.9” build area and a maximum printing speed of 100mm/s, making it larger and faster than the two others we’ve seen.
So what’s the catch?
Well, this printer uses a uniquely sized filament. It’s a little less expensive than you might think, but your options for buying filament are very restricted. This can, in turn, lead to slightly more expensive refills.
That said, in terms of performance, this product far outshines the others we’ve seen so far. It’s unfortunate that you can’t use standard filament with this model, but if this doesn’t bother you then the da Vinci Jr. would be an excellent choice.
Best Commercial 3D Printers
At some point, a standard 3D printer just isn’t going to meet your needs. Maybe you’re considering starting a printing business or just have exceptionally high demand. Whatever you need, we’re positive that one of the two following models will fit the bill.
Lulzbot TAZ 6
The Lulzbot TAZ 6 is very well-known in the 3D printing community, but it comes with a substantial $2500 price tag. So what does this product do to justify it?
Well, keep reading to find out.
Firstly, it has a massive build area of almost 11 square inches. Secondly, with the TAZ 6, you aren’t limited to just the standard materials. In fact, it can handle more than 30 different types of filament including wood, metal, and stone composites.
Not only that but this model has a self-leveling and self-cleaning print head. This takes the hard work away and leaves you free to enjoy the design and printing process.
So is it still as slow as all the rest? Well, it’s dual extruder compatible. This means that you can hypothetically halve the time it takes to complete a model, although of course, as we’ve mentioned above, this will affect the overall look of the finished result.
All things considered, we think that this printer will likely be too expensive and too high-tech for most people’s needs, but for commercial printers or organizations who plan to use it a lot, it’s actually very reasonably priced.
HICTOP Creality CR-10
The second commercial printer we’ve found is the HICTOP Creality CR-10. This is far less expensive than the TAZ, at around $500, yet provides an even larger build area.
This is due to this printer’s open design. It’s not constrained by the same hardware and can freely create things much larger than most of its rivals could handle. This simple design means that this printer can be broken down into just three parts for easy assembly. What else is good?
This printer has a variable printing speed. At its base rate, it can run at 80mm/s but this can be boosted as high as 200mm/s if you’re in a hurry. Layers can be as thick as 0.4mm or as thin as 0.5mm so there’s a good degree of creative freedom with the CR-10.
You might expect the CR-10 to be a compromise considering its far more palatable price. However, nothing could be farther from the truth. It’s a solid, fast 3D printer that can handle anything you throw at it.
Ultimately, if you don’t care about using anything except PLA then there’s no reason to spend any extra money on a fancy printer. Simply put, this model has everything you need.
If you work in a creative field, you’ll probably have been asked to create a rapid prototype of something. What if you could remove the hassle from this and create an even higher quality item while you were away doing other things?
Well, you can. The following 3D printers are packed full of features that make them invaluable to designers and we’re confident that you’ll find one you like.
FlashForge Creator Pro
First up we have the FlashForge Creator Pro. This is a pretty pricey printer but it supports printing with a huge range of different materials including wood and nylon. So how is it to use?
It does have a fairly small build area, but this is offset by its high speed. This means that you can create several smaller items and combine them later at the same time that creating a larger object would have taken.
This printer supports tetherless printing via SD card, but there’s no WiFI functionality.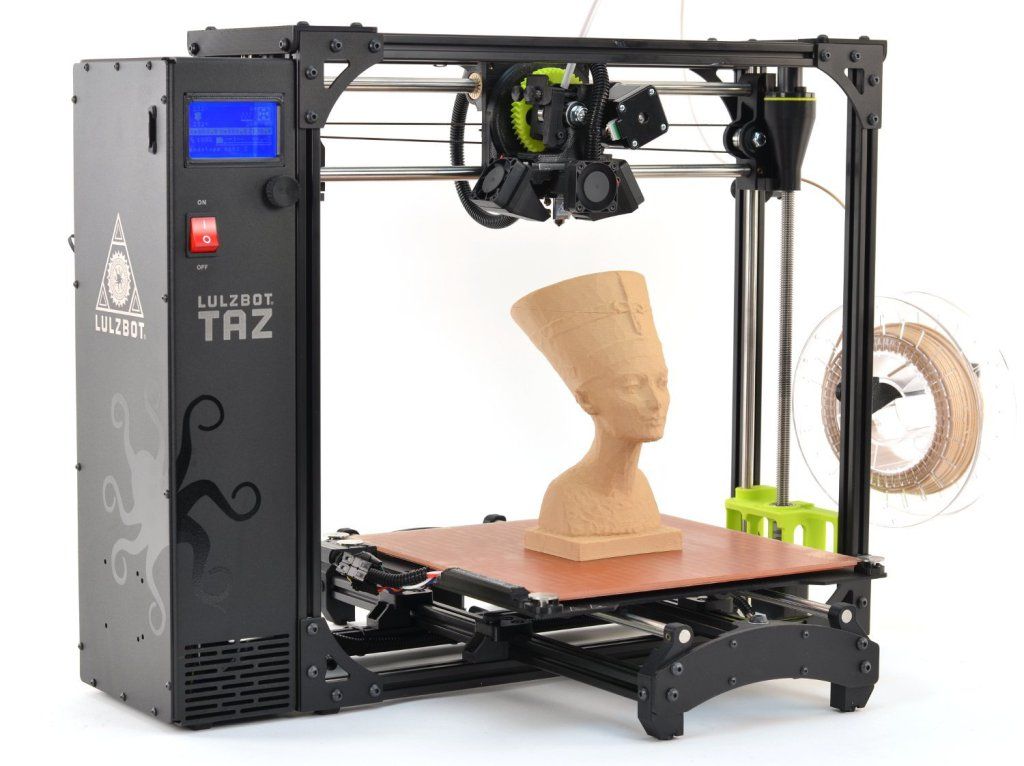 Considering it’s the kind of product that would be best suited to a computer lab, this really isn’t as big of an issue as it appears at first.
Overall, while the FlashForge can seem a little overpriced considering its small build area, it’s actually pretty good at what it does. We particularly liked its wide material support – this is something usually only found in far more expensive models and something we’re sure will come in handy.
QIDI TECHNOLOGY
There’s also a reasonably priced 3D printer from QIDI TECHNOLOGY. It costs around $400 and has a 5.5” build area. This is a pretty small chamber but considering this is a mid-budget pick, that’s to be expected.
So what is this printer’s best feature?
One of the things we really liked about this printer is its ultra-simple interface. 3D printing can get pretty technical so having something that’s easy to understand is a breath of fresh air and will help less experienced users feel more at home.
This printer supports both simple and advanced materials, although there are limits. You won’t be able to print with wood, for example, but less common plastic composites will work just fine.
All in all, the QIDI printer is a decent middle ground between the functionality of an advanced model and the price of a budget one. For that reason alone, it’s a strong choice, but when you take the versatility into account, this printer becomes a no-brainer for any designer.
Best 3D Printer For Hobbyists
Maybe the products we’ve seen thus far are way more than you’re looking for. Maybe you only want a 3D printer for occasional use or to help facilitate another one of your hobbies.
That’s okay too!
However, since you’re not going to be a heavy user, it doesn’t make sense to spend a lot of money. Below, you’ll find two 3D printers that are as versatile as they are inexpensive.
XYZPrinting Mini
First up is another entry in XYZPrinting’s da Vinci line. The XYZPrinting Mini is, as you might expect, a tiny little printer. It stands just 24” tall, 18” wide, and 15.5” deep. This makes it nice and easy to put away in a closet when you aren’t using it.
It has a build area that’s a reasonable size given this model’s sub-$200 price and 5.9” is plenty of space to create most of the things you’ll want, plus you can always combine components if you want to make something larger. So, let’s talk filament.
Like the da Vinci Jr., the Mini only uses a proprietary XYZPrinting filament. This is fairly standard PLA material but it’s a little narrower than other brands’. This does mean that filament is slightly more cost-intensive, but infrequent users will find that they don’t have to buy extra filament all that often anyway.
There’s a lot to like here. This product has an incredibly simple interface: it’s a single button with LED lights to indicate print status. This helps make the Mini an excellent choice for people looking to experiment with 3D printing for the first time.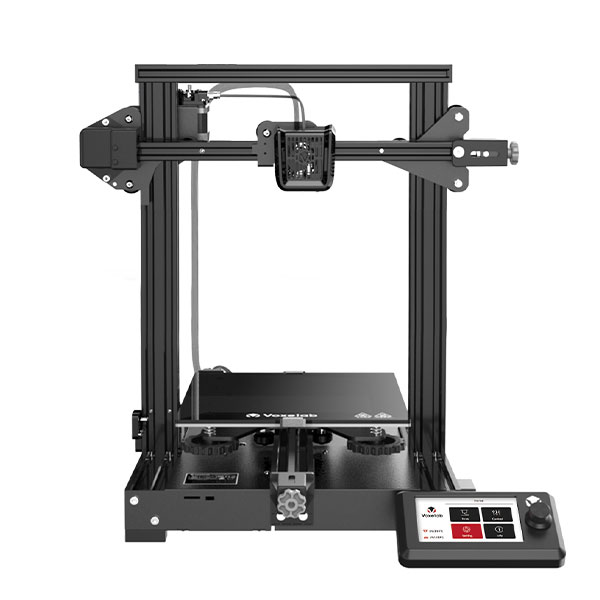
This printer takes the stress out of setup by automatically calibrating itself and with a maximum speed of 120mm/s, it’s more than capable of getting things done quickly when necessary.
So it’s perfect, right? Well, not exactly.
We did find that the Mini is a little loud, but that’s to be expected at this price range. If you’re planning to print overnight, we’d recommend placing this product as far from the bedroom as possible because even if it seems quiet at first, it can quickly become distracting enough to keep you awake.
Apart from its noisy operation, the da Vinci Jr. is an exemplary little 3D printer. It comes with everything you need to get started and is unhampered by the extensive setup and configuration process that more advanced printers are.
ALUNAR 3D Printer
If the Mini’s reliance on specific materials annoys you, you might be better suited to the ALUNAR 3D printer. It’s capable of using any standard filament plus some more advanced ones like wood or conductive materials.
This printer is a touch more expensive at around $210. That said, it comes with a 1000 hour motor guarantee, so you can expect it to work for a long time. So far, so good.
Now, a word of warning. This printer requires some assembly. For the most part, this is very simple but it does require some degree of common sense. For example, you’ll have to switch the voltage to either 100V or 220V depending on your input.
We really liked that this printer lets you pause your work at any time. This allows you to quiet it down after hours or catch any mistakes before they’re set in stone (possibly literally). You’ll have to be quick, though: this printer can go as high as 100mm/s.
Again, the ALUNAR has a slightly more complex user interface than the Mini. It has five buttons and an LCD display for navigating its menu system. Rather than complicating things, this actually makes the user feel like they have more control, and with this new wave of tech, that’s a benefit that can’t be understated.
This is a printer that provides the best of both worlds. On one hand, it offers far more creative freedom than its rivals, and on the other, it does require some construction. Nonetheless, we still recommend it.
Best Mid-Budget 3D Printers
The products above are great but let’s say you don’t fit neatly into any of our categories and just want to know what’s available. Well, you’re in luck! We’ve created a list of the best all-around 3D printers in the mid-budget range to help you out.
FlashForge Finder
Let’s take a look at the FlashForge Finder. It costs around $400 and has a 5.5”3 build area. But that’s far from all this product has to offer.
This printer is exactly what you imagine when someone says “3D printer”. It looks futuristic and sleek, featuring a small 3.5” LCD touchscreen interface. This keeps operation nice and simple while providing enough flexibility to navigate menus with ease.
The Finder offers two ways to import files. The first is the standard SD care and flash drive support, but it also features WiFi functionality for tetherless printing. This can be especially useful if your computer is somewhere out of the way and you don’t fancy running cables through your home.
The only issue with this printer is that it’s designed to work only with FlashForge PLA filament. That said, it’s also possible to use Hatchbox filament if you run it in from outside. Either way, your filament options are limited which may lead to slightly increased costs down the line.
One of the things we really liked about this model is its filament refill alert. It automatically detects when you’re running low so you never find yourself halfway through a print and having to buy extra filament.
QIDI TECHNOLOGY 3DP-QDA16-01
Our second pick is the QIDI TECHNOLOGY 3DP-QDA16-01. What it lacks in a catchy name, it makes up for in terms of functionality.
First up, it has a slightly wider than average build area at 8. 8”. This gives you the freedom to create ever larger items and given its price (around $650) this size is excellent. So what else does it offer?
Well, it’s almost entirely metal. This not only looks good but lends the printer added stability and structure. This is more important than you might think – with temperatures up to 280° you need all the stability you can get.
It features a dual-extruder setup. This means that you can print models up to twice as fast as other models. There is very little range in terms of layer size, however. It ranges from 0.1-.2mm and while you might think that this makes layers noticeable, it’s actually not that bad.
We really liked that this model comes with 24-hour tech support and a turbofan cooling function to let you grab your items as soon as possible after it’s done.
Files can be transferred either via SD card or USB stick, and while there’s no WiFi capability, this is just a bonus and isn’t all that necessary.
Robo R1+
Lastly, in this category, we have the Robo R1+. Sounds fancy, right? Well, you’ll be pleased to hear that its functionality lives up to its futuristic name.
This printer has a quick-change extruder system and fast-feed filament setup. Finally – a printer that can keep up with the fastest print speeds, In many ways, it’s designed for professionals – with maintenance this simple, it’s no longer a chore.
Believe it or not, it gets better. This printer has an absolutely huge build area. For around $500 you can create items up to 10” x 9” x 8” in size. That’s incredible, but wait, there’s more.
Let’s say you run into trouble using the R1+. No problem – just use the free 24-hour tech support. Ah but wait, what if the problem is your hardware itself? Relax! The R1+ is covered by a six-month parts warranty, so you can have it fixed at no additional cost. Good, right?
Our last point is a big one: this printer can use more than 30 different materials including carbon fiber PLA, rubber, and stainless steel. This provides unparalleled flexibility in terms of what you can create and frankly at this price range, that’s amazing.
Best High-End 3D Printers
Okay, we’ve covered most of the popular basic 3D printers but what if you have a little more money to spend? You’ll likely want printers with functionality that you can’t find in lower price brackets, right? The printers below offer extra features, both in terms of ease of use and printing capability.
Robo R2 3D Printer
Our first high-budget pick is the Robo R2 3D printer. This is priced at around $1500 so it’s not going to be for everyone. Those that can afford it, however, will find that it offers a lot of bang for your buck.
Did you know that this printer can print very thin layers? They range from 0.02mm to 0.3mm which is frankly crazy. This is far finer than any other printer we’ve seen and will result in a much more professional looking finished piece.
The build area is large but not as big as some due to the closed nature of the printer. Still, there’s plenty of space available for those who like to create larger items. This printer can actually save you time: models that would have to be done in parts on other printers can be done in one go with the R2.
More than 30 different materials are supported and because you can add a second extruder, you can even print two at once for a more attractive end product. If you’re not impressed yet, maybe this final point will change your mind.
The R2 comes with a year’s subscription to a professional level printing program, and there’s even 24/7 customer support, as well as a year’s warranty on parts. What’s not to like?
JGAURORA Printer
Next, we have the JGAURORA printer. It’s still considered a high-budget printer but costs about half as much as the R2. If you found the R2’s high price tag too hard to justify, perhaps this would be a better choice.
Let’s start with the basics. This printer works with any 1.75mm printing filament. That’s it – there are no other restrictions. This makes it an excellent choice for those who want to build complex, multi-material pieces without spending over a thousand dollars.
It also features a switchable voltage so be sure to alter this based on your power source. The frame is made of metal for added stability, plus the temperature can be controlled either by changing it directly or by using the built-in fan. So how is it for printing?
In a word: excellent. The layer thickness can be adjusted from 0.1-0.4mm which allows for some exceptionally high-quality models. These can be pretty large too since the build area is 11” wide, 7.9” tall and deep.
While this printer can’t connect via WiFi it does come with an 8GB SD card and reader. To be honest, WiFi connectivity would have been a bonus, but it’s hardly essential. The only difference is that files have to be transferred across. On the plus side, an SD card can load data faster than WiFi so you can get started sooner.
Sindoh 3DWOX DP200
Our final recommendation is the Sindoh 3DWOX DP200. Now, you might be thinking “how can I justify spending all this money on a product with a 7. 9×7.9×7.3” build area. Well, this printer has a number of features that make it a strong contender, and we’ll outline these below.
Take connectivity, for example. It can use Ethernet, USB, WiFi, or SD cards. Better still, it has an internal camera that can be viewed remotely. Want to check on its progress while at work? No problem!
This model makes it easier to begin printing, too. It can automatically load and unload filament and uses specialized technology to assist you during the bed-leveling process. The only way this printer could make your life even easier is if it sprouted legs and plugged itself in.
Now, this printer supports fewer material types than some of the others we’ve seen. That said, it still accepts the standard PLA and ABS filaments so the most commonly used types will work. Considering the layers can be as fine as 0.05mm, you’ll be able to create truly stunning, professional looking items.
Overall, we believe this printer to offer a good middle ground between performance and affordability. Although it has only basic material support, no other product on this list offers a camera or as many connectivity options.
3D Printer Buyer's Guide
Think It Right
Start-up Costs
Consumables Costs
Operating Costs and Savings
Service and Maintenance Costs
The Toughest Economics Survive
ConclusionsChoosing the right 3D printer is important now more than ever. A wisely chosen 3D printer will greatly speed up the iterative development process.
Think things through
Hard times are the strongest argument for investing in 3D printing and its opportunities. Money spent on a 3D printer will provide strategic benefits not only in the long term: it will increase the efficiency of development, accelerate the time to market for new products, and this will immediately lead to lower costs. The mainstream trend in 3D CAD technology is to use more and more models in the early stages of development - this increases the level of collaboration on the project, and the detected errors are eliminated long before production begins. In large-scale developments that require gradual fine-tuning (the so-called iterative developments), 3D printers, at quite reasonable costs, can reduce the overall cost of the model. nine0003
Wherever 3D printers appear, they revolutionize the world. Designers can bring their concepts to life in full color realistic models. Marketers begin to promote a product even before its production begins. In some cases, 3D modeling technology can be used for small-scale production of samples. But in order not to make a mistake in the choice, the decision maker must evaluate not only the direct costs of acquiring a 3D printer, but also all the others - often they can decide the fate of the purchase. It is even more important to find out in advance how 3D printers differ from each other and by what parameters you can compare devices from different manufacturers. nine0003
Start-up costs
Factors to consider include the cost of the device, maintenance during the first year of operation, the cost of post-treatment equipment, and possible additional equipment. Add to this the starter kit of consumables, installation and training costs, maintenance during the second year of operation and beyond. nine0003
These costs are not always obvious. Beware of "basic" kits. What does such a kit actually include? Some manufacturers limit it to the main device, and in order to get a fully functional system (or, in some cases, implement certain functions), you will have to invest in additional equipment for pre- or post-processing. Moreover, the devices of some manufacturers have increased requirements for energy consumption and operating conditions (for example, their operation is associated with the release of toxic fumes and the formation of chemical waste). nine0003
Some kind of post-processing is required for any 3D printer product, but the methods of this processing are extremely diverse, including in complexity. It is one thing when the product is enough, for example, to blow it with compressed air or immerse it in water to wash off the dust, and quite another when it comes to special devices and special cutters for removing mechanical supports. Depending on the manufacturer of the machine and its features, you may need additional ventilation equipment or special stands just to install the 3D printer in a convenient position for work. nine0003
Consumables costs
Another factor is the cost of consumables. It varies greatly depending on the type of processing, the specific geometry of the components and the specific application. For example, the use of a 3D printer for conceptual modeling requires that many parts be created in a short time during the development of a new product. Since some materials are objectively more expensive than others, the use of expensive materials will be too costly. In addition to the cost of materials, there may be others related to the manufacturing process and at first not manifested in any way. Some machines use simple, commercially available interchangeable printheads. Others require critical components only from the manufacturer. Moreover, in this case, additional materials are used for the structures supporting the protruding elements and the solvent containers. The starter kit is often supplied with the device, and its size and composition significantly affect the costs during the first year of operation. nine0003
When estimating the cost of consumables, identify the various components of these costs. The objective comparison parameter is the cost per unit volume of the simulated part - this is more reliable than comparing the cost per unit weight of the manufactured product. Be realistic about future work: the consumable requirements for modeling mobile phone components may be different than when modeling an exhaust pipe or pump housing.
All types of 3D printers use more material when working than what is left in the finished part - the material is taken with a margin. Some systems provide for the reuse of some or all of the consumables, others do not allow any reuse. These differences in process organization can lead to significant differences in material costs over time.
Some used consumables are difficult to dispose of or reuse, while others can be downright dangerous. All these are additional costs. nine0003
Operating costs and savings
The time factor contributes greatly to the overall cost picture. On different devices, the execution time of the same process can vary by more than five times. The same applies to individual operations: some operations require more actions than others (including the setting of parameters, which affects the scheduling of tasks and the need to involve qualified personnel). nine0003
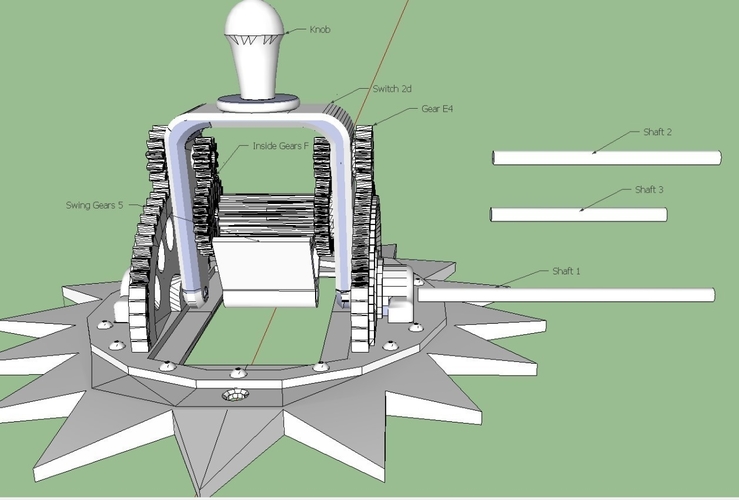
Similar printers from two different manufacturers can form comparable products, but differ significantly in speed and cost of production. For example, let's take a model of a pulley with a diameter of 6 inches (see figure). The average cost of making a multi-color part on a machine from manufacturer A is $3. 41 per cubic inch of production, while it is $5.56 per cubic inch for making single-color components on a printer from manufacturer B, which is almost twice as much. . Manufacturer A's printer takes (including setup time) 5.17 hours to produce one part; the material cost would be less than $47. Manufacturer B's printer takes 21.63 hours to complete the same job for $80 supplies, and the model will need to be repainted later. nine0003
The next article of potential time and money savings is device performance. This term refers to the total amount of output that can be produced in a certain time. Using reference parts with different geometries (see graph), manufacturer A's printer is producing 120-220 cubic inches of product in 24 hours, and manufacturer B's printer is only 15-25 cubic inches in the same time, so in terms of overall productivity, The performance of the first device is almost an order of magnitude better. nine0003
Some printers can make multiple copies of a sample (or different samples) in a single pass, allowing multiple users to work. Thus, productivity can also be calculated based on the number of copies of reference samples that can be made in a given time. This factor is very important when an entire engineering department or a group of students share the same 3D printer. What kind of time savings and productive work can we talk about, for example, when an engineer is tenth in line and waits a week for a part to be manufactured according to his project ...
Considering all relevant factors, including purchase, service, and shipping costs, as well as the performance that comparable 3D printers can deliver, there is a significant difference in part cost and lead time. Some of the results of comparing printers from the two leading companies are shown in the graphs.
Service and maintenance costs
Finally, you need to evaluate how much general and routine maintenance will cost, whether there is a guarantee and for how long it will be provided, what exactly is covered by the guarantee and what is not. nine0003
Conclusions
In short, just as when choosing a car, you look not only at its cost, but also at convenience, appearance, evaluate its reliability, take into account fuel consumption, so buying a 3D printer requires the same careful approach. Investing wisely in a 3D printer can help you reduce your product development costs and get your product to market faster, which is a huge advantage in a highly competitive environment.
 nine0003
  Sometimes mechanical errors can completely stop the printer from working. Therefore, it is better not to take the situation to extremes and, if any problems arise, immediately start checking and configuring the 3D printer. nine0003
  The EEPROM function must be enabled in the firmware, for this you need to remove two slashes in the line: nine0003
  nine0003
 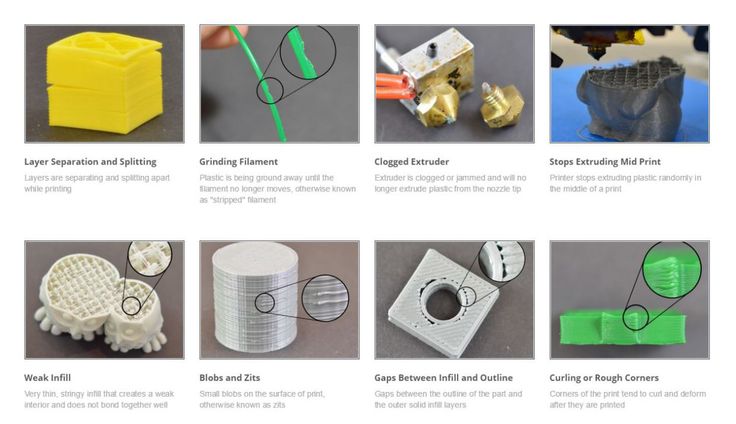 Adjust the tension of the belts on each axis of the printer using this method. nine0003
 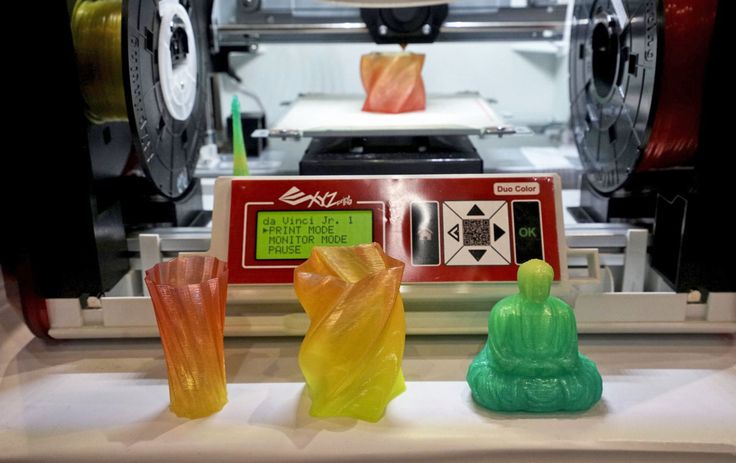 nine0003
 | Driver name nine0003 | Formula | Explanations |
| A4988 | Vref = Imax * 1.25 for R100 | To understand which formula to use, you need to find a resistor with the signature R100 or R050 on the driver. They are located next to the driver chip. nine0003 |
| DRV8825 | Vref = Imax / 2 | |
| LV8729 | Vref = Imax / 2 | |
| TMC2208 nine0002 TMC2100TMC2130 | Vref = Imax * 1. | One formula for all drivers |
 41
41 The value of the maximum current (Imax) depends on the motor controlled by the driver. This can be found in the engine specification or on the sticker on it. The following are the currents for the most popular motor models: nine0003
17HS4401 - current 1.7 A
17HS8401 - current 1.8 A
17HS4402 - current 1.3 A
Substituting the value into the formula, we get the Vref value for the maximum current supplied to the motor. But at this value, the engine will get very hot, so the resulting Vref value must be multiplied by 0.7. For example, for a motor with a maximum current of 1.5 A and a TMC 2208 driver:
Vref=1.5*1.41*0.7=1.48V nine0003
Now the resulting value can be used when configuring on the printer itself. To do this, disconnect the wires going to the motors, turn on the printer and place one voltmeter probe in the center of the trimmer, and the second probe to the negative terminal on the power supply (you can also use the negative terminal on the printer board and the contact on the driver, labeled as GND). You will see some value on the voltmeter screen. Turn the trimmer clockwise to decrease the Vref value and counterclockwise to increase it. nine0003
Attention: you should not specify a Vref value higher than the maximum calculated for your engine! Otherwise, the engine will soon break down!
Once you have adjusted the value on the drivers, you can turn off the power to the printer, connect the motor wires, and put the case back together. This completes the driver setup.
Motor steps
When setting up motor steps, you will need a ruler. For convenience, you can use the program Repetier-Host. The adjustment for each of the three axes occurs according to the same algorithm: nine0003
-
Set the caret to zero coordinates (Autohome or G28)
-
Move the carriage some distance
-
We measure how far the carriage has traveled
-
We calculate the correct number of steps per millimeter using the formula:
True steps per millimeter = current steps per millimeter * reported distance / distance traveled nine0003
For example, if the printer was set to 100 steps/mm, we tell the printer to move 80mm and the printer travels 87. 5mm. Then the correct steps per millimeter would be 100 * 80 / 87.5 = 91.42 steps/mm. For the convenience of measurements, you can fix a ruler on the table, and a thin object, such as a needle or pin, on the carriage. Then it will be possible to accurately measure the distance traveled. The extruder uses a partially different algorithm to measure distance: nine0003
-
Inserting plastic into the extruder
-
Cut it right at the outlet
-
We give the printer a command to stretch the plastic a certain distance (at least 100 millimeters)
-
Cutting plastic again
-
We measure the length of the resulting piece of plastic nine0003
-
We use the formula from the previous algorithm
Next, the settings data must be inserted into the firmware in the line:
#define DEFAULT_AXIS_STEPS_PER_UNIT {X,Y,Z,E0}
X,Y,Z and E0 should be replaced by the steps per millimeter for each of the axes, respectively. Otherwise, you need to insert this line into the initial GCODE:
M92 Ennn Xnnn Ynnn Znnn
Instead of nnn in each of the parameters, you must substitute the steps per millimeter for each axis. If you want to adjust the steps only for not all axes, then you can remove unnecessary parameters.
Acceleration
This parameter is responsible for the rate of change of speed. That is, how fast the printer will change its speed. This affects the nature of the movement of the hot end relative to the table. If the acceleration is too small, then the printer will print slowly, if it is too large, then the outer surface of the model will have visual defects: fading waves will be visible near each of the corners, as in the picture below. nine0003
To set up acceleration, you need to follow simple steps:
-
Cut a model of a standard test cube with a wall thickness equal to one nozzle diameter, without filling and top layers, bottom 2-3 layers;
-
Open GCODE file in notepad;
-
Find the G28 command at the very beginning and insert the line data after it: nine0003
M201 X5000 Y5000
M204 P500 T500
-
Save the changes, print the model according to the received GCODE and note at what parameters P and T it was printed;
-
Open the same GCODE file and change the P and T values on the second line, adding 500 to each;
-
Repeat steps 4-5 at least 3 times; nine0003
As a result, you will get several test cubes, some of which will show waves at the corners. Choose the cube that is printed with the highest P and T parameters, but that no waves can be seen on it. The number in parameter P will be the desired acceleration value. To save this value, you need to find 2 lines in the firmware:
#define DEFAULT_MAX_ACCELERATION {X,Y,Z,E0}
#define DEFAULT_ACCELERATION {nnn} nine0003
Instead of X and Y, you should put an acceleration twice as high as found earlier. And instead of nnn, you need to put the acceleration value found earlier. Otherwise, you need to insert a line in the initial GCODE:
M204 Pnnn Tnnn
In the parameters P and T, you need to put the value of the found acceleration. After that, the acceleration setting can be considered complete.
Jerk
A jerk indicates the speed with which to start accelerating. It affects the model in a similar way as acceleration: it creates ripples around the corners of the model. But it also increases the protrusion of the corners if the jerk is too small.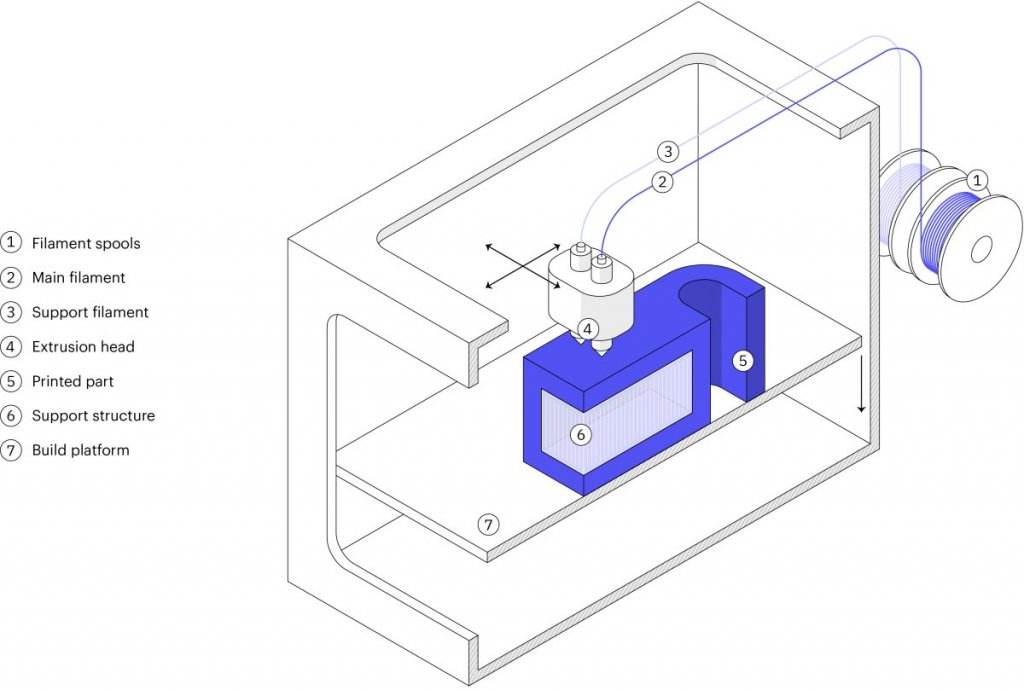 The jerk setting is also similar to the acceleration setting: nine0003
-
Cut a model of a standard test cube with a wall thickness equal to one nozzle diameter, without filling and top layers, bottom 2-3 layers.
-
Open GCODE file in notepad
-
Find the G28 command at the very beginning and insert the line data after it:
M205 X5 Y5
- nine0002 Save the changes, print the model according to the received GCODE and note at what X and Y parameters it was printed
-
Open the same GCODE file and change the X and Y values on the second line, adding 2 to each
-
Repeat steps 4-5 at least 3 times
As a result, you will get several cubes. Find a non-rippled cube printed at the highest X and Y settings. This will be the jerk value for your printer. To save them, you need to find the line in the firmware: nine0003
#define DEFAULT_XJERKnnn
#define DEFAULT_YJERKnnn
It is necessary to substitute the jerk values for the X and Y axes, respectively. Otherwise, you need to substitute the command in the starting GCODE:
M205
Instead of nnn, you need to substitute the jerk value found earlier. This completes the jerk setting.
Speed
In fact, there are many different speed parameters, the values \u200b\u200bof which vary greatly. Let's take a look at the main ones: nine0003
This parameter is responsible for moving the nozzle without extruding plastic. The value is in the range from 80 to 120 mm/s. Limited only by the maximum speed at which the motors can rotate. Does not affect the model
This speed is important because it indirectly affects the adhesion of the model to the table. Usually lies between 15 and 30 mm/s
-Print speed of inner walls
Usually set to about 60 mm/s, it only affects the strength of the model. Depends on the maximum amount of plastic that the extruder can push through the nozzle nine0003
-Speed of printing outer walls
Usually about half the printing speed of the inner walls (30 mm / s).