Lassonde 3d printing
3-D Printing at Lassonde Studios Made Easy | Lassonde Entrepreneur Institute
Home News Current Page
By Alicia Parry
For beginner 3-D printers, it’s easy to feel overwhelmed. Recent advances in 3-D print technology have made the impossible, possible: 3-D printing organs, food, even new 3-D printers. At the Lassonde Institute, the Make Space’s free prototyping area focuses on tearing down barriers between non-tech students and 3-D printing. Here are some tips to get you started:
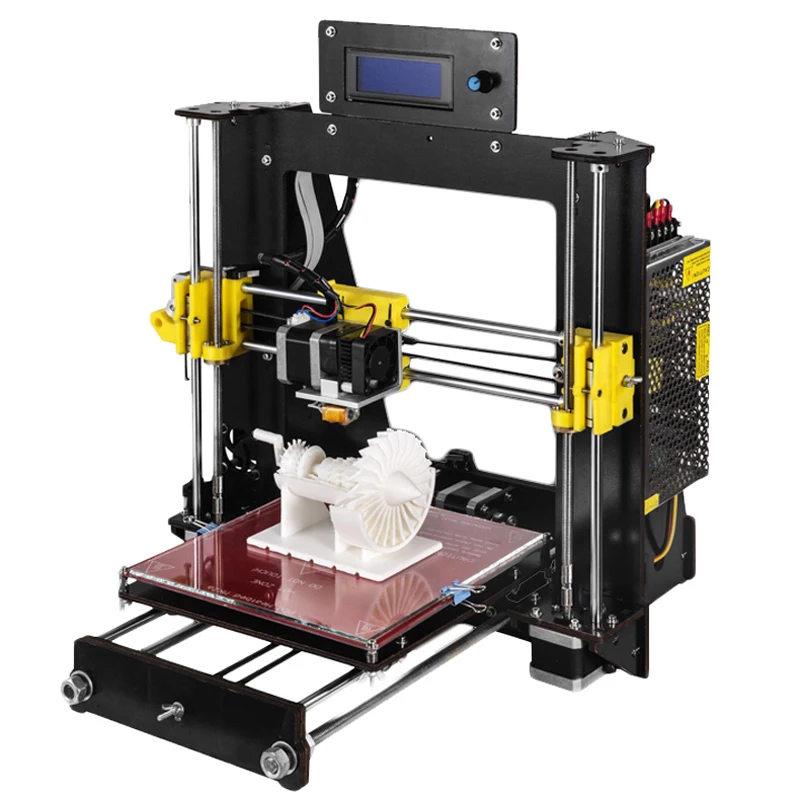
1. Decide What To PrintWhen starting out, Chris Holland, student director of prototyping, recommends finding a pre-made file online for your first print. Sites like Thingiverse offer thousands of creative commons files that fit within the 8-inch-by-8-inch parameters of the Make Space’s Ultimaker’s and don’t require an account to download. Ready to jump into the deep end and design your prototype? Holland recommends Fusion360, free online modeling software. “The best thing about this software is that it progresses with you,” he said. “Beginners won’t feel overwhelmed, but experts won’t feel confined. It also has a ton of video tutorials.”
Filament is the raw material that the 3-D printer heats and extrudes, creating a completed object. The Make Space offers four main types: PLA/PHA, copper, wood and NinjaFlex. Most prints use the PLA/PHA filament, which is a blend of plastics for general purpose printing. Since the center doesn’t order by color, your finished project could be anything from a bright purple to a deep forest green. “If a new material comes out, I just buy it,” Holland said. “I’m willing to experiment, so if a student wants to try something in particular, I’m open to scheduling time with them and exploring the possibilities for the material.”
3. Print Your File
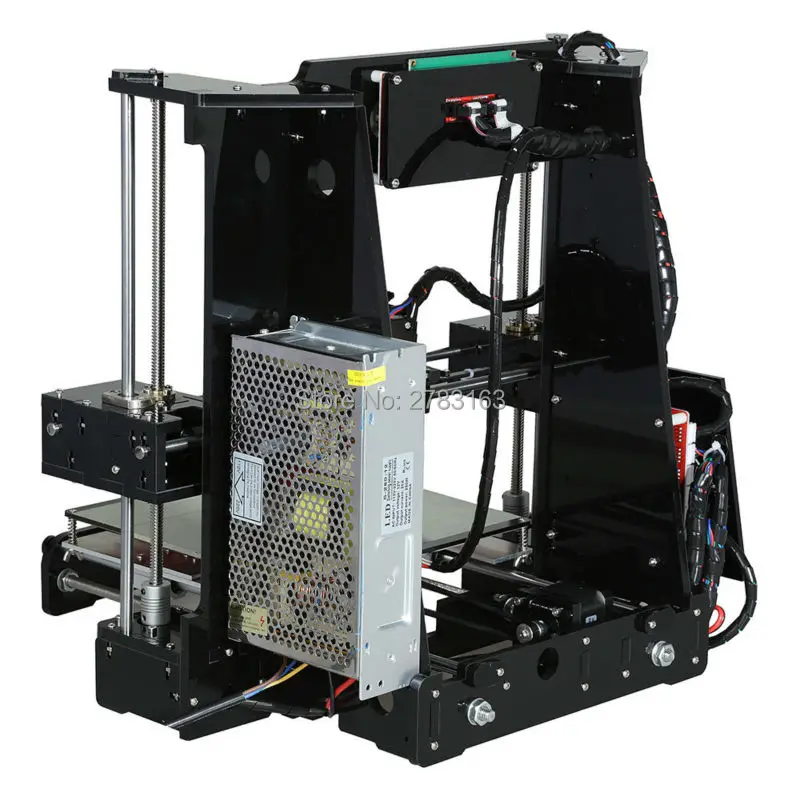
The six UltiMakers in the Make Space are operated on a first-come, first-served basis and have no queue system. If a machine is free, bring your file to the MakeSpace and talk to a Tool Mentor. According to Holland, the biggest barrier students face is the fear of bugging a tool mentor. “If anything, they’ll bug you,” he said. “All are enthusiasts, and we encourage them to approach students in the Make Space.”
The average print time is about 6hours, but don’t worry: you’re not chained to the printer while you wait. Files submitted later in the day will be left to print into the night and completed objects are placed on a shelf by the printers for students to retrieve whenever is most convenient.
The use of the printers and the filament are free, so there’s little risk involved should a print fail. “3-D printing is about speed,” Holland said. “Just get in there and see what works. If it doesn’t, there’s no barrier to trying again. We’ve got all the equipment to make it easy for you, and it doesn’t get any cheaper than free.![]() ”
”
Ready to print your first 3-D object? Drop by to speak with a tool mentor or visit the Make Space’s page for more information
Announcements 3-D Printing, Make Program, Prototyping. Permalink.Categories
CategoriesSelect CategoryAcademics (104)Alumni (38)Announcements (277)Events (283)Features (162)Lassonde Studios (152)Podcasts (7)Press Releases (195)Publications & Reports (169)Resources (106)Startups (415)Student Innovation @ the U (336)Tips & Tricks (165)Video (110)FEATURED
Top 10 RankedWe are one of the best programs in the country. Learn more. |
Student Innovation @ the U 2022Learn about student innovators across the U campus. |
- Latest News
- Events
-
Meet the Residential Advisors at Lassonde Studios for 2022-23 Oct 20, 2022
-
Pure Solutions: Innovating Access to Clean Water Oct 20, 2022
-
23 Must-Watch Movies for Entrepreneurs (on Netflix, Hulu, Amazon Prime, YouTube, Apple TV, Google Play & More) Oct 20, 2022
-
Get Seeded: Final Pitch Event for October Wednesday, October 26, 2022, 5:30 - 7pm
-
Hours with Experts: One-on-One Sessions Thursday, October 27, 2022, 3 - 5pm
-
Lassonde Information Session & Tour (In-Person or Virtual) Friday, October 28, 2022, 12:30 - 1:30pm
Free STL file Lassonde Studios・3D printing template to download・Cults
Print In Place Platform Jack
Free
Volumetric Flask
Free
Zipper Pull with Tab
Free
Handles from Dr.
 Who
WhoFree
Snowbird Aerial Tram
Free
Pumpkin Spice
Free
TARDIS Salt and Pepper
Free
Preassembled Pliers
Free
Best 3D printer files of the Architecture category
Townscaper model A
Free
Bird Feeder
€4.04
Metal and concrete curb and guardrail
€2.03
The castle of the English
€4.56
HO Scale The Dover
Free
Enchanted Garden
€17
Sand Castle
Free
Boeing 777-200 1:1000
Free
Best sellers of the category Architecture
Kandarian Dagger ,evil dead
€2. 60
60
SKULL OBELISK
€2.52
Roman Coliseum
€0.70
Disneyland Paris Cinderella Castle
€3.50
Fairy Hut
€2.83
1-100th scale furniture Architecture
€0.76
bates motel house psycho house
€6.58
London City - Skyscrapers
€0.99
Leaning Tower of Pisa
€2.50
Oil drum furniture set - chair, table and sofa
€3.76
Airbus A330-200 1:500
€0.50
battle sanctum
€8.75
Ancient Raven Castle
€4.98
Cessna 172 Skyhawk 1:72
€2
Garage Equipment and Furniture
€1
Eolienne Wind turbine
€5
Would you like to support Cults?
You like Cults and you want to help us continue the adventure independently? Please note that we are a small team of 3 people, therefore it is very simple to support us to maintain the activity and create future developments. Here are 4 solutions accessible to all:
ADVERTISING: Disable your AdBlock banner blocker and click on our banner ads.
AFFILIATION: Make your purchases online by clicking on our affiliate links here Amazon.
DONATE: If you want, you can make a donation via PayPal.
WORD OF MOUTH: Invite your friends to come, discover the platform and the magnificent 3D files shared by the community!
5 Tips to Avoid Delamination in 3D Printing
If you've owned a 3D printer for a while, you're probably used to solving a lot of problems. Delamination is one of the most annoying problems. In this article, we are going to learn (in 5 simple steps) how to rid your prints of this annoying problem. If you decide to buy ABS plastic, then our advice will be especially useful for you.
What is layer delamination?
Layer delamination occurs when the 3D printed layers do not fully adhere. This leads to the appearance of ugly cracks that upset and upset us. It's really not that hard to get rid of it. A few tweaks in the slicer and maybe a few in the printer and we'll say goodbye to ugly prints.
Let's take a look at some simple tips and tricks to help eliminate delamination!
1. Increase the temperature
The first (and perhaps most obvious) solution to 3D print delamination is to raise the printer's print temperature. Layers stick together under the influence of temperature. If the temperature of the extruded material is too low, it will not be able to adhere to the previous layer. Most likely, the fan is causing the material to cool too quickly, resulting in delamination.
Start with normal print temperature and increase it in 5°C increments until you see some improvement.
Note. If you see spots on the model, bubbles due to excessive extrusion, reduce the temperature and move on to the next tip.
2. Adjust Print Cooling
After reading the previous section, you probably expected this. If your part is delaminating and adjusting the print temperature didn't improve, the issue may be related to cooling.
First, make sure the printer fan is facing the model. If so, try reducing the fan speed in 10% increments. You will likely see a significant reduction in cracks in your prints.
3. Increase the flow rate (Flow)
Increasing Flow is a logical consequence of increasing the temperature, which we advised you to do in the first step. When you increase fluidity (or extrusion multiplier), more molten filament is squeezed out of the nozzle. This results in a stronger bond between the layers.
Start with a normal extrusion speed and increase it in 5% increments.
If you see problems with 3D printing caused by excessive extrusion, reduce the flow rate slightly. You don't want to fix one problem and cause another.
4. Reduce print speed
Delamination in 3D printing can be caused by high print speed. If the print head moves too fast, the extruded plastic will not have time to successfully adhere to the previous layer. If the previous fixes didn't improve the quality of your model, try lowering your print speed in 10mm/s increments.
Print speed can affect various printing problems, you might kill two birds with one stone!
5. Use a larger nozzle
If all else fails, try using a larger nozzle. This will allow you to print with wider lines, which should result in better layer adhesion. If you normally print with a 0.4mm nozzle, try using a 0.5mm nozzle and see if that makes a difference.
Please note that if you use a larger diameter nozzle, you will also need to increase the print temperature and flow rate. Make a few adjustments and you'll be one step closer to 3D printing beautiful models.
If you don't want to delve into 3D printing technology, 3D4U is here to help. We can produce custom 3D printing for projects of any complexity.
What is SLS 3D printing. How does an SLS 3D printer work? Overview of additive technologies.
What is SLS?
Hello everyone, Friends! 3DTool is with you!
In this article, we will talk in detail about one of the most promising technologies 3D print . Selective laser sintering.
Selective Laser Sintering (SLS) is a additive manufacturing process belonging to a broad family of wafer synthesis methods. In SLS, a laser selectively sinters polymer powder particles, fusing them together to create layer after layer. Granular thermoplastic polymers are used as construction material. Options for such devices can be considered in our catalog. For example, the Sintratec 3D printer.
This technology is used both for prototyping functional polymer products and for integration into small production runs, as it offers complete design freedom, high precision and produces parts with good and stable mechanical properties, unlike FDM or SLA .
Naturally, as in any other case, the possibilities of technology can be used to the full only if its key advantages and disadvantages are taken into account, so let's take a closer look at its features and principle of operation.
SLS printing process
How does SLS work?
The SLS fabrication process works as follows:
I. The powder chamber, as well as the entire printable area, is heated just below the melting temperature of the polymer, after which the leveling blade distributes a thin layer of powder over the build platform.
II. The CO2 laser scans the contour of the next layer and selectively sinters (melts) the polymer powder particles. The cross section of the component is scanned ( is sintered ) completely, so the part is monolithic.
III. When the layer is completed, the work platform moves down and the blade re-coats the surface with powder.
The process is repeated until the entire part is completed.
After printing, the part is completely sealed in the non-sintered powder, so the chamber and powder must cool before being removed. Cooling down can take a significant amount of time, up to 12 hours. Then the resulting part is cleaned of powder residues with compressed air. The unsintered powder is collected for further reuse.
Schematic diagram of an SLS 3D printer.
SLS printing specifications In SLS, almost all print options are set by the printer manufacturer. The default layer height for is 100-120 µm . For example, the Sintratec 3D printer we mentioned above allows you to print a much thinner layer, the layer thickness declared by the manufacturer varies from 50 to 150 micron.
The main advantage of method SLS is that the part does not need supports . In this case, the non-sintered powder plays the role of the necessary support. For this reason, the SLS method can print geometries of any shape that are impossible to print with any other additive or subtractive manufacturing method.
When printing with this method, it is very important to use as much of the printable area as possible, especially in small-scale production. Regardless of the amount of detail in the printable area, if the overall height is the same, printing will take the same amount of time. This is because it is the recoating step that determines the total print time ( the laser scanning and sintering itself is very fast ), and the printer has to cycle through the same number of layers. Also, you need to take into account the time for refilling the hopper with powder, because the same amount is poured into the chamber, regardless of the size of the printed part.
Layer caking
When using method SLS , the sintering strength of the layers to each other is excellent. This means that printed on SLS printer parts have almost isotropic mechanical properties.
As an example, the mechanical properties of samples printed on SLS using standard polyamide powder ( PA12 or Nylon12 ), the most commonly used material in SLS printing , are shown in the table in comparison with the properties of solid nylon:
Parts printed on SLS have superior tensile strength and modulus of elasticity comparable to solid material, but are more brittle ( their elongation at break is much lower than ). This is due to the internal porosity of the resulting part.
!A typical SLS part has a porosity of about 30%!
The porosity gives parts printed on SLS a characteristic grainy surface. This porosity also means that the parts can easily absorb water and are easy to paint. At the same time, such parts require special post-processing if they are to be used in a humid environment.
Shrinkage and deformation
SLS-parts are subject to shrinkage and deformation: when the newly sintered layer cools, its dimensions decrease and internal stress accumulates in it, due to which the underlying layer is pulled upwards.
Shrinkage of 3 to 3.5% is typical for SLS printing of and printer operators must take this into account during model preparation.
Large flat surfaces are most prone to deformation. This problem can be mitigated slightly by orienting the part vertically on the build platform. But still, the best way to reduce deformation is to minimize the thickness of the flat areas of the part, and add cutouts to the model where the design allows. These actions will also reduce the overall cost of the part, as less material will be used.
Finished sls-part with embedded embedded elements.
Excessive caking
Over-sintering occurs when excess heat around the contour of the part melts the unsintered powder around. This is fraught with loss of detail on small objects such as slots and holes.
Excessive sintering depends on both element size and wall thickness. For example, a slot with a width of 0.5mm or hole diameter 1mm will print successfully on a wall thickness of 2mm but will not print if the wall thickness is 4mm or greater. As a general rule, slot widths from to 0.8 mm and hole diameters from to 2 mm can be safely printed in SLS without fear of excessive sintering.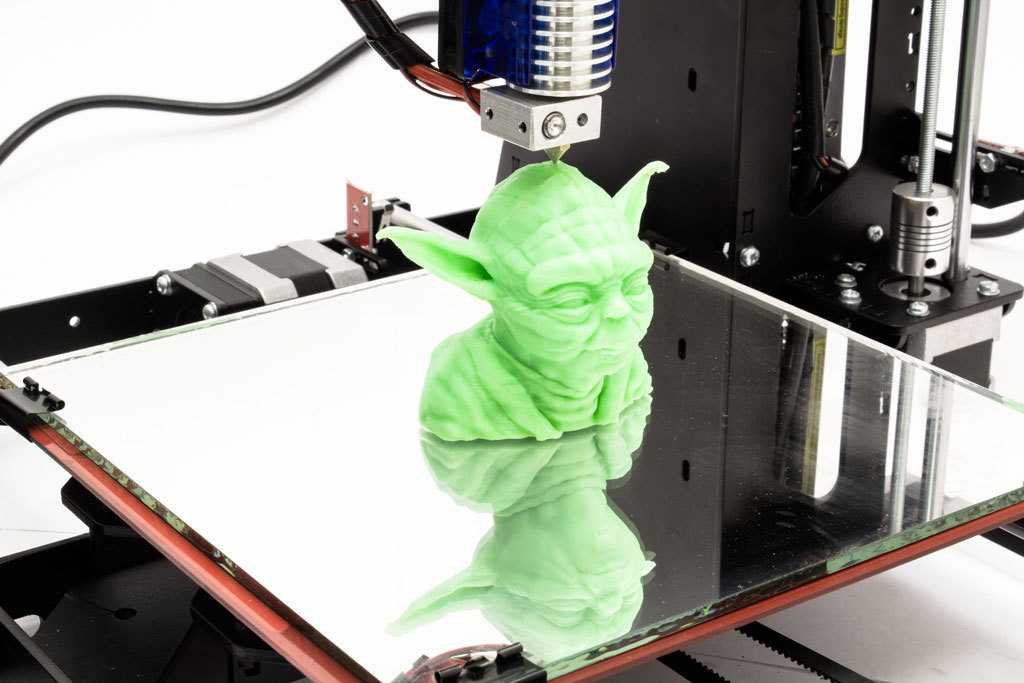
Powder removal
Since printing method SLS no supports required, parts with hollow sections print quickly and accurately.
Hollow sections in this case reduce the weight and cost of the part, as less material is ultimately used. But you will need to make outlet holes in the part to remove unsintered powder from the internal cavities. The general recommendation in this case is to add at least 2 outlet holes with a diameter of at least 5 mm to your part.
If high rigidity is required, the parts must be printed solid. An alternative here would be to make the structure hollow, with no outlets. In this way, the powder will be compacted tightly into the part, increasing its mass and providing some additional support when mechanical loads increase, without affecting print time. Also, instead of one solid internal cavity, you can add a honeycomb structure ( similar to the infill patterns used in FDM ) to further increase the rigidity of the model. Laying out the part in this way will also help reduce warping.
Removing powder from an SLS part
General materials SLS
The most commonly used material for SLS is Polyamide 12 (PA 12) , also known as Nylon 12 . At the moment, there are more and more materials with different properties for SLS 3D printing every day, for example, elastic polymers are represented by TPE powder and its analogues. Other technical thermoplastics such as PA11 and PEEK are also available but are not as widely used.
As an example, you can see the list of materials used in our catalog: Sintratec Powder Sls.
Polyamide powder can be supplemented with various additives ( such as carbon fibers, glass fibers or aluminum ) to improve the mechanical and thermal properties of the printed part. Materials supplemented with additives are usually more brittle and have higher anisotropy.
Post-processing
SLS produces parts with a powdery, grainy finish that is easy to paint. The appearance of printed parts of SLS can be improved to a very high standard using a variety of post-processing methods such as polishing, classic painting, spray painting and varnishing. Their functionality can also be improved by applying a waterproof coating or metal coating.
Advantages and limitations of SLS
Summarizing the above, the key advantages and disadvantages of the technology are given below:
- SLS parts have good, isotropic mechanical properties, making them ideal for functional parts and prototypes.
- SLS does not require support, so complex geometries are easy to print.
- SLS' manufacturing capabilities are excellent for small to medium series production.
- Only industrial SLS systems are currently widely available, so lead times are longer than other 3D printing technologies such as FDM and SLA.