Infill pattern 3d printing
What is the Best Infill Pattern for 3D Printing? – 3D Printerly
Infill patterns are sometimes overlooked in 3D printing because it’s just one part of many settings for your prints. There are several infill patterns but when looking through the list, I wondered to myself, which infill pattern is the best in 3D printing?
The best infill pattern for 3D printing is a hexagonal shape such as Cubic if you are after a good balance of speed and strength. When you determine the function of your 3D printed part, the best infill pattern will vary. For speed the best infill pattern is the Lines pattern, while for strength, Cubic.
There is a little more to infill patterns than I first realized, so I will go into some more details about the basics of each infill pattern, as well as which patterns people view as the strongest, the fastest and the all-round winner.
What Types of Infill Patterns are There?
When we look at Cura, the most popular slicing software out there, here are the infill pattern options they have, along with some visuals and useful information.
- Grid
- Lines
- Triangle
- Tri-Hexagonal
- Cubic
- Cubic Subdivision
- Octet
- Quarter Cubic
- Concentric
- ZigZag
- Cross
- Cross3D
- Gyroid
This infill pattern has a cross-over pattern which creates two perpendicular sets of lines, forming squares in the middle.
- Great strength in the vertical direction
- Good strength in the direction on the formed lines
- Weaker in the diagonal direction
- Creates a fairly good, smooth top surface
The Lines pattern creates several parallel lines across your object, with alternate directions per layer. So basically, one layer has lines going one way, then the next layer has lines going across the other way. It looks very similar to the grid pattern but there is a difference.
- Usually weak in the vertical direction
- Very weak in the horizontal direction except in the direction of the lines
- This is the best pattern for a smooth top surface
An example of how the Lines and Grid pattern are different is shown below, where infill directions are default at 45° & -45°
Lines (rectilinear) infill:
Layer 1: 45° – diagonal right direction
Layer 2: -45° – diagonal left direction
Layer 3: 45° – diagonal right direction
Layer 4: -45° – diagonal left direction
Grid infill:
Layer 1: 45° and -45°
Layer 2: 45° and -45°
Layer 3: 45° and -45°
Layer 4: 45° and -45°
This is pretty self-explanatory; an infill pattern where three sets of lines are created in different directions to form triangles.
- Has an equal amount of strength in each horizontal direction
- Great shear-resistance
- Trouble with flow interruptions so high infill densities have low relative strength
This infill pattern has a mixture of triangles and hexagonal shapes, interspersed throughout the object. It does this by creating three sets of lines in three different directions, but in a way that they don’t intersect in the same position with each other.
- Very strong in the horizontal direction
- Equal strength in each horizontal direction
- Great resistance to shear
- Requires many top skin layers to get an even top surface
The Cubic pattern creates cubes which are titled and stacked, creating a 3-dimensional pattern. These cubes are oriented to be standing on corners, so they can be printed without overhanging internal surfaces
- Equal strength in all directions, including vertically
- Pretty good overall strength in every direction
- Pillowing is reduced with this pattern because long vertical pockets aren’t created
The Cubic Subdivision pattern also created cubes and a 3-dimensional pattern, but it creates bigger cubes towards the middle of the object. This is done so the most important areas for strength have good infill, while saving material where infill is the least effective.
Infill densities should be increased with this pattern because they can be really low in the mid-areas. It works by creating a series of 8 subdivided cubes, then the cubes which are hitting walls get subdivided until infill line distance is reached.
- Best and strongest pattern in terms of weight and printing time (strength to weight ratio)
- Equal strength in all directions, including vertically
- Also reduces the effects of pillowing
- Increasing infill density means infill shouldn’t show through the walls
- Has many retractions, not great for flexibles or less viscous materials (runny)
- Slicing time is relatively longer
The Octet infill pattern is another 3-dimensional pattern which creates a mix of cubes and regular tetrahedra (triangular pyramid). This pattern produces multiple infill lines adjacent to each other every so often.
- Has a strong internal frame, especially where the adjacent lines are
- Models with a medium thickness (around 1cm/0.39″) do well in terms of strength
- Also has reduced pillowing effects because long vertical pockets of air aren’t created
- Produces bad top quality surfaces
The Quarter Cubic is a little more complex in explanation, but it’s quite similar to the Octet Infill. It’s a 3-dimensional pattern or tessalation (close arrangement of shapes) consisting of tetrahedra and shortened tetrahedra. Just like Octet, it also places multiple infill lines adjacent to each other every so often.
- Heavy loads dissapates weight to the internal structure
- Frame is oriented in two different directions, making them individually weak.
- Great relative strength for models with low thickness (few mm)
- Reduced pillowing effect for top layers because long vertical pockets of air aren’t produced
- Bridging distance for this pattern is long, so it can negatively effect top surface quality
The Concentric infill pattern simply creates a series of inner borders parallel to the perimeter of your object.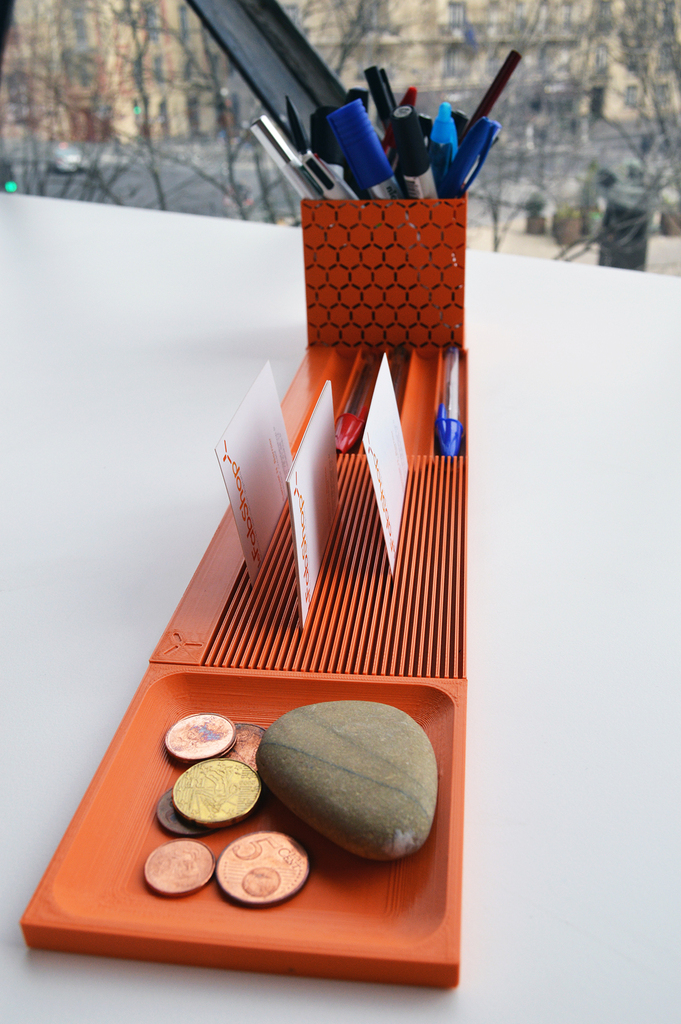
- At an infill density of 100%, this is the strongest pattern as lines don’t intersect
- Great for flexible prints since it is weak and even in all horizontal directions
- Has more strength in the vertical direction versus horizontal
- Weakest infill pattern if not using 100% infill density since horizontal strength isn’t there
- 100% infill density works better with non-circular shapes
The Zigzag pattern simply creates the very pattern as it’s named. It’s very similar to the Lines pattern but the difference is, lines are connected in one long line, resulting in less flow interruptions. Mainly used in support structures.
- When using 100% infill density, this pattern is the second strongest
- Better for circular shapes compared to the Concentric pattern at 100% infill percentage
- One of the best patterns for a smooth top surface, as line distance is very little
- Has a weak strength in the vertical direction as the layers have inadequate bond points
- Very weak in the horizontal direction, other than in the direction the lines are oriented
- Bad resistance to shear, so fails quickly under a load
The Cross infill pattern is an unorthodox pattern which creates curves with spaces in between, replicating cross shapes inside an object.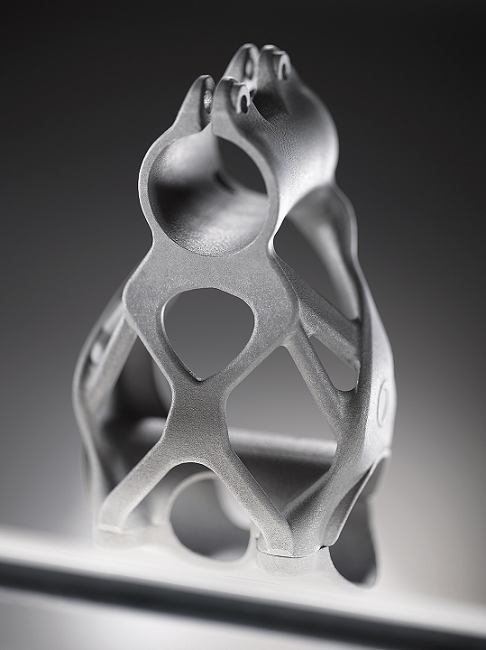
- Great pattern for flexible objects since it is evenly weak-pressured in all directions
- Long straight lines aren’t produced in the horizontal direction so it isn’t strong in any spots
- Has no retractions whatsoever, so it’s easier to print flexible materials with
- Stronger in the vertical direction than horizontal
The Cross 3D infill pattern creates those curves with spaces in between, replicating cross shapes inside the object, but also pulses along the Z-axis making it weaker in the vertical direction.
- Creates even ‘squishy-ness’ in both horizontal and vertical directions, the best pattern for flexibles
- Has no long straight lines so it’s weak in all directions
- Also produces no retractions
- This takes a relatively long time to slice
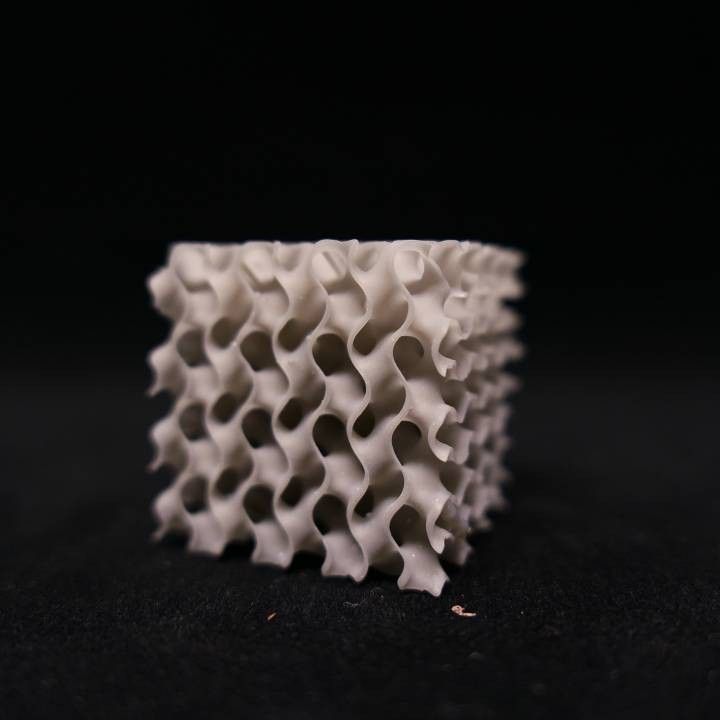
The Gyroid infill pattern creates a series of waves in alternating directions.
- Equally strong in all directions, but not the strongest infill pattern
- Great for flexible materials, but produces a less squishy object than Cross 3D
- Good resistance to shearing
- Creates one volume which allows fluids to flow, great for dissolvable materials
- Has a long slicing time and creates large G-Code files
- Some printers may find it hard to keep up with the G-Code commands per second, especially over serial connections.
What is the Best Infill Pattern for Strength (Cura)?
You’ll find many people arguing over which infill pattern is the best for strength. These infill patterns consist of high strength in multiple directions, usually being categorized as 3-dimensional patterns.
The best candidates that people have thrown out there are usually:
- Cubic
- Gyroid
Luckily it’s a quite short list so you don’t have to go through too many to find your perfect fit. I’ll go through each strength infill pattern to help you decide which to go for. Honestly, from what I’ve researched, there isn’t too much of a difference in strength between these but one does have the upper hand.
Cubic
Cubic is great because of its even strength is from all directions. It’s known as a strong infill pattern by Cura themselves and has a number of variations showing, just how useful it is as an infill pattern.
For pure structural strength, Cubic is very well-respected and popular for 3D printer users out there.
It can suffer from overhang corner warping depending on your model, but generally it prints very smooth.
Gyroid
Where gyroid prevails is its uniform strength in all directions, as well as the fast 3D printing times. The ‘crush’ strength test by CNC Kitchen showed the Gyroid infill pattern having a failure load of exactly 264KG for a 10% infill density in both the perpendicular and transverse directions.
In terms of printing time, there is around a 25% increase compared to the Lines pattern. Cubic and Gyroid have very similar printing times.
It does use more material than Cubic but it’s more prone to printing issues such as layers not stacking.
The high shear strength, resistance against bending and low weight of this infill pattern make it an ideal choice over most other patterns. Not only does it have high strength, it’s also great for flexible prints.
Specific strength tests run by Cartesian Creations found that the strongest infill pattern was Gyroid, compared to 3D Honeycomb (Simplify3D pattern similar to Cubic) and Rectilinear.
It showed that the Gyroid pattern is great at absorbing stresses, at 2 walls, 10% infill density and 6 bottom and top layers. He found that it was stronger, used less material and printed faster.
The choice is yours, but I would personally go for the Cubic pattern if I want maximum load-bearing strength. If you want strength, along with flexibility and quicker prints, Gyroid is the pattern to go with.
There are factors other than infill pattern for maximum strength. CNC Kitchen found the main factor being the number of walls and wall thickness, but it still has a signficant influence.
He found this out by testing a number of different infills, densities and wall thickness and found out just how significant wall thickness was.
This hypothesis also has more evidence behind it with an article written in 2016 on the Effects of Infill Patterns on Tensile Strength.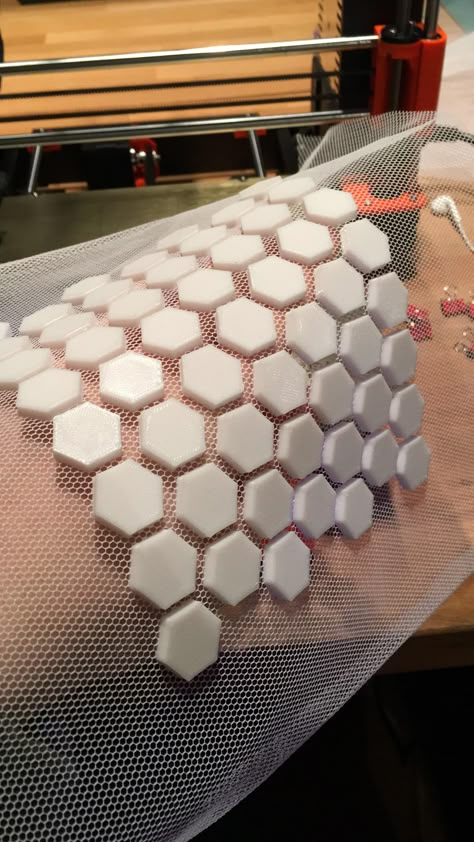 It explains that different infill patterns had a maximum of 5% tensile strength differences meaning that the pattern alone didn’t make too much difference.
Where the main difference came in terms of infill was on the infill percentage. Although, tensile strength isn’t the only strength sought after so this doesn’t mean infill patterns can’t make a difference of more than 5% functionality-wise.
What is the Fastest Infill Pattern for Speed?
If we are looking at the best infill pattern for speed, the clear factors here are which patterns have the most straight lines, less movement and least material used for the print.
This is a pretty easy one to determine when we think about the pattern choices we have.
The best infill pattern for speed is the Lines or Rectilinear pattern, which is the default infill pattern in Cura. Patterns with the most directional changes usually take longer to print, so straight lines print the fastest with great speed.
When we look at the important factor in speed and using the least material, we look at the parameter of the best strength per weight ratio. This means, in terms of strength and weight, which infill pattern has the best amount of strength in relation to how much infill is used.
We wouldn’t want to simply use the least material and have an object that falls apart easily.
Tests have actually been carried out on this parameter, where CNC Kitchen found that the normal Rectilinear or Lines pattern has one of the best strength per weight ratio and uses the least amount of material. The Cubic Subdivision pattern is another contender for using the least material. It creates high density infill around the walls and lower in the middle.
It’s a perfect pattern to have as a default for your prints, other than when you have a specific purpose for functionality and strength. Not only does the Lines pattern or Cubic Subdivision print very fast, it uses a low amount of infill and has good strength.
What is the Best Infill Pattern for Flexible 3D Prints?
The best infill patterns for TPU and flexibles are:
- Concentric
- Cross
- Cross 3D
- Gyroid
Depending on your model, there will be an ideal pattern for your flexible 3D prints.
As previously mentioned, the Concentric pattern works best at an infill density of 100%, but mostly for non-circular objects. It has fairly good vertical strength but weak horizontal strength, giving it the flexible characteristics
The Cross and Cross 3D patterns have even pressure on all sides but the Cross 3D also adds in the vertical direction element, but it does take longer to slice.
Gyroid is great when you are using lower density infills and is useful for a few reasons. It has fast printing times, great resistance to shearing but is less flexible overall, compared to the other flexible patterns.
If you are looking for the best infill pattern for compression then Gyroid is one of the best choices.
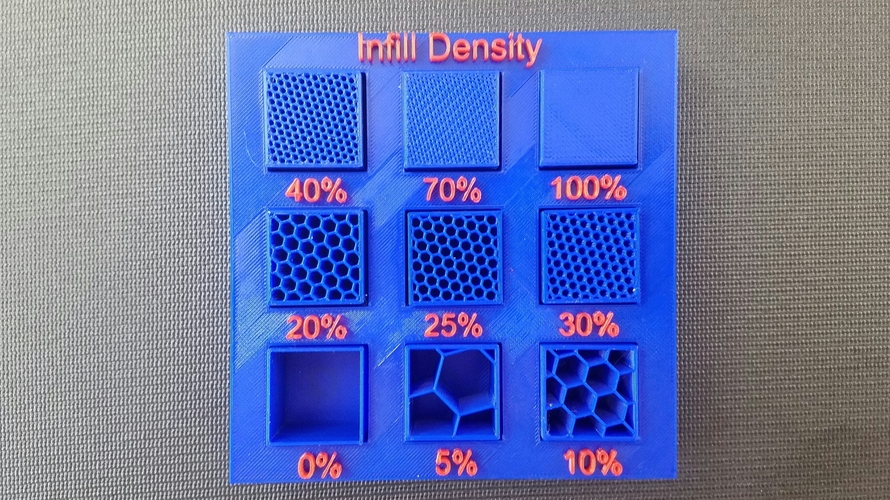
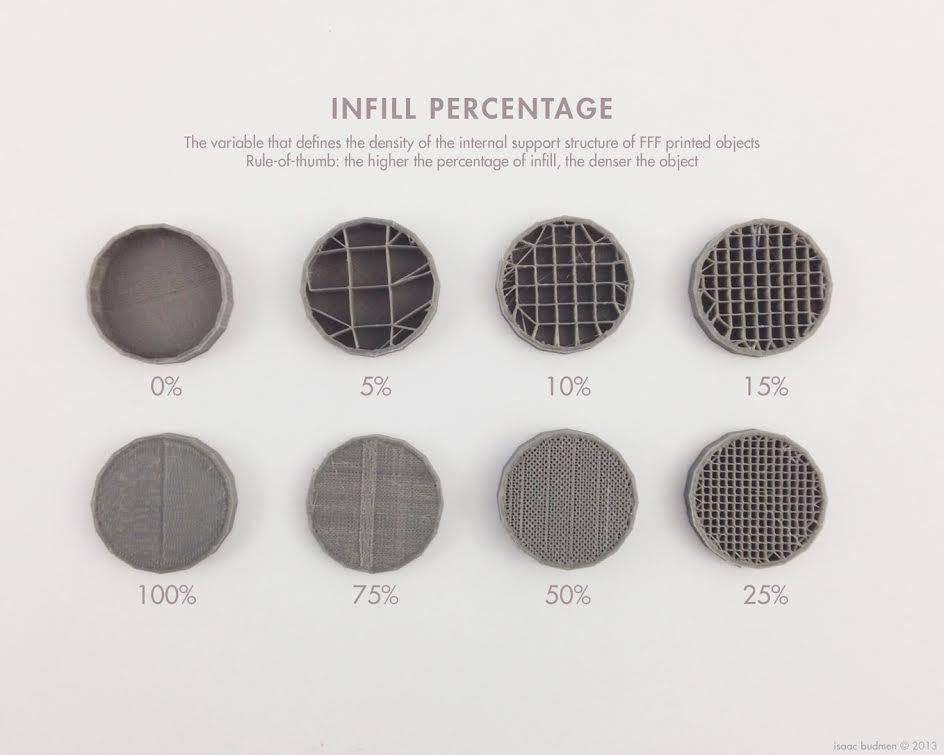
How Much Does Infill Density or Percentage Matter?
Infill density affects a number of important parameters for your 3D printed part. When you hover over the ‘Infill Density’ setting in Cura, it shows that it affects Top Layers, Bottom Layers, Infill Line Distance, Infill Patterns & Infill Overlap.
Infill density/percentage has a pretty significant impact on part strength and printing time.
The higher your infill percentage, the stronger your part will be, but at infill densities over 50%, they become a lot less significant in terms of adding extra strength.
The difference between infill density that you set in Cura has a big difference in terms of what it’s changing in your part structure.
Below is a visual example of 20% infill density vs 10%.
A larger infill density means your infill lines will be placed closer together, which means more structures are working together to give a part strength.
You can imagine that attempting to break apart with low density would be much easier than one with high density.
It’s important to know that infill density varies widely on how it affects a part due to differences in infill patterns.
Basically, a change of 10% infill to 20% infill for a Lines pattern isn’t going to be the same as the same change with a Gyroid pattern.
Most infill patterns have similar weight with the same infill density, but the Triangle pattern showed an almost 40% increase in overall weight.
That’s why people who use the Gyroid infill pattern don’t require such high infill percentages, yet still get a respectable level of part strength.
Low infill densities can result in problems such as walls not connecting to the infill and air pockets being created, especially with patterns that have many crossings.
You can get under extrusion when one infill line crosses another line because of flow interruptions.
Cura explains that increasing your infill density has the following effects:
- Makes your prints stronger overall
- Gives your top surface layers better support, making them smoother and airtight
- Reduces troubleshooting issues such as pillowing
- Requires more material, making it heavier than normal
- Takes a lot longer to print depending on the size of your object
So, infill density definitely matters when we are looking at the strength, material usage and timing of our prints.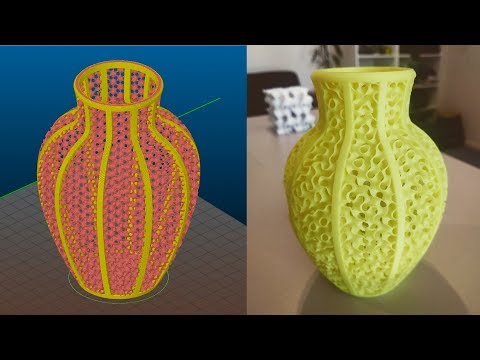 There is usually a good balance to strike between infill percentages, which is anywhere from 10%-30% depending on what you intend to use the part for.
Aesthetic or parts made for looking at require a lot less infill density because it doesn’t require strength. Functional parts require more infill density (up to 70%), so they can handle the load-bearing over a long period of time.
Best Infill Pattern for Transparent Filament
Many people love using the Gyroid infill pattern for transparent filament because it gives a cool looking pattern. The Cubic or Honeycomb infill pattern also looks great for transparent 3D prints. The best infill for transparent prints is usually either 0% or 100% for the model to be more clear.
Here’s an example of the Gyroid infill pattern in a clear PLA 3D print. One user said they also use Gyroid with a 15% infill density.
Clear pla with infill makes for a cool pattern from 3Dprinting
Check out the video below for a great visual on 3D printing transparent filament.
What they are and when to use them
Cura, a free slicing application for FDM 3D printing, is one of the most popular pieces of 3D printing software. Now maintained by Ultimaker, the slicer has over a million users, catering for most types of extrusion printers.
Part of the reason for Cura’s popularity is its range of printing parameters, from advanced travel settings like Z-hop to special printing modes for molds and spiralized outer contours. The slicing software also has a broad range of infill settings covering infill density, infill line direction, and infill pattern.[1]
This article looks at the 14 different infill patterns currently available in Cura, noting their advantages and disadvantages and suggesting when they might be used.
An FDM 3D printer works by extruding and depositing filament in successive layers until a solid 3D object has been built. However, most 3D printed parts aren’t completely dense; instead, their interior is usually a mixture of solid plastic and empty space.
The ratio of plastic to space is defined as a print’s infill density: close to 0% means the part is mostly hollow, while close to 100% means it is mostly solid. Most prints are around 30–50% dense.
But the geometrical structure of the internal plastic is just as important as the density, and this is where infill pattern comes in: the inside of a print can be made up of lines, grids, triangles, and many other 2D or 3D patterns. Not only does the chosen pattern affect print times and material usage, it can also have a big impact on the printed part’s strength, weight, and flexibility.
Recommended reading: Infill 3D printing: All you need to know
At the time of writing, Ultimaker Cura lets users choose between 14 default infill patterns. [2] Cura’s only notable omission is Honeycomb infill, which is available in Slic3r and other applications.
Grid
Strong 2D infill
Cura’s Grid infill pattern is a strong 2D infill that creates a grid on each layer of the print. The Grid pattern resembles the Lines pattern, but there is a major difference: the Lines pattern only prints in one direction per layer, adding perpendicular lines in the subsequent layer, and so on. By contrast, each layer of the Grid pattern has lines going in two directions.
The Grid pattern is used on everyday prints that require a moderate amount of strength and is Cura’s strongest infill pattern in the vertical direction.
3D printed model with Grid infill pattern
Lines
Quick 2D infill
The Lines infill pattern is a fast-printing pattern that uses minimal material. It is suited to visual prints like decorative models.
Sometimes known as rectilinear infill, this pattern prints unidirectional lines on each layer, changing direction 90 degrees for the subsequent layer. This makes a kind of disconnected grid in which layers one, three, five, etc. have lines along one axis, while layers two, four, six, etc. have lines along the perpendicular axis.
Triangles
Strong 2D infill
Cura users can select the Triangles infill pattern for everyday prints as an alternative to the Grid pattern. As its name suggests, the pattern is made up of triangles rather than the squares typical of a grid.
Shear-resistant and strong in every horizontal direction, its main drawback — one shared with Grid — is the interruption of flow at intersections.
Tri-hexagon
Strong 2D infill
The Tri-hexagon infill pattern is suitable for everyday prints. Like the Triangles pattern, it uses three sets of parallel lines. However, these lines are slightly offset, so rather than creating a grid of equally sized triangles, they create a mix of small triangles and large hexagons.
In terms of forces applied in any horizontal direction, this shear-resistant infill pattern is the strongest available in Cura.
Cubic
Strong 3D infill
Cura’s Cubic infill pattern is made up of 3D cubes standing on a corner. This orientation prevents overhangs and results in fairly high strength in all directions. Furthermore, because each cube is enclosed, long pockets of hot air cannot form, which reduces undesirable pillowing of the top layer.
The Cubic pattern is suitable for everyday parts or functional parts which require strength along all axes.
Cubic Subdivision
Strong 3D infill
A “smarter” version of Cubic, Cubic Subdivision is an algorithmically complex pattern designed to use less material and increase print speed while maintaining strength.
Cubic Subdivision features cubes of varying sizes, with the largest cubes (and consequently the least dense areas) placed at the center of the build. It is the best infill pattern for balancing strength with weight reduction and printing time. However, it can take a long time to slice.
Octet
Strong 3D infill
Cura’s Octet infill pattern is made up of tetrahedrons (triangular pyramids) and cubes, creating a very strong internal frame where the edges of these shapes meet. It is particularly suited to thin mechanical parts.
Although boasting high strength, the Octet infill can produce relatively poor top surface quality. This is due to the long required bridging distance: the space that needs filling between solid infill material in order to add the solid shell around the part.
Quarter Cubic
Strong 3D infill
The Quarter Cubic infill pattern comprises tetrahedrons and truncated tetrahedrons.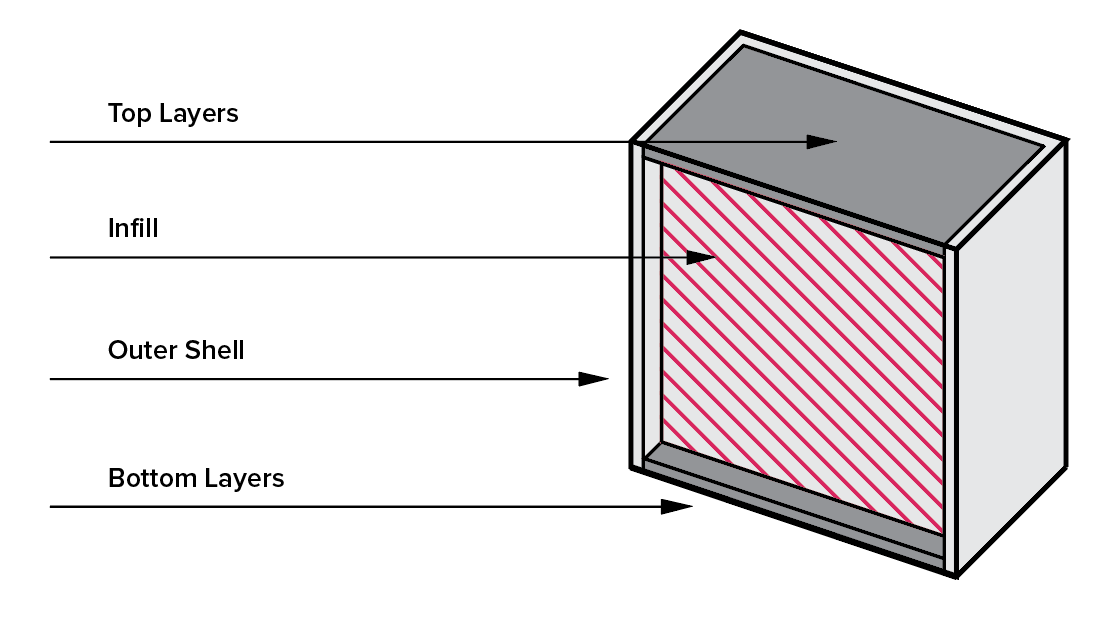 Like the Octet infill pattern, it creates an internal frame to which loads can be dissipated.
It is ideal for very thin functional parts that require a high degree of strength, but top surface quality can suffer due to the long bridging distance.
Concentric
Flexible 3D infill
Cura’s Concentric infill pattern creates concentric rings that follow the shape of the outer walls. When printed at low infill density, it has very low strength in all directions and is therefore suitable for flexible parts, which are designed to bend. (A higher infill density will create a more rigid part.)
Conversely, this infill pattern actually produces the strongest prints at 100% infill, as the lines do not intersect and can evenly distribute loads.
Zig-zag
Quick 2D infill
The Zig-zag infill pattern is similar to the Lines pattern, except the lines are joined up, as the nozzle turns and goes back on itself when it reaches an outer wall (rather than starting a new line).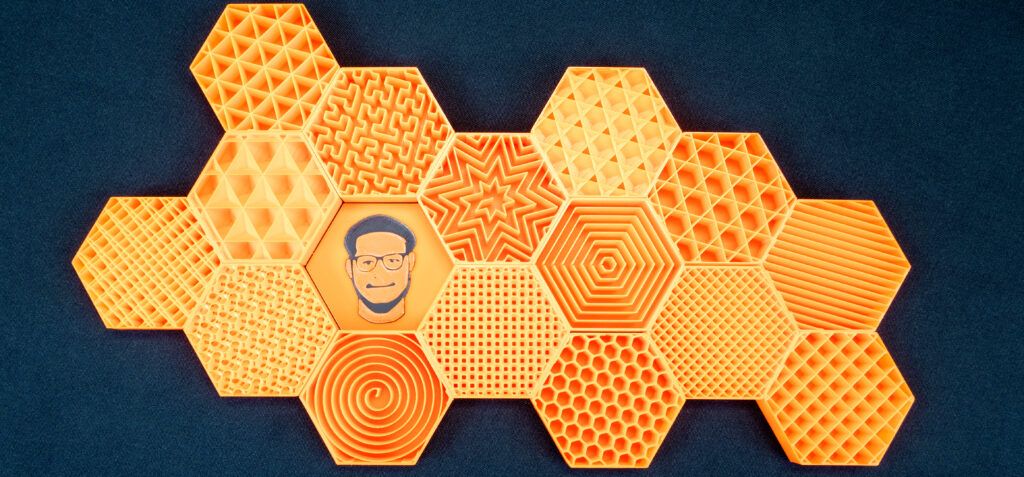 Zig-zag is fast and suitable for visual-only prints.
One potential advantage of Zig-zag over Lines is that the nozzle does not have to retract filament and travel. This reduces the chances of oozing, particularly with low-viscosity filaments like PETG, although it does use fractionally more material.
Cross
Flexible 2D infill
Designed for printing flexible filaments with a low infill percentage, the Cross infill pattern creates a pattern without any long straight horizontal lines. This produces a high level of flexibility across all horizontal directions, with a minimal amount of strength throughout.
The Cross pattern does not require retraction, which prevents oozing of flexible materials. However, a disadvantage of the 2D pattern — for flexible parts, at least — is its relatively high strength along the Z-axis, making it less flexible in the vertical direction.
Cross 3D
Flexible 3D infill
The undesirable vertical strength of the Cross pattern is eliminated in the Cross 3D pattern — with the caveat of longer slicing times.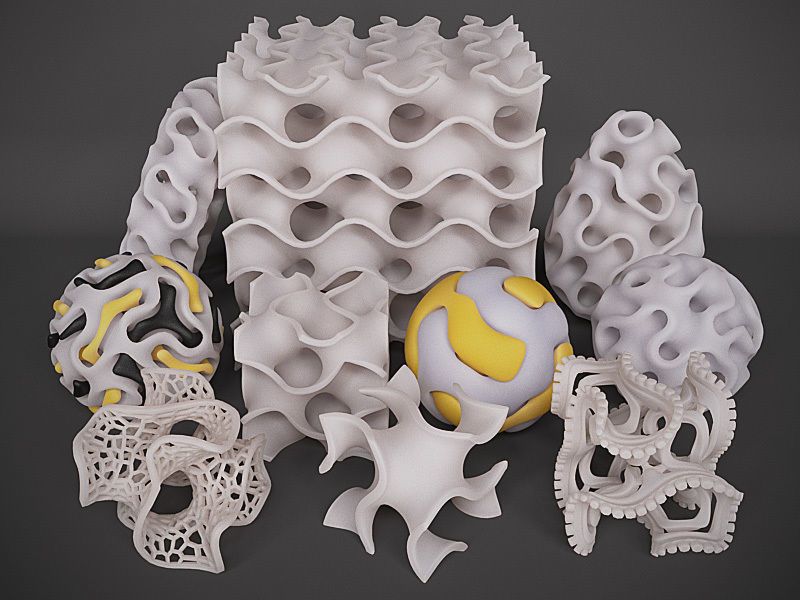 Cross 3D is weak (and therefore flexible) in all directions.
Cura’s Cross 3D infill pattern is better than Cross or Concentric for part flexibility. Like Cross, it does not require retraction and is therefore resistant to oozing.
Gyroid
Strong 3D infill
The Cura Gyroid high-strength infill pattern creates wavy lines of alternating directions. It is shear-resistant and strong in all directions, but not stiff, making it suitable for some flexible materials (though its flexibility is lower than the three dedicated flexible infill patterns).
Many Cura users favor Gyroid for its aesthetics, especially with transparent filaments where the internal geometry is visible. However, Gyroid infill is algorithmically complex, so slicing the 3D model can be slow.
Recommended reading: Understanding the Gyroid Infill in 3D Printing
Lightning
Quick experimental infill
The newest Cura infill pattern, released in December 2021 as part of Cura 4.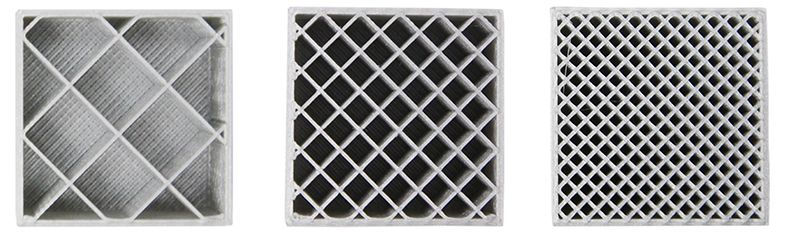 12, is a kind of topology optimization tool that generates jagged internal support structures with the sole purpose of supporting the top of the build.
Lightning infill uses minimal material, resulting in faster and more lightweight prints. It is suitable for low-strength parts like visual prototypes.
Infill patterns affect part strength because not all geometries are equally strong. A triangle, for instance, is more stable than a square, because it is the only rigid polygon: two sides always support the other.
The Triangles infill pattern provides strength and stiffness
A 2019 academic study measured the yield strength of printed PLA using Grid, Tri-hexagonal, and Concentric infill patterns. The researchers found Concentric to have the highest yield and ultimate strength at all densities, with Grid outperforming Tri-Hexagonal at 25% and 50% density and Tri-Hexagonal outperforming Grid at 75% density.[3]
In 2020, another study carried out low-velocity impact testing and compression testing of 60% density PLA, using the Triangles, Grid, Quarter Cubic, and Tri-hexagon infill patterns.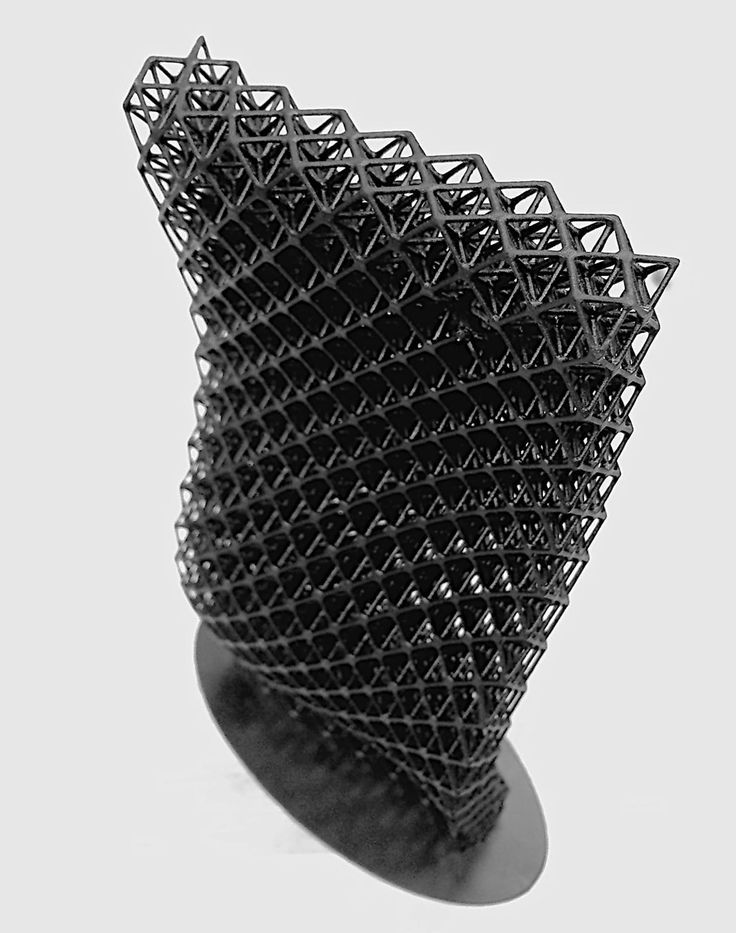 It found that Triangles exhibited the highest stiffness (668.82 N/mm) and could absorb the most energy in the impact testing, while Grid exhibited the highest compressive strength (72 MPa).[4]
Finding the right infill pattern for a build depends on the purpose of the 3D printed part, in addition to factors like material and part geometry. These are the best infill patterns for certain priorities:
Print speed: Zig-zag, Lines, Lightning
Least amount of filament: Lightning
Toughness: Gyroid
Stiffness: Tri-hexagon, Cubic
Strength by weight and printing time: Cubic Subdivision
Strength in vertical direction: Grid
Strength in horizontal directions: Tri-hexagon
Strength at 100% density: Concentric
Flexibility: Cross 3D
Top surface quality: Zig-zag, Grid
Cura’s 14 default infill patterns provide users with a great deal of flexibility in terms of print speed, material usage, and fine-tuning the mechanical properties of a part.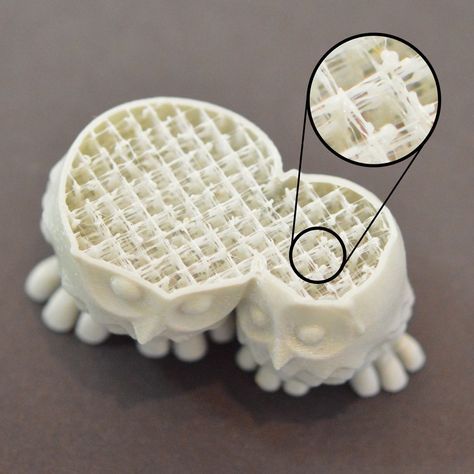 Fast, visual-only prints are suited to patterns like Zig-zag, functional parts are best served by 3D patterns like Cubic Subdivision, while flexible parts benefit from infill patterns such as Concentric.
[1] Infill settings [Internet]. Ultimaker Support. Ultimaker; 2020 [cited 2022 Feb 23]. Available from: https://support.ultimaker.com/hc/en-us/articles/360012607079-Infill-settings
[2] Ghostkeeper. Settings Guide [Internet]. GitHub. 2019 [cited 2022 Feb 23]. Available from: https://github.com/Ghostkeeper/SettingsGuide/blob/master/resources/articles/infill/infill_pattern.md
[3] Rismalia M, Hidajat SC, Permana IGR, Hadisujoto B, Muslimin M, Triawan F. Infill pattern and density effects on the tensile properties of 3D printed PLA material. Journal of Physics: Conference Series. 2019 Dec;1402:044041.
[4] Aloyaydi B, Sivasankaran S, Mustafa A. Investigation of infill-patterns on mechanical response of 3D printed poly-lactic-acid.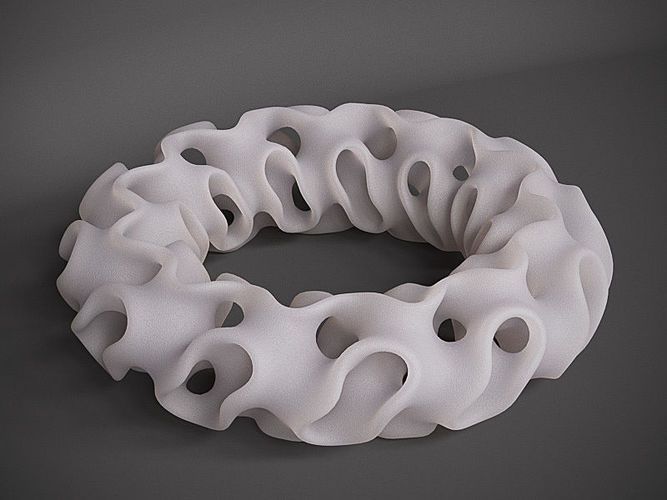 Polymer Testing. 2020 Jul;87:106557.
What is a fill pattern in 3D printing?
3DPrintStory 3D printing process What is a fill pattern in 3D printing?
Quite often, 3D printing is used to produce parts that can be easily produced using another manufacturing technology. However, while the end results may look the same on the outside, what's on the inside can be drastically different.
The main advantage (and necessity) of 3D printing is that parts can have different degrees of filling with material. From a production standpoint, this reduces the amount of material needed and the cost as well as the weight of the final product. And in terms of 3D printing, it saves valuable time!
What's inside the outer shell of a 3D printed model is called infill. It can be adjusted by the ratio of density (0% - emptiness, 100% - solid) and pattern.
Next, we'll take a look at the various fill patterns, in particular those available in Cura.
What filling options are available?
In the latest version of Cura (4.5), 13 infill types are available. They are grouped below according to what they are best suited for:
- Models and figurines (low strength): Lines, zig-zag ;
- "Standard" 3D models (medium strength): Grid , triangles , tri-hexagon ;
- Functional 3D models (high strength): Cubic , cubic subdivision , octet , quarter cubic , gyroid ;
- Flexible 3D models: Concentric , cross , cross 3D .
Models and figurines
Recommended infill density: 0-15%
3D models that are used as models or figurines usually do not require special strength, as they are not subjected to heavy operating conditions and are not subjected to heavy loads .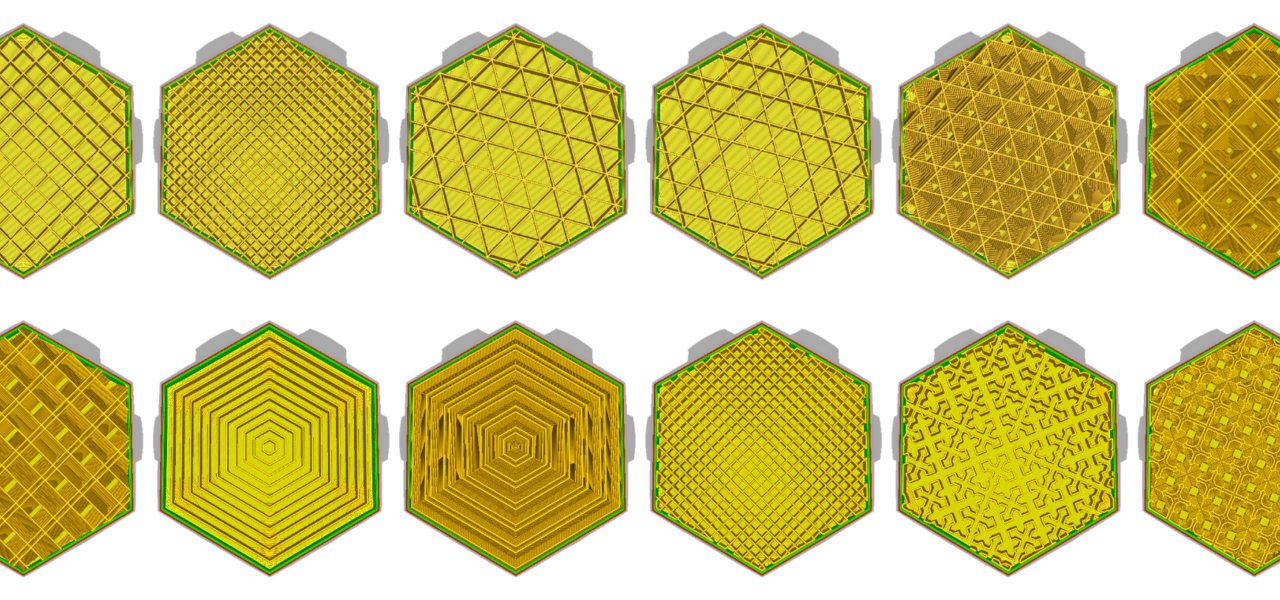
For these 3D printing options, lines or zig-zag fills are best because they provide the fastest 3D printing.
Similar to the "rectilinear" in other slicers, both templates create a 2D grid where 3D prints only along one axis on one layer. The difference between the two is that lines create multiple lines per layer, while a zigzag is just one continuous line (unless interrupted by a pattern).
Models or figurines work well with simple filling patterns. Prototypes of your future parts are also good candidates, given that they do not need to be tested for durability.
"Standard" 3D models
Recommended infill density: 15-50%
For 3D models subjected to low stresses, such as the media guide above, use a medium strength infill pattern. The most appropriate fill options are grid, triangles, or tri-hexagon. However, please note that these patterns can increase print times by up to 25% compared to lines.
- grid: A clear 2D template.
 The main advantage is the speed of 3D printing, as it is the least complex of the three;
 - triangles: A 2D mesh made up of triangles. This pattern infill option has an inherent strength advantage when a load is applied perpendicular to the object's surface. It makes sense to use for parts with thin rectangular components that might otherwise have very few connections between the walls;
- tri-hexagon: This 2D fill option creates hexagons interspersed with triangles. One of the advantages is that hexagons are a very rigid geometric figure, which ensures high strength of the finished product. In addition to this, the tri-hexagon filling gives shorter lines to connect each side, resulting in fewer bending issues due to poor cooling during 3D printing.
Functional 3D prints
Recommended infill density: > 50%
Functional 3D prints such as a shelf bracket require high strength in many directions. Excellent candidates for fill patterns include: cubic, cubic subdivision, octet, quarter cubic, gyroid.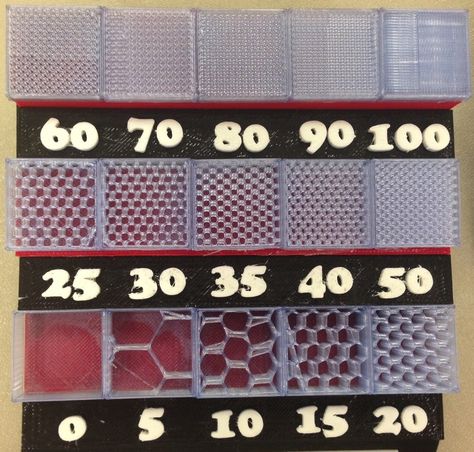
- cubic: this is a three-dimensional pattern of stacked and tilted cubes;
- cubic subdivision: this is a variant of the cubic type that uses less material;
- octet: This pattern variant, also known as tetrahedral infill, combines pyramid shapes;
- quarter cubic: this three-dimensional pattern is similar to the octet, but half of the pyramidal shapes are offset from the other half;
- gyroid: A unique 3D pattern that gives the impression of waves. However, it handles loads equally well in many directions. Thus, this infill pattern will be a good choice for a part that will be subjected to various loads.
The above 3D model infill options are often used even at lower infill densities due to their aesthetic appeal. Some people just like the effect of the internal pattern, which can be observed directly during 3D printing.
Flexible 3D models
Recommended infill density: 0-100% (depending on how “soft” you want the final product to be).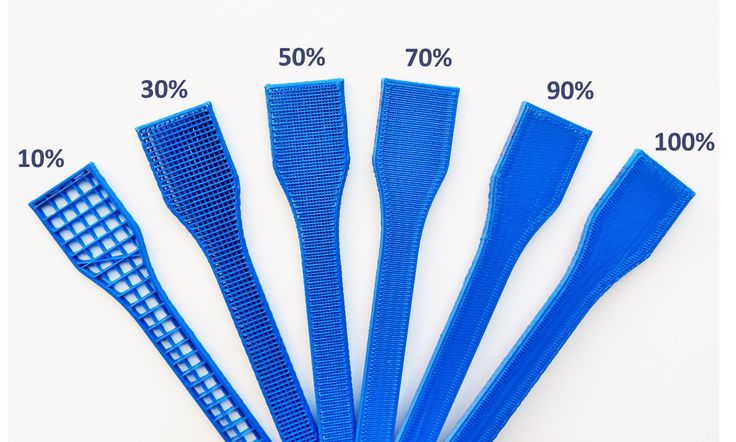
For flexible materials such as soft PLA MatterHacker, flexible infill patterns must be used to maintain the flexible nature of the print. Fill patterns such as concentric, cross, cross 3D are best for these types of 3D models.
- concentric: This 2D pattern creates "waves" within the print, mimicking the shapes of exterior walls. This is very similar to how a stone thrown into water leaves concentric circular waves on the surface;
- cross: Another 2D pattern that creates a grid of very fancy crosses. The gaps between the crosses and gratings allow bending and twisting;
- cross 3D: This 3D pattern is similar to a cross, but as the 3D model grows, the lines move at an angle. The end result is an object with a bit more rigidity.
Tips and Tricks
The choice of fill pattern for a 3D model is important, but that's not all. Here are a few things to keep in mind the next time you're configuring Cura's 3D print settings.
Fill Line Direction
One of the often overlooked fill settings is the fill line direction. The default is 45° so that both X and Y motors work together to print infill at maximum speed. However, it may be more useful to orient the infill at a different angle to maximize the strength or flexibility of the part, especially if its walls are aligned diagonally.
Gradient Fill vs. Gradual Fill
When it comes to fill, we usually think of it as uniform throughout the inside of the part. However, this should not be the case.
Using gradient infill, you can set up 3D printing with a higher infill density around the perimeter. Generally speaking, this should maintain the effective strength and stiffness of the part while using less material. This option is not built into Cura, but it can be implemented relatively easily with a Python script.
Gradient fill should not be confused with gradual fill, which provides something similar, but along the Z axis rather than the X and Y axes. In other words, this option makes the fill denser at the top of the 3D model compared to the bottom.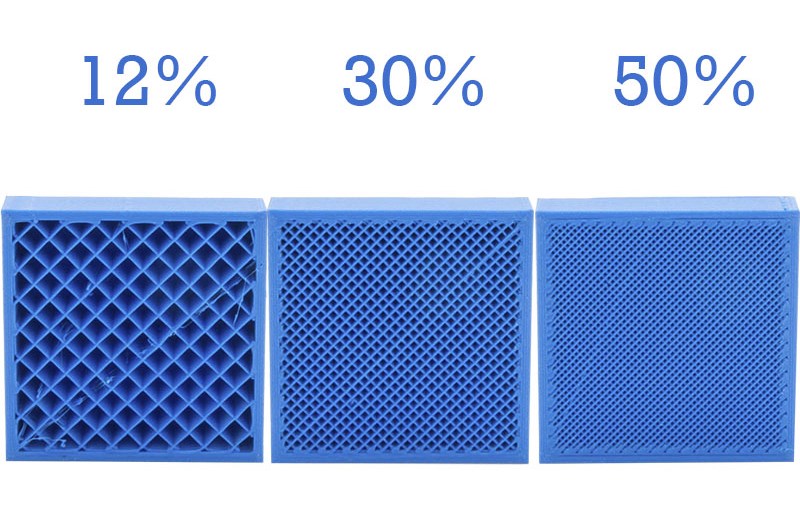 It can save material and time while maintaining sufficient strength.
Multiple filling density settings
Since the release of the fourth version of Cura, it has been possible to set the settings for each model. This allows for some neat design tricks, including multiple infill types and densities in a single model.
With the ability to set custom settings for each imported model and Cura's ability to easily combine them together, specialized support can be provided in specific areas.
While this will certainly require a lot of manual work and tweaking, this feature may become easier to use in the near future.
What is infill in 3D printing and how to properly set it up on a 3D printer.
top sellers
-
Bearing 604UU U604ZZ
U-bearing U604ZZ 604UU 4*13*4
35.
 00 UAH
 -
Thermal mat for 3D printing 200 x 200 mm
Thermal mat for 3D printing
150.00 UAH
-
Buy epo3d+ 3D printer
Epo3d+ Ukrainian FDM 3D printer on HIWIN rails. Thanks to reliable...
UAH 35,000.00
-
ABS granules
ABS granules for extrusion
400.00 UAH
-
PLA
PLA environmental plastic from Plexiwire.
 100% advance payment....
 UAH 375.00
-
Buy ABS plastic (ABS)
ABS plastic from Plexiwire. 100% prepayment. Free shipping...
UAH 220.00
-
Mini motor reducer 12v 100 rpm
high torque mini electric motor. Its size is...
150.00 UAH
-
Nozzle for 3D printer 1.75 mm, for E3D and MK8 hotends
Nozzle for 3D printer 1.75 mm 0.2/0.3/0.4/0.5
35.00 UAH
-
PETG plastic for 3D printer
PETG plastic from Plexiwire.
 100% prepayment. Free...
 UAH 360.00
-
SHF-20 shaft support
SHF-20 shaft support for CNC
60.00 UAH
-
A4988 stepper motor driver
35.00 UAH
-
Buy epo3d 3D printer
Ukrainian epo3d 3D printer built on the basis of modern kinematics...
UAH 18,000.00
All best sellers
Information
What is infill in 3D printing and how to properly set it up on a 3D printer.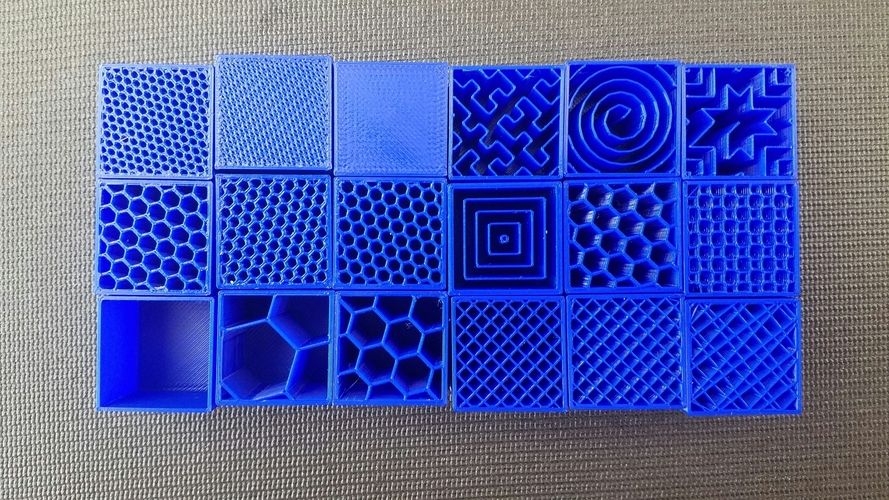
In 3D printing, the internal filling is a very important factor for the strength, structure and weight of the finished model. In this article, we will look at the various forms and types of filling to find out why and for what they are needed.
Target
In addition to the sealing function, infill also changes weight and allows
3D printers to reliably print flat horizontal edges over empty space. Without it, 3D models would not have robust structure and stability, and would be incredibly fragile.
Infill is perhaps one of the most significant factors in 3D printing. It comes in a variety of shapes and patterns, densities and styles. Its optimization can be a difficult task. However, with certain knowledge and settings, it will significantly improve the result.
Styles
Each 3D infill pattern has strengths and weaknesses, and each is applicable in its own way. There are several fairly standard patterns.
Because 3D infill takes up space within an object, it should be chosen for quality improvement, not aesthetics. To do this, it is better to use patterns that include grids, lines, honeycombs, as well as rectilinear or concentric patterns.
When set correctly, they provide enough volume for 3D printing between gaps. This allows the 3D printer to print on voids more accurately and with fewer errors.
Density
Once you've decided on the look of your drawing, the next step is to set the saturation of your 3D print, which is measured as a percentage. 0% is a hollow model and 100% is a solid print. Of course, there are many levels in between, and adjusting this value is incredibly useful.
One very obvious use is to vary the mass of a 3D product. Higher density makes heavier and harder 3D printing. On the contrary, a lower one will provide a simple and easy result.
Standard 3D infill is 20% to 25%. This strikes a good balance between durability and consumable material. If the composition does not matter, then you can take settings from 10% to 15%.
None of these ranges provide very much support, so don't use them if your subject needs to be rigid.