How much should i charge for 3d printing
How Much Should You Charge For A 3D Print? Calculator. – My3DLife
This is a guide for at-home 3D printers that are making parts for individual sales. This basically means that I will not be taking rent/lease/mortgage, internet, or machine cost into the calculation. This is purely cost per hour to run the 3D printer plus materials cost to give a fair evaluation of how much to charge for 3D prints and is not scaled for industrial factors or business expenses.
The simplest calculation to charge for a 3D print is (Filament Cost + Electricity Cost) times 3 plus the cost of programming, machine time, post-processing time, and adhesion materials. You should also have a predetermined minimum charge, $5.00 is a customary minimum charge.
The most expensive cost associated with 3D printing is time for setup, programming, and post-processing. You need to determine for yourself what a fair and reasonable hourly charge is for your own labor.
I have broken down the cost of 3D printing below.
Large 3D Print Cost Analysis.
Let’s assume we are printing out a 300% Benchy that is 144mm tall (5.669in). The print will take $6.24 in filament, $0.63 in electricity, 10 minutes in setup time ($1.66), 34.5 hours of machine time ($34.50), 0 hours post-processing time, and $0.50 in adhesion materials.
300% 3DBenchy = (($6.24 + $0.63) x 3) + $1.66 + $34.50 + $0.50 = $57.27
$57.27 probably sounds like a lot of money but I think you will find that this is actually a pretty good deal considering what other companies are charging for similar prints.
If you are wanting to do the friends and family discount and only charge for cost then only charge for filament, electricity, and adhesion materials.
300% 3DBenchy F&F discount. = $6.24 + $0.63 + $0.50 = $7.37
Small 3D print Cost Analysis.
Now let’s look at a much smaller %50 3DBenchy that is only 24mm tall. The print will take $0.05 in filament, $0.02 in electricity, 10 minutes setup time ($1. 66), 0.66 hours machine time ($0.66), 0 hours post-processing time, and $0.50 in adhesion materials.
50% 3DBenchy = (($0.05 + $0.02) x 3) + $1.66 + $0.66 + $0.50 = $3.03 (Or your $5.00 minimum).
50% 3DBenchy F&F Discount = $0.05 + $0.02 + $0.50 = $0.57
How Much Does 3D Printing Cost Per Gram?
3D printing typically costs $0.02 to $0.05 per gram for FDM printers and $0.03 to $0.06 per gram for SLA printers. The difference per gram doesn’t seem to make a large difference but for a larger print, it builds quickly.
For example, a 3DBenchy at 20% infill is 13g of filament which means it would cost $0.26 to $0.65 for FDM and 0.39 to 0.78 for an SLA printer.
What Costs Should Be Considered When 3D Printing?
The main costs that should be considered when 3D printing is Filament Cost, Electricity, Machine Time, Programming Time, Post-Processing, and Adhesion Materials. If you are selling your prints just at cost then only calculate Filament Cost, Electricity, and Adhesion Materials.
How Much Filament Does A 3D Printer Use?
The easiest way to calculate how much filament you are using is by inputting the variables into your slicer settings. Most slicers have the ability to calculate the cost of the filament by using the cost of a spool of filament divided by the grams of filament on the spool times the material density times the grams of filament used.
For example, if a spool of filament costs $24.00 for a 1kg spool of PLA filament (1000g) and you are printing a 3DBenchy that is 13g of filament. (24.00/1000)*1.24*13 = $0.38
Cura
In Cura go to Settings > Extruder 1 > Material > Manage Material (or click Ctrl + K). From this window in the General tab, you can change the currency by simply erasing the currently inputted value with your desired currency. In the Materials tab, select your material type, input the cost of your filament spool as well as the amount of material on the spool. (In Cura, the slicer automatically calculates the material density for you when you select your material type.)
When you slice your model the grams of filament used, length of material used, and cost of material will be in the same window where the slice button was.
Slic3r
In Slic3r go to Settings > Filament Settings (or click Ctrl+2) here you can input your filament diameter (typically 1.75mm), the cost per kg, or your filament, as well as your material density which you can find here.
After you export your G-Code Slic3r will create a Print summary in the lower right-hand side of the software that will show you the length of filament used, the grams of filament used, and below that the cost of the print.
PrusaSlicer
In PrusaSlicer go to the Filament Settings tab. Here you can input your filament cost per spool as well as the amount of material on the spool. You will also need the filament density which can be found here.
When you slice your model the length of filament used, grams of filament used, and cost of filament will show in the lower right corner.
As you can see from all 3 of these slicers the numbers are not exactly the same for all of them. This is because the infill pattern is slightly different. The most user-friendly and probably the most popular is Cura. My least favorite of these 3 is Slic3r, it feels very outdated and not very user-friendly.
How Much Electricity Does A 3D Printer Use?
Electricity doesn’t play a massive role in the cost of 3D printing but I believe that the cost should still be considered especially on larger prints or on 3D printers that use more electricity. I have already created a calculator just for figuring the cost of electricity for your 3D prints which can be found here.
What Is A Good Hourly Rate For 3D Printing?
A good fixed rate for machine time is $0.50 to $1.00 per hour depending on the complexity of the print.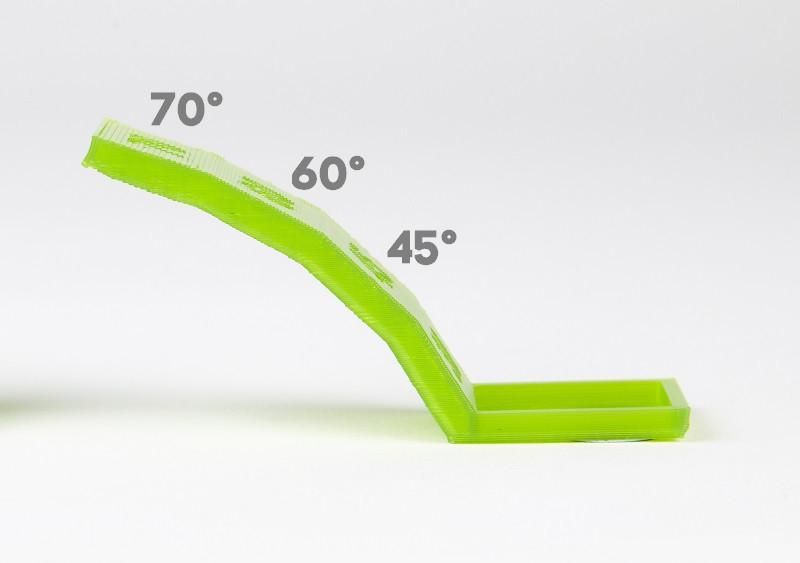 I also think it is wise to have a $5.00 minimum on all 3D prints. There is no real exact number for how much you should charge per hour so you might have to gauge your market to see what is acceptable.
How Much Time Does It Take To Program A 3D Printer?
Typically programming and starting a 3D printer will take less than 10 minutes. If there are special requirements or modifications that need to be made that cost for time and resources can be passed down to your customer and you should charge them your hourly rate.
How Much Should I Charge For Post-Processing 3D Prints?
For Post-Processing a 3D print you should charge an hourly rate that you will determine yourself. If this hourly rate is projected to be too high for your customer then you can always recommend they take care of the post-processing themself.
How Much Should I Charge For Adhesion Materials For 3D Prints?
The cost of adhesion materials for 3D printing are painters tape and stick glue which is usually a very cheap item. You can get a stick of glue for about $1.00 and a roll of painter’s tape for about $5.00. The easiest way to charge for these items is a flat rate of $0.50 per print.
How to calculate 3D printing costs?
We often see online discussions about the price of 3D prints, or more specifically: how to calculate the price for having something 3D printed. Since there are many myths floating around, we figured out that many people will be interested in a deep dive into various aspects of this field. So, how do you set the right price for a 3D print? We’ll take you through the main aspects of 3D printing pricing that affect the price, however, if you’re not really keen on learning every single detail, feel free to scroll down to the end – we have a small surprise for you there.
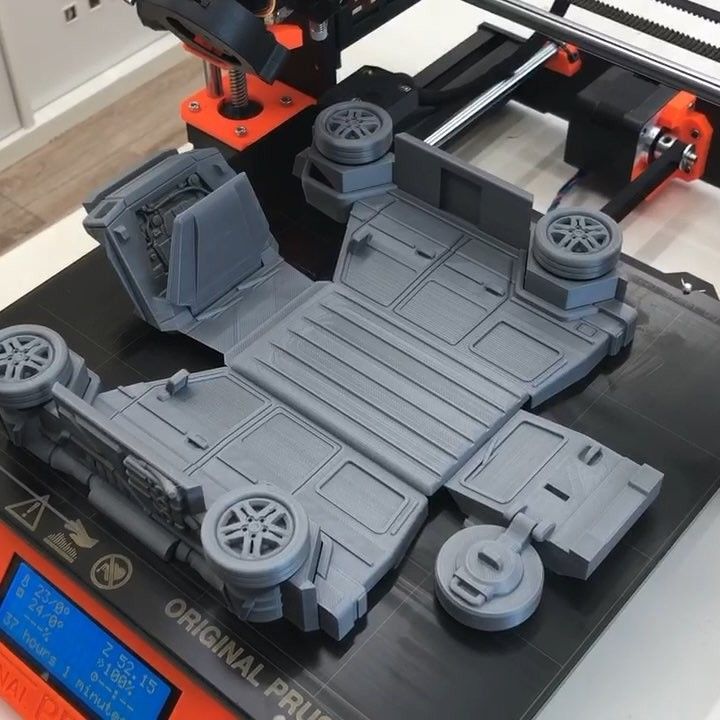
Let’s imagine a purely hypothetical example of a certain Josef from Prague (any similarities to actual persons or places are purely coincidental), who bought three 3D printers to make some profit: he has the Original Prusa i3 MK3S, Original Prusa MINI, and the Original Prusa SL1.
A customer ordered this test object from Josef and wishes to know the price of the object printed on the printers mentioned above. It should be printed with Prusament PLA Orange (MK3s and MINI) and with Prusa Orange Tough resin (SL1).
Material costs
Josef already knows that the most expensive aspects are manpower and filament (or resin). Filament and resin prices depend on the manufacturer’s pricing, which makes counting the material costs very simple. 1kg of Prusament PLA Orange costs 24.99 USD (without tax and shipping) and according to PrusaSlicer, one tree frog model consumes 6.27 g of filament (basic settings – 0.15mm layer height, 15% gyroid infill).
Josef simply calculated (24.99 / 1000 * 6,27) that material for one tree frog on the MK3s or MINI will cost him 0.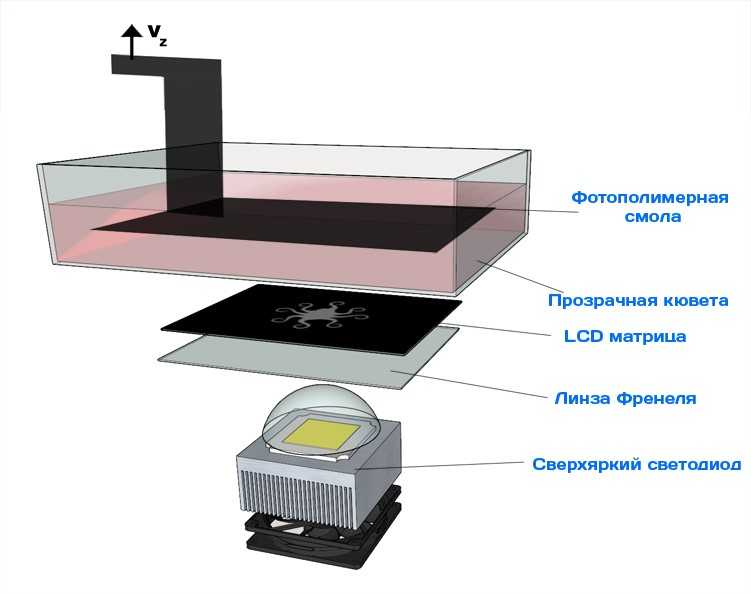 15 USD. Printing a tree frog without supports on the SL1 (0.05mm layer height) will consume 10.43 ml resin – this costs 0.6 USD. If the customer wants to print it with other materials, the price could rise a lot. There are filaments with a price exceeding 90 USD/kg and resins more expensive than 315 USD/kg.
The bottom line here is pretty simple: Material cost = filament price / filament weight (g) * model weight (g)
Manpower costs
Josef values his work at 9.50 USD/hour (calculated from average wage in the Czech Republic for the year 2020). He already knows that print preparation (including slicing) takes him approximately 5 minutes (10 minutes in case the resin in the SL1 needs to be changed). Therefore, he calculated the work on one treefrog to 0.8 USD for MK3s/MINI and 1.6 USD for SL1. It’s not too expensive to prepare small models downloaded from the internet. However, it’s important to know that plenty of models require more difficult print preparations.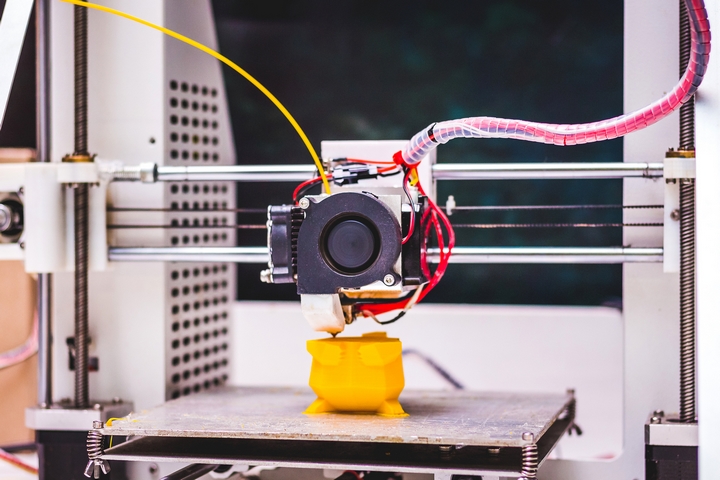 Even slicing alone can take even 30 minutes or more – e.g. preparing supports for SLA printing using manual supports can take a long time.
The price for human labor can, in many cases, reach dozens of USD, especially in cases when something completely new has to be designed. Even a relatively simple technical part can take several hours to draw, which increases the price dramatically.
3D printer operation costs
Another thing that Josef calculated was 3D printer operation costs. He started with electricity: according to the local electricity distributor’s rates, 1 kWh costs from 0.07 USD to 0.09 USD. Let’s work with 0.09 USD. The printer input power depends on several factors, however, most of the time it needs around 100-150 W. Printing a tree frog on the MK3s takes 1h 16 min, 1h 10min on the MINI, and 1h 48 min on the SL1. With 150W power input (usually it’s not that much), electricity for printing one tree frog will be less than 0,023 USD. Such a low price is practically negligible.
On the other hand, Josef would like to recoup the money he spent on buying his printers within 6 months (4392 hours) of printing. This led him to add a fixed fee to printing hour costs. The fee (based on our actual printer prices) is 0.21 USD/hour for the MK3S, 0.1 USD/hour for the MINI, and 0.36 USD/hour for the SL1.
3D printer operation costs = Printer price / required investment return time (h) * print time (h)
Electricity cost = negligible
Margin
Josef is still afraid that his investment might not return with these prices. There are other factors coming into play as well: for example, a printing accident could occur, causing the loss of filament. Or there may be extra maintenance costs. The most common issues are usually print quality problems (e.g. printing large ASA-based objects can lead to warping etc. ). You can head over to our older articles about print quality and troubleshooting.
In other words, it’s not easy to calculate a price that would cover all potential issues and/or mistakes. It largely depends on the user’s experience and many other factors. In this case, Josef has to observe what percentage of prints tend to fail over a long period, and what do these failures cost him. However, for starters, he set the margin to be 30% of the material (filament or resin) price.
So, let’s sum up the order: Josef charged the customer the following prices: 1.3 USD (MK3s), 1.16 USD (MINI), and 3.15 USD (SL1), tax not included. Certainly, there will be many people who see it differently – there are customers who won’t pay larger sums of money and there are makers who don’t see it profitable enough.
The purpose of this guide is to give you an overview of all things you should take into account when calculating the costs. Basically, you need to include the material costs, time spent on print preparations, and some kind of “failure insurance”, plus general running costs. The price for energy consumed is almost negligible. Really long prints will be around a dollar, tops. Obviously, we did not include taxes – if you want to start a business with commissioned 3D printing, you need to check your country’s laws regarding this kind of work.
Here’s a complete recap of Josef’s order:
Material: 0.15 (MK3s) + 0.15 (MINI) + 0.6 (SL1) USD
Labor: 0.8 (MK3s) + 0.8 (MINI) + 1.6 (SL1) USD
Printer operation: 0.27 (MK3s) + 0.12 (MINI) + 0.65 (SL1) USD
Margin (30% of material cost): 0.05 (MK3s) + 0.05 (MINI) + 0.18 (SL1) USD
Total: 5.42 USD
Finally, let’s see how the price would change if the customer wanted to have a truly large and complex model printed on the MK3s.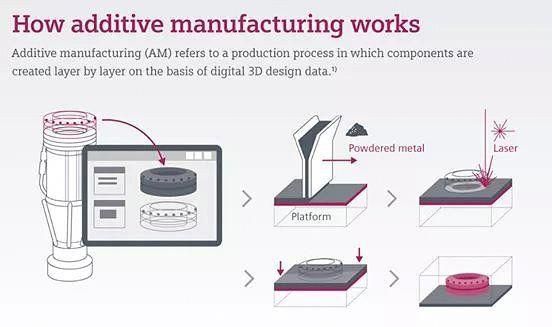 Again, it’s a downloaded model, which is pretty much ready to print, however, it takes 1 day, 17 hours, and 48 minutes to finish. The material of choice is a non-standard carbon fiber composite material XT-CF20, which costs 49.99 USD and we will need 756 g to finish the print. Other values necessary for the calculation remain the same:
Material: (49.99 / 750) * 756 = 50.39 USD
Labor: 0.8 USD
Printer operation: 0.21 * 41.8 + 0.023 * 41.8 = 9.74 USD
Margin (30% of material cost): 50,39 * 0,3 = 15,12 USD
Total: 76.05 USD
It comes as no surprise that larger objects and expensive materials also mean much higher final prices, even though the price for labor stays the same. Printer running/maintenance costs gradually increase with printed hours. Similarly, the price can increase even with seemingly simple parts, if it needs more of Josef’s time (for example drawing the part, manual editing of supports etc. ).
).
3D print calculators
We know that there’s a lot of things to cover, so this is why we made this handy 3D Printing Price Calculator! It’s incredibly easy to use: just fill in the data and it will give you the result immediately! You can set every necessary attribute there and you can share your results with other people. The calculator can also import existing G-codes, saving you even more time. Give it a go!
Do you use 3D printing to make a living? Share your experience with pricing and general thoughts in the comment section – we’re sure that many others will find it useful!
Happy printing!
3D printing cost calculation
Although I posted the link in the discussion of the parallel topic of comrade 3D_MPL (Cost of 3D printing. Calculator for calculating from 3D-MPL), I thought it would be better to make a separate post to get feedback.
So please make constructive (!) suggestions. I will answer any questions on the topic.
.
So.
Again and again the question arises of how to calculate the payment of your labor as correctly as possible. Although some of the details seem simple, they often require a lot of brain effort, which MUST be paid. Well, the time spent too.
.
Some people think that it is enough to take into account the weight of the part - I think this method is simply fundamentally wrong, because, for example, printing a vase / box with a 1mm nozzle and a 0.6mm layer will be faster than printing some highly detailed bracket in a car or a souvenir with a 0.2mm nozzle and a 0.05mm layer. So, with the same weight, the time can be many times (tens of times) longer! Yes, and draw a different bracket, you must be able to!
Moreover, we want our many hours of work to be adequately paid.
A typical example from my practice is a kettle handle.
The detail is shapeless, you don't know how to approach it in order to draw it.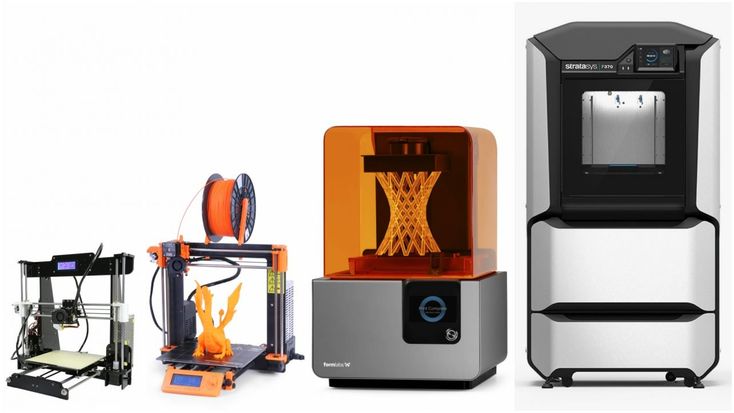 The result - 7 hours of modeling, 4 hours of printing, an hour of post-processing, 57 (total!) Grams of plastic. And now, imagine, a customer comes to you, 'Why is it so expensive??? It's only 57 grams!!!'. And you lost a whole day (work shift).
.
So, I think that the main resource that should be paid for is time!
.
And here, in fact, is the table.
Link to Yandex Disk: https://yadi.sk/i/oy1r3v_dA-8E1w
.
By the way, I update the table from time to time! I recently discovered an inaccuracy in the calculation of the cost of the material, corrected it. So follow the link and check it out.
.
Some characteristics:
Time is written conveniently - in hours and minutes.
Modeling and post-processing cost per hour.
Separately, the weight and cost of the coil are written - no need to calculate the cost of a kilogram (for lazy people).
The so-called 'difficulty factor' is missing from the table. The complexity itself will be formed from: modeling time (mostly), printing time (necessary detailing), post-processing time (picking out supports from hard-to-reach places, painting, etc.).
Substitute the values that are convenient for you. I don't insist on these. Columns 'Prices' and 'Costs'.
The white numbers in the 'Total' column are reference numbers, just for convenience.
Depreciation is calculated from the time of direct operation of the printer (more work - more wear). I take half a dollar.
The price of the first part differs from the subsequent ones only by taking into account the simulation time.
Printer power is taken to the maximum - pennies still come out.
Currency - rubles. You can change to yours.
When you write the price for a reel, you must also take into account the cost of delivery! (In our outback, the delivery of one coil is 500 rubles!) I can add the 'delivery' item for convenience, if you want.
.
I advise you not to show this table to the client. Unless if he thinks that it is too expensive, it must be recalled that he would not agree to work for 100 rubles / hour (or how much you put). And you yourself know that the client wins if he buys one spare part instead of a whole expensive unit. See for yourself.
Sometimes, on the contrary, it is possible to raise the price for the same reasons)))
.
Let me add a little about the cost of the actual filament.
Even the most expensive filament does not affect the final cost so much. Substitute in the table, for example, Bestfilament PLA (1350 rubles / kg) or Filamentarno CF-5 (3300 rubles / kg).
Here is a well-known detail. Bosch meat grinder safety clutch:
Its weight is 9 grams.
Calculate the cost of material only:
Bestfilament PLA - 7 rubles. (don't make such a thing out of it! :o)
Filamentafno CF-5 (as in the photo) - 30 rubles.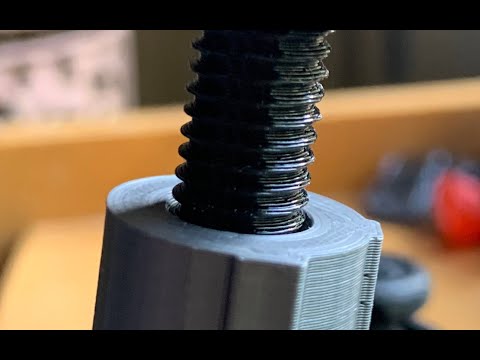
.
PS: The table is not designed for big business, but rather for a side job/money hobby.
.
Everything for everyone!
How to calculate the cost of printing on a 3D printer
For some ideas, 3D printing is the fastest and easiest solution. In some situations, purchasing your own 3D printer can be a good solution, but sometimes it is much more profitable and faster to order the necessary product from a company specializing in 3D printing. Yes, and many owners of a 3D printer are thinking about how to “monetize” their hobby, but how to correctly calculate their costs?
Despite the fact that it is customary to indicate the price per gram of working material, simply multiplying the weight of the model by the cost of 1 gram will be wrong. In addition to the cost of consumables, many more, at first glance, non-obvious costs are added to the price of the product.
Each 3D printing technology uses its own consumables. Let's analyze the most popular and affordable of them.
Available technologies and key differences
Currently, a huge number of 3D devices have appeared, from small desktop ones that fit on the desktop to huge industrial machines. Among the most affordable, 2 technologies can be distinguished - FDM and photopolymer printers (LCD / DLP / SLA).
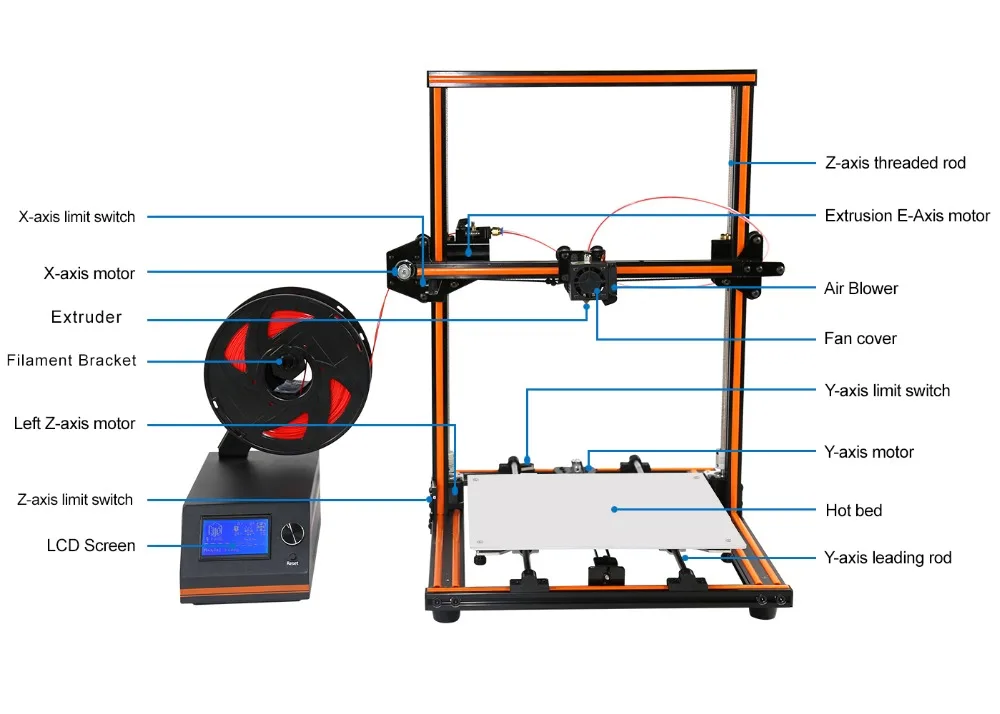
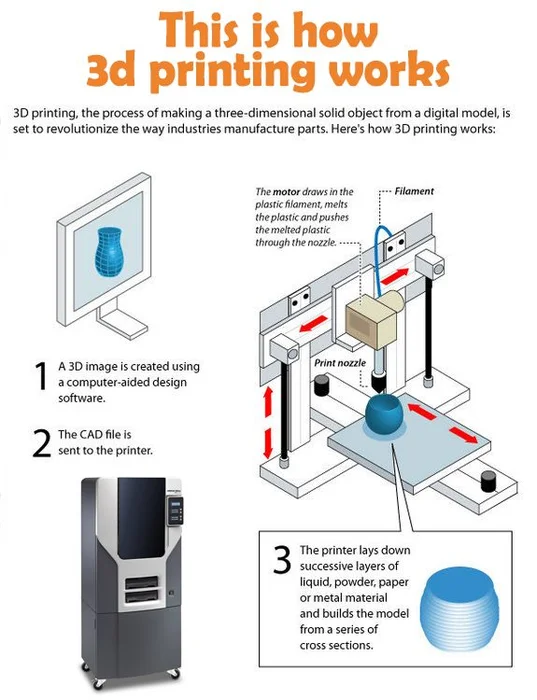
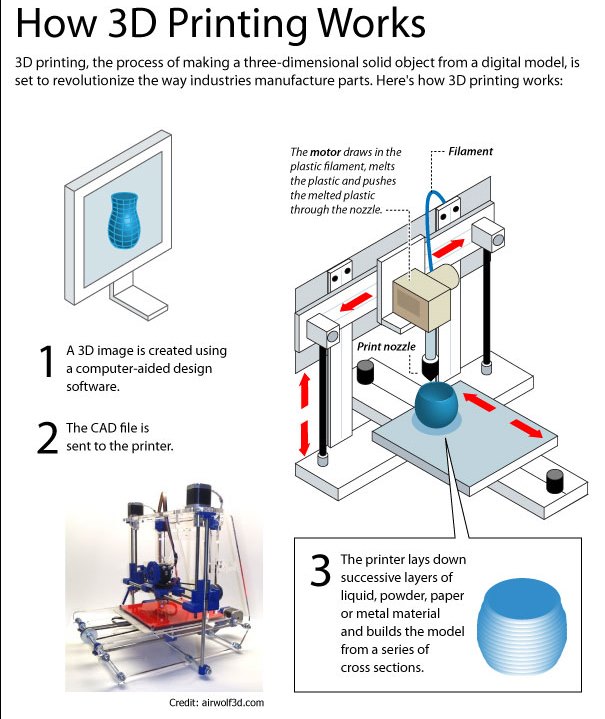
FDM 3D printing
Today, the most affordable 3D printing technology is FDM. A variety of materials and 3D printers allow FDM to be applied to a wide range of applications.
Schematic operation of FDM printer
A large selection makes it easy to choose a 3D printer for a specific task or find a universal device.
The material for printing is a plastic thread - filament. On the market you can find filament for various tasks, for every “taste” and budget. These can be very inexpensive ABS and PLA plastics or specific ones - conductive, burnable, etc.
Pros:
Cons:
Despite the fact that FDM allows you to print a wide range of plastics with different properties, the technology has some limitations. For example, it is impossible to obtain a perfectly smooth surface, to produce miniature and very thin elements, or to produce parts with very complex internal geometry with high accuracy.
Photopolymer printing
Photopolymer printers can work on one of 3 technologies - SLA, DLP or LCD. These devices will come to the rescue if you need to make a small but very detailed model with many small details.
How photopolymer printers work
As a consumable material, a photopolymer resin hardened by UV radiation is used. Now there is a wide variety of photopolymer resins for every taste. From particularly strong and precise engineering or jewelry resins to soft flexes.
Pros:
-
High print precision
-
Good surface quality
-
A wide variety of printers and consumables
Minuses:
Photopolymer printers have shown themselves well in a variety of industries that require a perfectly smooth surface and high accuracy.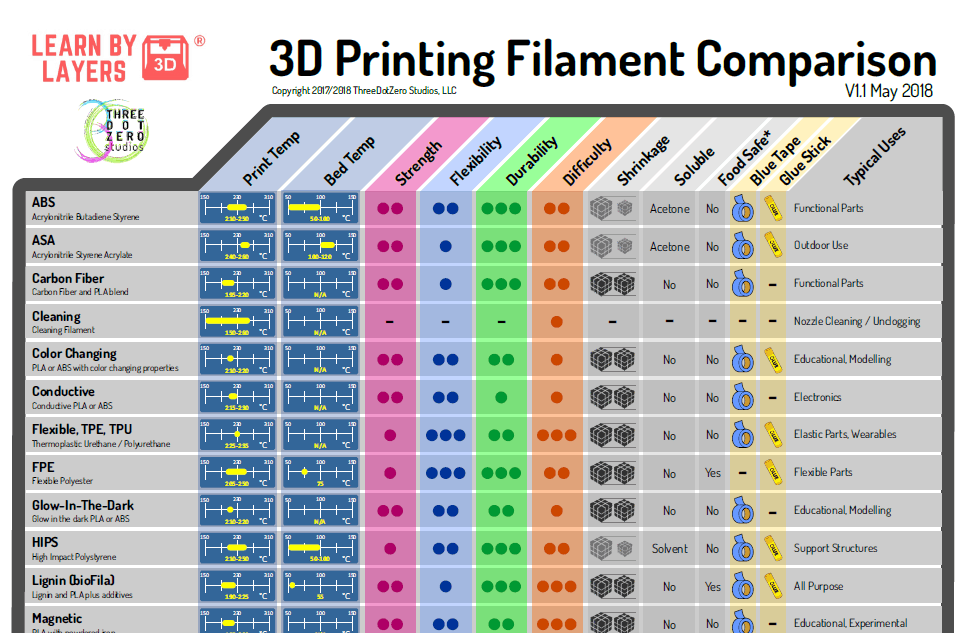 They are used in dentistry, the jewelry industry, for making miniature master models for casting, and much more.
Industrial printers
These are already industrial machines, which require a separate room and sometimes certain requirements for ventilation, etc. In this article, we will not analyze these devices in detail, but briefly consider the most popular technologies.
FDM
In addition to desktop devices using FDM technology, industrial printers that work on the same principle are common.
This category includes devices with a large print area (from 30x30x30 cm and more). For example, Raise Pro2 with a print area of 30x30x30 cm.
Raise Pro2
Or machines designed for printing with refractory materials (eg PEEK). Such 3D printers usually have an active thermal chamber, and the extruder can be heated above 400 degrees.
CreatBot F160-PEEK designed for use with refractory plastics
Photopolymer printers
Industrial photopolymer devices usually have a much larger working area, compared to their "home" brothers.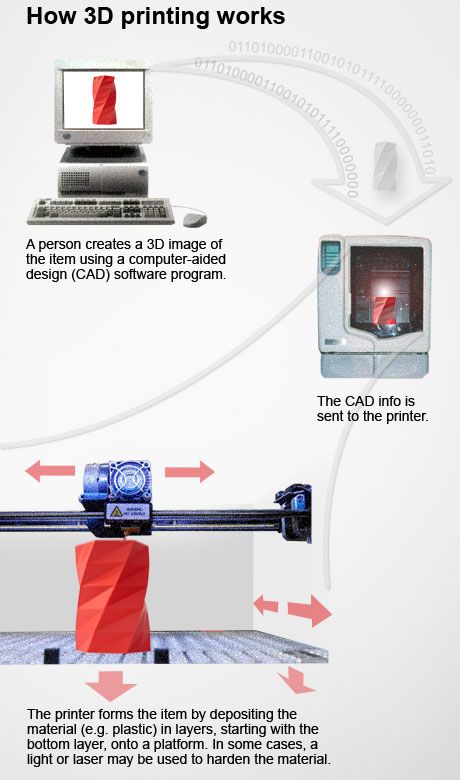 In addition, many processes have been optimized and automated for faster operation. On such printers, you can quickly and accurately produce a small batch of models, a large prototype or a master model.
Large Area Prismlab Industrial Resin Printer Family
3DP
3DP - Three-Dimensional Printing (translated as three-dimensional printing) is a logical continuation of conventional two-dimensional printers. Printing is done using nozzles that selectively apply a binder to the material (usually gypsum). A dye can be added to the binder and the model will be colored.
Colored plaster model
Since the plaster model is fragile, a similar principle is used for printing with metals. Only the finished product needs to be treated in an oven to remove the binder and improve strength. But despite the processing, such metal prints will still be inferior in strength to cast products.
MJM
This is a proprietary technology of 3D Systems. MJM is a mix of FDM, 3DP and sometimes SLA (depending on material chosen). Printing is done using a variety of small nozzles (from 96 to 488) located on the head of the machine. The accuracy and quality of the surface of models made in this way is in no way inferior to photopolymer printers.
Models made with MJM technology
Such devices can work with photopolymer resins, wax or thermoplastics. You can combine several materials at once - for example, for complex models, you can use wax as a support.
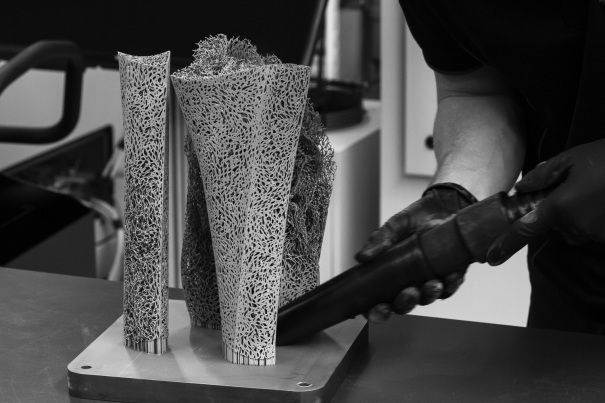
SLM
SLM is the layer-by-layer sintering of metal powder using a powerful laser. There are several similar technologies - SHS/SLS. The principle of operation is the same, only a thermal print head is used instead of a laser beam.
SLM Turbine
As a material for printing, you can use powders of various metals - gold, stainless steel, aluminum, various alloys, etc.
During printing, the working chamber is filled with an inert gas to prevent oxidation of metals. This allows printing even with titanium powder.
Models made by this method are in no way inferior, and sometimes even superior, to cast products. SLM allows you to produce models with complex internal geometry that cannot be produced by another method (casting or milling).
Cost of 3D printing
The cost of a model usually consists of several factors.
-
Equipment depreciation. The printer, like any machine, requires maintenance and periodic replacement of some parts. During operation, belts gradually stretch, bushings or linear bearings wear out. For example, when bushings or linear bearings are worn; shafts may wear out and need to be replaced.
Cost of materials
The main cost item for a 3D printer is, of course, the printed material.;
FDM (plastic filament)
Since FDM technology is by far the most common, the choice of filaments is very diverse.
-
Engineering plastics are usually nylon with various fillers added to improve the physical characteristics of the finished model. Special cost. plastics starts from 2000r per coil and above. It all depends on the manufacturer and filler (carbon fiber, fiberglass, etc.).
-
Decorative plastics are used to imitate various materials. Plastic can simply be unusually colored (luminous, transparent plastics) or a special filler is added to it (plastics with metal powder). The cost of decorative plastics starts from 1500 rubles per coil and more, depending on the filler.
A big advantage of FDM is the diverse choice of materials to work with. This allows, having one printer, to produce almost any product - from a child's toy to a complex engineering prototype.
Photopolymers (resin)
Photopolymer resin printing technology is becoming more and more accessible. There are many different resins.
-
The cost of ordinary colored resin starts from 2500 rubles per 0.5 kg (volume +/- 0.5 l). You can find a smaller volume of resin (250 gr) on sale. You can buy several different resins in small containers and find out in practice which one is best for a particular model.
-
Engineering resins are resins with increased strength. They can be used not only for printing decorative items, but also for making functional prototypes and models. The cost for 0.5 kg starts from 5900r and above.
-
Special resins - burnable, dental, soft flexes, etc. Depending on the resin, the price for 0.5 kg can start from 4800 rubles and more. It all depends on the characteristics of the resin.
Photopolymer resins have not yet reached such a variety as FDM filaments, but they are surely catching up. Although due to the fact that a liter of resin costs significantly more than a spool of filament, the cost of the product is much higher.
Print examples
FDM
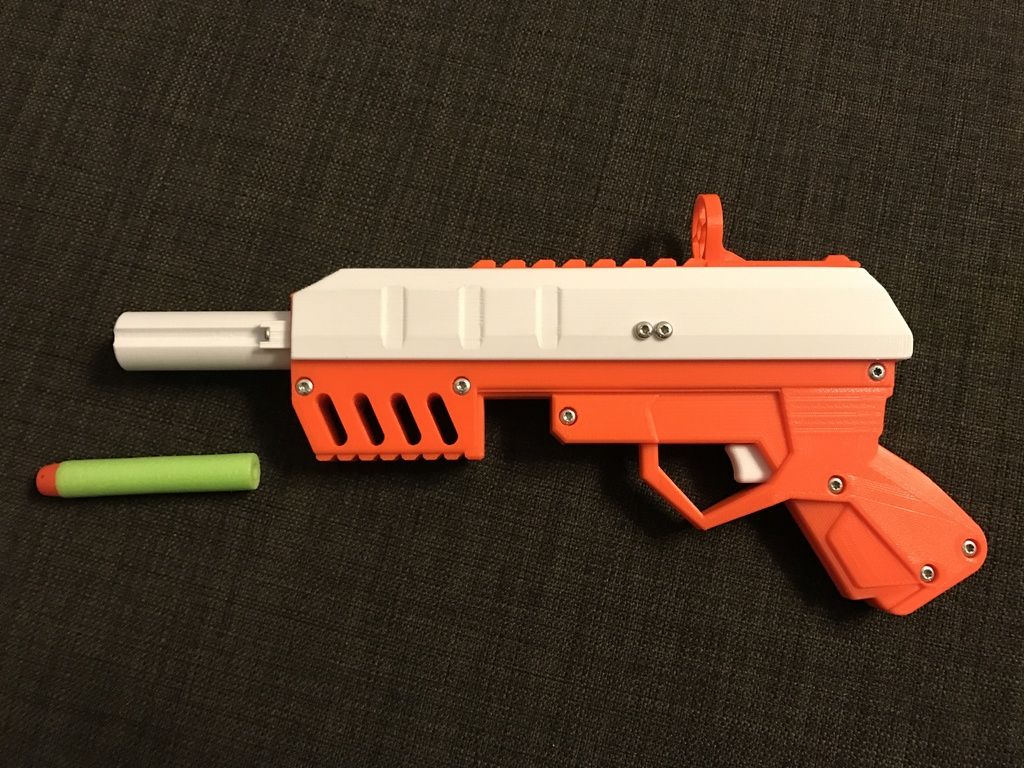
Mag Pull (quick release loop) for G3 magazines.
The model was downloaded for free from an open source (the file can be downloaded here). Printing with engineering carbon-filled plastic (price per spool from 4700 rubles). The weight of the model with support is about 25 grams. Post-processing was not needed. The cost of the finished model is 250 rubles.
Plastic fastener
The file was downloaded from an open source (can be downloaded here). Plastic - carbon-filled nylon (price per coil from 4700r). The weight of the finished product is about 20 grams. Print without post-processing. The total cost is 200 rubles.
Model watch
The model is modeled to order (the cost of modeling is from 1000 rubles). The product is printed on an industrial printer using soluble support. Print without post-processing. The cost of the finished product - from 700 rubles per piece (depends on the number of required products).
Traction prosthesis
The model is taken from an open source (you can download the modified version of the prosthesis here). The weight of the used material is about 600 gr, printed with ABS plastic (the cost of the coil is from 800 r). After printing, post-processing and assembly took place. The total cost of the product - from 3000 r (depends on the print material, support material, filling, etc.).
Pedal layout
Production of a 3D model according to the drawing (from 1000 r). The weight of the finished model is about 200 gr. The product was printed with engineering carbon-filled plastic (the cost of the coil is from 4700 r). Post-processing was not needed. The cost of the finished product is about 3000 rubles.
Photopolymer printers
Model jaws for crowns
Files for printing were obtained using a 3D scanner and finalized in a 3D editor (the cost of scanning is from 3000 r, the cost of manual revision is from 1000 r). Printing on an industrial photopolymer printer. Post-processing is not needed. The cost of the finished product is from 80 r per gram.
Burn-out resin rings
The model is made to order. Printing on a desktop SLA printer with a burnable polymer. Post-processing is not needed. The cost of the finished product is 200 rubles per product.
Miniatures
The models were bought on the myminifactory website (the cost of the model is from $2). Made with a desktop DLP printer. Post-processing was not required. The cost of the finished figurine is from 70 r per gram.
Custom 3D printing
Many owners of 3D printers are thinking about monetizing their hobby. But you should understand that the price of 3D printing “for yourself” and the price of commercial printing are very different.
When starting to print to order, it is better to have several printers working on different technologies.
Cost of commercial 3D printing
In addition to the cost of the model, to the commercial production of products, you can add:
-
Modeling. Often the client needs not only to make a part, but to pre-model it. It can be a simple cogwheel that doesn't take long to model, or it can be a complex sculpture that takes more time to model than it does to make.
-
Model post-processing. This can be simply the removal of supports, with cleaning of the place of their contact with the product, or a complete processing cycle (puttying, surface grinding, painting, etc.).
It should be borne in mind that it is not always possible to print the model the first time. Sometimes it may take several attempts. And these are additional costs.
What is unprofitable to print
Despite the wide possibilities of 3D printing, there are models that are unprofitable to make on a 3D printer.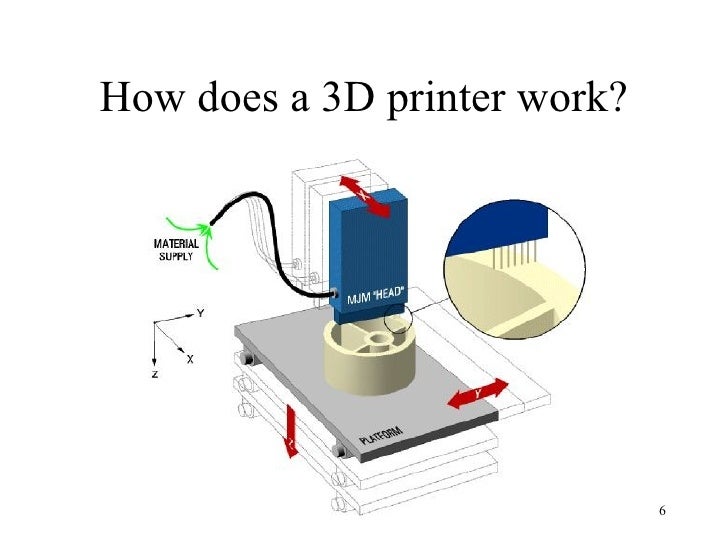 For such models, it is better to use other manufacturing methods.
Commercial print examples
Jewelry for further casting
Manufacture of promotional items and souvenirs
Piece miniatures or master model for further casting
3D printed model
Profitable to print on a 3D printer:
-
If the item is only sold as an assembly. For example, a small gear broke in the mechanism, but the mechanism is sold only “assembly”. It is much cheaper to make the desired gear on a 3D printer than to buy the entire mechanism.
-
A small batch of parts. Small batches, especially models with complex geometry, are more profitable to produce on a 3D printer than by casting or other methods.
Totals
If you need several models or a small project, sometimes it will be more expedient to outsource manufacturing.