Form 1 3d printer review
Form 1 + 3D Printer Review 2022
4.6
See Price
In a departure from the widely used FDM technology found in the majority of consumer 3D printers, Formlabs jumps off the bandwagon to offer a small form factor desktop SLA printer at a fraction of the usual cost.
On the back of a tremendously successful Kickstarter crowdfunding campaign that raised an eye-watering $3 million in the space of few months, the Form 1 and its advanced version, the Form 1 +, strives to bring the precision-oriented SLA technique to the masses.
How does it rival the standard FDM design and has Formlabs succeed in its mission to bring professional-grade quality free of the variable quality of other low-cost 3D printers to the average maker? Let’s find out.
| Printing Area | 125 mm x 125 mm x 165 mm |
| Layer Resolution | 25, 50, and 100 microns |
| Supported Filament | Liquid Plastic Resin |
| Technology | SLA |
| Software | PreForm |
Table of ContentsShow
Design and Features
Most striking is the orange acrylic cover that sits above a glossy grey base with soft contours, an efficient closed look, and a definite nod towards Formlab investing considerable time and money into generating a visually enticing device. The Form 1 + is well constructed with an intelligent design from the placement of the different components, the latched removable inverted build plate, and functional resin reservoir.
It’s easy to forget that the Form 1 + is supposed to sit alongside entry-level pre-assembled 3D printers due to how good it looks. It oozes precision and professionalism with an almost otherworldly attraction that drew us inexplicably to this machine. The total weight of 18 lbs is worth noting as it ensures the printer stands firmly on any surface with a robust set of low-profile feet.
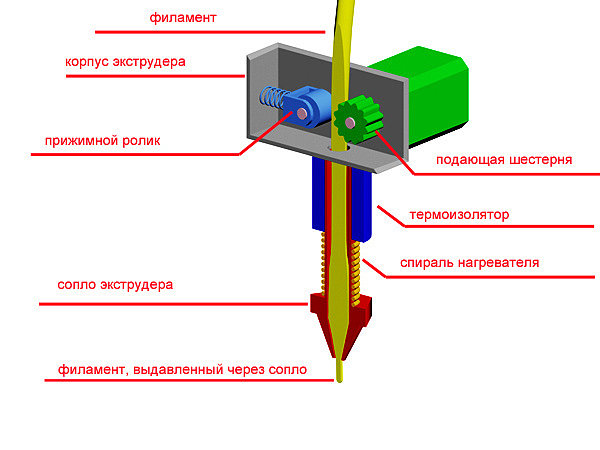
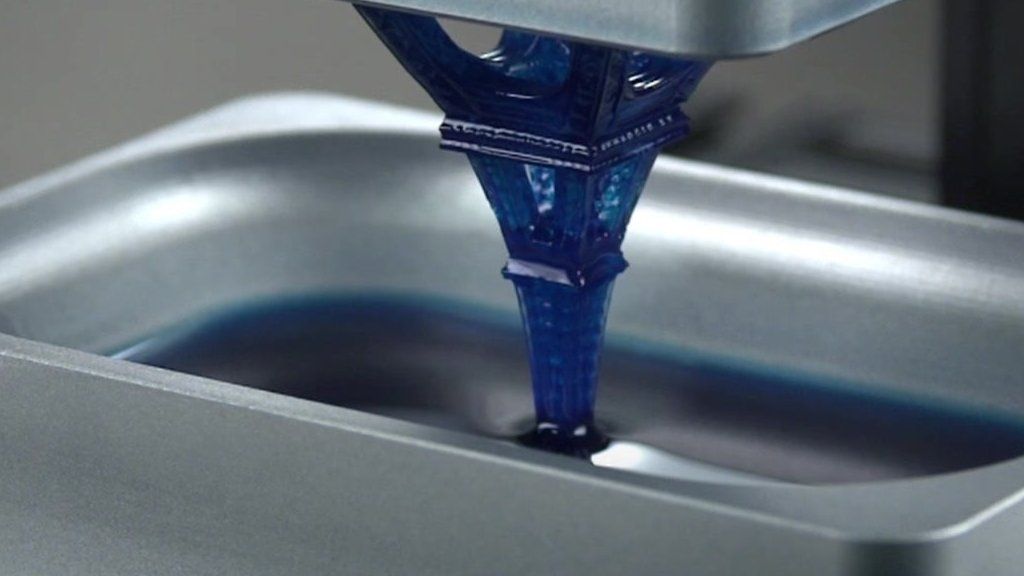
As mentioned above it uses SLA tech, or inverted stereolithography, which involves a UV laser that cures or hardens a light-sensitive liquid plastic resin layer by layer into a solid object. The galvanometer-directed UV laser effectively draws on the surface of the liquid resin causing it to harden. Delving a little deeper the process centers on a process called photopolymerization, whereby molecules are fused and solidified when in contact with light to create polymers.
As you can see, this is miles away from the, at times, slapdash FDM technique, where plastic is melted then extruded layer by layer to create a printed model. Consequently, SLA usually carries with it a non-negligible price tag, if only for the equipment itself, but also for the actual liquid resin.
But the jump in price is also synonymous with a massive leap in quality as well. The results are incomparable to standard FDM tech, and if you were to put two identical models made via each of the technologies alongside one another, you’d be amazed by how much better the SLA printer performed.
The benefits don’t stop there, SLA is all but silent and long are the days of abrasive mechanical ear sores emanating from an FDM printer three rooms away. Equally, it is arguably safer due to only reaching temperatures ranging from 18 to 28 degrees centigrade compared to the standard 100 + degrees recorded during the operation of conventional 3D printers.
Now, to jump back to the hinged orange casing mentioned previously, it serves a fundamental purposes as it blocks outside light from infiltrating the closed chamber and spoiling the resin as well as looking pretty cool.
The Form 1 + packs a decent build area of 125 mm x 125 mm x 165 mm that is somewhat constrained by the incremental cost of SLA printing. The build volume took a hit to make the printer cost-effective. It’s smaller than most similarly priced FDM equivalents, but the upside is much better precision and detail.
At this point in our review, we would usually dive into extruder specifics, but as the Form 1 + doesn’t have one we jump to layer resolutions that range from an ultra-precise 25 to 100 microns alongside a minimum feature size of 300 microns (i.e., features of a model).
As for the resin itself, it is made of acrylate-based materials with an NPCA HMIS health safety rating of 2 (read moderately hazardous) and is produced exclusively by Formlabs and is, as expected, pretty expensive at around $150 for 500 mL, but much cheaper than the resin used for professional-grade machines. The standard resin is engineered for high-resolution details as well as strength and durability. Formlabs offers a range of colors and finishes alongside castable and flexible resins. Third-party resins aren’t supported and unfortunately won’t work with the Form 1 +.
Formlabs believes in simplicity and no more so than in the controls on the Form 1 +, which is nothing more than a one-button control panel with monochromatic LCD.
Otherwise, connectivity is limited to USB-to-PC via Formlabs slicing/preparation software dubbed PreForm with inbuilt tools for orientation, rotation, scaling, duplication, support generation and placement, density and geometry options, monitoring and print time estimates, and STL/OBJ file support (pulled from any 3D CAD software) converted to FORM for the Form 1+ to read. PreForm is compatible with both Windows and MacOS.
PreForm is easy to use, intuitive, and definitely among the best proprietary forced usage software we’ve come across in our years of 3D printing.
Assembly
The Form 1 + comes amply protected in a package of suspended cardboard inserts holding the printer in place, edge protectors, and protective tape. Unpacking involves removing the printer while being careful not to damage the packaging as it is designed for reuse when transporting the Form 1 +.
The package includes the Form 1 +, USB cable, power cord, power adapter, official documentation, quick start guide, safety guide, a 1L bottle of resin, and a Form Finishing Kit (setup guide, rinse bucket, rinse basket, tray, scraper, squeeze bottle, tweezers, absorbent pad, and disposable nitrile gloves).
The Form 1 + comes pre-assembled, and we mean genuinely, pre-assembled. No messing around fitting extruders, build plates, or filament spools. Due to the SLA tech, there’s no bed leveling or calibration either. It is functional straight out of the box.
Setup couldn’t be easier: remove the plastic protective layer from the resin tank paying attention not to smudge the bottom or top, plug in the power cord to the adapter and socket, connect the USB cable to the printer then PC, and finally switch on the Form 1 + via the button next to the display screen.
Print preparation is limited to filling the resin tank with liquid resin up to the marked line. Gloves are recommended which is a slight inconvenience, but otherwise, the process couldn’t be more straightforward.
Printing
For someone accustomed to FDM printers, the Form 1 + was a revelation. The quality of the prints can only be described as outstanding to the point that we’re genuinely dreading going back to FDM models.
The quality of the precision allows finite details on models to be abundantly apparent and not merely a blotched mesh of vaguely resembling filament that is so often the case with FDM. Every model we printed came out great with more detail than we are accustomed to in consumer/prosumer 3D prints.
The whole setup, slicing, and print initiation setup was also a pleasure and a world away from the overly complicated procedure usually associated with SLA style 3D printing. We did not once face any issues or failed prints at all.
The printer is also reasonably fast, and the revised Form 1 + is up to 50 times faster due to an improved UV laser and optics.
The finishing kit is also excellently designed with brackets to fit the detached build plate while you scrape off the model and an efficient rinse basket. The supports were easy enough to remove with a little force; a sure sign they were doing their job during the printing process.
The one real issue we had with the Form 1 +, but that comes with the SLA territory, was how meticulous we had to be in keeping the device clean. Any stray finger marks or blemishes on the resin tank meant cleaning it from top to bottom or risk ruining the curing process due to the precision of the optics, mirrors, and UV laser.
Support
Although Formlabs has technically stopped producing the Form 1 + in favor of the Form 2, they stay committed to providing expert after-sales support as well as a free one-year warranty, manning a repairs and servicing team, and providing educational resources from articles to videos by way of webinars and troubleshooting guides on its website.
Verdict
The Form 1 + takes the precision and quality of professional SLA printers, miniaturizes it, simplifies the printing process, and produces high-resolution prints with a nearly perfect finish. If you want something different to the standard FDM design, then the Form 1 + offers the ideal all-in-one package to get your feet wet.
Although the ongoing cost of resupplying the resin tank can prove costly overtime, the Form 1 + uses resin sparingly, and we were surprised by how many models we were able to pump out with the stock 1L bottle. The long term cost is worth keeping in mind, but not a deal breaker in our book.
The cost of the resin means you won’t use it to create and experiment with test models. We see it more as finishing tool for low tolerance prototyping and models for casting.
The price tag hovers around the $3000 mark so this printer isn’t necessarily within the realm of the novice or first-time buyer, but veterans on the lookout for a new addition to their collection will find a lot of joy in the Form 1 +.
Review: Formlabs Form 1 | WIRED
The current king of at-home 3D printers is the MakerBot Replicator 2. The latest-generation machine from the MakerBot folks has so far proven to be wildly popular with the DIY and hobbyist crowd, as well as artists and students. And its popularity makes sense: the machine is fast, easy to use, runs on good software, and is supported by an online community of people eager to share their designs. It costs $2,550, about as much as a beater automobile.
There's something undeniably cool about printing with lasers.But the Replicator 2 is limited by its printing mechanism, which (like many other 3D printers) uses heated polyester filament to build models in three dimensions. The machine basically acts like a super-accurate hot glue gun, adding the material layer by layer. It has a maximum resolution of 0.1 millimeters per layer (about 1/250th of an inch) which is good enough for most home applications like model-making and small parts replacement, but not accurate enough for people working with crazy-intricate designs.
The Form 1 is built for more demanding work. It prints objects by way of stereolithography, a form of 3D fabrication that uses an ultraviolet laser to cure liquid plastic resin. A laser "draws" the object by shooting into a reservoir filled with resin, and the resin hardens layer by layer as the laser does its work.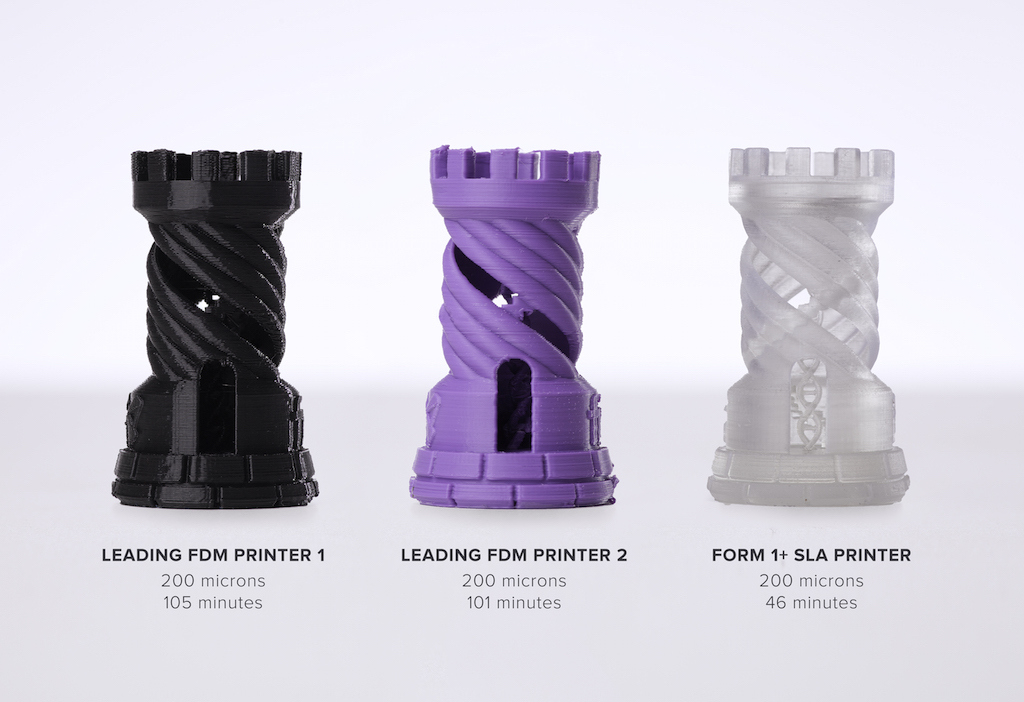 This method gives you a very high-resolution print – 0.025 millimeters per layer, or 1/1000th of an inch – so it's better suited to late-stage prototyping, tiny parts replacement, jewelry, and other things that require perfect edges and incredibly fine details. Stereolithography machines are professional tools. So of course, they're inaccessible to most people, enormous machines that cost hundreds of thousand of dollars.
But the Form 1 is very small and relatively cheap – $3,300 for the unit and $150 per liter of resin. Also, the company's custom PreForm software that runs the printer is very easy to use and is available as a free download for Windows and Mac OS X. It's a pro machine built for the mass market.
The company set up a Kickstarter last year to produce the machines, and raised almost $3 million. The first Form 1 printers have been rolling out to early adopters for the last few months, but if you want one, you can pre-order and get it around the end of 2013. Formlabs sent us a first-run unit to test, along with a liter of clear resin and the "finish kit," which is a small assembly of tools for dressing your completed print.
The Form 1 itself is only 18 inches tall and has a footprint of about one square foot. Also, it's beautiful. The hinged lid is crafted from a translucent orange plastic which, in addition to lending the Form 1 a striking, colorful visage and allowing you to safely watch the printer in action, also serves to protect the resin tray inside from UV light. You can leave the reservoir filled with resin and, as long as the lid stays closed, the liquid will remain uncured until you hit it with the laser.
Setting the rig up for printing is as simple as plugging the Form 1 into the wall, connecting it to your PC via a USB cable, and installing the software. After that, you have to find something to print. The machine is limited to printing objects less than 4.9 inches wide, 4.9 inches deep, and 6.5 inches tall (though like with other 3D printers, you can make larger objects if you print pieces separately and join them together).
You can drop any .STL file from almost any CAD program into the software, or you can do what I did and turn to one of the internet's various repositories for 3D printing enthusiasts. For my first test print, I searched for objects specifically made for printing on the Form 1, or at least things posted by other Form 1 owners so I could compare my results against theirs. There weren't many out there – objects made for testing the Form 1 or actual Form 1 owners – given how new the machine is. But I did find this cute little robot pendant by Gregg Wygonik. He described it as "simple, tiny, and intricate," and he modeled it in Blender specifically for testing his Form 1. Exactly what I was looking for. I downloaded the robot and gave it a go.
The printer offers a few default resolutions: the high resolution of 0.025mm per layer, a medium resolution of 0.05mm per layer, and a low resolution of 0.1mm per layer. For the first print, I decided to try out the highest resolution first. I loaded the robot's file into the PreForm software, selected the default support option, which tilted the figurine's body about 20 degrees from prone and inserted a bunch of support pegs into his back. Clicking the big "print" button loads the instructions to the printer – you can see this happening by watching the only display on the printer itself, a small LCD screen on the front of the case. After a couple of minutes, the printer's LCD reads "Ready to Print," and you set things in motion by pressing the big button next to the display.
Formlabs Form 1+ 3D Printer Review
Formlabs Form 1+ 3D Printer is elegant in design, easy to use and more accurate and faster than any other printer in this form factor with SLA printing technology.
Model 1+ received one of the highest ratings on the popular site 3DHubs, specializing in comparisons, reviews and collecting statistics from users around the world. The highest rating for this model was given after collecting opinions from more than 2000 users.
Unlike more popular FDM 3D printers that produce models using melted plastic filament layering, the Form 1+ uses laser stereolithography (SLA) technology. The Form 1+ 3D printer uses a high-precision violet laser, with a wavelength of 405nm, to bake a special liquid photopolymer in a special printer tank. The laser beam falls into the photopolymer tank, which causes the liquid to solidify, so layer by layer, the finished model rises upside down from the tank.
Laser and photopolymer work result in amazingly precise and smooth surfaces of the finished model. Such results cannot be achieved on a conventional, household 3D printer with FDM printing technology.
Appearance
Form 1+ 3D printer is surprisingly small and light, measuring 20 x 28 x 45 cm and weighing only 8 kg.
Form 1+ 3D printer print area size - 125 x 125 x 165 mm, when compared with the dimensions of FDM printers, it may seem that this is extremely small, but the printer is intended for other tasks where it is not necessary to create large models, but high requirements for quality, accuracy and speed.
The appearance of the printer is a cube in a minimalist style. In the lower part there are software and control boards, all optics and mechanics, in the upper part, there is a transparent orange hood / cover that protects the printing process from mechanical external influences and the influence of sunlight on the photopolymer during printing.
On the front of the printer there is a power button, combined with an LED that displays blue, yellow and green, different printing processes. The button can also be controlled, Press once - pause in printing, press again - start. Holding down the button for three seconds cancels the print job.
Form 1+ is very quiet. Unlike plastic printers, where 2-3 motors move a massive print head in 3 axes, the FORM 1+ printer only moves the platform along the vertical axis, and the movement of the laser unit is so quiet that you can talk in a whisper in the room. An intermittent beep may be a little disturbing, but this is a signal for the start or end of the printing process.
One of the advantages of this printer is the built-in memory. You don't need to constantly use a cable, or download models to an SD card. After starting the printing process, you can safely disconnect the printer from the computer. The STL file is loaded into the printer's internal memory. Printing is completely offline.
Printer setup is very easy. At the first start, you need to remove all the foam and shipping stickers, then fill the acrylic transparent container with photopolymer resin, connect the printer to the computer using the USB cable that comes with the kit. Download the original software and start printing.
Proprietary printer setup program is a friendly, intuitive program with a lot of settings, manipulation and editing of virtual 3D models. In addition to manual control of all settings, the program has preset values. You just have to choose the print quality, which varies from the highest - 25 microns (0.025 mm.) to the lowest - 200 microns (0.2 mm)
Printing process
You must understand that any 3D printing, of any technology, is not a fast process. Although the Form 1+ is faster than its competitors, it will take a long time to build a full-size model. Depending on the complexity of the virtual model, the set resolution and the need to build additional supports, the printing time will take you from 1 to 8 hours.
Every 3D printer requires a complex procedure for removing finished models. Due to the fact that the FDM technology is based on heating to high temperatures, it is quite difficult to remove the figure from the platform, because. it is literally welded to the surface of the platform. With SLS and Form 1+, everything is much simpler, thanks to the stainless steel surface and relatively low temperatures, the finished model is removed very simply, without special tools and without fear of mechanical damage, both to the model and the printer itself.
In order for post-printing work to be easy, the printer comes with a set of special tools and accessories for cleaning the surface of the printer platform from photopolymer residues, removing support elements on the model itself, special washing containers, absorbent swabs, scraper and of course gloves to protect your hands.
After printing, the finished figurine is covered with sticky resin residue from photopolymer. In order to get rid of the unpleasant sticky layer and give the figure a marketable appearance, it is necessary to lower the figure into a special bath (included) with isopropyl alcohol, which is commercially available. You can learn more about the washing process in the instruction manual for the Form 1+ 3D printer.
Why Formlabs Form 1+
Of course, the relatively expensive price of a printer, the speed of printing 3D technology in general, and the complexity of processing the model after printing may scare you away, but what you get in the end will frankly surprise you. Printing results can be described in one word - accuracy.
The most rigorous and difficult test for a printer, we found on the site Thingiverse.com we downloaded a model of the Eiffel Tower and launched it into print. The results exceeded all our expectations. In 3 hours and without additional support for the model, the tower was printed without flaws, or marriage of textures. Everything was printed with great precision with fine details, despite the size, even the railing of the tower stairs turned out to be perfect.
Conclusion
If you're a jeweler, prototyping small parts, or your hobby is modeling, then the Form 1+ 3D printer is for you! The ability of the printer to produce models with the highest accuracy and excellent texture will not leave anyone indifferent, neither amateurs nor professionals of 3D printing and design.
And don't let the price of this machine scare you, first of all it is a workhorse for people who save time and want to optimize the production of master models: in dentistry, jewelry and other industries where you need to create fast and inexpensive high-precision prototypes, or models for further industrial production in traditional ways.
3D printing mold making
Desktop 3D printing molding allows engineers and designers to get more functionality out of a 3D printer beyond prototyping. Molding opens up a world of production materials and provides the opportunity to produce small batches and sample test molds before using expensive
tools.
This booklet covers the following three mold making strategies: injection molding, high temperature molding and injection molded elastomers. Typically, molds are made from Formlabs clear resin, which is preferred for its transparency, although any standard resin can be used, and high temperature resin is ideal for processes with high temperature requirements. It should be noted that these processes are best suited for stereolithographic 3D printing (SLA) because the printed parts are isotropic and waterproof.
Prototyping and small-scale production with 3D printing tools
| Process | Equipment | Run time | Material cost (for example: 300 ml / cm3) |
| Do-it-yourself mold making and parts making | Mold 2 and injection molding machine | 5 to 24 hours (form print time) | Approximately $50 for High Temperature Resin |
| Outsourced SLA Form | injection molding machine | 3-5 days | Approximately $700 for back office printing on industrial SLAs |
| Outsourced metal mold | injection molding machine | 1-2 weeks | Approximately $6,400 for office desk, aluminum finish |
| Outsourced mold Creation and production | no - full outsourcing | 1-3 weeks | $4,000 to $15,000 depending on volume and materials |
Silicone molding and some desktop molds are available using Formlabs Standard Resins High Temp, which has the highest HDT at 0. 45 MPa for any 3D printed media currently on the market and allows print parts that can be used for high temperature forming such as thermoforming and injection molding of materials with higher melt temperatures
Injection molding
High-resolution SLA 3D printing on the Form 2 can be used to rapidly prototype inexpensive injection molds that can be used to make real parts from a wide variety of
thermoplastic materials. Injection molds can be used to test mold designs before manufacturing metal tooling or to produce low-volume parts
3D Printed Injection Molding covers injection molding using Formlabs clear resin printed molds. Following the release of Formlabs High Temperature Resin, designed to achieve higher heat resistance and stiffness, the booklet has been updated to describe the benefits of High Temperature Resin plates that are less likely to break due to thermal shock or temperature-related deformation
USB Device Enclosure Mold, 3D Printed on Form 2 High Temperature Resin
This mold contains a core, a cavity and two "gates" leading to the two halves of the enclosure.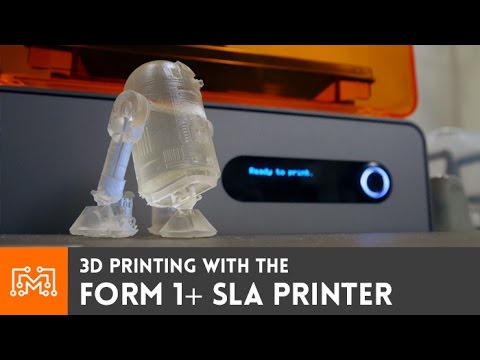 High temperature resin molds can be used to mold a wide range of thermoplastics without thermal stress or temperature-related deformation
Formlabs High Temperature Resin can be used to injection mold a wide range of plastics.
3D printed mold tools reproduce the exact quality of the SLA print finish on the Form 2. Forms can be printed at 100 microns for faster prototyping or the recommended 50 microns for fine detail and smoothness
electronics molded in HDPE with a High Temp tool.
This shape of the USB case has been adjusted over three iterations to remove pits, entrapped air, and some shrinkage. Total cost of materials for prototyping this high temperature resin mold tool: $25
Thermoforms
Form 2 3D printed thermoformed dies are a fast and efficient way to create high quality vacuum formed parts for low volume production. Printed thermoformed dies can be used to make packaging prototypes, clean orthodontic retainers, and food-safe molds for chocolate confectionery.
Thermoforming dies experience less pressure than injection molds, but still reach high surface temperatures.
High temperature polymer resists deformation and surface degradation from the combined heat and pressure of thermoforming for most plastics. Standard resins may also be suitable for thermoforming with some low temperature plastics such as vinyl.
APPLICATION EXAMPLE
Formech thermoformed prototype packaging.
Thermoforming a thin sheet of polycarbonate over a high temperature polymer matrix produces a transparent piece by matching the geometry and detail of the matrix. Thermoformed packaging can be easily prototyped and incorporated into the design process along with 3D printed product prototypes, and all this is achievable on the Form 2. The printed matrix was used without additional processing and the need for UV curing. Texture is recommended in thermoforming design to prevent air trapping under the sheet - layer lines on the printed thermoforming die can be helpful in this regard.
TEMPERATURE CONTROL
Cycle thermoforming with a high temperature polymer matrix
The surface temperature of the matrix reaches a level at 130 ° C.
The surface temperature of the printed matrix will increase over several cycles. The high temperature resin is highly resistant to deflection, whereas with standard resins you must allow the print matrix to cool between cycles, otherwise warping and degradation may occur.
If temperature rise becomes a limiting factor in molding efficiency, cooling channels are an effective way to remove heat from the print. When used in conjunction with an automated thermoforming machine, the water-cooled die can produce more parts with shorter cycle times.
Conformal water channels visible in the high temperature thermoforming die.
Thermoforming die surface temperature
Conformal cooling channels are easy to implement when designing for SLA 3D printing and print successfully without any internal supports to interfere with flow. After printing, the channels are flushed with uncured resin using isopropyl alcohol. The mold is connected to a pump and a source of cold water.
Integrated water cooling as a strategy can also be applied to standard and rigid polymer parts to reduce heat dissipation when used in higher temperature environments.
Elastomer casting
Precision molds for most flexible elastomers, such as silicone and urethane rubbers, can be printed on the Form 2 using standard resin. The transparency of Clear Resin allows the material to be observed during the pouring or injection process. Flexible materials can be easily removed from rigid SLA printing plates, and applications from model production to functional molding can be obtained. Silicone molding can also be used to quickly replicate master prints, greatly reducing production time when multiple rigid parts and objects are needed.
CASE STUDY
Forms printed on Form 2 are used to create composite parts with advanced built-in features.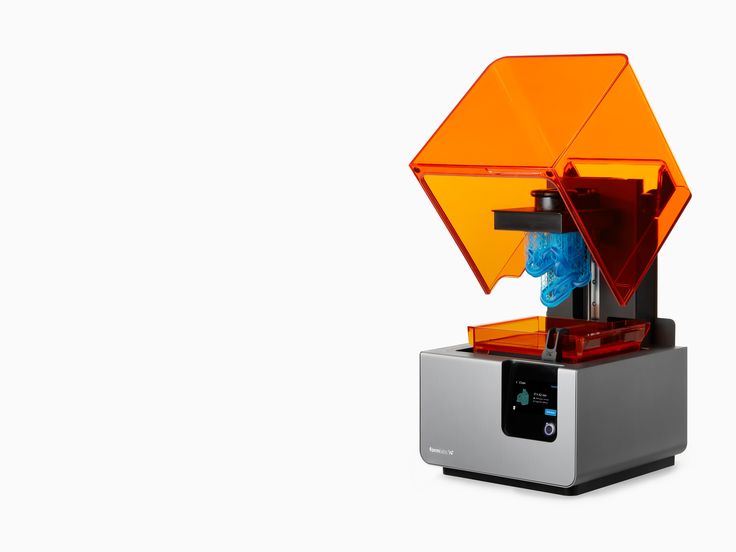 Assembly subcomponents such as electronic, metal and SLA printed elements can be embedded and sealed in soft surface molds.
RightHand Robotics used the Form 2 to create the production blocks of their robotic gripper using urethane molding. The forms were printed in clear resin, with black resin inserts forming the internal structure.
The Form 2 printer allowed RightHand Robotics to move from prototypes to small-scale production without the need for expensive tooling. The rapid transition from original printed prototypes to production materials that have longer flex cycle life was done with 3D printed plates on the same Form 2 hardware they used for initial prototyping.
The first layer applied from RightHand Robotics' multi-stage process includes urethane compounds that can withstand multiple flex cycles while still providing the high elasticity needed to securely return the gripper to its open state.
The outer layer provides improved tactile grip and control, as well as sealing the sensor electronics with softer, lower durometer rubber.
Learn more