Ender 3d printer how to use
Ender 3/Pro/V2/S1 Starters Printing Guide – Tips for Beginners & FAQ – 3D Printerly
The Ender 3 is probably the most popular 3D printer in the industry, mainly due to its competitive cost and ability to produce effective 3D printing results. I decided to put together a nice starter’s guide for 3D printing with an Ender 3.
This guide will also cover everything you need to start printing with the Pro, V2 & S1 versions.
Is an Ender 3 Good for Beginners?
Yes, the Ender 3 is a good 3D printer for beginners due to the very competitive price, the ease of operation, and the level of print quality that it provides. One aspect that is a downside is how long it takes to assemble, requiring several steps and many separate pieces. There are tutorials that help with assembly.
The Ender 3 is pretty cheap compared to other printers that offer similar features, maybe one of the most cost-effective 3D printers out there. It also offers decent print quality way above what you’d expect for that price point.
The Ender 3 comes as a 3D printer kit, which means that it requires a decent amount of assembly. According to many users, it can take an hour or so if you have a good tutorial with you, but you want to take your time to make sure things work well.
It’s actually quite ideal for beginners to put a 3D printer together because you learn how it works and comes together which is useful if you need to make repairs or upgrades down the line.
Upgrading the Ender 3 after getting some successful 3D prints is a very common event with many beginners out there.
If you check out the Creality Ender 3 on Amazon, you’ll see plenty of positive reviews from beginners and even experts on just how well this 3D printer performs.
In some cases, there have been poor quality control issues, but these are usually solved by contacting your seller and getting which ever replacement parts or assistance that you need to get things up and running.
You also have plenty of forums and YouTube videos that can assist you with the Ender 3 because it has such a large community behind it. The Ender 3 does have an open build volume so for younger beginners, you might want to get a Comgrow 3D Printer Enclosure from Amazon.
It’s useful from a safety perspective to improve safety, both physical and from fumes.
You can actually get better print quality in some cases because it protects from drafts that can cause print imperfections.
One user who purchased the Ender 3 as his first 3D printer said he’s absolutely in love with the 3D printer. They 3D printed a decent number of models, going through a full 1KG spool in just over 2 weeks, having success with each one.
They did mention that it took a lot longer than they thought to put it together, but it was still a fairly simply process. The Ender 3 is very popular for first-time users, and there are plenty of YouTube tutorials to help you get up and running.
He also mentioned that the build surface it came with didn’t perform the best so he recommended getting your own surface like a Creality Magnetic Bed Surface or a Creality Glass Build Surface.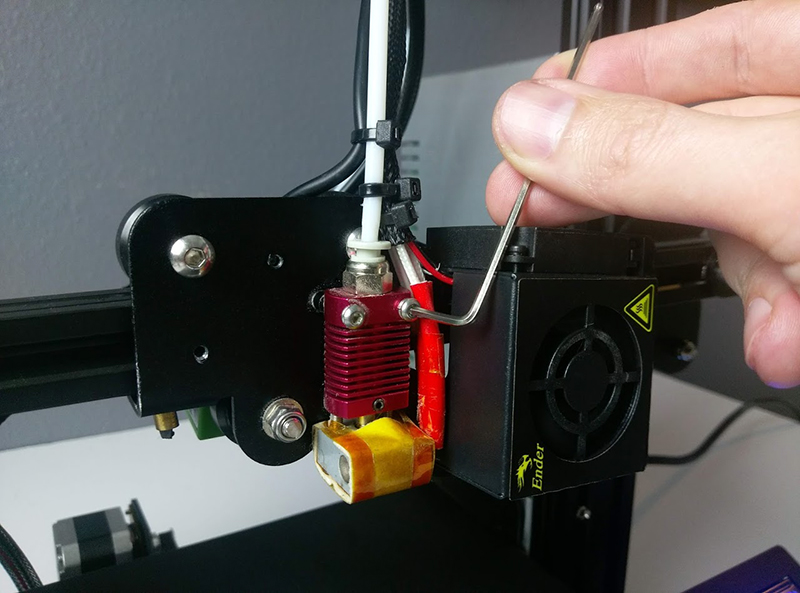
The open source aspect of the Ender 3 was a key for him personally so he could upgrade and replace parts easily without worrying about compatibility.
It’s a great investment, whether you have a specific hobby, have kids/grandkids, or just love technology and the DIY aspect of things.
How to 3D Print with an Ender 3 – Step by Step
The Ender 3 is a kit printer, which means it comes with some assembly required. The instructions and documentation for assembling the printer can be pretty complex
So, I’ve written this guide to help you get the printer up and running quickly.
How to 3D Print with an Ender 3 – Assembly
To get the best performance out of an Ender 3, you must assemble it correctly. Doing this will help reduce any hardware problems interfering with your printing.
The instructions that come with the printer do not really cover some important things to note when assembling the printer. So, we’ve composed a list of helpful tips for assembling an Ender 3 Printer.
Here they are.
Tip 1: Unbox the printer, lay out all its components, and cross-check them.
Ender 3 printers have a lot of components. Laying them out helps you quickly find what you’re looking for when assembling the printer.
- Make sure you compare what’s in the box with the bill of materials to ensure no part is missing, and that the long metal lead screw isn’t bent by rolling it on a flat surface.
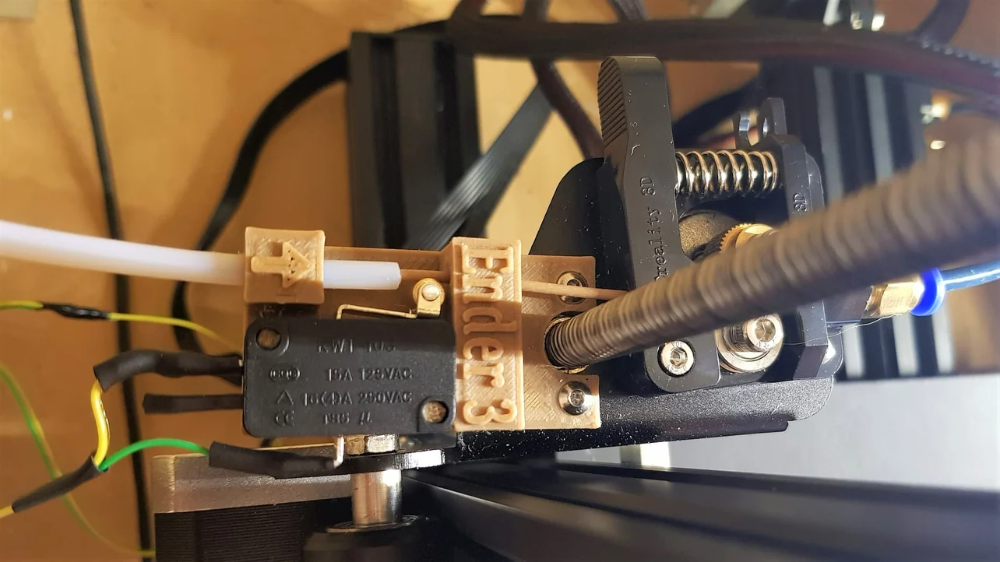
Tip 2: Make sure all the wiring is connected to the mainboard.
The Ender 3’s base comes in one piece, with the bed and electronics wiring already connected to the mainboard.
- Check the wiring of the hotend and the motors and make sure they are correctly connected to the mainboard and not loose.
Tip 3: Ensure all the rubber POM wheels are gripping the carriages properly.
The Ender 3 has POM wheels on both uprights, the hotend assembly, and at the bottom of the bed. These POM wheels should grip the carriages tightly to avoid wobbling during operation.
- If there is any wobble on these parts, turn the adjustable eccentric nut (on the side with two POM wheels) until there is no wobble.
- Be careful not to overtighten the eccentric nut. Immediately there is no wobble; stop tightening.
NOTE: When tightening an eccentric nut, a good rule of thumb is to tighten the nut until the POM wheels cannot rotate freely when you turn them with your finger.
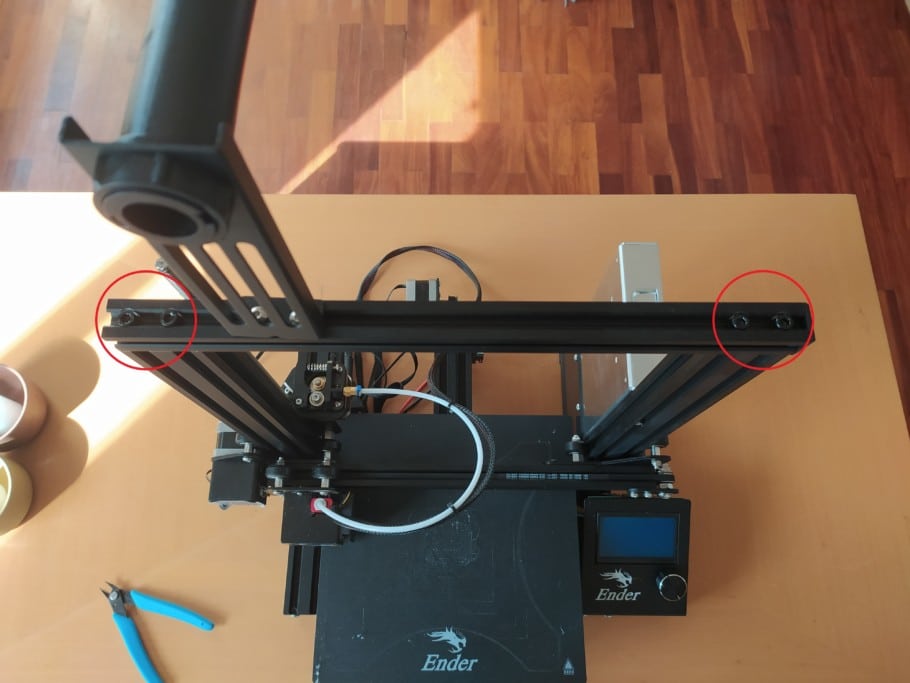
Tip 4: Make sure the printer’s frame is well aligned.
There are two Z uprights, one on each side with a crossbar on top. There is also an X gantry that carries the extruder and hotend assembly.
All these components should be perfectly straight, level, and perpendicular. This helps ensure you get accurate prints consistently.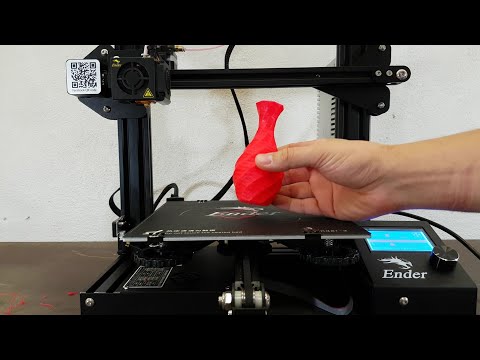
- After installing each upright or gantry, take a spirit level or speed square to ensure they are correctly level or perpendicular.
- Using a screwdriver, tighten the screws firmly, ensuring the frame stays accurate.
Tip 5: Switch the power supply’s voltage
The Ender 3’s power supply comes with a voltage switch that you can switch to your country’s voltage (120/220V). Before turning on the power supply, make sure you check and see if the switch is set to the correct voltage for your country.
Tip 6: Now that your printer is assembled, it’s time to turn it on and test it.
- Plug the power supply into the power source and turn on the printer. The LCD should light up.
- Auto home the printer by going to Prepare > Auto home
- Confirm that the printer is hitting all the limit switches and the motors are moving the X, Y, and Z axes seamlessly.
How to 3D Print with an Ender 3 – Bed Levelling
After assembling your printer, you’ll need to level it before you can print accurate models on it. A YouTuber named CHEP created an excellent method for accurately leveling your bed print bed.
Here’s how you can level the bed.
Step 1: Preheat Your Print Bed
- Preheating the print bed helps account for the bed’s expansion during printing.
- Turn on your printer.
- Go to Prepare > Preheat PLA > Preheat PLA Bed. This will preheat this bed.
Step 2: Download And Load The Levelling G-Code
- The G-Code will help move your printer’s nozzle to the right areas of the bed for leveling.
- Download the Zip File from Thangs3D
- Unzip the file
- Load the CHEP_M0_bed_level.gcode file & CHEP_bed_level_print.gcode file on your SD card
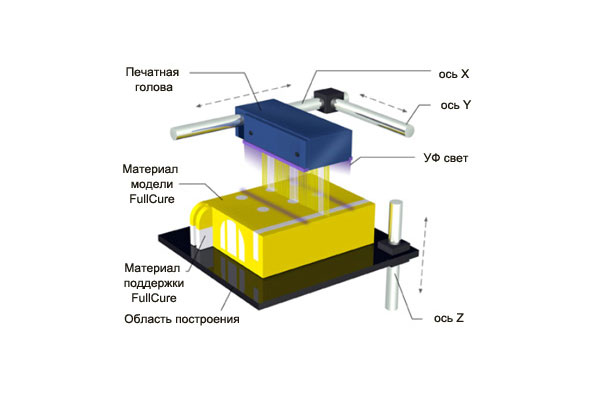
Here’s what the G-Code file looks like when checked in Cura, which represents the path the model will take.
- First run the CHEP_M0_bed_level.gcode file on your Ender 3 or any similar size printer with an 8-Bit board V1.
 1.4 board. Adjust each corner by running a piece of paper or Filament Friday sticker under the nozzle until you can barely move it then click the LCD knob to advance to the next corner.
 - Then run the CHEP_bed_level_print.gcode file and live adjust or “adjust on the fly” the bed level knobs to get as close to a level bed as possible. The print will continue multiple layers but you can stop the print at any time and then you are ready to 3D print without worrying about bed level.
Step 3: Level The Bed
- Start with the CHEP_M0_bed_level.gcode file and run that on your Ender 3. It simply moves the nozzle to the corners and middle of the bed twice so you can manually level the bed.
- The printer will auto-home itself, go to the first position, and pause.
- Slide a piece of paper in between the nozzle and the bed.
- Adjust the bed springs until there is friction between the paper and the nozzle, while still being able to wiggle the paper slightly.
- Once you’re done with that, click the knob to take the printer to the next position
- Repeat the entire procedure until all the points on the bed are level.
Step 4: Live-Level the Bed
- Run the next file CHEP_bed_level_print.gcode file and basically adjust your leveling knobs while the bed is moving, being careful with the movement of the bed. You want to do this until you see the filament is extruding nicely onto the bed surface – not too high or low.
- There are multiple layers but you can stop the print when you feel the bed has been leveled fully
The video below by CHEP is a great illustration to leveling your Ender 3.
For the Ender 3 S1, the leveling process is a lot different.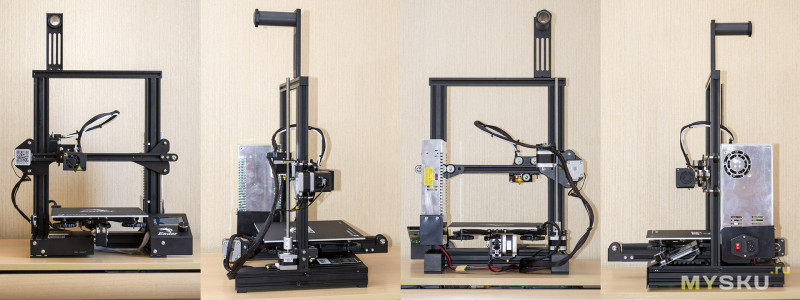 Check out the video below to see how it’s done.
How to 3D Print with an Ender 3 – Software
To print a 3D model with the Ender 3, you’ll need slicer software. A slicer will convert the 3D model (STL, AMF, OBJ) into a G-Code file that the printer can understand.
You can use various 3D printing software like PrusaSlicer, Cura, OctoPrint, etc. The most widely used software is Cura because it’s packed with several features, easy to use, and free.
Let me show you how to set it up:
Step 1: Install Cura On Your PC
- Download the Cura installer from the Ultimaker Cura website
- Run the installer on your PC and agree to all the terms
- Launch the app when it’s done installing
Step 2: Set Up Cura
- Follow the prompts on the onscreen guide to set up the Cura application.
- You can either choose to create a free Ultimaker account or skip the process.
- On the next page, click on Add a non-networked printer.
- Navigate to Creality3D, select the Ender 3 from the list and click Next.
- Leave the machine settings and do not modify them
- Now, you can use the Cura virtual workspace
Step 3: Import Your 3D Model Into Cura
- If you have a model that you want to print, click on it and drag it into the Cura application.
- You can also use the Ctrl + O shortcut to import the model.
- If you do not have a model, you can get one from an online 3D model library called Thingiverse for free.
Step 4: Adjust The Model’s Size And Placement On The Bed
- At the left-hand sidebar, you can use various settings like Move, Scale, Rotate and Mirror to your desire
Step 5: Edit Print Settings
- You can adjust the print settings for the model by clicking on the upper right panel such as Layer Height, Infill Density, Printing Temperature, Supports etc.
- To display some of the more advanced options available, click on the Custom button.
You can check out How to Use Cura for Beginners – Step by Step to learn how to use these settings better.
Step 6: Slice the Model
- After editing the 3D model, click on the slice button to convert it to G-Code.
- You can either save the sliced G-Code file to an SD card or print it via USB with Cura.
How to 3D Print with an Ender 3 – 3D Printing
After slicing your 3D print, it’s time to load it up on the printer. Here’s how you can start the 3D printing process.
- Save your G-Code on the SD card or TF card
- Insert the SD card into the printer
- Power on the printer
- Go to the “Print” menu and select your model
- The bed and nozzle will start to pre-heat to the set temperature and will begin when reached.
When printing with the Ender 3, it’s essential to observe the first layer of the print because it’s vital to the print’s success.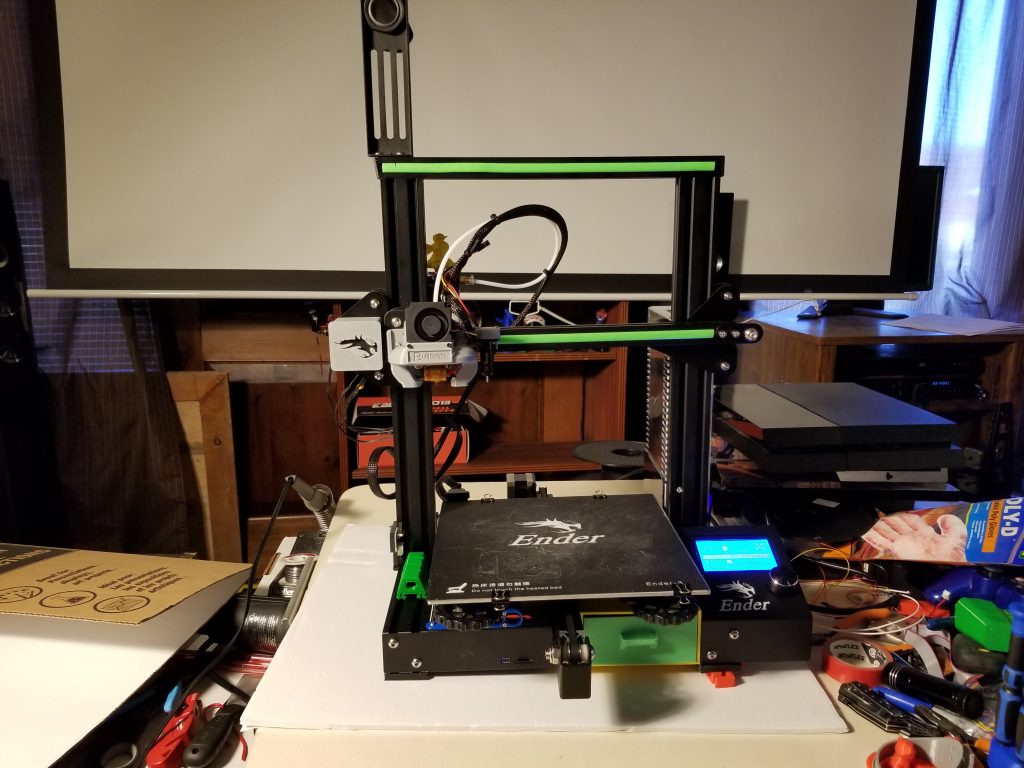 A poor first layer will almost definitely lead to the print failing.
When the printer is laying down the filament, check if the filament is adhering properly to the bed. If you’ve leveled your bed correctly, it should adhere nicely.
Also, check if the nozzle is digging into your print bed while printing. If the printhead is digging into the bed, adjust the level with the four bed leveling knobs under the print bed.
Additionally, if the corner of the print is lifting due to warping, you may need to improve your first layer settings. I wrote an article you can check out called How to Get the Perfect First Layer on Your 3D Prints.
How to 3D Print with an Ender 3 – Post-Processing
Once the 3D model is done printing, you can remove it from the print bed. In some cases, the model might still need some post-processing touches to reach its final form in some cases.
Here are some of the more common ones.
Support Removal
Supports help hold up overhanging parts of the print, so they have a foundation to print on. After printing, they are no longer necessary, so you need to remove them.
It’s important to be careful when removing supports to avoid damaging the print and yourself. You can use the flush cutters provided with the Ender 3 or needle nose pliers to remove them efficiently.
Something like the Engineer NS-04 Precision Side Cutters from Amazon should work well for this. It is compact sized which makes it ideal for cutting supports and it has a special design specific for cutting edges nicely.
This pair of side cutters is constructed from heat treat carbon steel, which provides excellent cutting performance and durability. It also has ESD safe comfort grips that is constructed from oil resistant material.
If you want to go for a whole kit for your 3D printing needs, I’d recommend going with something like the AMX3D Economy 43-Piece 3D Printer Toolkit from Amazon.
It has a large set of tools including:
- Print Adhesion – large 1.25 oz glue stick
- Print Removal – super thin spatula tool
- Print Clean-Up – Hobby knife kit with 13 blades, 3 handles with a de-burring tool with 6 blades, tweezers, pliers, mini-file and large cutting mat
- Printer Maintenance – 10-piece 3D printing nozzle needles, filament clippers, and a 3-piece brush set
Assembling 3D Prints
When 3D printing, your model might have multiple parts, or maybe your print bed might not be big enough for your projects. You might have to split the model into multiple sections and assemble it after printing.
You can assemble the individual pieces using superglue, epoxy, or some kind of heat friction method by heating both sides and holding the model together.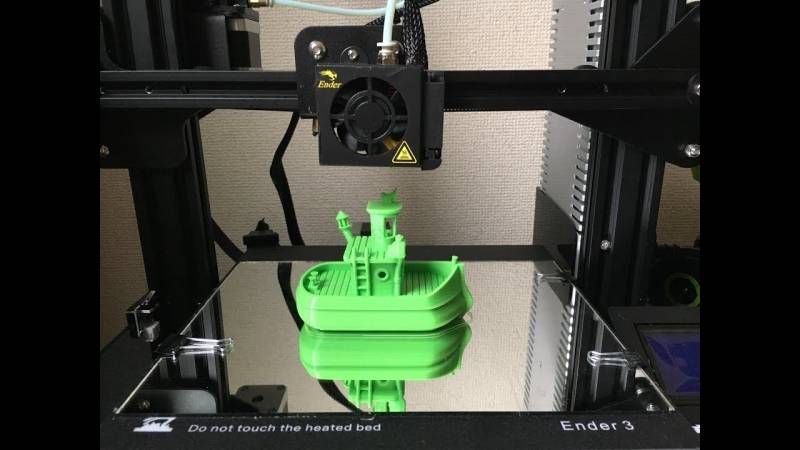
Check out the video below by MatterHackers on how to bond your 3D prints together.
Some 3D prints have built-in hinges or snap fits that mean they can be assembled without glue.
I wrote an article called 33 Best Print-in-Place 3D Prints that has many of these types of models, as well as an article called How to 3D Print Connecting Joints & Interlocking Parts.
Sanding and Priming
Sanding helps eliminate surface deformities like strings, layer lines, blobs, and support marks from the model. You can use sandpaper to gently buff out these imperfections from the print’s surface.
A primer helps fill in the gaps on your print to make sanding it down easier. It also makes it easier to paint if you want to paint the model afterward.
A great primer you can use with your 3D prints is the Rust-Oleum primer. It works well with plastics and also doesn’t take long to dry and solidify.
First, sand the print down with 120/200 grit coarse sandpaper. You can move up to 300 grit once the surface becomes smoother.
Once the surface is sufficiently smooth, wash the model, apply a coat of primer, then sand it down with 400 grit sandpaper. If you want a smoother surface, you can keep on using lower grit sandpaper.
Users who 3D print cosplay models sand and prime their model to achieve a more professional looking finish. It can take about 10 minutes of careful sanding with different grits of sandpaper to get great results.
I’d recommend getting something like the YXYL 42 Pcs Sandpaper Assortment 120-3,000 Grit from Amazon. A few users who have used this product for their 3D prints mentioned that it works great to turn their models into smooth, professional looking models.
You can sand the models wet or dry, with varying levels of grit to achieve your desired result.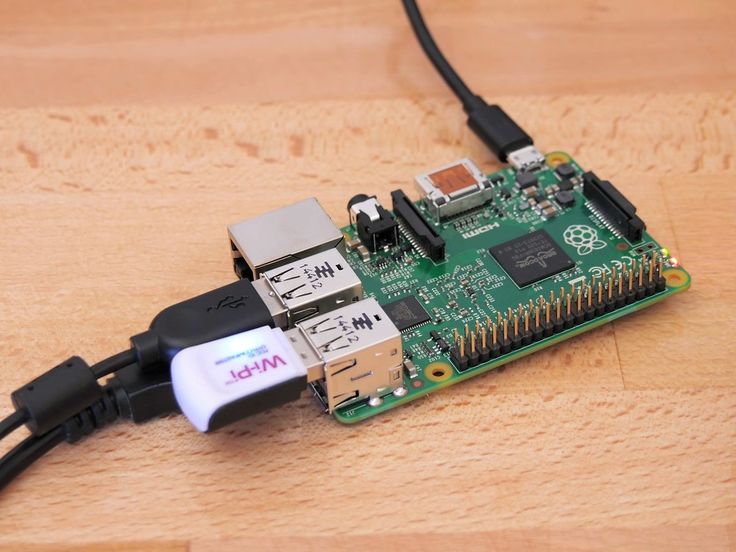
Epoxy Coating
Epoxy coating is beneficial if you need the print to be watertight or food safe. It helps seal up the holes and spaces in the print to avoid bacteria accumulation and leakages.
Also, epoxy coatings can help fill in layer lines and give the prints a smoother appearance it sets. You need to mix the resin with the activator, brush it on the print, and leave it to set.
Most users recommend checking whether the resin is food safe and FDA compliant before using it with your print. A great option is the Alumilite Amazing Clear Cast Epoxy Resin from Amazon.
It’s a favorite among 3D printing hobbyists, as most have gotten good results with it. Just be careful to let the resin cure properly before you start using the 3D printed parts.
Also, epoxy can be very dangerous if you do not follow the proper precautions while using it. Be sure to follow this safety guide while coating your prints.
What Program Does a Creality Ender 3 Use?
The Ender 3 doesn’t have a designated program that is uses, so you can use it with whatever slicer you choose. There is an official Creality Slicer that some people use, but most people choose to use Cura for the Ender 3. It’s very simple to use and has a lot of features that other slicers don’t have.
Some other popular choices are PrusaSlicer and Simplify3D (paid).
How to Add an Ender 3 to Cura
- Open Cura
- Click on the printer tab at the top of the screen
- Select Add Printer
- Click on Add a Non-networked printer.
- Look for Creality3D on the list and select your Ender 3 version.
- Click Add
- Once you select it, you can customize your printer’s properties and its extruder.
Can You 3D Print from a USB on an Ender 3? Connect to Computer
Yes, you can 3D print from a USB on an Ender 3 by connecting a USB to your computer or laptop then to the Ender 3. If you are using Cura, you can navigate to the Monitor tab and you’ll see an interface showing the Ender 3 along with some control options. When you slice your model, simply select “Print via USB”.
Here are the steps for 3D printing from a USB.
Step 1: Download the Drivers for Your PC
The Ender 3 drivers allow your PC to communicate with the Ender 3’s mainboard. These drivers are usually present on Windows PC but not always.
If you connect your 3D printer to your PC and your PC doesn’t recognize it, you need to download and install the drivers.
- You can download the drivers required for the Ender 3 here.
- Open the files and install them
- After installing them, restart your PC. Your PC should recognize your printer now.
Step 2: Connect Your PC to the Ender 3 with the correct USB cable
- Turn on your printer
- Using the correct USB cord, connect your PC to your Ender 3
- Open Cura
- Click on Monitor
- You should see your Ender 3 printer and a control panel. It will look different once the Ender 3 is connected.
Step 3: Slice and Print your Model
After slicing your model in Cura, you’ll see an option saying Print via USB instead of Save to file.
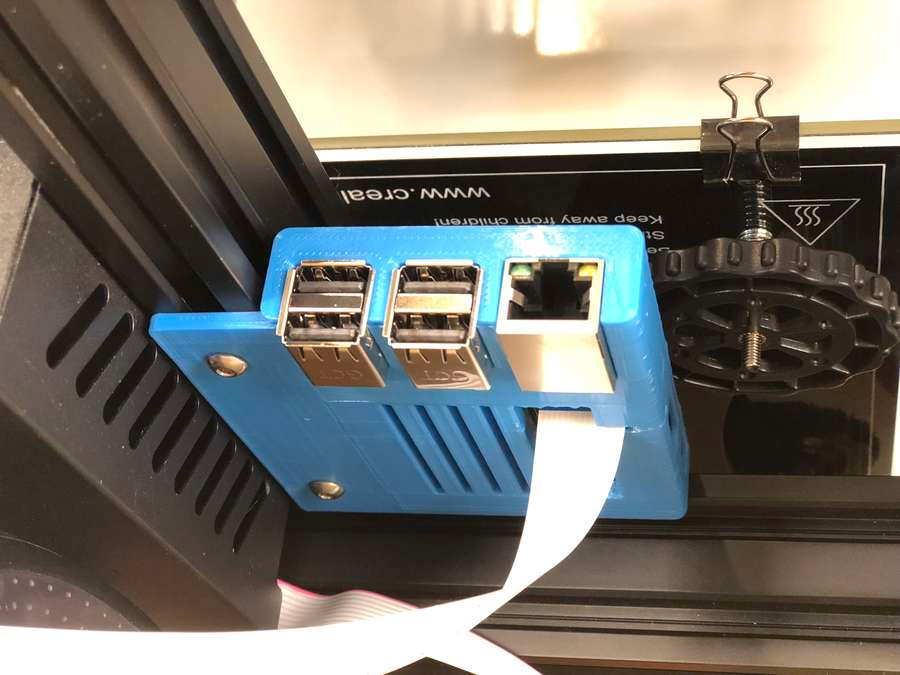
If you do not like Cura, you can use several other applications like Pronterface, OctoPrint, etc. However, using Octoprint requires you to purchase and set up a Raspberry Pi to connect your printer to your PC.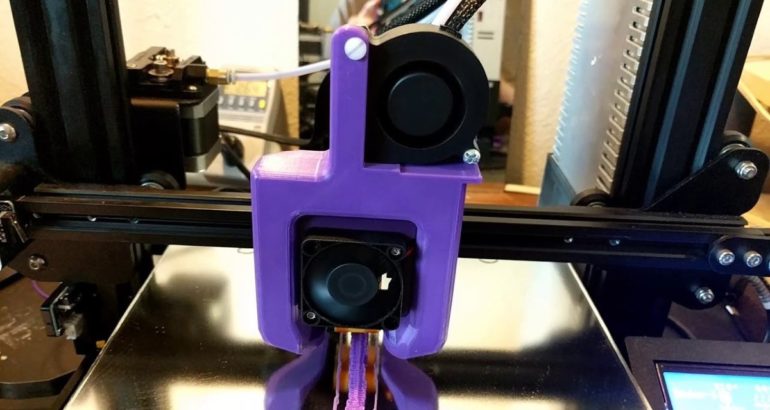
Note: When printing via USB, make sure your PC doesn’t turn off or go to sleep. If it does, the printer will automatically end the print.
What Files Does an Ender 3 Print?
The Ender 3 can only print G-Code (.gcode) files. If you have a file in a different format like STL AMF, OBJ, etc., you’ll need to slice the 3D models with a slicer like Cura before you are able to print it with an Ender 3.
Putting together an Ender 3 printer is no small feat, but trust me, you will have a lot of fun with this machine. As you get comfortable with it, you might even decide to spring for some more upgrades.
Check out my article How to Upgrade Your Ender 3 The Right Way – Essentials & More.
Good Luck and Happy Printing!
SainSmart Ender 3 V2 3D Printer - Quick Start Guide
- Introduction
- Assembly
- Install Z-axis Limit Switch Assembly and Z-axis Profiles
- Install Z-axis Motor Assembly and Lead Screw
- Assemble the Nozzle and X axis gantry
- Install the Gantry assembly and Screen
- Install Filament holder, covers, Bowden tube and Extruder knob
- Electrical Connections
- Controlling the Printer
- Level the bed
- Installing a Slicer on your PC
- Configuring your machine
- Selecting or adding a Filament
- Loading the model
- Selecting and modifying the Print Profile
- Slicing
- Printing
- To load a filament
- Removing the Printed Model
Introduction
Congratulations on your purchase of the Ender-3 V2 3D Printer from SainSmart.
This Ender-3 V2 3D Printer Quick Start Guide is designed to aid Ender-3 V2 users in the assembly and use of their new printer and to help in getting started with 3D Printing.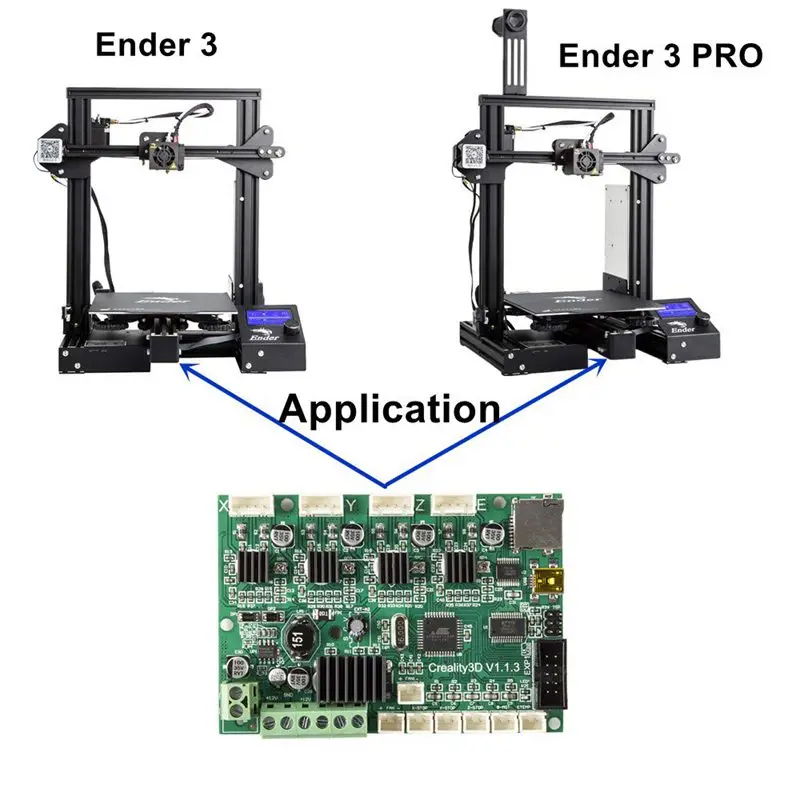 We still recommend that you read through the User Manual before starting assembly and use.
Assembly
This guide contains a quick summary of the assembly steps. Full and detailed assembly instructions is available here.
Install Z-axis Limit Switch Assembly and Z-axis Profiles
- Slide the Z axis limit switch onto the left Z-Axis profile (2 holes at the bottom) and use the M5x45 screws to secure the profiles to the base.
- Tighten the limit switch at it’s lowest position.
Install Z-axis Motor Assembly and Lead Screw
- Attach the Z axis motor to the left hand Z profile with 2 M4x18 screws into the bottom holes on the profile.
- Insert the Lead screw into the motor coupler and tighten.
Assemble the Nozzle and X axis gantry
- Fit the pneumatic joint into the Extruder.
- Bolt the XE-axis Assembly onto the X axis profile using 2 M4x16 screws.
- Wrap the drive belt around the pulley in the XE-axis Assembly.
- Slide the Nozzle assembly onto the X axis profile over the drive belt.
- Screw the Z axis Roller bracket assembly onto the X axis profile using 2 M4x16 screws.
- Thread the drive belt through the tensioner, Attach the tensioner to the X axis Gantry and attach the ends of the belt into the slots on the Nozzle assembly.
Install the Gantry assembly and Screen
- Slide the V pulleys into the vertical profiles along with threading the lead screw into the Brass nut on the Extruder assembly.
- Adjust the tension of the drive belts, not too tight but taught.
- Install the top gantry profile using 4 M5x25 screws.
- Attach the display screen to the right side of the frame, connecting the cable.
Install Filament holder, covers, Bowden tube and Extruder knob
- Assemble the filament holder and attach it to the top profile with 2 M5x8 screws and T Nuts (flat side to the back).
- Push the collar on the Extruder in, slide the Bowden tube fully in, release the collar and secure with the clip on spacer.
- Push the covers onto the ends of the top gantry profile.
- Slide the extruder knob onto the top of the extruder stepper motor shaft.
Electrical Connections
- CAUTION Select the correct input voltage on the power supply, If not set correctly this can damage your printer!
- Connect the wiring to the stepper motors and limit switches according to the labels on the wires.
Controlling the Printer
The printer is controlled by using the rotary knob at the bottom of the display to select the menu options, or to increase or decrease a selected number. The knob is also a push switch which is used to select the highlighted item or confirm a change. (This is referred to as Tap or ↓).
Level the bed
The bed must be levelled correctly before using the printer. Full instructions on how to level the bed can be found here.
The bed and Nozzle must be preheated to a working temperature before levelling the bed to allow for heat expansion of the materials of the build plate, adjusters, hot end and nozzle!
To level the bed for the first time:
- Make sure the glass plate is clipped on, after removing any protective film.
- Turn the bed height adjusters to lower the bed.
- Heat the build plate and nozzle to a working temperature by Prepare ↓ Preheat PLA ↓ or Prepare ↓ Preheat ABS ↓
Then (or for any subsequent times the bed needs re-levelling):
- Place a sheet of thin paper on top of the bed.
- From the printers control screen select Prepare ↓ Auto Home ↓
- To move the nozzle across the bed use the Prepare ↓ Move↓ Move X/Y ↓ commands, then rotate the control knob to set the position and Tap to execute the move. Coordinates are always absolute offsets from the home position.
- The approximate positions of the levelling points are as X/Y coordinates 30/30, 30/205, 205/205, 205/30
- Move the nozzle to the first point.
- Use that corners bed height adjuster to raise (or lower) the build plate height so that you feel resistance when moving the paper between the nozzle and the build plate.
- Repeat, positioning the nozzle to each levelling point in turn and adjusting the height at that corner.
- Select Prepare ↓ Auto Home ↓ again and repeat the adjustment at each corner performing any fine tuning of the height which may be necessary.
- Select Prepare ↓ Cooldown ↓ unless you will be printing immediately.
Installing a Slicer on your PC
SainSmart recommends the Ultimaker Cura Slicer, others are available with varying features and while a lot are open source or free to use some are not. Cura is fully featured, well supported and is free to use.
To download the latest version of Ultimaker Cura, go to https://ultimaker.com/software/ultimaker-cura A version may be on the SD card but the latest version will be available on the website. There are also tutorials and documentation available there. The version used in this guide is 4.6.2
Configuring your machine
You have to tell Cura (or any other slicer) what 3D Printer you are using. They vary in size, speeds, nozzle sizes etc.
From the Cura top menu select Settings / Printer / Manage Printers/Add. And select Add a non-networked printer, scroll down and click Creality 3D. (At some point there will be a Creality Ender 3 V2 available, if so just select that and close) Until then select the Creality Ender 3 PRO from the list, change the Printer name to SainSmart Ender 3 V2 (or anything else you prefer) Click Add and this will open the Machine Settings window.
The recommended settings for the SainSmart Ender 3 V2 are:
In the Printer settings Start G-code and End G-code boxes copy the lines below into the relevant box replacing ALL text.
Start G-Code |
; Ender 3 V2 Custom Start G-code G92 E0 ; Reset Extruder G28 ; Home all axes G1 Z2.0 F1200 ; Move Z Axis up little to prevent scratching of Build Plate G1 X0 Y20 Z0.3 F9000 ; Move to start position G1 X0 Y200 Z0.3 F1200 E15 ; Draw the first line G1 X0. G1 X0.4 Y20 Z0.3 F1200 E30 ; Draw the second line G92 E0 ; Reset Extruder G1 X0 Y10 Z0.2 ; Wipe Nozzle G1 Z2 ; Move Z Axis up little to prevent scratching of Build Plate |
 4 Y200 Z0.3 F9000 ; Move to side a little
End G-Code |
; Ender 3 V2 Custom Start G-code G90 ; Set Absolute positioning G92 E0 ; Reset the extruder position G0 E-3 ; Retract filament G0 X0 Y{machine_depth} Z{machine_height} F9000 ; Present the print, build plate to the front, Z at the top M106 S0 ; Turn-off cooling fan M104 S0 ; Turn-off hotend M140 S0 ; Turn-off bed M84 ; Disable all steppers M300 S2000 P200 ; Make Ending Sound 3 beeps M300 S0 P100 M300 S2000 P200 M300 S0 P100 M300 S2000 P200 |
And click Next.
The Printer will now appear in the Local Printers list. Click Activate to make this the current printer. And close the window.
Selecting or adding a Filament
To add or customize a filament select Preferences/Configure Cura and then click Materials. Cura as supplied contains the settings for a lot of different filament types and brands. For the sample print I am using SainSmart PRO-3 White PLA which has the following properties:
- Diameter 1.75mm (±0.02mm)
- Print Temp 180˚C to 215˚C (200˚C is a good starting place)
Either create an entry to match your filament or select a generic type (The sample filament which comes with your printer is likely to be PLA).
The recommended starting settings for SainSmart PRO-3 PLA White are:
Save the filament settings.
Loading the model
Download the sample model (sainsmart keychain) here.
Go to File/ Open File(s) and select the model file to print, these are normally *. stl files but other types are supported. So select SSKeyFob.stl [File location needs specifying! Is it on the SD card or downloaded? If downloaded I would add a downloading the sample files above this section.]
Cura will centre the model on the build plate and show the file in a 3D representation, the colour of the model will be taken from the filament properties.
Make sure in the top bar that the printer is shown as SainSmart Ender-3 V2 and the filament is PRO-3 PLA (or Generic PLA).
Selecting and modifying the Print Profile
Various ‘standard’ print profiles are available in Cura. You can create and save your own but open the print settings by clicking on the right hand side of the top icon bar. Select the Super Quality in the Profile dropdown for this test.
The higher the quality, the longer it will take. This is because the higher quality uses smaller lines which means more of them, slower print speeds etc. All of these settings can be altered individually if required, also Cura by default only shows the more important settings in the print settings dialogue.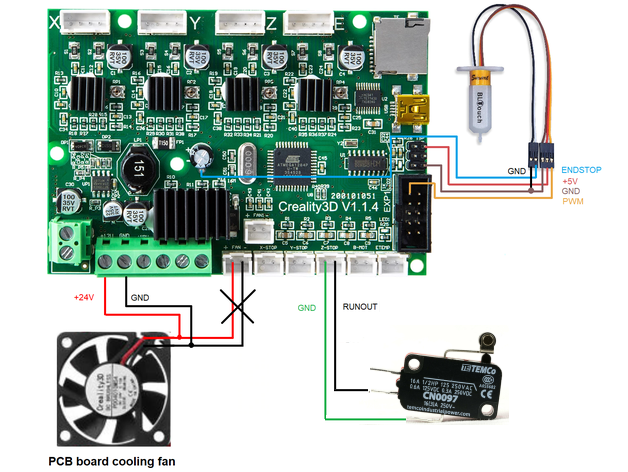 Settings can be made visible or hidden by the Preferences / Configure Cura / Settings option, but there are well over 400 settings that can possibly be shown!
The print profile draws on the current machine and filament settings for some of the values.
For this model SuperQuality is suggested to produce clean detail on the lettering and smooth surfaces.
Slicing
Cura now has the model and the settings to be used set so click the Slice button. Cura will now process the model according to the profile settings and generate the Gcode needed to print the model.
The dialogue box will show an estimated print time and amount of filament required to print the model. In this case just over ½ a metre of filament will be used. To see the details of the slicing operation in more detail click the Preview button. The slider to the right of the screen shows the number of layers the model has been sliced into and the current layer being shown. The bottom slider shows and can play the process for each layer.
HINT: Use the scroll button on your mouse to zoom in and out and hold the right mouse button to rotate the model.
Save the .gcode file either to the root directory of SD card directly, or to a file on your PC and then copy the .gcode file to the root directory of the SD Card.
Printing
Insert the SD card into the printer and turn the printer on.
Make sure the correct filament is loaded, the same type as you used in the print profile, and that the build plate is level.
To load a filament
- Preheat the nozzle to a temperature above the melting point of the filament [From the controller select
- Hold in the lever on the extruder drive assembly and slide the filament all the way into the Bowden tube and into the nozzle as far as it will go.
- NOTE: it can be a bit tricky to get the end of the filament into the Bowden tube as it can get caught up on the internal changes in diameter. If this happens try twisting the filament a bit and if necessary pull out the filament and re-trim the end to round it off.
- NOTE: it can be a bit tricky to get the end of the filament into the Bowden tube as it can get caught up on the internal changes in diameter. If this happens try twisting the filament a bit and if necessary pull out the filament and re-trim the end to round it off.
- If changing a filament sufficient material needs to be extruded until any remnants of the previous filament have been expelled.
- To remove any previous filament heat the nozzle above the melting point of the filament as above, hold in the lever and gently pull the old filament out.
- Release the lever and then on the printer control screen select Prepare ↓ Move ↓ Extruder ↓ and dial up a +5mm movement to push the filament through the nozzle until a steady clean stream is extruded. Increase the extrusion distance if necessary.
- Remove any extruded filament from the nozzle and build plate.
Select Print ↓ from the main menu and then select the file to print. Tap to start printing.
- The printer will first heat the bed to the set temperature, the only indication of this is the bed temperature on the display will slowly rise.
- Next the Nozzle will be heated to the set temperature, the only indication of this is the Nozzle temperature on the display will slowly rise.
- Once everything is up to temperature the printer will go to the home position.
- A priming line will be printed to make sure the filament is flowing correctly, this is an up and down line at the left of the bed.
Then the print will start, first laying down the skirt and then the model itself.
Once the print is finished:
- The nozzle will go to the back left corner of the build plate presenting the model for removal.
- Three beeps will sound indicating the print is ready.
- The bed and nozzle will cool down, the hot end cooling fan will still be running, do not turn the printer off until the nozzle temperature is below 50˚C.
Removing the Printed Model
- If necessary use the scraper to gently prise the job from the build plate.
- Only use gentle force to avoid damage to the machine.
- Also remove the priming lines from the build plate.
Take the key fob and after inspecting it place it on your key ring!
Your first 3D print with the Creality Ender-3 V2 / Ampere
Let's assume that you've already completed the printer assembly quest and you can't wait to print something. Here's how to get started printing with the Creality Ender-3 V2, and what settings to look out for in order to get the most out of your 3D printer.
Before printing on a 3D printer, the model must be prepared and divided into layers. Usually 3D models are distributed in STL format - this is a kind of JPEG in the world of modeling. A three-dimensional object in the STL format consists of a set of polygons - triangles, the coordinates of which are described in the file. nine0003
However, printers are unable to process STL files themselves. First, the selected model must be converted into a G-code - special commands for the printer that tell you where to move the head and at what speed to extrude plastic during the printing process. To convert an arbitrary 3D model into a G-code, there are special programs - slicers.
We will show how this operation looks like using the Creality Ender-3 V2 3D printer as an example. Let's process the popular 3DBenchy boat model in the Cura slicer.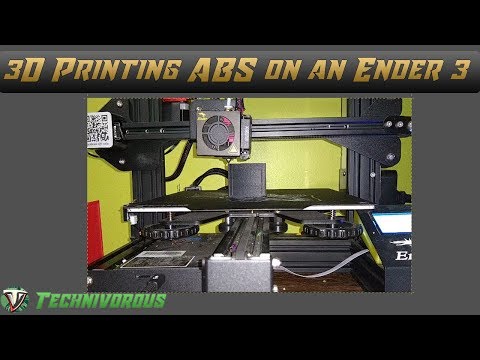 nine0003
This model is specially made to detect printing imperfections on 3D printers and calibrate settings. You can download any 3D model in STL format from specialized sites.
Slicer download
Any slicer program is suitable for converting models to G-code. In this example, we will use the Cura slicer - the most functional of the free programs. Download the slicer from the official site and run the installation.
Skip the welcome screens and accept the terms of use.
Setting up a printer in the slicer
Add a printer to the program using the "Add a non-networked printer" button.
Select "Creality Ender-3" from the list. This is the previous model, which has identical characteristics.
Any printer name can be entered in the "Printer name" field. It is needed to distinguish between several printers or several settings profiles of one printer. Name it "Creality Ender-3 V2". nine0003
All printer settings are the same as Ender-3, so nothing needs to be changed on this screen. Click the "Next" button.
Changing the program language
For convenience, let's change the program language right away. Go to the settings using the “Preferences” → “Configure Cura…” button
Select Russian in the “Language” drop-down menu.
The interface language will change only after the program is restarted. Close Cura and reopen - you will be greeted by Russian-language menus. nine0003
Adding a model to the slicer
Click the button with the folder icon and select the downloaded 3D model file.
Setting print options
All program management is placed in the top panel with three buttons.
Printer selection
The name of your printer is displayed in the upper left corner. We only added one model, so this item should be Creality Ender-3 V2.
Plastic and nozzle selection on the printer
Your Creality Ender-3 V2 printer is capable of printing on a variety of plastics and nozzle sizes.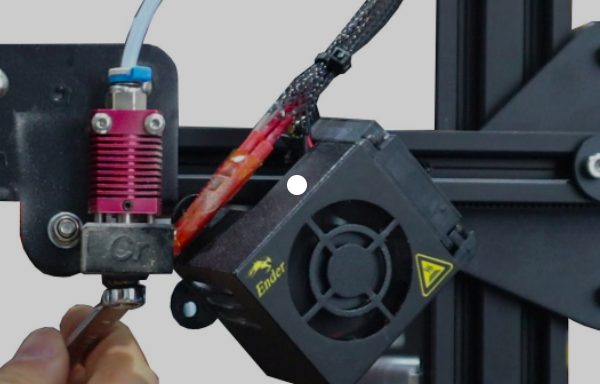 Make sure that the standard 0.4 mm nozzle is selected in the program, which is installed in the printer from the factory.
Open the plastic and nozzle selection shutter. In the "Material" section, select your plastic. We print with PLA, so we chose "PLA" in the "Universal" section.
Selecting slicing settings
By clicking on the long button on the right, a list with basic slicing settings opens. The developers of Cura tried to make the program more understandable, so they built hints into it. When you hover over an unknown parameter, a tooltip will appear that will help you understand what setting it is responsible for and what it affects. nine0003
Custom button opens detailed settings with many options. Leave all professional options at their defaults. We have enough basic settings.
The top slider "Profiles" is responsible for the height of one layer. The thicker each layer, the faster the model is printed. At the same time, by reducing the layer thickness, a more accurate print quality is achieved.
Set the layer height to 0.16 mm. This is the golden mean between speed and quality. nine0003
The second "Infill" slider is responsible for the interior of the model. The printer can print only the walls of the model, and leave the internal volume empty. This will greatly reduce plastic consumption, but will negatively affect the strength of the model. So that the finished plastic part does not fall apart in the hands, its insides do not remain empty, but are filled with a mesh. The resulting edges increase the rigidity of the model.
To strike a balance between model strength and plastic consumption, set the infill to 20%. nine0003
Also in the slicing settings menu are two additional options: supports and sticking.
If the part has protrusions that hang over the table, then the printer will not be able to print them - they will simply fall. To prevent this from happening, activate the "Supports" option with a checkmark. Under the overhanging parts, columns will be printed that will support the part.
In our test model of the boat, there are no such parts, so the "Support" parameter does not need to be activated. But if you print your own model - do not forget about the supports. nine0003
The "Stick" setting improves adhesion. This is the adhesive force between the workpiece and the table. If the adhesion is insufficient, the part may come off during the printing process. The printer will print a skirt around the model, which will increase the contact area with the table. After printing, it can be cut off, but it will not allow the model to come off the table in the middle of the process.
Activate this option, because the bottom of the boat is quite shallow, and an additional surface for stronger adhesion will be very useful. nine0003
Preview
Click the Slice into Layers button. After that, the slicer will calculate the trajectory of the head and generate a G-code.
Switch to the "Preview" tab, where you will see the built layers of the model. The preview helps you check your print settings and understand how your model will print.
G-code export
To record the finished file, it is easiest to connect a microSD memory card to the computer through the adapter supplied with the printer. The slicer will immediately detect the removable device and offer to save the file to it. Save the G-code to a memory card, or use the drop-down list to save to a file, and then manually copy to the card. nine0003
Table Calibration
The initial setup was already done when the printer was assembled, but over time the table may fail. If the model does not adhere well or, conversely, the first layer is too thin and the extruder starts to click, then the table must be recalibrated using the four corner screws.
Use the encoder on the screen to enter "Prepare".
Select "Auto home". The printer will set the nozzle to the zero position. nine0003
Then turn off the motors with the "Disable stepper" command.
Place a sheet of paper between the nozzle and the table. Adjust the screw. The nozzle should scratch but not tear the sheet.
Move the print head and table by hand. Repeat this operation in each corner of the table to set the most even position in the horizontal plane.
Replacing the filament
Before the test print, we already loaded the filament spool, but sooner or later you will have to change it. For example, if you want to print in a different color or try a different type of plastic. To do this, you first need to remove the remnants of the old plastic. We will change the plastic to another one, or remove the remnants of the old one. nine0003
The filament melts in the nozzle during printing. If the nozzle is cold, then the plastic will fuse to the nozzle, and you won't be able to get it out. Heat the nozzle to the melting temperature of the plastic. To do this, go to the "Prepare" item.
Select "Preheat PLA". The nozzle will start to heat up.
Use the "Back" button to exit to the main menu.
Make sure the nozzle is at the correct temperature.
Use the indicator wheel to unscrew the plastic thread from the Teflon tube and extruder. nine0003
Cut off the end of the new plastic. In order for the plastic to get into the fitting and not get stuck in the extruder, it is more convenient to cut the end of the plastic at an angle. Printing will not start immediately. The printer first needs to heat the bed and nozzle to operating temperature.
Thread the end of the spool into the extruder and use the indicator wheel to push the plastic up to the nozzle.
Plastic should flow from the nozzle.
Printing from a memory card
Adhesion must be considered before printing. The glass has a special coating that improves the adhesion between the first layer of plastic and the table, but larger models may have curled edges. To improve adhesion, you can thinly anoint the table with a glue stick or sprinkle with hairspray.
Insert a memory card into the bottom of the printer.
Enter the Print menu.
Select the boat file that we prepared in the slicer. nine0003
Printing will not start immediately. The printer first needs to heat the bed and nozzle to operating temperature. Wait until the temperature rises.
During printing, you can adjust the nozzle temperature, print speed, and several other settings. We've set everything up in the slicer, so you don't need to change anything.
In conclusion
We have shown you the shortest way to start using the Creality Ender-3 V2 3D printer right after assembly. This will serve as a cheat sheet for printing arbitrary 3D models and experimenting with different types of plastic. Dare! nine0003
Useful links
- Where to Download Free 3D Models of
First introduction to 3D printing and Ender 3 Pro.
START
Good afternoon everyone, my name is Denis and I started to get involved in 3D printing.
"Hello, Denis" - based on the stereotypes of alcoholics anonymous societies of 3D printing fans.
First of all, I would like to thank the authors of numerous articles on this resource and the resource itself, because from the very beginning, I found here useful instructions, tips, opinions, including in the comments. This is my first personal attempt at graphomania, but perhaps, as these articles are written, someone in the future will also be able to find some answers to newbie questions in them. Well, please share your experience in the comments. nine0003
Background: not so long ago I came across the topic of 3D printing at work. I did a little research on forums, news sites, applications, opportunities, the contribution of 3D printing to the fight against COVID-19, etc. Perhaps a little superficial, but it was enough to arouse the interest of the layman in this topic outside of work. I told a colleague who was also inspired, and after a while we decided to try 3D printing with our own hands.
Despite the fact that we agreed to cut the costs by half, we decided to start with a budget model. The first apparatus is also for experiments and training. Plus, they were of the opinion that if it is not easy to get it out of the box and start printing, namely, at least partially assemble it, then this will give a minimum set of basic knowledge on the design of the printer. nine0003
Our choice was the Ender 3 Pro. We relied on the fact that the model is popular in the world and you can always find tips from "experienced", plus he is from the DIY class. I’ll repent a little more here, I didn’t go into technical details too much, because. there was no understanding of terminology and other nuances, they simply decided, Pro - it means they finalized it, and it became better. Yes, yes - clapping hands on the face.
INTRODUCTION AND FIRST STEPS
A day after the procedure for debiting funds from the card for a printer and a pair of filament spools (we took PLA and ABS from BF - the final choice of the manufacturer has not yet been made, and I immediately ask for advice on manufacturers) the courier violated my self-isolation and handed me a weighty box. We agreed in advance that I would start with the technical part and the printer would be with me for the time being, so I write further on my own. Honestly, I had a very pleasant feeling when I opened the box and saw two floors of parts. Well, you know, an adult office worker, and here is such a constructor. nine0003
I will not repeat numerous posts on the Internet about the assembly and assembly, I can only say that everything was completed according to a Chinese piece of paper in English.
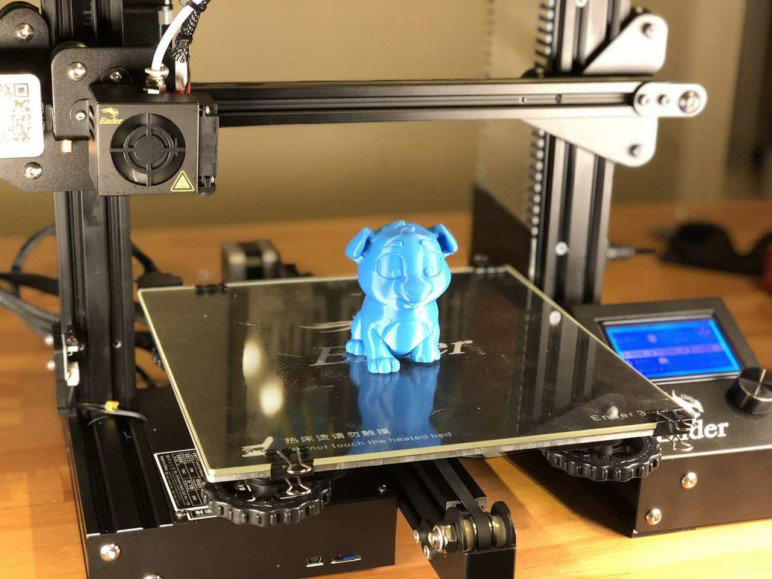
After everything was assembled and connected, the power button swung from O to I, the question arose - what to print? I remembered the bundled flash drive (microSD), but an incident happened - the computer recognized it, but all folders and files had unreadable characters and refused to open. I already knew about thingiverse, so I downloaded the first model that came across, cut it in Cura (what settings are there, didn’t touch anything at all), scaled it down to speed up the process, threw it on a flash drive and was about to print. nine0003
The printer on the flash drive found several files, but the names were incomprehensible - I poked at random and I got the first figure:
Delight, baby Yoda appeared on the table instead of air! IT IS WORKING.
Well, yes, it would seem that they decided to assemble the printer on their own in order to get to know its device, but here it turns out simply - assembled it and prints it. Yes, nothing like that, I did not immediately understand about the calibration, so before the iodine, I first got the passage of the nozzle on the table and a little more snot. nine0003
Ender 3 Pro calibration short (yes, with paper):
1) Prepare -> Auto Home -> Disable Steppers. The trick is that the nozzle extends a little beyond the hard part of the table (I have a magnetic mat), so this stage went smoothly.
2) Important: look at the difference between the level of the nozzle and the stage. If the nozzle is higher, then we take the table with our hand and position it so that the nozzle is in the left near corner above the hard part of the table. We take a sheet of paper, put it on the table under the nozzle in this place and then play with the level wheel at this angle so that the nozzle presses the sheet of paper. Now we lower the table a little with the wheel so that the sheet stops touching the nozzle or barely touches it. The first one is ready. (If the nozzle is initially lower than the surface of the table, then lower the table by eye with the wheel so that the nozzle is above it). nine0003
3) Then I went clockwise - far left corner (2). We pull the table towards us so that that corner is under the nozzle. By the way, I left a piece of paper on the table so that it could be seen if the nozzle starts to cling to it along the way and it was possible to lower the table in advance with the wheel where we are going. We repeat step 2.
4) Corner 3 (far right) - move the print head to the right by hand, without touching the table. We repeat step 2.
5) Corner 4 (near right) - move the table away from you and yes, step 2 again. nine0003
6) Repeat the circle 1-2 times.
7) Congratulations. It’s just that in the Chinese instructions this process is somehow poorly described, and it’s easier to follow the text than the video on YouTube.
And back to print. Then I decided to go according to the classics - a boat, but then the flash drive finally died, the file on it constantly disappeared while I carried it from the laptop to the printer. Formatting did not lead to anything, except for the complete death of the flash drive (by the way, on the manufacturer's website you can often find a copy of the files from it, so the loss is not great). Naturally, a little confusion - I want to play with printing further, but how? Ordering a new card means waiting for delivery, and here the expectation of death is similar. In general, rummaging through the shelves, I found a cable from GoPro. I was very surprised when the "print via USB" button appeared in Cura, but in the end there was one more 3DBenchy in the world.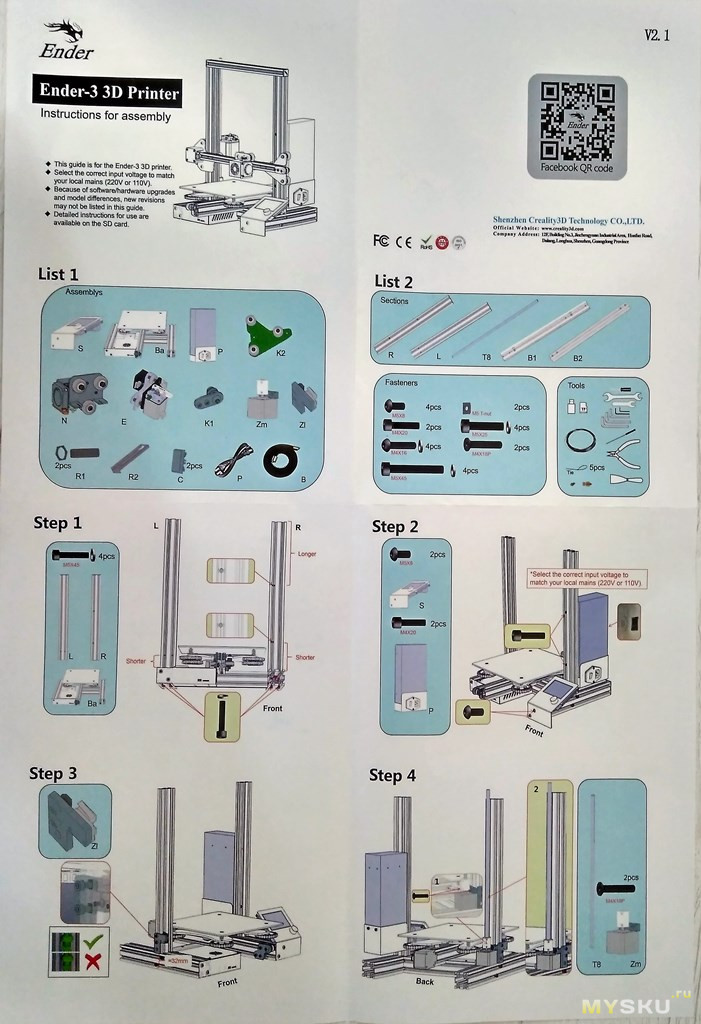 Small victory. nine0003
By the way, I was still printing on stock PLA. I decided to save a little on plastic, because. afraid of the replacement process. In general, the whole design of the printer seemed somehow delicate, it can be compared with a new car or telephone, when at first you blow off dust particles from them. And the replacement of plastic, even taking into account the video and tips, was a little annoying, because. the first time you do it yourself.
The first "revision" for the printer, a filament dust cleaner with a simple loop: nine0003
Operates from the table, nothing needs to be connected. And tormented sponge for washing dishes. Honestly, I also printed more out of curiosity than out of practical necessity.
But printing models downloaded from the Internet is one thing, but doing the steps:
IDEA -> MODELING -> CUTTING -> PRINTING is another. It was necessary to go through the chain completely. I found a small plastic clip at home and decided to reproduce it.
I heard more about CAD programs than experienced. I haven't approached them since I was in college. I chose the most accessible "here and now" - TinkerCad. I would probably recommend it for beginners. Access through the browser, therefore, you do not need to download, install, and it is free. 30 minutes for familiarization, measurements of the part, playback on the screen and the finished .stl file at the output. I’ll make a reservation right away, I keep this program in my head in reserve, because. then I immediately set myself Fusion 360. It hurts more with it, I often have to google it. Not ready to compare my new choice with analogues, of which there are many, because. I still don’t understand the nuances of modeling, the capabilities of the program and its convenience for designing certain products. If anyone also shares advice on choosing software, I will also be very grateful. nine0003
In general, uploaded MY .stl to Cura for the first time. There were no problems further according to the standard - cutting and printing.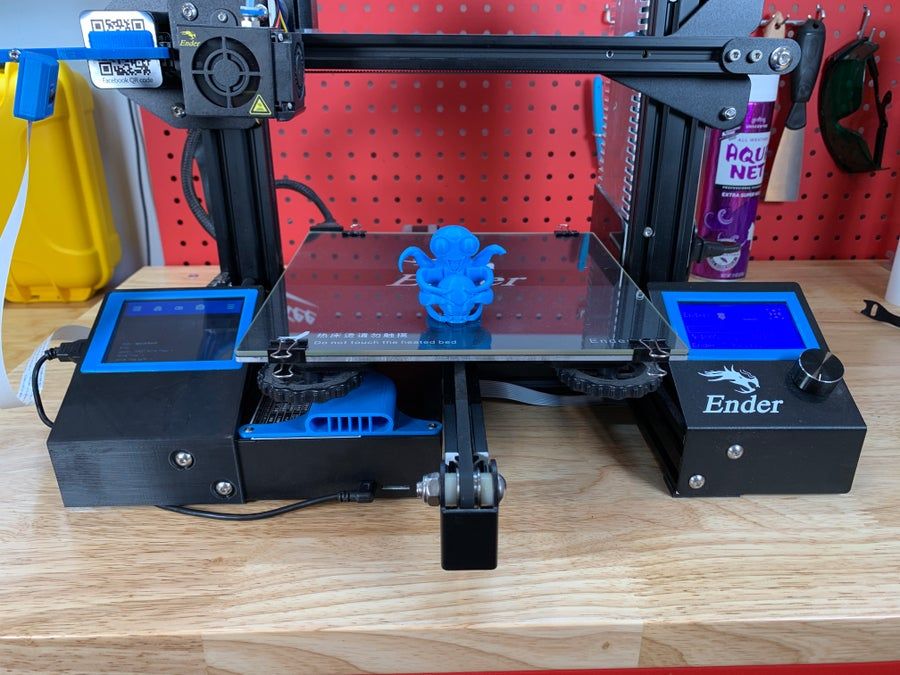 Again, print settings are still something unknown.
The chain has ended and the part is in hand. The only thing I noticed was that a round hole was made in it, which, upon printing, looked like a polyhedron, not a circle. I assume that TinkerCad played a role here. In the future, this did not happen again with Fusion.
INVOLVED OR REPLACEMENT UNDER DUCTION
It so happened that a few days later I told my friend about the printer and showed my photos and videos of the printing process and results. There was no big surprise, but the comment that I later heard several times sounded: “Oh, cool! I always wanted to try / get confused myself. By the way, here, it seems to me, the word “get confused” describes all the steps in understanding printing very well. Hello software, materials, settings. Maybe I, as a beginner, of course, am mistaken. nine0003
In general, the flight of fantasy went further about how much everything can be printed. I somewhat restrainedly answered that yes, I can imagine, but I am not yet ready to comment professionally and I guess - not on my printer.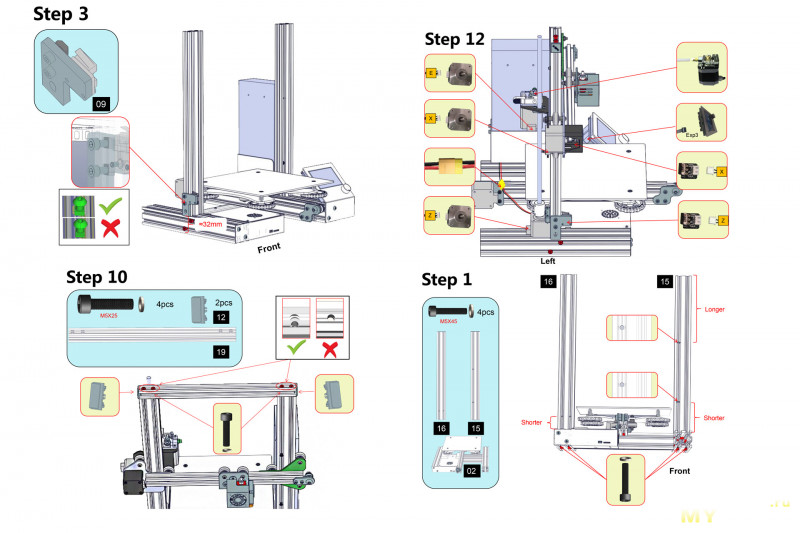 By the way, a person is professionally engaged in welding and has an overwhelming amount of tools, devices and everything else. I was taken to a semi-homemade device and asked if I could print a small piece for it to replace the handmade wood. Decided to agree. nine0003
Arriving home late in the evening, sat down at an unfamiliar Fusion. Surprisingly, it turned out pretty quickly. The detail was very simple, and I wrote all the dimensions very carefully on a piece of paper with a schematic image in two projections. In the morning I decided to print it, but then out of the corner of my eye I noticed the remains of the complete plastic and realized that it definitely wouldn’t be enough for anything. How I didn't want that moment to come. Still it was good.
Plastic replacement nine0232
I sit on the balcony in front of the printer and watch YouTube at 1.5 speed. Interestingly, almost everything I found called for heating the hot end to printing temperature (I have PLA at 200 C degrees), open the plastic feed mechanism and pull out / pull out the bar, then insert a new one in the same place until it stops. I was somewhat embarrassed that on the printer screen I met the Replace Filament menu item, but could not find it again then. I admit it didn't go as bad as I thought. I got into the plastic hole rather quickly and plastic snot appeared on the nozzle. Another step. nine0003
By the way, as I understand it, item Replace Filament appears only when the hot end is heated. I then tried to use this function. In short, during printing or just for replacement, when the nozzle is heated (you can manually start heating it), the printer, by clicking on the replacement item, winds the plastic back by 10 centimeters, then it can also be pulled out, but a thin long part is formed at the end of the bar , as when stretching gum (I didn’t take a photo, but I hope the analogy is clear). Here I still have suspicions that more plastic remains in the tube than with the first method, but this is not certain. Next, the printer says to insert a new plastic, we do this and confirm the replacement by poking at the control wheel. I tensed up a little when the printer began to squeeze out a large amount of plastic, but in fact, it turned out that, having also pulled out the snot in 10 cm, it calms down and offers to repeat and squeeze out more or the second option - that's enough for you. We press enough, remove the snot - the printer is ready. nine0003
I have not made a choice which method is better and more correct, but so far the score is 3-2 in favor of the first.
Since PLA, as we thought, we became friends, small jambs were not so important, and there is still no understanding of a perfectly printed replacement model, I stayed with PLA. Next is the printing process, where you either sit at the printer, because waiting for some jamb, or resorting to it once every 10 minutes. Almost 5 hours and everything happened. He did not postpone experimental tests and took the part for tests. I must say right away that I thought that during operation it would melt from the heating of the rubbing elements, but after a week the flight was normal.