Download g code for 3d printer
Gcode best 3D printer models・Cults
Dirt Bike 450R
€0.61
Rapid-forge.com Bed Level test
Free
Industrial rail barrier
€0.80
Industrial rail barrier
€0.80
F**k COVID SHIELD MMP V11 by Bruno Horta gcode for ender3 1:33
Free
Quick temperature turn
Free
UGA Bulldogs logo remixed
Free
Extended bed levelling code for FlashForge Creator Pro
Free
PrusaSlicer configuration for FlashForge Creator Pro (Slic3r)
Free
PrusaSlicer G-code snippets for FlashForge Creator Pro
Free
Extended bed levelling code for QIDI Tech 1
Free
GCode Viewer for Android -SOURCE-
Free
Anet A8 Automatic Shutdown
€1. 77
Clamp bracket
Free
PENCIL CASE WITH CATS PEEKING (with nose) - PORTAPENNE CON GATTI CHE SBIRCIANO (con naso)
€1.88
PADS CUSHION FOR OVAL CHAIR LEG INSIDE 3CM X 1.8CM LEG - CUSCINETTO PER GAMBA OVALE SEDIA INTERNO GAMBA 3CM X 18 CM
€1.88
Ipad pro 12.9 drawing stand
Free
Marking Gauge marking aid parallel marker incl. Gcode for Prusa i3 mk3s
€1.50
G-Code . Google logo. with and without magnets.
€1.34
G - Code - Simulator
Free
3d canape file
€15
EV Charger Plug & Cable Holder - Reduced Print time
Free
GCode Print Simulator
Free
3D Printer Tablet Holder
Free
Spare Electric Panel Wrench
Free
Yelmo Fh4300
Free
Gmixer for Cura: A program mixes gcode files with different layer settings
Free
Get numerous Maurer Rose figures gCode
Free
Juggling ball holder storage with wall bracket including Gcode for PETG fuzzy skin effect
€1. 50
50
Picard's Song
Free
GPX gcode to x3g converter
Free
Man On The Silver Mountain
Free
Happy Birthday Tim Berners-Lee!
Free
Z axis for CNC mini mill
Free
Gearbox desk
€1.25
gearbox for desk
€5
gearbox for desk
€5
Boat
€2.50
Puzzle box No 3
€2.50
Fixed wrench 10 in 1
€2.50
Puzzle box No 2
€1.25
Puzzle box gear
€1. 25
25
62 pieces helical gears set Module 2
€1.25
31 piece crossed helical gears set Module 1
€1.25
31 piece crossed helical gears set Module 0,25
€1.25
MakeAnything Colorful 3D Prints on a Single Extruder Printer Test Pog/Chip
Free
BASICEXTRUD
Free
Cold Pull GCode
Free
Open source 3D printing toolbox
What is Slic3r?
Features
Compatible with your printer too. RepRap (Prusa Mendel, MendelMax, Huxley, Tantillus...), Ultimaker, Makerbot, Lulzbot AO-100, TAZ, MakerGear M2, Rostock, Mach4, Bukobot and lots more. And even DLP printers.
Fast G-code generation is fast. Don't wait hours for slicing that detailed model. Slic3r is about 100x faster than Skeinforge. It also uses multithreading for parallel computation.
Lots of input/output formats. Slic3r reads STL, AMF and OBJ files while it can output G-code and SVG files.
Do you like the graphical interface or command line? All the features of the user-friendly interface are also available from command line. This allows to integrate Slic3r in your custom toolchain and batch operations as you like.
Open source, open development. Slic3r is open source software, licenced under the AGPLv3 license. The development is centered on GitHub and the #slic3r IRC channel on FreeNode, where the community is highly involved in testing and providing ideas and feedback.
Dependencies? Nah. Slic3r is super-easy to run: download, double click and enjoy. No dependencies needed. Hassle-free. For MacOS X, Windows, Linux.
Print with dual multiple extruders. Print beautiful colored objects, or use your secondary extruder to build support material. Or put a larger nozzle on it and print a faster infill.
Use brim for the best adhesion. This unique feature improves built plate adhesion by generating a base flange around your objects that you can easily remove after printing.
Microlayering: save time, increase accuracy. You can choose to print a thicker infill to benefit from low layer heights on perimeters and still keep your print time within a reasonable amount.
Compose a plate but print one object at time. Use the built-in plating interface that allows to place objects with drag-and-drop, rotate and scale them, arrange everything as you like. The sequential printing feature allows to print one complete object at time in a single print job.
Cool cooling strategies. A very smart cooling logic will regulate your fan speed and print speed to ensure each layer has enough time to cool down before next one is laid on it.
Manage multiple printers, filaments and build styles. The configuration handling system was designed for people working with multiple machines and filaments: you can save configurations as presets for each category avoiding to multiply your saved configurations.
Enjoy support material. Automatic generation of support material for overhangs.
Gallery
Links
The RepRap Project
G-CODE in Russian for 3D printing (Mini-guide)
Often, for high-quality printing, and especially when selecting print parameters, it is necessary to be able to read and edit the G-code during calibration.
A commonplace example: setting your own values for the "Temperature Tower" or creating start and end blocks of codes in slicers for a specific printer.
On some sites (like reprap.org/wiki/G-code) on the Russian-language pages, the commands are only partially described in Russian, and the rest in English. On some domestic sites, the commands are translated into Russian, but some are given with errors - stupidly copy-paste a clumsy translation.
Tired of searching through different sites, trying to find the CORRECT description of a particular command and its parameters.
I made myself such a mini-reference book. I'll be glad if anyone else finds it useful.
I tried to describe the maximum number of commands used, except for very specific ones.
(Yes, special commands for deltas, for example, sorry, I consider them specific and not necessary for me)
However, most commands are supported by all printers and firmware.
Attention! Compliance of commands and parameters is checked only for Marlin firmware.
G-commands
G0(G1) Xnnn Ynnn Znnn Ennn Fnnn – movement.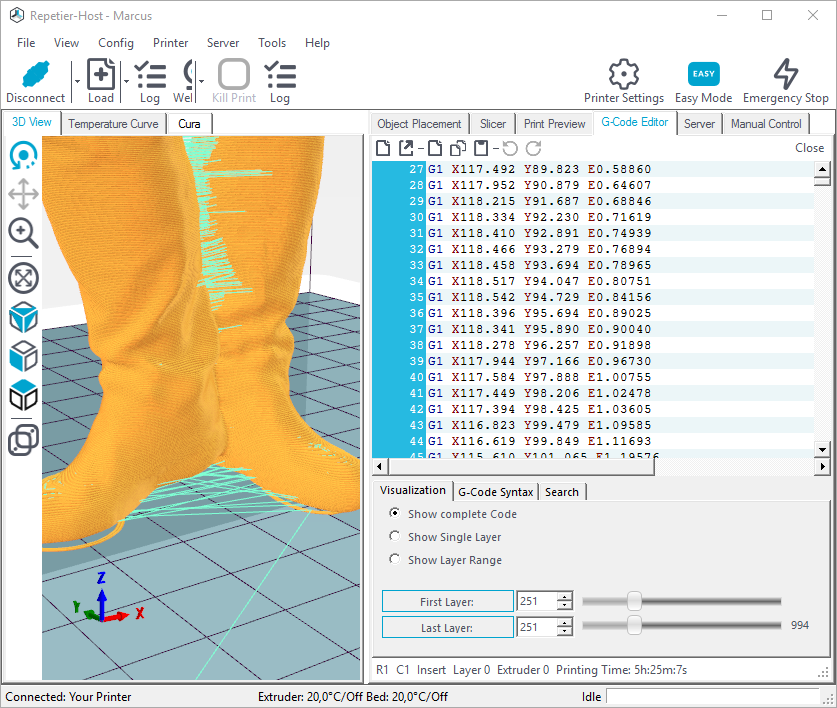
G0 - fast idle
G1 - linear working travel
Xnnn, Ynnn, Znnn – coordinates.
Еnnn - amount of extruded material in mm (with negative values - retract).
Fnnn – travel speed in mm/min (this speed will be used until the next change).
G0 X12 (will move 12mm in X)
G0 F1500 (Set travel speed to 1500 mm/min.)
G1 X90.6 Y13.8 E22.4 (Move 90.6mm in X and 13.8mm in Y while extruding 22.4mm of material.)
G4 .
Pnnn - Timeout, in milliseconds
Snnn - Timeout in seconds.
"G4 S2" and "G4 P2000" - equivalent to
G10 - Plastic rollback (Retract)
Filament rollback according to M207 settings.
G11 - Plastic feed
Feed / reposition the head according to M208 settings.
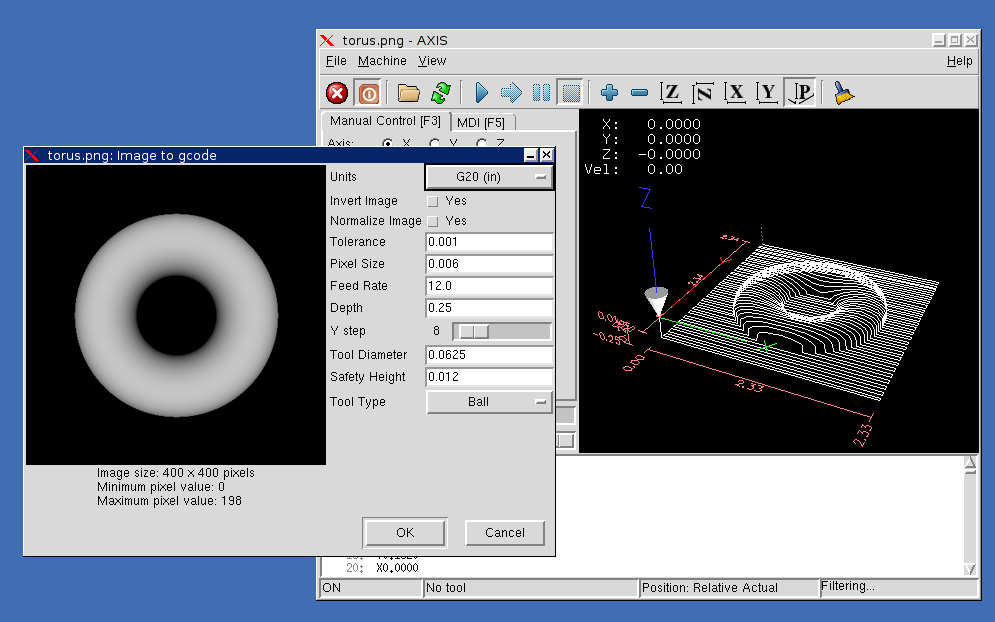
G20 - Inch unit setting
G21 - Setting the units in millimeters
From now on, the reading will be in inches/millimeters.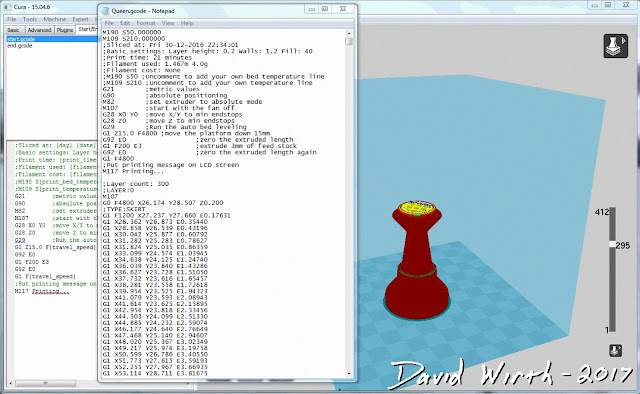
G28 - Move to start ("home") until limit switches actuate
G28 – home on all axes.
G28 X Z - Move home only in X and Z axes
G29 - Create table curvature mesh (MESH_BED_LEVELING)
The command allows you to create a compensation (Z-height) grid and use it later when printing. The grid can be used repeatedly even after the printer is turned off.
After using the G28 command, the mesh created by the G29 command flies off.
It is necessary to save the rhinestone mesh after it has been created! To recall the grid from memory, use the M420 command.
Be sure to use G28 before using G29, otherwise the mesh will be incorrect.
Creating Mesh Bed Leveling manually (via commands):
1. Enter G29 S0 to start meshing.
2. Enter G29 S1 to set the first grid point.
3. Align the nozzle with paper (as usual).
4. Enter G29 S2 to save the value and jump to a new point
5. Repeat steps 3 and 4 until the creation procedure is completed.
6. Enter M500 to write the resulting mesh to EEPROM.
Creating Mesh Bed Leveling using the printer menu (the function must be active in the firmware):
1. Select Prepare followed by Auto home (aka G28 command).
2. Select Prepare and then Level Bed.
3. Wait for on-screen instructions to begin. Press the "twist" on the screen when the inscription "Click to Begin" appears. The head will go to the first grid point.
4. Use the thumbwheel to raise or lower the nozzle to align the nozzle with the paper. Same as when leveling the table. After you have achieved the desired gap between the nozzle and the piece of paper, press the "twist". The head will move to a new grid point.
5. Repeat step 4 until the program has passed all points.
6. When finished, enter the Control menu and select the Store memory item to save the created mesh to EEPROM.
To use the grid stored in EEPROM when printing, use the command
M420 S1 (See M420).
G90 - Setting absolute coordinates
All coordinates are absolute relative to the machine origin.
G91 - Set relative coordinates
All coordinates from now on become relative to the last position. Marlin translates all axes into relative coordinates, including the extruder.
G92 Xnnn Ynnn Znnn Ennn - Set position
This command can be used without any additional parameters.
G92 - reset all axis coordinates to zero.
Xnnn - new X coordinate
Ynnn - new Y coordinate
Znnn - new Z coordinate
Ennn - new extruder position
Example: G92 X10 E90
M-commands
M17 - Enable/Enable all stepper motors
M18 - Remove current from motors
Motors can be turned by hand. Command analog M84
M20 - List of files on SD card
M21 - SD card initialization
If the SD card is loaded when the printer is turned on, this will happen by default. The SD card must be initialized for other SD card functions to work.
M22 - Release SD card
The specified SD card will be released. On future (random) read attempts, a guaranteed error occurs. Useful before removing the SD card.
M23 - Select file on SD card
Example: M23 filename.gco
M24 - Start/continue printing from SD card
The printer will print from the file selected with the M23 command.
M25 - SD card print pause
M28 - Start writing to SD card
Example: M28 filename.gco.
A file is created on the SD card, designated as filename.gco (if the file exists, it is overwritten) and all subsequent commands to the printer are written to this file.
M29 - Stop writing to SD card
Example: M29 filename.gco
The file opened by the M28 command is closed and all subsequent commands are executed by the printer in normal mode.
M30 - Delete file from SD card
Example: M30 filename.gco. filename.gco will be deleted.
M32 - Select file and start printing from SD card
Example: M32 filename.gco.
Used for SD card printing and works the same as M23 and M24
M80 - Enable ATX Power Supply
Puts the ATX power supply into sleep mode. Does not work on electronics without sleep mode.
M81 - Turn off the ATX power supply
M82 - Set the extruder to absolute mode
M83 - Set extruder to relative mode
Allows extruder to be extruder in absolute/relative units
M84 SNNN X, Y, Z, E - transfer motors to the waiting mode of
SNNN - time per seconds.
If a timeout is specified with Snnn, this command simply sets the stepper motor inactivity timeout.
If no motors (X,Y,Z or E) are specified, this command immediately disables all.
If one or more axes are specified, this command disables the specified ones immediately. For example, "M84 S10" will put stepper motors into standby mode after 10 seconds of inactivity.
M92 Xnnn Ynnn Znnn Ennn - Set the number of steps per axis per unit
Ennn - steps per unit for extruder
Examples: M92 X87.489 Y87.489 Z87.489 or M92 E420
Allows you to set the number of steps per unit (usually mm) for motors. These values are replaced with the values from the firmware at power up unless written to the EEPROM see M500.
M104 Snnn - Set extruder temperature and DO NOT wait
Snnn - Set temperature
Example: M104 S190
Sets the temperature of the active extruder 190C and immediately returns control (that is, DOES NOT WAIT for the extruder to reach the set temperature).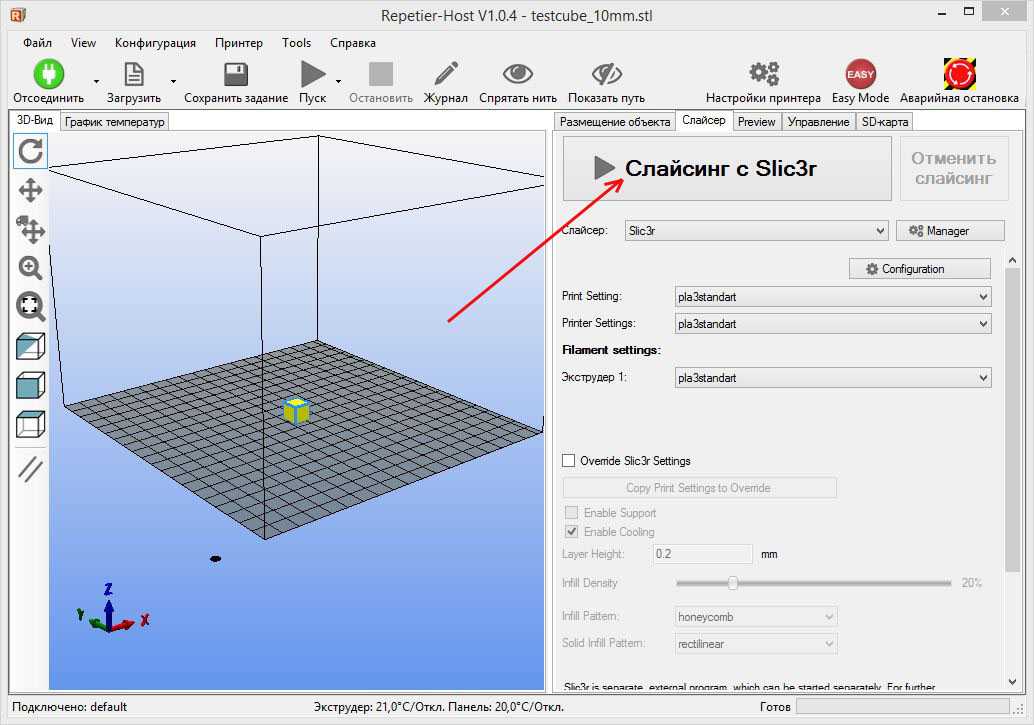 See also M109
M105 - Get Extruder Temperature
Gets the temperature of the active extruder and hot bed in degrees Celsius. The temperature is transmitted to the connected computer. The response sent to the computer might look like this: ok T:201 B:117
M106 Snnn - Turn on the fan blowing part
SNNN - fan rotation of fan from 0 to 255 (127 - 50% speed)
m107 - turn off the fan
m108 - cancel the heating 9000 9000 temperature set by M109 and M190, continues printing.
M109 Snnn - Set extruder temperature and wait
Sets the temperature in Celsius and waits for it to be reached. See also M104
M110 Nnnn - Set current line number
Nnnn - Line number
Example: M110 N123
In this example, the number of the current line 123 is set. Thus, it is expected that the next line after this command will be 124.
M112 - Emergency Stop
m114 - receipt of current positions 9
M115 - Get a firmware version
m119 - get the status of ends
m140 - set the temperature of the table and DO NOT wait
Example: M140 S65
Sets the table temperature to 65C and immediately returns control (ie DOES NOT WAIT for the table to reach the set temperature). See also M190
M190 - Set table temperature and wait
Sets the temperature in Celsius and WAITS to reach it. see M140
M200 Dnnn Tnnn - Set the REAL diameter of the filament rod.
Dnnn – diameter in mm.
Tnnn – extruder number. (can be omitted for single extruder printers)
Example: M200 D1.65
Used to calculate the actual extruded volume.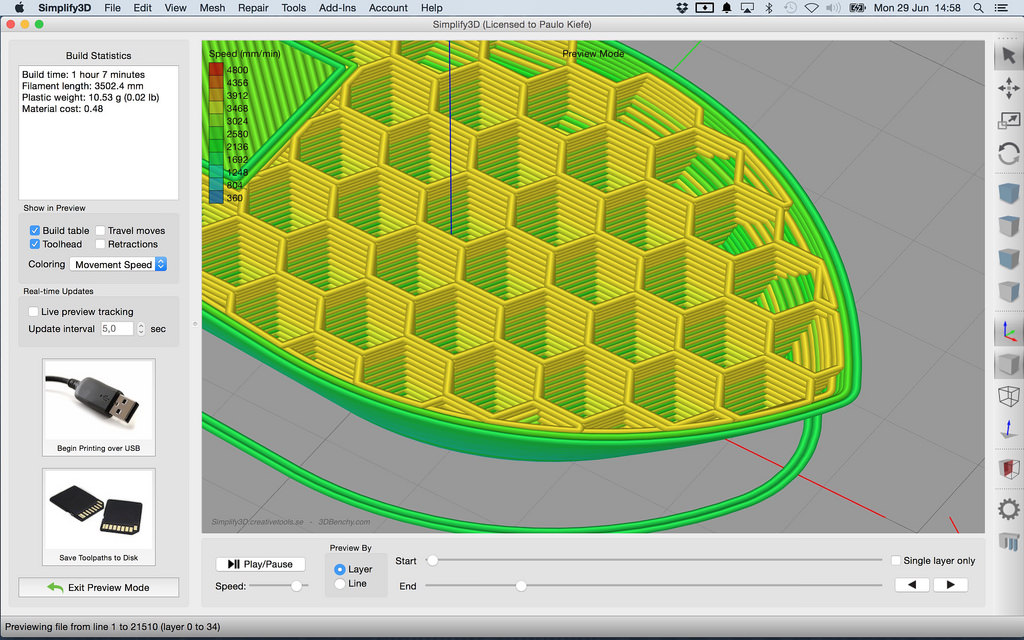
See M404 for rating setting.
M201 Xnnn Ynnn Znnn Ennn - Setting of the maximum accelerations (in mm/s in sq.)
for axes.
Ennn - accelerations in mm/s in sq. for the extruder.
Only one/two of the parameters can be used.
Example: M201 X1000 Y1000 Z100 E2000
Use M500 to store parameters in EEPROM
M202 - Setting the maximum acceleration for simple (idle) movement.
!Not used in Marlin! V mm/s in sq. Example: M202 X1000 Y1000
M203 Xnnn Ynnn Znnn Ennn - Setting the maximum speed (in mm/s)
Xnnn, Ynnn, Znnn - max speed for axes
Ennn - max extruder speed.
Only one/two of the parameters can be used.
Example: M203 X6000 Y6000 Z300 E10000
Use M500 to store parameters in EEPROM.
M204 Pnnn Rnnn Tnnn - Acceleration setting (in mm/sec. in sq.)
Pnnn - Printing acceleration
Rnnn – Retract Acceleration
Tnnn - Accelerations during idle movements
Only one/two of the parameters can be used.
Example: M204 P800 T3000 R9000
Use M500 to store parameters in EEPROM.
M205 Xnnn, Znnn, Ennn - Setting the maximum jerk (jerk) (mm / s)
Xnnn - jerk along the X and Y axes. (Jerks are the same along these axes)
Znnn - jerk along the Z axis.
Ennn - extruder jerk.
Only one/two of the parameters can be used.
Example: M205 X30 Z5 - Set jerk X/Y = 30, Z jerk = 5.
Use M500 to store parameters in EEPROM.
М206 Xnnn, Ynnn, Znnn - Set offsets relative to limit switches (zero)
Similar to G92 command, but these offsets can be written to EEPROM see M500.
Example: M206 X10.0 Y10.0 Z-0.4
M207 Snnn Fnnn Znnn - Set retract parameters (bar retraction)
Snnn - positive retract value in mm.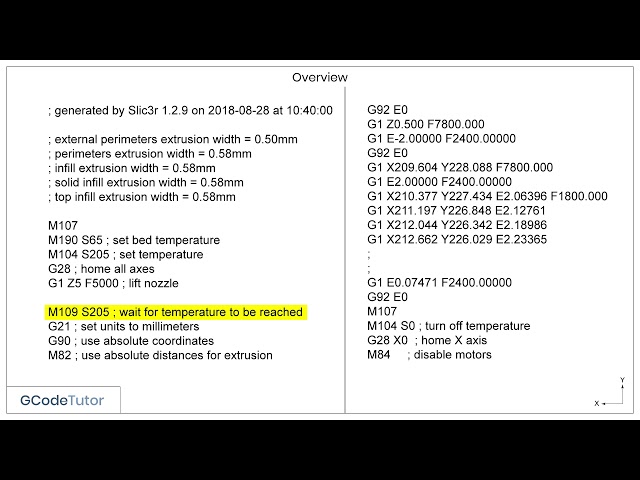
Fnnn – feedrate mm/sec.
Znnn - lift (lift) of the head along the Z axis in mm during retract. (Helps avoid hitting the model)
Example: M207 S4.0 F2400 Z0.075
Used subsequently for G10 and G11 commands.
Use M500 to store parameters in EEPROM.
M208 Snnn Fnnn – Bar feed recovery parameters after retract
Snnn – positive feed value in mm.
Fnnn – feedrate mm/sec.
Use M500 to store parameters in EEPROM.
M209 Snnn – On/off automatic retraction
Snnn – value 1 – on, 0 – off
Used if the slicer does not support the G10 and G11 commands.
Each extrusion command will be classified as a retract, depending on the value (positive or negative).
M218 Tnnn Xnnn Ynnn – head offset setting
Tnnn - head number
Xnnn, Ynnn – X,Y coordinates.
Example: M218 T0 X50 Y10.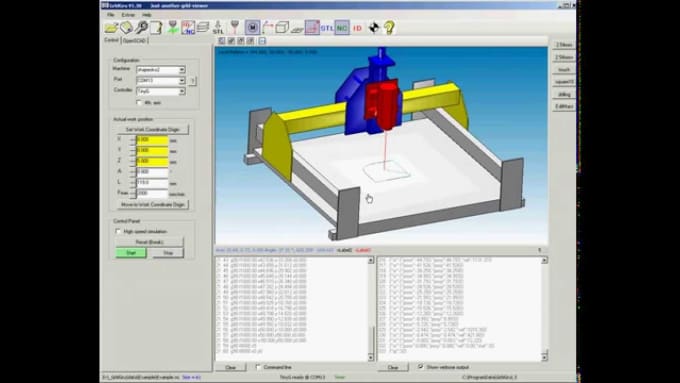 5
5
M301 Hnnn Pnnn Innn Dnnn — Write hotend PID parameters(!)
Hnnn – extruder number. h2 - the first exruder (hotend).
Pnnn - Proportional gain (Kp)
Innn - Integral factor (Ki)
Dnnn - Derivative coefficient (Kd)
Example: M301 h2 P1 I2 D3
Use M500 to store parameters in EEPROM.
See M304 for writing table PID.
M302 Snnn - Allow extrusion at Snnn and above.
Snnn - Set temperature
Example: M302 S170 – enable extrusion (turn on the extruder motor) at a nozzle temperature of 170C and above. M302 S0 - extrude at any temperature.
M303 Ennn Snnn Cnnn - Start PID calibration process for table/hotend
Ennn - E0 hotend, E1 table.
Snnn is the calibration temperature.
Cnnn – number of calibration cycles. More cycles - more precise parameters.
Example M303 E1 C8 S110 – table PID calibration at 110C for 8 cycles.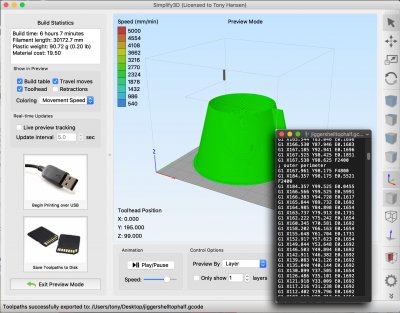
The PID parameters will be displayed as a string on the terminal screen of a program running in connection with the printer, such as Repetier-Host.
M304 Pnnn Innn Dnnn - Write table PID parameters(!)
Pnnn - Coefficient proportional (Kp)
Innn - Integral factor (Ki)
Dnnn - Derivative coefficient (Kd)
Example: M301 h2 P1 I2 D3
M301 - without parameters will display the current parameters.
Use M500 to store parameters in EEPROM.
For writing extruder PID see M301.
М404 Wnnn - Setting the nominal filament thickness 1.75 or 3.
Wnnn - nominal (theoretical) filament thickness in mm.
Example: M404 W1.75
M404 - without parameters, will display the current nominal value as a string.
This value is used to determine the percentage difference in the automatic rate adjustment in response to the measured filament width and must match the value used for the filament width in slicer settings.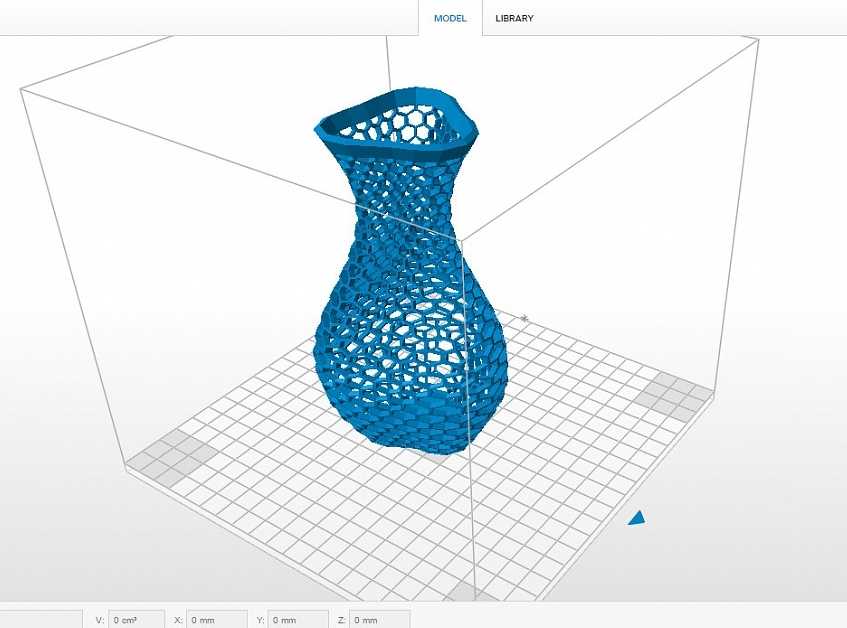
Set actual filament thickness, see M200.
М420 Snnn – Enable/disable the use of the table curvature compensation grid (MESH_BED_LEVELING)
Snnn – S1 on, S0 off.
M420 S1 – use the table curvature compensation grid loaded from EEPROM when printing.
See G29 to get the current status and create a table curvature compensation grid.
M500 - Save data to EEPROM
M501 - Reading data from EEPROM
M600 - Command for automatic filament change
what are start (initial) commands g code
The current level of development of additive technologies allows users to recreate complex technical objects without a detailed analysis of the essence of the technological process. At the same time, knowledge of G-code and the ability to use it is necessary for every owner of a 3D printer. Effective use of code allows you to dive deeper into the process and take into account all the nuances when printing products. Also, the ability to read and edit the G-code is necessary for the selection of technical parameters when printing and calibrating the device.
What is a G-code?
G-code is a programming language for machines and machine tools with an integrated numerical control module.
It was developed by the Electronic Industries Alliance in the first half of the 1960s. Programs created using this code have a rigid and extremely consistent structure. G-code lacks cycles, functions, and logical commands; its capabilities allow you to configure the equipment only in such a way that it performs only those actions that were embedded in the computer.
G-code for 3D printers can be generated by a special program - a slicer - by preloading a 3D model into it and setting the required printing parameters.
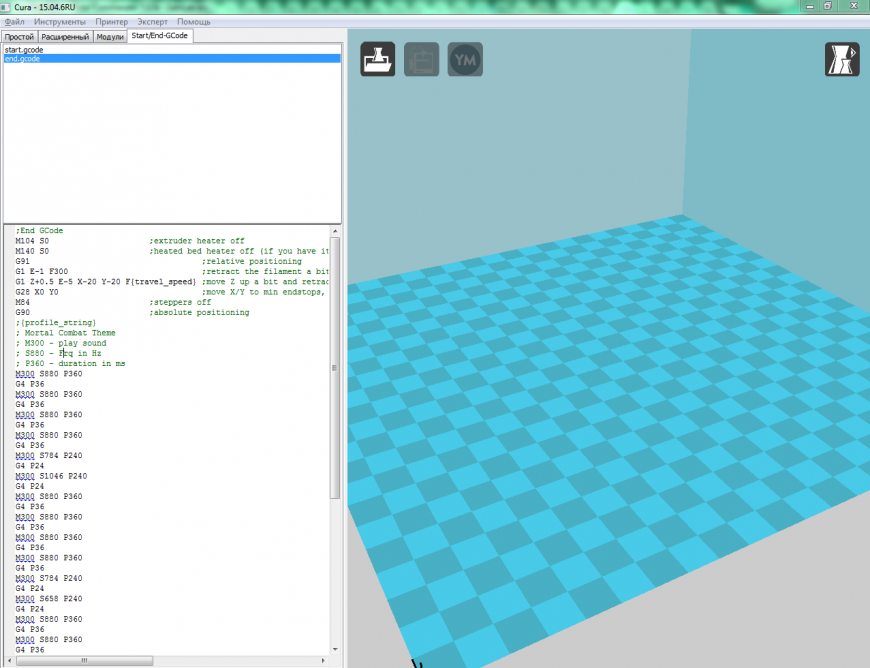
G-code is used by the vast majority of popular printers. Its popularity is due to its ease of use and the ability to generate code in any available slicers, including Cura, Chitubox, Simplify3D, Slic3er, etc. You can edit the written program in a regular notepad or NotePad ++, which is available to all users of the Windows operating system.
But there are cases when printing devices work on encrypted G-code, for example - Zortrax, which uses its own slicer, which generates a file in the Z-code extension.
Files created in this way cannot be opened using standard programs and third-party slicers.
Regardless of the type of encryption, the code consists of lines, each of which is a frame. For each frame or group of frames, developers write comments that are highlighted in the code feed with a semicolon.
Basic language commands
All basic language commands begin with the letter G. They are responsible for the following actions:
- Linear and circular movement of the working device along a given trajectory at a set speed.
- Perform standard operations such as starting fans, heating elements, etc.
- Set parameters and coordinate system.
Commands whose names begin with M or T are considered additional. M commands are auxiliary, technological. They are responsible for the use of heating, cooling, reading parameters and their subsequent output to the display of the printing device.
The T commands are responsible for changing the tool used or moving from one extruder to another.
Each line (frame) of the G-code carries an encrypted specific command, as well as a set of characteristics that determines the operation of the equipment: the operating time of the drives, the amount of material supplied, its heating, etc.
Development and popularization of special programs -slicers helped optimize and make the programming process automatic. The code obtained using modern software, as a rule, does not require correction, and if it does, then the developer has to make changes not to the entire code, but to several lines, adjusting one or more parameters.
How the 3D printer software works
Each of the G-code strings is a command that the printing device must execute. The principle of operation of software for 3D printers is to break 3D models into many layers located in a horizontal plane.
Each of them, regardless of the method of creation, further goes through another breakdown into many lines of different thicknesses and widths, the parameters of which are set by the developer.
For example, the line width for a 3D printer using FDM technology must correspond to the diameter of the nozzle, and the height must correspond to the thickness of the extruded material layer.
Each vector in the G-code motion path can be described in terms of the Cartesian coordinate system along which the extruder is moving. Also in this file related parameters are additionally indicated: heating, extruder speed, material feed speed, etc.
When to use a G-code?
Editing a G-code compiled by slicers is useful in the following cases:
- When making spot edits to the code.
- For setting special settings, including changing the heating temperature of the extruder during printing, etc.
- For solving problems. To eliminate them, developers can add a special command, for example, turn on the blower or increase the heating temperature of the material.
G-code commands
The most popular G-codes are:
- G0 - used to determine idle speed, does not include tool operation.
- G1 – command defines coordinated movement along X, Y, Z, E axes.
- G4 - used in cases where it is necessary to designate a pause and set its time in seconds.
- G28 - the command is responsible for returning the extruder head to the origin of the coordinate system.
- G90 - used when it is necessary to use absolute coordinates.
- G91 is a command used to use relative coordinates.
- G92 - determines the current target position.
Commands M
The largest group, including commands responsible for controlling the printing device.