Diy uv resin 3d printer
How to make a DIY UV Curing Station for Resin 3D Printers
Please Note: This site uses affiliate links. Our affiliates are shown in the sidebar on the homepage
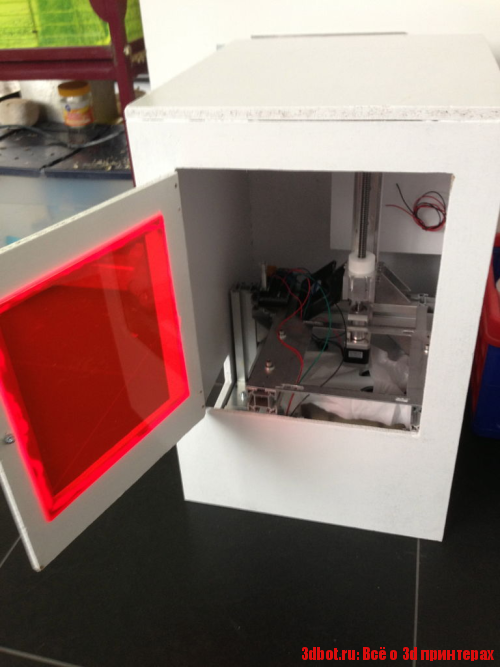
Whilst you can Buy UV Curing Stations, or UV Curing Chambers online they are very expensive. I just don’t have the money to spend what they cost! So instead I built my own and I’ll show you the steps in our How to Make a DIY UV Curing Station for Resin 3D Printers guide.
Ok, so if you follow me on Facebook or Instagram you’ll see from my posts I love my 3D printer. After buying this, however, I was surprised (due to my over-excited lack of actual research) that the parts you print actually need to be fully cured post-print with UV light.
So when my first print came off the plate, I was scrambling around looking for anything which would suffice. Thankfully my wife had a UV Cure station which was made for nail gels. So I used this for the first week until it died.
Still unable to afford one of the retail options, I was looking at how to make a decent cure station. Many people will just stick a print in the sunlight, but living in the UK during the winter, we don’t get much sun. Even when we do it’s probably raining anyway.
There’s a lot to consider when curing resin, if you want to cure it properly without it becoming too brittle or warping you need to regulate temperature and light intensity. You also need to balance it across the surface. When I was making base toppers for my miniatures and using my wife’s nail curing station thy started to curl from being left under the direct light.
Whilst you can’t really regulate temperature with a DIY Curing Chamber, you can easily keep the part rotating to get more even coverage.
How to make a DIY UV Curing Chamber – Parts
If you have a Resin printer, I’ll just assume you have plenty of Isopropanol for rinsing the parts and Nitrile gloves for handling uncured resin. Not that you need them for making this. I just didn’t realise how many gloves or how much Isopropanol I’d need for resin printing.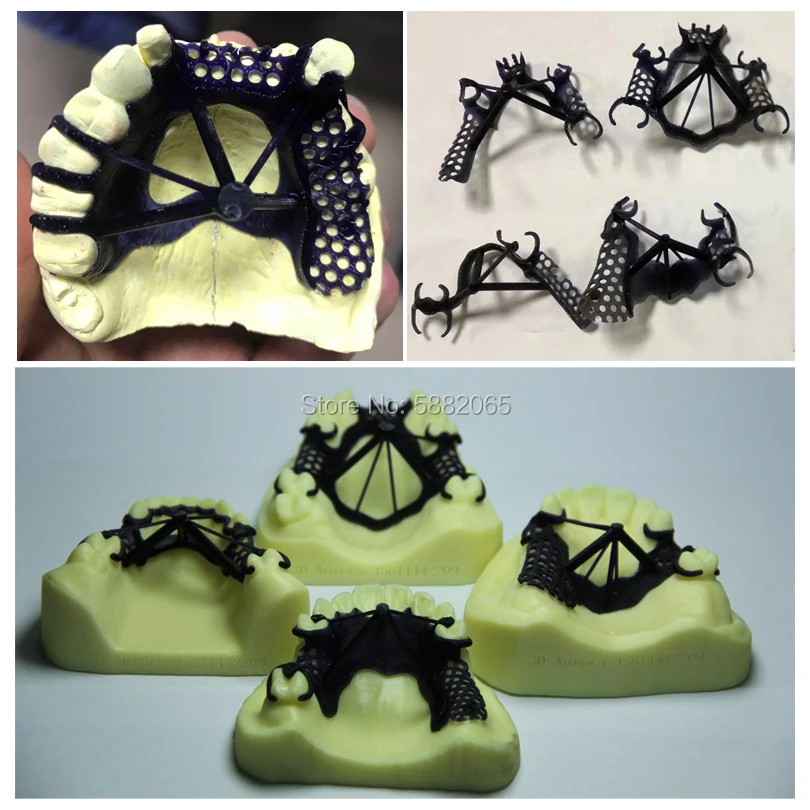 so if you rea reading this before getting a printer, let me just say you need this stuff. Lots of it.
Let’s have a look at what you need to make a cure station
Empty Paint Tin
The reason I’ve picked a paint tin is becasue teh inside is already reflective. You will lose a lot of the UV’s power in reflected light but it’s still better to have some than none. Some people have gone as far as lining the inside with Aluminium tape to increase the reflectivity of the surface. For the amount of UV light that would reflect over the normal lining of a tin, I just couldn’t see it was worth the effort. But go ahead and do that if you want.
Size-wise, you want a 5L paint tin (1 gallon). I did try with a smaller 2.5L tin, but it was too small for the majority of larger printed parts.
UV LED Light Strip
For this guide, I used a 5M LED Light strip, pretty much the cheapest I could find for 5m. You can get 10M and double up for more intense light. But I’ve found 5M is just fine.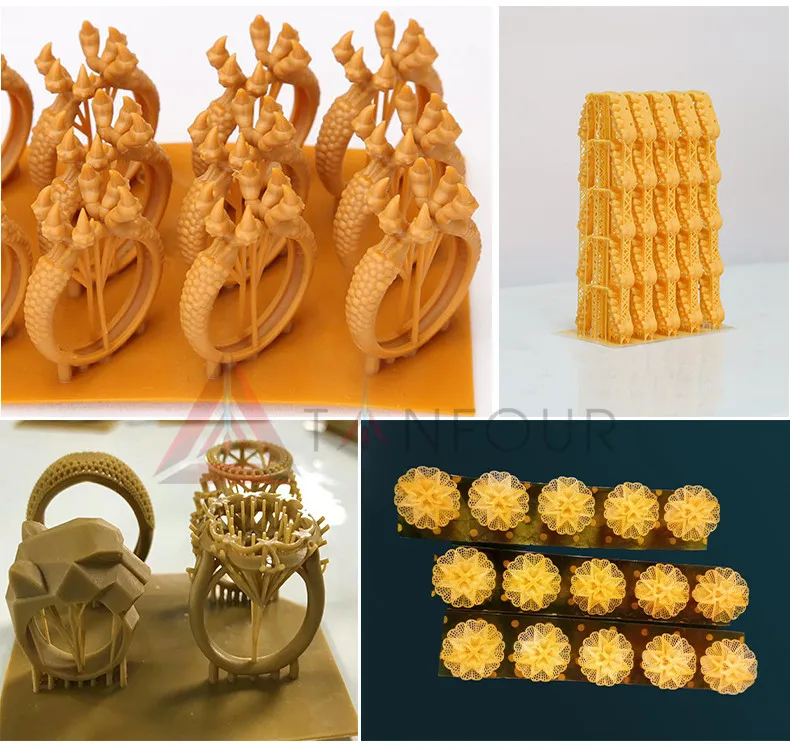
Rotating Display Stand
I like these for displaying models when they are completed. they are really cheap when you hunt around. there are actually 3 variants. One which is powered by light. and one which has the option of adding a battery. The one without the battery option still has the compartment for it, just no connections for the battery to connect to.
If you get the super cheaper one, this probably doesn’t have the battery, probably. this doesn’t mean the more expensive one will let you add a battery. Anyway, I got the cheap one because the UV lights will power it anyway.
UV Protection Safety GlassesYou’re working with UV Lights, protect your eyes.
Drill (optional)
Depending on how you follow the steps ahead you may want to use a drill so that the power lead comes out of the bottom of the tin. You can have it coming out of the top if you want to do it the easy way but you won’t be able to close the lid flush.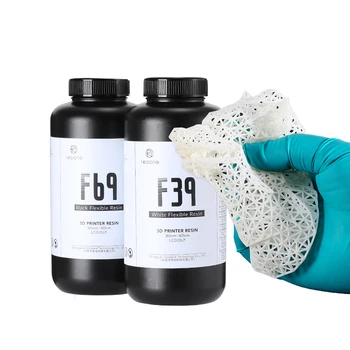 I drilled a hole for the lead becasue the DIY Cring Chamber looked neater as a finished item.
Your call.
You’ll need to measure the diameter of your power cable. I used a 12mm flat wood drill bit for mine.
How to make a DIY UV Curing Chamber
Step 1 – Assemble Components
Straight forward, just get everything ready, You need your Empty Paint Tin, Drill and UV LED Strip.
Step 2 – Drill a hole
You can skip this step and just have the power lead coming out of the top. but again the lid won’t sit flush and this just looks neater.
Go careful when doing this, these are really brittle tins and the drill can send shards flying everywhere. Go slow and steady, don’t push, just let the drill score the tin until it punches through.
Step 3 – Test Your LED Strip
I’ve seen a few people online mention how flimsy these Cheap LED strips can be. take a minute to make sure it works before your next step.
Step 4 – Measure the Tin & LED Strip
Depending what size tin you got you may need to get maths involved so you can evenly space the Led strip around the inside.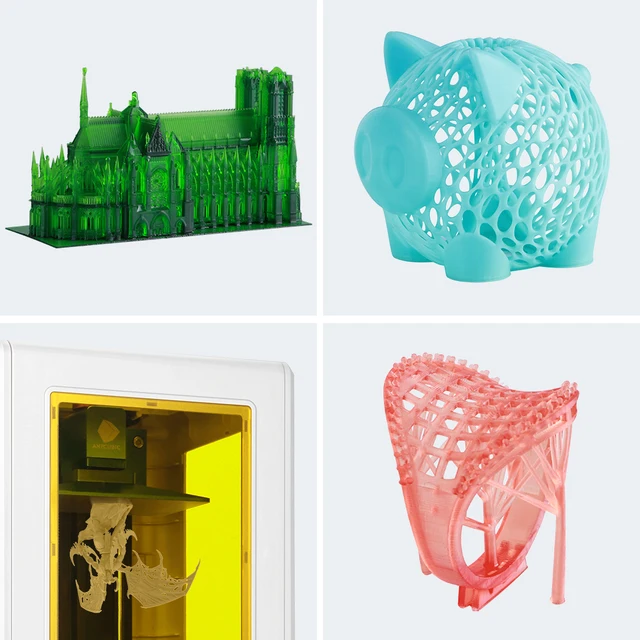 Thankfully for me, I remembered some maths. thankfully for you, if you get the paint Tin size I recommended I’ve done the spacing here for you.
To work out even spacing I needed to know roughly how many times I could wrap a 5m led strip around the circumference of this painted tin.
Well, everyone knows C = πD (right?)
You can always just avoid math and use a tailors tape measure wrapped around the tin.
So I have a tin diameter of 17.5cm. 17.5 x π = 54.98cm (let’s say 55cm)
The length of the UV LED strip is 500cm. So 500/55 is 9.1. so I can wrap this around the inside of the tin 9 times.
The height of the tin is 22.5cm. 22.5/9 is 2.5cm. Pretty much an inch
Hey cool, I have an inch ruler!
Step 5 – Mark the Tin
Using a marker pen draw the evenly spaced lines up the inside of your tin. This is a guide to follow in the next step
Step 6 – Stick in The LED Strip
Feed your power cable through the hole in the bottom of the tin. Then, starting from the bottom, stick the Led strip around the inside of the can. Try to follow your guidelines as best you can on each full rotation to keep them evenly spaced.
I left a little bit of LED sticking out of my tin near the power hole so I could see from the outside when it was on. It’s just enough so that when I flick the lights off in my office I can see it glowing, reminding me to actually turn it off.
When you are done you shouldn’ have any need to trim the LED strip as it should be a perfect fit. Assuming you measured correctly or got the bits we suggested above. any excess can just be doubled up a bit toward the top.
Step 7 – Add the Solar Powered Display Turntable
Stick it in with double-sided pars if you want, but I just placed it in the base of the tin so I can replace it if needed.
Some people like to coat the turntable itself in foil tape or tin-foil. In my experience, you can end up with some resin seepage from your model and it will start to discolour the foil and tear it away.
How to make a DIY UV Curing Box – Complete
And that’s it. Once you have rinsed off your resin Model in Isopropanol and let it evaporate. just place it on top of the turntable and plug it in. The UV lights will power the turntable to keep it spinning.
These LED strips are really low power so I tend to leave my parts in for anything up to an hour, then flip them over and do an hour on the other side. As I’m writing this I’ve just remembered I’ve left a part curing for the last 4 hours becasue I forgot about it!
I just checked it, it’s fine, fully cured and no warping.
What did you think of this Tutorial? please let us know in the comments.
If you like what we’re doing here you could really help encourage more content with a share on any social media platform.
Click the share links at the bottom of this screen (or on the left for computers and tablets)
Want to keep updated with the blog? You can subscribe in the sidebar for RSS or by email below
Email address:
(Sidebar is below the article on Mobile Devices)
Author
Summary
The DIY Resin SLA 3D Printers You Can Build From $20!
With the internet at just about everyone’s disposal, freely shared tutorials and videos have awakened many to the satisfying and rewarding nature of doing things yourself. DIY resin 3D printers have been a popular choice for creators for a while now, and for many different reasons.
- For FDM kits, we have another ranking of the best DIY 3D printers.
High quality 3D printers can be very pricey, and DIY SLA 3D printers have become more prevalent for those who want to get 3D printing, but don’t want to pay full price for a new machine.
While some of the best resin 3D printers are more affordable these days, this was not always the case. DIY resin 3D printers made waves in the 3D printing community from 2015-2018 as makers scrambled to avoid paying full price for a pre-assembled printer, and there are still those who choose to build their resin 3D printer today.
In this article, we will show why some people are designing and building their own 3D printers, as well as highlight some of the newer and more interesting DIY resin 3D printers from both professional and hobbyist creators that you can build yourself cheaply.
Uses of DIY SLA 3D printers
People from all walks of life have taken to building their own 3D printers.
Because resin 3D printers are known for speed and accuracy, they are ideal for both prototyping and creating working molds and projects for a variety of applications.
For example, resin 3D printers have been used in dentistry to save time and money creating dental models, and these costs are further cut with DIY resin 3D printers over pre-assembled models that cost much more.
For personal use, resin 3D printers are great for projects with smooth surfaces and intricate detailing, like jewelry, toys, and minifigures.
Why Build a Resin 3D Printer?
Just like computers, bikes, furniture, and even cars; people are often keen to build their own home additions and tech, provided they have both the time and the skill. 3D printers are no exception.
Of course, experience and skill is recommended for anyone who wants to try, but anyone willing to put the time and effort in will find DIY resin 3D printing to be a rewarding and worthwhile experience.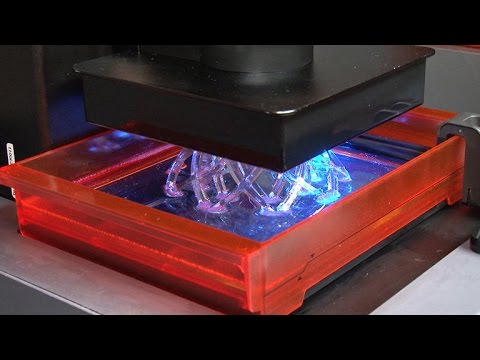
Resin printers solidify UV resins with powerful light sources to create models, parts, and prototypes, and are known mainly for their high resolution and speed.
While some resin 3D printers have fallen dramatically in price in recent years, DIY SLA printers can cost as little as $20 in parts. While the time and effort are costs themselves, that’s a price tag as of yet unbeaten in the world of DIY resin 3D printers.
Features such as as build plate sizes, portability, durability, and material compatibility are all customizable with a DIY build. Beyond simple modding, DIY 3D printers can be altered mid-build to suit you.
The best DIY resin 3D printers you can build
Peopoly Moai 130
- Price: $1,395 — Available on Matterhackers here
- Build volume: 130 x 130 x 180 mm
Born from a Kickstarter campaign in 2017, the Moai is a DIY resin 3D printer that found a huge backing in a short time. Available as a DIY kit or fully-assembled, the Moai is advertised as an affordable resin 3D printer kit for those looking for large, accurate builds.
The Peopoly Moai is also praised for its simplicity in both construction and design. Its compatibility with third-party materials and easy modification and tweaking possibilities make it popular with engineers who know exactly what they want.
Since its initial release, several versions of the Moai have been released after a few upgrades, including more durable frames and accessories such as upgraded build plates.
While still a DIY 3D printer, the Moai has a large following of many users with varying levels of experience and expertise. This means that peer-to-peer support, advice, and information is easy to come by and very useful for anyone who needs it.
Despite the Moai’s popularity, many users have reported the enclosed build space as being very limiting for larger projects, and have noted that the lack of a built-in air filtration or sealing systems as potentially harmful to a project’s success.
For those looking for a larger resin 3D printer, Peopoly released the much larger Peopoly Phenom in 2019.
The Peopoly Moai is capable of a layer resolution of up to 5 microns, which is incredibly accurate, far more so than any pre-assembled 3D printer at this price. Its compatibility with third-party resins also means that cheaper materials can be used to further cut printing costs.
Beyond hobbyists, the Moai is used by researchers for prototypes, and it can be used with biocompatible materials for medical uses such as dental 3D printing.
Overall, the Peopoly Moai is seen as a great (if messy) first step in the world of DIY SLA 3D printing. With enough time, work, and community advice, even newcomers will find themselves printing large, highly detailed resin models like pros.
For more commercially available resin printers, read our resin 3D printer buyer’s guide
For larger resin printers, read our buyer’s guide to large resin 3D printers
Not Just a Professional’s Game: Resin 3D printer kits you can build for cheap
Paulg100’s DIY SLA Printer Build
DIY resin printers are not just projects for professional engineers with crowd-funded goals, anyone with the right skillset and time can make their own tech.
Sites like Reddit, Twitter, and YouTube are full of creators eager to show off their homemade resin 3D printers. Some are more detailed than others, but posts such as this DIY resin printer build by XSimulator user Paulg100 are must-reads for those looking to build their own resin printer.
Paulg100, a dental laboratory owner, uses biocompatible materials with their DIY SLA printer for dental work, and has actively encouraged others to follow their listing. Thanks to the impressive accuracy of his DIY resin printer, he’s able to create remarkably intricate designs on a very tiny scale, something he was unable to do before.
With this build, you too can create complex and accurate prints of anything you like for a fraction of the cost of a pre-assembled 3D printer. If that doesn’t excite you, then we don’t know what will!
From images seen of both practical and cool projects made with this unnamed resin printer, the accuracy and detail look fantastic for the price.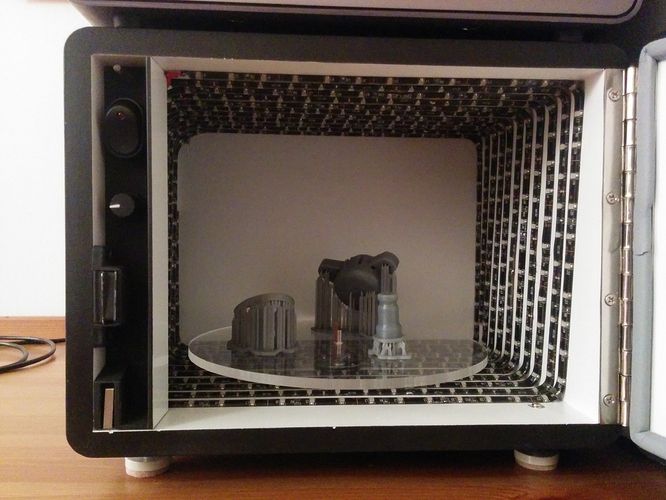
For anyone looking for a challenging build that yields impressive results, this is a DIY 3D printer that should not be overlooked.
Arduino Uno: The $10 DIY Resin Printer
For an impressively cheap DIY SLA printer, Build Your Own SLA user mystamo outlines here their build for a DIY SLA printer made of very cheap parts.
While the concept appears too good to be true, the video below shows the finished project in action.
Peer reviews have also shown this to be a very impressive, if rudimentary, DIY resin printer. While mainly built as a resin test, the speed and reliability of this Arduino Uno build are notably eyebrow-raising given its tiny cost.
TristramBudel DIY SLA Printer
Wanting to spread the gift of 3D printing as far as possible, online builder TristramBudel designed their own DIY SLA 3D printer to share with peers.
As the name suggests, this build prioritizes resolution without sacrificing the speed that resin printers are known for.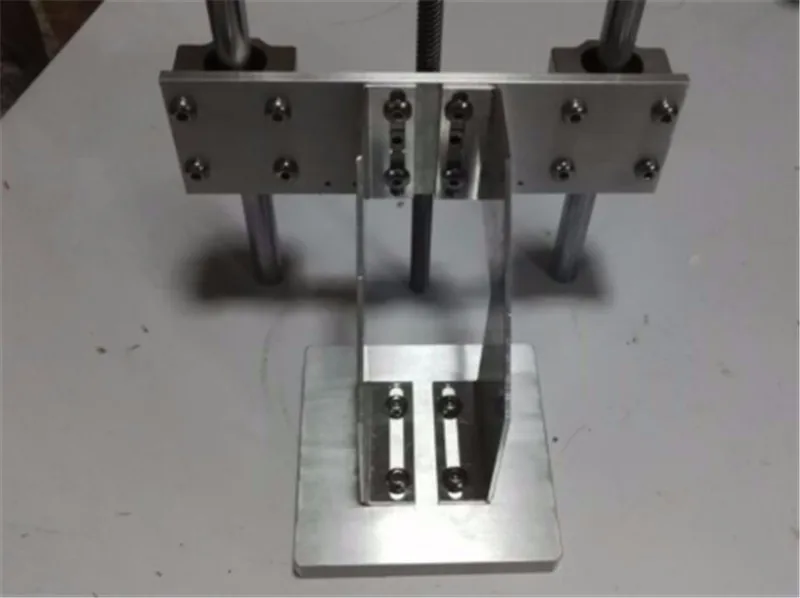
Since its creation, this DIY 3D printer has gained a good following of fellow creators looking to sell their ideas, with one reviewer even calling it ‘a piece of 3D printing history.’
3D printing company autum3D even based their industrial DLP 3D printers on the build, showing just how much of an impact these DIY 3D printers can have on the 3D printing industry as well as the larger community.
Related posts:
- Best resin 3D printers
- Large resin 3D printers
- Resin SLA 3D slicers
- Best resin curing stations
Photopolymer 3D printer
3D printers can be sorted not only by the printing technologies used, but also by the consumables used. In this section, we will look at devices that use photopolymer resins to build models.
- 1 Consumables
- 2 Laser stereolithography (SLA)
- 3 Projector stereolithography (DLP)
- 4 Multi-jet (MJM and PolyJet)
- 5 3D pens
- 6 Additional illumination
Consumables
Photopolymer resins are liquid polymers that harden when exposed to light. As a rule, such materials are sensitive to the ultraviolet range, which determines the design of photopolymer printers. One of the common design elements is a transparent colored cap or housing made of a material that filters ultraviolet radiation. This is done both to protect the user's eyes and to protect the supplies inside the printer from exposure to sunlight and background lighting.
Photopolymer resin loaded into Form 1 3D printer
The physical properties of resins after polymerization vary widely. Both rigid and flexible options are available, transparent and matte. A wide selection of colors is also available. Resin consistency and exposure times also vary, so a range of compatible media should be considered when choosing a printer.
The last aspect to consider when choosing a material is its toxicity. There are both quite toxic options and biologically safe ones.
The cost of consumables can be considered the Achilles' heel of photopolymer printing. The plants themselves are already reaching quite acceptable price levels, but it is still quite difficult to find inexpensive photopolymer resins. It is hoped that the proliferation of inexpensive photopolymer printers will lead to an increase in the production of consumables and lower prices.
Laser Stereolithography (SLA)
SLA Model
The firstborn of photopolymer printing and modern 3D printing in general. The technology was developed in 1984 by Charles Hall, who later founded 3D Systems.
SLA printers use laser emitters to cure the photopolymer supply.
A typical SLA printer consists of a consumable tray sitting under a build platform driven vertically by a raise/lower mechanism.
Alternatively, the cuvette itself can be driven - what matters is the relative movement of the platform and the container. Above the cuvette is a laser emitter and a mirror system for deflecting the laser beam.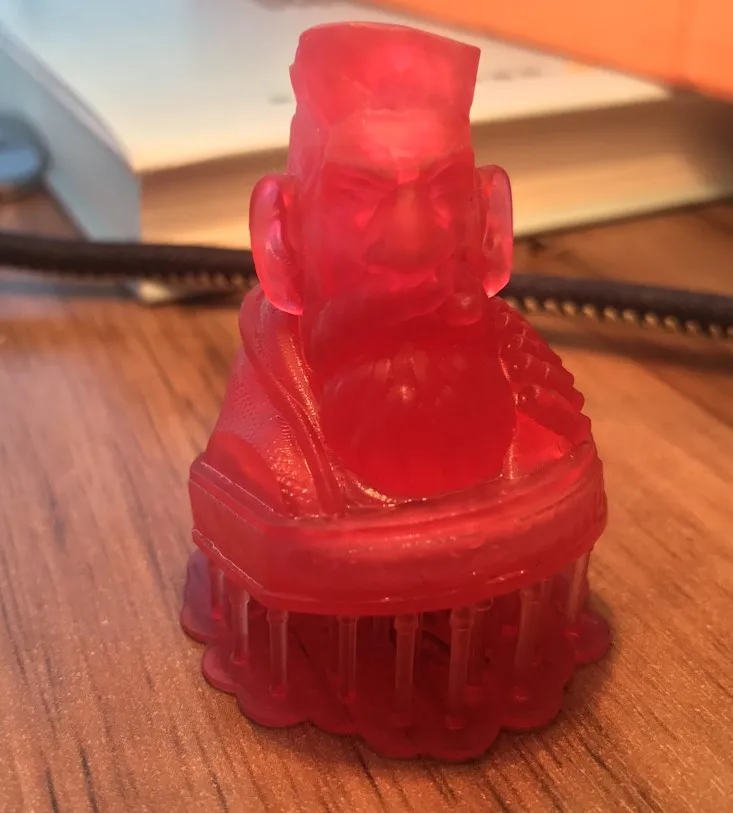
During the printing process, the platform is immersed in the consumable for the thickness of one layer of the digital model.
Since photopolymer resins can be quite thick, a leveling mechanism is often used to speed up the process.
SLA printer operation scheme
After leveling, the process of illumination of the material begins. Illumination is produced by laser irradiation. Most photopolymer resins are designed to cure (polymerize) when exposed to ultraviolet light, which determines the choice of laser frequency. The movement of the beam along the X and Y axes is determined by the operation of the deflecting mirrors.
After the drawing of the layer is completed, the platform is immersed in the material for the thickness of one more layer, and the process is repeated with the drawing of the next layer of the digital model.
Model building animation
SLA printing takes quite a long time, and printers using this method tend to have relatively small build areas.
This is mainly due to the high cost of laser emitters: printing large objects with a single laser will take too much time, and installing additional emitters and mirrors will complicate the design, increase the dimensions of the installation and raise the price to an unacceptable level for most users.
Despite the success of this technology, projected stereolithography is considered to be a more promising, although very similar method.
Projector Stereolithography (DLP)
Formlabs Form 1 Desktop DLP Printer
A close relative of laser stereolithography, this method uses digital LED projectors instead of laser machines with mirror deflection systems. The method became popular due to the development of technology for the production of low-cost high-resolution digital projectors by Texas Instruments.
Layers are illuminated using a digital projector that highlights patterns of the entire layer, which distinguishes this method from SLA, where the "picture" emerges progressively using an ultraviolet laser.
A similar approach has previously been used on SGC-type plants, but this technology used physical photomasks, making the process costly, time consuming, slow and noisy.
At the moment, the FTI technology continues to exist - the development of SGC, almost indistinguishable from DLP printing, since it also uses digital LED projectors.
DLP printer design
Simultaneous illumination of an entire layer using projectors can significantly speed up the printing process even compared to SLA printers that have a high scanning speed (ie beam movement).
In addition, these printers are less sensitive to rough physical impact due to the absence of delicate mirror systems.
The absence of mechanical mirror systems improves accuracy. Finally, the cost of projectors sets them apart from laser systems.
Projection size can be quite significant, reaching the average of popular FDM printers.
An interesting feature of DLP printers is the ability to "reverse" or "reverse" printing.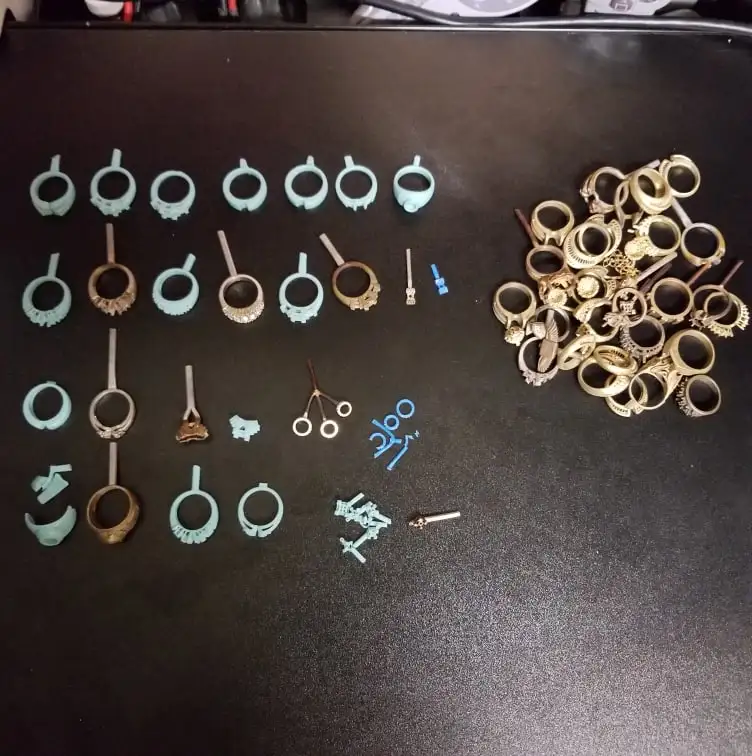
In this case, the projector is installed under a transparent (material choice for transparency in relation to ultraviolet light) cuvette, and the platform does not sink into the material, but gradually rises, pulling out the layers of exposed polymer.
This approach eliminates the alignment mechanism and achieves even higher Z resolution than SLA printers.
In addition, the size of models in height is not limited by the depth of the cuvette, which favorably affects the dimensions of the printer and the possibility of increasing the build area.
Multi-jet printing (MJM and PolyJet)
3D Systems ProJet 3500HDMax MJM printer
MJM and PolyJet technologies are practically indistinguishable from each other. The name difference comes from the respective patents: Multi Jet Modeling is owned by 3D Systems, while PolyJet is owned by rival Stratasys.
The very principle of multi-jet polymer printing was developed by the Israeli company Objet, which eventually became a division of Stratasys.
Multi-jet printing technology combines features of 3D inkjet printing (3DP) and projection stereolithography (DLP).
How the MJM PolyJet printer works
Models are built by spraying photopolymer using linear arrays consisting of multiple nozzles.
The applied layer is immediately exposed to ultraviolet lamps - as a rule, two processes occur simultaneously.
By the time the array reaches the end of the build chamber, the previously deposited material is hard enough to print a new layer.
Composite models created on the ProJet 3500 DP dental printer
This approach allows to achieve very high printing speed, but is characterized by high design complexity, which negatively affects the cost of such installations and limits their distribution to professional use.
One of the advantages of MJM and PolyJet technologies is the ability to create composite structures from photopolymer resins with different physical characteristics.
It is therefore possible to create models with easily removable supports, use multiple colors and use flexible and rigid materials in parallel within the same model.
3D Pens
CreoPop 3D Pen
Recently, there has been a craze for hand-held printing devices called 3D pens. At the moment, there are three main options for such devices: drip-jet pens (DOD), called BioPen and used in the development of new methods for treating damaged tissues, FDM 3D pens, which are manual extruders (essentially similar to the usual hot glue guns, but using thermoplastics) and developments in 3D-drawing with photopolymer resins.
CreoPop 3D pen was the first "handheld resin printer". The design of this device is quite simple, because the most complex function, positioning, is performed by the user himself. The pen only extrudes resin through the tip surrounded by LED emitters.
CreoPop 3D pen in action
This way the resin hardens immediately after application, allowing you to literally draw on air.
The advantage of such handles over FDM-analogues is the low operating temperature - there are no heating elements in the device. As a result, with such pens you can even draw on the skin.
In addition, a wide range of photopolymer resins with different physical properties can be used with such devices, which greatly expands the range of possible applications. At a minimum, this is a relatively inexpensive, but entertaining toy.
The only drawback is the relatively high cost of consumables, but such devices are unlikely to require large volumes of photopolymer resin when used in everyday life.
Additional Lighting
Final Lighting of Resin Models in a Homemade Camera
Full curing of models can take quite a long time, so models during SLA and DLP printing are only partially polymerized, sufficient to maintain the physical shape of the part.
After production, the models are usually placed in chambers equipped with ultraviolet lamps until fully cured.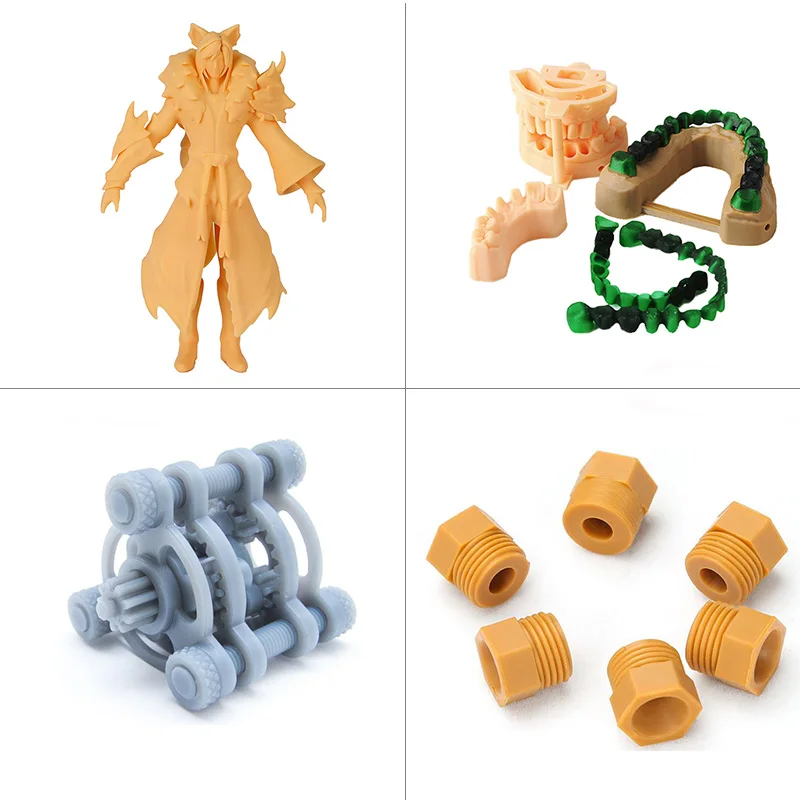 Of course, if possible, you can simply lay out the models in the sun - the effect will be the same.
Just keep in mind that ordinary glass practically does not transmit ultraviolet light, so exposure to sunlight must be direct.
If desired, a UV-transparent quartz glass container can be used.
Go to the main page of the Encyclopedia of 3D Printing
Types of resins for photopolymer 3D printer, characteristics, application
In recent years, the introduction of photopolymer printers in various areas of production is gaining more and more popularity. In order for the printer to reach its full potential, it is necessary to choose the right material - photopolymer resin.
Now there is a wide variety of resins designed to solve a wide range of problems. Sometimes it can be difficult not to get confused in such a variety of materials. It is conditionally possible to divide photopolymer resins into several types - standard, engineering, dental, jewelry (burned).
Standard resins
Standard resins are well suited for making decorative models. They are strong and hard enough for making miniatures, master models, paintable figures or mock-ups, but their strength is usually not strong enough for functional products.
But standard resins are different from each other. Some of them can be washed not with alcohol, but with plain water, there are transparent types of resins or, for example, with a wide color palette.
Standard
Compared to other types of photopolymers, standard resins have a richer color palette. The main advantages are an inexpensive price, good detail and fast curing time.
ESUN Standard
A good resin for professionals and beginners who are just getting acquainted with photopolymer printing. The advantages of ESUN Standard are a large palette of colors, no smell and fast printing speed.
ESUN Standard is suitable for printing decorative models or any other product that will not be subjected to heavy physical exertion.
Print Technology: DLP/LCD/LED
UV wavelength: 395-405nm (transparent 395-410nm)
Shore hardness: 80-82 D
Impact strength according to Izod: 18 - 40 J/m
Bending strength: 46-72 Mpa
Modulus of elasticity: 1000 - 1400 MPa
Elongation at break: 28-35%
Exposure time per layer (recommended): 5-10 sec.
Color palette: white, black, gray, red, blue, yellow, green, light green, flesh, orange, transparent.
Volume: 0.5 kg, 1 liter.
Deadpool figurine
Bust of a military man
Moving castle, miniature
Users note good detailing, a good balance of strength and light elasticity, and excellent adhesion to the platform. The print time of the layer corresponds to the one declared by the manufacturer (5-10s) even on 3D printers with a weak UV source.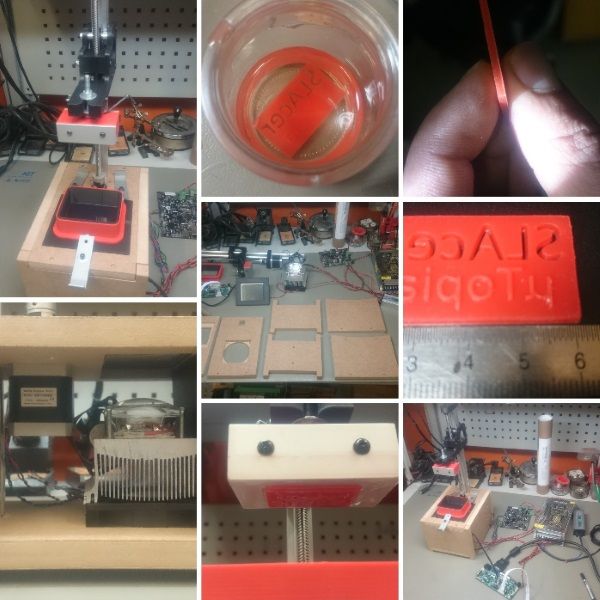
Of the minuses - sometimes the resin can be difficult to stir and a fine suspension comes across. This does not reduce print quality, but it does make me nervous. The gray color is slightly transparent, many users would like the color to be more “dense”.
ESUN eResin-PLA
eResin-PLA is based on PLA monomer, familiar to many from FDM printing. This makes the resin environmentally friendly and the finished product very tough and scratch resistant.
Resin is well suited for decorative items, master models or functional models without load.
Print Technology: DLP/LCD/LED
UV wavelength: 395-405nm
Shore hardness: 75-80 D
Elongation at break: 20-50%
Modulus of elasticity: 600 - 800 MPa
Impact strength according to Izod: 15 - 32 J/m
Tensile strength: 35-50 Mpa
Exposure time per layer (recommended): 15-20 sec.
Color palette: white, black, gray, red, blue, yellow, green, light green, flesh, orange, transparent.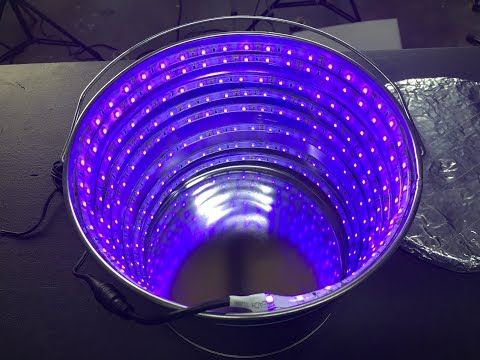
Volume: 1 liter
Shoe model
Figurine cartoon girl
Play miniature
Non-standard focusing rings for lens
Phrozen Aqua 4K
The Phrozen Aqua 4K is specifically designed to unlock the full potential of 4k resolution photopolymer printers. A pleasant bonus is the almost complete absence of shrinkage.
Resin is well suited for precision printing of decorative models. The manufacturer specifies that all properties of the resin are revealed when using printers with high resolution, such as Sonic Mini 4K / Sonic Mighty 4K.
Print Technology: DLP/LCD/LED
UV wavelength: 395-405nm
Shore hardness: 77 D
Color palette: gray, ivory.
Volume: 1 kg
Armor printed in gray resin Phrozen Aqua 4K
Bust Predator
Figurine war with a bear, to demonstrate the capabilities of Phrozen Aqua 4K
Phrozen Beige Low Irritation
This resin is hypoallergenic. Phrozen Beige Low-Irritation has passed the ISO-10993 10 test, which means that the resin does not contain heavy metals and the finished models can directly contact the human body.
The resin can be used in dentistry or for products that will come into contact with the skin.
Print Technology: DLP/LCD/LED
UV wavelength: 395-405nm
Color palette: beige
Volume: 0.5 kg
Decorative figurine
Jaw
ESUN Precession Model
Resin is designed for fast printing of high-precision models. In addition, finished products are tough and can withstand heat up to 80 degrees.
ESUN Precession Model is a good choice for models that need high detail.
Print Technology: DLP/LCD/LED
UV wavelength: 405 nm
Shore hardness: 85 D
Elongation at break: 12.1%
Bending strength: 77 Mpa
Tensile strength: 335-410 Mpa
Color palette: red.
Volume: 1 liter
DC Universe Riddler's Head
Miniature model of ICE
Clear resins
Clear resins are present in other photopolymer ranges, but may become yellow or cloudy over time. If optical transparency without yellowness is important in the finished model, then you should pay attention to special polymers.
Phrozen SC-801 Clear
The main advantage of Phrozen SC-801 Clear is its optical transparency. Models made from Phrozen SC-801 Clear will not become hazy or yellow during post-curing or use.
This photopolymer is suitable for the manufacture of durable and accurate models for which optical transparency is important.
Print Technology: DLP/LCD/LED
UV wavelength: 405 nm
Shore hardness: 70 D
Color palette: transparent
Volume: 1 liter
Material transparency model
Left product made of Phrozen SC-801 Clear, right RESINMAGIC3D High-Grade Clear
Figurine printed with Phrozen SC-801 Clear
Miniature bottles printed for a articulated doll.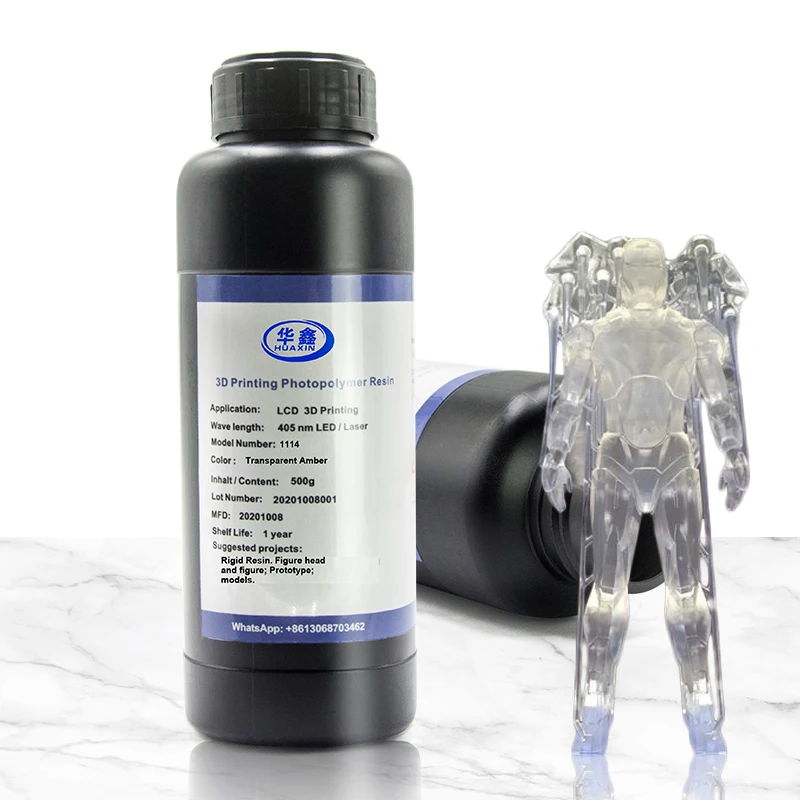 Left made from Phrozen SC-801 Clear, right made from another polymer.
Washable
Finished models made on a photopolymer printer are recommended to be washed from photopolymer residues with alcohol. There are situations where this is not acceptable, such as when the printer is being used in schools. For such cases, manufacturers have created the Washable line. Washable are resins that can be washed with plain water.
ESUN Water Washable
ESUN Water Washable is as strong and precise as ESUN Standard resins. The only difference is that the finished product can be washed not with alcohol, but with plain water.
ESUN Water Washable is well suited for printing at home or in educational institutions due to its low toxicity and odorlessness.
Print Technology: DLP/LCD/LED
UV wavelength: 395-410 nm
Shore hardness: 76 D
Tensile strength: 68 MPa
Elongation at break: 5-10%
Bending strength: 45-70 MPa
Modulus of elasticity in bending: 900-1400 MPa
Izod impact strength: 18-39 J/m
Color palette: white, transparent, flesh, gray, black.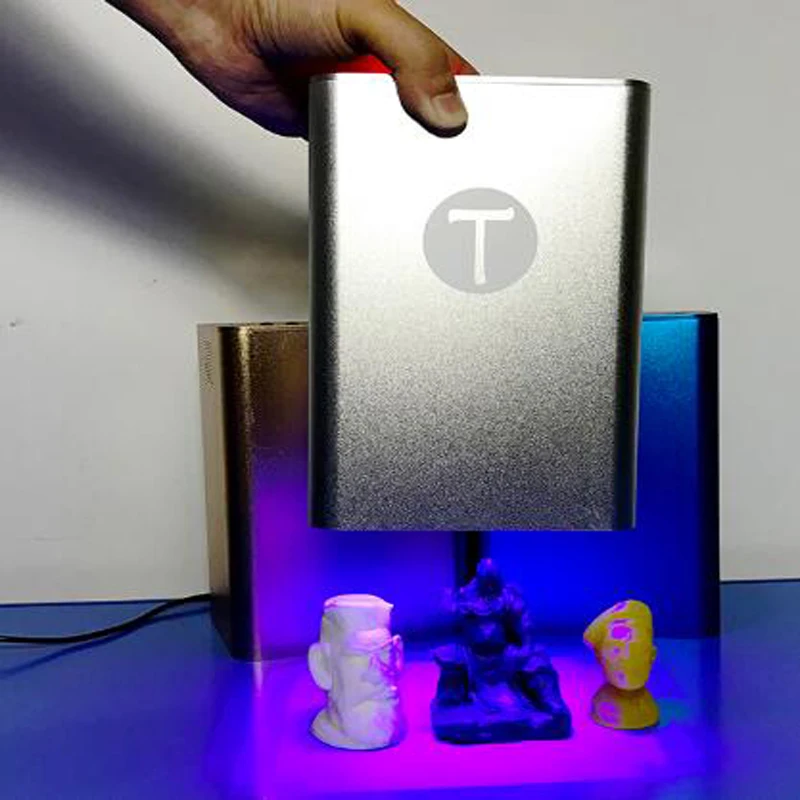
Volume: 0.5 kg
Rings and pendant printed in clear ESUN Water Washable
Fox figurine
Phrozen Water Washable
Phrozen Water Washable compares favorably with other water-washable resins in terms of strength, durability, and short flash-over time.
The resin is suitable for making prototypes and other models at home and in educational institutions where it is undesirable to use strong-smelling alcohols for washing.
Print technology: DLP/LCD/LED
UV wavelength: 405 nm
Shore hardness: 80 D
Color palette: gray, black.
Volume: 1 kg
Bust made from Phrozen Water Washable
Alien printed from Phrozen Water Washable
Bust of Spiderman
Wanhao Water washable
It is a resin with high resolution and good hardness.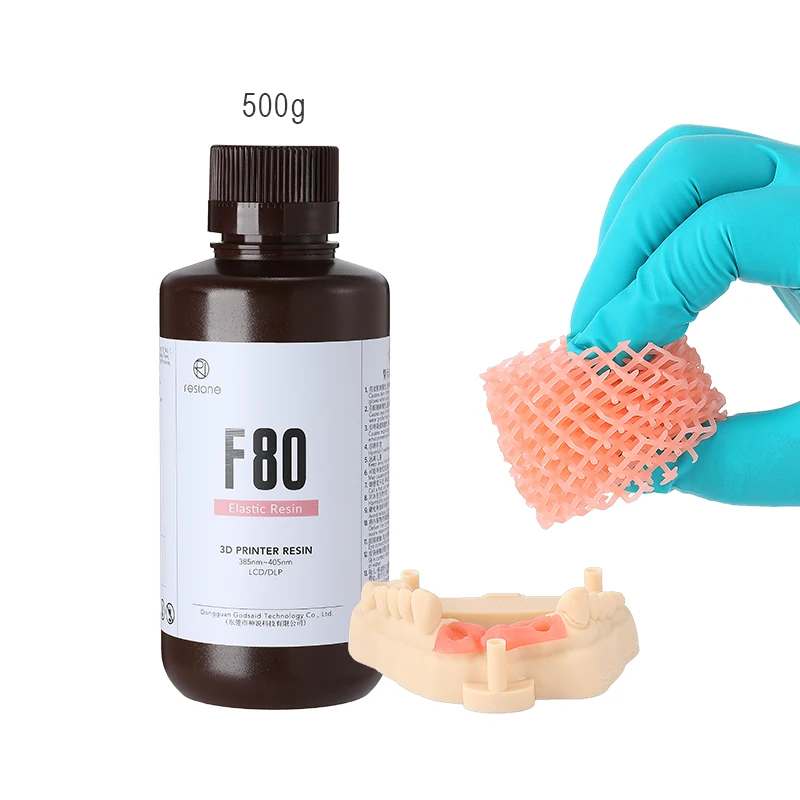 Wanhao Water washable has very little shrinkage and a wide range of colors.
Resin is well suited for printing master models and decorative models when it is not possible to use alcohol to wash the final product.
Print technology: DLP/LCD/LED
UV wavelength: 395~420nm
Shore hardness: 75D
Color palette: white, transparent, black, gray
Volume: 0.5 kg, 1 kg
Han Solo from transparent Wanhao Water washable
Test model of transparent Wanhao Water washable
Multi-color test patterns Wanhao Water washable
Engineering
Previously, photopolymer printers were mainly used for making master models and products with high accuracy. Now they face a wider range of tasks. It is much more convenient to make a ready-made, functional model right away. For this, engineering photopolymer resins with improved characteristics have been developed. Depending on the application required, they can be harder, heat resistant and durable than standard resins.
Reinforced
These are polymers with improved characteristics - for example, high heat resistance or impact strength. They can be used to produce functional prototypes, engineering models, etc.
Phrozen TR250-LV
The Phrozen TR250-LV has been specifically designed to meet engineering challenges. In addition to high strength and hardness, the resin has increased heat resistance and can withstand heating up to 150 degrees.
The Phrozen TR250-LV is suitable for the production of models for subsequent thermoforming or products that require increased heat resistance.
Print Technology: DLP/LCD/LED
UV wavelength: 405 nm
Shore hardness: 79D
Tensile strength 25 MPa
Izod impact strength: 6.31 kJ/m2
Color palette: gray
Volume: 1 kg
Jaw Layout
Orc Bust
Phrozen ABS-like
This resin is similar in characteristics to ABS plastic, familiar to many from FDM printing. There is a white color in the palette, this allows, if necessary, to easily paint the finished product.
Phrozen ABS-like is suitable for printing functional models and prototypes.
Print technology: DLP/LCD/LED
UV wavelength: 405 nm
Shore hardness: 79D
Izod Impact Strength: 2.32 kJ/m2
Color palette: gray, white
Volume: 1 kg
Skull Model
Weapons for miniature figures
1/4 mask
Phrozen Rock-Black Stiff
When creating Rock-Black Stiff, emphasis was placed on strength, wear resistance and heat resistance (up to 97 degrees). Models are strong and slightly flexible to withstand shock loads.
Print technology: DLP/LCD/LED
UV wavelength: 405 nm
Shore hardness: 81D
Elongation at break: 4%
Izod impact strength: 2.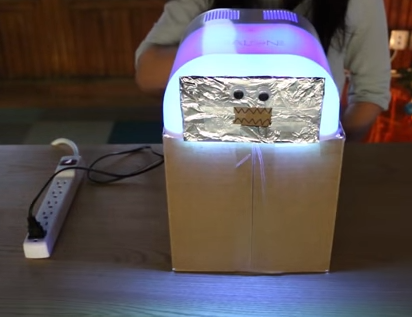 68 kJ/m2
Color palette: black
Volume: 1 kg
Elf bust
Bust printed in Phrozen Rock-Black Stiff
Phrozen Nylon Green Tough
Photopolymer is an analogue of nylon. Nylon is a very strong and wear-resistant material, familiar to many from FDM printing. Products are very durable and resistant to stress. Finished models printed in Nylon Green Tough can be folded.
Suitable for the manufacture of finished products or functional prototypes.
Print Technology: DLP/LCD/LED
UV wavelength: 405 nm
Shore hardness: 68D
Elongation at break: 130%
Tensile strength: 19 MPa
Izod impact strength: 23.79 kJ/m2
Color palette: green
Volume: 1 kg
Phrozen Nylon Green Tough Vase
Test model
Spectacle frame
Phrozen TR300 Ultra-High Temp
TR300 Ultra-High Temp allows you to quickly produce durable, shock and heat resistant products (up to 160 degrees). The photopolymer compares favorably with its competitors by its short exposure time (on 3D printers of the Phrozen Sonic series, 1.3 seconds per layer).
Phrozen TR300 is suitable for the manufacture of heat-resistant and durable products. For example, it can be a model for subsequent thermoforming or manufacturing an industrial layout.
Print Technology: DLP/LCD/LED
UV wavelength: 405 nm
Shore hardness: 80D
Tensile strength: 32MPa
Izod impact strength: 8 kJ/m2
Elongation at break: 2%
Color palette: gray
Volume: 1 kg
Phrozen Onyx Rigid Pro410
The main properties of models made from Onyx Rigid Pro410 are amazing detailing and durability. The resin was developed in partnership with Henkel and is intended primarily for home workshops.
Photopolymer is perfect for models with an abundance of small details that need high detail. Or for engineering/functional models where high accuracy and strength are important.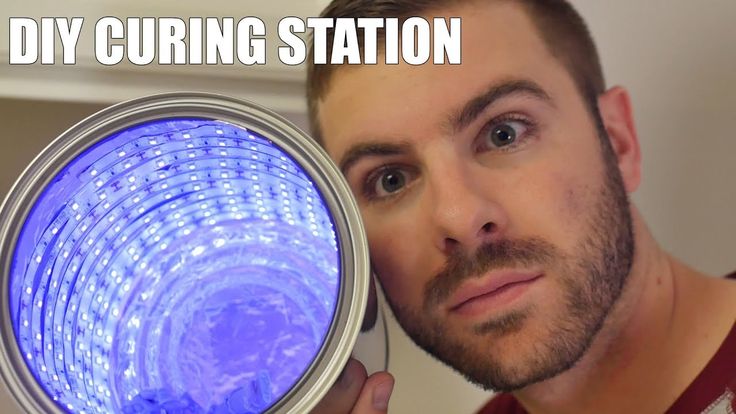
Print Technology: DLP/LCD/LED
UV wavelength: 405 nm
Color Palette: Black
Volume: 1 kg
Tablet stand
Fruit bowl
Wall mounted spice holder
Wall hanger
Flexible
Products made from such resins will look like silicone or rubber. Such photopolymers make it possible to obtain flexible and durable functional products resistant to tearing.
Phrozen Biege Flex
This is a resin designed for products that need to be strong and slightly flexible. Phrozen Biege Flex is suitable for functional models that need some flexibility.
Print Technology: DLP/LCD/LED
UV wavelength: 405 nm
Shore hardness: 65D
Tensile strength: 40 MPa
Modulus of elasticity: 192 MPa
Color palette: beige
Volume: 0. 5 kg
5 kg
Bust of Harley Quinn
Miniature from Phrozen Biege Flex
Functional carabiner
HARZ Labs Industrial Flex
By its properties, finished products from HARZ Labs Industrial Flex resemble polyurethane. Products from it are elastic and very durable.
HARZ Labs Industrial Flex is suitable for the manufacture of gaskets or any other model where softness and tensile strength are important.
Industrial Flex can be used as an additive for other HARZ Labs resins. This allows you to increase the flexibility and strength of the finished model. Depending on the resin ratio, different degrees of flexibility can be achieved in the finished product.
Print Technology: DLP/LCD/LED
UV wavelength: 405 nm
Shore hardness: 63D
Shrinkage: 0.5%
Elongation at break: 103%
Tensile strength: 13 N/mm2
Color palette: transparent
Volume: 0. 5kg 1kg
Various gaskets printed from HARZ Labs Industrial Flex
ESUN Flex
Flexible and durable material with good wear resistance. Good tear resistance and accuracy make ESUN Flex suitable for engineering models.
For example, products that must be strong and flexible at the same time. These can be engineering prototypes or functional models.
Print Technology: DLP/LCD/LED
UV wavelength: 405 nm
Shore hardness: 85-90 A
Shrinkage: 6.9%
Elongation at break: 100-150%
Bending strength: 77 Mpa
Tensile strength: 390-320 kN-m
Color palette: transparent yellow
Volume: 0.5 kg
Test model from ESUN Flex
Dental resins
From the very beginning of its existence, photopolymer printers have taken the place of indispensable assistants in the dental industry, therefore, in the assortment of many companies that manufacture photopolymer resins, there are materials intended for use by dentists.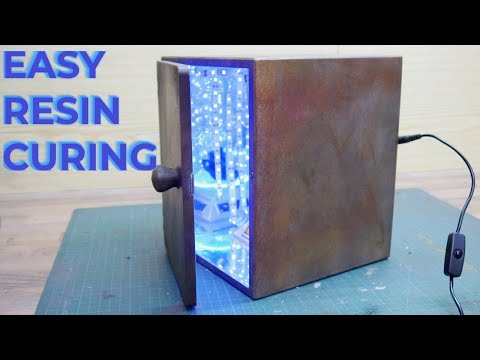
Special photopolymers
These are special polymers that are focused on solving specific problems. No one forbids using them for other than their intended purpose, but they fully reveal their potential precisely in the task for which they were created.
Harz Labs Dental Soft
Dental Soft was created as a material to simulate gums in demonstration models. The finished print is pink in color and has high strength and chemical resistance. Despite its flexibility, the finished model will be resistant to deformation. Harz Labs Dental Soft is certified for medical use.
The material is suitable for gum printing or other medical applications.
Print Technology: DLP/LCD/LED
UV wavelength: 405 nm
Shore hardness: 87-90D
Shrinkage: <0.5%
Elongation at break: 68%
Tensile strength: 1.2 N/mm2
Color palette: pink
Volume: 0.5 kg, 1 kg
Gums from Harz Labs Dental Soft
Gums from Harz Labs Dental Soft
NextDent Gingiva Mask
Another gum simulation resin from NextDent. Gingiva Mask is a flexible and durable resin that blends beautifully with model material.
The resin is suitable for various models in the dental industry.
Print Technology: DLP/LCD/LED
UV wavelength: 405 nm
Shore hardness: 60 - 75 A
Elongation at break: 40 - 60%
Color palette: pink
Volume: 1 kg
Gingiva made from NextDent Gingiva Mask
Part of the gum made from NextDent Gingiva Mask
Jaw Demo with NextDent Gingiva Mask Inserts
Harz Labs Dental Clear
Products from this resin are durable and hard. The main feature is the resin is transparent, without turbidity and yellowness. Harz Labs Dental Clear is certified for medical use.
This photopolymer is suitable for the manufacture of surgical templates, demonstration models and even aligners.
Print Technology: DLP/LCD/LED
UV wavelength: 405 nm
Shore hardness: 90-92D
Elongation at break: 4-6%
Shrinkage: less than 0.5%
Color palette: transparent
Volume: 0.5 kg, 1 kg
Jaw Demo Model
Piece of jaw printed from Harz Labs Dental Clear
Dental Yellow Clear
Very similar in its properties to Harz Labs Dental Clear - just as strong and hard. The only difference is that the color of the resin is not crystal clear, but yellow. The resin is certified for use in medicine.
Dental Yellow Clear is suitable for making aligners or demonstration models.
Print Technology: DLP/LCD/LED
UV wavelength: 405 nm
Shore hardness: 90-92D
Elongation at break: 4-6%
Shrinkage: less than 0.5%
Color palette: transparent yellow
Volume: 0. 5 kg, 1 kg
Gingiva pad made of Dental Yellow Clear
Jaw models
Dental Yellow Clear Demonstration Product
Burnout
In addition to specialized resins in dentistry, low-ash burnable or smelted materials are needed for direct casting.
Before casting, be sure to read the instructions from the manufacturer. Each resin has its own burnout cycle in order to obtain a good casting quality.
ESUN Castable Dental
ESUN Castable is designed for direct casting in dentistry. Finished products are smooth and hard. When burning, the ash content is practically absent.
High precision allows ESUN Castable to be used for crowns, bridges and other castings.
Print Technology: DLP/LCD/LED
UV wavelength: 405 nm
Shore hardness: 80D
Elongation at break: 11-20%
Bending strength: 49-58 Mpa
Impact strength according to Izod: 44 - 49 J/m
Color palette: green
Volume: 1 kg
Crowns printed from ES
ESUN Castable jaw
Example of printed and molded model
Phrozen Wax-like Dental Green
Wax-like Dental Green is a waxy resin with low shrinkage and zero ash content. Due to the low shrinkage, the finished products are very accurate, and the matte surface will help to see even small imperfections.
Print Technology: DLP/LCD/LED
UV wavelength: 405 nm
Color palette: green
Volume: 0.5 kg
Ring made from Phrozen Wax-like Dental Green
HARZ Labs Dental Cast Cherry
HARZ Labs Dental Cast Cherry was developed for direct casting of dental products. With the correct burnout cycle, it is possible to achieve almost zero ash content. The photopolymer is certified for medical use.
Dental Cast Cherry is suitable for casting metal or ceramic crowns and bridges.
The manufacturer recommends the use of phosphate-based phytomass, because they can be used at high temperatures, which are required for high-quality burning of the model.
Print Technology: DLP/LCD/LED
UV wavelength: 405 nm
Shore hardness: 40-50D
Shrinkage: less than 1%
Color palette: red
Volume: 1 kg
Crown models printed with Dental Cast Cherry
Cast crowns
NextDent Cast
It is an easy-to-burn-out resin with zero ash content. Designed for the manufacture of burn-out dental models.
Print Technology: DLP/LCD/LED
UV wavelength: 405 nm
Shore hardness: 80-90D:
Color palette: red
Volume: 1 kg
Crowns made from NextDent Cast
Demo model
DETAX Freeprint cast UV
High precision resin designed for fast manufacturing of dental products. Finished products can be used for direct casting. DETAX Freeprint cast UV burns out ashless even with large casting volumes. For molding, it is recommended to use phosphate-based masses.
Print Technology: DLP/LCD/LED
UV wavelength: 378-388 nm
Color palette: red
Volume: 1 kg
Overlay made of DETAX Freeprint cast UV
Crowns made from DETAX Freeprint cast UV
Burnout resins
In addition to dentistry, 3D printers have firmly established themselves in the jewelry industry.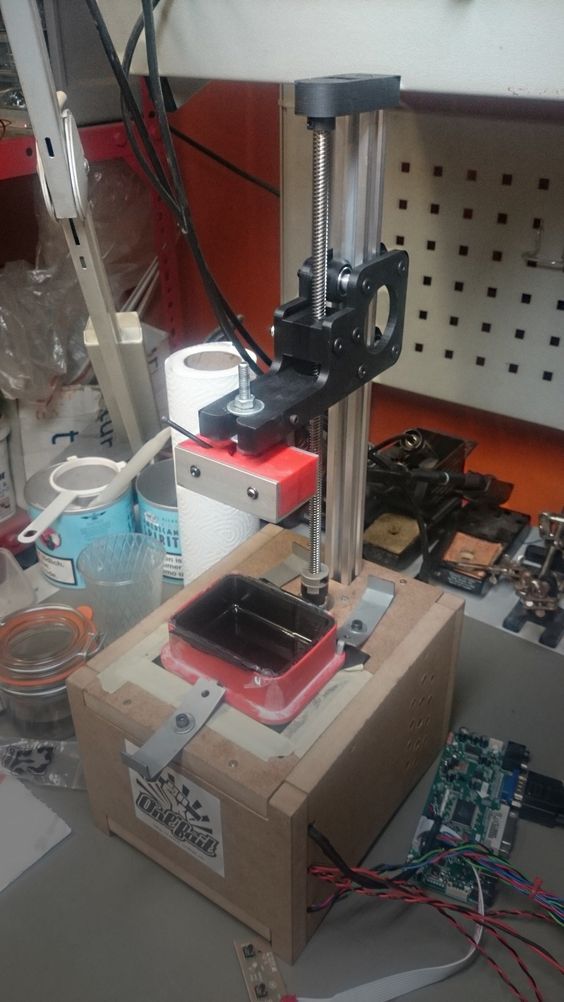 3D printing allows you to create complex products much faster than classical methods (manual wax cutting, CNC machine). Burnt-out resins were created especially for jewelers.
ESUN Castable for jewelers
Photopolymer specially designed for printing and casting small models with high detail. Products from ESUN Castable are smooth, and almost zero ash content makes it easy to get the desired product in the metal.
The resin is suitable for printing jewelry - rings, pendants, earrings and for other burn-out models, in which accuracy and perfect surface quality are important.
Print Technology: DLP/LCD/LED
UV wavelength: 395-405nm
Shore hardness: 60 D
Color palette: yellow, green
Volume: 1 kg
Ring printed from ESUN Castable
Ring from ESUN Castable
Phrozen Wax-like Castable Violet
Waxy polymer with low shrinkage and zero ash content.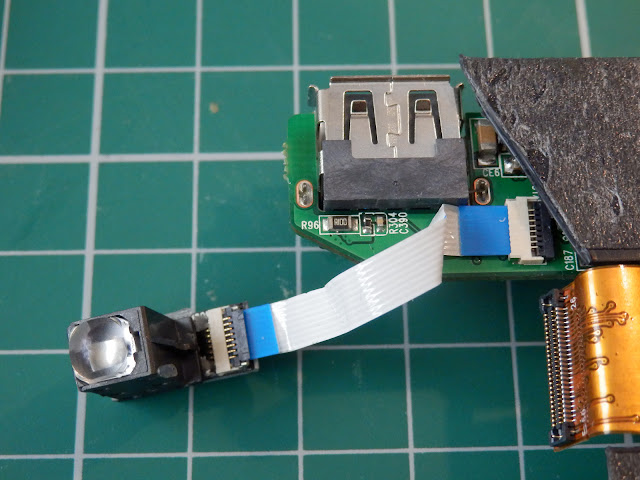 Products made from Phrozen Wax-like Castable Violet have a nice matte surface, which will show the slightest imperfections.
Wax-like Castable is suitable for making any castable models.
Print Technology: DLP/LCD/LED
UV wavelength: 405 nm
Color palette: purple
Volume: 0.5 kg
Ring printed in Wax-like Castable and finished casting
Wax-like Castable Openwork Rings and Precast Castings
Wax-like Castable pendant and finished product
HARZ Labs Jewelry J-Cast
This is a photopolymer designed for the manufacture of burn-out models for subsequent casting in metal. High precision, low shrinkage (less than 1%) and low ash content (less than 0.1%) make it possible to print even very small products without distortion.
HARZ Labs Jewelry J-Cast is suitable for printing jewelry. Due to its high thermoplasticity, the photopolymer can be burned out over a wide temperature range.