Diy 3d body scanner
6 DIY 3D Scanners You Can Build at Home
Creating a 3D model of a real object can be done extremely fast if you have a 3D scanner at home. The problem is: 3D scanners are expensive to buy new.
If you're looking for a solution, why not try building your own affordable 3D scanner at home? It might not create perfect 3D models, but it's a cost-effective alternative to buying a 3D scanner.
Is It Cheaper to Build a DIY 3D Scanner?
The cost of buying a decent 3D scanner ranges from $700 to $10,000 at the highest end. On the other hand, building a DIY 3D scanner can cost less than $200—some even as little as $35.
Depending on the resolution of your homemade 3D scanner, you will still have to work to tidy up the 3D model so that it can be used for things like 3D printing, game development, or perhaps design prototyping. But overall, it will still speed up the design process when compared to building a model from scratch.
1. Cheap 3D Printed 3D Scanner
This 3D scanner is built using 3D printed parts, featuring both open source software and open source hardware files. If you choose to install the maximum of four lasers, then the cost of the project comes in at $35 to $50. Once it's built, handling the digital scan will require some legwork to smooth out. But considering its price tag, it's well worth giving it a go.
You can find the STL files and a full build guide on Instructables. Besides the 3D printed components, you will need one to four lasers, a stepper motor, a turntable, and an Arduino Nano to bring it all together. One benefit of this project is that it's been built many times by community makers, resulting in plenty of images and feedback surrounding the project to help fill in any gaps.
2. DIY 3D Scanner Using a DSLR Camera
Another option for building a 3D scanner is to use a DSLR camera and a method called photogrammetry. At its most basic, it involves taking a lot of images of an object from different angles and stitching those photos together in a software program to create a 3D model.
Alongside a DSLR camera, you will need an Arduino, a stepper motor and driver, an LCD screen, and an IR LED.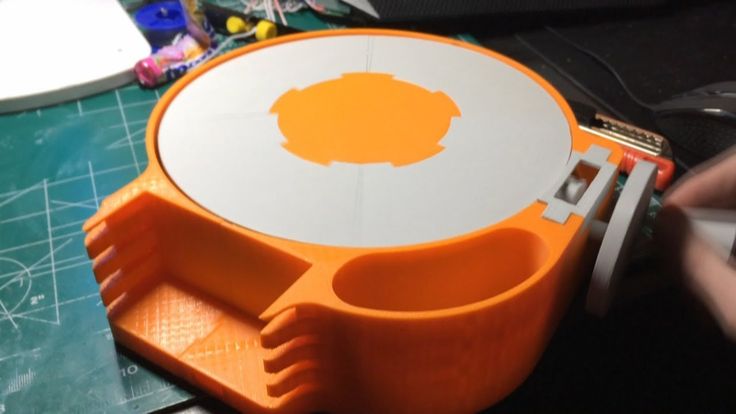 The goal of the hardware is to build a rotating platform that moves by set amounts so that your camera can photograph the object in a very detailed and controlled way. You can find a great explanation of the project on Instructables.
The real difficulty of this project comes in processing the photos. A good photogrammetry program is essential, and that can cost over $150 to license. There is some free software available, but it may come with limitations.
If you're wondering if there is an alternative solution, you can read our guide to how to turn everyday objects into 3D models without a 3D scanner.
3. Optical CT/3D Scanner With Arduino
For something a little different, in this project you will build a 3D scanner that also doubles as an optical CT scanner. This type of scanner will do the trick if you have objects that are semi-transparent, like a gummy bear or a segment of orange. Otherwise, you can use this setup with the photogrammetry method for regular 3D scans.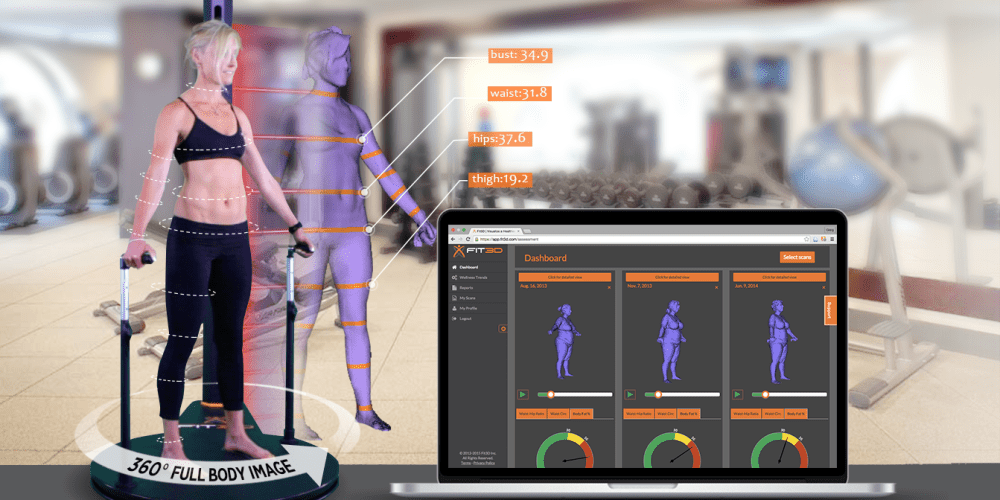
Everything in this build is enclosed inside a box. This allows greater control over lighting the object to produce sharper images. While it involves some woodworking and construction, the hardware is still powered by a humble Arduino Nano, plus additional parts that you can find at any hardware store.
A great guide is available on Instructables for building the box, alongside details for creating a sleek control panel for changing photo parameters on the go.
4. FabScan: Raspberry Pi + Arduino 3D Scanner
This 3D scanner uses both a Raspberry Pi and an Arduino to build a 3D laser scanner. What sets this build apart is that it can be operated remotely via a web browser on a phone.
Much like other DIY 3D scanners, a stepper motor and driver are used to rotate a turntable holding the object you want to scan. Additionally, you will need a line laser and a Raspberry Pi camera. You can find the guide and a full components list on Instructables.
While the creators have gone with a laser-cut MDF box, you can just as easily use spare parts lying around the home to create the enclosure. Alternatively, cardboard can work too, and painting it black will aid in diffusing the laser light so that it doesn't interfere with the scan.
Once you have a good scan of your object, you might be interested in 3D printing it. Haven't got a 3D printer? Here is our pick of the best 3D printers.
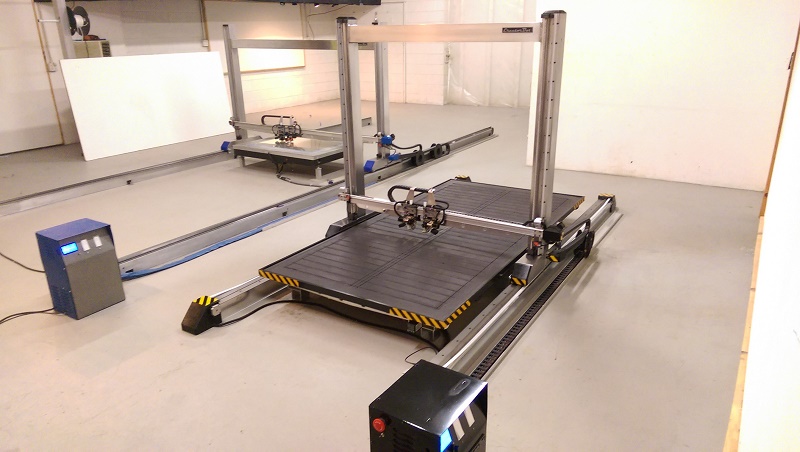
5. The Ultimate Human Sized 3D Scanner With Raspberry Pi
While most homemade 3D scanners are built to capture a small object, it's also possible to build a human-sized 3D scanner. The way to do this is with a lot of Raspberry Pis, as you can see over on Instructables.
The maker behind this project scaled up his 3D scanner using a whopping 47 Raspberry Pis plus a Raspberry Pi camera for each module. The goal was to use the photogrammetry method to take a photo of his subject from every possible angle. Because he wanted to capture a 3D model of his two-year-old son, this all had to happen instantly.
Incredibly, it works, and it works very well too. If you have the time and investment to buy a box full of Raspberry Pis, you won't be disappointed because the results are impressive.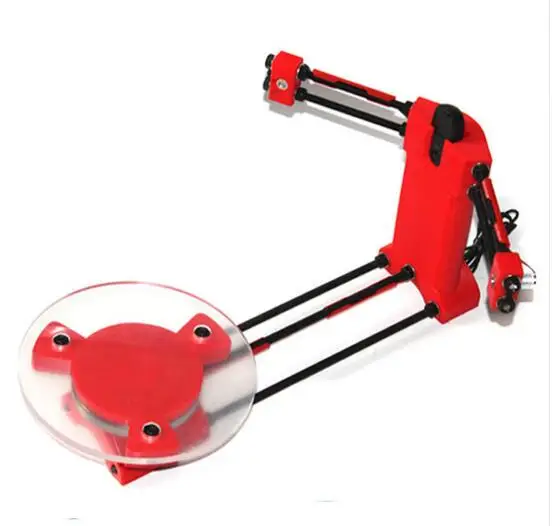 The maker says you can use fewer Pis and cameras and still get good results, especially if you only need to capture the front of a person’s face.
6. Standalone 3D Scanner
Maybe you're just after a simple and small 3D scanner that you can make over the weekend. If so, then this project will suit you. This 3D scanner on Instructables is designed to be all-in-one, meaning that the photos are compiled onboard and an STL file is saved directly to a memory card. Instead of compiling the photos in a separate photogrammetry program, this 3D scanner handles them for you.
While it doesn't produce incredibly detailed scans, it does make for a rapid way to take a 3D model straight to 3D printing. One thing to bear in mind, however, is that the dimensions of the 3D scanner structure need to be kept exactly as written in order to match the code.
Building a Homemade 3D Scanner
Putting together a 3D scanner at home isn't extremely difficult to achieve. When compared to the expensive price of commercial 3D scanners, it's well worth building a DIY 3D scanner yourself.
With a Raspberry Pi or Arduino and a few extra affordable parts, you'll be well on your way to creating a cheap and awesome 3D scanner.
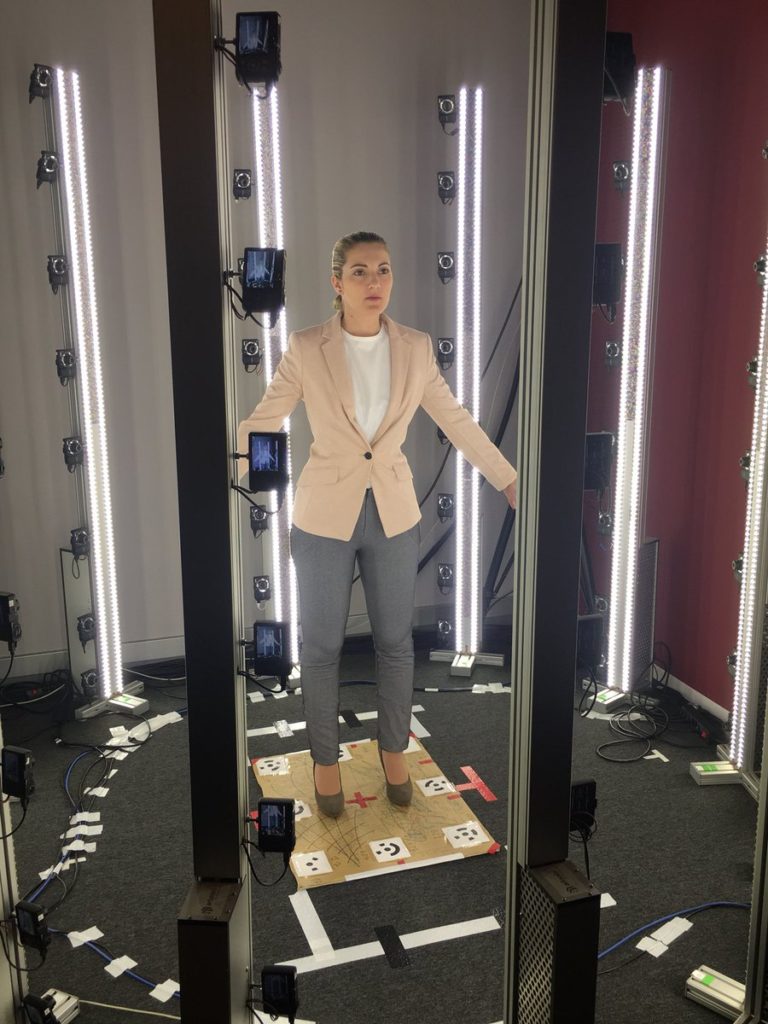
Affordable Raspberry Pi 3D Body Scanner
With a £1000 grant from Santander, Poppy Mosbacher set out to build a full-body 3D body scanner with the intention of creating an affordable setup for makespaces and similar community groups.
Uses for full-body 3D scanning
Poppy herself wanted to use the scanner in her work as a fashion designer. With the help of 3D scans of her models, she would be able to create custom cardboard dressmakers dummy to ensure her designs fit perfectly. This is a brilliant way of incorporating digital tech into another industry – and it’s not the only application for this sort of build. Growing numbers of businesses use 3D body scanning, for example the stores around the world where customers can 3D scan and print themselves as action-figure-sized replicas.
Print your own family right on the high street!
image c/o Tom’s Guide and Shapify
We’ve also seen the same technology used in video games for more immersive virtual reality. Moreover, there are various uses for it in healthcare and fitness, such as monitoring the effect of exercise regimes or physiotherapy on body shape or posture.
Within a makespace environment, a 3D body scanner opens the door to including new groups of people in community make projects: imagine 3D printing miniatures of a theatrical cast to allow more realistic blocking of stage productions and better set design, or annually sending grandparents a print of their grandchild so they can compare the child’s year-on-year growth in a hands-on way.
The Germany-based clothing business Outfittery uses full body scanners to take the stress out of finding clothes that fits well.
image c/o Outfittery
As cheesy as it sounds, the only limit for the use of 3D scanning is your imagination…and maybe storage space for miniature prints.
Poppy’s Raspberry Pi 3D Body Scanner
For her build, Poppy acquired 27 Raspberry Pi Zeros and 27 Raspberry Pi Camera Modules. With various other components, some 3D-printed or made of cardboard, Poppy got to work. She was helped by members of BuildBrighton and by her friend Arthur Guy, who also wrote the code for the scanner.
The Pi Zeros run Raspbian Lite, and are connected to a main server running a node application. Each is fitted into its own laser-cut cardboard case, and secured to a structure of cardboard tubing and 3D-printed connectors.
In the finished build, the person to be scanned stands within the centre of the structure, and the press of a button sends the signal for all Pis to take a photo. The images are sent back to the server, and processed through Autocade ReMake, a freemium software available for the PC (Poppy discovered part-way through the project that the Mac version has recently lost support).
Build your own
Obviously there’s a lot more to the process of building this full-body 3D scanner than what I’ve reported in these few paragraphs. And since it was Poppy’s goal to make a readily available and affordable scanner that anyone can recreate, she’s provided all the instructions and code for it on her Instructables page.
Projects like this, in which people use the Raspberry Pi to create affordable and interesting tech for communities, are exactly the type of thing we love to see. Always make sure to share your Pi-based projects with us on social media, so we can boost their visibility!
If you’re a member of a makespace, run a workshop in a school or club, or simply love to tinker and create, this build could be the perfect addition to your workshop. And if you recreate Poppy’s scanner, or build something similar, we’d love to see the results in the comments below.
3D scanning of a person with a budget scanner Peel 3D
Powerful tool for high-quality digitization of the human body
Order a test scan
- Branches
- Scanning step by step
- 3D model examples
- Hardware and software
- Where to buy?
3D human scan with peel 3D scanner
- Fast and accurate acquisition of individual body images in color, taking into account all the features of the figure and clothing texture
- Efficiently create 3D models of a full-length human or a separate body part for implants in medicine, fashion design, entertainment, fashion, and 3D printing of souvenirs and advertising layouts
- Refinement of the 3D model in the embedded software, easy removal / addition of individual elements for further printing of the object
If you need to perform a human scan, you can order it from our specialists.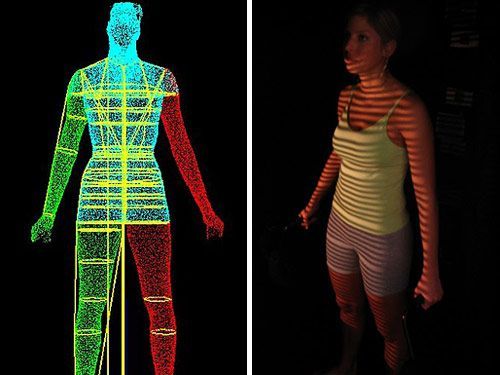
Applications
Medicine
- creation of individual prostheses, orthoses, surgical templates, implants
- visualization and modeling of the result of transplantation, prosthetics and plastic surgery
Souvenirs
- making figurines of real people for 3D printing
- manufacture of personalized accessories and jewelery
- digitization of mini-copies of real objects, sculptures, busts
Entertainment, fashion
- creation of digital models of real people for computer games and other programs
- 3D clothing modeling, sizing improvement
- use of 3D models for trying on clothes on sites
Project examples
Scanning the human body
Human body (whole)
Man in winter clothes
Saint Alphonse Liguori
More cases in different industries
Test the scanner for free and see how it performs for your needs Test scan
Body Scan Guidelines
Do you want to test the 3D scanner?
Order a scan in our office or make an appointment
for an online demo.
3D human scanning solutions
3D scanner peel 3d Scanning a person is fast, easy and safe!
The compact peel 2, peel 2 CAD, Go!SCAN 20 scanners are professional solutions for digitizing objects up to 3 m with an accuracy of 0.1 mm and the ability to capture texture and color.
Go to catalog
Software Unleash your creativity with this powerful 3D modeling software!
The peel 3d software product allows you to solve all the main tasks when processing scanned data.
Go to catalog
Why order
solutions from iQB Technologies
Exclusive distributor of peel 3d in Russia
Professional
3D scanners at the price of budget counterparts
Free trial
3D scan of your part
Demo hall in Moscow: more than 10 scanners and 3D printers
Services for the implementation, maintenance and repair of 3D equipment
Training in the use of 3D scanners in prof. activities
3D scanning services based on our own fleet of equipment
About
Rules for 3D human scanning
For the greatest similarity of the resulting 3D copy with the original object and the successful implementation of the process of digitizing a human figure, several important rules must be observed.
By adhering to these recommendations, you can always achieve the highest quality and realistic results. Order a peel 3d scanner from iQB Technologies and you will be able to make a high-precision 3D model of yourself or any other person, and then print it using 3D printing.
All scanner models are in stock in our warehouse.
- Scan each body part once, especially when scanning a human face. If you scan the face several times in a row, the program will recreate the model as something in between all the received 3D scans.
 As a result, you will get an option that is completely different from the original face of the person being scanned.
 - In the process of work, the person being scanned must absolutely not move - otherwise, any movement, whether it be tilting, turning the head or stepping from foot to foot, can lead to image deformation. It is advisable to freeze in one position for a while and remain motionless until the very end of the procedure.
- If you want to create a figurine using 3D scanning, then you do not need to use additional light. To get a high-quality 3D figurine, LED flashes are enough.
- When using a turntable, its speed must be made as slow as possible. Thus, a 3D scan of a person will be much more accurate, and difficult places such as palms or ears will be much easier to scan.
The process of scanning a person with a 3D scanner
If you need to scan a person, you can order a scan of any part of the body from us at a bargain price.
The process of 3D scanning and modeling in software generally takes from 10 minutes to several hours.
The obtained data of 3D scanning of the human body is processed in specialized software: errors are corrected, problem areas are eliminated. The finished 3D model with an accurate texture and a clear rendering of the smallest details, if necessary, is sent for 3D printing. At the same time, a high-precision copy of a person can be obtained on a 3D printer, which in the future can become a memorable gift or souvenir. It is possible to scan with the transfer of the color of the object.
Also, the finished model can be used to create individual products that are ideally suited to the human figure.
It should be mentioned that 3D human scanning is completely safe, painless and does not harm the human body.
Scanner options
3D scanners for scanning a person are divided into:
-
Optical:
Optical 3D scanning technology uses a lamp flash designed to take measurements with the highest accuracy.
 Projection distortions of the object are recorded by the scanner's video cameras, thereby allowing to determine the shape and dimensions of the scanned object, and then transferred to a specialized PC program for further processing.
 Optical 3D scanners are fast, allowing you to scan people even in motion and in full growth.
Scanning a person with a 3D scanner using this technology takes from two minutes when using a special cell and up to 20 minutes when using a handheld scanner.
Most optical handheld devices are capable of color scanning and texture reproduction of the original model and various details, including jewelry and clothing.
-
Laser:
Traditional laser scanners, as a rule, are developed for the tasks of metrological measurements, and therefore require special reflective marks to be fixed on or near the object, the position of which is read by the device for precise positioning.
 Some models of 3D scanners work in tandem with a tracking device (tracker) and do not require the use of reflective marks on the scanned object, for example, Creaform portable 3D scanners.
 Such devices are rarely used for digital measurements of moving objects, including the human body, since the concept of a metrological instrument rarely includes a color camera to capture the texture of an object. However, when it is necessary to produce more accurate models, for example, for orthopedics, prosthetics or the creation of exoskeletons, specialists prefer 3D laser scanners. In addition, this technology allows you to scan shiny, mirror and other complex surfaces, unlike optical three-dimensional equipment.
iQB Technologies offers to buy hand-held 3d scanners in Moscow or order a human scanning service at an affordable and favorable price. Our specialists guarantee fast delivery and high-quality service of the presented equipment.
how to quickly create prostheses and other unique products
reverse engineering
implementation stories
Medicine
Author: Aleksey Chekhovich
Author: Aleksey Chekhovich
Video: Real-time 3D Face Scan | Order a free test scan | 3D scanner helps victims | 3D scanning of the human body in great detail
3D Prosthesis Creation: Era of New Possibilities
As technology improves and becomes more accessible, there are new opportunities to solve the most complex medical problems. A team of researchers from the company Chabloz Orthopedie (France) managed to create a unique and truly revolutionary prosthesis.
Chabloz Orthopédie worked with Denis Gauthier, who had his forearm amputated. First, the experts performed a 3D scan of the patient's healthy arm using a peel 3d scanner to obtain its mirror image.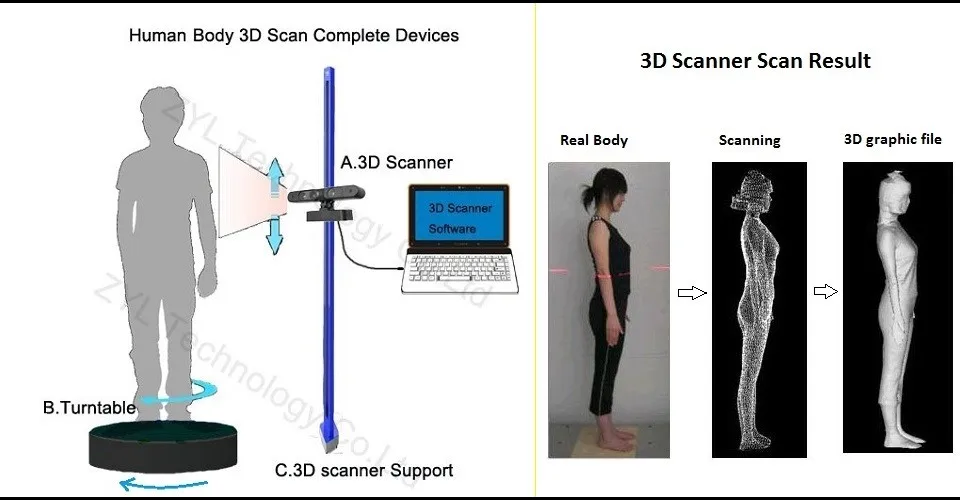 This was done so that the designed product ideally repeated the proportions of a healthy limb. The rest of the amputated arm was also scanned to achieve a comfortable and ergonomic fit for the prosthesis.
Denis Gaultier with finished prosthesis
The team then proceeded to design a CAD model and develop a myoelectric prosthesis. Batteries, sensor cables and an artificial hand were integrated with the fabricated forearm. The prosthesis itself was designed in CAD and printed on a 3D printer. HP Jet Fusion technology was used to print various components of the forearm. After manufacturing, all parts were finished and painted.
The use of 3D scanning and 3D printing guarantees not only the correct fit of the fixture, but also gives complete freedom of movement. A new approach to prosthesis design allows professionals to develop solutions that are lightweight and highly customizable. Did you know that 3D printed parts are 20% lighter than their carbon or fiberglass counterparts? Such products also have the necessary rigidity, hardness and durability.
Later, this innovative prosthesis was combined with the BeBionic hand, one of the most advanced bionic limbs, and a state-of-the-art myoelectric forearm and hand was custom-made. Gauthier's case is a great example of the innovative use of 3D measurement and 3D printing technologies.
The video shows the complete process of digitizing the face and ears using the Creaform Go!SCAN 20 portable 3D scanner (its analogue in white peel 2 is now being produced). This solution provides a detailed digital model for use in areas such as plastic and reconstructive surgery, in particular, facial prosthetics.
Order a test 3D scan for free!
3D scanner helps victims
Unfortunately, tragedies inevitably occur around the world, and those affected need help. But, fortunately, there are organizations such as Médecins Sans Frontières (Doctors Without Borders) that do their best to provide them with the necessary treatment and care. Since 2016, the organization has been working tirelessly to solve the problem of providing prostheses to those in need around the world. The goal is to help amputees regain independence. The solutions that are used in this case are 3D technologies.
Upon completion of the medical examination of the patient, doctors determine his needs and expectations. Using the peel 3d scanner, with minimal discomfort for the victim, a high-precision digital model of the injured limb is created. Compared to traditional impression making, 3D scanning is significantly faster and does not require contact. The result of the 3D scan is then transferred to the virtual sleeve and prosthesis design software. The developed component is made on a 3D printer and installed on the patient's limb. If necessary, during the installation process, the prosthesis and sleeve are finalized. After three months of use, the patient is invited to evaluate the comfort of the prosthesis.
MSF has also developed a similar procedure to create compression masks for burn patients. Here, the use of non-contact technology also provides significant advantages over traditional plaster bandages, not only making the procedure less painful for the patient, but also speeding it up, allowing for a much larger number of people in needy countries to be treated.
Physiotherapist Pierre Moreau scans a patient with head burns. Then, based on the scan, a transparent pressure therapy mask is created / Photo: Elisa Oddone, Al Jazeera
Pierre Moreau, a physiotherapist from Médecins Sans Frontières, says: “The purpose of the 3D project is to help patients in need of special rehabilitation care. We launched this project in Amman in 2017, where we started providing upper limb amputees with 3D printed prostheses. But simply printing a prosthesis is not enough - we try to understand the needs of the victims, find individual solutions and keep them in their new position for as long as possible. We are assisted by an interdisciplinary team of rehabilitation workers and engineers. Then our specialists helped more than 30 patients in Jordan.
In 2018, we began to use the technology in another direction - for patients with burns, especially on the face and neck. Skin complications are a very serious problem for burn victims. Hypertrophic scars may form, and pressotherapy is needed. This requires transparent masks, but they are quite difficult to produce on site. Therefore, we started to explore 3D scanning, 3D printing and computer modeling in an attempt to help our team in the production of these devices for patients who so desperately need them. Now we provide more than 50 transparent facial orthoses.
When I think about this project, I always remember one story that demonstrates its development. In 2017 in Jordan, we had a small patient with burns and an amputation - she had no arm, and the condition of her remaining part was too complex to develop a prosthesis. Then we couldn't help her. But she came back the following year and we were finally able to make a prosthesis for her. For the first time, she was able to use her hand. This is one of our best memories of the project and a measure of its success.”
3D scanning of the human body in great detail
There are already more than 7.5 billion people on Earth, and although some are very similar to each other, there are no completely identical people. With such a variety of faces, it is not at all surprising that in the process of evolution the human brain became masterfully recognizing the smallest details that help to distinguish them. To get as close as possible to the original, the 3D scan of the statue must be extremely accurate and have a high geometric resolution.
3D copies: 2013 Kinect scan (left figure) and peel 3d (right figure)
To improve the quality of scanning, the Canadian company USIMM has begun using peel 3d. The company specializes in the machining of non-metallic materials and is constantly involved in artistic projects.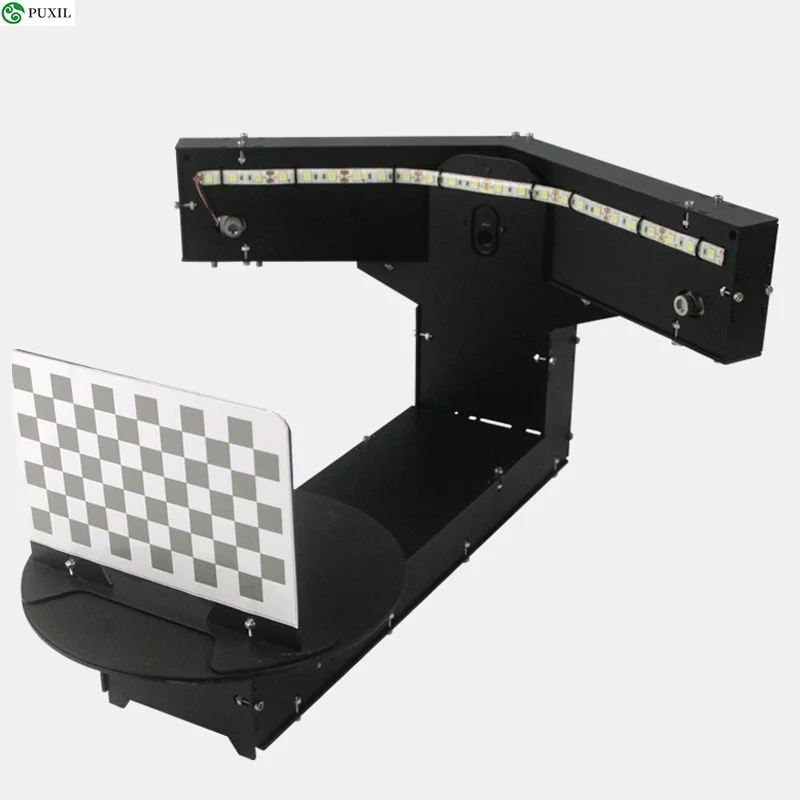 The main goal was to show the evolution of CNC machining by comparing the results of a 3D version of one employee made a few years ago with current results.
According to USIMM's Leia Lepage, scanning a living person is not an easy task: “Scanners are usually quite sensitive to the smallest movements, even if it's just breathing. Scanning a person is very difficult.” In order to accomplish such an extraordinary task, the USIMM team needed a 3D scanner that was immune to certain movements - but at the same time had high resolution and accuracy. Peel 3d possesses such qualities: a resolution of up to 0.5 mm and a volumetric accuracy of 0.5 mm/m.
The team scanned the same employee in the same pose as they did a few years ago. The resulting 3D scan data was sent to a five-axis CNC machine, and then a full-size replica of a person was created from polystyrene. The results were incredible.
The scan results obtained earlier by the Skanect device did not stand next to the peel 3d results.