Create your own 3d printer designs
New 3D printer? Here's how to create your own printables
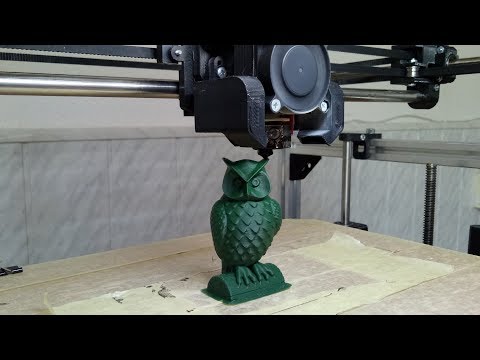
Recently I got the chance to spend some time with a Micro 3D Printer, my first foray into the world of turning a spool of plastic filament into, well, just about anything.
I had lots of fun downloading existing designs from sites like Pinshape and Thingiverse, but eventually I wanted to create objects of my own. Unfortunately, I don't have a degree in CAD or access to any kind of 3D-design software.
Good news: Turns out you don't need either one. Autodesk's Tinkercad is a free Web-based design tool that enables you to create 3D objects, then download those creations in a printer-friendly format. Here's how to get started.
Step 1: Head to Tinkercad and sign up for a free account using Facebook, Twitter or your e-mail address.
Step 2: The service will immediately walk you through a lesson to help you learn basic navigation, followed by another lesson that teaches camera controls, and so on. It's a good idea to go through all of these, just to familiarize yourself with the environment.
Step 3: When you're ready to create your own object, return to the Tinkercad dashboard, then click Create New Design. The tool will immediately send you to the design page, complete with a randomly assigned (and often amusing, like Tremendous Snaget-Fulffy) name for your project. You can change the name by clicking Design > Properties, though this can happen at any point along the way.
Step 4: Now it's time to start assembling your object. The toolbar on the right side is home to a wide assortment of prefab shapes you can drag to the workplane and modify as needed. (You can also import existing SVG (2D) or STL (3D) shapes if you have any.) For purposes of our tutorial, click Geometric, then drag the Hexagonal Prism to your workplane.
Step 5: Notice that the shape has five white "handles": one at each corner and one in the center at the top. When you mouse over any of them, you'll see corresponding measurements appear. Click and drag any of the corners to resize the prism in that direction; click and drag and center one to adjust the height. (The thing that looks like a black teardrop above the center handle is used to raise and lower the object relative to the workplane.)
Enlarge Image Screenshot by Rick Broida/CNETStep 6: As you add and modify more objects, remember the size of your 3D printer's print bed and build accordingly. When you're done, click Design > Download for 3D Printing and you'll immediately get an STL file you can load into your printer. (As you'll see, Tinkercad also has options for Minecraft versions, ordering 3D prints and uploading to Thingiverse.)
And that's all there is to it. This is a great place to start creating 3D objects to print.
Before you get back to it, here are some quick tips for the Tinkercad beginner:
- Use your mouse wheel to quickly zoom in and out.
- Click and hold the right mouse button, then move your mouse to change the viewing angle.
- After selecting an option, you'll see an Inspector window. Click the Hole option to make that shape "pass through" any solid shape. That's how you would, for example, create a cylindrical hole down the center of your prism.
- To make finer adjustments to object placement, click the Snap grid pull-down and choose a number smaller than the 1.0 default.
Have you found another good tool for creating 3D printer-ready designs? Name it in the comments!
What software to use for 3D printing: The complete guide
David Roberson13 May 2021
Guide
Before starting to 3D print, you will need to make sure you have gathered all the necessary software “ingredients” that will guide you through the printing process, from preparing your 3D model to managing printers themselves.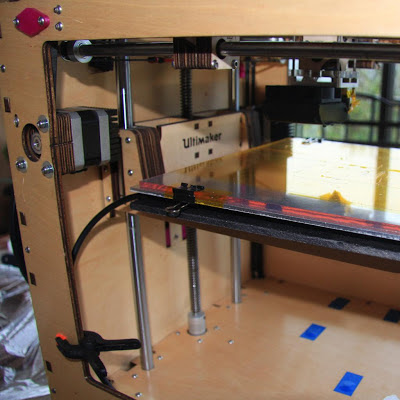
These include:
CAD software to create a 3D model (you can also use an existing 3D model, if you do not wish or need to design one)
Slicing software
Software to operate your printer remotely (this is optional, but can be convenient)
This article will go through each of these ingredients, and will also touch on how the Ultimaker platform creates a seamless end-to-end flow between hardware, software, and materials, empowering you to unlock the magic of 3D printing and make innovation happen.
What is a “slicer”?
A 3D printing slicer – also known as slicing or print preparation software – is a program that converts a 3D model into a language your 3D printer understands.
Slicing software, such as Ultimaker Cura, digitally cuts a model into flat layers, which your printer can then print one by one. With the Ultimaker platform, however, slicing software is not always needed, thanks to integrations that allow you to print directly from CAD or the Ultimaker Digital Library.
Preparing a 3D print using Ultimaker Cura software
What is the best CAD software to design 3D prints?CAD, or computer-aided design, software enables you to design a 3D model from the ground, up. There are many types of CAD software, each with its own benefits. AutoCAD, created by Autodesk, is perhaps the best-known among them since it was one of the first CAD software programs available for personal computers when released in 1982. Other CAD platforms include:
Fusion360 – great for designing and creating efficient mechanical parts
3ds Max – used in all types of 3D model creation, including video game design, architecture, and 3D printing
TinkerCAD – A free, browser-based CAD tool that allows users to build 3D models out of various shapes. Popular with CAD novices and for STEAM education
Blender – free, open-source 3D model creation software
Siemens NX – for designing and creating advanced 3D models
Solidworks – for designing and creating professional parts for industrial use
Catia – Advanced design software used for creating surfaces and engineering systems
Before you begin 3D printing, be sure to do your research and pick the CAD software that’s right for your use case. This way, you’ll get the most out of the model you choose to design and print.
Also check which file types your slicing software is compatible with, so you can make your 3D designs into 3D prints.
A design in CAD software (left screen), slicing software (right), and the finished print
How to design parts for 3D printing?
When designing for 3D printing, there are best practices to help you get the best results from your 3D printer and the parts it creates. Design parts optimized for 3D printing will improve print success rates, reduce costs through lower wastage, and boost the speed of your product development cycle.
Consider build volume. Your 3D prints can only be as large as your printer’s build volume. Be sure to know its dimensions, then create a part that can either be printed within those dimensions in one go, or plan to use modularity (printing then combining separate parts).
Decide orientation early. Because FFF prints layer by layer, determining the print orientation early in the process helps drive design choices, text alignment, and snap features.
Evaluate overhang support requirements. FFF printed parts are self-supporting up to 45 degrees. Overhangs below 45 degrees must be supported from below with support material.
Follow bridging support guidelines. For most basic filaments, FFF printing does not need support when bridging materials within a 10 mm gap.
Pay attention to nozzle size. When designing small features, you should consider height, wall thickness, and nozzle size. Larger nozzles will print faster than smaller nozzles, but at a cost of increased minimum thickness and height for your models.
Design with hole diameters in mind. Generally, 3D printed hole features should not be smaller than 2 mm. If accurate holes are required, it is recommended to design the holes smaller than intended and post-process with a drilling operation.
Avoid sharp corners. Sharp corners can be modelled in CAD, but the print may warp. Increasing the area of the surface in contact with the bed will decrease the likelihood of the warpage.
For a deep dive into these factors and more, check out our blog on design for 3D printing.
What software do I need to start a 3D print?
This depends on how much of the 3D printing workflow you need to perform.
As long as you already have access to a 3D model, you will typically need software that can slice that model, so your printer can get to work. Once you have started to print, you can also use software to manager your 3D printer (or printers) remotely.
But as we saw earlier, the slicing step can be avoided if you have a 3D printer integration installed in your CAD tool. If you already have access to a 3D printable file (such as a G-code on a USB stick) you can also go ahead and print without the need for any slicing software, as your digital file is already ready to print.
Controlling 3D printers remotely with Ultimaker Digital Factory software
Managing 3D printers remotely
Ultimaker S-line printers, the Ultimaker 2+ Connect, and the Ultimaker 3 can make use of a network connection to access cloud-based services on Ultimaker Digital Factory.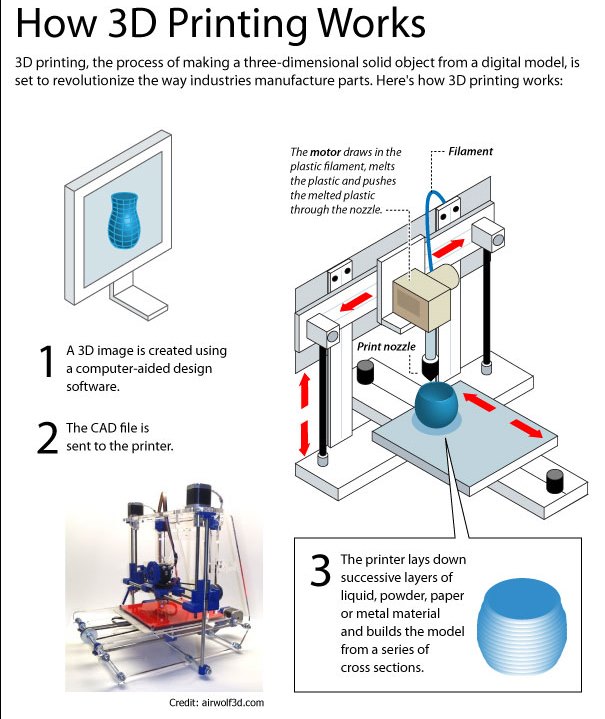 By linking a printer to your Ultimaker account, your printer can then be controlled remotely, from outside of its local area network.
Want to learn more about 3D printing software?
Download our free white paper, “Important 3D printing software features,” which will help you determine the best 3D printing software for your business needs, as well as examine settings, print profiles, and other features that can help you get the most out of your printing experience.
Get the white paper
90,000 programs for modeling and printing on a 3D printerContent
-
- Program programs
- File types for 3D printing
- Free programs
- Paid programs for 3D modeling
- Programs for cutting 3D models (slicers)
- Free slicers
- Paid slicers
- To summarize
The whole cycle of creating a part on a 3D printer can be fit into three stages: Creating / finding a model, cutting a model in a slicer, printing on a 3D printer.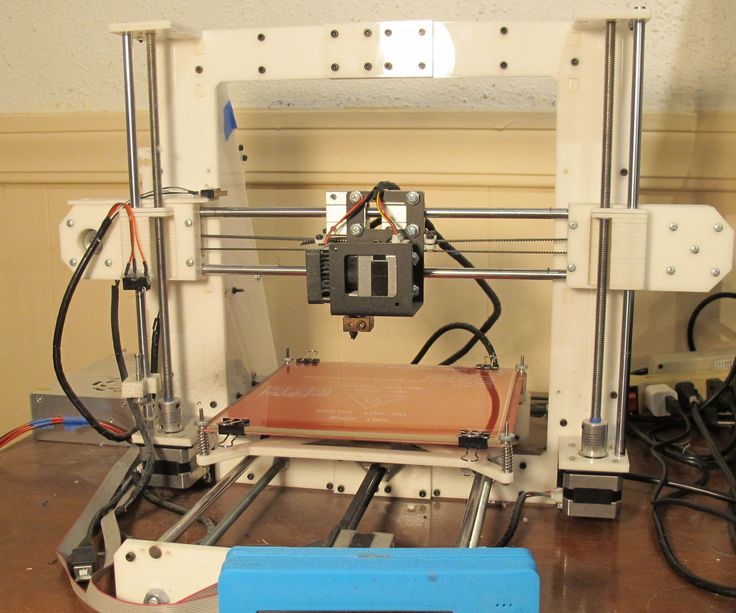 Each stage is tied to its own program. Models are created in special programs, then in the slicer the model is “cut” into steps that the printer will sequentially execute. The resulting list of steps (commands) is either placed on a memory card and run from the printer itself, or sent to the printer via a wired/wireless connection. As a result of all these actions, we get the product. Therefore, looking for a “3D printer program” is wrong: you need to look for a modeling program and a slicer.
3D modeling software
Programs for 3D modeling are divided into two large groups:
Obviously, when creating a drawing, an engineer needs precise tools: a ruler, pencil, compass, etc. But the artist needs more free tools: brushes, pastels, palettes and others. Programs are divided according to the same principle: in engineering programs, there are all the tools that allow you to accurately specify the characteristics of each element of the part, and in art programs, tools are created to give smoother forms so that the model looks as natural as possible. Of course, in art programs it is possible to model technical products, but this is comparable to drawing a drawing with pastel: it is inconvenient, difficult and inaccurate. Therefore, it is very important to determine why you need a simulation program.
Tip: It is best to learn one or two programs at a professional level, as this will allow you to create complex models. But you should also know the basics in other programs, since a large circle of knowledge allows you to more flexibly choose the approach to creating models.
File types for 3D printing
To begin with, it is worth understanding what types of files are involved in the manufacturing process of the part. The first step is to create a model. It can be saved in the format of the program itself (for example, KOMPAS-3D files have the .m3d extension, while 3ds Max has the .MAX file extension). Such files can only be opened in the programs in which they were created. But we need a universal format - STL. All programs can save models in this format. It stores the polygons that create the model.
All files are divided into 3 categories:
-
Files that store polygonal information (STL, OBJ, etc.). They are analogues of a raster image. It is possible to increase the quality of 3D models in this format only by smoothing, but in this case small details will be lost, and the file weight will increase greatly.
-
Files that store the steps for creating a part (STEP, STP, etc.). Here you can draw an analogy with vector images. Each element is specified either using simple dot connections (for example, as in a cube or pyramid), or using formulas (any curved, rounded objects). Models in this format can be scaled without loss of quality, while maintaining a relatively small file size.
-
Utility files that store steps for a 3D printer (GCODE, GCOD). These files store the commands that the printer executes and, in some cases, comments (for example, with what settings the model was cut).
 Some slicers can simulate the movements of the printer, thereby rendering the model, but it is impossible to convert a file from this format to a full-fledged model.
Be careful! If you are not sure that the GCODE file is intended for your printer, then you should not print it, because the print area for each printer is different. On third-party firmware there is no limit on the maximum travel distance, some third-party software commands may lead to incorrect operation of the control board. If the printer tries to move the print head out of the printable area many times, then it can harm itself!
If the files are in the same category, then they can be easily converted from one format to another with almost no data loss. The formats indicated in brackets are a kind of “transits”. For example, Inventor has its own file format - itp, and Fusion 360 has its own - f3d. But if you save the file in Inventor in the generic STEP format, you can open it in any engineering program and then save it in that program's format.
Free programs
Usually, free programs are either limited in functionality or created by enthusiasts, which is why they have a very crooked interface and a lot of errors. But their functionality is enough to create simple models, and in some cases, such programs can completely replace paid software.
Tinkercad
In essence, this is not even a program, but a website, that is, it does not need to be installed on a computer and it opens from any device that has Internet access. But this is its main disadvantage - without Internet access, you will not be able to download any model for yourself, because each project is initially saved in the cloud. You also need to register to use this site. Initially, the site was created for children, so each tool is intuitive. The program is suitable for modeling simple products: gaskets, bushings, adapters, covers, boxes, etc.
Pros:
Cons:
-
Inability to work without the Internet
-
Each individual project needs to be downloaded
-
Limited number of tools
FreeCAD
This program is designed to create technical products: fasteners, bushings, hinges and more. Since this is an open source project, it is distributed free of charge. At the same time, it has all the necessary functionality for opening and editing files with the .step extension - a universal format for all engineering programs. It is also worth noting the ability to add addons - special subroutines that allow you to perform any actions in a fully automatic mode. For example, there is an addon that makes it easier to create various gears. In this program, you can create more complex products: mechanisms, gearboxes, hinges, etc.
Pros:
Cons:
OpenSCAD
This CAD is closer to programming languages than to modeling: each object or any action is specified as a code. This allows you to create universal models. For example, a coin sorter: once you write the “model code”, you can create a huge number of variants of this model for different countries, changing just a few parameters. This program, like the previous one, is an open source project, as a result of which it is regularly updated.
Pros:
-
Works on weak PCs
-
Ease of creating universal models
-
Easy to learn if you have programming experience
Cons:
-
No Russian interface
-
Is a programming language
-
Difficult to create curvilinear geometry
Free Shipping
Add to compare
Item added to compare Go
| Manufacturer | Anycubic |
Free shipping
Add to compare
Product added to compare Go
| Manufacturer | Phrozen |
Free Shipping
Add to compare
Product added to compare Go
| Manufacturer | Raise3D |
Free shipping
Add to compare
Product added to compare Go
| Manufacturer | Anycubic |
Meshmixer
Art program for entry-level 3D modeling. There are simple tools for processing STL files and functions for recovering “broken” files. Using Meshmixer, you can conveniently cut the model into several parts, as it is possible to set the size of the print area of your printer. And one of the most useful tools is the installation of tree supports. This function has already appeared in many slicers, but it is in meshmixer that they can be flexibly configured and installed manually. Despite the many tools, this program is rather auxiliary, as there are more suitable programs for creating a model from scratch.
Pros:
Cons:
-
Limited functionality for creating 3D models
-
Lack of Russian interface
-
Some operations require a powerful PC
Blender
A completely free program with huge possibilities not only for creating models, but also for animation, rendering, simulations and much more. It is mainly used by multipliers, but due to the large number of extensions, this program covers a huge range of tasks. At first glance, Blender may seem too complicated, but everyone can master the basic functionality. Also worth noting are constant updates that improve performance and add new tools. A large community of people working in this program and developing it will help with the solution of many problems.
Paid 3D modeling software
This category includes programs for professionals and enterprises, as well as their simplified versions for home use. Many companies have begun releasing a product at a low cost for home use, although initially the designs were intended only for enterprises and were priced accordingly. The common advantage of these programs is great functionality and constant support. For example, Autodesk Inventor was first released back in 1999 and is updated annually. Next, we will look at the most popular of them.
Fusion 360
The new product from Autodesk tried to combine several tasks at once: modeling, simulation and rendering. In many ways, it adopted the functionality of the previously mentioned Inventor, but supplemented it with a simple interface: many tools are similar to those that can be used in the previously mentioned Tinkercad. You can also edit STL files in it, albeit with a limited set of tools.
The main feature of this program is cloud data processing, such as simulations and renders. At the same time, almost all functions can be performed offline using the power of a PC. To process tasks in the cloud, you need to buy additional tokens, but when creating models, they are not necessary. It is worth considering that despite the presence of a native file format (f3d), all files are initially stored on Autodesk servers, and then they can be saved to your computer.
There is a version for schools and universities, but obtaining such a license requires the educational institution to register and issue you a personal license.
Pros:
Cons:
Price: from 7,123₽ to 25,721₽ for 1 year
Netfabb
The program is designed to prepare the model before slicing. In many ways, it is similar to meshmixer, but it does not have the tools to create a model from scratch. Merging several models in STL format can be called a distinctive function, but the most important tool is the “repair” of models. That is why everyone should install this program, even if you have another model editor or model repair built into the slicer. Also in Netfabb it is very convenient to cut the model into several parts for printing separately. At the moment, the Netfabb functionality is built into Fusion 360 and is not officially available separately, but can be found on third-party resources as a separate program.
Pros:
-
Great functionality for repairing the model
-
Convenient cutting into pieces
-
Easy to learn all the necessary tools
Cons:
Price: from 18 024₽ for 1 month
KOMPAS-3D
A professional program created by Russian developers for Russian enterprises. It has a huge functionality, but at the same time, each function has a description, and the main tools have explanatory animations, a huge database of standards and GOSTs is built in. The program is free for all students and does not require verification of documents. There is also a paid version of KOMPAS-3D HOME, which, although intended only for home use, retains all the functionality of the “professional” version. Because of this, and also because of the low price, this CAD system is the best choice as the first professional program for creating complex 3D models.
Pros:
-
Completely Russian interface
-
A large number of tools
-
Availability of a free student version
-
Very low price
Cons:
Price: from 1 490₽ for 1 year
SolidWorks
One of the oldest programs on the market that has become a standard. If you learn how to work in SolidWorks, then you can work in any CAD. It has a relatively simple interface, an average number of tools that are enough even for professionals, but since the program is designed for production, many functions will only interfere with work. It should be noted that this program is available in Russian, and this is one of the reasons for the prevalence of this program in Russia.
Pros:
-
Easy to learn
-
The presence of the Russian interface
-
Large community of people using SolidWorks
-
Widespread in Russia
Cons:
Price: from 8,431₽ to 292,560₽ for 1 year
Inventor
The main program at many enterprises, but due to the simplicity of the interface and the presence of the Russian language, it is easy to learn. In many ways, it is similar to SolidWorks, both in functionality and in purpose. The main distinguishing feature of this program is a large number of high-quality video tutorials and text courses. It is studied at many universities both around the world and in Russia.
Pros:
-
Prevalence among the Russian community
-
Lots of learning materials
-
Intuitive interface
-
Availability of student version
Cons:
Price: from 106 860₽ for 1 year
SelfCAD
It is the simplest program for technical modeling. As easy to learn as Tinkercad, but not for kids, but for professional 3D printing. This program is not CAD, so there is no editing history, which allows, for example, to change sketches without entering edit mode.
You can download this program for free, but this version will have limited functionality. There are also paid versions with monthly payment or a one-time purchase forever. Only paid versions have a simple slicer, but its functionality is extremely limited.
Pros:
Cons:
-
Small functionality
-
Big cost
Price: from 1160₽ ($14.99) for 1 month
3ds Max
The program is designed to create 3D models and render images. It has great functionality, but it is extremely difficult to learn due to the lack of the Russian language and a complex interface. This is due to the fact that 3ds Max was originally developed for 3D animation and video game studios. It was to create a simple and free analogue that the previously mentioned Blender was created. Due to the above reasons, this program is not suitable for creating 3D models for subsequent printing on a 3D printer, but nothing prevents you from doing this.
Pros:
Cons:
Price: from 9 791₽ for 1 month
Free Shipping
Add to compare
Product added to compare Go
| Manufacturer | Phrozen |
Free Shipping
Add to Compare
Product added to comparison Go
| Manufacturer | Anycubic |
Free Shipping
Add to compare
Product added to compare Go
| Manufacturer | PICASO 3D |
Free Shipping
Add to Compare
Product added to comparison Go
| Manufacturer | Phrozen |
3D cutting software (slicers)
Having any model in STL format, you cannot immediately place it in the printer and start printing, because the printer only executes commands, and these commands form a slicer. According to the etymology of the word, one can understand that the program cuts the model into layers, or rather into separate commands. But the number of cutting options for one model is almost endless. In this regard, a large number of programs have appeared that allow you to fully customize the operation of the slicer, or rather, how it will split the model into separate commands. The slicer itself consists of two parts: the core and the shell. The slicer core performs slicing based on the specified parameters, and the shell allows you to set these parameters and visually evaluate the slicing result before sending the model to print. In addition, many slicers have built-in functionality for direct access to the printer, which allows you to manually control the printer and carry out its settings and diagnostics. Next, we will consider the most popular slicers, which have their positive and negative sides.
Free slicers
The availability of free slicers is due to the fact that without them the printer becomes a useless machine that can only heat coffee and play a melody with the help of motors. Therefore, many companies that create 3D printers supply slicers with them, while laying them out in the public domain. Often these are large companies such as Ultimaker, CraftUnique, Prusa, etc.
Ultimaker Cura
It was originally created only for Ultimaker 3D printers, but soon became an open-source project. Now in its library of profiles you can find a huge number of printers from various manufacturers. Uses its own core Cura, which has many settings and functions: tree support, wireframe printing, color printing, etc.
Frequent updates bring innovations and even more profiles for various 3D printers. It is a standard choice for beginners, as it has two control modes: simple and professional. Recently, support for add-ons has appeared that allows you to save backup copies of settings, repair the model directly in the slicer, integrate various programs for 3D modeling, and much more.
It is also possible to control the printer by sending commands directly from the computer. But there is no feedback from the printer, apart from receiving information about the temperature of the nozzle and table.
Pros:
Cons:
Prusa Slic3r
Sometimes you can find other names: Slic3r Prusa Edition or Slic3r PE. Prusa decided not to reinvent the wheel, and took the open-source Slic3r project, partially reworked it and began to actively develop it. Like Cura, Prusa Slic3r has many printer profiles, but Prusa's printer profiles are the most optimized. The core of the slicer of our own design, while the number of settings is less than that of the same Cura.
A distinctive feature is the flexible adjustment of the layer thickness and the support of a special extruder capable of printing 5 different plastics at once (again, produced by Prusa). The program will be extremely useful for people who have more than one 3D printer: all settings are divided into 3 tabs, each of which can be saved to separate profiles. But the printer control console disappeared completely, only the send button for printing via wire remained. In general, this program will be a reliable and convenient slicer, especially if you have a large number of printers.
Pros:
Cons:
Repetier
This slicer was created more for remote control of the printer, but it can also cut models. One of the few programs where you can choose the slicing core: Cura, Sic3r, Prusa Slic3r. The number of settings for the slicing itself is extremely small, but they are enough to cut the test cube.
The most important plus of this slicer is the huge functionality for managing and configuring the printer. It is worth noting the convenient interface for sending commands, as well as customizable temperature graphs. This is extremely useful, for example, when tuning the PID or checking the movement of the axes. Even if you choose a different slicer, this program is handy to have in order to 3D print using GCODE from another slicer.
Pros:
Cons:
MatterControl 2.0
One of the few programs that combine functions for editing stl files and a slicer. You won't be able to create any serious model, but you can add text or cut out part of the model. The slicer has not so many settings, but they are enough for a beginner 3D printer. This slicer can be useful if you need to make art products with minor changes. Supports saving to the cloud.
Pros:
Cons:
3DprinterOS
This software is designed to remotely manage printers from anywhere in the world. All that is needed is to connect the printer to the computer and install this program on it. From now on, all printer management occurs through the web interface. In it, you can remotely change the model, cut it and put it on print. It is also possible to connect a camera and observe the printing process. There are very few slicing settings, some will not even be enough to calibrate the printer, not to mention serious printing.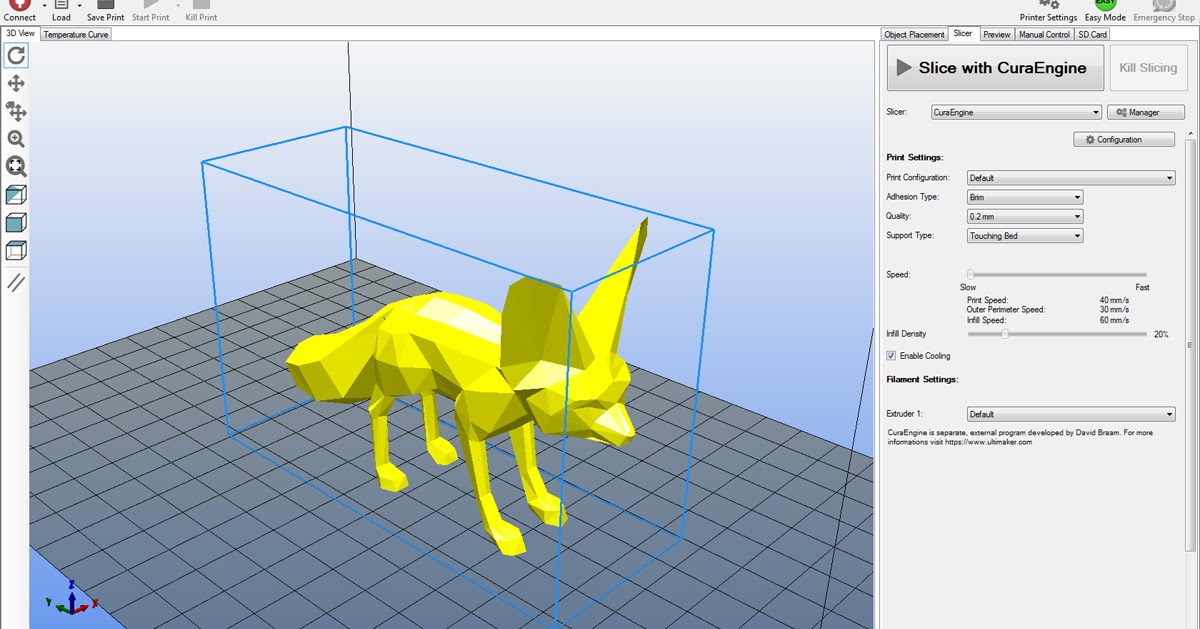
Carefully! It is not recommended to leave the printer unattended, especially if it is no longer new: at any time there may be a risk of fire due to wiring or mechanical problems.
Pros:
-
Simple interface
-
Start printing from anywhere in the world
-
Ability to monitor printing
-
Availability of tools for editing the model
Cons:
IceSL
It is a combination of OpenSCAD with its “modeling language” and slicer. In addition, models can be edited using a “brush”, like the one in Meshmixer. It has many small pluses that are not found in other slicers, but it is not suitable for everyday use due to an inconvenient interface and a small number of slicer functions. This program can be described in one phrase: interesting, but not recommended.
Pros:
Cons:
Octoprint
In many ways it is similar to 3DprinterOS, but is an open source project, as a result of which it has many additions. Designed for home use. It is the most popular way to remotely control a printer, and the user community is constantly growing. Therefore, it will be very easy to transfer your printer to remote control due to the large number of lessons and articles. The program itself does not have a slicer, but direct export of files from Slic3r is supported, which is already good in itself. Just like Repetier, it has an excellent printer management and monitoring console. But, unlike the aforementioned analogue, most of the functions will have to be configured manually.
Pros:
-
Large user base
-
Lots of tutorial articles
-
Ability to create a video broadcast of the printing process
Cons:
Paid Slicers
At the moment, many paid slicers are no longer used, as free ones have either caught up or overtaken them. But some of them are still unique.
Simplify3D
One of the first thundered paid slicers. At the time of its introduction, it was the most advanced due to the ability to change the print settings for one model at different layer heights and the functionality of printing with more than one extruder. But at the moment it has been replaced by Cura and Prusa Slic3r. Nevertheless, the convenience of setting up print settings and their number still remain the main advantage of this slicer. Also worth noting is the excellent printer management interface, second only to Repetier host.
Another difference is the ability to manually install supports and a large number of filling patterns. Viewing models also has several features: changing the way models are displayed, viewing in section, displaying normals to planes.
Pros:
-
Lots of print options
-
Convenient printer management interface
-
Manual installation of supports
-
Changing print settings at different heights
-
Easy print setup with two extruders
Cons:
Price: from 11499₽ ($149)
Read also: A detailed review of 3D printing slicers: Ultimaker Cura, Simplify3D, IdeaMaker, UP Studio, FlashPrint
Astroprint
Many believe that this particular software is a direct competitor to 3DPrinterOS. The most important difference is user friendliness, achieved through a user-friendly interface and easy installation. The program is based on Octoprint, essentially providing only a server, a modified interface and several add-ons that allow you to fully manage the printing process while away from the printer - from finding a model, to cutting and printing. At the same time, the program positions itself as a serious business solution, so the company also provides special PCs and management consoles that make it easy to connect the printer to the system. A trial plan is available where only 2 printers can be connected, but all basic features will be available.
Pros:
-
Easy connection and setup
-
Trial Availability
-
Interface specially designed for mobile devices
Cons:
Price: from 765₽ ($9.90) for 1 month
KISSlicer
This slicer is another representative of programs that failed to keep up with the times. Previously, its functionality was a cut above the rest, but now the same Cura has all the same settings as KISSlicer, and also adds its own. Of the useful in this program, we can note the function of joint viewing of GCODE and model.
There were two versions: free and PRO. The only significant difference between them is that the paid version has support for printing in multiple colors. At the moment the project is dead, even the main site does not work, but the program can still be found on third-party sources.
Pros:
Cons:
Price: from 3240₽ ($42)
Summing up
After considering all the popular programs, we can highlight the clear favorites:
For beginners in 3D printing, Tinkercad is the best 3D modeling software because it combines simplicity with the necessary functionality. The best programs for professional-level 3D modeling are KOMPAS-3D, Fusion 360 and Blender, due to the huge number of tools and a large community that makes it easy to find lessons and guides. Among the slicers, the Ultimaker Cura and Prusa Slic3r are the best choice for ease of use and flexibility when slicing models. But do not forget about such auxiliary programs as Meshmixer and Netfabb, which allow you to quickly edit or repair the model. You can learn more about some of the programs from this list on our website.
Add to compare
Product added to compare Go
| Manufacturer | Tiger3D |
Add to compare
Product added to compare Go
| Manufacturer | Tiger3D |
Add to compare
Product added to compare Go
| Manufacturer | Tiger3D |
Add to compare
Product added to compare Go
| Manufacturer | Tiger3D |
Top Free 3D Modeling Software (for Beginners) for Spring 2021 Users can export their models and either 3D print them or post them online for others to download for free or for money.

These programs range from easy-to-use for beginners to professional programs that can take years to learn. That's why we've created our list of the best free 3D modeling software to help you make your choice.
Some free online programs run entirely in the browser, others require a download. But they are all, at least in the short term, free.
List of the best free 3D modeling software in 2021:
-
TinkerCAD - Best program for beginners
-
3D Slash - Simple program for beginners
-
FreeCAD - Free source code
- ,000
BLEPER 9000
MeshMixer
-
Fusion 360
-
Vectary
- 0003
-
OpenSCAD
-
Wings 3D
Sketchup
Criteria used for evaluation:
-
Ease of use. Free programs are often used by beginners, so this is important.
-
A well-developed set of tools for creating professional 3D models.

-
The presence of new tools that allow you to take a completely new approach to creating 3D designs.
1. TinkerCAD is the best free program for beginners
Country of origin - USA. Available to work in the browser.
This is one of the many 3D CAD programs from Autodesk giant TinkerCAD. The tool looks deceptively primitive, easy to use, but again and again it makes it to the top of the best free programs.
TinkerCAD allows you to create detailed 3D models using basic shapes by joining them together. The learning process is much easier than in other programs. It is perfect for beginners and kids to teach kids how to 3D print. It is most often used in schools and classrooms around the world. You can get started in minutes in your browser without downloading. What's more, you can download the TinkerCAD app and play with the models on your smartphone or tablet!
Autodesk produces a variety of software for various industries. TinkerCAD is perfect for beginners in 3D design to make something cool. You can export the model to STL and any other format and send it to a 3D printer. Once you gain the necessary experience, you may need a more sophisticated program such as AutoCAD. But at the same time, TinkerCAD remains a great program to start your career as a 3D designer.
2. 3D Slash is a simple free program for beginners
Basic version is free, premium version costs $2 per month.
Ideal for beginners. 3D Slash is not like a regular program, more like a friendly, interactive 3D world where you can create whatever you want. The development team clearly thought out how to make the user interface as natural as possible, understandable to non-designers, without a complex learning process. The functionality is intuitive and convenient.
At the same time, you are not limited to basic shapes. You can create impressive and more complex objects. The standard version is free, the premium version comes with a small monthly fee. School and professional plans are also available.
3. FreeCAD is free and open source
FreeCAD was released back in 2002, and although it's still in beta testing, its development is well advanced. It is designed to make the process of creating 3D versions of real objects as efficient and simple as possible.
A very useful feature is the ability to start with a static 2D sketch, from which you can then build the final 3D model. FreeCAD works well on Windows and Mac, you can easily export the model as STL, OBJ or even DXF files, for example for CNC.
Although FreeCAD was developed primarily for machine tools, it can also be used for 3D printing. What's more, FreeCAD is open source, so you can work with Python.
FreeCAD is ideal for users with some design experience, as some of the tools can be difficult for beginners. But overall it is a very powerful free 3D modeling tool.
4. SketchUp
Basic version free, Pro version $299 per year. The country of the developer is the USA.
A veteran of the 3D modeling software industry, created in 2000 by Lastsoftware. In 2006, Google bought it to implement this versatile and powerful tool in its services. It has since been sold to Trimble Inc., who have offered a free version. SketchUp is a great choice for beginner designers. It, like TinkerCAD, is easier to learn than most other 3D programs. Contains almost all the tools you might need.
Though mostly used by architects, SketchUp is gaining popularity in 3D printing. The tools are surprisingly well suited to 3D CAD file creators. You can download the SketchUp STL extension to create files in STL.
SketchUp has a simple interface that is not overloaded with information. You can easily figure it out in a few hours and create a very realistic 3D model on the first day.
5. Blender - Extended Freeware
The country of origin is the Netherlands.
Possibly the most popular 3D design software.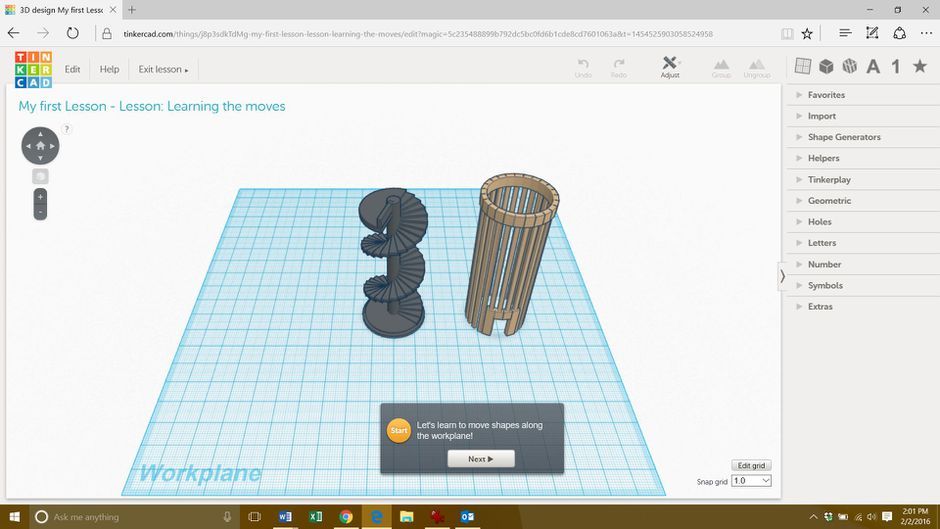 Blender has a huge active community that shares its STL files and 3D models as well as information on the web. A quick Google and YouTube search will turn up thousands of links where users showcase their 3D designs and share their Blender 3D experience. Such popularity is primarily due to the fact that the program is 100% free and open source. You can create almost anything in it. The choice of tools is huge.
The learning process is more complex than in previous programs. However, thanks to its toolset, Blender is a versatile 3D modeling program. It is used in a variety of applications ranging from VFX for movies, video games, 3D model design to 3D printing. In addition, Blender comes with an integrated game engine as well as detailed modeling tools and video editing capabilities. This incredible free software is ideal for game developers and experienced 3D modelers.
6. MeshMixer
Country of origin - USA.
Meshmixer is a unique program that does not fit into any particular category. Another development from Autodesk, Meshmixer sets itself apart from the competition in that it allows you to edit existing models using a variety of tools, including animation, buckle/fill, repair. Meshmixer is well suited for design modification and quality assurance. Useful for both beginners and experts. Allows you to improve and prepare your models for 3D printing.
Another important advantage of the program is the possibility of using it in topological optimization. With simple tools, parts can be made lighter and more economically. This is especially useful for subsequent 3D printing in industries such as aerospace and automotive, where the weight of the model is very important.
All in all, Meshmixer is a versatile option for those who need to improve their 3D model. Beginners can change their models, experts can optimize industrial designs.
7. Fusion 360
The program is free for personal use for a year, the Pro version costs about $500 per year.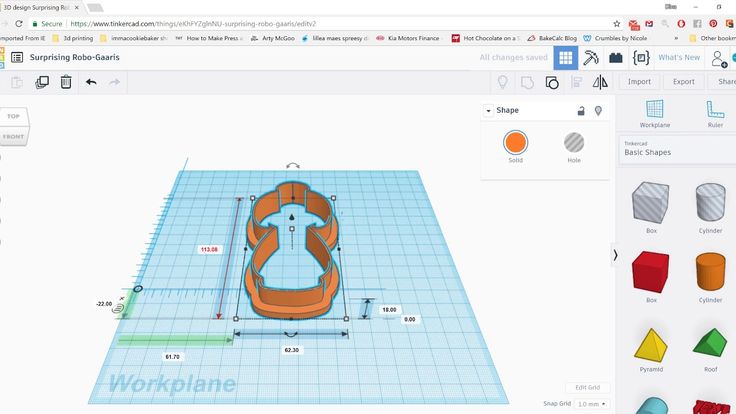
Country of origin - USA.
Another Autodesk development for schools and academic institutions. It is undoubtedly a tool for experts, but easy enough to use for an educated beginner. Fusion 360 is a sharing program that allows you to share STL files via the cloud for collaborative editing and model optimization.
Powerful tools for virtually any industrial 3D design. It has built-in functions for estimating the load that the components of a 3D model will face. This allows designers to find potential weaknesses before printing. Once created, you can easily export the model to an STL file or any other format. The program has recently become free for students, startups, and more. If you have some experience or want to improve your 3D design skills, this 3D software is perfect.
8. Vectary
Free program with premium features for $12 per month.
Vectary launched in 2014 and calls itself the most accessible 3D and AR design platform. This is a free web-based 3D modeling program. Vectary offers templates with pre-rendered and lit screens that you can place your 3D models in front of for product photography and other artistic purposes. A simple work interface with the necessary set of tools makes working with lighting and modeling easy. You can easily export your finished design or scene as an AR model.
The free package includes access to Vectary Studio for creating and designing models, as well as the ability to export your creations to OBJ or STL formats. For other formats, you will need an update. You can create up to 25 projects for free, as well as access a library of 3D assets, materials, and Vectary icons. A paid upgrade gives you access to AR preview tools, as well as project sharing features and teams for better and faster feedback between multiple people.
9. SelfCAD
Free education software. For the rest, it costs $4.99 per month.
Country of origin - USA.
SelfCAD focuses on being the best browser-based, no-download free 3D modeling software for students around the world.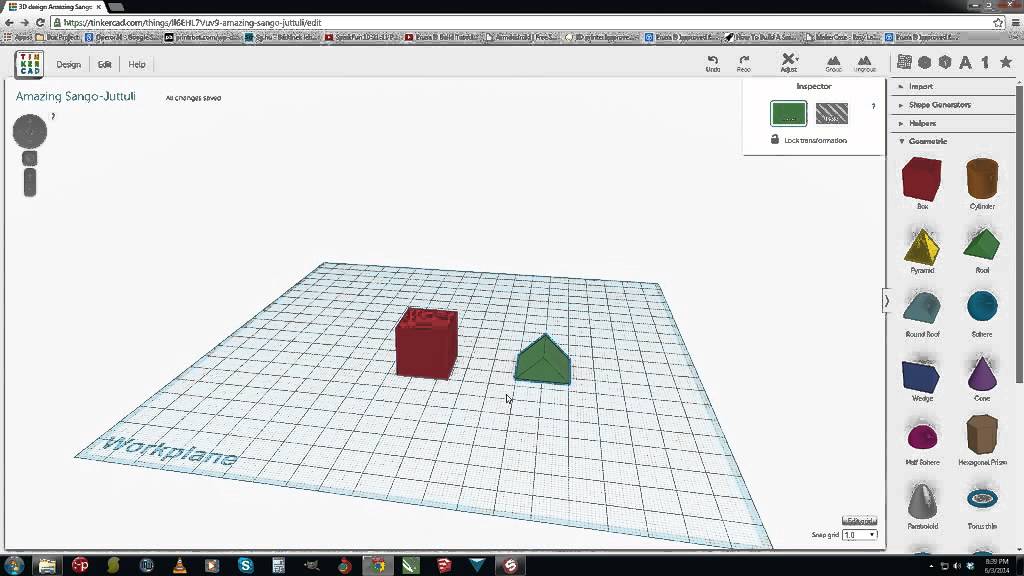 It is popular in American schools teaching 3D design to students. Simple and easy to use, requiring a short training period, SelfCAD has all the necessary tools for creating models. It also has slicing tools to prepare STL or G-code files for 3D printing.
SelfCAD is a simple 3D design program with a very clear interface, suitable for beginners.
10. BlocksCAD
The program is provided free of charge. There are paid educational versions for schools.
Country of origin - USA.
BlocksCAD is educationally oriented and was created for STEM students in grades 3-8. It is a cloud-based free 3D modeling software that promotes learning about mathematics, computational thinking, coding concepts, and designing models for 3D printing.
The free gallery has a wide selection of projects that can be used in personal and classroom work, ranging from snowmen, jewelry rings, fish, and even the infamous cafeteria. Works great with OpenSCAD, designed to be simple, fun and easy for kids to work with. 3D models can be created using colorful, easy-to-manage blocks and exported either as STL files or as files to be opened and edited in OpenSCAD. For beginners, BlocksCAD offers extensive tutorials on the basics of 3D modeling and how to use 3D software.
11. OpenSCAD
OpenSCAD is a free downloadable program. It looks intimidating, because it “envelops” with codes and scripts. This is a powerful tool. But keep in mind that it is for those who are used to coding. The program was created back in 2010 by Marius Kintel and Clifford Wolf. New updates and patches are released regularly. OpenSCAD is loved by 3D designers who prefer a scripted rather than an artistic design method. It is also worth noting that a 3D part in OpenSCAD can be created using only the mouse, but this is not the only feature of the program.
Overall, we are impressed with OpenSCAD: it offers something new and free of charge. However, at least intermediate knowledge of scripting languages is required.